Introduction to the Hello
World Series...
In this series of tutorials we create the classic 'Hello World' program... a basic program to just show a text message onscreen!... each example will be a single ASM file (with font where required) and we'll look at the stages required to compile the ASM, and get it onto a disk or cartridge.
In this series of tutorials we create the classic 'Hello World' program... a basic program to just show a text message onscreen!... each example will be a single ASM file (with font where required) and we'll look at the stages required to compile the ASM, and get it onto a disk or cartridge.
Once we've got 'hello world' working,
we'll extend it, adding a 'Monitor' to show registers, and MemDump,
to display part of the RAM to the screen... these are a useful
starting point if you're building something new.


Coding Hello World
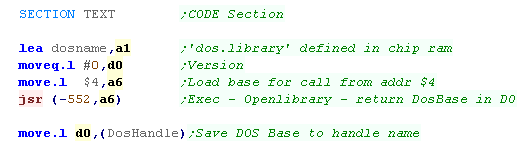
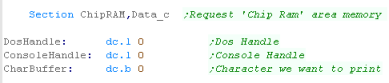
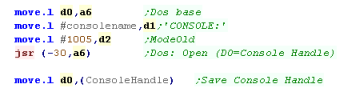
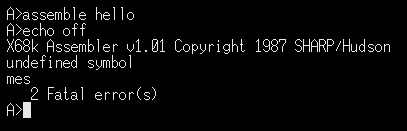
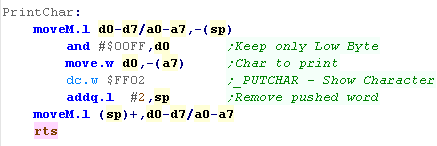
| When it comes to printing a character to the screen, we're
going to use a system call... On the X68000 these are defined by a word which starts $Fxxx - the PutChar routine is $FF02 It takes its parameter off the stack, so we need to push the character we want to show... we then use the command (by defining it as an inline word with DC.W $FF02)... we need to pop the parameter off the stack after we're done. |
 |
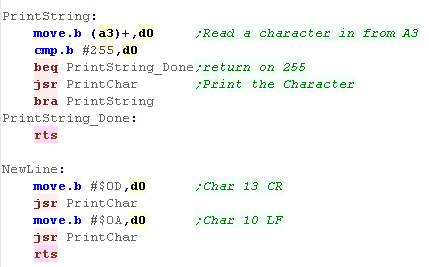
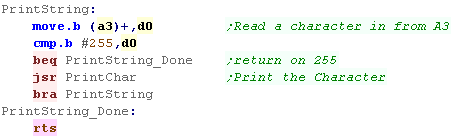
| We'll extend our Print Char function to print chr 255
terminated strings |
 |
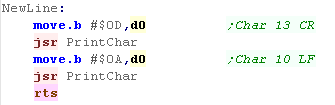
| We can start a new line by printing Characters 13 and 10 to
the screen |
 |
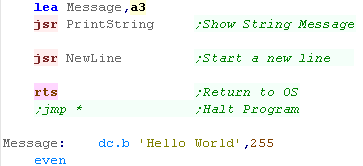
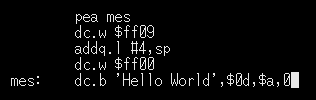
| We can load the address of our string to show... We use system call $FF00 after we're done to return to DOS. When we define the string, we put a 'EVEN' command after it... this is because our code must be Word Aligned, but if our string has an odd number of bytes it won't be! - 'Even' will fix this! |
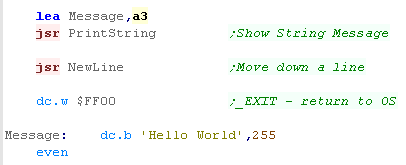 |
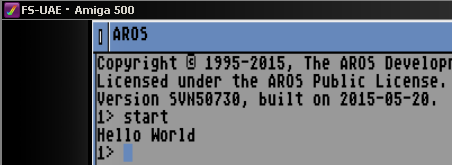
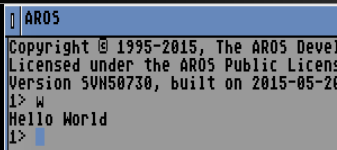
| Our 'Hello World' message will be shown to screen. | 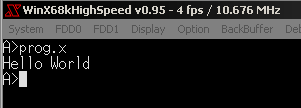 |
Building our disk image
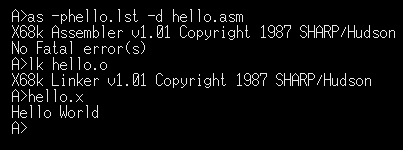
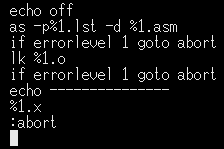
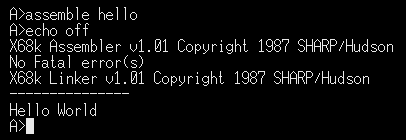
We build our file with Vasm - Vasm has
support for the special Xfile format used by the x68 for
executable files... I use this build command in my batch files. We need to specify the source asm file to compile we're specifying the processor type as 68000 We're specifying that VASM should ignore case, and check if labels look like commands (in case we forgot our tab on a command) I define a couple of symbols, but you won't need them for the simple example... We're telling VASM We need to tell vasm to build an Xfile - this is the executable file type of the x68k Finally, we specify a filename for the output file |
|
| We're using NDC
to alter disk image, I use a template disk that has a
basic dos boot, and automatically starts prog.x We first delete the old version of the program from the disk... then we add the new file to the disk image |
 |
| We start X68K high speed - the configuration of the program is
set up to pre-insert the disk image. |
 |
 |
The X68000
needs an operating system boot disk... this tutorial uses a
'minimal' disk with starts a Human68k Dos command line - the
autoexec.bat will start up the program. Just because it has an Autoexec.bat, Don't think that Human68k is the same thing as MS-DOS - it's similar but a totally different OS! |
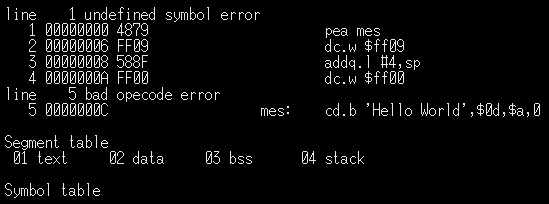
Xfile format
If you're not using Vasm, or another
assembler that can output Xfiles you're going to have to build
your own header with the correct header... I used to attach a
template header into the file, then patch in a new length into
the filename. |
|
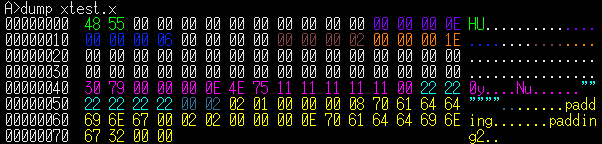
| The binary file is shown to the right, we can see the
following sections... The Header is at the start of the file The Code (text) segment - it's size can be seen in the header The Data segment - it's size is also in the header The Symbol table - it's size is also in the header. The Relocation table has the addresses of code which needs it's addresses altering - it's size is also in the header |
 |
Monitor Tools
| As part of my tutorials, I wrote some simple 'Monitor Tools'
which will help with debugging By including a few extra files we can use those tools with this example. |
  |
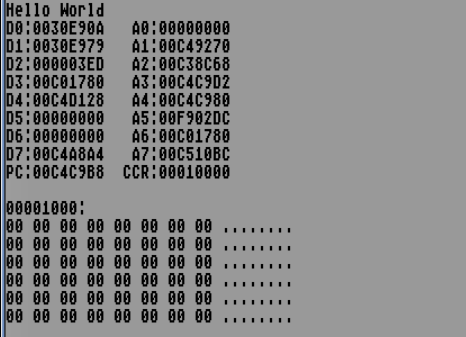
| These tools provide two useful functions... "Monitor" will show the register contents to the screen "Memdump" Will output some lines of memory to the screen from the specified memory address |
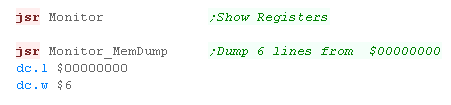 |
| The registers and requested memory area will be shown to the screen. | 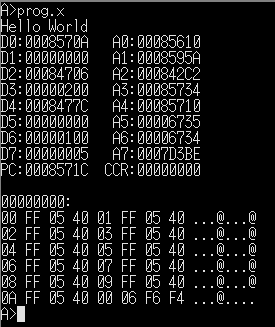 |
 |
Lesson
H2 - Hello World on the Atari ST This time, lets take a look at the Atari ST!... we'll use operating system calls to show Hello World to the screen. |
 |
 |
|
 |
Coding Hello World
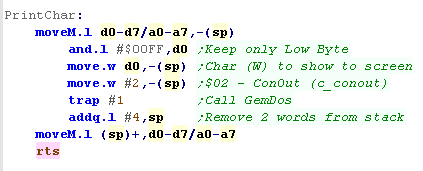
| When it comes to printing a character to the screen, we're
going to use a system call... We'll use Trap #1 (Gemdos) and
Function #2 (Console Out) First we push the Character number onto the stack... then we push the function number #2... finally we use the Trap #1 command. The Character will be printed to the screen, we now need to remove the two words off the stack before returning. |
 |
| We'll extend our Print Char function to print chr 255
terminated strings |
|
| We can start a new line by printing Characters 13 and 10
to the screen |
|
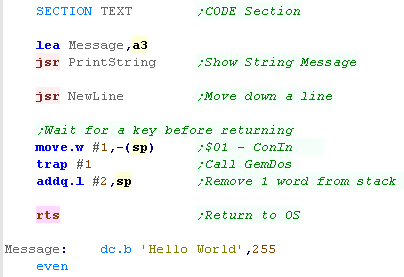
| Our program starts with a 'Text' Section - this defines
the area as being program code. We can load the address of our string to show... and use our function. If we just RETurned straight away, our output would only appear for a moment - so we'll pause a moment for a keypress.. We use Trap #1 - Function #1 (ConIn) to read in a key from the console first... this will pause for a moment for us to admire our work! |
 |
| Our 'Hello World' message will be shown to screen. | 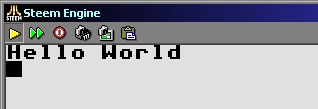 |
Building and Starting our program
We build our file with Vasm - Vasm
has support for the special Xfile format used by the x68 for
executable files... I use this build command in my batch
files. We need to specify the source asm file to compile We're specifying that VASM should ignore case, and check if labels look like commands (in case we forgot our tab on a command) I define a couple of symbols, but you won't need them for the simple example... We're telling VASM to output a listing. This is a text file which shows how the asm commands convert to bytecode... We don't need it - but it may help us if we have problems! We need to tell vasm to build an ELF - We'll need to link this later Finally, we specify a filename for the output file |
|
We need to 'Link' the ELF file to convert it into an
executable We specify the source ELF from the last assembly step We specify an output file in TOS format (Atari executable). We need to specify the file format as AtariTos |
|
| We can use a folder on our windows machine as a hard drive
- we've mapped the folder \RelAST to
the C drive |
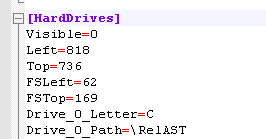 |
| Any files we put in this folder will appear as a drive on our machine | 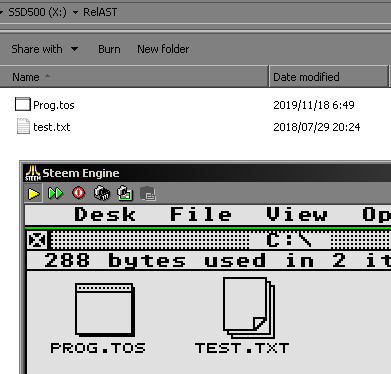 |
Monitor Tools
| As part of my tutorials, I wrote some simple 'Monitor
Tools' which will help with debugging By including a few extra files we can use those tools with this example. |
  |
| These tools provide two useful functions... "Monitor" will show the register contents to the screen "Memdump" Will output some lines of memory to the screen from the specified memory address |
 |
| The registers and requested memory area will be shown to the screen. | 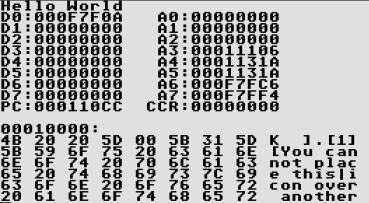 |
 |
We're
just using Text console mode in this example... if you
want to see the same functions in bitmap mode, please see
the platform specific series. That's probably what you'll want to do if you're writing a game... unless it's a text adventure! |
 |
Lesson
H3
- Hello World on the NeoGeo The NeoGeo uses 5 bits per channel, has 16 colors per palette, and up to 256 palettes! Lets learn how to set the colors on the Neo Geo! |
|
NEO_HelloWorld.asm |
|
|
Starting a NeoGeo Cartridge
| First we're going to define some symbols pointing to RAM - we're going to need a few bytes for our code. | 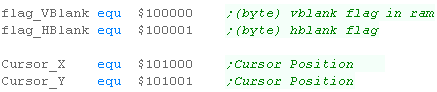 |
| The start of our cartridge needs to contain the 'Traps' -
these handle CPU and system events - we need to point them
to the bios These won't need changing for a simple program |
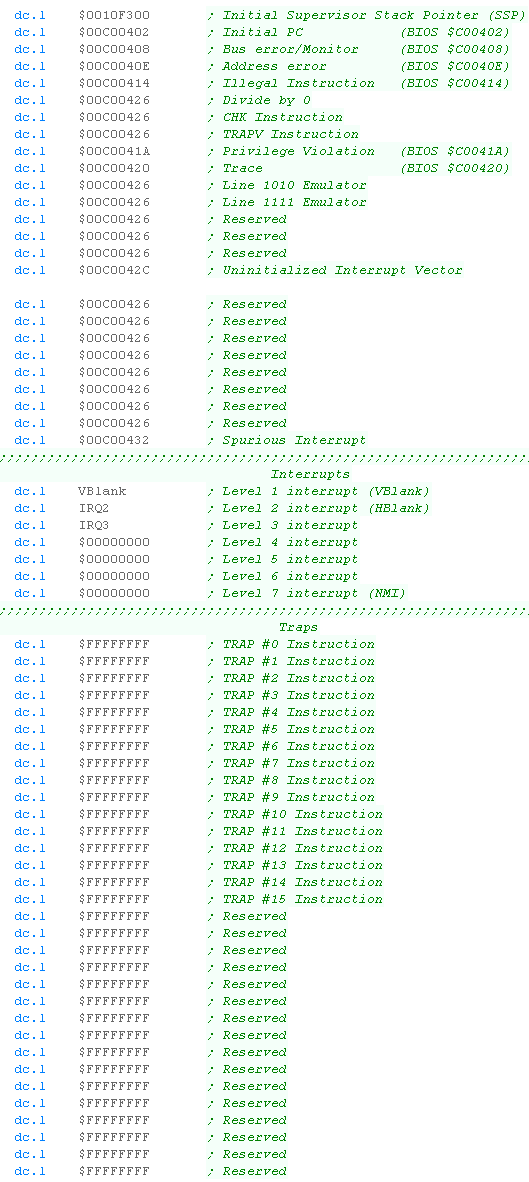 |
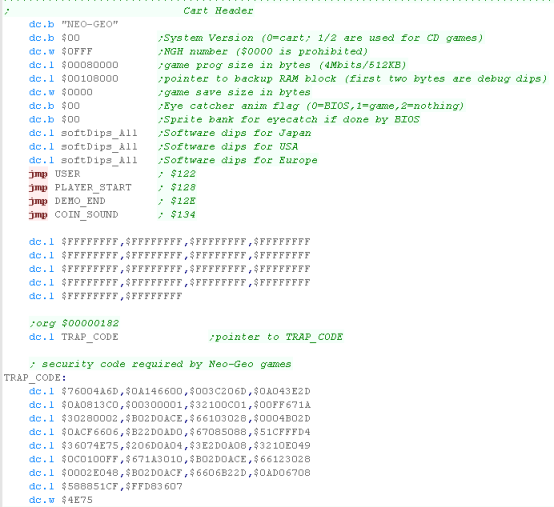
| We now need the actual 'Cartridge header' This has a few system parameters, and links to settings and subroutines for system events You probably won't need to change this |
 |
| We need to define a bank of settings for the 'Dip Switches' | 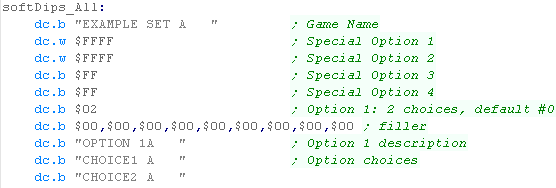 |
| We need some functions to handle system events. The VBlank one here is one you may wish to change, this occurs every frame redraw, so can be useful for controlling game speed - but you don't need to worry about it when you're just starting out. Phew! that's the end of the 'header'... Lets start writing our code! |
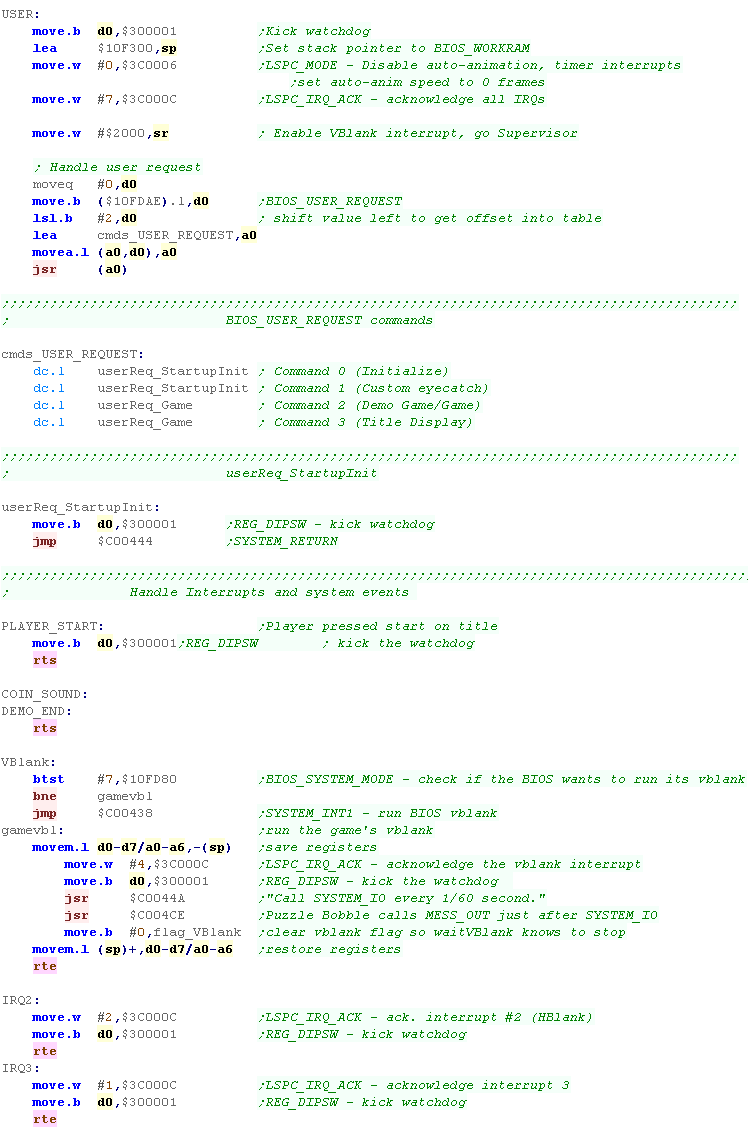 |
Setting up our screen
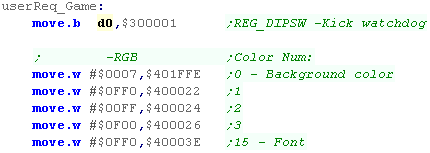
| Now we can start our program! First we're going to do a write to $300001 - this is known as 'Kicking the Watchdog'... We're going to see this a lot! The watchdog is a hardware function of the NeoGeo - if the Watchdog is not routinely 'kicked' then it will reset the machine! this is to ensure the Arcade games didn't crash and end up locked in an unplayable state! Next we need to set up our palette... this is handled by addresses $400000+... we set the background color, a few of the first palette entries, and color 15 - this will be used by our font. |
 |
| Next we need to init the screen... we use some firmware functions to clear the 'Fix Layer' (we'll use this for our font) and the first sprite. |  |
| Our actual program is rediculously small! We just call our Printstring routine (we'll see it in a moment)... then we loop indefinitely, just kicking the watchdog to stop the machine rebooting. | 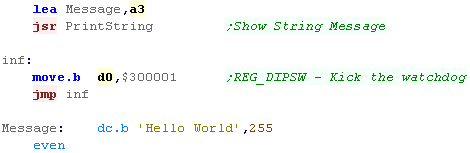 |
Printing a Character to the screen
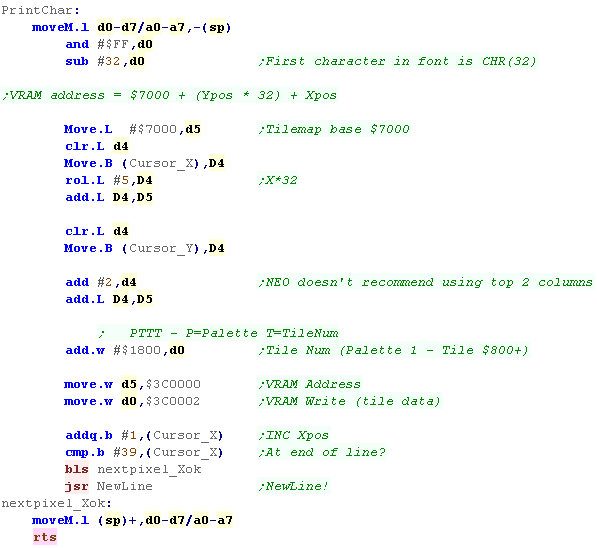
| You'll notice we never mention a font file in this section -
it's a ROM included in the Mame XML... When it comes to getting characters on the screen on the NeoGeo, we'll use the 'Fix Layer'... a tilemap that starts at VRAM address $7000 This is a 40x32 tilemap of 8x8 tiles... rather surprisingly the axis are flipped...each consecutive byte goes DOWN the screen first, then Across. For this reason, the formula for our tilenumber is: VRAM address = $7000 + (Ypos * 32) + Xpos We achieve multiplication by bit-shifting... We need to subtract 32 from our character number (as the first character in our font is 32)... but we also add $1800 - 1xxx because we want palette 1... $800 is the first tile of our font (the other $800 are reserved for system use) We need to select a VRAM address by writing the address to $3C0000, Writing to VRAM is achieved by writing to $3C0002 |
 |
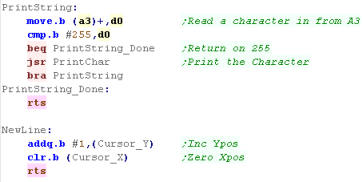
| We extend our PrintChar routine into a PrintString routine
... it prints a Character 255 terminated string We also need a 'NewLine Function to start a new line. |
 |
| The message will be shown to the screen. | 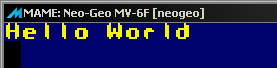 |
The XML! (MAME ROM Layout)
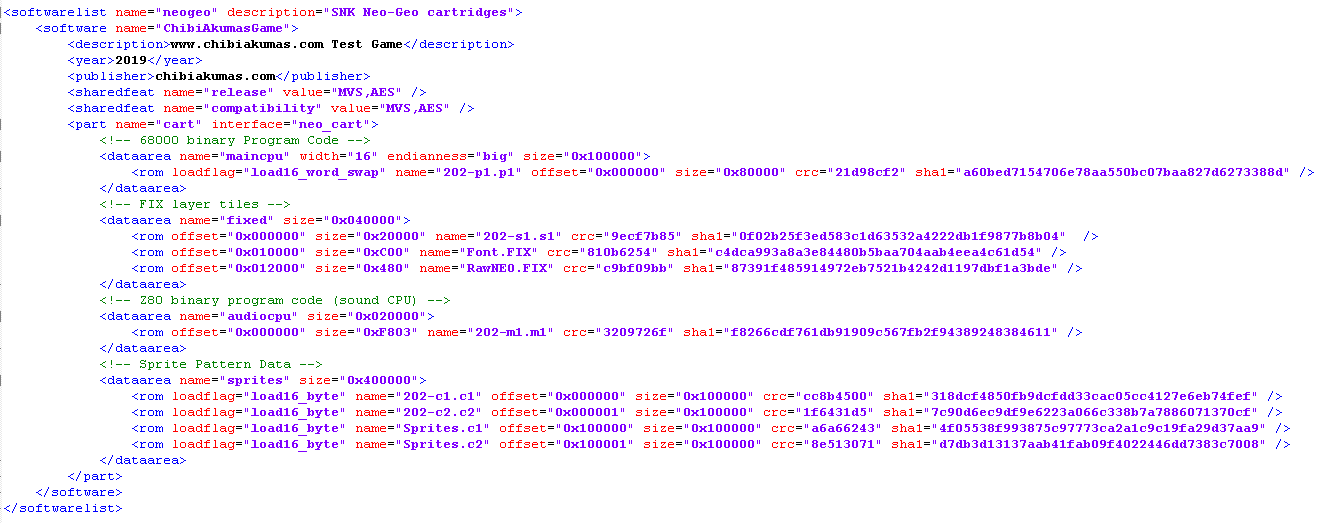
| To run a custom game on MAME, we need to create a hash file
- usually called 'neogeo.xml' This defines how the various binary files that make up a game are attached to the system... multiple files can be combined for a single purpose - the 'Offset' The Operating system needs 202-s1.s1, 202-c1.c1, 202-c2.c2 Our 68000 Program Code is 202-p1.p1 ... we have a z80 program called 202-m1.m1 ... This is a sound driver For this example We need the FONT.FIX RawNEO.FIX, Sprites.c1 and Sprites.c2 are not needed for this example (they are for my other tutorials!)
|
 |
|||||||||||||||
| There are various parameters for
'rom' files that must correct for MAME to be happy, otherwise
you will get the error "One or more ROMs/CHDs for this machine
are incorrect. The machine may not run correctly"... To fix this you must ensure the following parameters are correct:
|
||||||||||||||||
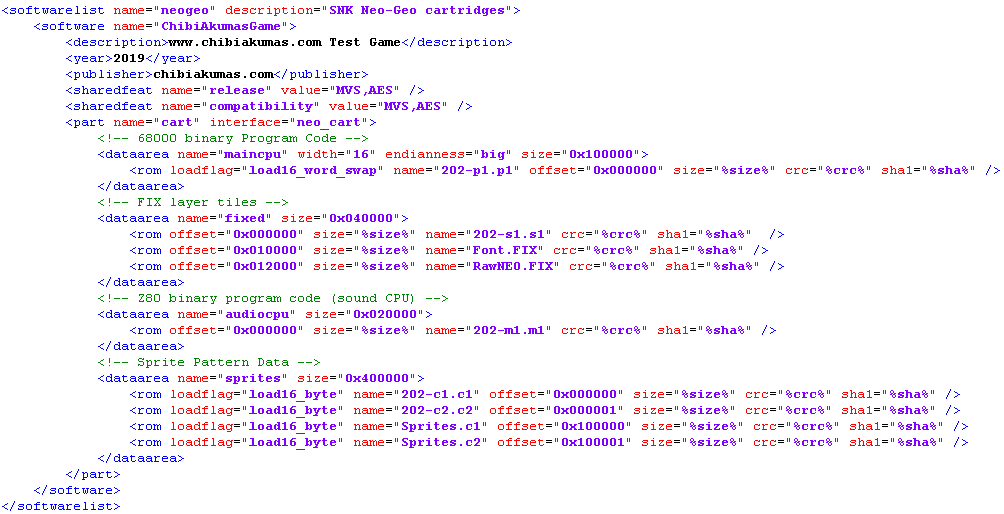
| If you want to calculate the hashes, you can do so with my
'MakeNeoGeoHash' program - you need to provide it a template
(shown to the right) - it will calculate the size,crc and sha1
of each rom, and write out a new xml which mame will be happy
with! MakeNeoGeoHash is included in my 68000 development tools package, with scripts to use it automatically with my tutorials samples |
 |
|||||||||||||||
| Sprites and Tiles MUST be defined in romfiles,
and included in the XML, this is the only way ROMS can be
built on the NeoGeo... This is because of the way the hardware is designed, each 'module' (Graphics sound etc) has it's own physically independent rom files. The NeoGeo CD is different, it has ram that can be filled by our program, but it's slower as a result. |
 |
Building the ASM file
We build our file with Vasm - Vasm
has support for the special Xfile format used by the x68 for
executable files... I use this build command in my batch
files. We need to specify the source asm file to compile We're specifying that VASM should ignore case, and check if labels look like commands (in case we forgot our tab on a command) I'm specifying to output 68000 CPU code I define a couple of symbols, but you won't need them for the simple example... We're telling VASM to output a listing. This is a text file which shows how the asm commands convert to bytecode... We don't need it - but it may help us if we have problems! We need to tell vasm to build an BINary file Our source sample will only compile correctly in DevPac mode Finally, we specify a filename for the output file |
Our File is built, but we need to
do more, we need to convert the byte data into the correct
format for the NeoGeo by swaing the byte pairs... we also
need to pad the file |
We need to make sure the SIZE, CRC
and SHA are correct in the XML for each file... I've written
a little program to calculate the hashes If your hashes are wrong, MAME will whine... if your Size is wrong MAME may crash! |
Finally, we can load MAME and start our game.  |
Monitor Tools
| As part of my tutorials, I wrote some simple 'Monitor
Tools' which will help with debugging By including a few extra files we can use those tools with this example. |
|
| These tools provide two useful functions... "Monitor" will show the register contents to the screen "Memdump" Will output some lines of memory to the screen from the specified memory address |
|
| The registers and requested memory area will be shown to the screen. | 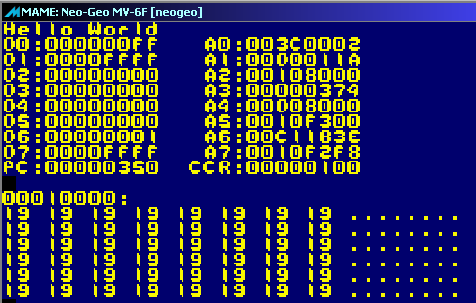 |

Coding Hello World
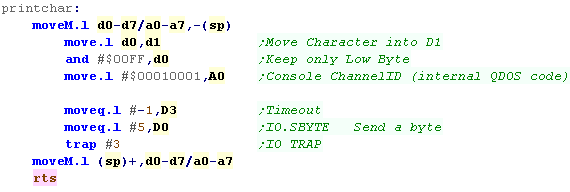
| We're going to use an OS trap to draw characters to the
screen Trap #3 - Function #5 (In D0) will send a byte to the screen... we need to set the Timeout (D3) and Channel ID (A0) as well... and make sure the character code is in D0 |
 |
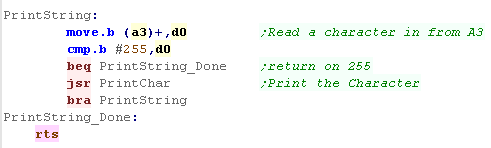
| We're going to extend our PrintChar routine into a
PrintString Routine - it'll use Char 255 terminated strings. We just send each character to PrintChar until we get to the 255 |
 |
| We can start a new line by printing a character 10 to the screen. | 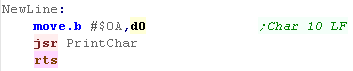 |
| Let's start our program! We load the address of our string into A3, before calling Printstring Before we return to basic we need to load D0 with zero - otherwise basic will complain! |
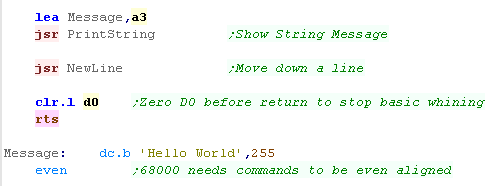 |
| And here's the result! | 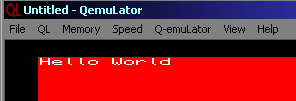 |
Building and Starting our program
We build our file with Vasm - Vasm
has support for the special Xfile format used by the x68 for
executable files... I use this build command in my batch
files. We need to specify the source asm file to compile We're specifying that VASM should ignore case, and check if labels look like commands (in case we forgot our tab on a command) I define a couple of symbols, but you won't need them for the simple example... We're telling VASM to output a listing. This is a text file which shows how the asm commands convert to bytecode... We don't need it - but it may help us if we have problems! We need to tell vasm to build an BIN file Finally, we specify a filename for the output file |
|
| We need to set up QemuLator to use the destination directory as a drive... we do this by right clicking on a drive number, and Attaching Directiory | 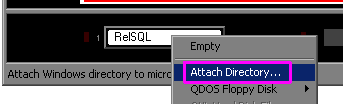 |
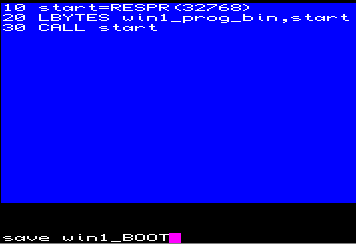
| We need to create a startup file called BOOT on drive
WIN1... this will cause our program to launch with the
emulator. The basic program to the right will load the program to ram address 32768 and launch it. This program can be saved with the command "save win1_BOOT" |
 |
| We can save a settings file with correct settings for the disk image, and load it on the commandline with QemuLator |  |
| Our program will run as soon as the emulator starts (after we select monitor type with F2) | |
Monitor Tools
| s part of my tutorials, I wrote some simple 'Monitor
Tools' which will help with debugging By including a few extra files we can use those tools with this example. |
|
| These tools provide two useful functions... "Monitor" will show the register contents to the screen "Memdump" Will output some lines of memory to the screen from the specified memory address |
|
| The registers and requested memory area will be shown to the screen. | 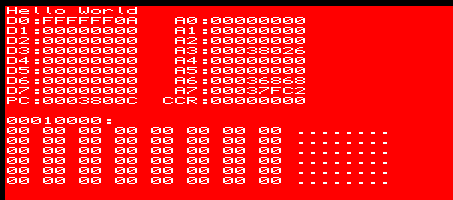 |
| We've only used the basic text mode, which isn't too useful for gaming... Take a look at the 'Platform Specific' series, where we covered the bitmap modes for more 'useful' code! |  |

Starting our program
| The start of the Genesis cartridge needs to define the
'Traps' - these are needed by the processor. We then need the cartridge header... a sample one is shown. |
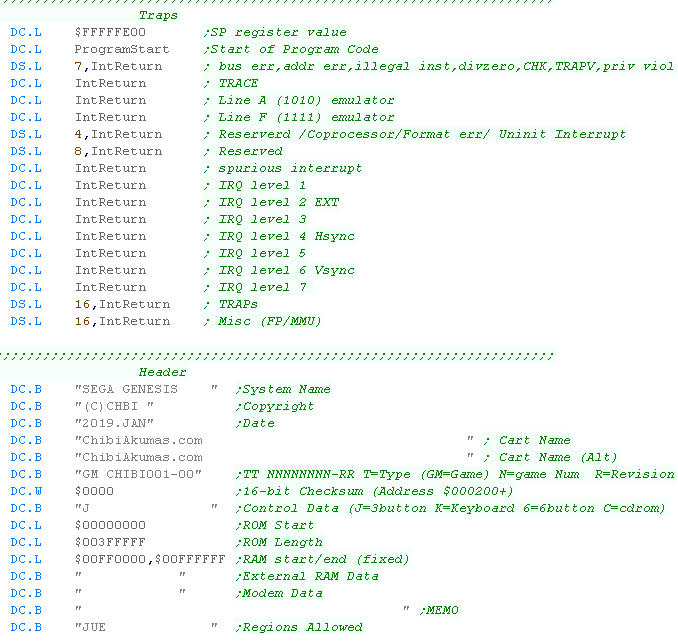 |
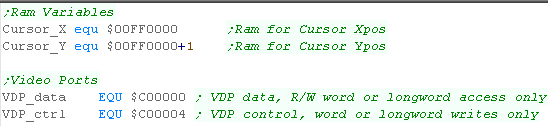
| We're going to define two symbols for ram addresses (Cursor
X and Y) we need these for our text writing. We're also going to define two symbols for VRAM data and VRAM address/control - we'll need these for writing to VRAM |
 |
| Our Header needs a dummy interrupt handler (Just a
return)... We now need to start our program... first we'll disable the TMSS if it exists (TradeMark Security System) |
 |
Initialize the Graphics
| We're going to need to set up the screen... we do this by
writing words to the control port... the top byte is the Reg
Num (the top BIT must be 1)... the bottom byte is the value
for that register. We read in the values from a table 'VDP Settings' |
 |
| We' define one byte for each register... we've got a set of settings to set up a basic screen for our purposes here. | 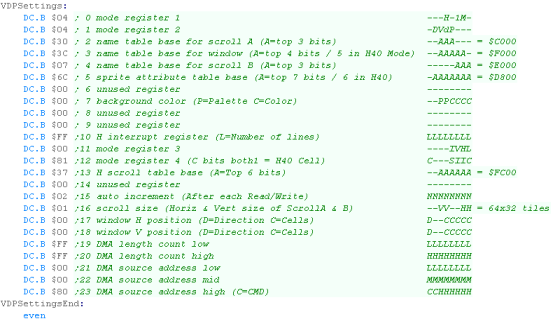 |
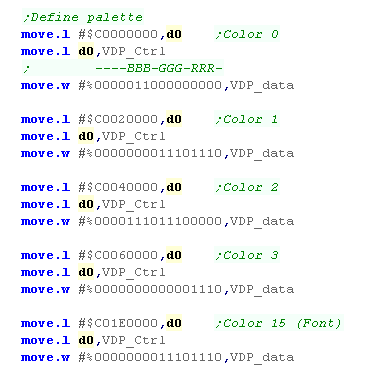
| We need to define some colors - We need to at least define
the background color 0... and the font color (15)... We do this by writing an 'address' to the VDP control port, then a pair of bytes for the color to the data port. The address format for the palette is $C0nn0000 - where nn is the color address (Color *2 as we have 2 bytes per color) |
 |
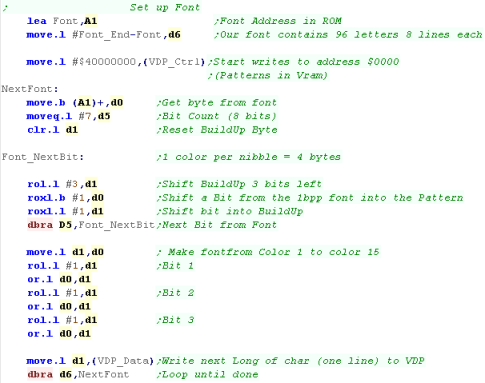
| We're using a bitmap font for our characters... it uses 96
characters (First is character 32 - space) each character is 8x8 1bpp - so each character is 8 bytes We need to convert it from 1bpp (2 color) to 4bpp (16 color) We need to start our VDP writes to VRAM address $0000 (the tile definitions) We do this by writing $40000000 to the control port We now need to convert the font lines... We shift one bit from the font in ROM, shift it to the left 3 times, and repeat this 7 times, this puts the bits in the 4 bytes of the font Long as color 1... We then do 3 shifts and ORs - effectively copying the bits to all 3 other positions in the nibble, converting it to color 15 |
  |
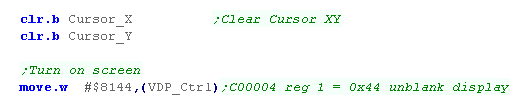
| OK, Our screen is finally set up! We reset our cursor position to zero... and turn on the screen! |
 |
Printing a character to the screen
| We're going to define a PrintChar routine - this will print
a character in D0 to the screen. We need to calculate the VRAM address for the next tile we're going to set... the tilemap is 64x64, starts at $C000, and each tile is two bytes so the formula is: VRAM address= $C000 + (Ypos *128) + (Xpos * 2) Because of the strange format of the ram commands, to specify the base of $C000 we add to the long $40000003 Once we've calculated the address... we write the address to VDP Ctrl, and the Tile number word to VDP Data. After we've set the tile, we need to check if we're at the end of a line - if we are we start a newline |
 |
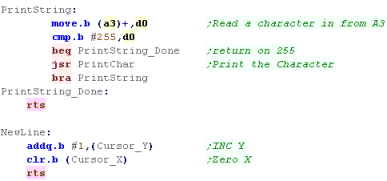
| We're going to extend our PrintChar routine into a
PrintString Routine - it'll use Char 255 terminated strings. We just send each character to PrintChar until we get to the 255 We also need a newline function to zero the Xpos, and INC the Ypos |
 |
| The hello world message will be shown to screen. | 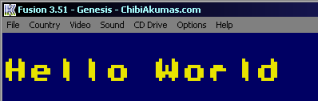 |
| We've
learned how to use the tilemap for 8x8 characters here...
next time we'll take things further, and actually draw some
nice graphics! Tune in next time in the 'Simple Series' to see more! |
 |
Building and Starting our program
We build our file with Vasm - Vasm
has support for the special Xfile format used by the x68 for
executable files... I use this build command in my batch
files. We need to specify the source asm file to compile We're specifying that VASM should ignore case, and check if labels look like commands (in case we forgot our tab on a command) I define a couple of symbols, but you won't need them for the simple example... We're telling VASM to output a listing. This is a text file which shows how the asm commands convert to bytecode... We don't need it - but it may help us if we have problems! We need to tell vasm to build an BIN file Finally, we specify a filename for the output file |
|
| We can start Fusion with the cartridge specified on the command line |  |
Monitor Tools
| s part of my tutorials, I wrote some simple 'Monitor
Tools' which will help with debugging By including a few extra files we can use those tools with this example. |
|
| These tools provide two useful functions... "Monitor" will show the register contents to the screen "Memdump" Will output some lines of memory to the screen from the specified memory address |
|
| The registers and requested memory area will be shown to the screen. | 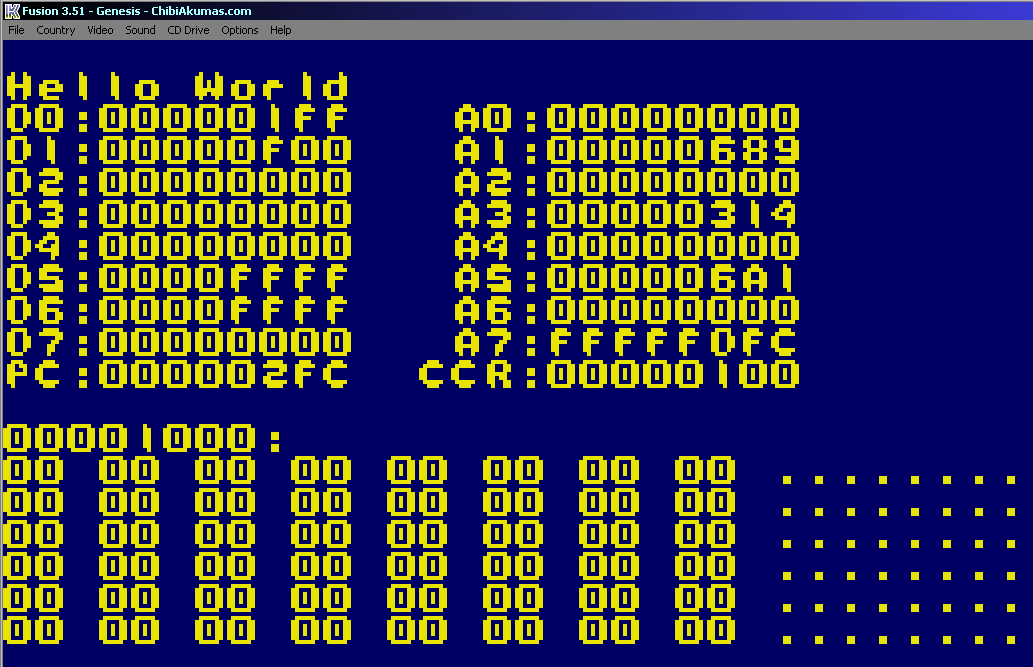 |

Coding Hello World