Learn Multi
platform Z80 Assembly Programming... With
Vampires!
Platform Specific Lessons
ChibiSound PRO!
ChibiSound is the sound driver that handles the particularities of a
system, there is typically one driver per system, though the CPC and MSX
drivers are essentially identical except for the AY register setting
routines.
The original 'ChibiSound' gave us one channel, one
Volume bit, six pitch bits, and the ability to turn noise on. Pitches were
not matched across systems, so sound 32 won't sound the same on all
systems.
The updated 'ChibiSound Pro' gives us all the channels
provided by the hardware, 8 volume bits, 16 pitch bits, and the ability to
turn noise on. Pitches were not matched across systems, however the
'ChibiOctave' lookup table provides values which ARE matched across all
systems.
ChibiSound PRO is essentially a reduced subset of AY functionality, and
was designed on the Z80 - it's 'PRO' suffix is a parody of the
'SoundBlaster PRO' - which could only do 8 bit sound so wasn't up to
professional standards! (neither is ChibiSound PRO)
ChibiSound PRO provides a standard interface to the underlying hardware,
it allows the following features to be set for each channel on the
underlying hardware:
Function
|
Zero page entry
|
Notes:
|
Channel Number (bit 0-6)
Noise On/Off (bit 7) |
H |
Multiple channels can be supported, but on single channel systems
only Channel 0 will be sure to play.
If possible Channel 0 will be a center channel, Channels 1+ may be
left/right
Noise bit turns the noise effect on (1) or off (0) - this can be set
on any channel, if the underlying hardware only supports one noise
channel, this will be resolved by the driver. |
| Volume |
L |
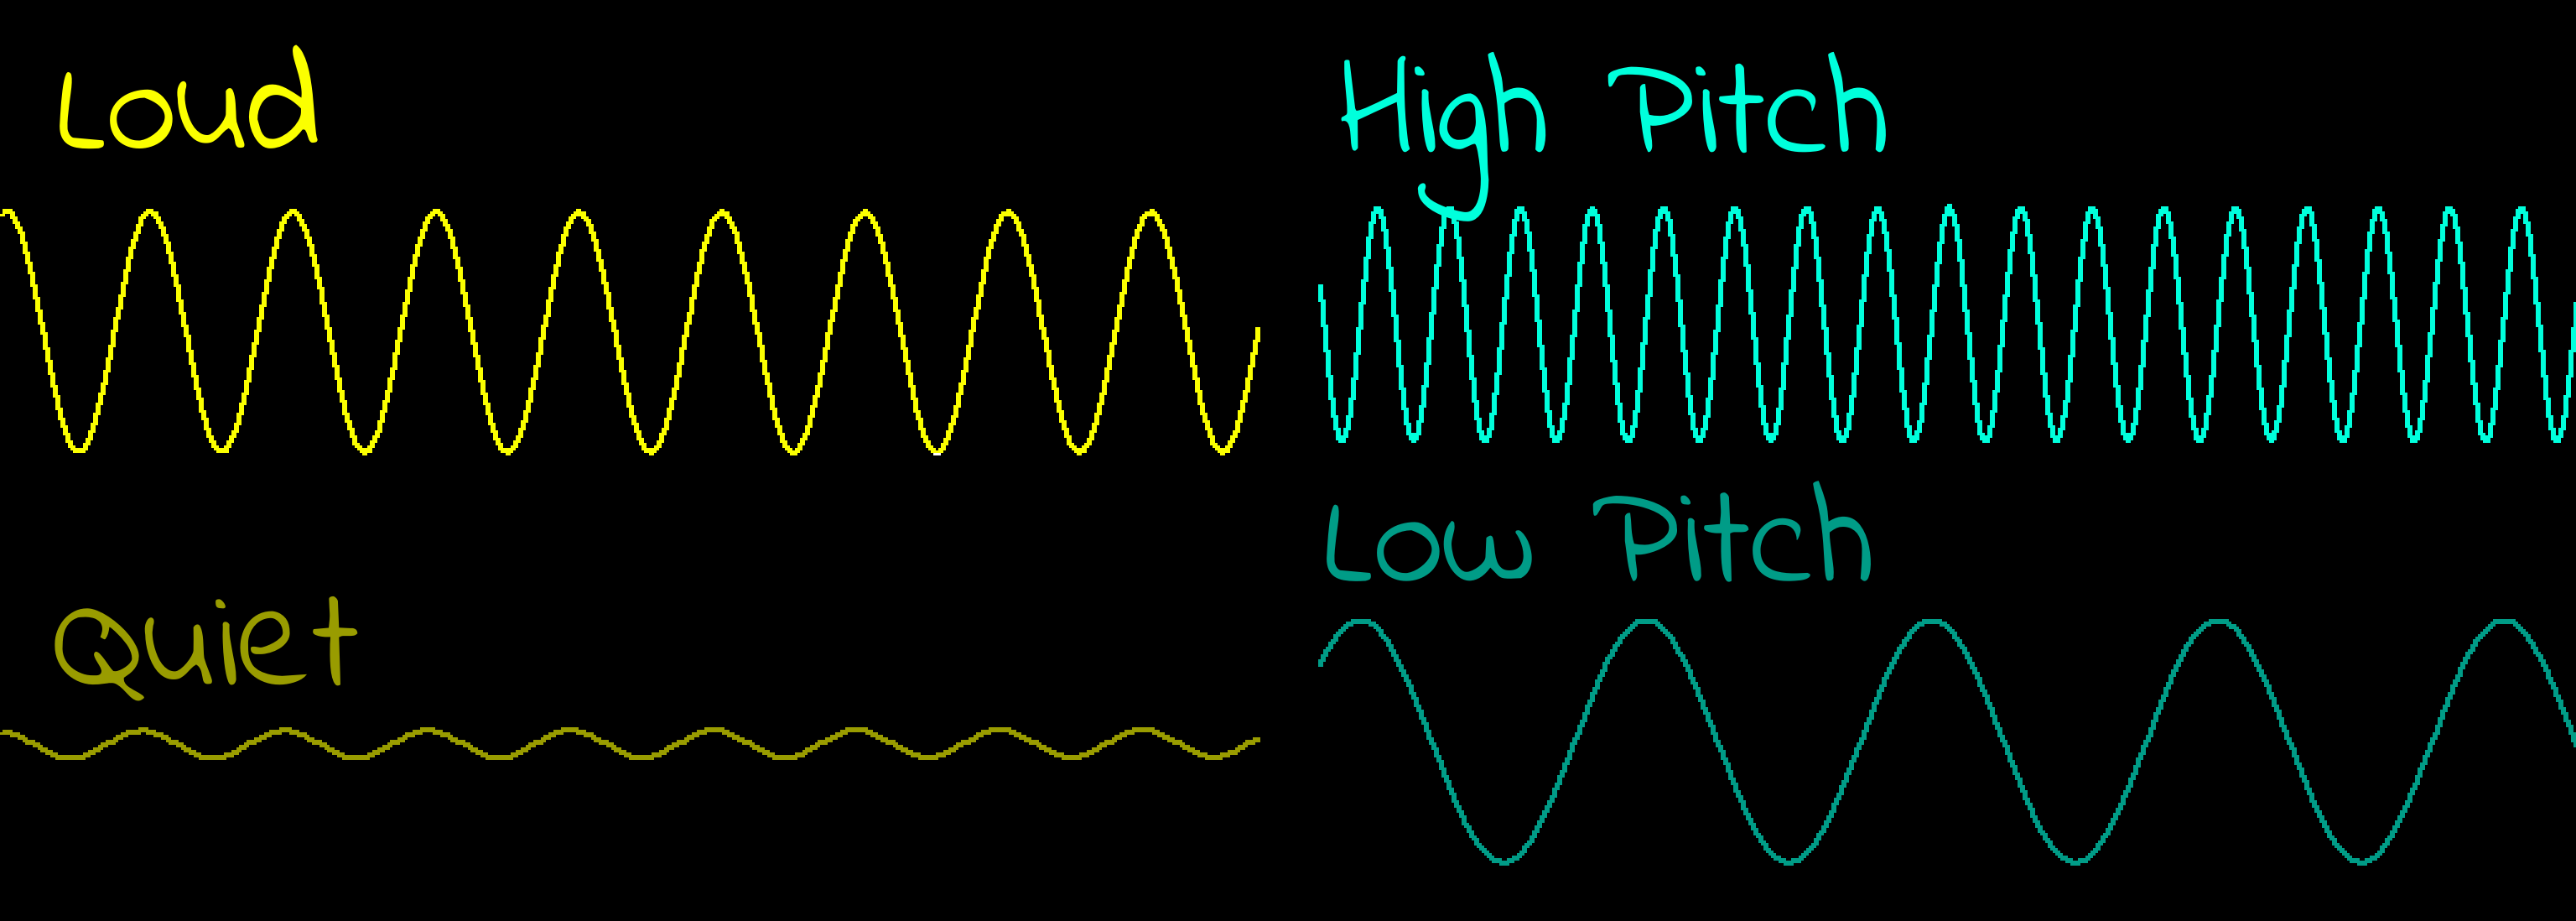
Set volume of the channel (0-255). Higher numbers are louder. O is
off |
| Pitch |
DE |
Set the pitch of the channel (0-65535). Higher numbers are higher
pitch.
Using DE does not standardize the resulting pitch - however a
'Lookup table' of notes 'ChibiOctave' provides a standardized way of
getting the correct DE value to get a pitch correct note on the
platform. |
Chibisound PRO does not offer features like Envelope, LFE etc, as providing
consistent functionality across different platforms would not be realistic.
The
new driver is a big improvement on the old one but doesn't really
deserve the PRO suffix!
It's a parody of the early 'Soundblaster Pro' sound cards, which
could only do 8 bit digital sound, so weren't really of 'pro spec'
either!
|
 |
Sound Controller - SN76489
The sound chip uses a single port &7F, we can write our data to that
port in the format below
|
|
Bits |
| Command |
Bit
Details |
7
|
6
|
5
|
4
|
3
|
2
|
1
|
0
|
| Format Template |
L=Latch C=Channel T=Type XXXX=Data |
L |
C |
C |
T |
D |
D |
D |
D |
|
|
|
|
|
|
|
|
|
|
| Tone - Command 1/2 |
C=Channel L=tone Low data |
1 |
C |
C |
0 |
L |
L |
L |
L |
| Tone - Command 2/2 |
H= High tone data (Higher numbers = lower tone) |
0 |
- |
H |
H |
H |
H |
H |
H |
| Volume |
C=Channel (0-2) V=Volume (15=silent 0=max) |
1 |
C |
C |
1 |
V |
V |
V |
V |
| Noise Channel |
(Channel 3) M=Noise mode (1=white) R=Rate (3=use tone
2) |
1 |
1 |
1 |
0 |
- |
M |
R |
R |
 |
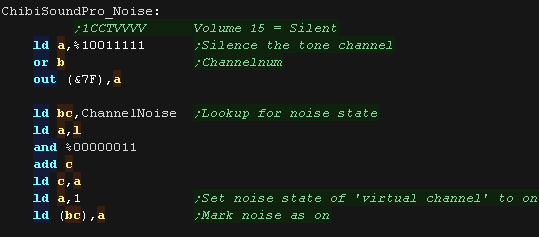
Chibisound PRO
requires each channel to be capable of noise, but the SN76489
sound chip only has one noise channel.
We'll have to track the noise state for each 'virtual noise
channel' and update the actual noise channel accordingly
|
The ChibiSound Pro driver
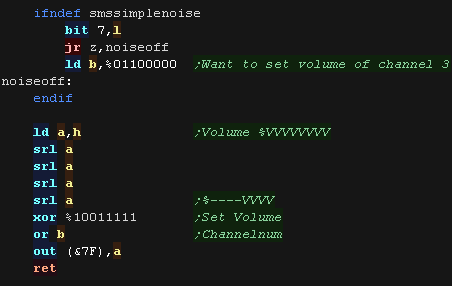
The BBC/SMS driver has two options which can be enabled.
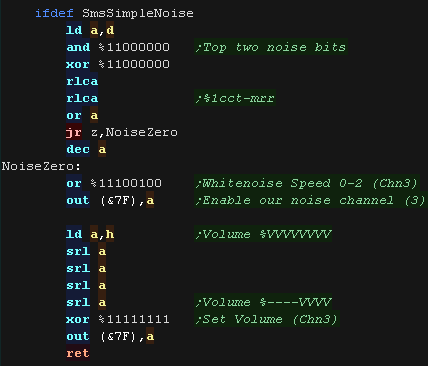
SmsSimpleNoise:
The SMS/BBC has two noise options, a noise pitch of 0-2, or a noise
pitch set by channel 2 (losing a tone channel). We can enable this
option to avoid using tone channel 2, or sacrifice tone
functionality for better noise.
SmsTranspose:
The SMS/BBC can't produce accurate low tones, we have two options,
use 'off tone' ones, or transpose everything up an octave.
|
 |
| We need some ram to keep track of the nose state, and a lookup
table for the 3 channels available to the hardware. |
 |
We need to set bits 5-6 of our sound parameters to a channel
number.
We may be passed a channel 0-127, so we use a 4 bit lookup table to
'map' these to actual channels 0-2
|
 |
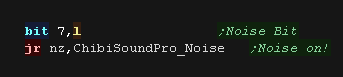
| Next we check the noise bit of our passed L parameter and branch
if needed |
 |
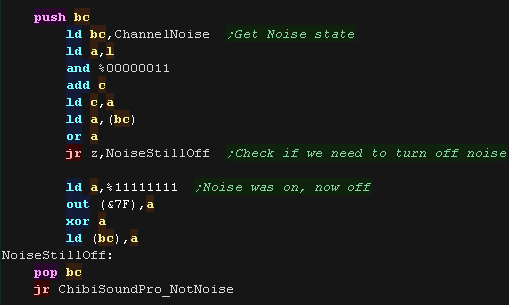
The noise state may have changed, so we check the previous noise state, and see if we now need to
turn it off.
If we do, we do so by setting the volume of channel 3 (noise) to 15
(silent)
|
 |
if noise is on, we silence the matching tone channel,
We then set the channels noise flag.
|
 |
If we're using simple noise, we need to set the volume of channel
3, and the bottom two bits of the frequency setting - which can only
take a value of 0-2 (3 sets it to use channel 2's frequency setting)
We're done, so we just return. |
 |
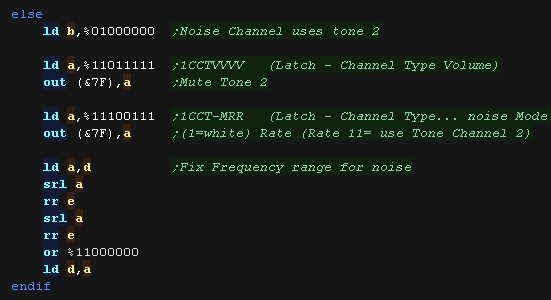
If we're using advanced noise, we need to set the frequency of
channel 2, but the volume of channel 3
We set up the noise setting here - setting the rate to 3.
We also bitshift the pitch in DE, effectively shifting it to the
&C000-&FFFF range.
|
 |
First we set our frequency.
The DE pair passes 16 bits, but we can only use 10, and we need to
split those into 6 and 4 and send them to the hardware in two
separate parts. |
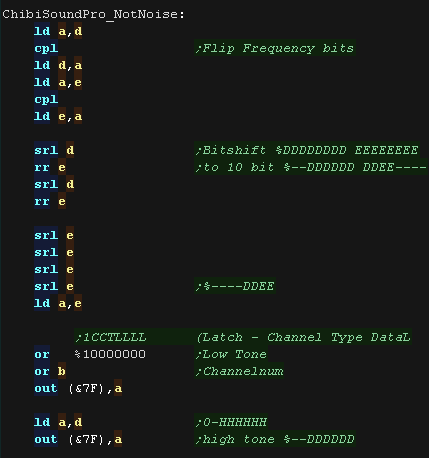 |
If we're not using simple noise, we need to set the frequency of
channel 2, but the volume of
channel 3
We then shift the 8 volume bits into position to pass the 4 bits to
the hardware.
We also flip those bits, as on the hardware 15 is silent, and 0 is
loudest. |
 |
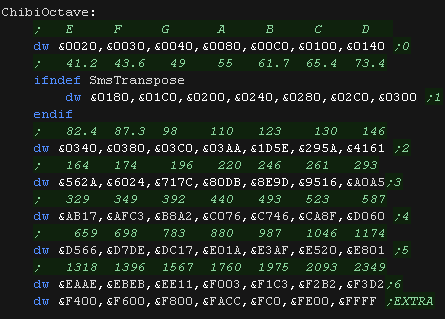
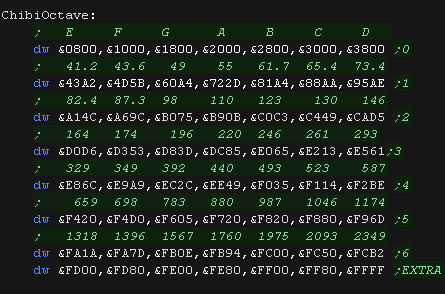
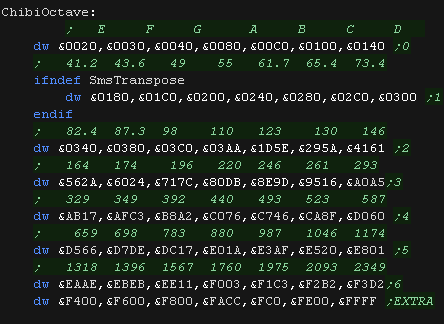
The ChibiOctave lookup table provides matched notes which can be
loaded into DE to give consistent tones across all systems.
Sharps and flats can be calculated by adding two values and dividing
them by two.
|
 |
ChibiSound PRO!
ChibiSound is the sound driver that handles the particularities of a
system, there is typically one driver per system, though the CPC and MSX
drivers are essentially identical except for the AY register setting
routines.
The original 'ChibiSound' gave us one channel, one
Volume bit, six pitch bits, and the ability to turn noise on. Pitches were
not matched across systems, so sound 32 won't sound the same on all
systems.
The updated 'ChibiSound Pro' gives us all the channels
provided by the hardware, 8 volume bits, 16 pitch bits, and the ability to
turn noise on. Pitches were not matched across systems, however the
'ChibiOctave' lookup table provides values which ARE matched across all
systems.
ChibiSound PRO is essentially a reduced subset of AY functionality, and
was designed on the Z80 - it's 'PRO' suffix is a parody of the
'SoundBlaster PRO' - which could only do 8 bit sound so wasn't up to
professional standards! (neither is ChibiSound PRO)
ChibiSound PRO provides a standard interface to the underlying hardware,
it allows the following features to be set for each channel on the
underlying hardware:
Function
|
Zero page entry
|
Notes:
|
Channel Number (bit 0-6)
Noise On/Off (bit 7) |
H |
Multiple channels can be supported, but on single channel systems
only Channel 0 will be sure to play.
If possible Channel 0 will be a center channel, Channels 1+ may be
left/right
Noise bit turns the noise effect on (1) or off (0) - this can be set
on any channel, if the underlying hardware only supports one noise
channel, this will be resolved by the driver. |
| Volume |
L |
Set volume of the channel (0-255). Higher numbers are louder. O is
off |
| Pitch |
DE |
Set the pitch of the channel (0-65535). Higher numbers are higher
pitch.
Using DE does not standardize the resulting pitch - however a
'Lookup table' of notes 'ChibiOctave' provides a standardized way of
getting the correct DE value to get a pitch correct note on the
platform. |
Chibisound PRO does not offer features like Envelope, LFE etc, as providing
consistent functionality across different platforms would not be realistic.
The
new driver is a big improvement on the old one but doesn't really
deserve the PRO suffix!
It's a parody of the early 'Soundblaster Pro' sound cards, which
could only do 8 bit digital sound, so weren't really of 'pro spec'
either!
|
|
Sound ports on the Enterprise
| Port |
Purpose |
Bits |
Bit
Meaning |
| &A0 |
Channel 0 Tone L |
LLLLLLLL |
L=Tone Low Byte� Lower values=Higher tone |
| &A1 |
Channel 0
Tone H |
RPCCHHHH |
H=Tone High
Bits / polynomial Counter / Ring Modulator (CH2) / highPass Filter
(CH1) |
| &A2 |
Channel 1 Tone L |
LLLLLLLL |
L=Tone Low Byte� Lower values=Higher tone |
| &A3 |
Channel 1
Tone H |
RPCCHHHH |
H=Tone High
Bits / polynomial Counter / Ring Modulator (CHN) / highPass Filter
(CH2) |
| &A4 |
Channel 2 Tone L |
LLLLLLLL |
L=Tone Low Byte� Lower values=Higher tone |
| &A5 |
Channel 2
Tone H |
RPCCHHHH |
H=Tone High
Bits / polynomial Counter / Ring Modulator (CH0) / highPass Filter
(CHN) |
| &A6 |
Noise Channel
frequency |
RHLBCCNN |
Noise
(0=31khz 1-3=Channel 0-2 link) / polynominal Counter/ swap Bits 7
& 17 of pc / Lowpass /Highpass / Ring modulator |
| &A7 |
Sync &
Interrupt rate |
-IIDDSSS |
Interrupts
(0=1khz,1=50hz,2=tone0,3=tone1) D=D/A ladder on (speccy 48k emu) /
Sync for tone 0,1,2 (1=hold 0=run) |
| &A8 |
Tone Channel 0 LH Amplitude |
--VVVVVV |
V=Volume(63=max)
D/A ladder (If &A7 Bit3=1... tape port,
Speaker L) |
| &A9 |
Tone Channel 1 LH Amplitude |
--VVVVVV |
V=Volume(63=max) |
| &AA |
Tone Channel 2 LH Amplitude |
--VVVVVV |
V=Volume(63=max) |
| &AB |
Noise Channel LH Amplitude |
--VVVVVV |
V=Volume(63=max) |
| &AC |
Tone Channel 0 RH Amplitude |
--VVVVVV |
V=Volume(63=max)
D/A ladder (If &A7
Bit4=1... tape port, Speaker R) |
| &AD |
Tone Channel 1 RH Amplitude |
--VVVVVV |
V=Volume(63=max) |
| &AE |
Tone Channel 2 RH Amplitude |
--VVVVVV |
V=Volume(63=max) |
| &AF |
Noise Channel RH Amplitude |
--VVVVVV |
V=Volume(63=max) |
|
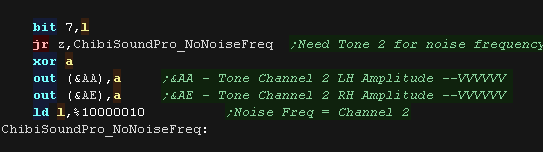
Chibisound PRO
requires each channel to be capable of noise, but the Enterprise
sound chip only has one noise channel.
We'll have to track the noise state for each 'virtual noise
channel' and update the actual noise channel accordingly
|
The ChibiSound Pro driver
The Enterprise has 3 channels + noise, but to control the noise
frequency we have to bind the noise channel to one of the tone
channels.
We write a value of 3 to port &A6, which selects Channel 2
|
 |
| We need some ram to keep track of the nose state, and a lookup
table for the 3 channels available to the hardware. |
 |
We may be passed a channel 0-127, so we use a 4 bit lookup table
to 'map' these to actual channels 0-2
We store this channel number back in L
|
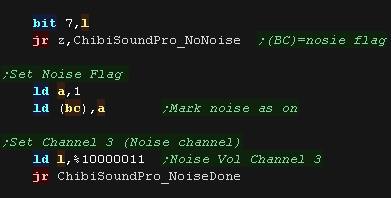
 |
We select the Noise channel flag at address (BC)
This tracks if we were asked to turn this channels noise on in the
past - as all our noise settings are actually redirected to the one
noise channel, we have to keep track of what we were asked using
these virtual channels |
 |
We check if the noise is now to
be turned on.
If the noise is on, we set the the noise flag at (BC), and switch
the channel number in L to Channel 3 for when we set the volume
|
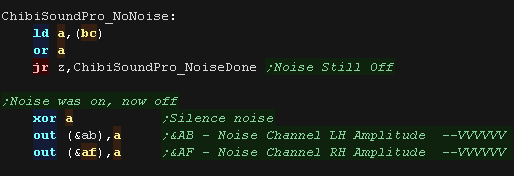
 |
If noise is now of, The noise state may have changed, so we check
the previous noise state, and see if we now need to turn it off.
If we do, we do so by setting the volume of channel 3 (noise) to 0
(silent)
We set the Left and Right channel with ports &AB and &AF |
 |
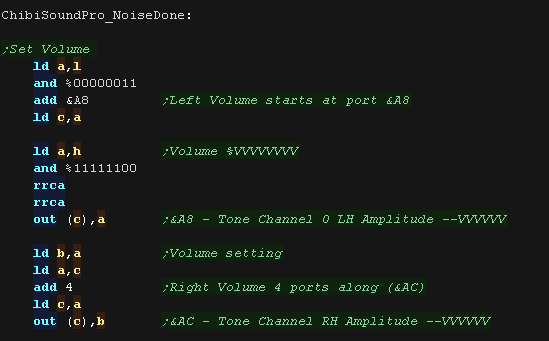
We set the volume next.
ChibiSound Pro uses an 8 bit volume in H
We need a 6 bit volume for the enterprise, and we need to set Left
and Right channels separately.
The Left Volume registers are &A8+
The Right Volume registers are &AC+
|
 |
If we're using simple noise, we need to set the volume of channel
3, and the bottom two bits of the frequency setting - which can only
take a value of 0-2 (3 sets it to use channel 2's frequency setting)
We're done, so we just return. |
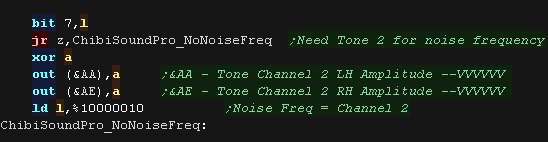 |
If we're using noise, then after we've set the volume, we need to
set the frequency of Channel 2 - which controls the noise frequency.
BUT we don't want the tone 2 to sound, so we silence it's volume by
writing 0 to &AA and &AE
|
 |
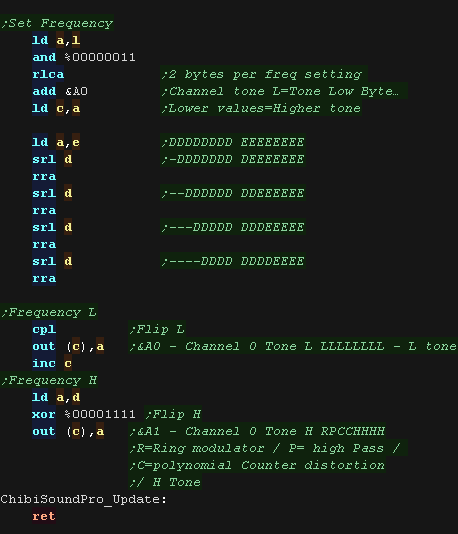
Finally we set our frequency.
The DE pair passes 16 bits, but we can only use 12, we need a 4 bit
H part, and an 8 bit L part.
We also need to flip the bits, as 0 is the highest frequency.
The tone is controlled by two ports &A0/A1 for channel 0,
&A2/A3 for Channel 1, &A4/A5 for channel 2... with the first
port being the L part, and the second being the H part. |
 |
The ChibiOctave lookup table provides matched notes which can be
loaded into DE to give consistent tones across all systems.
Sharps and flats can be calculated by adding two values and dividing
them by two.
|
 |
ChibiSound PRO!
ChibiSound is the sound driver that handles
the particularities of a system, there is typically one driver per
system, though the CPC and MSX drivers are essentially identical except
for the AY register setting routines.
The original 'ChibiSound'
gave us one channel, one Volume bit, six pitch bits, and the ability to
turn noise on. Pitches were not matched across systems, so sound 32
won't sound the same on all systems.
The updated 'ChibiSound Pro'
gives us all the channels provided by the hardware, 8 volume bits, 16
pitch bits, and the ability to turn noise on. Pitches were not matched
across systems, however the 'ChibiOctave' lookup table provides values
which ARE matched across all systems.
ChibiSound PRO is essentially a reduced
subset of AY functionality, and was designed on the Z80 - it's 'PRO'
suffix is a parody of the 'SoundBlaster PRO' - which could only do 8 bit
sound so wasn't up to professional standards! (neither is ChibiSound
PRO)
ChibiSound PRO provides a standard interface
to the underlying hardware, it allows the following features to be set
for each channel on the underlying hardware:
Function
|
Zero page entry
|
Notes:
|
Channel Number (bit 0-6)
Noise On/Off (bit 7) |
H |
Multiple channels can be supported, but on single channel
systems only Channel 0 will be sure to play.
If possible Channel 0 will be a center channel, Channels 1+ may be
left/right
Noise bit turns the noise effect on (1) or off (0) - this can be
set on any channel, if the underlying hardware only supports one
noise channel, this will be resolved by the driver. |
| Volume |
L |
Set volume of the channel (0-255). Higher numbers are louder. O
is off |
| Pitch |
DE |
Set the pitch of the channel (0-65535). Higher numbers are
higher pitch.
Using DE does not standardize the resulting pitch - however a
'Lookup table' of notes 'ChibiOctave' provides a standardized way
of getting the correct DE value to get a pitch correct note on the
platform. |
Chibisound PRO does not offer features like Envelope, LFE etc, as
providing consistent functionality across different platforms would not be
realistic.
The
new driver is a big improvement on the old one but doesn't
really deserve the PRO suffix!
It's a parody of the early 'Soundblaster Pro' sound cards, which
could only do 8 bit digital sound, so weren't really of 'pro
spec' either!
|
|
Sound ports on the Spectrum
The Spectrum has a single 1 bit sound port
A write to bit 4 of port &--FE
sets the sound as 'on' or off'
we use this to 'build' our wave form by flipping the wave in a
timed fashion. Unfortunately it is not possible to set the volume
(height) of the wave
Port FE also sets the border, it's format is:
%---SMBBB S=Speaker M=Mic B=Border
|
 |
|
Chibisound PRO
requires each channel to be capable of noise, but the Spectrum
sound chip only has one channel.
We'll have to track the channels, and select only the loudest to
actually play
|
The ChibiSound Pro driver
We have some options we can enable on the spectrum.
SmsTranspose - will shift the pitches up 1 octave... The speccy
can't really do low pitches well, so this improves the sound of
low songs by transposing them.
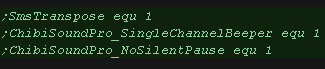
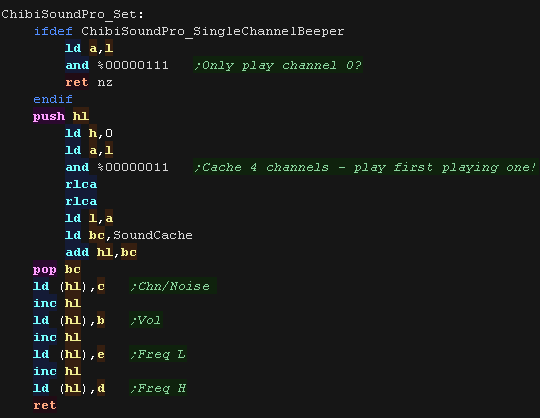
ChibiSoundPro_SingleChannelBeeper - if this is set the sound
driver will play only channel 0, otherwise it will play the first
active channel from 0,1,2,3 (The speccy can only make one sound at
a time!)
ChibiSoundPro_NoSilentPause - setting this will do nothing when
the sound is silent, otherwise there will be a short pause
to keep play speed consistent. If you're sound is timed by an
interrupt you want this on, if it's played in a simple loop, you
want this off.
|
 |
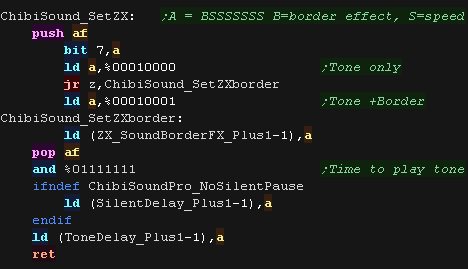
On the speccy we have a special function to set tone length, and
turn off the border effect
A length of 16 gives a good sound, but is slow - it is good for
title screen music or something where nothing else is happening!
a length of 3 still gives a 'recongnizable tone' and uses little
CPU power, so is better for interrupt driven sound
|
 |
We only have one physical sound channel, but our
music player expects each 3
We cache 4 virtual sound channels, and only play the first active
one
|

|
We scan the channels for the first active channel.
Alas We can't do volume levels on the speccy beeper, so we
consider anything with a volume <&40 as silent |
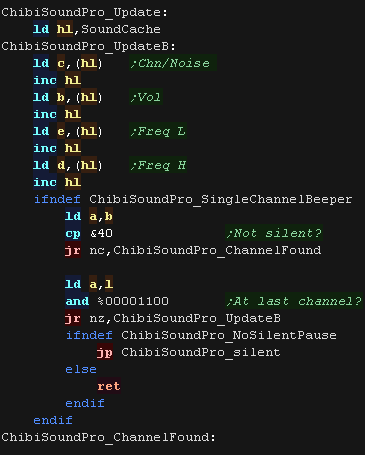 |
if we are silent we pause for roughly the same amount of time as a
tone would take - this keeps the music playing consistently.
We don't need to pause if our timing is interrupt based.
|
 |
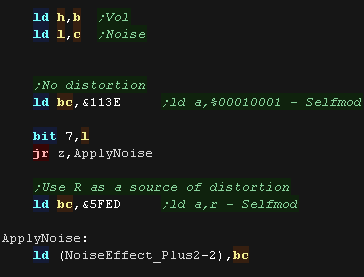
We check if the noise is now
to be turned on.
if Noise is on we use the R register as a random source.
if it's off we use a constant value of %00010001
We patch this in via self modifying code
|
 |
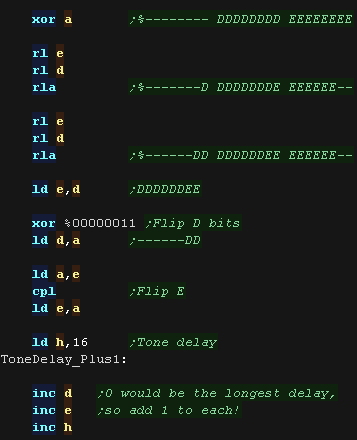
Finally we set our frequency.
We need to set up DE as the delay between changes to the beep bit
to form the waveform.
we use H to count how many times we do the flip - if we want each
tone to be the same length, irrespective of frequency, we'll need
to repeat the tone a varying number of time. |
 |
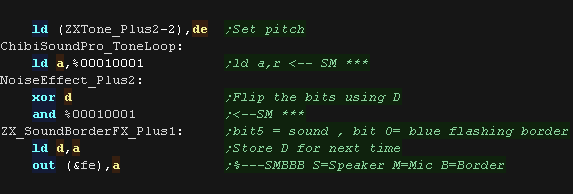
We write our value to port &FE, we need to flip the bit each
write, so we XOR with D
if we want a noisy sample we use LD A,R - otherwise we use LD
A,%00010001 |
 |
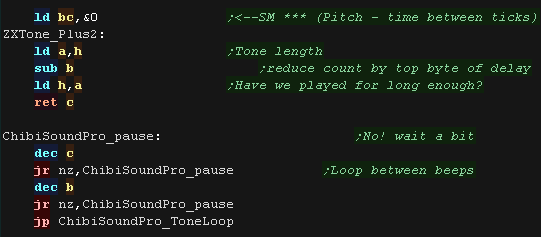
After each flip - we need to wait a while , we load BC with the
delay (it's self-modified in)
we decrease H - and when it reaches <0 we return - the amount
of loops we do goes up as DE goes down to keep the tone length
roughly constant. |
 |
The ChibiOctave lookup table provides matched notes which can be
loaded into DE to give consistent tones across all systems.
Sharps and flats can be calculated by adding two values and
dividing them by two.
|
 |
ChibiSound PRO!
ChibiSound is the sound driver that handles
the particularities of a system, there is typically one driver per
system, though the CPC and MSX drivers are essentially identical except
for the AY register setting routines.
The original 'ChibiSound'
gave us one channel, one Volume bit, six pitch bits, and the ability to
turn noise on. Pitches were not matched across systems, so sound 32
won't sound the same on all systems.
The updated 'ChibiSound Pro'
gives us all the channels provided by the hardware, 8 volume bits, 16
pitch bits, and the ability to turn noise on. Pitches were not matched
across systems, however the 'ChibiOctave' lookup table provides values
which ARE matched across all systems.
ChibiSound PRO is essentially a reduced
subset of AY functionality, and was designed on the Z80 - it's 'PRO'
suffix is a parody of the 'SoundBlaster PRO' - which could only do 8 bit
sound so wasn't up to professional standards! (neither is ChibiSound
PRO)
ChibiSound PRO provides a standard interface
to the underlying hardware, it allows the following features to be set
for each channel on the underlying hardware:
Function
|
Zero page entry
|
Notes:
|
Channel Number (bit 0-6)
Noise On/Off (bit 7) |
H |
Multiple channels can be supported, but on single channel
systems only Channel 0 will be sure to play.
If possible Channel 0 will be a center channel, Channels 1+ may be
left/right
Noise bit turns the noise effect on (1) or off (0) - this can be
set on any channel, if the underlying hardware only supports one
noise channel, this will be resolved by the driver. |
| Volume |
L |
Set volume of the channel (0-255). Higher numbers are louder. O
is off |
| Pitch |
DE |
Set the pitch of the channel (0-65535). Higher numbers are
higher pitch.
Using DE does not standardize the resulting pitch - however a
'Lookup table' of notes 'ChibiOctave' provides a standardized way
of getting the correct DE value to get a pitch correct note on the
platform. |
Chibisound PRO does not offer features like Envelope, LFE etc, as
providing consistent functionality across different platforms would not be
realistic.
The
new driver is a big improvement on the old one but doesn't
really deserve the PRO suffix!
It's a parody of the early 'Soundblaster Pro' sound cards, which
could only do 8 bit digital sound, so weren't really of 'pro
spec' either!
|
|
Sound on the
Gameboy
Like many systems, the Gameboy uses a series of memory mapped registers
for sound.
It has 2 standard Tone channels, one wave
channel (which uses 32x one nibble samples) and one noise channel.
ChibiTracks really ones 3 channels, so we'll program the wave channel
with a square wave, and use it as the 3rd tone channel!
| Section |
Addr |
Name |
Bits |
Bit Meaning |
| Sound |
FF10 |
NR10 -
Channel 1 (Tone & Sweep) Sweep register (R/W) |
-TTTDNNN |
T=Time,D=direction,N=Numberof
shifts
|
| Sound |
FF11 |
NR11 -
Channel 1 (Tone & Sweep) Sound length/Wave pattern duty
(R/W) |
DDLLLLLL |
L=Length
D=Wave pattern Duty |
| Sound |
FF12 |
NR12 -
Channel 1 (Tone & Sweep) Volume Envelope (R/W) |
VVVVDNNN |
C1 Volume /
Direction 0=down / envelope Number (fade speed) |
| Sound |
FF13 |
NR13 -
Channel 1 (Tone & Sweep) Frequency lo (Write Only) |
LLLLLLLL |
pitch L |
| Sound |
FF14 |
NR14 -
Channel 1 (Tone & Sweep) Frequency hi (R/W) |
IC---HHH |
C1 Initial
/ Counter 1=stop / pitch H |
| Sound |
FF16 |
NR21 �
Channel 2 (Tone) Sound Length/Wave Pattern Duty (R/W) |
DDLLLLLL |
L=Length
D=Wave pattern Duty |
| Sound |
FF17 |
NR22 -
Channel 2 (Tone) Volume Envelope (R/W) |
VVVVDNNN |
C1 Volume /
Direction 0=down / envelope Number (fade speed) |
| Sound |
FF18 |
NR23 -
Channel 2 (Tone) Frequency lo data (W) |
LLLLLLLL |
pitch L |
| Sound |
FF19 |
NR24 -
Channel 2 (Tone) Frequency hi data (R/W) |
IC---HHH |
C1 Initial
/ Counter 1=stop / pitch H |
| Sound |
FF1A |
NR30 -
Channel 3 (Wave Output) Sound on/off (R/W) |
E------- |
1=on |
| Sound |
FF1B |
NR31 -
Channel 3 (Wave Output) Sound Length |
NNNNNNNN |
Higher is
shorter - no effect unles C=1 in FF1E |
| Sound |
FF1C |
NR32 -
Channel 3 (Wave Output) Select output level (R/W) |
-VV----- |
VV=Volume
(0=off 1=max 2=50% 3=25%) |
| Sound |
FF1D |
NR33 -
Channel 3 (Wave Output) Frequency's lower data (W) |
LLLLLLLL |
Low
frequency |
| Sound |
FF1E |
NR34 -
Channel 3 (Wave Output) Frequency's higher data (R/W) |
RC---HHH |
H=high
frequency C=counter repeat (loop) R=Restart sample |
| Sound |
FF20 |
NR41 -
Channel 4 (Noise) Sound Length (R/W) |
---LLLLL |
L=Length |
| Sound |
FF21 |
NR42 -
Channel 4 (Noise) Volume Envelope (R/W) |
VVVVDNNN |
Volume /
Direction 0=down / envelope Number (fade speed) |
| Sound |
FF22 |
NR43 -
Channel 4 (Noise) Polynomial Counter (R/W) |
SSSSCDDD |
Shift clock
frequency (pitch) / Counter Step 0=15bit 1=7bit (sounds
eletronic)/ Dividing ratio (roughness) |
| Sound |
FF23 |
NR44 -
Channel 4 (Noise) Counter/consecutive; Inital (R/W) |
IC------ |
C1 Initial
/ Counter 1=stop |
| Sound |
FF24 |
NR50 -
Channel control / ON-OFF / Volume (R/W) |
-LLL-RRR |
Channel
volume (7=loud) |
| Sound |
FF25 |
NR51 -
Selection of Sound output terminal (R/W) |
LLLLRRRR |
Channel 1-4
L / Chanel 1-4R (1=on) |
| Sound |
FF26 |
NR52 -
Sound on/off |
A---4321 |
read
Channel 1-4 status or write All channels on/off (1=on) |
| Sound |
FF30
� FF3F |
Wave
Pattern RAM |
HHHHLLLL |
32
4 bit samples |
Writing Chibisound Pro
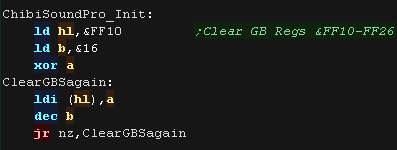
Before we use Chibisound we should run the INIT
routine.
First this clears all the sound registers to zero to reset them to a
default state. |
 |
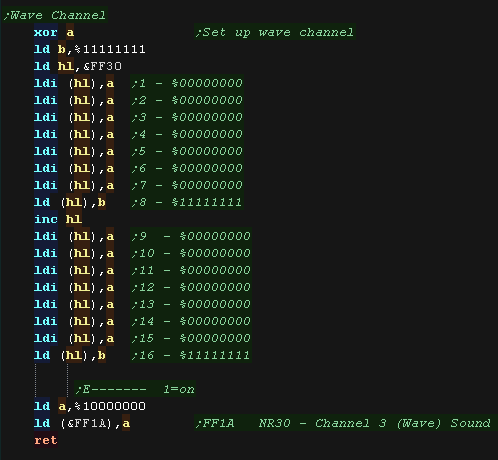
Next we enable the sound channels
|
 |
Finally we load a wave into the 16 'one nibble per sample'
registers, and turn on the wave channel.
|
 |
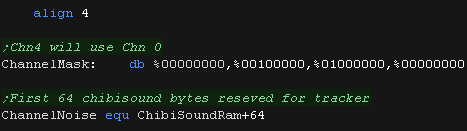
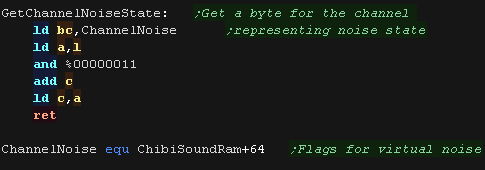
ChibiSoundPro requires each channel to support noise - but we only
have one noise channel!
to work around this we have a 'Virtual noise state' - we keep track
of the requested noise state with 'ChannelNoise' and redirect the
requests to the actual noise channels. |
 |
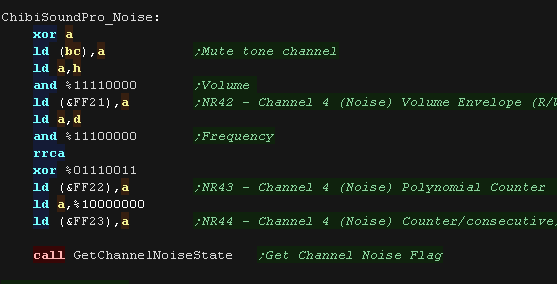
The SET command configures our
sound!
We use 4 registers to select the sound settings for a channel:
H=Volume (0-255)
L=Channel Num (0-127 unused channels will wrap around) / Top
Bit=Noise
DE=Pitch (0-65535)
We need to decide what channel we're going to
use.
If we've been asked to use channel 0, we need to use port &FF12
as our base
If we're using channel 1, we use port &FF17
Otherwise we'll use the wave channel and port &FF1C |
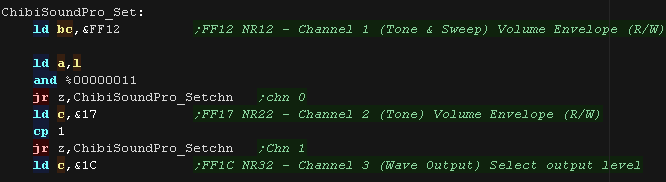 |
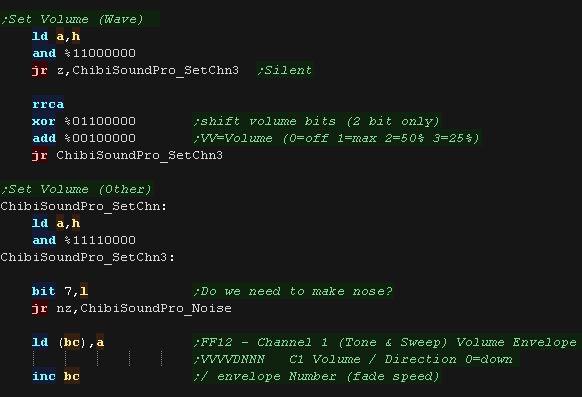
the Wave channel's volume setting
is a bit odd. All others use a 4 bit volume
We also check if we've been told to make a noise! |
 |
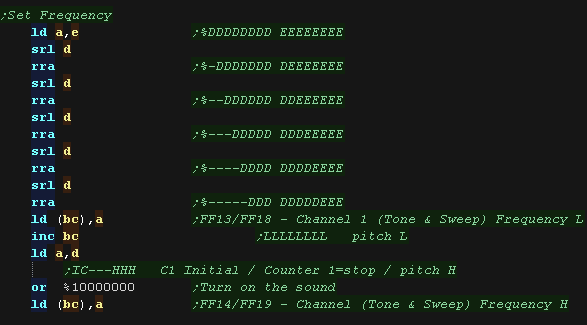
We've been passed a 16 bit pitch
parameter, but we only want 11 bits for our settings.
We bitshift DE to match what the hardware registers need. |
 |
Next we check the Noise flag.
If this channels virtual noise state was on, but is now off, we
silence noise by setting it's volume to 0 with &FF21 |
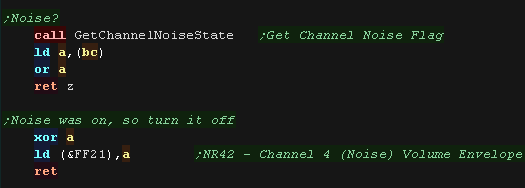 |
If noise is on we want to redirect our settings to the Noise
channel!
We silence the tone. and set the volume of the noise.
We set the frequency of the noise with &FF22 - but we can only
use the top 3 bits of the DE frequency.
We set noise to on so we know to turn it off later! |
 |
ChibiSound PRO!
ChibiSound is the sound driver that handles the
particularities of a system, there is typically one driver per system,
though the CPC and MSX drivers are essentially identical except for the AY
register setting routines.
The original 'ChibiSound' gave
us one channel, one Volume bit, six pitch bits, and the ability to turn
noise on. Pitches were not matched across systems, so sound 32 won't sound
the same on all systems.
The updated 'ChibiSound Pro'
gives us all the channels provided by the hardware, 8 volume bits, 16
pitch bits, and the ability to turn noise on. Pitches were not matched
across systems, however the 'ChibiOctave' lookup table provides values
which ARE matched across all systems.
ChibiSound PRO is essentially a reduced subset
of AY functionality, and was designed on the Z80 - it's 'PRO' suffix is a
parody of the 'SoundBlaster PRO' - which could only do 8 bit sound so
wasn't up to professional standards! (neither is ChibiSound PRO)
ChibiSound PRO provides a standard interface to
the underlying hardware, it allows the following features to be set for
each channel on the underlying hardware:
Function
|
Zero page entry
|
Notes:
|
Channel Number (bit 0-6)
Noise On/Off (bit 7) |
H |
Multiple channels can be supported, but on single channel systems
only Channel 0 will be sure to play.
If possible Channel 0 will be a center channel, Channels 1+ may be
left/right
Noise bit turns the noise effect on (1) or off (0) - this can be set
on any channel, if the underlying hardware only supports one noise
channel, this will be resolved by the driver. |
| Volume |
L |
Set volume of the channel (0-255). Higher numbers are louder. O is
off |
| Pitch |
DE |
Set the pitch of the channel (0-65535). Higher numbers are higher
pitch.
Using DE does not standardize the resulting pitch - however a
'Lookup table' of notes 'ChibiOctave' provides a standardized way of
getting the correct DE value to get a pitch correct note on the
platform. |
Chibisound PRO does not offer features like Envelope, LFE etc, as providing
consistent functionality across different platforms would not be realistic.
The
new driver is a big improvement on the old one but doesn't really
deserve the PRO suffix!
It's a parody of the early 'Soundblaster Pro' sound cards, which
could only do 8 bit digital sound, so weren't really of 'pro spec'
either!
|
|
Sound on the SAM
Coupe
The Sam Coupe has 32 registers - though some have no purpose... write a
RegNum to port 511, then a value to port 255 to set one.
| Reg |
Purpose |
Bits |
Bit
Meaning |
| &00 |
Amplitude
generator 0 |
RRRRLLLL
|
Left /
Right ... 15=Max volume
|
| &01 |
Amplitude
generator 1 |
RRRRLLLL |
Left /
Right ... 15=Max volume |
| &02 |
Amplitude
generator 2 |
RRRRLLLL |
Left /
Right ... 15=Max volume |
| &03 |
Amplitude
generator 3 |
RRRRLLLL |
Left /
Right ... 15=Max volume |
| &04 |
Amplitude
generator 4 |
RRRRLLLL |
Left /
Right ... 15=Max volume |
| &05 |
Amplitude
generator 5 |
RRRRLLLL |
Left /
Right ... 15=Max volume |
| &08 |
Tone
Generator 0 Frequency |
FFFFFFFF
|
Higher
number = higher tone |
| &09 |
Tone
Generator 1 Frequency |
FFFFFFFF |
Higher
number = higher tone |
| &0A |
Tone
Generator 2 Frequency |
FFFFFFFF |
Higher
number = higher tone |
| &0B |
Tone
Generator 3 Frequency |
FFFFFFFF |
Higher
number = higher tone |
| &0C |
Tone
Generator 4 Frequency |
FFFFFFFF |
Higher
number = higher tone |
| &0D |
Tone
Generator 5 Frequency |
FFFFFFFF |
Higher
number = higher ton41 |
| &10 |
Octave
register |
-111-000
|
Set tone
register octaves |
| &11 |
Octave
register |
-333-222
|
Set tone
register octaves |
| &12 |
Octave
register |
-555-444
|
Set tone
register octaves |
| &14 |
Frequency
enable |
--543210 |
Tone
Channel enable 0=off |
| &15 |
Noise enable |
--543210 |
Noise Channel enable 0=off |
| &16 |
Noise Generator |
--11--00 |
00=31k 01=15k 10=7k 11= freq
gen 0 (Chn0) / 1 (Chn3) |
| &18 |
Envelope
Generator 0 (CH2) |
O-GREEEM
|
envelope
controller On / 0= use CH 1 1=timed / Resolution / Envelope
shape / Mirror other channel |
| &19 |
Envelope
Generator 1 (CH5) |
O-GREEEM
|
envelope
controller On / 0= use CH 4 1=timed / Resolution / Envelope
shape / Mirror other channel |
| &1C |
Reset and
Enable |
------RE
|
Reset
frequency / Enable sound |
|
Chibisound PRO
requires each channel to be capable of noise, but the SAM needs
to use chn 0/3 for frequency.
We'll remap all noise to Channel 3, and use 'virtual noise
state' flags to track when we were asked to turn noise on or off
on a channel.
|
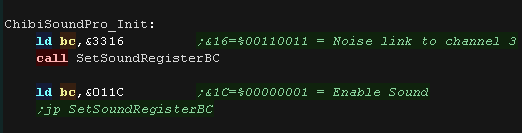
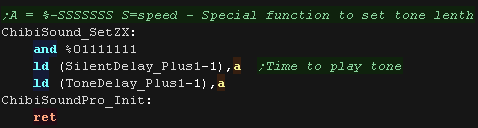
Writing Chibisound Pro
Before we can use ChibiSound PRO we should run the INIT routine.
We use Channel 3 for our noise frequency, so we set this with reg
&16.
We enable sound with reg &1C
|
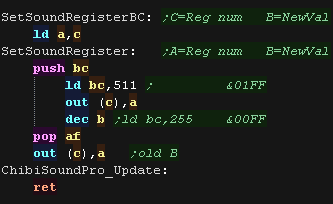
 |
We use SetSoundRegister to set
a sound register
We write the register number to port 511 (&01FF), then the new
value to port 255 (&00FF)
|
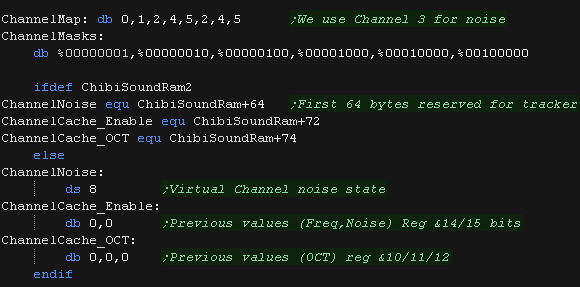
 |
We need some ram and lookup tables for our work.
The ChannelMap remaps the channel number in L -
effectively leaving channel 3 free for noise.
ChannelMasks has a lookup of the bits for reg
&14/15
ChannelNoise keeps track of the virtual noise
channel state.
ChannelCache_Enable remembers the previous value in
reg &14/15
ChannelCache_OCT remember sthe previous values of
&10/11/12
|
 |
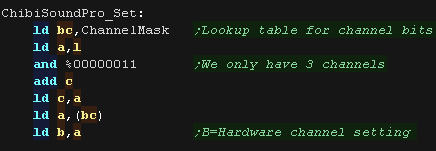
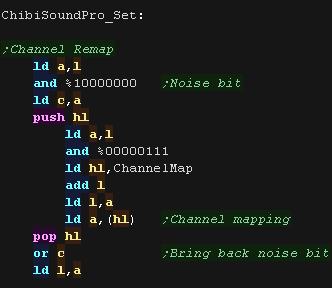
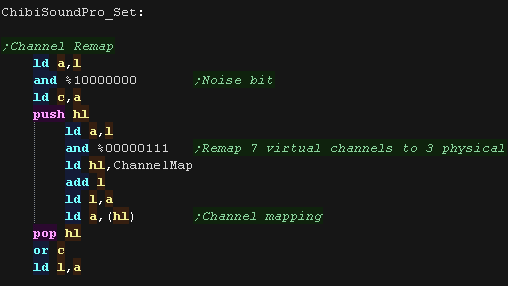
We use ChibiSoundPro_Set to set
the channel state.
H=Volume (0-255)
L=Channel Num (0-127 unused channels will wrap around) / Top
Bit=Noise
DE=Pitch (0-65535)
The first job is to remap the channel number to avoid channel 3.
|
 |
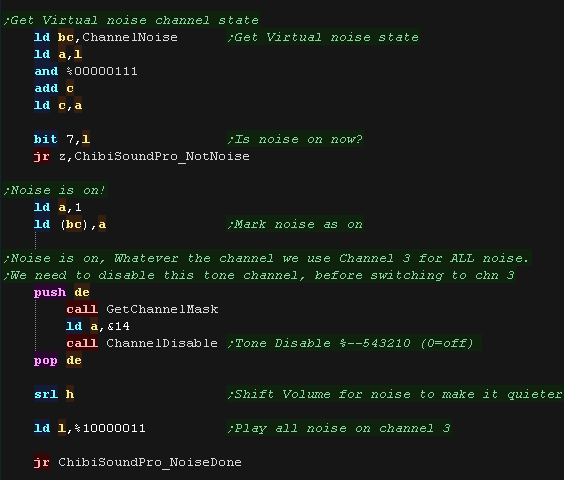
We check the Noise state.
If noise is on, we set the flag for this channels noise state.
We then silence the tone channel, and remap L so that the following
commands go to channel 3.
|
 |
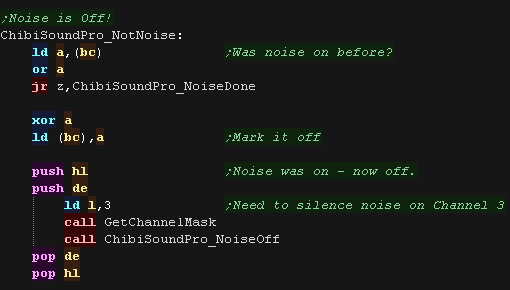
If Noise is off we check the previous noise state of the virtual
channel.
If it was on before, we need to now silence the noise on channel 3
|
 |
Next we set the Volume.
The volume on the SAM is stereo in the format %RRRRLLLL, so we
double up our 4 bit volume.
If it's zero we mute the sound channel
|
 |
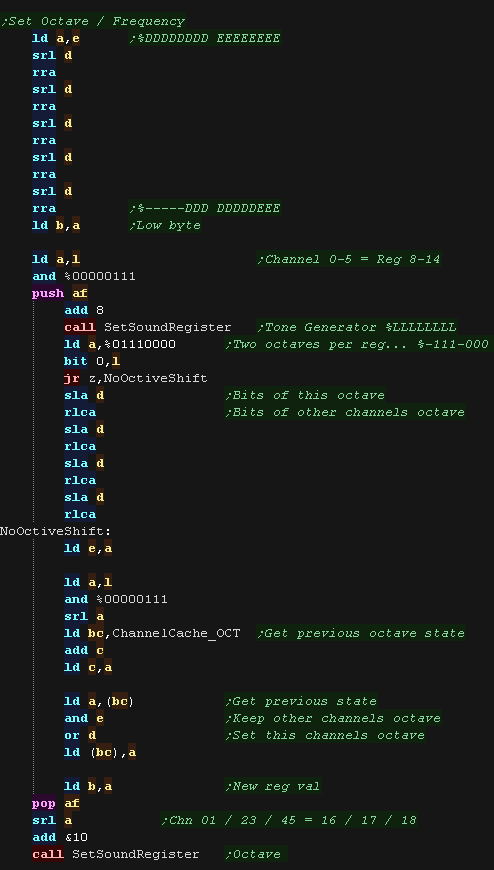
We now want to set our Frequency.
On the SAM this is done in two parts:
A 3 bit Octave in registers &10/11/12
and an 8 bit frequency in registers &8/9/A/B/C/D
We bitshift our 16 bit value as required.
As two channels share a register, We then shift the top 3 bits one
nibble if required (depending on the bottom bit of our channel
number.
We use ChannelCache_OCT to track the value of the register, and mask
with D/E to keep the channel we don't want to change, but or in the
new value for the current channel
|
 |
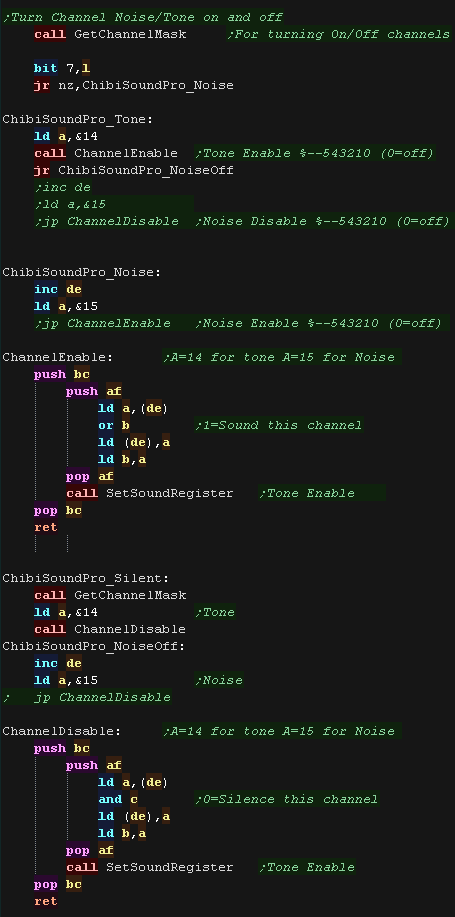
Finally we need to Enable Channel
Noise and Tone or disable it by setting or clearing the correct bits
in reg &14/15
ChannelEnable will turn a channel on.
ChannelDisable will turn a channel off.
A needs to point to the register number.
DE needs to point to the correct value in ChannelCache_Enable
|
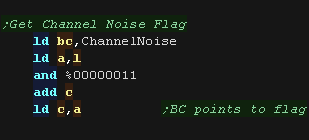
 |
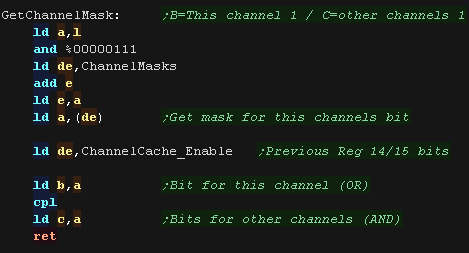
GetChannelMask will set up DE to point to the prevous value, and
set B and C
B will be set to the bit for the current channel - it can be ORed to
enable the channel
C will be set to the bits for the other channels - it can be ANDed
to disable the channel
|
 |
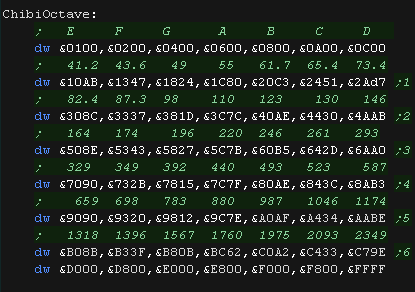
The ChibiOctave lookup table provides matched notes which can be
loaded into DE to give consistent tones across all systems.
Sharps and flats can be calculated by adding two values and dividing
them by two. |
 |
ChibiSound PRO!
ChibiSound is the sound driver that handles
the particularities of a system, there is typically one driver per
system, though the CPC and MSX drivers are essentially identical except
for the AY register setting routines.
The original 'ChibiSound'
gave us one channel, one Volume bit, six pitch bits, and the ability to
turn noise on. Pitches were not matched across systems, so sound 32
won't sound the same on all systems.
The updated 'ChibiSound Pro'
gives us all the channels provided by the hardware, 8 volume bits, 16
pitch bits, and the ability to turn noise on. Pitches were not matched
across systems, however the 'ChibiOctave' lookup table provides values
which ARE matched across all systems.
ChibiSound PRO is essentially a reduced
subset of AY functionality, and was designed on the Z80 - it's 'PRO'
suffix is a parody of the 'SoundBlaster PRO' - which could only do 8 bit
sound so wasn't up to professional standards! (neither is ChibiSound
PRO)
ChibiSound PRO provides a standard interface
to the underlying hardware, it allows the following features to be set
for each channel on the underlying hardware:
Function
|
Zero page entry
|
Notes:
|
Channel Number (bit 0-6)
Noise On/Off (bit 7) |
H |
Multiple channels can be supported, but on single channel
systems only Channel 0 will be sure to play.
If possible Channel 0 will be a center channel, Channels 1+ may be
left/right
Noise bit turns the noise effect on (1) or off (0) - this can be
set on any channel, if the underlying hardware only supports one
noise channel, this will be resolved by the driver. |
| Volume |
L |
Set volume of the channel (0-255). Higher numbers are louder. O
is off |
| Pitch |
DE |
Set the pitch of the channel (0-65535). Higher numbers are
higher pitch.
Using DE does not standardize the resulting pitch - however a
'Lookup table' of notes 'ChibiOctave' provides a standardized way
of getting the correct DE value to get a pitch correct note on the
platform. |
Chibisound PRO does not offer features like Envelope, LFE etc, as
providing consistent functionality across different platforms would not be
realistic.
The
new driver is a big improvement on the old one but doesn't
really deserve the PRO suffix!
It's a parody of the early 'Soundblaster Pro' sound cards, which
could only do 8 bit digital sound, so weren't really of 'pro
spec' either!
|
|
Sound ports on the Camputers Lynx
The Camputers Lynx has a single 6 bit sound port
A write to bit 4 of port &0084
sets the sound as 'on' or off' (or any port that matches the
bitmask %********10***10*)
we use this to 'build' our wave form by flipping the wave in a
timed fashion. Unfortunately it is not possible to set the volume
(height) of the wave.
On the Lynx, the beeper takes a 6 bit volume level, in the format:
%0-VVVVVV (Bit 7 must be 0)
|
|
|
Chibisound PRO
requires each channel to be capable of noise, but the Camputers
Lynx sound chip only has one channel.
We'll have to track the channels, and select only the loudest to
actually play |
The ChibiSound Pro driver
We have some options we can enable on the spectrum.
SmsTranspose - will shift the pitches up 1 octave... The Lynx
can't really do low pitches well, so this improves the sound of
low songs by transposing them.
ChibiSoundPro_SingleChannelBeeper - if this is set the sound
driver will play only channel 0, otherwise it will play the first
active channel from 0,1,2,3 (The Lynx can only make one sound at a
time!)
ChibiSoundPro_NoSilentPause - setting this will do nothing when
the sound is silent, otherwise there will be a short pause
to keep play speed consistent. If you're sound is timed by an
interrupt you want this on, if it's played in a simple loop, you
want this off.
|
|
On the Lynx we have a special function to set tone length.
A length of 16 gives a good sound, but is slow - it is good for
title screen music or something where nothing else is happening!
A length of 3 still gives a 'recognizable tone' and uses little
CPU power, so is better for interrupt driven sound
|
 |
We only have one physical sound channel, but our
music player expects each 3
We cache 4 virtual sound channels, and only play the first active
one
|
|
We scan the channels for the first active channel.
If no channel is playing we need to do a 'silent pause' |
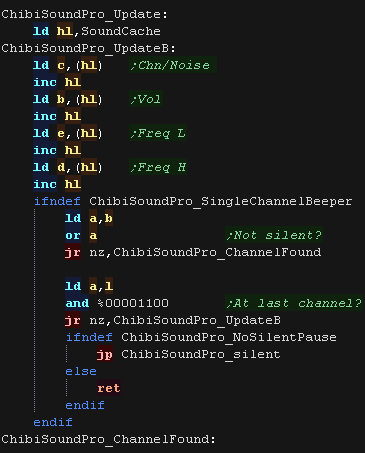 |
if we are silent we pause for roughly the same amount of time as a
tone would take - this keeps the music playing consistently.
We don't need to pause if our timing is interrupt based.
|
|
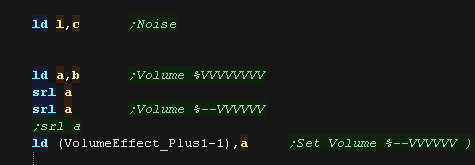
First we set our volume.
We can use a 5 bit volume, we patch it into an AND statement via
self modifying code. |
 |
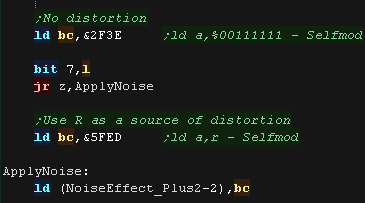
We check if the noise is now
to be turned on.
if Noise is on we use the R register as a random source.
if it's off we use a constant value of %0011111
We patch this in via self modifying code
|
 |
Finally we set our frequency.
We need to set up DE as the delay between changes to the beep bit
to form the waveform.
we use H to count how many times we do the flip - if we want each
tone to be the same length, irrespective of frequency, we'll need
to repeat the tone a varying number of time. |
|
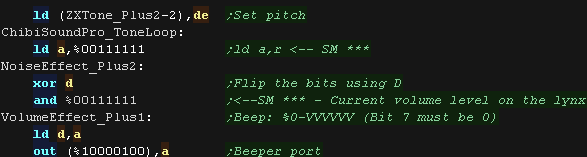
We write our value to port %10000100, we need to flip the wave
each write, so we XOR with D
if we want a noisy sample we use LD A,R - otherwise we use LD
A,%00111111, ANDed with our volume level |
 |
After each flip - we need to wait a while , we load BC with the
delay (it's self-modified in)
we decrease H - and when it reaches <0 we return - the amount
of loops we do goes up as DE goes down to keep the tone length
roughly constant. |
|
The ChibiOctave lookup table provides matched notes which can be
loaded into DE to give consistent tones across all systems.
Sharps and flats can be calculated by adding two values and
dividing them by two.
|
|
MinTile is a
multiplatform 'engine' which allows us to define our game code in
a common way, and let the platform specific code handle the
platform specific work!... it was used to write 'ChibiFighter' on
the Z80.
For more details on Mintile, see the Mintile series here...
|
|
Tile Drawing Routines
Our example shows an onscreen tilemap and two software 'sprites'.
Mintile supports scrolling and X-Flip (but not Y-flip)
The 'sprites' are actually miniature tile maps, this is to reduce
the amount of platform specific code.
these are all created via the DoStrip platform specific routine,
which we'll look at here |
 |
The MinTile shared routine provides calculation and tilemap
planning, however we need to do the actual job of 'Drawing' in the
platform code.
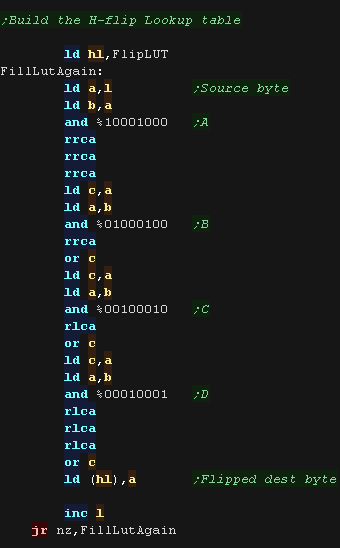
The code can horizontally flip tiles, on the Amstrad CPC we use a
256 byte lookup table, to 'pre-calculate the flipping of the 4
pixels in a Mode 1 byte |
 |
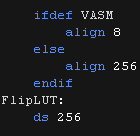
| The LUT needs to be byte aligned, so &8100 or &FE00 would
be fine, but &FE01 would not! |
 |
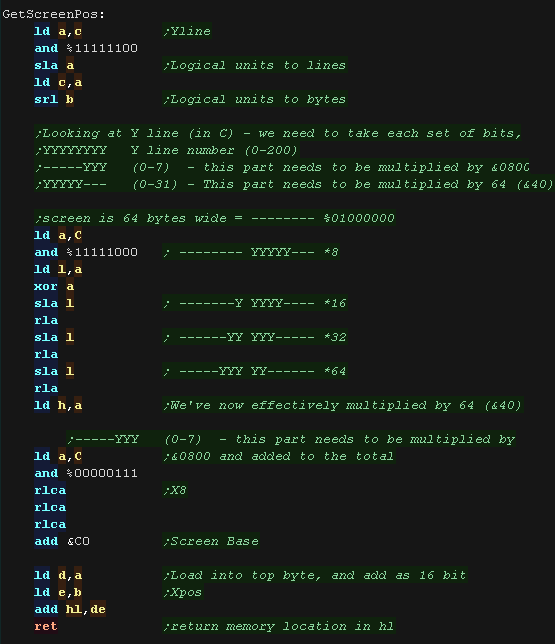
We have a 'GetScreenPos' function , which calculates the VRAM
destination for the sprite objects.
|
 |
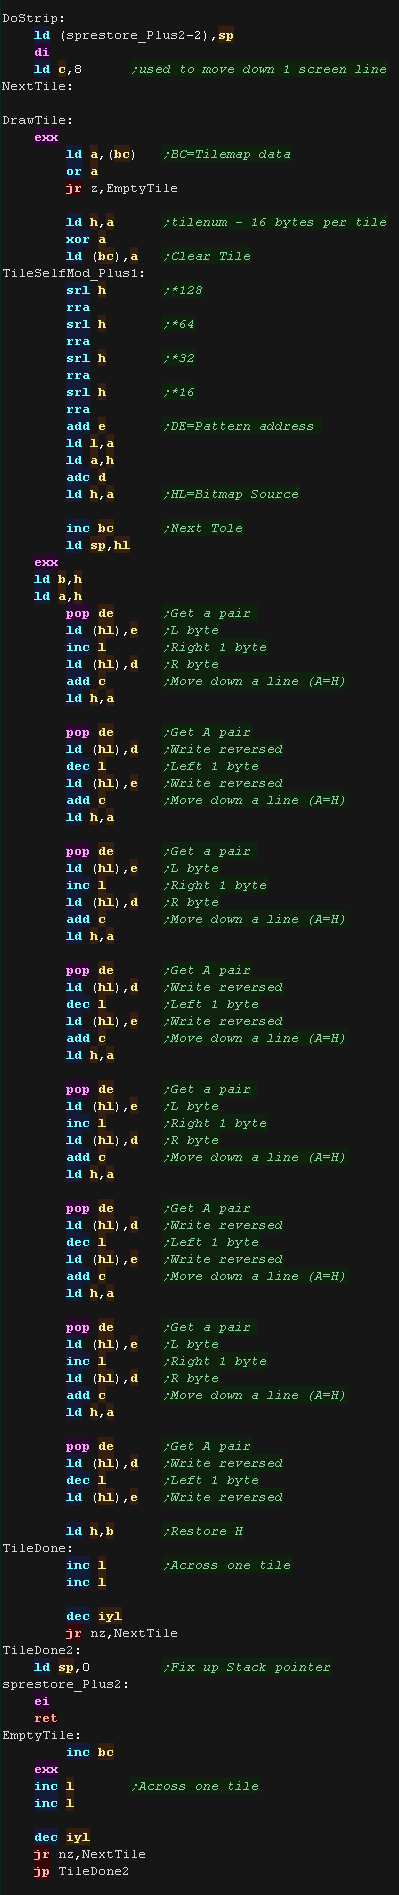
DoStrip will draw one horizontal strip of tiles.
The job is defined by the following registers
HL = VRAM Dest
BC' = Tilemap
DE' = Pattern data
IYL = TileMap Width
The tilemap will either be the TileCache (for the background) or a
mini tilemap (for sprites)
If using the tile cache we zero the tiles after they are drawn
we use stack misuse to speed up loading the pattern data
After each line, we add &0800 to the HL pair, to do this
quickly, we load &08 into C, and keep the H part in the
Accumulator,
We can alternate whether we write the screen bytes left->right or
right->left, so that we don't need to 'step backwards' (dec
L) more than we must as we go down the screen
|
 |
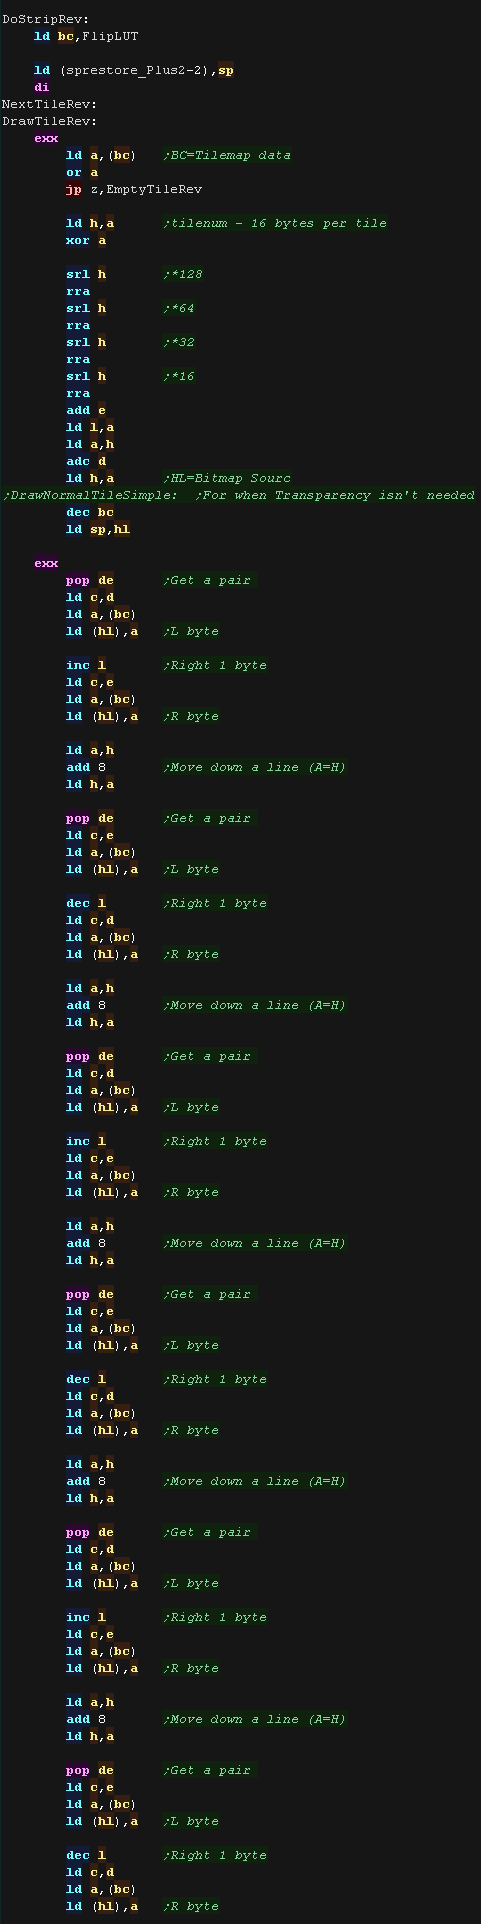
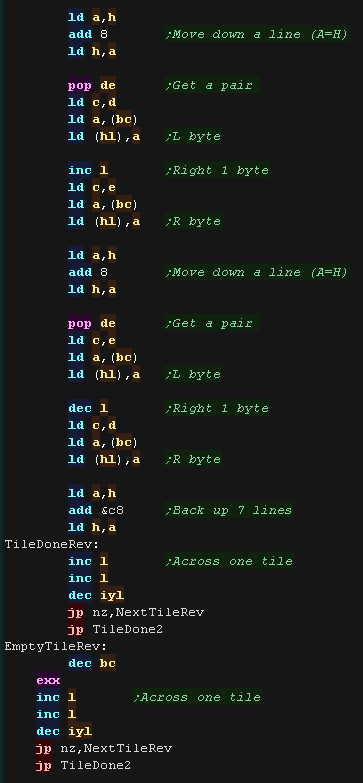
DoStripRev has essentially the same function, however it
horizontally flips the pattern data via the lookup table.
We're using BC to point to our lookup table, which means we don't
have enough registers free to do the same 'trick' with H and C as
before.
This time we do a more conventional 'ADD 8' to increase H
|
|
Note that
Mintile makes extensive use of the shadow registers HL' BC' and
DE' (but not AF')
This means you'll need to keep interrupts disabled (as the
firmware uses them!), or write your own interrupt handler....
We'll write our own interrupt handler later on when we add music
to this example.
|
 |
MinTile is a
multiplatform 'engine' which allows us to define our game code in
a common way, and let the platform specific code handle the
platform specific work!... it was used to write 'ChibiFighter' on
the Z80.
For more details on Mintile, see the Mintile series here...
|
|
Screen Init
Our Tilemap code supports a background tilemap and simulated
sprites.
we can also scroll the screen.
Our example shows an onscreen tilemap and two software 'sprites'.
Mintile supports scrolling and X-Flip (but not Y-flip)
The 'sprites' are actually miniature tile maps, this is to reduce
the amount of platform specific code.
these are all created via the DoStrip platform specific routine,
which we'll look at here |
 |
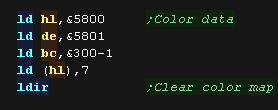
| The Tiles themselves do not
use the color attributes of the ZX spectrum, so first we fill the
&300 color attribute range with color 7 (white) |
 |
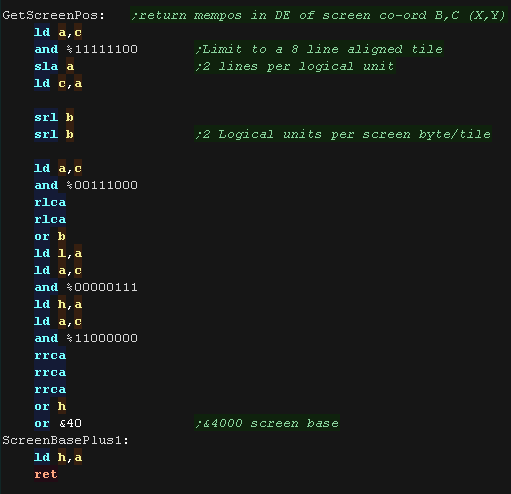
Normal Tile Drawing Routine
Bitmap screen memory starts from &4000, but for sprite drawing
we need to calculate the vram destination for the sprite.
GetScreenPos will do this for us. |
 |
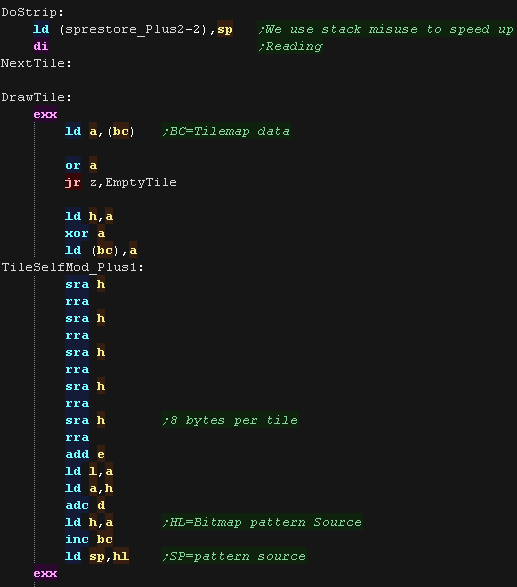
DoStrip will draw one horizontal strip of tiles. The job is
defined by the following registers:
HL = VRAM Dest
BC' = Tilemap
DE' = Pattern data
IYL = TileMap Width
We use stack Misuse to speed up data reading.
BC' will point to the tilemap, a zero tile is 'empty' ... either
unchanged in the tile cache, or a transparent part of the sprite.
Each tile pattern is 8 lines, so 8 bytes, and the pattern data is at
address DE'
The tiles in the cache are zeroed after drawing them to screen, but
if we're drawing a sprite, this is disabled via self modifying code. |
 |
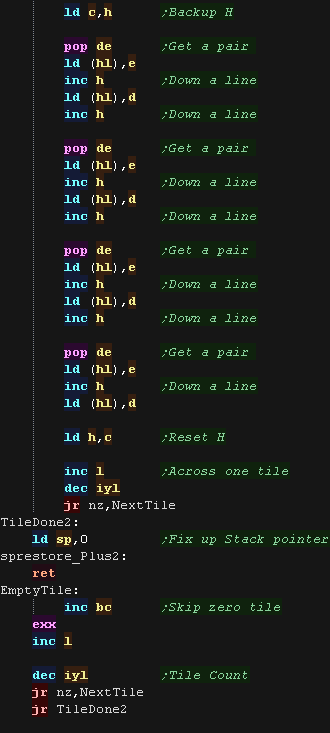
We use stack misuse to read the bitmap data via POP DE commands.
HL is the VRAM destination... We inc H after each line to move down,
and restore the HL from the backup in C
we repeat for the rest of the screen lines. |
 |
X-Flipped Tile Drawing Routine
The MinTile shared routine provides calculation and tilemap
planning, however we need to do the actual job of 'Drawing' in the
platform code.
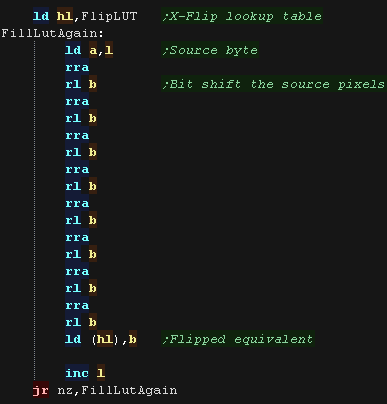
The code can horizontally flip tiles, on the Speccy we use a 256
byte lookup table, to 'pre-calculate the flipping of the 8 pixels in
a byte
if we load BC with the address FlipLUT, and set C to the byte we
want to flip, the byte read back from (BC) will be the equivalend
flipped byte! |
 |
| The LUT needs to be byte aligned, so &8100 or &FE00 would
be fine, but &FE01 would not! |
 |
DoStripRev has essentially the same function, however it
horizontally flips the pattern data via the lookup table.
We're using BC to point to our lookup table, to quickly flip the
byte data of the patterns
|
|
Note that
Mintile makes extensive use of the shadow registers HL' BC' and
DE' (but not AF')
This means you'll need to keep interrupts disabled (as the
firmware uses them!), or write your own interrupt handler....
We'll write our own interrupt handler later on when we add music
to this example.
|
|
MinTile is a
multiplatform 'engine' which allows us to define our game code in
a common way, and let the platform specific code handle the
platform specific work!... it was used to write 'ChibiFighter' on
the Z80.
For more details on Mintile, see the Mintile series here...
|
|
Screen Init
Our Tilemap code supports a background tilemap and simulated
sprites.
we can also scroll the screen.
Our example shows an onscreen tilemap and two software 'sprites'.
Mintile supports scrolling and X-Flip (but not Y-flip)
The 'sprites' are actually miniature tile maps, this is to reduce
the amount of platform specific code.
these are all created via the DoStrip platform specific routine,
which we'll look at here |
 |
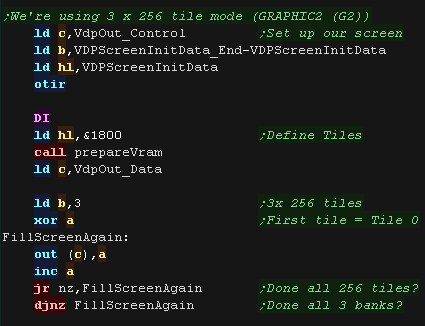
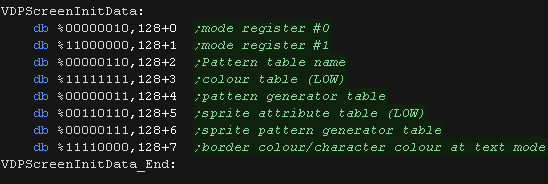
We're treating the tilemap as a bitmap screen.
We do this by defining the 3 thirds of the screen as using a
different 'set' of 256 tiles (Mode: GRAPHIC2 (G2) )
This allows every pixel to be unique |
 |
 |
The MSX1 VDP is
a bit on the slow side!... we have to add some NOPs to slow the
writes down
The MSX2 is faster, and doesn't need them!
|
Normal Tile Drawing Routine
With our screen setup, Bitmap screen memory starts from &0000,
but for sprite drawing we need to calculate the vram destination for
the sprite.
GetScreenPos will do this for us. |
 |
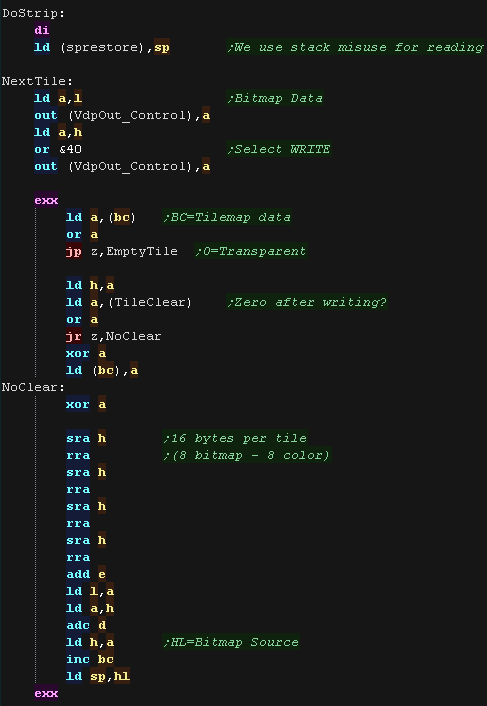
DoStrip will draw one horizontal strip of tiles. The job is
defined by the following registers:
HL = VRAM Dest
BC' = Tilemap
DE' = Pattern data
IYL = TileMap Width
We use stack Misuse to speed up data reading.
BC' will point to the tilemap, a zero tile is 'empty' ... either
unchanged in the tile cache, or a transparent part of the sprite.
Each tile pattern is 8 lines, for bitmap and color data, so 16
bytes, and the pattern data is at address DE'
The tiles in the cache are zeroed after drawing them to screen, but
if we're drawing a sprite, this is disabled via the 'TileClear'
flag -
Unlike some systems we don't use self modifying code, as we may be
running from ROM |
 |
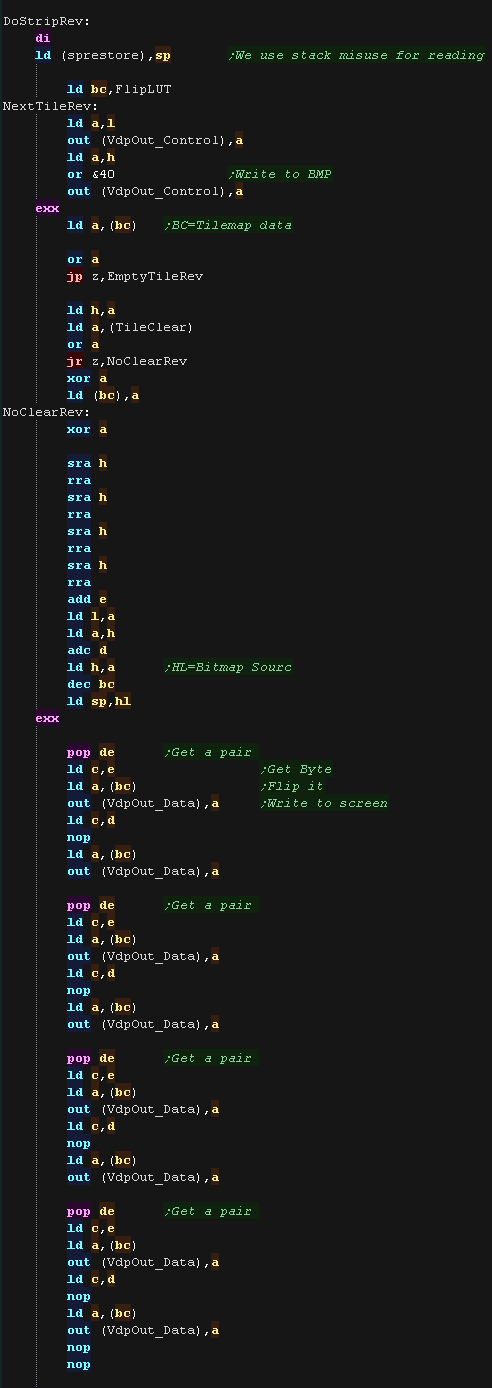
We use stack misuse to read the bitmap data via POP DE commands.
We read in the bytes, and OUT them to the screen.
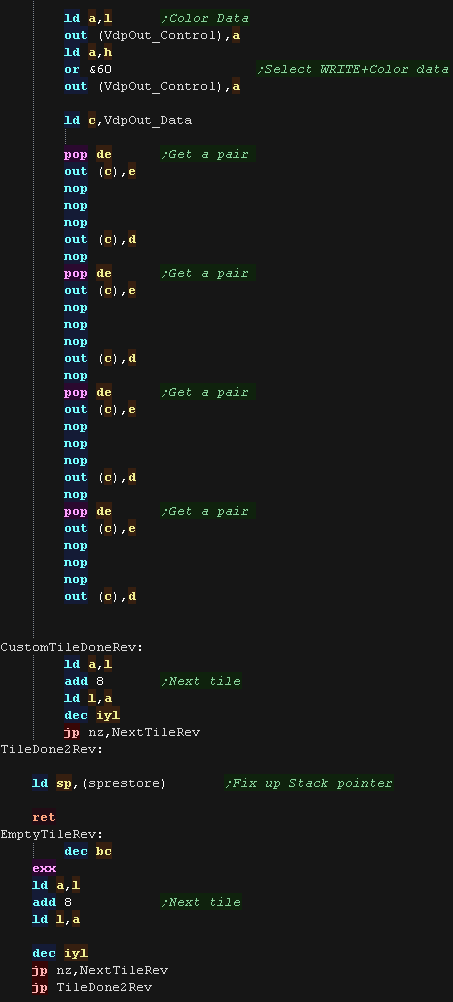
After we've done the 8 bytes bitmap data, we offset to &2000+
and output the 8 color bytes |
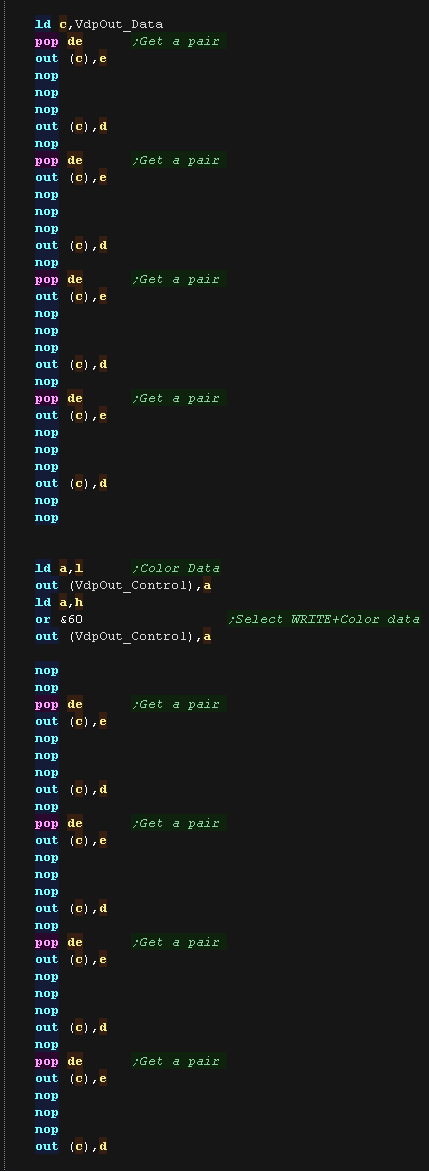 |
| After our tile is done, we move to the nect tile and repeat |
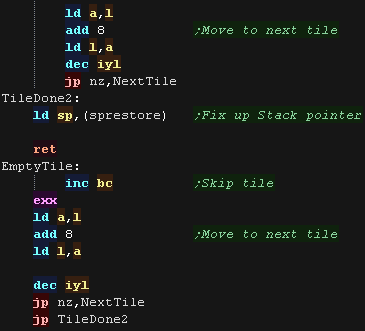 |
X-Flipped Tile Drawing Routine
The MinTile shared routine provides calculation and tilemap
planning, however we need to do the actual job of 'Drawing' in the
platform code.
The code can horizontally flip tiles, on the Speccy we use a 256
byte lookup table, to 'pre-calculate the flipping of the 8 pixels in
a byte
if we load BC with the address FlipLUT, and set C to the byte we
want to flip, the byte read back from (BC) will be the equivalend
flipped byte! |
|
| The LUT needs to be byte aligned, so &C100 or &CE00 would
be fine, but &CE01 would not! |
 |
DoStripRev has essentially the same function, however it
horizontally flips the pattern data via the lookup table.
We're using BC to point to our lookup table, to quickly flip the
byte data of the patterns
We don't need to X-flip the color data!
|
|
Note that
Mintile makes extensive use of the shadow registers HL' BC' and
DE' (but not AF')
This means you'll need to keep interrupts disabled (as the
firmware uses them!), or write your own interrupt handler....
We'll write our own interrupt handler later on when we add music
to this example.
|
|
MinTile is a
multiplatform 'engine' which allows us to define our game code in
a common way, and let the platform specific code handle the
platform specific work!... it was used to write 'ChibiFighter' on
the Z80.
For more details on Mintile, see the Mintile series here...
|
|
Tile Drawing Routines
Our example shows an onscreen tilemap and two software 'sprites'.
Mintile supports scrolling and X-Flip (but not Y-flip)
The 'sprites' are actually miniature tile maps, this is to reduce
the amount of platform specific code.
These are all created via the DoStrip platform specific routine,
which we'll look at here
The screen is configured to a 256x192 size, to maintain a compatible
screen size on all systems |
 |
The MinTile shared routine provides calculation and tilemap
planning, however we need to do the actual job of 'Drawing' in the
platform code.
The code can horizontally flip tiles, on the Enterprise we use a 256
byte lookup table, to 'pre-calculate the flipping of the 4 pixels in
a Mode 1 byte |
|
| The LUT needs to be byte aligned, so &8100 or &2E00 would
be fine, but &2E01 would not! |
|
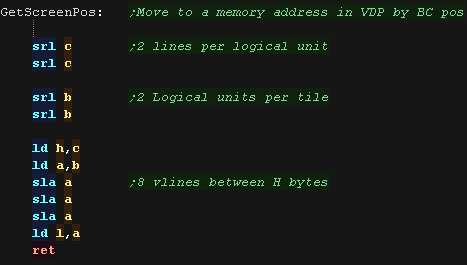
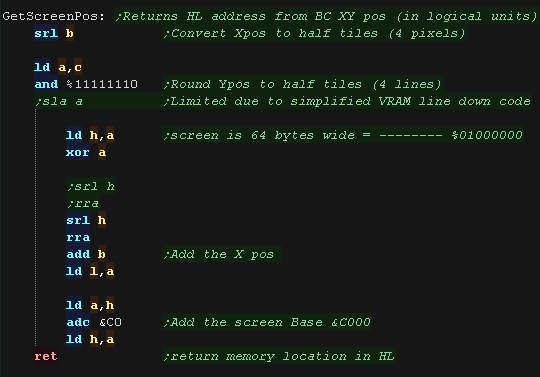
We have a 'GetScreenPos' function , which calculates the VRAM
destination for the sprite objects.
We only allow half tile movements (4 lines / pixels) , This is
because the X axis has 4 pixels per byte, and Y axis needs an update
of the H address byte every 4 lines.
By limiting to 4 lines, our code can be more optimized for speed.
|
 |
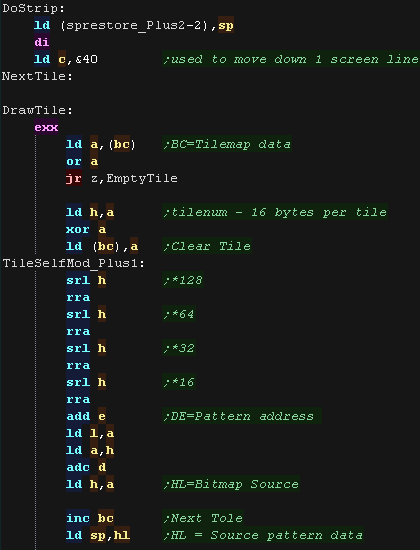
DoStrip will draw one horizontal strip of tiles.
The job is defined by the following registers
HL = VRAM Dest
BC' = Tilemap
DE' = Pattern data
IYL = TileMap Width
The tilemap will either be the TileCache (for the background) or a
mini tilemap (for sprites)
If using the tile cache we zero the tiles after they are drawn
We multiply the tile number by 16 to get the offset to the pattern
data.
we use stack misuse to speed up loading the pattern data |
 |
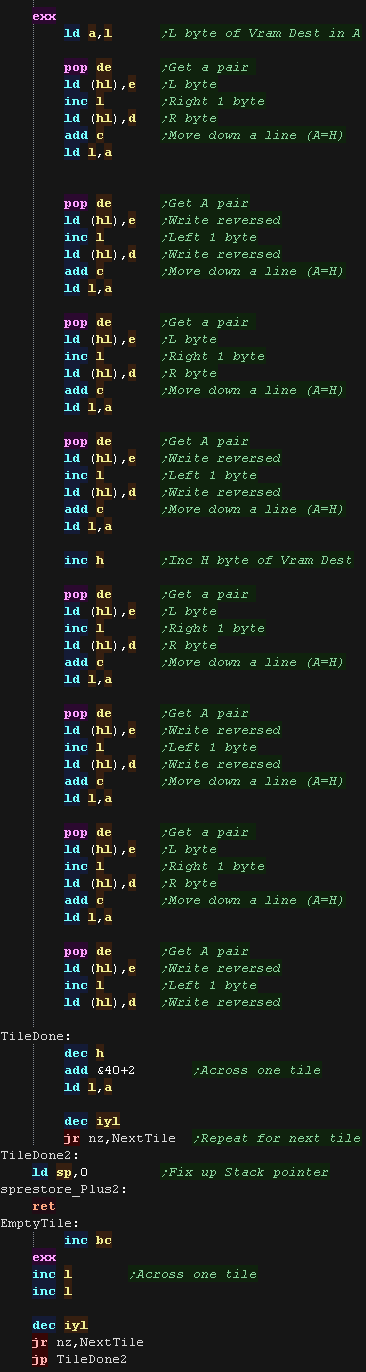
After each line, we add &40to the L part HL pair, to do this
quickly, we load &40 into C, and keep the L part in the
Accumulator...
This works for 4 lines, but on the 4th line we need to inc H too...
this is why we limited Y movement to half tiles (4 lines)
We can alternate whether we write the screen bytes left->right or
right->left, so that we don't need to 'step backwards' (dec
L) more than we must as we go down the screen
|
 |
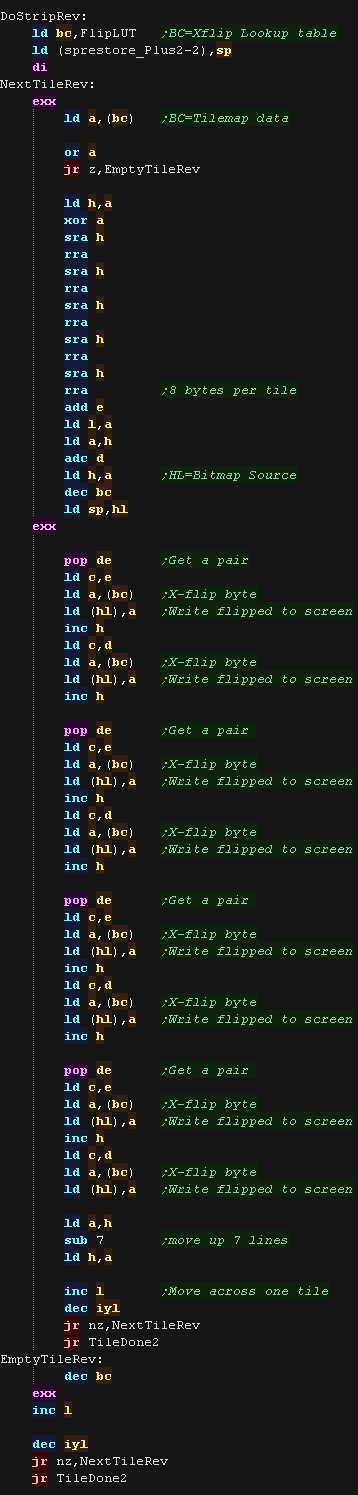
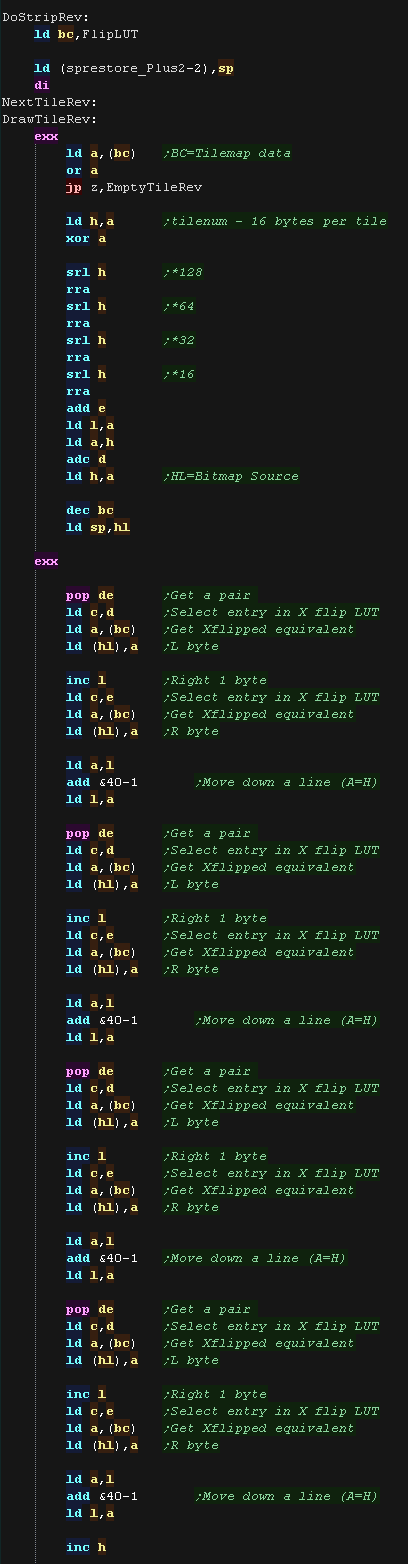
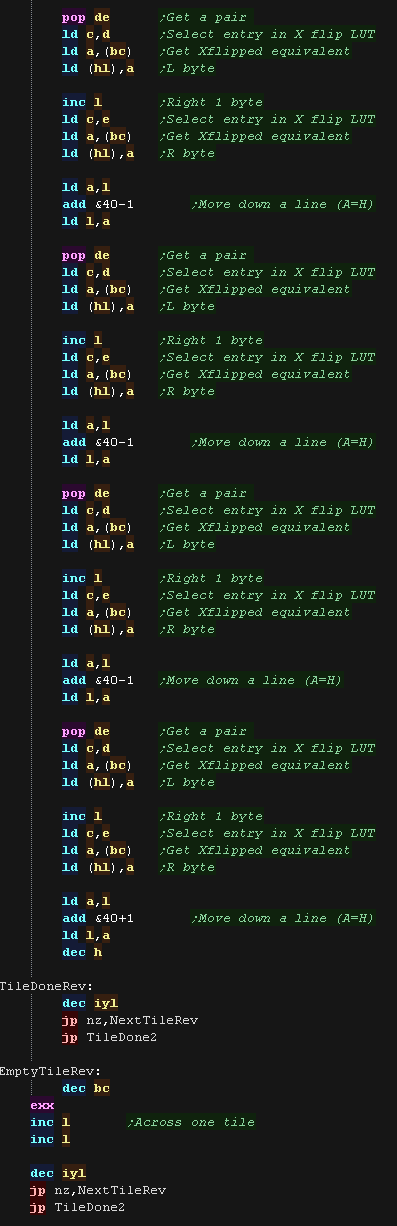
DoStripRev has essentially the same function, however
it horizontally flips the pattern data via the lookup table.
We're using BC to point to our lookup table, which means we don't
have enough registers free to do the same 'trick' with H and C as
before.
As we don't have A or C available This time we do a more
conventional 'ADD 40-1' to increase L
|
|
Note that
Mintile makes extensive use of the shadow registers HL' BC' and
DE' (but not AF')
This means you'll need to keep interrupts disabled (as the
firmware uses them!), or write your own interrupt handler....
We'll write our own interrupt handler later on when we add music
to this example.
|
|


