|
Photon does not use bitmap graphic,
all the graphics are drawn at the pixel level... to port to a
new system you just need a PSET function to set a pixel and a
POINT function to read a pixel back...
All other graphics are drawn using
a LINE function, which uses the PSET function - PHOTON is
essentially a simple game, a tutorial on LINE and VECTOR image
drawing (With Scaling) AND a tutorial in Pixel plotting on each
system.
photon uses VECTREX packet format
for it's title graphics (Yes it uses the same format as the old
home console!), and a slightly tweaked Cpacket format (2 bytes
per line rather than 3) I designed to save space for it's font
and other bits... Akusprite Editor now has crude export
functions for these formats!
Photon is available on the CPC, Spectrum, MSX1, MSX2, Sam Coupe, Elan Enterprise, Master System, Game Gear... and now it's being ported to the 6502 and 68000 systems! |
 |
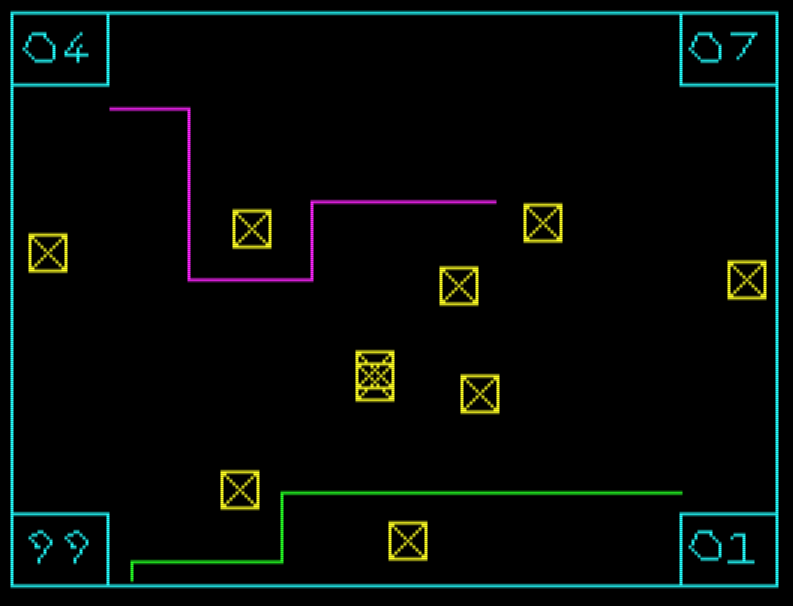
| Photon is a one player (Vs CPU) Light Cycle game - you have to
stay alive longer than your opponent to win a level. Death occurs when you hit a wall or light trail. Each win progresses the level (Shown bottom right), and increases CPU difficulty (Shown top right), and adds objects to the screen. The player has a 'boost' power (count in bottom left) to accelerate... you have four lives per game (shown top left) Photon's CPU AI is hardly amazing - the game is really a 'tech demo' for pixel plotting and multiplatform vector drawing. |
 |
| The drawing engine has it's own vector font, and is capable of
scaling all vector objects (only powers of 2... eg 1/4x 1/2x 1x 2x
4x) This allows the same title screen data to be drawn smaller on the gamegear... and fonts to be shown at different sizes |
 |
| Photon supports many different 8 bit systems - porting it to a new system really just consists of substituting the PSET and POINT routines |  |
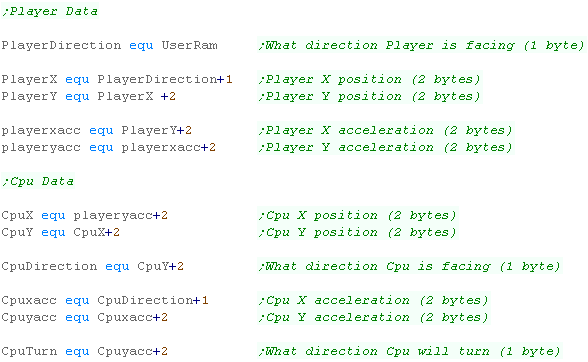
| The Player and CPU have various parameters for their position Direction is the current direction of movement - the game is controlled with Left and Right to turn - this is the current direction. X and Y are the current position in pixels (2 byte word) Xacc and Yacc are the current 'acceleration' - these are added/subtracted from the position each tick. CpuTurn is used by the AI to decide which direction the CPU will turn next time. |
 |
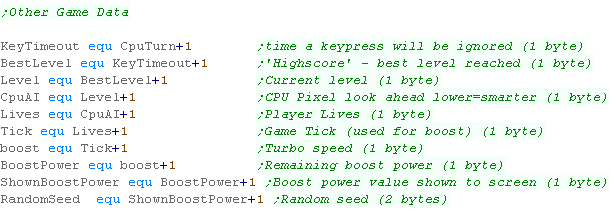
| The Game Engine needs some settings for the Level logic. KeyTimeout is for 'ignoring' player keys after a press BestLevel is the highest level the player has got to - effectively a highscore. Level is the current level (duh!) CpuAI is the CPU intelligence... lower means tighter corner turning making the CPU harder to trap. Lives is player lives Tick is used to handle player boost - normal speed is an update every other tick... boost is an update every tick Boost is used to mark player boost as enabled (Cpu doesn't use boost) BoostPower is the remaining 'Boost' - 99 units per level ShownBoostPower is the visible boost - used when redrawing the boost in the bottom left corner RandomSeed is the random seed for random number generation |
 |
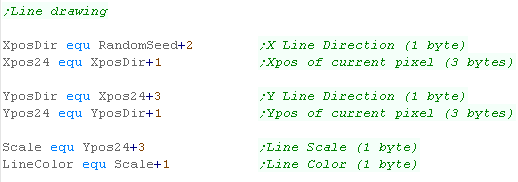
| The Line and vector routines need some bytes of data XposDir and YposDir define if the movement are Up/Left or Down/Right Xpos24 and Ypos24 are the current pixel position (24 bit) Scale is the scaling factor... 1 2 4 = 1x 2x 4x ... -1 -2 -4 = 1/2 1/4 1/8 LineColor is the line color (obviously!) |
 |
 |
Note:
All these addresses are relative to the base address
'UserRam'... this is so the RAM data can be located where ever
free ram exists on the target platform. So the game can work on ROM machines, this is the only writable data, The is no self modifying code or altered data within the other areas of code. |
| Directions defines the 4 directions in the form of 2 words... these can be added to the position to affect a move | 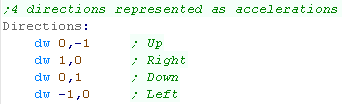 |
| Next we have some Random Number Lookup tables | 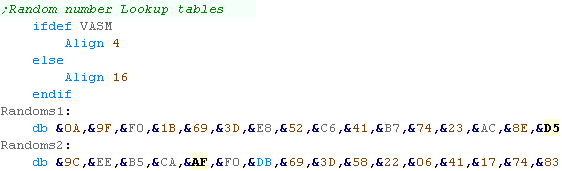 |
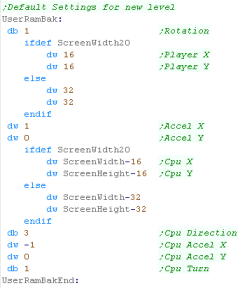
| We need to reset the player and Cpu location and settings each
level... we have the defaults here. |
 |
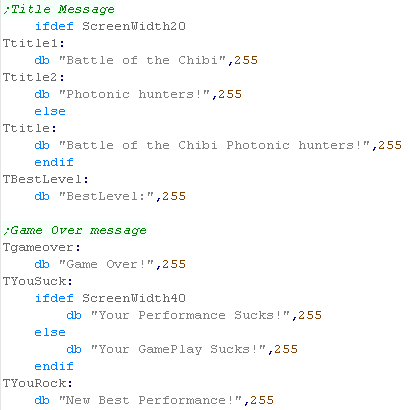
| Next we have the text messages used in the
game. |
 |
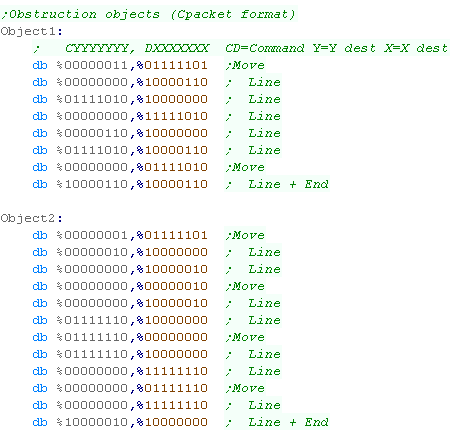
| Finally we have the Obstruction objects...
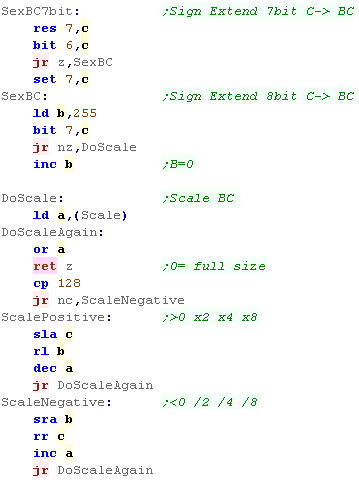
These are put in random places in the level to get in the way! These are in 'Cpacket format' (Compressed Vectrex Packet)... a format I made based on the 'Packet' format used by the Vectrex console. It uses a 7 bit X movement, a 7 bit Y movement, and a 2 bit Command There are 2 possible command - 1.Move drawing cursor to position (Byte 2 bit 7 = 0) 2. Draw from drawing cursor to position (Byte 2 bit 7 = 1) A Byte 2 bit 7 = 1 is the end of the list. |
 |
| All graphics in PHOTON are vectors! The screen here is made up of PACKET (3 byte per line) and CPACKET (2 bytes per line) The 'Battle of the Chibi Photonic Hunters' and 'BestLevel' text are drawn with a 'Cpacket Font' via PrintChar function These all rely on a multiplatform LINE function, which is based on a platform specific PSET function (pixel set) |
|
 |
We need to
draw lines on screens up to 320x200 pixels in size, so we need
16 bit for co-ordinates, but we need to be able to work in 'half
pixels' for smooth drawing. To solve this we use 24 bits for drawing. |
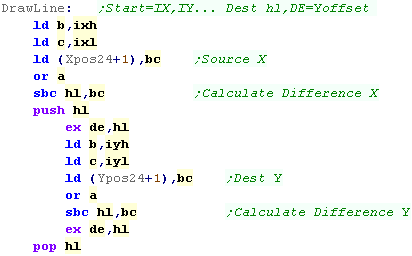
| For our line drawing we use 24 bit numbers - the low byte is not
drawn - it's for fractional movement - the top two bytes are
effectively visible pixels. We also have 2 direction bytes, for whether the 'Move' is to be added or subtracted. Note: This routine is limited to a line length of 255 |
|
| We have 2 Drawing modes... Relative (From last postition) and
Full (Start XY and Dest XY)... If we're using Normal mode we need to set the start position, and calculate the relative offset (by subtraction) |
 |
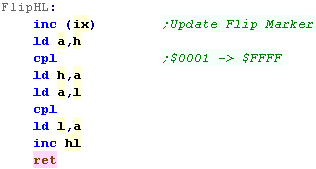
| If the line length is zero, we increase our destination to draw at least 1 pixel | 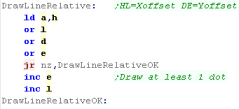 |
| Next we're going to convert the X and Y movement - we'll change
a negative value into a positive one... When the value was negative, we set the XPosDir/YposDir to 1 |
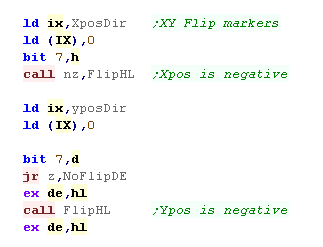  |
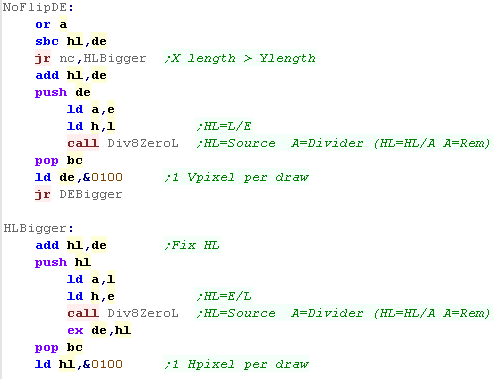
| We're going to convert our units... lets suppose we need to move
from (0,0)-(200,100) We're going to need to move 0.5 Y units for each 1 X unit... to calculate this, we're going to work out whether the X or Y movement is greater, and divide the smaller movement by the larger... we then set the larger axis movement to 1. |
 |
| We need to prepare our parameters... we load IY and IX with the move sizes, and swap B and C - so we can use DJNZ for the more common move. | 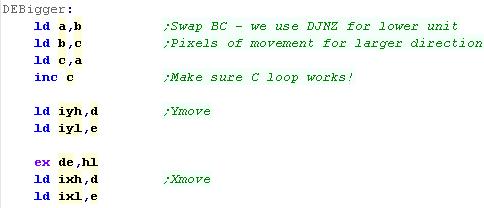 |
| Time for the main loop! We need to draw the next pixel of the line using PSET. |
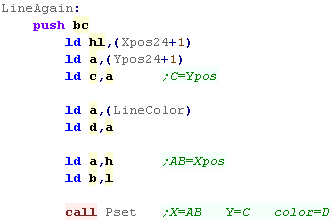 |
| Once we've drawn the pixel we need to move to the next dot of
the line. We use Add24 - a 24 bit add routine, that uses the Directions to decide whether to Add to or Subtract from an axis |
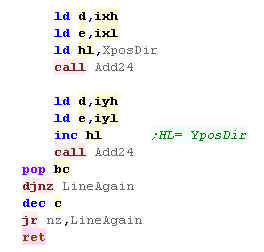 |
| ADD24 works with a 4 byte parameter at (HL) - it adds or
subtracts DE from that address at 24 bit resolution (&UUHHLL) (HL+0) is the Direction - 0= Add 1= Subtract (HL+1) is the Low byte (&----LL) (HL+2) is the High byte (&--HH--) (HL+2) is the Upper byte (&UU----) |
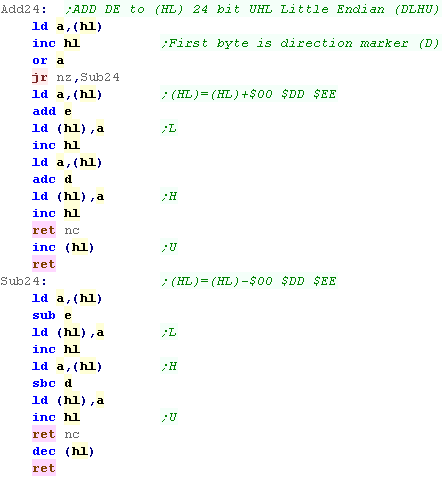 |
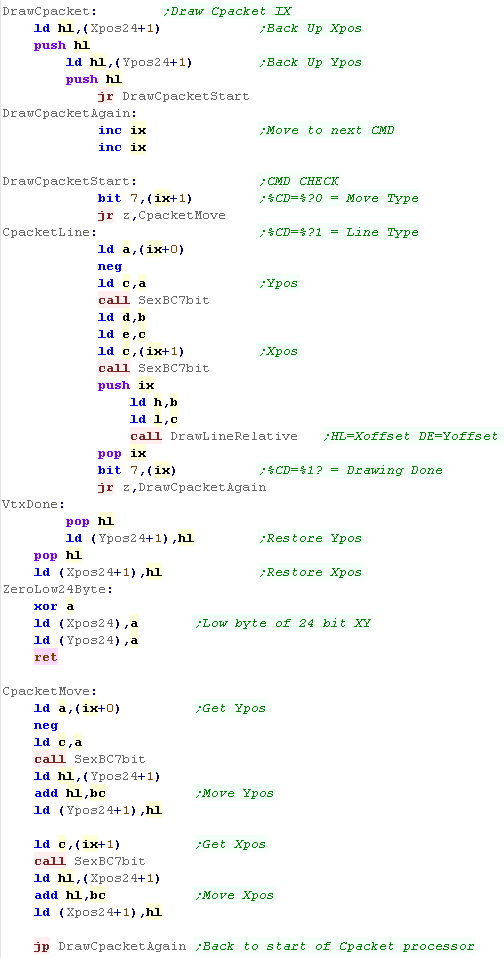
| Photon uses Vectrex 'Packet'
format for many parts of it's title screen... this format uses 3
bytes per vector This draws the Packet at address HL The first is a command byte ($00=Move to pos, $FF=Draw to pos, $01=End of list)... the 2nd and 3rd are a Y and X pos We branch depending on the command, then read in two bytes for the Y,X pos These are sign extended to 16 bits with SexBC. If we're drawing a line , we use the previous DrawLineRelative to do the job. If we're just moving, then we add the move to the X and Y to the pen position. |
 |
| SexBC will Sign extend an 7/8 Bit value in C to 16 bits... There's also a 'Scale' option, which offers resizing... 0=Normal Size 1=Double Size... 2=Quad Size... etc. -1=Half Size... -2= Quarter size... etc. |
 |
| Here is a sample PACKET image | 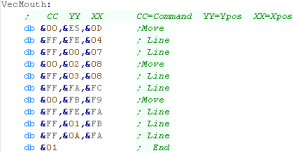 |
 |
Packet format gives great vector graphics,
but at 3 bytes per line, it uses a lot of ram! The author of Photon created a 'reduced' format called 'CPacket', which uses 2 bytes per line it uses 7 bit for the co-ordinates, and the remaining two bits for the commands. |
| We check the top bit of the 2nd byte... If it's 0 then this is a MOVE, if it's 1 then this is a LINE. There are only 7 bits per co-ordinate, so we use SexBC7Bit to sign extend. We check the top bit of the 1st byte... If it's 0 then there are more lines to draw , if it's 1 then we've finished. |
 |
| Here is a sample CPACKET image | 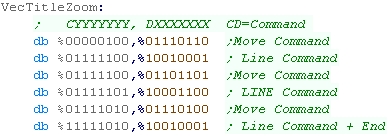 |
| the PrintChar routine will read the address of the characters
CPacket from a lookup table, and draw the Cpacket. It protects all the registers, so it can be used with other functions easily |
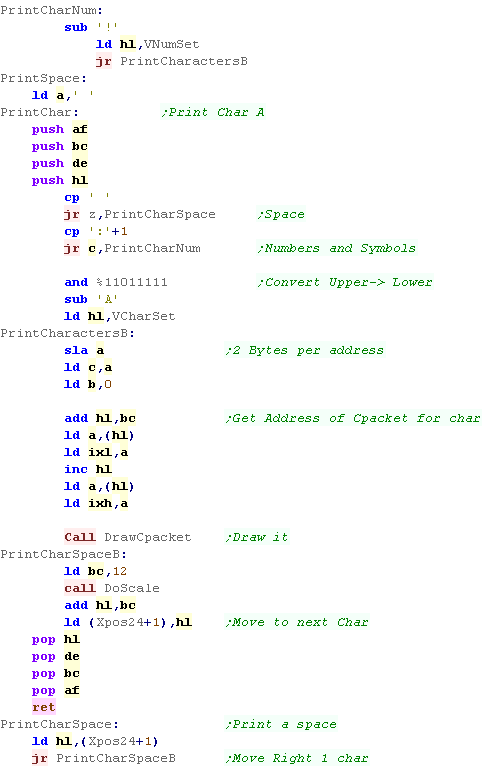 |
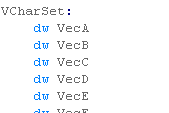
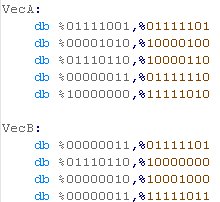
| The Font consists of lookup tables and Cpacket letters... To save space, not all characters are not represented, however they could be added if required. The Lookup tables are required as characters are different lengths. |
  |
| We're using the exact same random number generator as Yquest
did. It uses bit shifts with XORS, and two lookup tables to produce 16 bit random numbers from a 16 bit random seed. It produces 'repeatable' psuedo random numbers - you will get the same result from the same random number. |
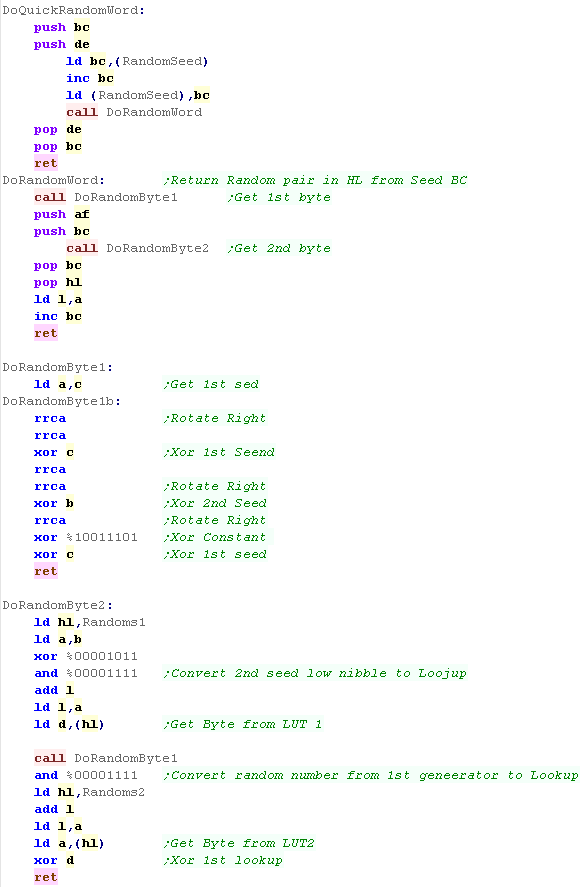 |
| Sometimes we just need a random byte, in these cases, we convert the random Word to a byte | 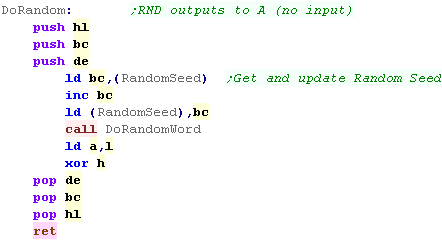 |
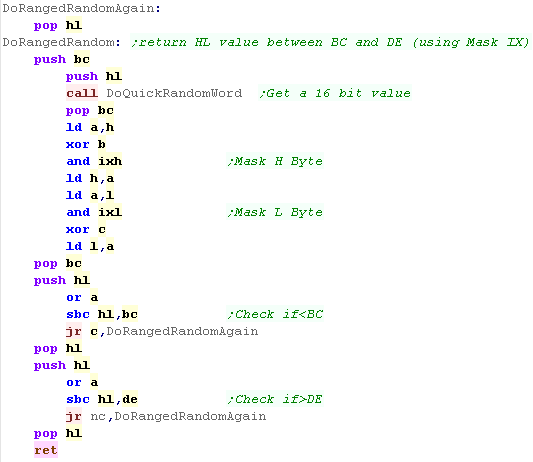
Our random number generator gives values from 0-65535, but usually we need more limited ranges... DoRangedRandom will return a value in HL between BC and DE This function uses IX as a mask to speed things up, eg a mask of $1FF will guarantee a value <$200 |
 |
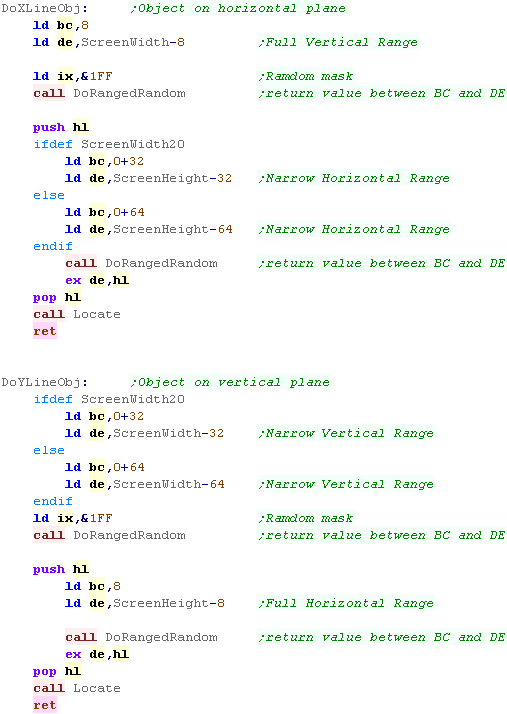
| We'll often need to generate
locations for objects, to do this we'll define 3 functions DoXLineObj will generate a position for a Horizontal Object DoYLineObj will generate a position for a Vertical Object |
 |
| The Main menu routine resets the game settings for a new level. | 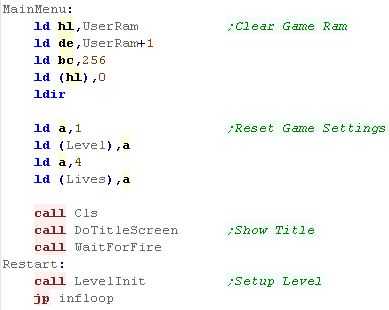 |
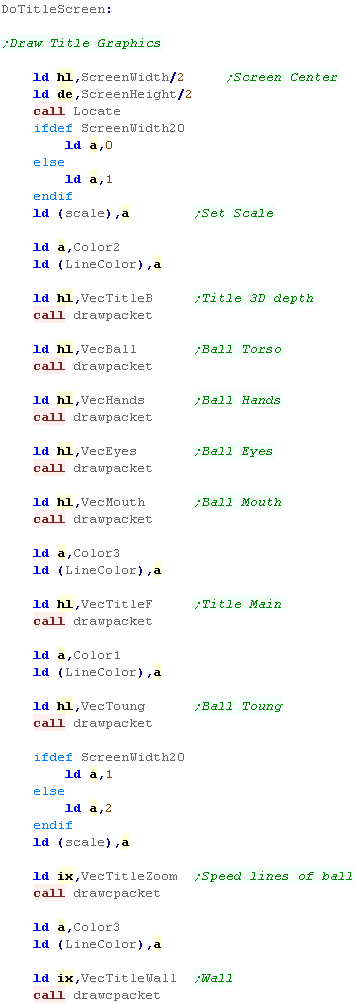
| The Titlescreen is made up of a set of Packets, some are PACKET
data (for high resolution) and some are CPACKET (for simple data) The title screen is split into sections - partially for simplicity (to allow for the graphic to be designed in sections) - and partially because bits of the graphics are split into different colors and scales |
 |
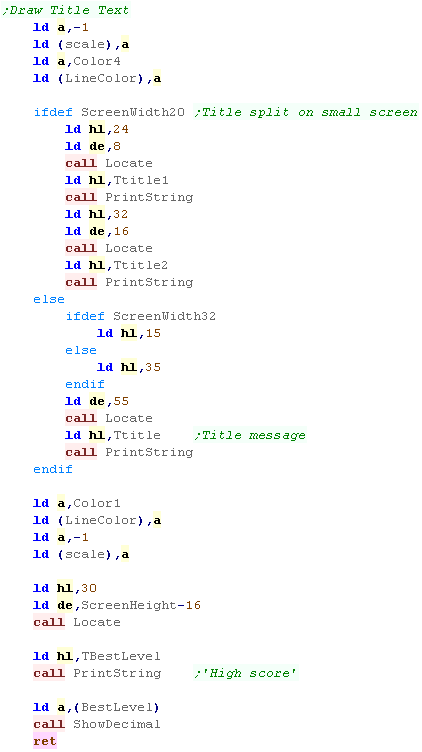
| Next we draw the text The title has to be split into two lines on some smaller systems. We also show the 'Best Level' (the highest difficulty won by the player) |
 |
| The
main reason that the title screen is split into multiple packets
is AkuSprite editor is really bad at drawing vectors! It's only a bitmap editor really, but it has a 'very crude' vector routine... very VERY crude! |
|
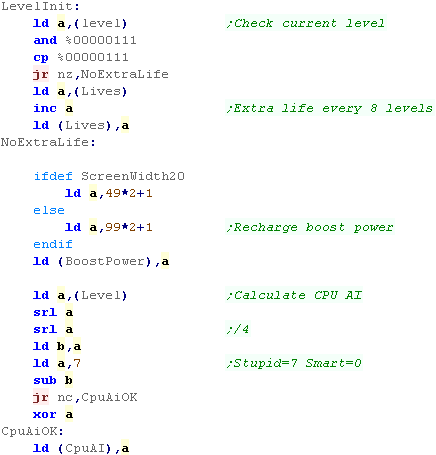
| When a new levels starts, we first check if the player
deserves an extra life - they get one every 8 levels. next we restore the 'boost power' - the player has a certain amount of time they can move fast to catch up with the CPU - this is set once per level. now we work out the cpu AI - this is how tight the reactions of the CPU are - 7 is a stupid CPU that responds to objects 7 pixels away - 0 is a very smart CPU, which will turn right next to the walls. |
 |
| Next we reset the player positions and other settings from a backup copy via LDIR | 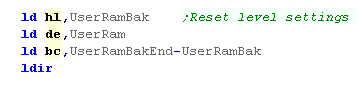 |
| We're going to draw some obstacles to the screen. The first 10 pairs will be simple squares, the rest will be hollow complex objects. We do these in pairs - one is in the vertical center, the other is in the horizontal center - this is so the 4 corners are empty (where the player appears) The objects are Cpackets. |
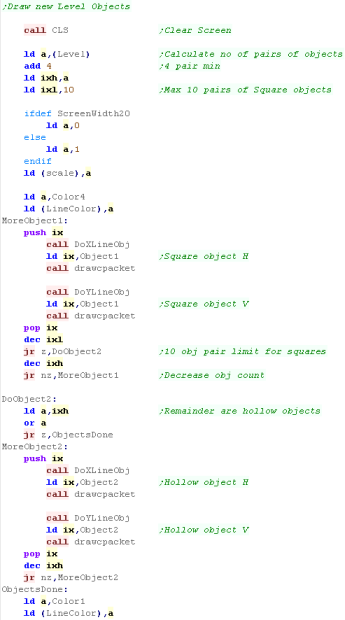 |
| Now we draw the borders of the screen | 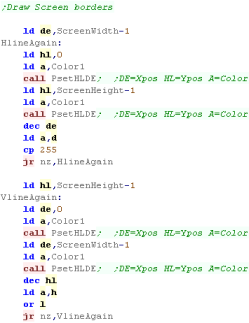 |
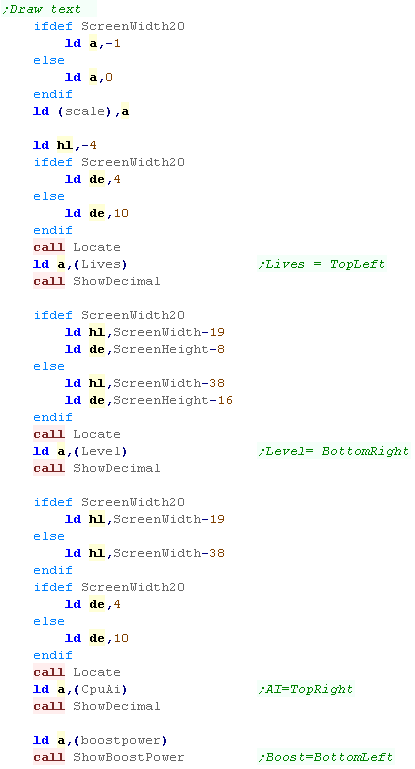
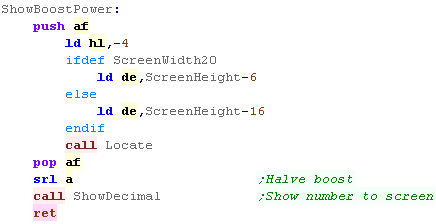
| We draw the level stats in the corners of the screen... Boost power needs to be redrawn during the level, so this is a separate subroutine |
  |
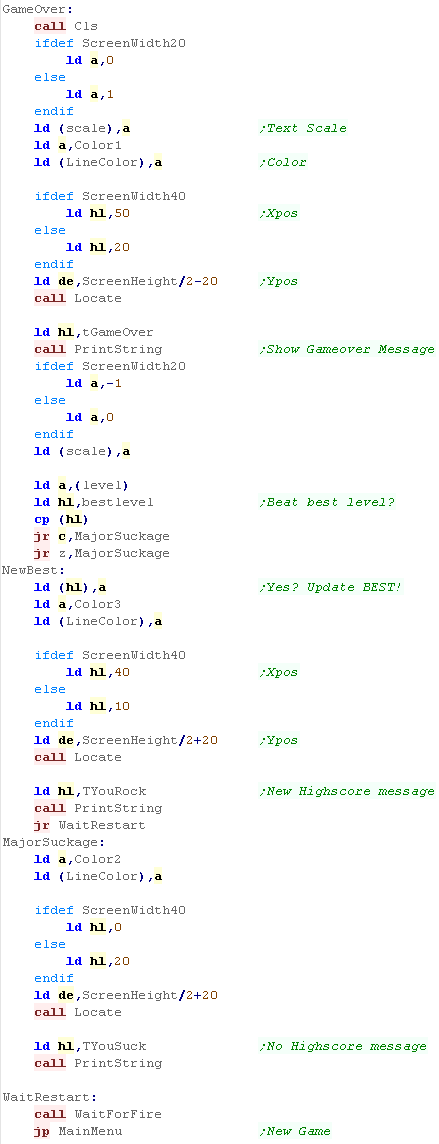
| When the player runs out of lives, we show a 'Game over'
message The game doesn't have a 'high score' - but it does record the 'best level' the player has reached. This is checked here, and updated as required. A suitable 'well done' message is shown if the player got a new best level A suitable (?) 'do better' message is shown if the player did not! |
 |
|
All Text and Vector packet drawing uses
the Scale, Color and XY pos (Set by locate). It's a bit of a pain, but it does allow us to 'scale' the graphics for systems like the GameGear with a teeny screeny! |
Player Movement
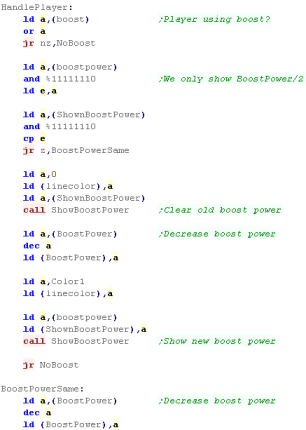
| First we'll look at the Human player. The first thing we do with the human is deal with 'Boost Power' - this is where the player can press fire to speed up movement. The remaining boost power is show to screen but this is HALF the actual data value... for example if boost power is actually 100 then 50 will be shown to screen. We remove the opld boost power from the screen by drawing the old value in the background color... we then draw the proper new boost power. |
 |
| We need to move the player every tick if boosting... or every
other tick if not. To move the player we add the players acceleration to the player position. |
 |
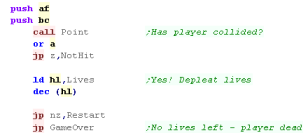
| If the player has moved we need to check the new position and see
if there's already something there via the 'POINT' function - if
there IS (nonzero) then we've died. We reduce the lives and restart the level, but if the player has no lives left, then they are dead and we reduce their lives. |
 |
| if the new position is OK then we PSET the new pixel position of the player. | 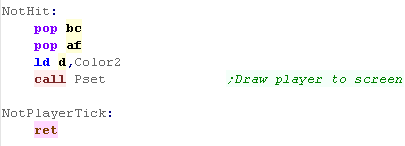 |
| Keypress handling is performed during the platform specific code,
however we update the player acceleration with a multiplatform
function. We pass this the address of the player direction in HL - and this copies the new XY acceleration for the player from the 4 template directions - each contains a WORD for the X and Y position - so 4 bytes per direction We use LDIR to copy these bytes to the current players definition (passed in IX) |
 |
CPU movement
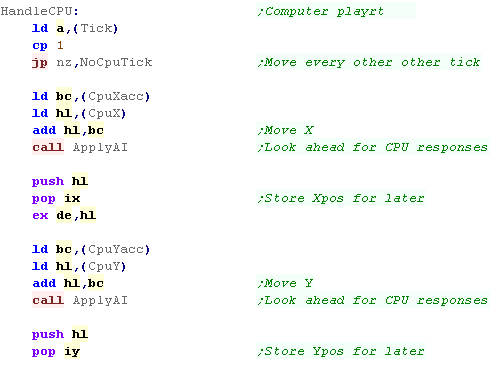
| Like the player - the CPU moves only every other tick (the CPU
doesn't use boost power) We load in the CPU position and acceleration and move forward 1 unit... We then need to deal with the CPU 'AI'... the CPU will look a number of pixels ahead and respond to what's there - the further away it looks the easier it is to trap, so a look ahead of 7 would mean it would crash into the player if they are 5 pixels away Apply AI repeatedly adds the acceleration to effect this look ahead. |
 |
| We now check the point the CPU is looking at - if it's zero there's no need to turn. | 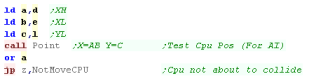 |
| Generally the CPU will turn in the same direction as last time, but there's a random chance it will change its mind. | 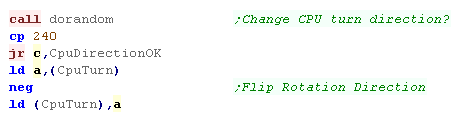 |
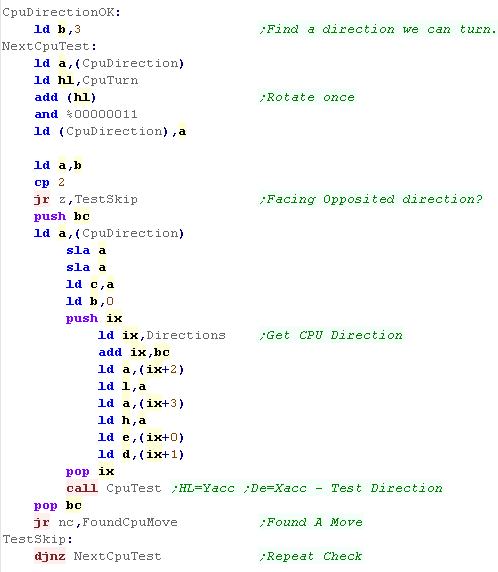
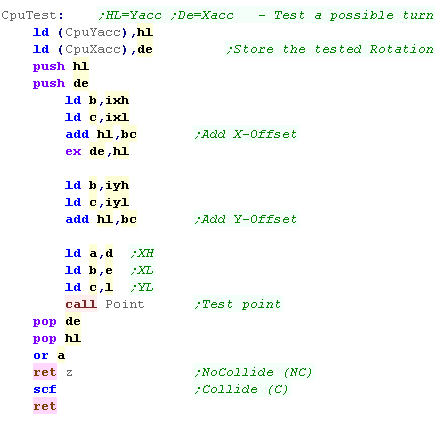
| We need to test the possible turns - we can't turn 180 or we'll
hit our own trail, but we test the other directions. we use 'CpuTest' to try out the move - we'll see this function in a moment |
 |
| Once we have an actual direction for the CPU move, we update the
CPU position. We then check if the CPU has hit anything with POINT - if it has, then the player has ascended to the next level. if not then we plot the new position of the CPU |
 |
| The ApplyAI function is effectively a multiplication setting
HL=HL+BC*A We set A to the AI - HL to the CPU position and BC to the acceleration. |
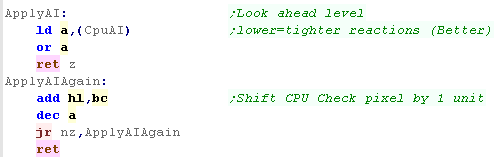 |
| CPU Test will apply a 'test direction' to the current CPU position
and see if this will cause the CPU to collide with anything. It will return Carry if a collision occurred |
 |
 |
The CPU AI is
as dumb as a bag of rocks - but it's enough to make a playable
game. If you want a CPU to match your 1337 gaming skillz go ahead and make one! |
| Much of the code of
Photon is the same as the code in Yquest and the Simple series...
we're not going to cover things like setting up the screen or
reading the Joypad... We've covered it so many times before it's getting boring! |
 |
Data Definitions & Starting the game
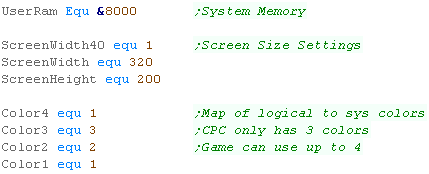
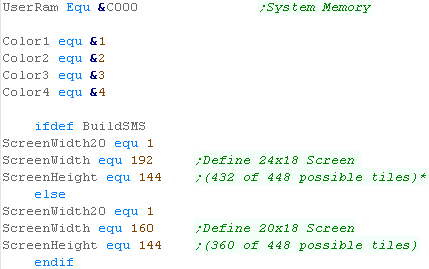
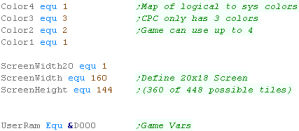
| Each system needs some platform specific settings. The first is an address of RAM for system vars - the game needs less than 256 bytes - this is the entirety of the RAM needed - the rest of the game can run from ROM We define some screen size vars - these set the scale for objects and font., and the boundaries of the screen for drawing the level. We also define some 'colors' ... the game uses up to 5 colors (Background 0 and 4 more) BUT some systems have fewer... on the CPC we have only 0-3... so we use color 1 for Colors 1+4 |
 |
| When the game starts we clear the game ram... We then show the Main menu. | 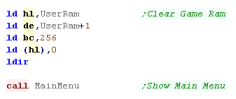 |
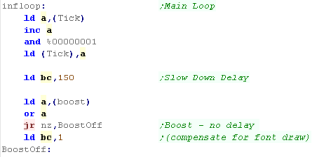
Main Game Loop
| At the start of the loop, we update the 'Tick' The Tick is 1 or 0 - this is used by the multiplatform code for boost (during which player moves at 2x speed) If Boost is ON we lower the delay - we need to speed the game up because redrawing the 'Boost counter' is too slow. |
 |
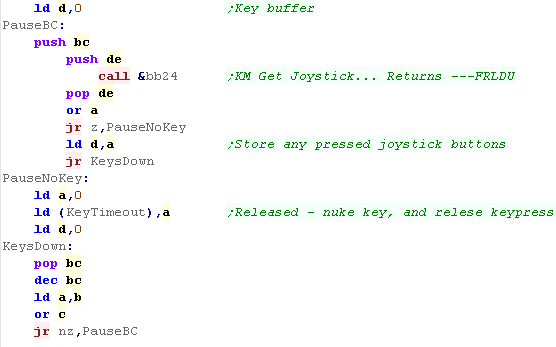
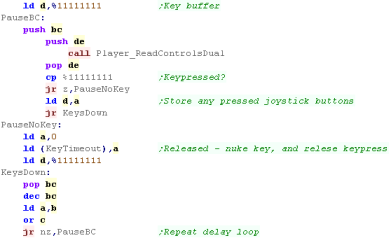
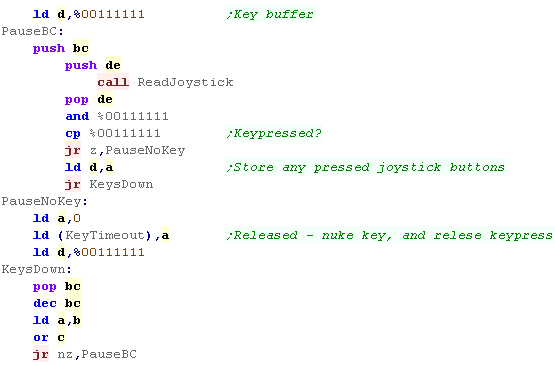
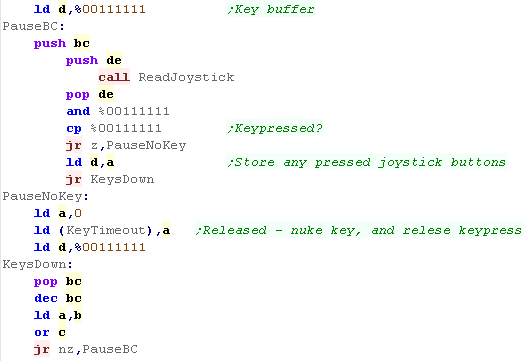
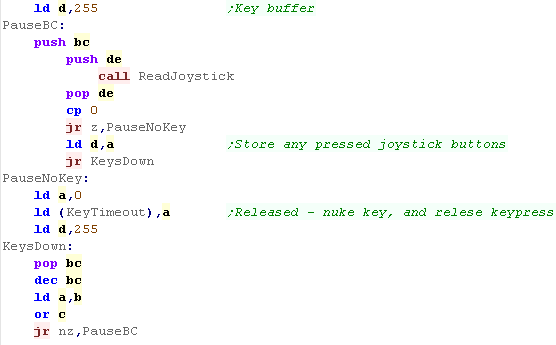
| During the pause loop we check the keypreses... if a key is not
held down we release the keytimeout The timeout means if we hold left we don't keep rotating around... we have to press left multiple times We store any keypresses in D - and wait until BC reaches Zero |
 |
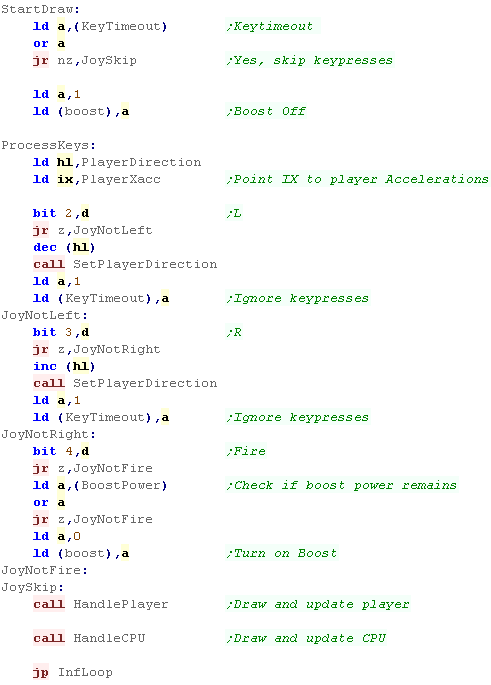
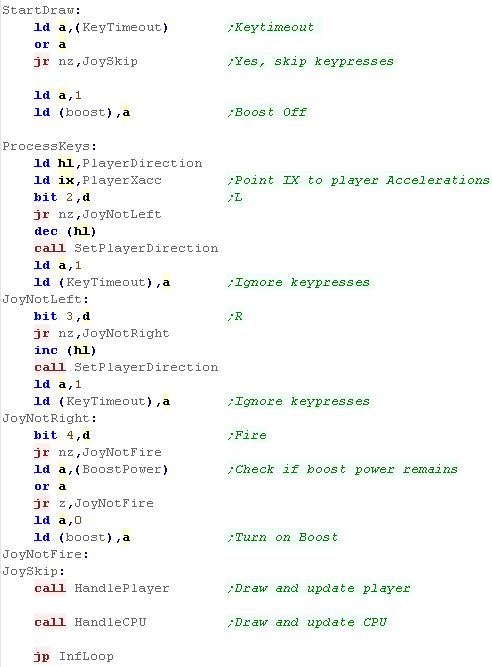
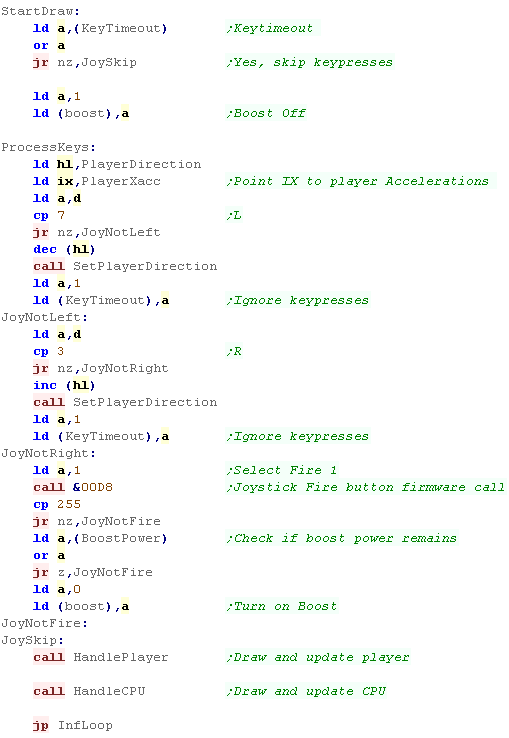
| If the Keytimeout is not cleared we will ignore Left / Right
keypresses. First we turn off Boost (it will be turned back on if FIRE is held) When we process Left or Right we INC/DEC the 'Player Direction' then run the SetPlayerDirection routine which handles the rest of setting the movement for the player. If Fire is pressed then we check if any 'Boost power' is left.. If there is, then we turn boost power on. Once the keypresses are handled, we update the player with 'Handle Player' Then we update the CPU with 'Handle CPU' That's it... We jump back to the start of the loop for the next tick. |
 |
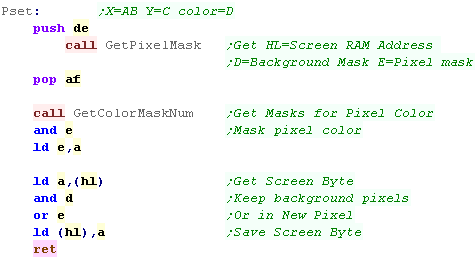
PSET - Plot Pixel / POINT - Read pixel color
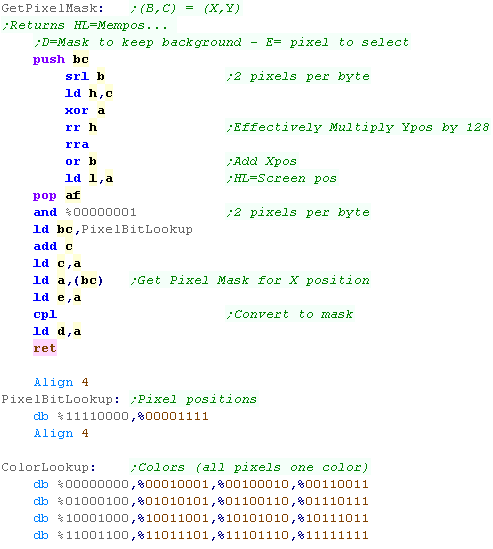
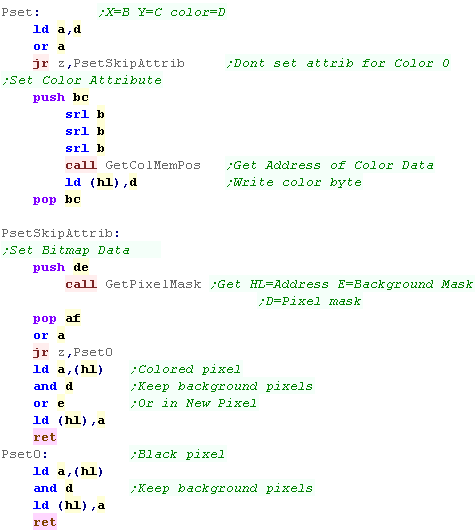
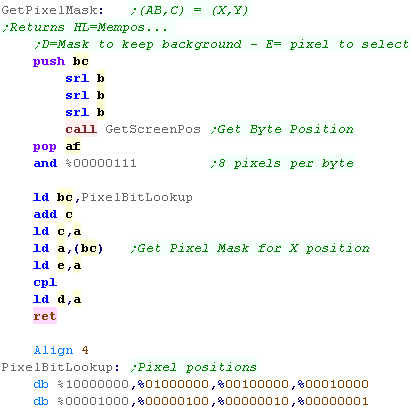
| The PSET command will set a pixel of the screen... The 16 bit X co-ordinate is defined by registers A B (A= High byte B= Low byte)... this is so we can support a 320 pixel wide screen The 8 Bit Y co ordinate is defined by C... only 8 bits, as our maximum screen is 200 pixels tall D is the new color for the pixel (0-3) GetPixelMask will calculate the screen byte we want to change (in HL)... the mask to keep the screen pixels we don't want to change will be in D... the mask for the pixel we want to change is E We next need to work out the bytes for the pixel color... we use GetColorMaskNum ANDing the result with E - this gives us the new value for the one pixel Finally we get the current screen byte... AND it with D - removing any pixel data for the pixel we want to change... then OR in the new pixel color from E |
 |
| Groups of 4 pixels are held in a single byte - in Mode 1 the top
and bottom nibbles are effectively 'bitplanes' where one bit of each
make up the color number. depending on which of the 4 pixels in the byte we want to change, we'll return E as a mask for the pixel we want to change... and D as a mask we can AND with the background to clear the pixel we want to change. We first get the screen address with GetScreenPos to calculate the VRAM address of the byte containing the pixel.... Next we read the pixel mask for E from a lookup table... and flip the bits with CPL to get the background mask. |
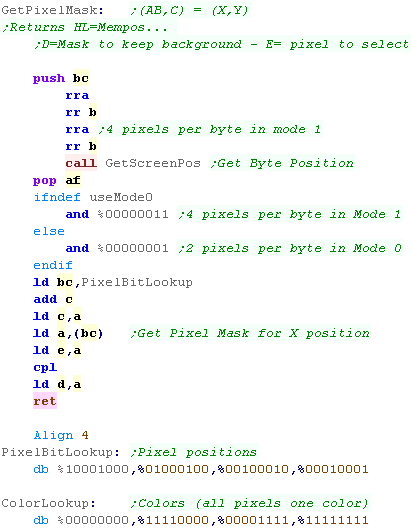 |
| GetColorMask number will get a byte where all 4 pixels are the
selected color in A We AND this with E from Get Pixel Mask to get the bits for the pixel we want, in the color we want. |
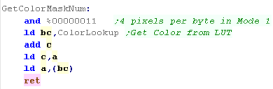 |
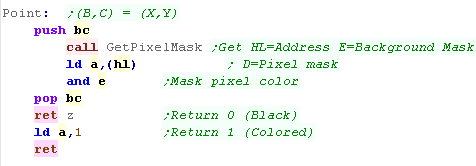
| POINT works in reverse to PSET... returning the color in A for
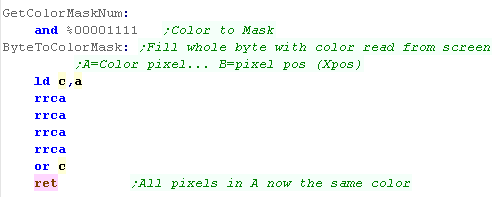
pixel AB,C Once again, we get the pixel mask, and read in the screen byte, ANDing it with E to get one pixel. We're going to convert this to a byte where all the pixels are the same color (so we can search for it in the Color Lookup) with Byte to Color Mask |
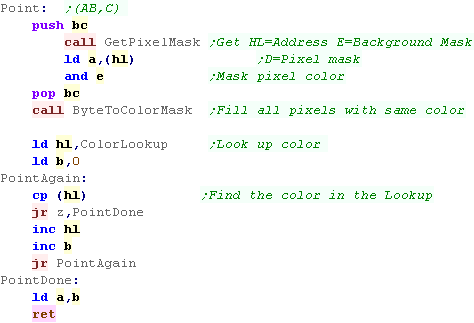 |
| Byte to color mask will take a single colored pixel, and fill all
the pixels in that byte with the same color. This is done by bit shifts and ORS to copy 1 pixel to all 4 |
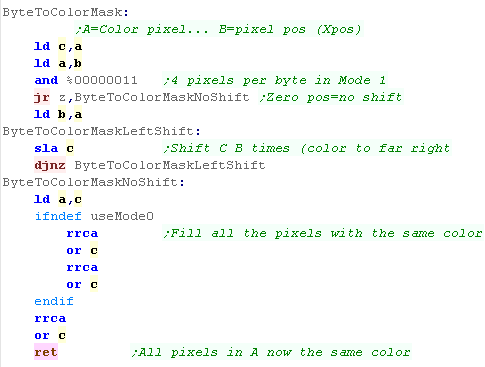 |
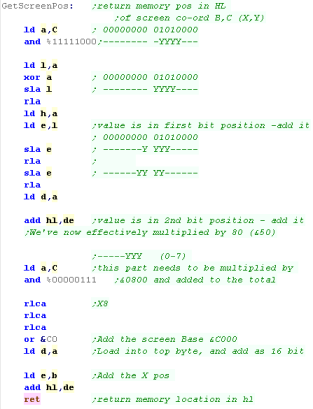
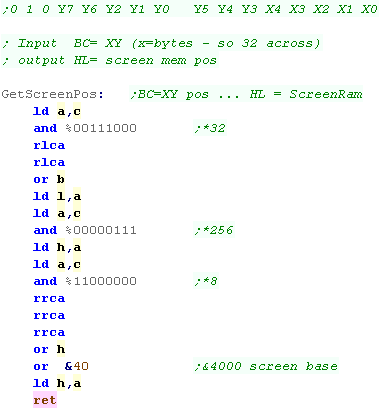
| The GetScreenPos routine is the same as Yquest - this version
returns in HL, not DE When We want to calculate a destination screen address we need to deal with the weirdness of the CPC screen layout! The Screen Base is at &C000, but unfortunately the formula to calculate the lines is complex, we have to split up the bits of the line number up, and multiply them accordingly YYYYYYYY Y line number (0-200) -----YYY (0-7) - this part needs to be multiplied by &0800 and added to the total YYYYY--- (0-31) - This part needs to be multiplied by 80 (&50) The screen position required is passed in BC and an address is returned in HL |
 |
|
The POINT routine here is excessive - as
PHOTON doesn't care what color a pixel is, just if it's black or
not. ALSO, it would be quicker to calculate the color number via bitshifts, rather than filling a byte and looking it up... but POINT is hardly used in this game, so speed isn't a problem, and the example here is easily ported to other systems, or converted for CPC Mode 0 |
| Much of the code of
Photon is the same as the code in Yquest and the Simple series...
we're not going to cover things like setting up the screen or
reading the Joypad... We've covered it so many times before it's getting boring! |
|
Data Definitions & Starting the game
| Each system needs some platform specific settings. The first is an address of RAM for system vars - the game needs less than 256 bytes - this is the entirety of the RAM needed - the rest of the game can run from ROM We define some screen size vars - these set the scale for objects and font., and the boundaries of the screen for drawing the level. We also define some 'colors' ... the game uses up to 5 colors (Background 0 and 4 more) On the SAM we can have all 4 colors! |
|
| When the game starts we clear the game ram... We then show the Main menu. | |
Main Game Loop
| At the start of the loop, we update the 'Tick' The Tick is 1 or 0 - this is used by the multiplatform code for boost (during which player moves at 2x speed) If Boost is ON we lower the delay - we need to speed the game up because redrawing the 'Boost counter' is too slow. |
|
| During the pause loop we check the keypreses... if a key is not
held down we release the keytimeout The timeout means if we hold left we don't keep rotating around... we have to press left multiple times We store any keypresses in D - and wait until BC reaches Zero |
 |
| If the Keytimeout is not cleared we will ignore Left / Right
keypresses. First we turn off Boost (it will be turned back on if FIRE is held) When we process Left or Right we INC/DEC the 'Player Direction' then run the SetPlayerDirection routine which handles the rest of setting the movement for the player. If Fire is pressed then we check if any 'Boost power' is left.. If there is, then we turn boost power on. Once the keypresses are handled, we update the player with 'Handle Player' Then we update the CPU with 'Handle CPU' That's it... We jump back to the start of the loop for the next tick. |
 |
PSET - Plot Pixel / POINT - Read pixel color
| The PSET command will set a pixel of the screen... The X co-ordinate is defined by register B... The screen is 256 pixels wide The Y co ordinate is defined by C... The screen is 192 pixels tall D is the new color for the pixel (0-15) GetPixelMask will calculate the screen byte we want to change (in HL)... the mask to keep the screen pixels we don't want to change will be in D... the mask for the pixel we want to change is E We next need to work out the bytes for the pixel color... we use GetColorMaskNum ANDing the result with E - this gives us the new value for the one pixel Finally we get the current screen byte... AND it with D - removing any pixel data for the pixel we want to change... then OR in the new pixel color from E |
|
| pairs of pixels are held in a single byte - the top nibble will be
the left pixel of the pair... the bottom nibble will be the right
pixel Depending on which of the two pixels in the byte we want to change, we'll return E as a mask for the pixel we want to change... and D as a mask we can AND with the background to clear the pixel we want to change. We first get the screen address, effectively multiplying the Ypos by 128, and adding the Xpos This calculates the VRAM address of the byte containing the pixel.... Next we read the pixel mask for E from a lookup table... and flip the bits with CPL to get the background mask. |
 |
| GetColorMask number will get a byte where both pixels are the
selected color in A We AND this with E from Get Pixel Mask to get the bits for the pixel we want, in the color we want. Byte to color mask is almost the same - this is used to fill a byte where one of the pixels is set - it's used to check the color of bytes read from the screen |
 |
| POINT works in reverse to PSET... returning the color in A for
pixel B,C Once again, we get the pixel mask, and read in the screen byte, ANDing it with E to get one pixel. We're going to convert this to a byte where all the pixels are the same color (so we can search for it in the Color Lookup) with Byte to Color Mask |
|
|
The POINT routine here is excessive - as
PHOTON doesn't care what color a pixel is, just if it's black or
not. ALSO, it would be quicker to calculate the color number via bitshifts, rather than filling a byte and looking it up... but POINT is hardly used in this game, so speed isn't a problem, and the example here is easily ported to other systems, or converted for CPC Mode 0 |
| Much of the code of
Photon is the same as the code in Yquest and the Simple series...
we're not going to cover things like setting up the screen or
reading the Joypad... We've covered it so many times before it's getting boring! |
|
Data Definitions & Starting the game
| Each system needs some platform specific settings. The first is an address of RAM for system vars - the game needs less than 256 bytes - this is the entirety of the RAM needed - the rest of the game can run from ROM We define some screen size vars - these set the scale for objects and font., and the boundaries of the screen for drawing the level. We also define some 'colors' ... the game uses up to 5 colors (Background 0 and 4 more) BUT some systems have fewer... on the CPC we have only 0-3... so we use color 1 for Colors 1+4 |
 |
| When the game starts we clear the game ram... We then show the Main menu. | |
Main Game Loop
| At the start of the loop, we update the 'Tick' The Tick is 1 or 0 - this is used by the multiplatform code for boost (during which player moves at 2x speed) If Boost is ON we lower the delay - we need to speed the game up because redrawing the 'Boost counter' is too slow. |
|
| During the pause loop we check the keypreses... if a key is not
held down we release the keytimeout The timeout means if we hold left we don't keep rotating around... we have to press left multiple times We store any keypresses in D - and wait until BC reaches Zero |
|
| If the Keytimeout is not cleared we will ignore Left / Right
keypresses. First we turn off Boost (it will be turned back on if FIRE is held) When we process Left or Right we INC/DEC the 'Player Direction' then run the SetPlayerDirection routine which handles the rest of setting the movement for the player. If Fire is pressed then we check if any 'Boost power' is left.. If there is, then we turn boost power on. Once the keypresses are handled, we update the player with 'Handle Player' Then we update the CPU with 'Handle CPU' That's it... We jump back to the start of the loop for the next tick. |
|
PSET - Plot Pixel / POINT - Read pixel color
| The PSET command will set a pixel of the screen... The X co-ordinate is defined by register B... The screen is 256 pixels wide The Y co ordinate is defined by C... The screen is 192 pixels tall D is the color Attribute for the block containing the pixel. First we set the color attribute... Get ColMemPos will take a XY position and return the ram address - we first convert the X pos from a pixel pos to a byte GetPixelMask will calculate the screen byte we want to change (in HL)... the mask to keep the screen pixels we don't want to change will be in D... the mask for the pixel we want to change is E Depending on the 'Color' we need to set or clear the pixel - we just clear the pixel by ANDing the current screen byte with D To set a pixel we AND it with D - removing any pixel data for the pixel we want to change... then OR in the new pixel color from E |
 |
| bitmap data for 8 pixels are held in a single byte ... the
top bit is the left most pixel Depending on which pixel in the byte we want to change, we'll return E as a mask for the pixel we want to change... and D as a mask we can AND with the background to clear the pixel we want to change. We first get the screen address with GetScreenPos his calculates the VRAM address of the byte containing the pixel into HL Next we read the pixel mask for E from a lookup table... and flip the bits with CPL to get the background mask. |
 |
| We're going to need to be able to calculate the screen ram
position, for two purposes... First we'll do the more complex screen co-ordinates... The screen layout is weird... the final HL address is made up of the bits in the following format: 0 1 0 Y7 Y6 Y2 Y1 Y0 Y5 Y4 Y3 X4 X3 X2 X1 X0 The X bits are all at the bottom - so moving across the screen is easy, but moving down is a pain - so long as we're in an 8 pixel tall strip (effectively a character block) we can just INC H, but beyond that we have to do some work!... the top 3 bits are always %010 - because the screen base is &4000 We need a version called GetScreenPos... which coverts (X,Y) position (B,C) to a HL memory address - we'll use this to calculate the screen memory position of a byte we want to write... We specify the X position in bytes... and the Y position in lines |
 |
| Color data is simpler... the data is 'linear'... but there is only
1 byte for each 8x8 square... If we work out which 8x8 block we're in (by ignoring the low 3 bits of the Y co-ordinate) we just need to multiply that Y-block number by 32... we do this by bit-shifting We then add the Xpos (in bytes) |
 |
| POINT works in reverse to PSET... returning the color in A for
pixel B,C Once again, we get the pixel mask, and read in the screen byte, ANDing it with E to get one pixel. We return 0 if the pixel is clear, 1 if the pixel is set |
 |
|
The POINT
routine doesn't check what color a pixel is, since color
attributes are set at the 8x8 level - this means you can't test if
a pixel is 'Red or Green' just if it's 'Black' or 'Colored' Also PSET will set color attributes for each write - if you set 10 pixels in the same block, the color will be changed 10 times - you may need some smarter code, to stop the colors 'flashing' for no good reason. |
| The SMS screen is 32x24
tiles so it would take 768 unique tiles to cover it... but the SMS
only has 512!... that's enough for the GameGear, but the SMS
couldn't do full screen graphics in that mode... but the MSX1 DOES
have a 768 tile mode. Don't worry though, we'll have a GameGear tutorial soon, and that WILL also work on the SMS! |
|
Data Definitions & Starting the game
| Each system needs some platform specific settings. The first is an address of RAM for system vars - the game needs less than 256 bytes - this is the entirety of the RAM needed - the rest of the game can run from ROM We define some screen size vars - these set the scale for objects and font., and the boundaries of the screen for drawing the level. We also define some 'colors' ... the game uses up to 5 colors (Background 0 and 4 more) on the MSX1/SMS we define the 'color attribute' which will be used to color an 8x1 strip. |
 |
| When the game starts we clear the game ram... We then show the Main menu. | |
Main Game Loop
| At the start of the loop, we update the 'Tick' The Tick is 1 or 0 - this is used by the multiplatform code for boost (during which player moves at 2x speed) If Boost is ON we lower the delay - we need to speed the game up because redrawing the 'Boost counter' is too slow. |
|
| During the pause loop we check the keypreses... if a key is not
held down we release the keytimeout The timeout means if we hold left we don't keep rotating around... we have to press left multiple times We store any keypresses in D - and wait until BC reaches Zero |
 |
| If the Keytimeout is not cleared we will ignore Left / Right
keypresses. First we turn off Boost (it will be turned back on if FIRE is held) When we process Left or Right we INC/DEC the 'Player Direction' then run the SetPlayerDirection routine which handles the rest of setting the movement for the player. If Fire is pressed then we check if any 'Boost power' is left.. If there is, then we turn boost power on. Once the keypresses are handled, we update the player with 'Handle Player' Then we update the CPU with 'Handle CPU' That's it... We jump back to the start of the loop for the next tick. |
|
PSET - Plot Pixel / POINT - Read pixel color
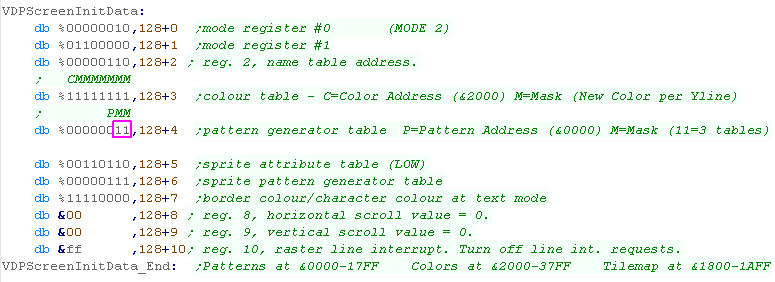
| We need to change the screen settings slightly, rather than having
256 tiles on the screen, we'll have 256 different tiles on each
1/3rd of the screen! To do this we set bit 0 and 1 of VDP register 4 to %00000011 |
 |
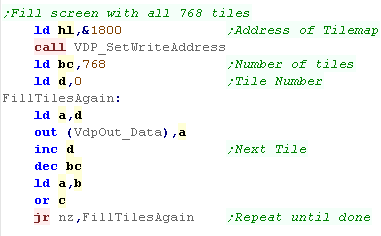
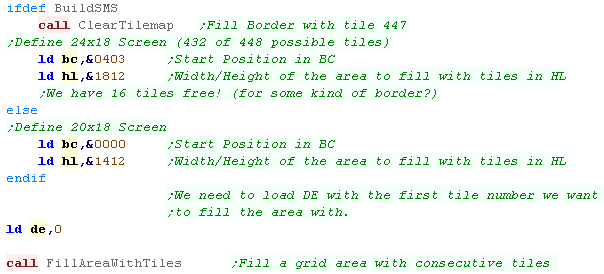
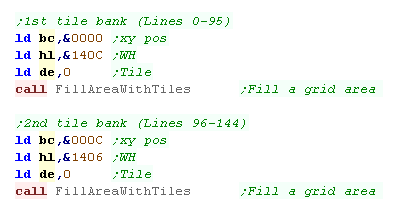
| We need to fill the entire screen with consecutive tiles - we'll
then change the patterns of those tiles to plot pixels. The Tilemap is at address &1800 |
 |
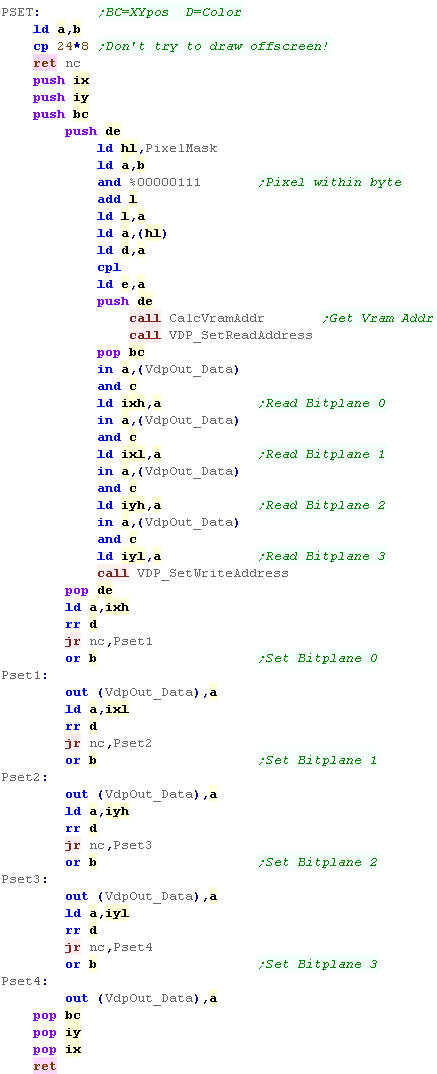
| The PSET command will set a pixel of the screen... The X co-ordinate is defined by register B... The screen is 256 pixels wide The Y co ordinate is defined by C... The screen is 192 pixels tall D is the color Attribute for the block containing the pixel. When we want to set a pixel, we'll need to change a pixel within the byte of the screen... first we'll need to read in from screen ram the current byte, then change it and write it back. First we calculate the bit position within the byte - we use a lookup table for the bit pixel position. Each tile contains 8 vertical lines, so we shift 3 bits our of the Y position, the remaining bits are the High byte of the memory address... The Resulting Address compared to XY pos is as follows: 0 0 0 Y7 Y6 Y5 Y4 Y3 X7 X6 X5 X4 X3 Y2 Y1 Y0 The bottom 3 bits of the X position are the 'In byte' X position... the remaining bits are the horizontal line, BUT we need to add the bottom 3 bits of the Y position... this is the L byte... this is now our HL memory address We select this address for READING by writing the address to the control port. We read in the current byte and OR in the new pixel (we found from the look up table). we set bit 6 of the H address and write to the control port again - this selects the data port for WRITING... we write the update byte back Next we set the color attribute - we add &2000 to the address - this is the equivalent color attribute for the pixel position we just set. - we write the color from D to this address... of course, this will 'accidentally' affect 7 other pixels |
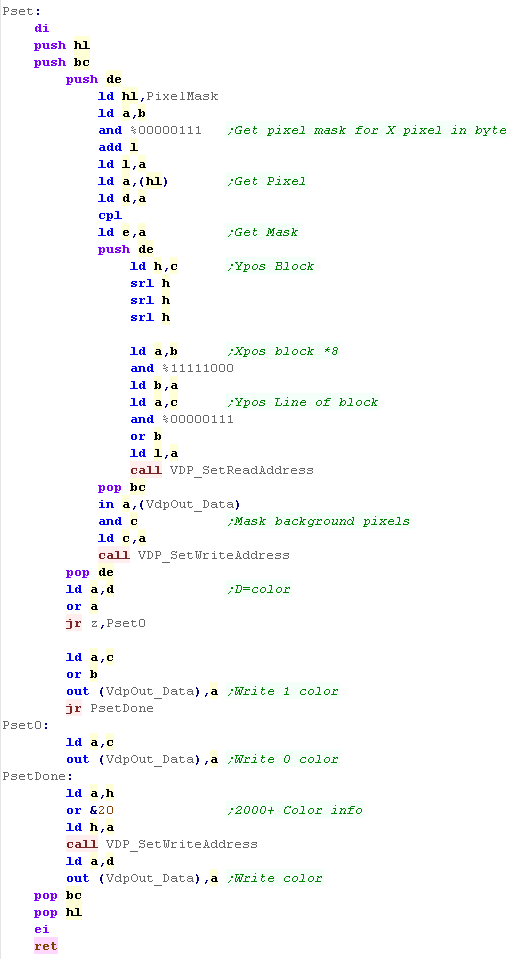 |
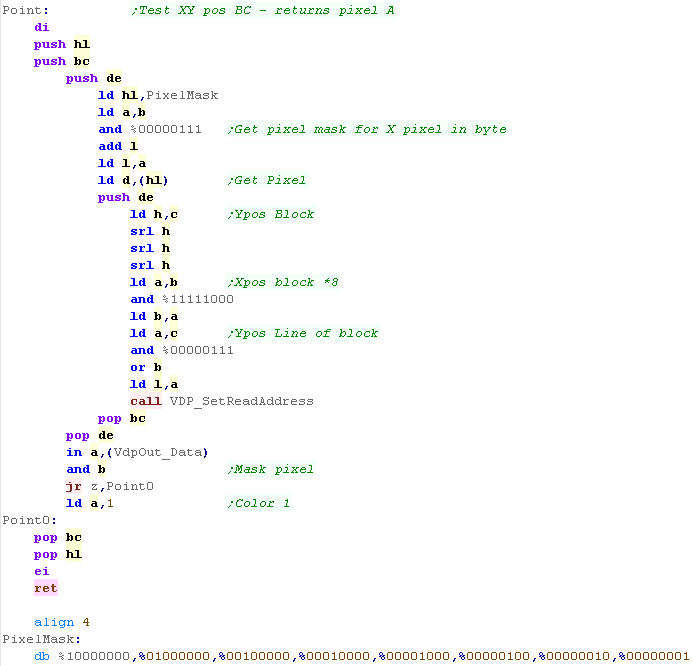
| Point is similar... we still read in from the screen in the same
way... but this time we check if the read byte has the required bit
set - we return 1 if it is, and zero otherwise. Note this routine does NOT check color info. |
 |
| We have two routines to select ram addresses - these are used to read and write data to and from VRAM | 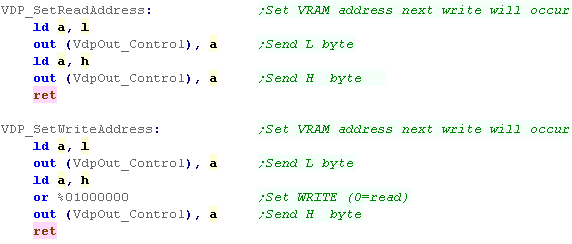 |
| When we want to clear the screen, we zero all the Color and Pattern ram. | 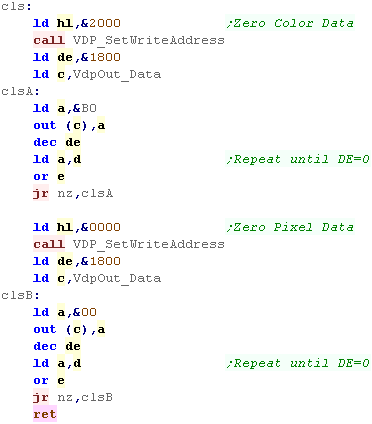 |
| The SMS has 512
tiles total 'In Theory' but this would be all 16k of VRAM! We need the top 2k of VRAM for the tilemap - so the effective limit is 448 tiles MAX! |
|
Data Definitions & Starting the game
| Each system needs some platform specific settings. The first is an address of RAM for system vars - the game needs less than 256 bytes - this is the entirety of the RAM needed - the rest of the game can run from ROM We define some screen size vars - these set the scale for objects and font., and the boundaries of the screen for drawing the level. We also define some 'colors' ... the game uses up to 5 colors (Background 0 and 4 more) on the MSX1/SMS we define the 'color attribute' which will be used to color an 8x1 strip. |
 |
| When the game starts we clear the game ram... We then show the Main menu. | |
Main Game Loop
| At the start of the loop, we update the 'Tick' The Tick is 1 or 0 - this is used by the multiplatform code for boost (during which player moves at 2x speed) If Boost is ON we lower the delay - we need to speed the game up because redrawing the 'Boost counter' is too slow. |
 |
| During the pause loop we check the keypreses... if a key is not
held down we release the keytimeout The timeout means if we hold left we don't keep rotating around... we have to press left multiple times We store any keypresses in D - and wait until BC reaches Zero |
 |
| If the Keytimeout is not cleared we will ignore Left / Right
keypresses. First we turn off Boost (it will be turned back on if FIRE is held) When we process Left or Right we INC/DEC the 'Player Direction' then run the SetPlayerDirection routine which handles the rest of setting the movement for the player. If Fire is pressed then we check if any 'Boost power' is left.. If there is, then we turn boost power on. Once the keypresses are handled, we update the player with 'Handle Player' Then we update the CPU with 'Handle CPU' That's it... We jump back to the start of the loop for the next tick. |
|
PSET - Plot Pixel / POINT - Read pixel color
| We need to fill the entire screen with consecutive tiles - we'll
then change the patterns of those tiles to plot pixels. We use FillAreaWithTiles - this was covered in the simple series. |
 |
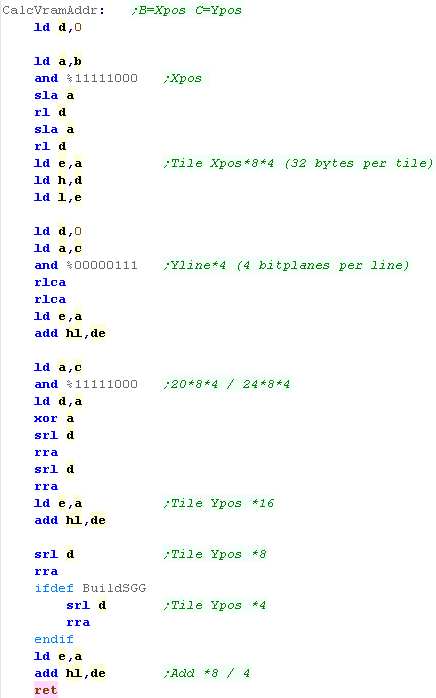
| We're going to need a function to calculate the address of a line
within the patterns that we want to change... On the SMS the til area will be 24 tiles wide, on the SGG the tilemap will be 20 tiles wide... each tile is 8 lines tall - 4 bytes per line (32 bytes) We calculate a HL memory address from an X,Y pixel position in B,C |
 |
| The PSET command will set a pixel of the screen... The X co-ordinate is defined by register B... The screen is 256 pixels wide The Y co ordinate is defined by C... The screen is 192 pixels tall D is the color Attribute for the block containing the pixel. When we want to set a pixel, we'll need to change all 4 bitplanes of the pixel to set it... first we read screen ram to get the current 4 bytes, then change it and write it back - setting the bitplanes to match the new color. First we calculate the bit position within the byte - we use a lookup table for the bit pixel position. Next we need to calculate the memory address of the line of the tile we want to change... We select this address for READING by writing the address to the control port. We read in the current byte and OR in the new pixel (we found from the look up table). We set bit 6 of the H address and write to the control port again - this selects the data port for WRITING... we write the update bytes back ORing in the bit to set each bitplane as required |
 |
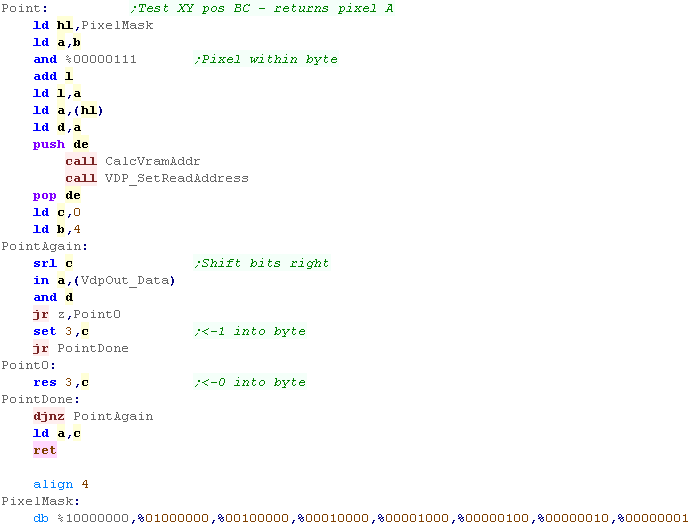
| Point is similar... we still read in from the screen in the same
way... but this time we check if the read bytes has the required bit
set We set each of the bottom 4 bits of the returned byte depending on the bitplane |
 |
| We have two routines to select ram addresses - these are used to read and write data to and from VRAM | |
| When we want to clear the screen, we zero all the bytes of pattern ram | 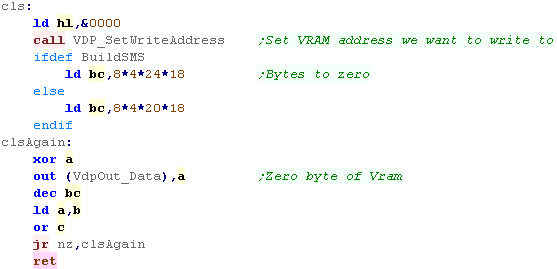 |
|
This version gives a smaller screen on the
SMS... but the colors are better - the MSX1 9918 mode has a more
'pastel' color palette - but full screen graphics! You'll have to make your choice and put up with one limitation or the other! |
Data Definitions & Starting the game
| Each system needs some platform specific settings. The first is an address of RAM for system vars - the game needs less than 256 bytes - this is the entirety of the RAM needed - the rest of the game can run from ROM We define some screen size vars - these set the scale for objects and font., and the boundaries of the screen for drawing the level. We also define some 'colors' ... the game uses up to 5 colors (Background 0 and 4 more)... we're using 16 color mode for this game, so we can use all 5 here |
 |
| When the game starts we clear the game ram... We then show the Main menu. | |
Main Game Loop
| At the start of the loop, we update the 'Tick' The Tick is 1 or 0 - this is used by the multiplatform code for boost (during which player moves at 2x speed) If Boost is ON we lower the delay - we need to speed the game up because redrawing the 'Boost counter' is too slow. |
|
| During the pause loop we check the keypreses... if a key is not
held down we release the keytimeout The timeout means if we hold left we don't keep rotating around... we have to press left multiple times We store any keypresses in D - and wait until BC reaches Zero |
 |
| If the Keytimeout is not cleared we will ignore Left / Right
keypresses. First we turn off Boost (it will be turned back on if FIRE is held) When we process Left or Right we INC/DEC the 'Player Direction' then run the SetPlayerDirection routine which handles the rest of setting the movement for the player. If Fire is pressed then we check if any 'Boost power' is left.. If there is, then we turn boost power on. Once the keypresses are handled, we update the player with 'Handle Player' Then we update the CPU with 'Handle CPU' That's it... We jump back to the start of the loop for the next tick. |
 |
| We're going to take a quick look at the graphics commands we need to create this game on the MSX2, but if you want all the info please check out this tutorial - where we went into detail on all the commands and how they work | |
CLS - Clear screen / PSET - Plot Pixel / POINT - Read pixel color
| We need to enable our 16 color 256x192 screen - here are the VDP Control register settings to do this | 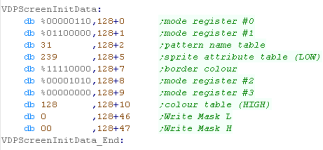 |
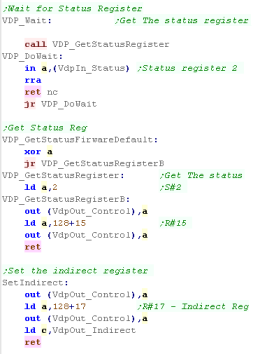
| We're going to need some shared functions for our graphics
routines. VDP_Wait will wait for the VDP to be ready to do tasks for us. Get_StatusRegister will select a status register - for testing if the VDP is ready, and reading back color data for POINT Set Indirect is used to allow us to set sequences of concecutive command registers - we need to do this a lot! |
 |
| Our CLS command will clear the screen
(Duh!) We need to transfer a set of variables and a command byte to the VDP registers from 36 onwards... We do this via a sequence of OUTI commands (Specified as byte code to save ram) So that we can pass them in registers, we push the values onto the stack, and OUTI them off the stack to the VDP, once the sequence is sent the the Clear will occur. The command byte is &C0 for a 'Area Fill' - when we send this, the clear (fill) woill occur. |
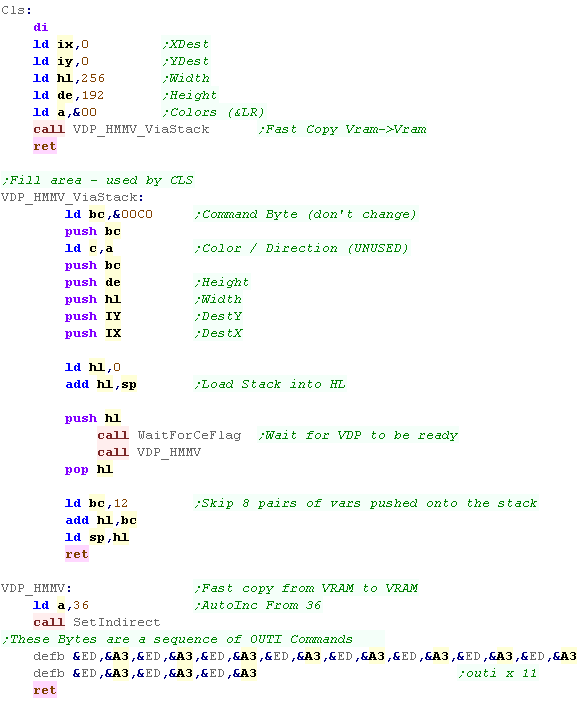 |
| The PSET command will set a pixel of the screen... Again we need to send the settings to the VDP - this time to registers 36+ - the command byte for setting a pixel is &50 PSET can work in different logical operations - like AND / OR and XOR - we just want to set the pixel to our value (whatever was there before) so we use Logical op 0 |
 |
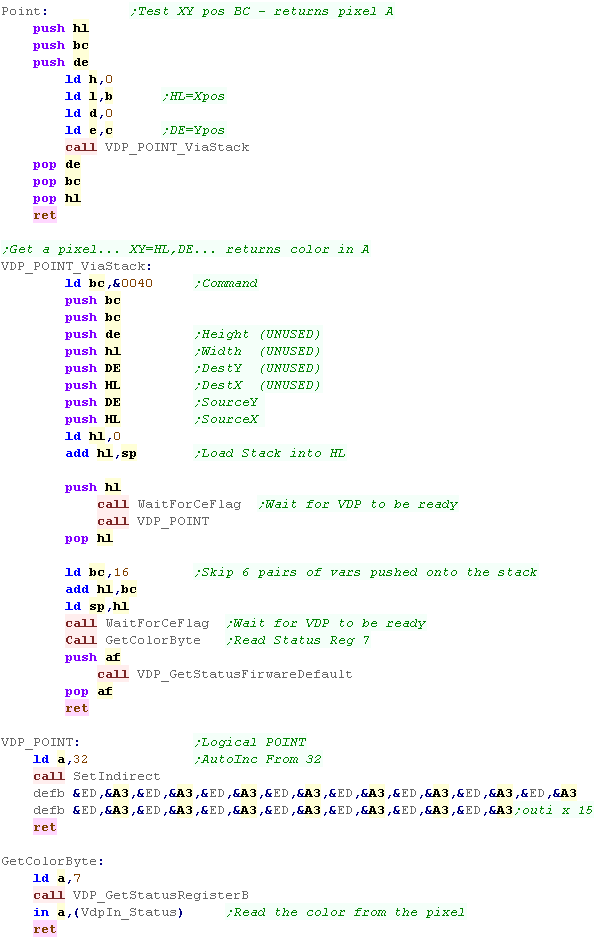
| POINT is similar... we send the sequence from Reg 32+ and use
command &40 We select the pixel we want to read, then we wait for the VDP to be ready again To read in the color We read status register 7 which will be the color of the pixel |
 |
| Much of the code of
Photon is the same as the code in Yquest and the Simple series...
we're not going to cover things like setting up the screen or
reading the Joypad... We've covered it so many times before it's getting boring! |
|
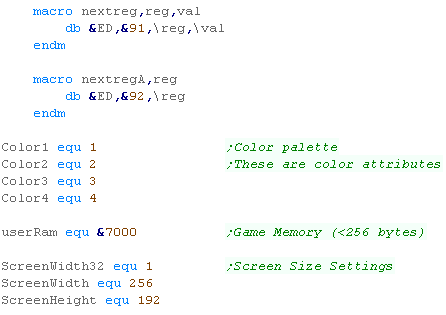
Data Definitions & Starting the game
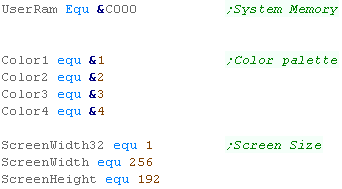
| Each system needs some platform specific settings. The first is an address of RAM for system vars - the game needs less than 256 bytes - this is the entirety of the RAM needed - the rest of the game can run from ROM We define some screen size vars - these set the scale for objects and font., and the boundaries of the screen for drawing the level. We also define some 'colors' ... the game uses up to 5 colors (Background 0 and 4 more) Since the NEXT is using 256 color mode we can certainly have all 5! We also need to define the NextReg macros. |
 |
| When the game starts we clear the game ram... We then show the Main menu. | |
Main Game Loop
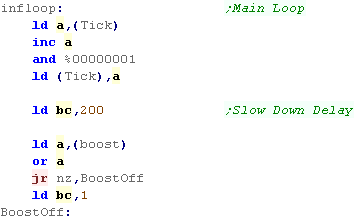
| At the start of the loop, we update the 'Tick' The Tick is 1 or 0 - this is used by the multiplatform code for boost (during which player moves at 2x speed) If Boost is ON we lower the delay - we need to speed the game up because redrawing the 'Boost counter' is too slow. |
 |
| During the pause loop we check the keypreses... if a key is not
held down we release the keytimeout The timeout means if we hold left we don't keep rotating around... we have to press left multiple times We store any keypresses in D - and wait until BC reaches Zero |
|
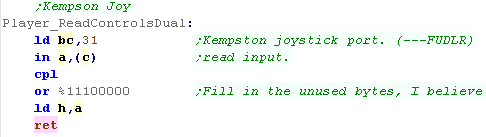
| We're going to read in from a Kempson type Joystick. We read in from pory &0031 - the byte returned is in the format %---FUDLR |
 |
| If the Keytimeout is not cleared we will ignore Left / Right
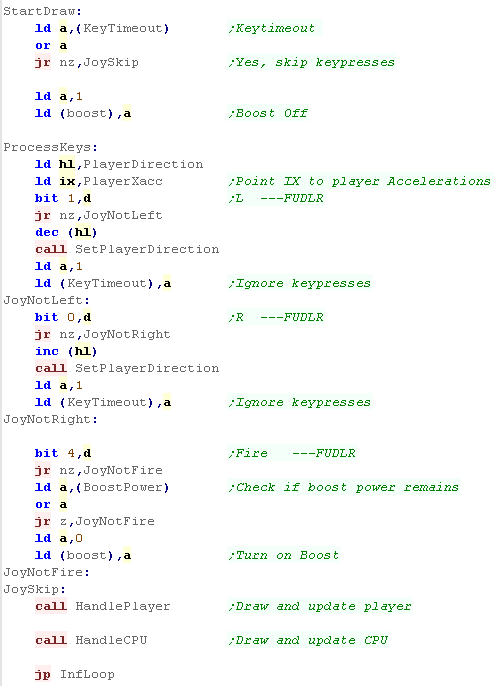
keypresses. First we turn off Boost (it will be turned back on if FIRE is held) When we process Left or Right we INC/DEC the 'Player Direction' then run the SetPlayerDirection routine which handles the rest of setting the movement for the player. If Fire is pressed then we check if any 'Boost power' is left.. If there is, then we turn boost power on. Once the keypresses are handled, we update the player with 'Handle Player' Then we update the CPU with 'Handle CPU' That's it... We jump back to the start of the loop for the next tick. |
 |
PSET - Plot Pixel / POINT - Read pixel color
| Our screen mode is 256 color - so each pixel of the screen is a
single byte - which make things easy! GetScreenPos will handle the page banking and calculate the memory address into HL - then we just write D to the address HL |
|
| We have a matching point command that does the opposite. | 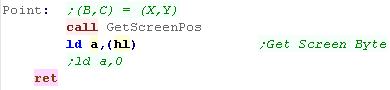 |
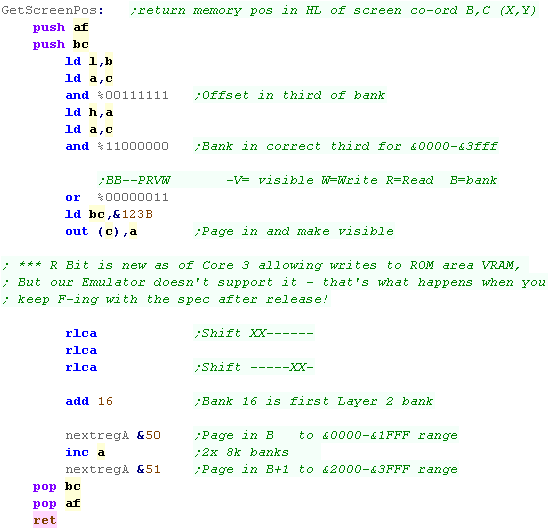
| We need to calculate a memory address... B,C contains an X,Y
screen position. Each row of our screen is 256 pixels - so 256 bytes, meaning in theory the screen address is easy 256x192 is 48k - we need to page in sections of the screen depending on the top two bits of the Y position we can page in one third of the screen to the ROM area &0000-&3FFF with port &123B - any writes to this area will go to the screen - but READS will come from rom! That's a problem for our PSET command, so we have to use the Spectrum Next banks switching registers - registers &50-&51 handle this area (banks are split into 8k chunks) The screen VRAM starts from bank 16... so we page in the two matching banks into the &0000-3FFF area so our POINT command works... We still use &123B to turn on the screen. |
 |
|
Instead of paging in banks with reg
&50/51 - we can also use bit 2 of &123B to enable reading
- however this only works on Firmware revision 3! This means it won't work on older firmware revisions so the reg &50/51 is safer. |
|
The 'Z80
macros' simulate missing commands and registers - using RAM to
emulate IX/IY registers... the 'Substitute commands' are much
slower than the 'proper ones' - but as the game is so simple, it
won't be a problem. |
Photon on the gameboy
| Photon on the gameboy uses the full area of the screen - it uses 4
colors in both GB and GBC mode. Because the Gameboy classic only supports 256 tiles, we switch to an alternate tile address mid screen draw to give effectively 360 tiles - enough to make every tile unique. |
 |
Data Definitions & Starting the game
| Each system needs some platform specific settings. The first is an address of RAM for system vars - the game needs less than 256 bytes - this is the entirety of the RAM needed - the rest of the game can run from ROM We define some screen size vars - these set the scale for objects and font., and the boundaries of the screen for drawing the level. We also define some 'colors' ... the game uses up to 5 colors (Background 0 and 4 more) The Gameboy / GBC only allows 4 colors per tile, so we remap color 4 |
 |
| When the game starts we clear the game ram... We then show the Main menu. | |
| The Gameboy screen is 160x144 - this means it will take 360 tiles
to fill the screen. The Gameboy can only do 256!.. but there's a trick, we can alter the address of the background tiles during redraw...The first 96 lines will use tiles starting at address &8000... The remaining lines 196-144 will start from address &8800 Here we're filling all those tiles with consecutive tile numbers - we'll then alter the colors of those tiles to plot pixels to the screen. |
 |
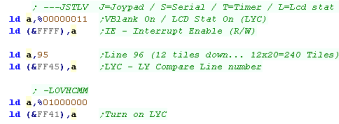
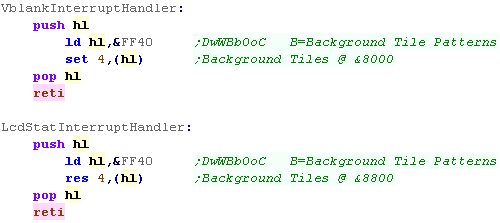
| To Switch to the second bank of tiles at &8000 we need to use
two interrupts VBLANK at the top of the screen will set bank &8000 LYC will switch to the second bank &8800 at the end of line 95 |
  |
Main Game Loop
| At the start of the loop, we update the 'Tick' The Tick is 1 or 0 - this is used by the multiplatform code for boost (during which player moves at 2x speed) If Boost is ON we lower the delay - we need to speed the game up because redrawing the 'Boost counter' is too slow. |
|
| During the pause loop we check the keypreses... if a key is not
held down we release the keytimeout The timeout means if we hold left we don't keep rotating around... we have to press left multiple times We store any keypresses in D - and wait until BC reaches Zero |
|
| If the Keytimeout is not cleared we will ignore Left / Right
keypresses. First we turn off Boost (it will be turned back on if FIRE is held) When we process Left or Right we INC/DEC the 'Player Direction' then run the SetPlayerDirection routine which handles the rest of setting the movement for the player. If Fire is pressed then we check if any 'Boost power' is left.. If there is, then we turn boost power on. Once the keypresses are handled, we update the player with 'Handle Player' Then we update the CPU with 'Handle CPU' That's it... We jump back to the start of the loop for the next tick. |
|
PSET - Plot Pixel / POINT - Read pixel color
| We're going to need a function to calculate the address of a line
within the patterns that we want to change... On the Gameboy / GBC each tile pattern is 8 lines tall - 2 bytes per line. We pass an XY pixel in BC. We calculate the address of the tile pattern from this. There are 2 bytes per line of the pattern - so we multiply the bottom 3 bits of the Ypos by 2 There are 20 x 16 byte tiles for each horizontal line - so we multiply the remaining bits by 20*8*2 We multiply the X pos by 8*2 Finally, as there are 16 unused tiles in the first bank (256 bytes) - if our Y line is over 96 - we add 256 by Incing H |
|
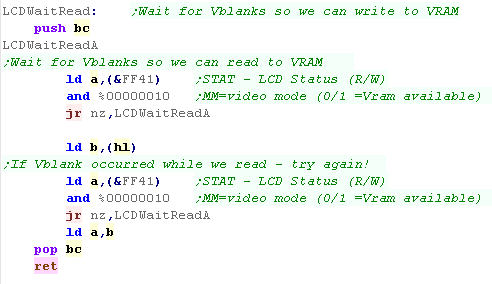
| We can only access VRAM when the screen is not drawing. We could wait for VBLANK, but that would be slow... there is also a small HBLANK on each line. The trouble is, if we test for H/Vblank before we start our Read or Write - it could end before our Read/Write completes - meaning things will go wrong. To get around this the code checks for HVblank... starts the transfer and rechecks HVblank - if H/Vblank ended we force the transfer again - ensuring it definitely happens without waiting for a full vblank. |
 |
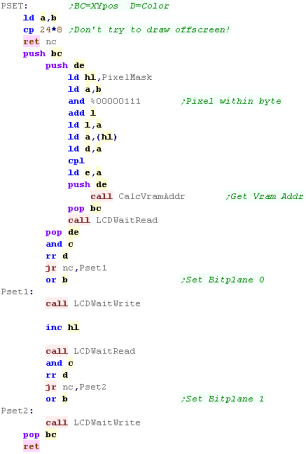
| The PSET command will set a pixel of the screen... The X co-ordinate is defined by register B... The screen is 160 pixels wide The Y co ordinate is defined by C... The screen is 144 pixels tall D is the color Attribute for the block containing the pixel. When we want to set a pixel, we'll need to change both bitplanes of the pixel to set it... first we read screen ram to get the current 2 bytes, then change it and write it back - setting the bitplanes to match the new color. First we calculate the bit position within the byte - we use a lookup table for the bit pixel position. Next we need to calculate the memory address of the line of the tile we want to change... We use our LCDWaitRead command to read in the two current bytes of the pattern. We mask out the pixel we're changin, then OR in a bit for each of the 2 color bits in D we use LCDWaitWrite to write the new values to the VRAM |
 |
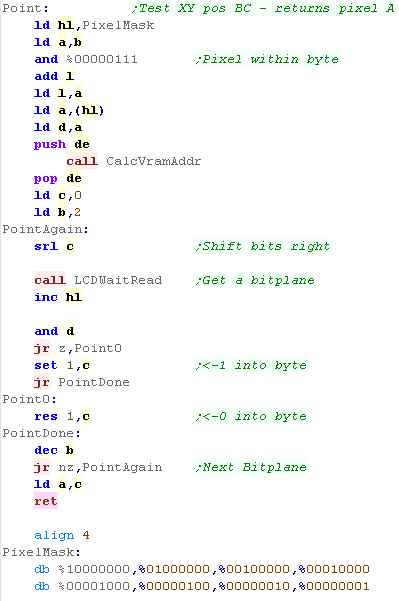
| Point is similar... we still read in from the screen in the same
way... but this time we check if the read bytes has the required bit
set We set each of the bottom 2 bits of the returned byte depending on the bitplane |
 |
| When we want to clear the screen, we zero all the bytes of pattern ram | 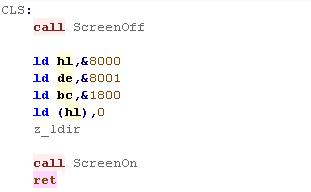 |
|
Rather than keep
waiting for Vblank, we could have a 'cache' of patterns (or pixel
changes) in RAM, and transfer them during VBLANK. It would use more ram for a pattern cache - and be more complex for a 'changes' cache, but it would probably be better for a game making more screen changes per frame - like a wireframe 3d game or something. |


