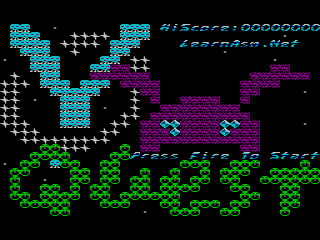
| Y-Quest is an Action-Puzzle game... to complete each stage you
need to collect all the 'crystals' onscreen, by navigating your
'Y' Icon around the screen. The original X-quest was controlled by mouse, however this version is joystick controlled. Unlike the original, the edges of the play area do not kill you. Change acceleration with the joystick / keys UDLR... You can shoot with the firebutton ... if you have a second fire you can immediately stop with it. There are 16 levels, after which the levels will repeat. |
  |
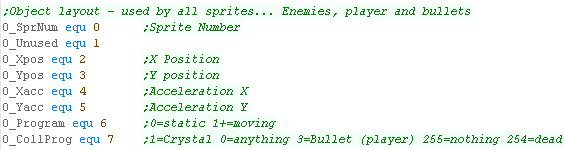
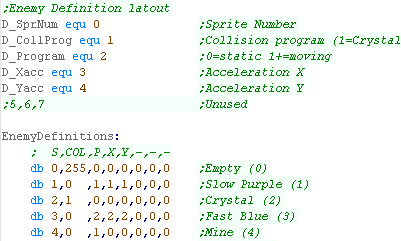
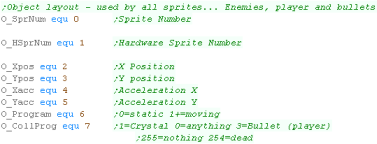
| All Sprite Objects uses the same 8 byte definition.. The Sprite Number defines the graphic image of the sprite from the sprite data bank... this is a single byte, and the address is calculated by multiplying the sprite number by the size of an 8x8 sprite Xpos and Ypos are the screen position of the sprite. Xacc and Yacc are the Acceleration of the sprite (how fast it moves in each direction Program is the logic routine that handles movement - this is used by enemies that change direction and fire. Collision program is the logic routine that handles collision - this defines enemies, crystals, bullets etc and how they affect the player... a value of 255 is an unused object... 254 is a dead object which will later respawn |
 |
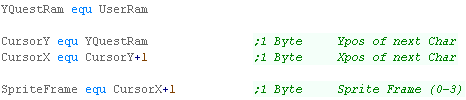
| The Ram is defined as offsets from the 'UserRam' Definition -
this is to allow the code to work consistently on ROM based
systems. All values will be zeroed on startup, and any values with other required values will be initialized accordingly CursorX and CursorY are the position of the next character draw - this is used by string printing routines. SpriteFrame is used by the bitmap drawing routine... this selects which bank of sprites to use... there are up to 4 banks (depending on system memory) |
 |
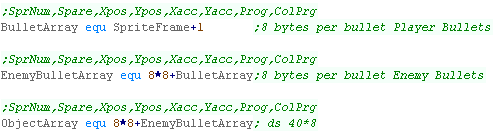
| The BulletArray allows for 8 player
bullets - this uses the standard 'Sprite Object Layout' The EnemyBulletArray allows for 8 enemy bullets - this uses the standard 'Sprite Object Layout' The ObjectArray allows for up to 40 objects including enemies, crystals and mines - this uses the standard 'Sprite Object Layout' |
 |
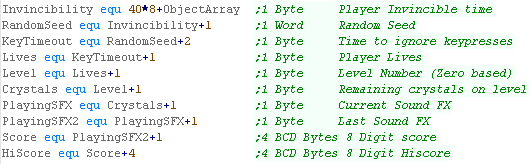
| Invincibility is a counter for how long the
player is invincible, either at the start of a level, or after
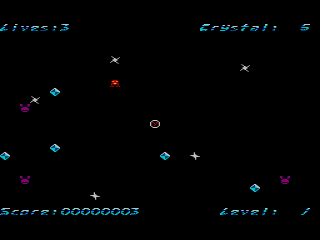
being killed Random Seed is a 16 bit random seed - used by the psuedorandom number generator KeyTimeout is used as a delay for key processing - this is to reduce the speed of acceleration of the player Lives is the number of lives of the player Level is the Level number - starts from 0 Crystals is the number of crystals left to collect - note: due to the object limit only 5 are shown at a time - they respawn when collected. PlayingSFX is used to control the current sound PlayingSFX2 is the last sound played - when it does not match PlayingSFX we need to update the sound Score is the current score, 8 binary coded decimal packed digits (4 bytes) HiScore is the best score so far. |
 |
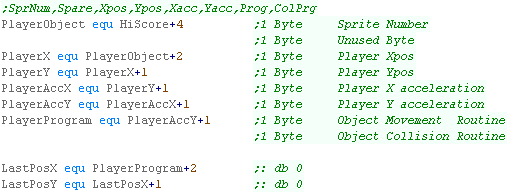
| The PlayerObject handles the player
sprite, this uses the standard 'Sprite Object Layout', however
there are labels to the component parts of the player object There are also a backup of the X,Y position called LastPosX and LastPosY |
 |
 |
Note:
All these addresses are relative to the base address
'UserRam'... this is so the RAM data can be located where ever
free ram exists on the target platform. So the game can work on ROM machines, this is the only writable data, The is no self modifying code or altered data within the other areas of code. |
| The Player Object Backup is a copy of the
player settings, this is used to reset the player at the start of
a round |
 |
| We have some constant definitions next. Object Byte Size is the number of bytes in an object... The Player,Enemies and Bullets are all 8 bytes per object Enemies is the number of objects... this includes Mines and Crystals. Bullet Count is the number of bullets for Players and Enemies... 8 means the Player can shoot 8 bullets, and enemies can shoot a separate 8 bullets Onscreen Crystals is the number of crystals onscreen... this can be less than the number per level, as crystals will respawn when collected as required |
 |
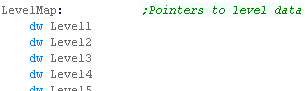
| The Level Map is a bank of pointers to the
Level data. |
 |
| Each Level Definition has the same format. First is a pair of header bytes... the first byte is the crystal count... the second is unused. Next comes pairs of object definitions... the first byte is an object type... the second is a count. The definition is ended by an object of 0 and a count of 255 |
 |
| Although the contents have the same purpose, The Object
Type definitions are not in the same format as the Sprite
Objects Each definition is a different enemy type, 0 is the 'empty object' and is used for the end of the level definition |
 |
| Next we have some Random Number Lookup tables |
|
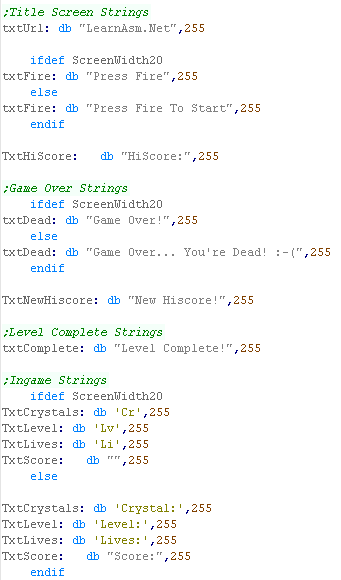
| We have a set of 255 terminated Text strings. These are used for ingame messages - for the Sega GameGear there are shortened versions |
 |
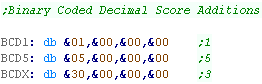
| The BCD Definitions are used to add points
to the current score... The BCD code requires source and destination value to be 4 bytes - little endian |
 |
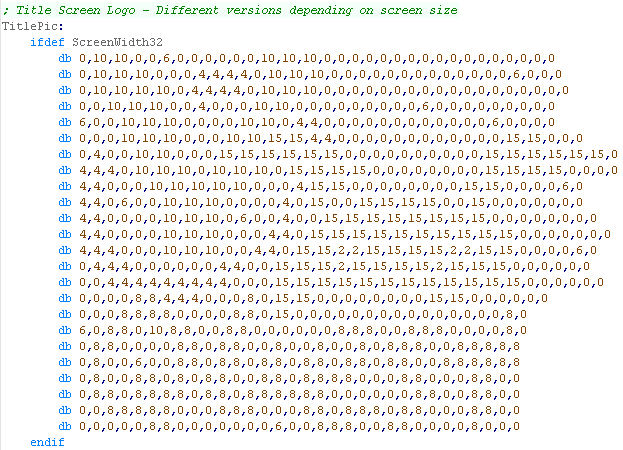
| Finally we have the Title screen definition...
one tile per byte These use the same sprite numbers (and sprite graphics) as the enemy objects. There are different versions depending on screen size. |
 |
| The Random number generator for Yquest was 'borrowed' from
ChibiAliens... It produces repeatable 16 bit
random numbers from a 16 bit seed. To assist in this it uses two 16 byte Lookup tables. |
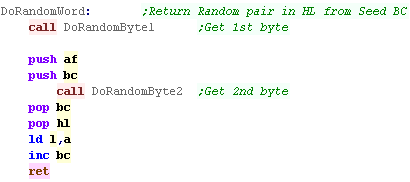 |
| The First byte is generated by using the two byte seeds, with rotations and Xors | 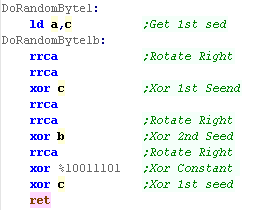 |
| The second byte is produced by using the lookup tables, and the result of the first generator. | 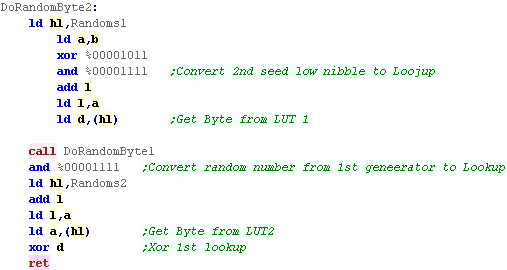 |
| Y quest only uses single byte random numbers, so we use a simple 1 byte generator DoRandom, which autoincs it's seed. |  |
 |
Of course, a
one byte generator could have been used, However this 16 bit one had already had extensive testing while developing ChibiAliens generator to ensure it produced good random numbers. |
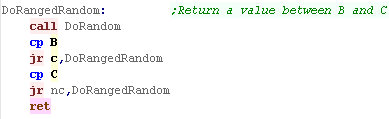
| Our random number generator gives values from 0-255, but usually
we need more limited ranges... DoRangedRandom will return a value between B and C |
 |
| We'll often need to generate
locations for objects, to do this we'll define 3 functions RandomXPos will generate a new Xposition at random RandomYPos will generate a new Yposition at random RandomizeObjectPosition will randomize both. |
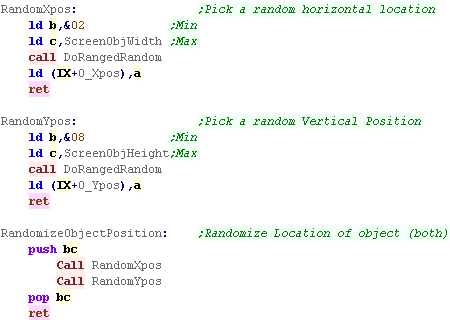 |
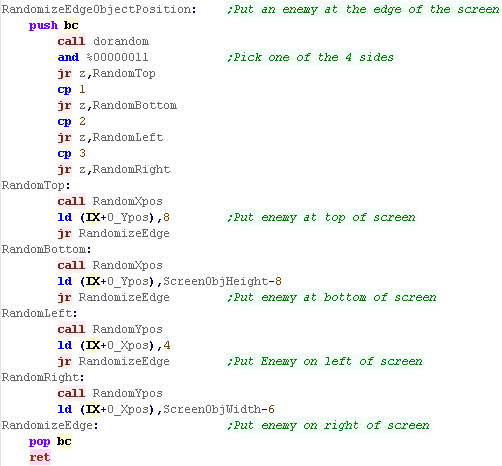
| When an object is respawned, it must appear at the edges of the
screen, to do this we have 'RandomizeEdgeObjectPosition' The object pointed to by IX will be positioned on one of the 4 edges at random. |
 |
| We have a special function called "Safe
Randomize Object Position" This will randomize the position of the object IX, making sure it does not overlap the first C objects This is used during the initialization routine to position objects, and respawn crystals |
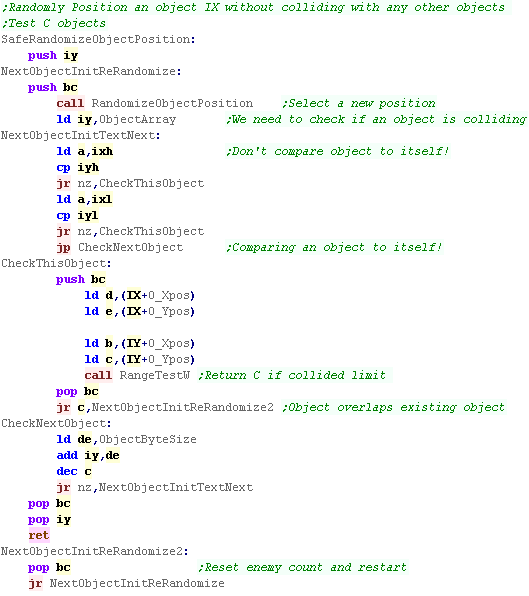 |
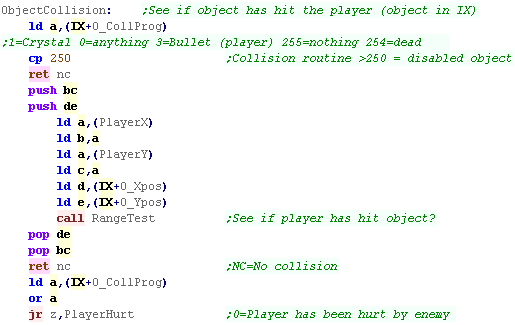
| RangeTest is used to check the proximity of
position DE with object BC with range HL This is used to check if a bullet has hit the player or enemy, and if the player has collided with an object. It's also used when randomly selecting an object to see if the object is overlapping another object. The result is passed via the carry flag. Carry means the objects collided. No Carry means they did not. |
 |
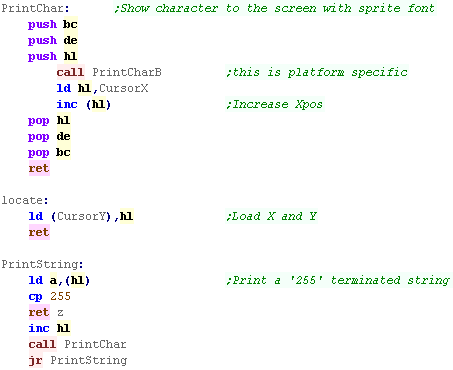
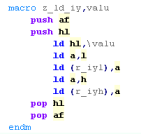
| Y Quest uses the sprite routines for the font, so the font is in
native format for the platform PrintChar will print the character in A to the screen... PrintCharB will be found in the platform specific module - we'll see it later Once a character is printed, the CursorX position is increased. Locate will set a new XY position for the cursor... CursorX must immediately follow CursorY so they can be loaded together. PrintString prints a 255 terminated string - this is take from the Hello World series. |
 |
 |
PrintCharB is in the platform specific
code - we'll see it in later lessons... this is because it
needs to calculate the address of the sprite depending on the
font - which depends on the screen layout and hardware. |
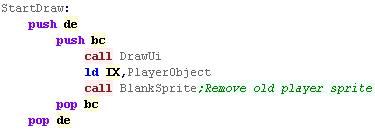
| DrawUI is used during gameplay, this draws info onto the
screen... The UI consists of the following: Lives (Top Left) Crystals remaining (Top Right) Score (Bottom Left) Level (Bottom Right) Show Decimal and BCD Show are used in some cases to show these to the screen... ShowDecimal was used before, and BCD show was based on the previous Z80 tutorial, so will not be covered here |
 |
| When a level starts we need to init the level data... First we load in the pointer to the level data, as the levels loop after level 16, we ignore the top nibble. |
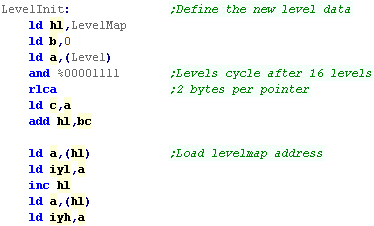 |
| We need to load in the level crystal count from the definition |  |
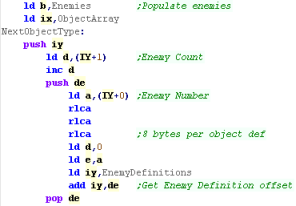
| Next we need to populate the enemies and other objects Each object needs to be populated from the object definition Each definition is 8 bytes, so we multiply the definition number by 8 |
 |
| For each object we populate the entry in the object array from
the definition, We then pick a random position for this object, ensuring the new object does not overlap any of the existing objects Once the object has been positioned we repeat until the count of this object type is completed (as defined in the Level data) |
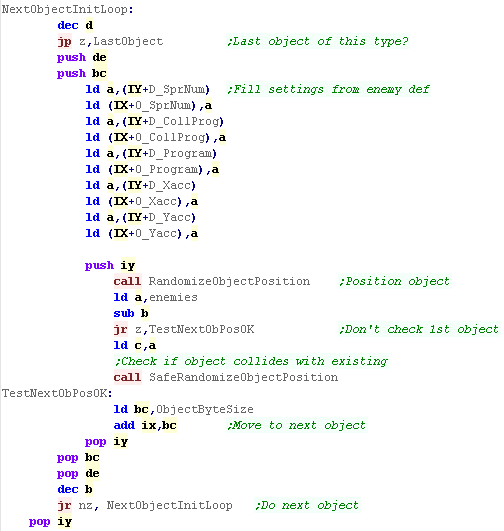 |
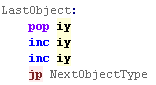
| When the total count of an object is completed, we need to
restart the loop with the next object The LastObject routine handles this |
 |
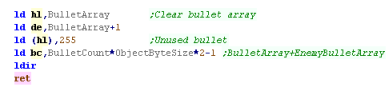
| Once the level is defined we clear both bullet arrays -
setting all bullet objects to 255 Note: It's a requirement of this code that the Enemy Bullet array is immediately after the Player Bullet Array. |
 |
| When a level starts, or the player dies, the player position will need to be reset, the player will also be invincible for a short period | 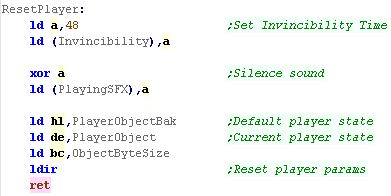 |
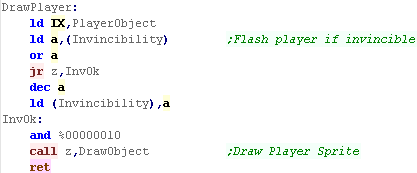
| DrawPlayer will draw the player to screen. If the player is invincible, the player will only be drawn every other frame, causing the player to flash |
 |
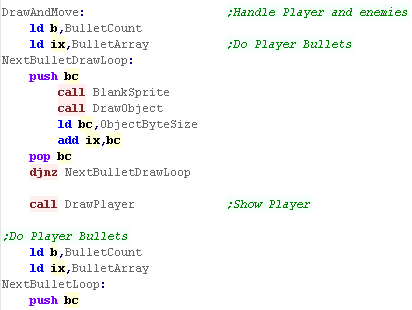
| First we're going to draw all 8 of the player bullets, Next we'll draw the player themselves |
 |
| For each player bullet, we need to check if it's hit an enemy. We check each object, and see if its a 'shootable enemy' (not a crystal or mine) If it is, we do a collision detection, and if they collided, we mark the enemy as dead, give the player some score, and set the 'Collision program' to 254 - marking it as dead. We repeat for each enemy, and each bullet. |
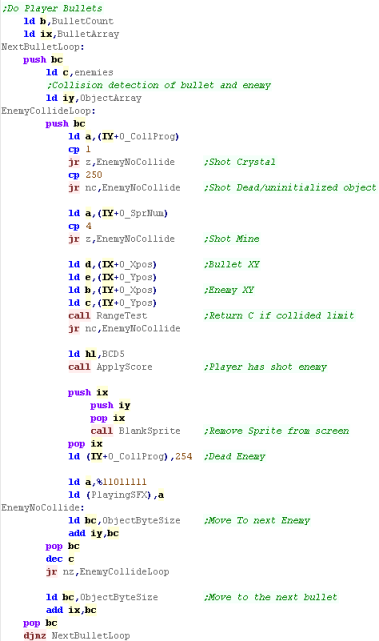 |
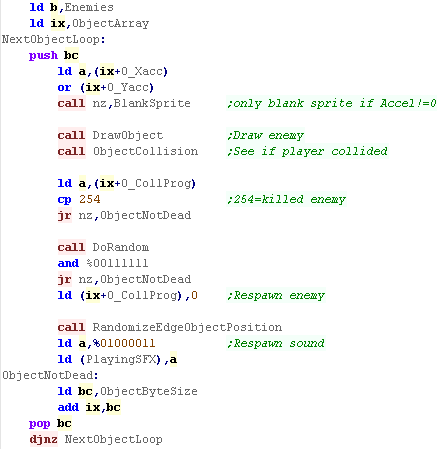
| We now need to draw the enemies, we loop through the objects,
drawing each to the screen We need to check if the object has hit the player, we also need to check if the object is dead (Coll prog 254) If it is, randomly we will respawn it, giving it a new position at the edge of the screen |
 |
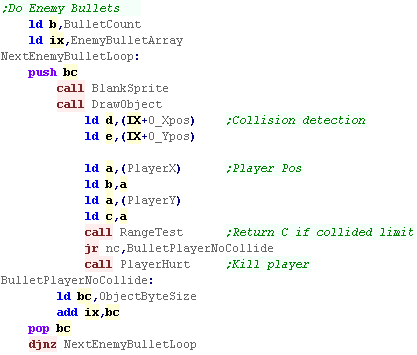
| We now draw each of the enemy bullets. We also check if they've hit the player... if they have, we need to run 'Player Hurt' |
 |
| Finally we check the 'Playing SFX'... if it's changed, we run the ChibiSound driver to update it. | 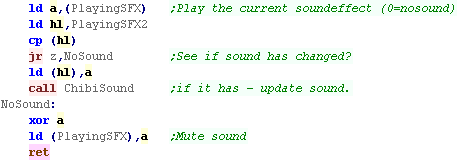 |
| ApplyScore will add some points to the players score. | 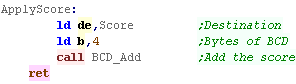 |
| Chibisound was written
during the Platform Specific series... the BCD routines were
written during the multiplatform series. If you want to see more, please take a look at those respective series' |
|
| Lesson
YQuest4 - Multi-platform code Part 3/4 The bulk of the code is common to all systems, lets take a look at the code and what it does |
 |
 See
YQuest folder folder
|
 |
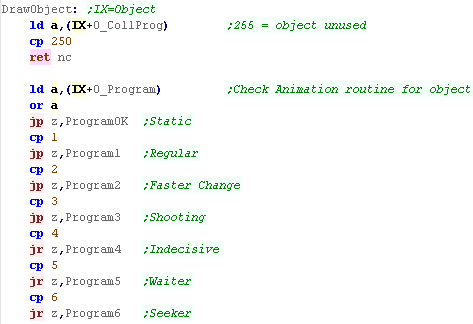
| Draw Object handles the
Player, enemy, crystal and bullet sprite drawing and movement...
First we check the Collision program - if its greater than 250, this object is unused, Next we look at the program, this defines the movement pattern |
 |
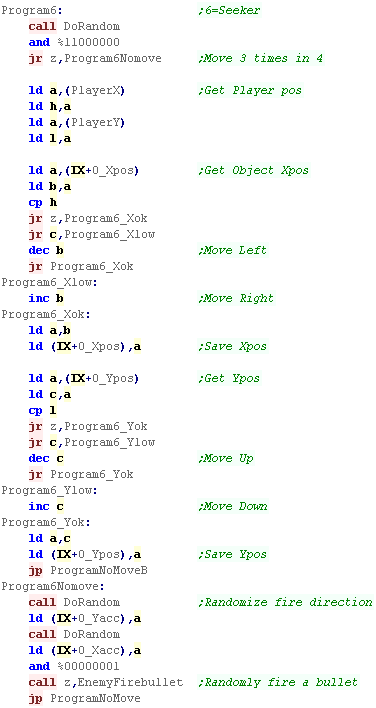
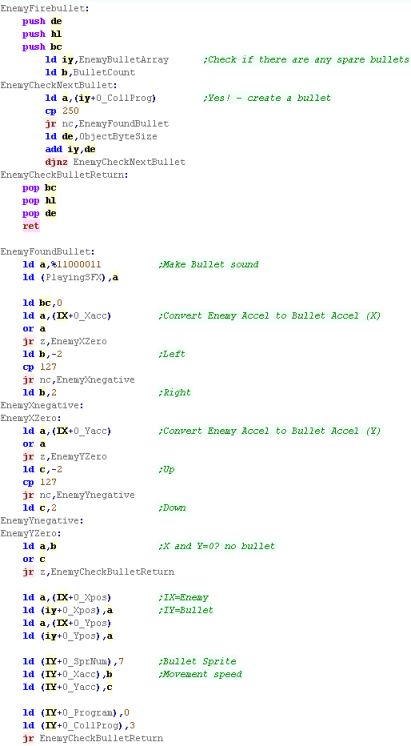
| Program 6 seeks onto the player. First we use the random number generator to decide if we'll move this frame Next we load the player position into HL Next we compare the object Xpos to the Player Xpos, and move accordingly Next we compare the object Ypos to the Player Ypos, and move accordingly Finally, we randomize the Acceleration of the object... in this case it doesn't affect the movement of the object, but it randomizes the movement of the bullets. We also randomly fire a bullet! |
 |
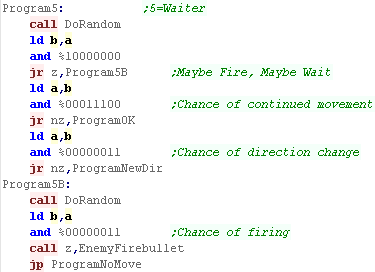
| Program 5 is an object hat sometimes
moves, and sometimes fires, and sometimes changes direction! Different bits of the random number decide what happens |
 |
| Program 4 will rapidly change direction based on random bits. | 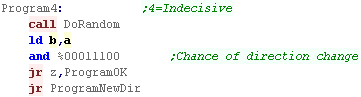 |
| Program 3 Will fire sometimes, and occasionally fire bullets | 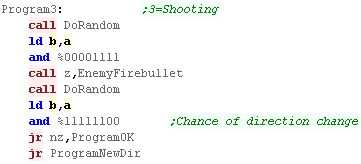 |
| Program 2 Changes direction occasionally | 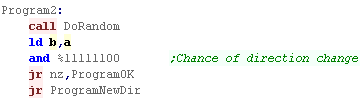 |
| Program 1 Changes direction regularly | 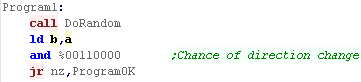 |
| If we're going to randomly change direction, we'll use the random number generator to decide the new direction and flip the acceleration accordingly |  |
| if there's no move, then we just load the previous position | 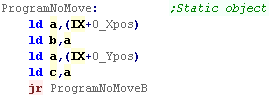 |
| We need to move the object, so we load the old position, and add the acceleration of the object. | 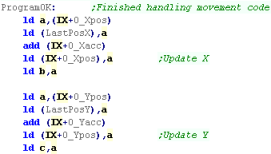 |
| If the object has hit the edge of the screen we flip the Acceleration on that axis to send the object in the opposite direction | 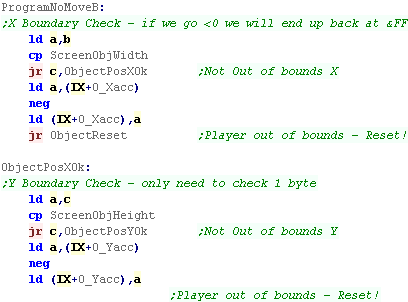 |
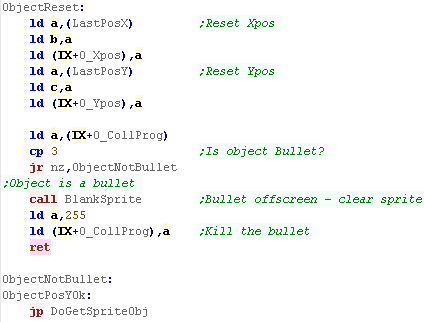
| If the object is offscreen we reset its position Now we check if it's a bullet - if it is, we zero the bullet, by setting it's collision program to 255 Finally, if The object Was Ok, we do the Sprite Drawing routine... we'll look at that later. |
 |
| Lesson
YQuest5 - Multiplatform code Part 4/4 The bulk of the code is common to all systems, lets take a look at the code and what it does |
|
See
YQuest folder folder
|
|
| This routine checks if the
player has collided with object IX First we rangetest with the current object and the player, and return if no collision has occured. If there was a collision we see what the collision program is - Zero means the player is hurt. |
 |
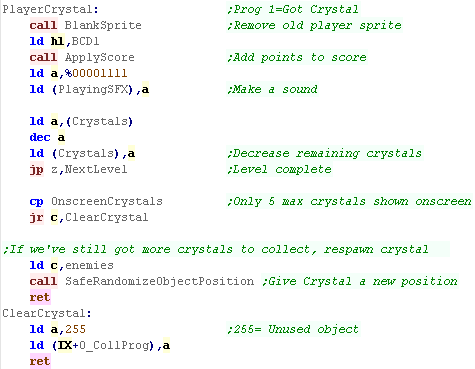
| Ifg the player hit a crystal, we need to clear the sprite,
give the player some points and make a sound. Next we want to decease the level crystal count, if there are more crystals to collect than 'OnscreenCrystals' (The number we show), we need to respans the current crystal. If not then we need to remove the current crystal by setting it's collision program to 255 |
 |
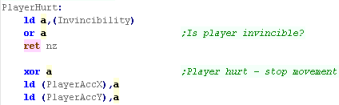
| If an object has hit the player, we first check if the player
is invincible still, and return if they are. If not we stop the player movement - as we're going to do an explosion animation |
 |
| We change the player sprite to 5 (the explosion) We then loop 4 times, changing the frame of animation and using ChibiSound to make a runbling sound that changes in pitch with each frame. |
 |
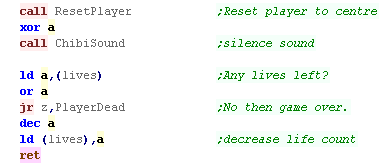
| We need to reset the player, and silence the sound effect. If the player has no lives left, the player is dead nad the game is over, Otherwise we reduce the life count, and continue the game |
 |
| The player is dead, so we show the 'You're dead' message... the text position varies depending on screen size | 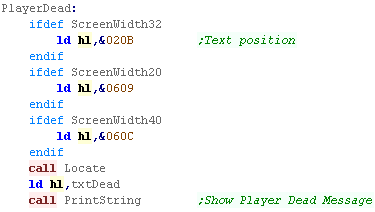 |
| We use BCD_CP to compare our current score to the high score. | 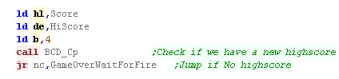 |
| If we have a highscore, we show a 'New Highscore' messagge, and transfer the 4 bytes of the score to the highscore. | 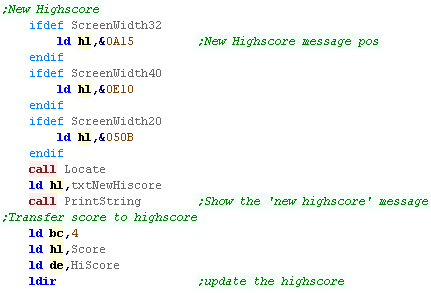 |
| We wait for the player to press fire, and return to the main menu | 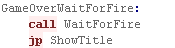 |
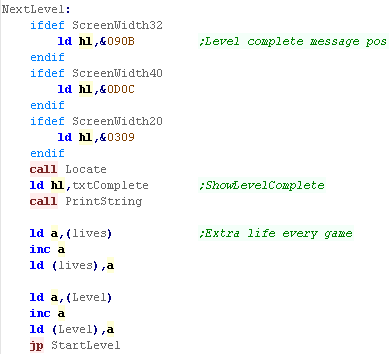
| When we want to progress
to the next level, we show the level complete message. We give the player a bonus life, and increase the level number We then increase the level number, and jump to the Start Level routine to define the new level settings |
 |
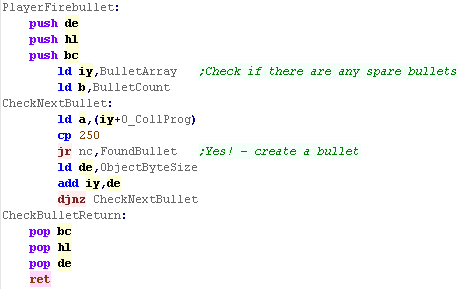
| When we want to fire bullets, we need to look through the
bullet array and see if there is a spare slot. This is a slot where the Collision program is >250 |
 |
| If we find one, we need to look at the player movement direction, and convert it to a bullet acceleration | 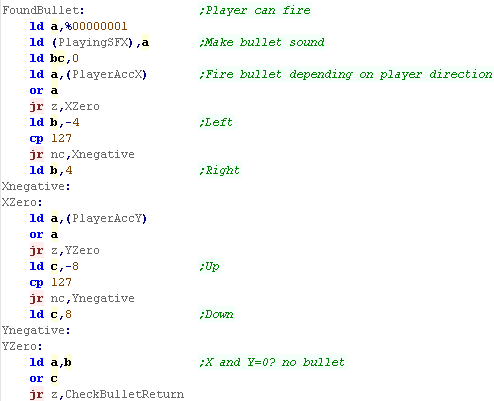 |
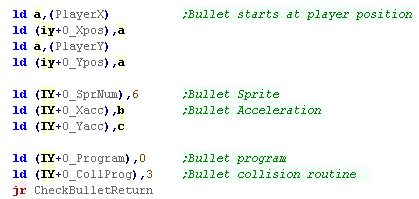
| We position the new bullet at the player position, We set the sprite, acceleration, program and collision routine |
 |
| The enemy fire bullet routine is essentially the same as the
player one. The only difference is a few changes to the source parameters, and the acceleration and sprite of the resulting bullet. |
 |
|
We've covered all the Multiplatform
code... The rest is 'Platform Specific'... We'll look at that Platform Specific code separately... with one single episode covering each system's Y-Quest code |
 |
Lesson
YQuest6 - Amstrad CPC Specific code The Amstrad CPC was the first version of the game written... lets check it out! |
|
See
YQuest folder folder
|
|
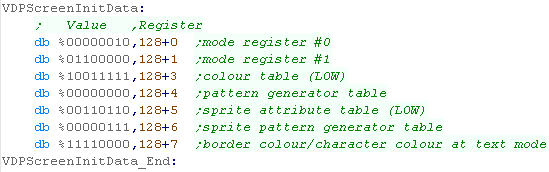
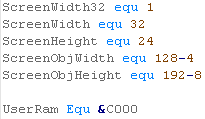
| So we can support multiple platforms with different screen
sizes we have platform specific screen size definitions Also note the game ram is at &8000... this is RAM on the CPC We also define a symbol for the CLS command - pointing to the firmare. |
 |
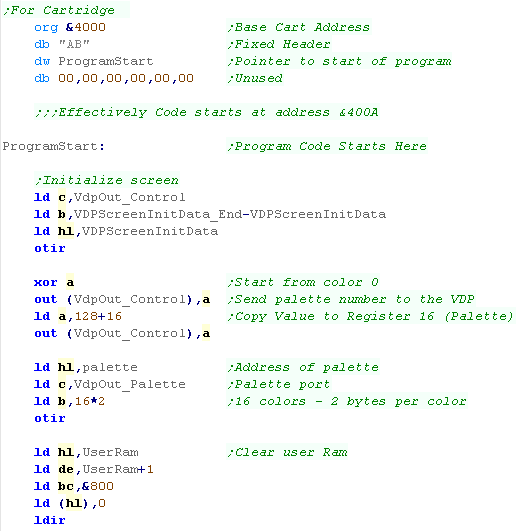
| Next we need to start our program... we're starting with a
base of &100 First we set the Screen Mode to Mode 1 Next we set the palette using firmware function &BC32 We use firmware function &BC38 to set the border color |
 |
| When The title screen starts, we first reset the game
settings for a new game to start, Then we clear the screen. |
 |
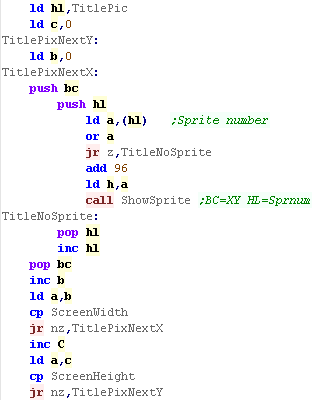
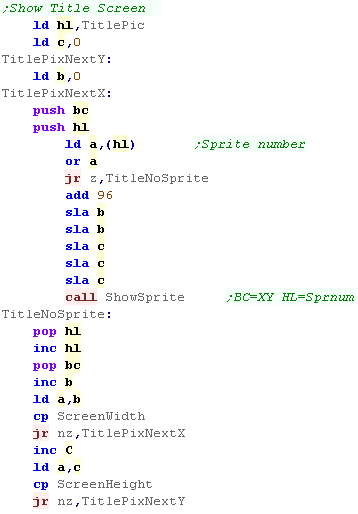
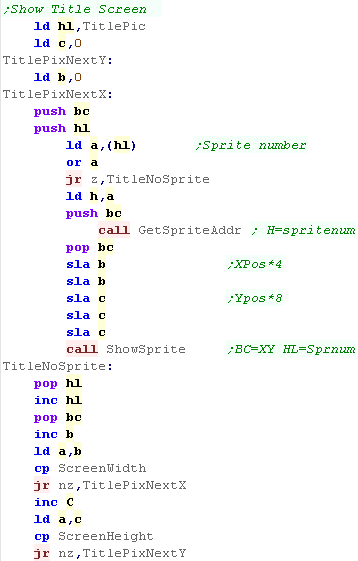
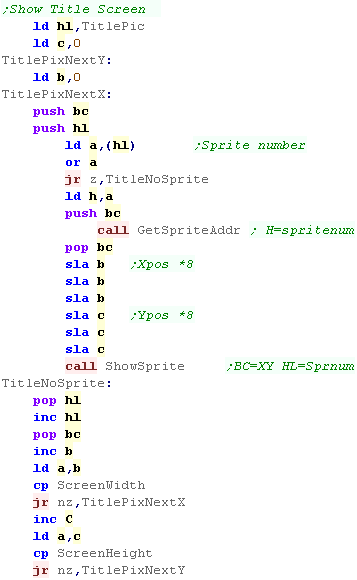
| We want to draw the tilescreen... it's held as a 1 byte per
tile data block in our code at 'TitlePic' We use our ShowSprite Routine to draw it to the screen... however we need to calculate the sprite address of the desired tile, so we use GetSpriteAddr to do so |
 |
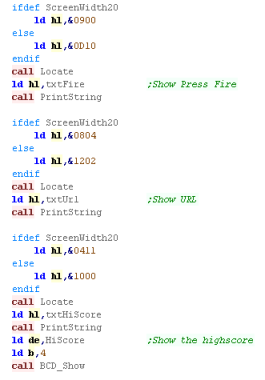
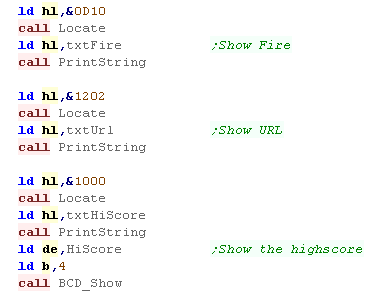
| We need to show a few text items to the screen A 'Press Fire' Message The 'LearnASM.Net' URL (Very Important!) The Highscore. |
 |
| When the game or a new level starts, we first wait for fire
to be pressed. Next we clear the screen, Reset the player position Initialize the level enemies with LevelInit |
 |
| We have to pause a while during the game loop, so we read in
from the joystick during this time, and if the user presses a
key we'll store it for later. We use firmware call &BB24 to do the read |
 |
| First we draw the UI (Score etc) Next we clear the player sprite. |
 |
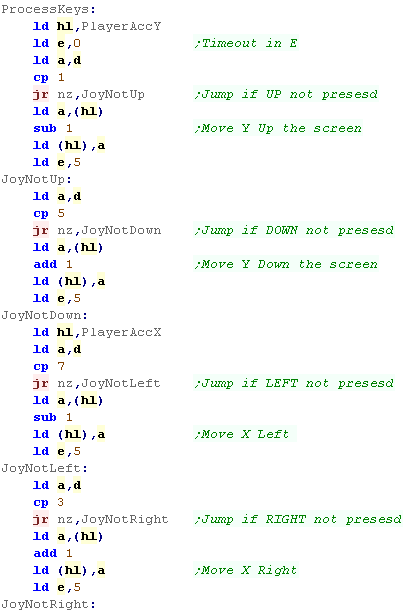
| To slow down the acceleration, we have a 'timeout'... if a key was pressed, for a short time we'll ignore any other keys. | 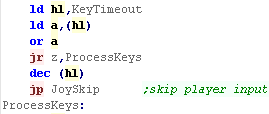 |
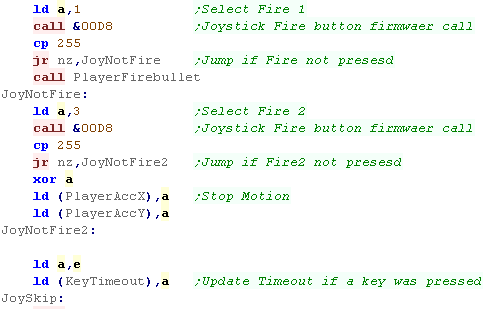
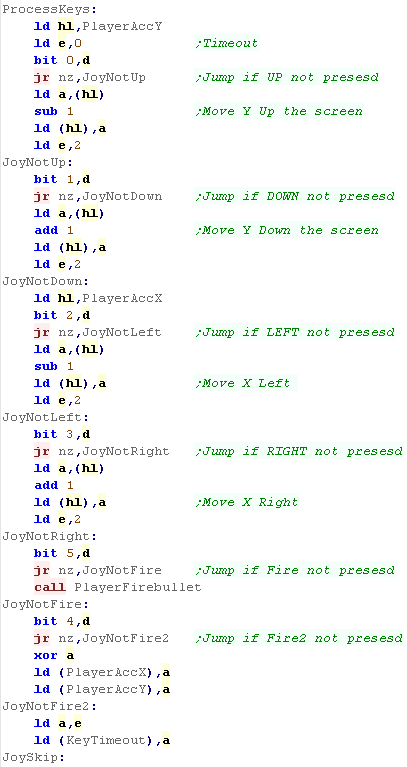
| We're going to process the input, We process each direction, and alter the acceleration of the player if a direction is pressed... We have a 'Bullet fire' routine (in the common code) for Fire 1 Fire 2 will immediately stop the player If any button is pressed, the key timeout is set |
 |
| Finally we run the multiplatform 'Draw and Move' rotuine, this draws the player, and handles movement and drawing of enemies and bullets |  |
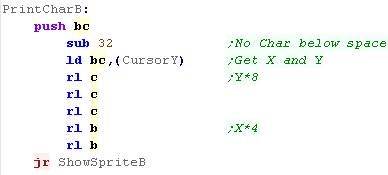
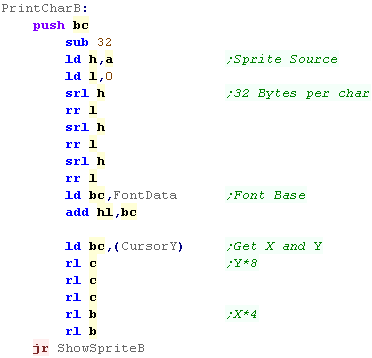
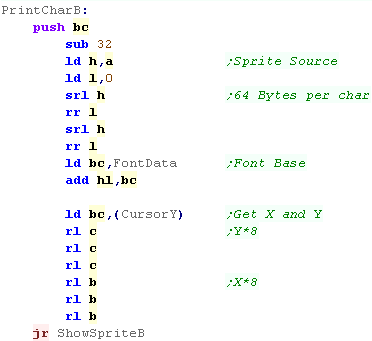
| We have a 'PrintChar' routine to show sprite characters from
our font... Note, part of the 'PrintChar' routine is in the multiplatform code. Each Character is 16 bytes, and there are no characters below 32 (space) We also need to multiply up the X,Y pos into an 8x8 position. |
 |
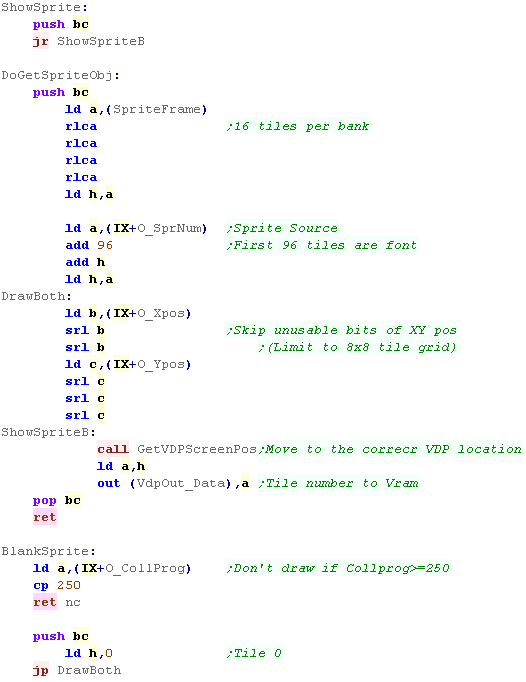
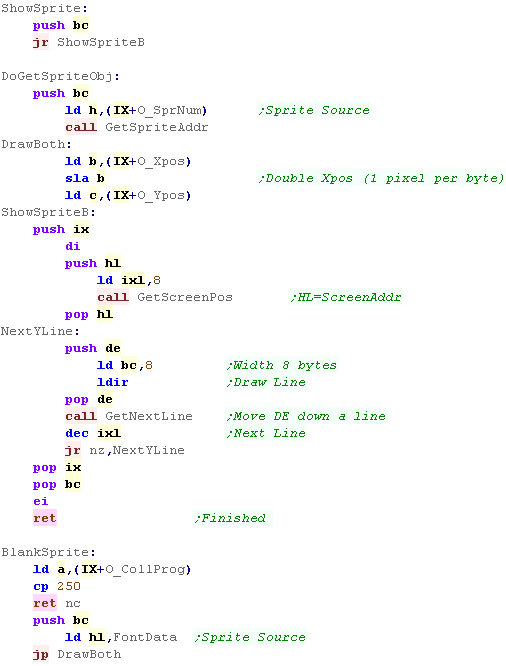
| We have a couple of ShowSprite routines... ShowSprite will draw Sprite A onscreen (at XY position BC) DoGetSpriteObj will show object IX to the screen, getting Sprite, and XY pos from IX BlankSprite will draw the empty sprite (Space in the font), using the object IX - to clear the old position of the object This Sprite routine is optimized for 8x8 tiles. |
 |
| When We want to calculate a destination screen address we need
to deal with the weirdness of the CPC screen layout! The Screen Base is at &C000, but unfortunately the formula to calculate the lines is complex, we have to split up the bits of the line number up, and multiply them accordingly YYYYYYYY Y line number (0-200) -----YYY (0-7) - this part needs to be multiplied by &0800 and added to the total YYYYY--- (0-31) - This part needs to be multiplied by 80 (&50) The screen position required is passed in BC and an address is returned in HL |
 |
| GetNextLine will move the current screen address in HL down
one line... This is a bit tricky, due to the weird layout of the screen, when the address goes below the bottom of the screen range, we wrap around |
 |
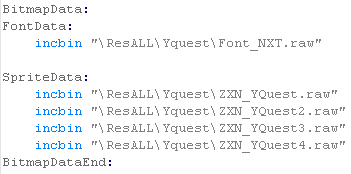
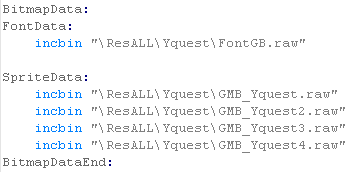
Sprite Data and Palette
| We have 5 different files of sprites 96 for the font 16x4 for the 4 banks of sprites we also have a 4 color palette in the native CPC color format |
 |
Joystick Reading
| When we want to read from the joystick we use firmware call
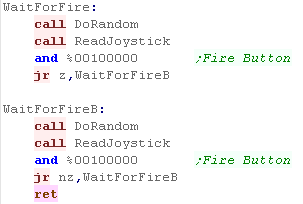
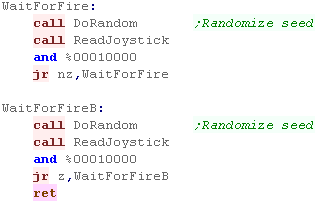
&BB24 We also have a 'Wait for fire' function... this randomizes the seed, and waits for fire to be released, then pressed. It's used for menus and between levels. |
 |
| The CPC version
of Y-Quest was the first written, this is because the WinApe's
built in Assembler and Debugger make writing a game like this
quicker and easier... Essential when development is being Livestreamed to avoid unnecessary Embarrassment! |
 |
  |
Lesson
YQuest7 - Master System / GameGear Specific code The SMS / GG share the same code... Lets take a look! |
|
See
YQuest folder folder
|
|
| The Master System and GameGear are almost the same, however
the screens are different sizes, so we need some tweaks to our
code. To make this possible,we define some symbols in our header. Also note the game ram is at &C000... the RAM area of the SMS/GG |
 |
| The Header is basically the same as the previous simple bitmap examples, we're turning on the screen, defining a palette and the tile patterns for our font and game graphics | 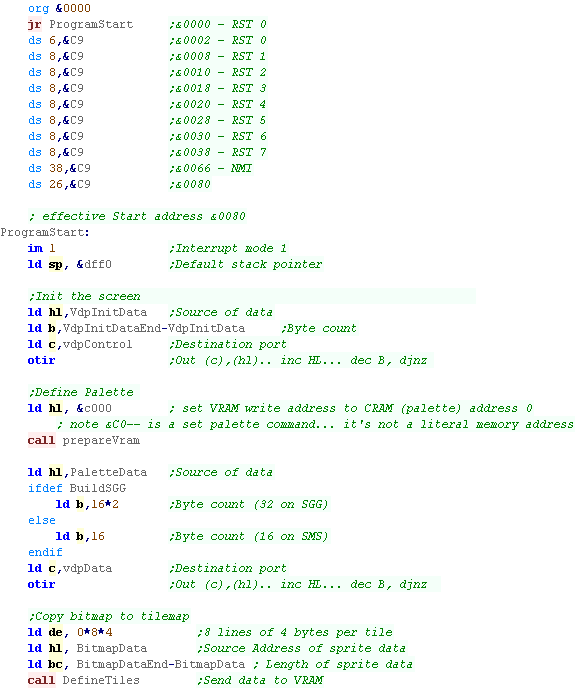 |
| When The title screen starts, we first reset the game settings
for a new game to start, Then we clear the screen. |
|
| We want to draw the tilescreen... it's held as a 1 byte per
tile data block in our code at 'TitlePic' We use our ShowSprite Routine to draw it to the screen... however our game graphics come after the font, so we add 96 to the tile number to calculate the pattern to send to 'ShowSprite' |
 |
| We need to show a few text items to the screen A 'Press Fire' Message The 'LearnASM.Net' URL (Very Important!) The Highscore. The position will differ depending on if we're using the SMS or GG |
 |
| When the game or a new level starts, we first wait for fire to
be pressed. Next we clear the screen, Reset the player position Initialize the level enemies with LevelInit |
|
| We have to pause a while during the game loop, so we read in from the joystick during this time, and if the user presses a key we'll store it for later. | 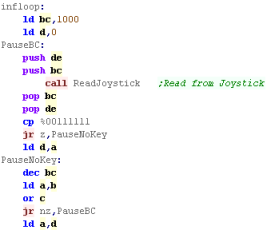 |
| First we draw the UI (Score etc) Next we clear the player sprite. |
|
| To slow down the acceleration, we have a 'timeout'... if a key was pressed, for a short time we'll ignore any other keys. | |
| We're going to process the input, We process each direction, and alter the acceleration of the player if a direction is pressed... We have a 'Bullet fire' routine (in the common code) for Fire 1 Fire 2 will immediately stop the player If any button is pressed, the key timeout is set |
|
| Finally we run the multiplatform 'Draw and Move' rotuine, this draws the player, and handles movement and drawing of enemies and bullets | |
| We have a 'PrintChar' routine to show sprite characters from our
font... our font only has 96 tiles... the first 32 characters are
not used. Note, part of the 'PrintChar' routine is in the multiplatform code. |
 |
| We have a couple of ShowSprite routines... ShowSprite will set a tile onscreen (at XY position BC)...the position will show Tile H Because we're using the tilemap, we have to ignore many of the bits of the position we'd 'like' to show the sprite DoGetSpriteObj will show object IX to the screen, getting tilenumber, and XY pos from IX BlankSprite will draw the empty sprite, using the object IX - to clear the old position of the object |
 |
Clear Screen
| When we want to clear the screen, we set all the tiles to tilenumber 0 |  |
Define Tiles,Vram Address and Get Screen Pos
| Define Tiles will transfer data from RAM to VRAM - it's like OTIR, but it will work with BC bytes, and automatically selects the Vram destination |  |
| When we want to select a RAM addres we use Prepare Vram, we need to set bit 6 of the High byte of the address (to define we're writing to the address)... then we write the address to the control port |  |
| GetVdpScreenPos will select will select a memory address of a Tile
from an XY position in BC.... Each Tile is 2 bytes, and the screen is 64 bytes wide (32 tiles) The Tilemap base is &3800 |
 |
Sprite Data
| We have 5 different files of sprites (tiles) 96x1 Tiles for the font 16x4 tiles for the 4 banks of sprites |
 |
Joystick Reading
| When we want to read from the joystick we just read in from port
&DC We also have a 'Wait for fire' function... this randomizes the seed, and waits for fire to be released, then pressed. It's used for menus and between levels. |
 |
Palette, Screen,init and footer
| We've seen this all before! We have the code to initialize the screen... |
 |
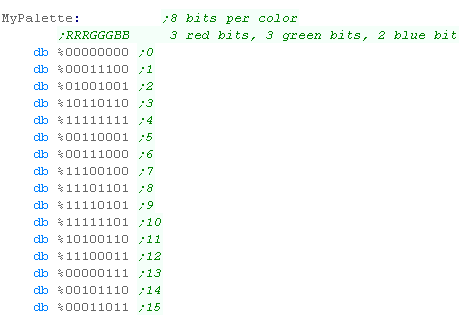
| We have the palette data, it's different depending on if we're using a SGG or SMS |  |
| Finally We have our cartridge footer |  |
 |
Using the
tilemap to simulate sprites gives an annoying 'chunky' movement of
8 by 8 blocks... it's hardly ideal, but the onscreen sprite limit
would cause us other problems, For a quick simple game like this, we'll have to make do with Tiles, but it would be nice to use sprites at a later date. |
 |
Lesson
YQuest8 - MSX1 Specific code The MSX1 is a tile based system, we'll define the font and graphics and tiles, then use those tiles for drawing our game to the screen. |
|
See
YQuest folder folder
|
|
| We need to define the screen size for the platform specific
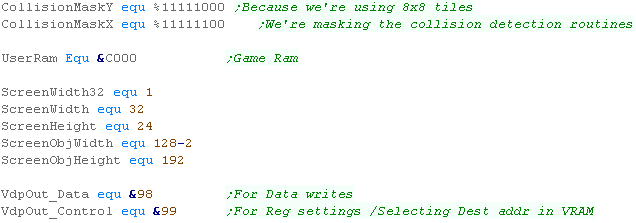
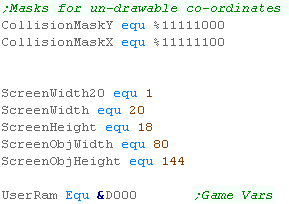
code. Because the screen is using an 8x8 tilemap, we're going to have to use simpler collision detection - so we have some masks to do this Also note the game ram is at &C000... the RAM area of the MSX1 |
 |
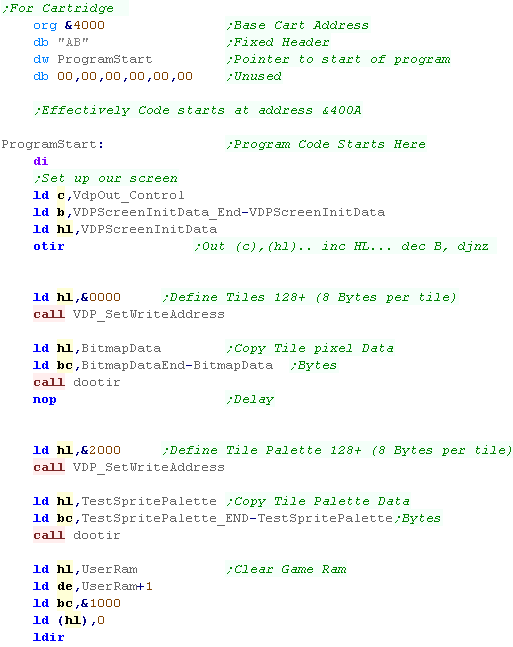
| The Header is basically the same as the previous simple bitmap
examples, we're turning on the screen, defining the tile patterns
and color info for our font and game graphics We clear the user ram. |
 |
| When The title screen starts, we first reset the game settings
for a new game to start, Then we clear the screen. |
|
| We want to draw the tilescreen... it's held as a 1 byte per tile
data block in our code at 'TitlePic' We use our ShowSprite Routine to draw it to the screen... however our game graphics come after the font, so we add 96 to the tile number to calculate the pattern to send to 'ShowSprite' |
|
| We need to show a few text items to the screen A 'Press Fire' Message The 'LearnASM.Net' URL (Very Important!) The Highscore. |
 |
| When the game or a new level starts, we first wait for fire to
be pressed. Next we clear the screen, Reset the player position Initialize the level enemies with LevelInit |
|
| We have to pause a while during the game loop, so we read in from the joystick during this time, and if the user presses a key we'll store it for later. | 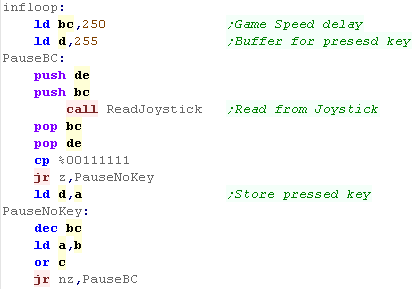 |
| First we draw the UI (Score etc) Next we clear the player sprite. |
|
| To slow down the acceleration, we have a 'timeout'... if a key was pressed, for a short time we'll ignore any other keys. | |
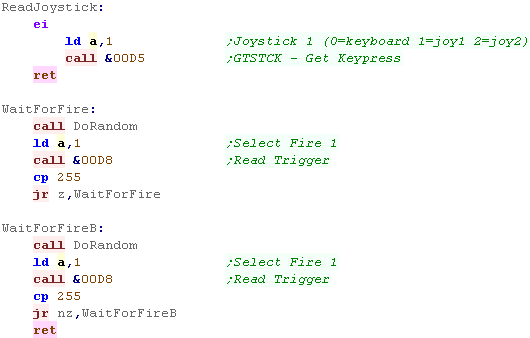
| We're going to process the input, We process each direction, and alter the acceleration of the player if a direction is pressed... The MSX joystick Firmware routine (&00D5) returns numbers for each possible direction from 1-8 |
 |
We use Firmware function &00D8 to read the fire buttons - we need to select the fire button with A We have a 'Bullet fire' routine (in the common code) for Fire 1 Fire 2 will immediately stop the player If any button is pressed, the key timeout is set |
 |
| Finally we run the multiplatform 'Draw and Move' routine, this draws the player, and handles movement and drawing of enemies and bullets | |
| We have a 'PrintChar' routine to show sprite characters from our
font... our font only has 96 tiles... the first 32 characters are
not used. Note, part of the 'PrintChar' routine is in the multiplatform code. |
|
| We have a couple of ShowSprite routines... ShowSprite will set a tile onscreen (at XY position BC)...the position will show Tile H Because we're using the tilemap, we have to ignore many of the bits of the position we'd 'like' to show the sprite DoGetSpriteObj will show object IX to the screen, getting tilenumber, and XY pos from IX BlankSprite will draw the empty sprite, using the object IX - to clear the old position of the object |
 |
Clear Screen
| When we want to clear the screen, we set all the tiles to tilenumber 0 | |
DoOTIR,Vram Address and Get Screen Pos
| DoOTIR will OUT BC bytes from HL to the VDP Data port. This is used for defining tiles. |
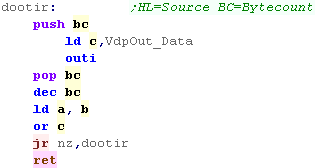 |
| When we want to select a RAM address we use Prepare Vram, we need to set bit 6 of the High byte of the address (to define we're writing to the address)... then we write the address to the control port | 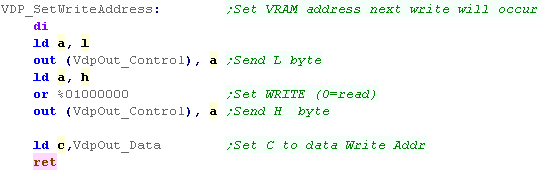 |
| GetVdpScreenPos will select will select a memory address of a Tile
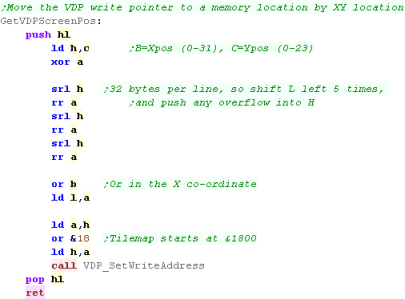
from an XY position in BC.... Each Tile is 1 byte, and the screen is 32 bytes wide (32 tiles) The Tilemap base is &1800 |
 |
Sprite Data
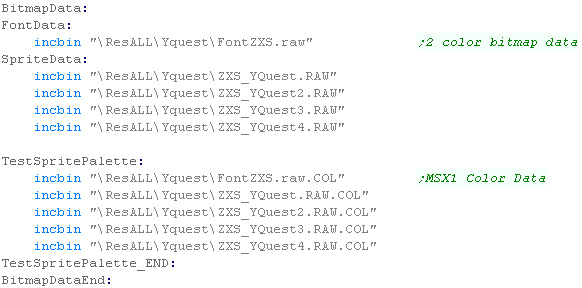
| We have 5 different files of sprites (tiles) 96x1 Tiles for the font 16x4 tiles for the 4 banks of sprites As well as the Black and White data, we have color data for the tiles. |
 |
Joystick Reading
| When we want to read from the joystick we use firmware function
&00D5 - this returns the UDLR part of the joystick When we want to read the fire buttons we use &00D8 this is used by the 'Wait for fire' function... this randomizes the seed, and waits for fire to be released, then pressed. It's used for menus and between levels. |
 |
Palette, Screen,init and footer
| We've seen this all before! We have the code to initialize the screen... |
 |
|
The MSX1 has the same 8x8 limitation of the
SMS version, but despite it's relatively limited color options the
result is pretty nice! We could make the game even better, by making the player icon a sprite rather than a tile, but that's too complex for this stage. |
|
Lesson
YQuest9 - MSX2 Specific code The MSX2 is a bitmap based system, unfortunately it's screen format will be a little tricky... lets make it behave! |
|
See
YQuest folder folder
|
|
| We need to define the screen size for the platform specific
code. Also note the game ram is at &C000... the RAM area of the MSX1 |
 |
| The Header is basically the same as the previous simple bitmap
examples, we're turning on the screen, We're also Defining the palette and clearing the user ram. |
 |
| Next we transfer the bitmap data into VRAM... this code is designed to simulate a tilemap - each bitmap is 8x8 | 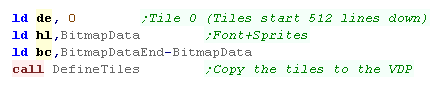 |
| When The title screen starts, we first reset the game settings
for a new game to start, Then we clear the screen. |
|
| We want to draw the tilescreen... it's held as a 1 byte per tile
data block in our code at 'TitlePic' We use our ShowSprite Routine to draw it to the screen... We need to convert the Tilenumber to a sprite position... the screen is 128 bytes wide and 192 lines tall, so we multiply the Xpos by 4 and the ypos by 8 however our game graphics come after the font, so we add 96 to the tile number to calculate the pattern to send to 'ShowSprite' |
 |
| We need to show a few text items to the screen A 'Press Fire' Message The 'LearnASM.Net' URL (Very Important!) The Highscore. |
|
| When the game or a new level starts, we first wait for fire to
be pressed. Next we clear the screen, Reset the player position Initialize the level enemies with LevelInit |
|
| We have to pause a while during the game loop, so we read in from the joystick during this time, and if the user presses a key we'll store it for later. | 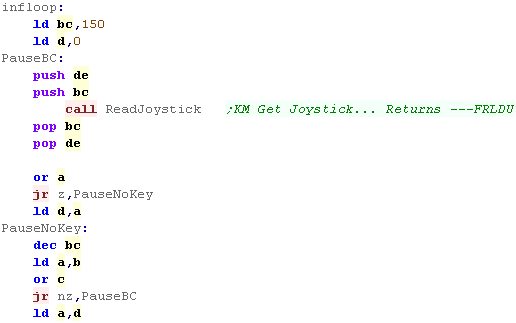 |
| First we draw the UI (Score etc) Next we clear the player sprite. |
|
| To slow down the acceleration, we have a 'timeout'... if a key was pressed, for a short time we'll ignore any other keys. | |
| We're going to process the input, We process each direction, and alter the acceleration of the player if a direction is pressed... The MSX joystick Firmware routine (&00D5) returns numbers for each possible direction from 1-8 |
|
We use Firmware function &00D8 to read the fire buttons - we need to select the fire button with A We have a 'Bullet fire' routine (in the common code) for Fire 1 Fire 2 will immediately stop the player If any button is pressed, the key timeout is set |
|
| Finally we run the multiplatform 'Draw and Move' routine, this draws the player, and handles movement and drawing of enemies and bullets | |
| We have a 'PrintChar' routine to show sprite characters from our
font... our font only has 96 tiles... the first 32 characters are
not used. We need to convert the XY char-pos into a byte-pos, so we multiply X by 4, and Y by 8 Note, part of the 'PrintChar' routine is in the multiplatform code. |
 |
| We have a couple of ShowSprite routines... ShowSprite will set a tile onscreen (at XY position BC)... We're going to use HMMM_ViaStack to copy the sprite onto the screen from the hidden vram. All the tiles are held in the hidden are - 32 tiles per strip... for this reason, we need to convert the tile number into an X/Y position of the source data (within the hidden area) DoGetSpriteObj will show object IX to the screen, getting tilenumber, and XY pos from IX BlankSprite will draw the empty sprite, using the object IX - to clear the old position of the object |
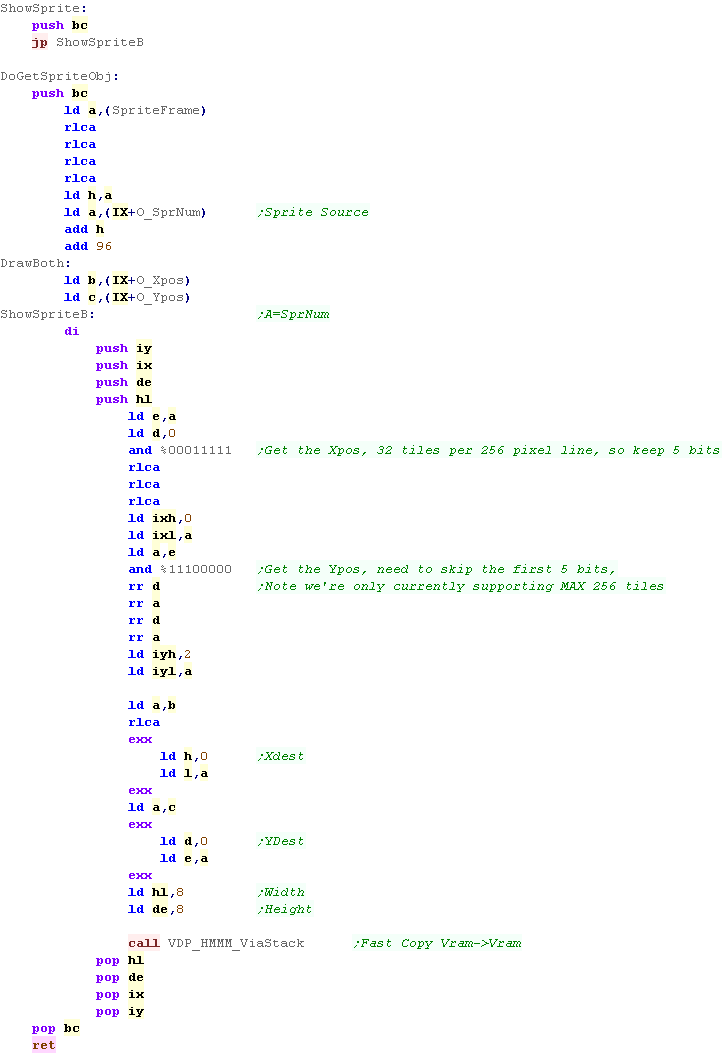 |
Define Tiles
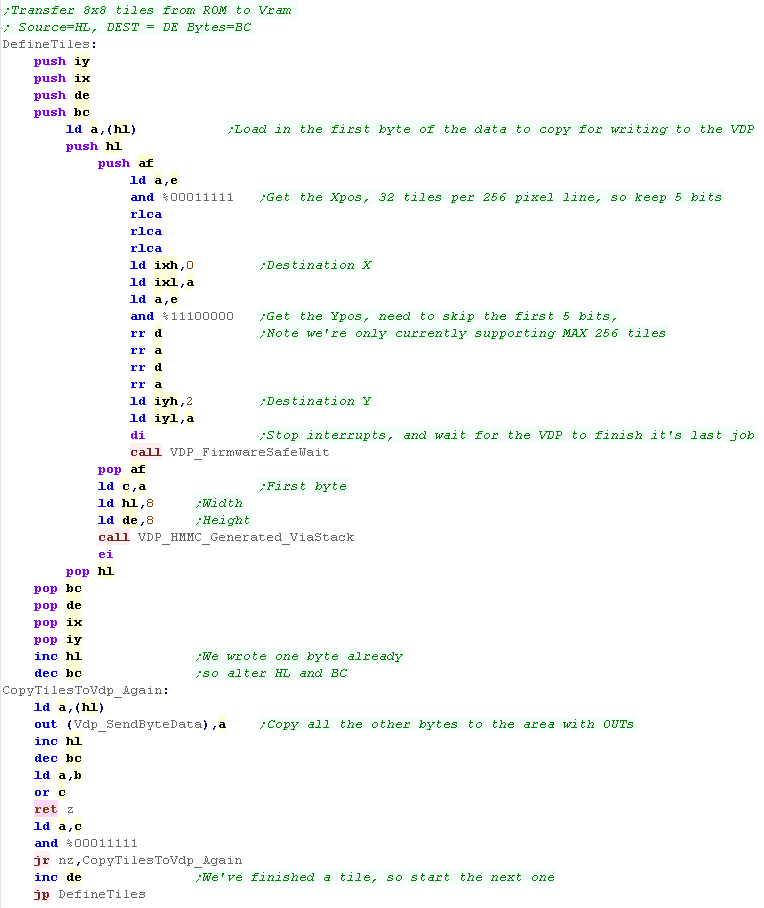
| Our source bitmap data is
split into 8x8 'tiles'... We need to copy this into the hidden area
of the screen (Ypos 512+) We covert the tile number into an xy position - each 8 line tall strip can store 32 tiles - so we split the tilenumber's bits up and use these to calculate the XY destination of the tiles. We then use HMMC to initialize the data transfer - and OUT all the bytes of the source tiles to transfer them to VRAM |
 |
| The HMMM and HMMC commands
deal with the VDP hardware... they were covered in the Platform
Specific series Here... |
|
Clear Screen
| When we want to clear the screen, we use HMMV - this fills an area of the screen with a solid byte. | 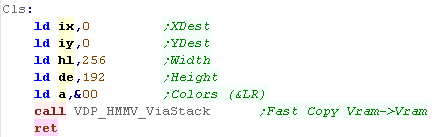 |
Sprite Data
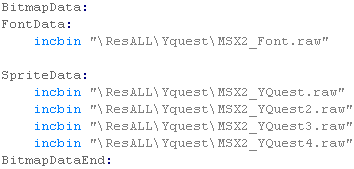
| We have 5 different files of sprites (tiles) 96x1 Tiles for the font 16x4 tiles for the 4 banks of sprites These are all transferred into the hidden screen area (Lines 512+) |
 |
Joystick Reading
| When we want to read from the joystick we use firmawre function
&00D5 - this returns the UDLR part of the joystick When we want to read the fire buttons we use &00D8 this is used by the 'Wait for fire' function... this randomizes the seed, and waits for fire to be released, then pressed. It's used for menus and between levels. |
|
Palette and Screen init
| Finally we have a list of parameters to initialize the screen, and also the palette for the MSX2 graphics. | 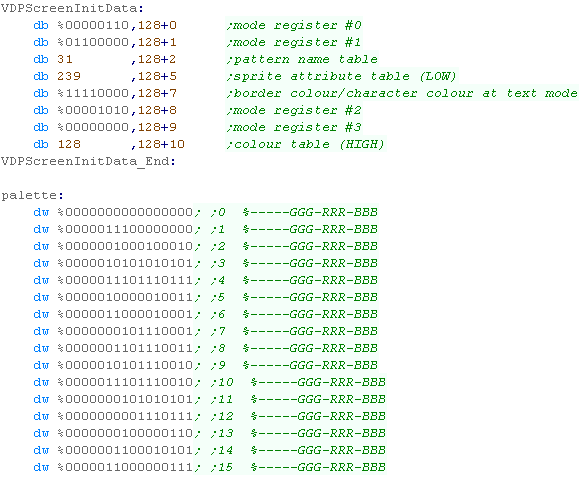 |
 |
Lesson
YQuest10 - Sam Coupe Specific code The Sam coupe uses a bitmap screen - with relative ease we can port to this system |
|
See
YQuest folder folder
|
|
| So we can support multiple platforms with different screen
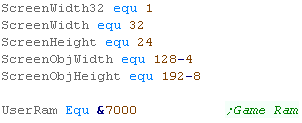
sizes we have platform specific screen size definitions Also note the game ram is at &7000. |
 |
| Next we need to start our program... we're starting with a
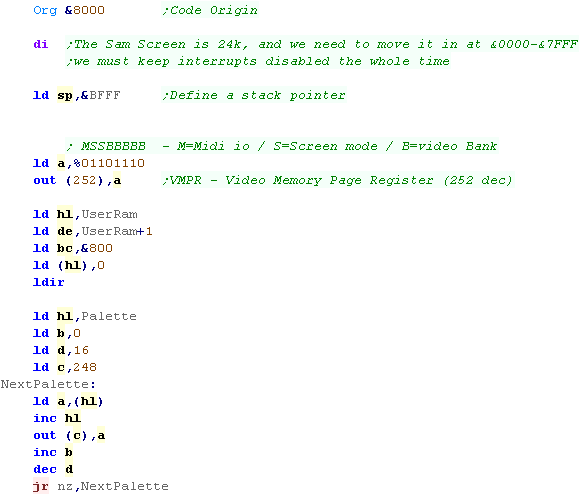
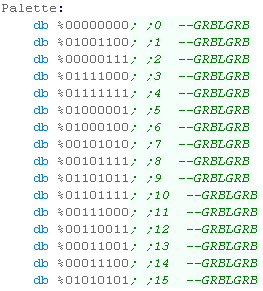
base of &8000 We define a stack pointer, page in the VRAM bank, clear the user ram, and define our palette |
  |
| When The title screen starts, we first reset the game settings
for a new game to start, Then we clear the screen. |
|
| We want to draw the tilescreen... it's held as a 1 byte per
tile data block in our code at 'TitlePic' We use our ShowSprite Routine to draw it to the screen... however we need to calculate the sprite address of the desired tile, so we use GetSpriteAddr to do so |
 |
| We need to show a few text items to the screen A 'Press Fire' Message The 'LearnASM.Net' URL (Very Important!) The Highscore. |
 |
| When the game or a new level starts, we first wait for fire to
be pressed. Next we clear the screen, Reset the player position Initialize the level enemies with LevelInit |
|
| We have to pause a while during the game loop, so we read in from the joystick during this time, and if the user presses a key we'll store it for later. |  |
| First we draw the UI (Score etc) Next we clear the player sprite. |
|
| To slow down the acceleration, we have a 'timeout'... if a key was pressed, for a short time we'll ignore any other keys. | |
| We're going to process the input, We process each direction, (QAOP) and alter the acceleration of the player if a direction is pressed... We have a 'Bullet fire' routine (in the common code) for Fire 2 (Space) Fire 1 will immediately stop the player (Enter) If any button is pressed, the key timeout is set |
 |
| Finally we run the multiplatform 'Draw and Move' routine, this draws the player, and handles movement and drawing of enemies and bullets | |
| We have a 'PrintChar' routine to show sprite characters from our
font... Note, part of the 'PrintChar' routine is in the multiplatform code. Each Character is 32 bytes, and there are no characters below 32 (space) We also need to multiply up the X,Y pos into an 8x8 position. |
 |
| We have a couple of ShowSprite routines... ShowSprite will draw Sprite A onscreen (at XY position BC) DoGetSpriteObj will show object IX to the screen, getting Sprite, and XY pos from IX BlankSprite will draw the empty sprite (Space in the font), using the object IX - to clear the old position of the object This Sprite routine is optimized for 8x8 tiles. |
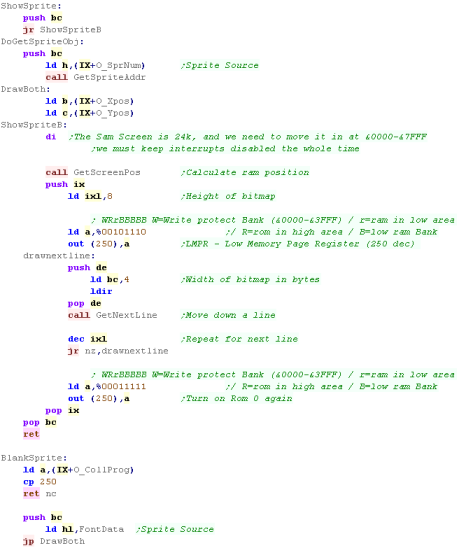 |
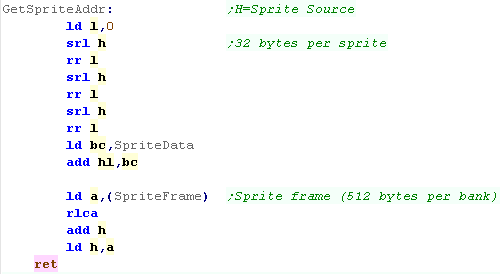
| Get SpriteAddr will calculate the address of the sprite frame Each sprite is 32 bytes, and each bank of 16 bytes is 512 bytes |
 |
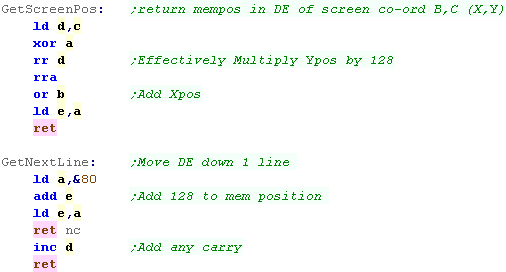
| GetScreenPos Will convert a XY position in BC into a memory
address in DE GetNextLine will move DE down a line |
 |
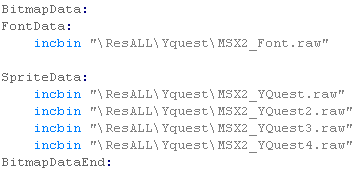
Sprite Data and Palette
| We have 5 different files of sprites 96 for the font 16x4 for the 4 banks of sprites |
 |
Joystick Reading
| We're going to use a direct hardware reader this time. We select a row of the keyboard using port &FE... the 0 bit in B will select a line The byte we read in from the port. Each bit of that byte will contain the keys for that line - a bit 1 is an 'unpressed key'... a bit 0 is a 'pressed' key We shift the bits of the keys we actually want (QAOP Space Enter) into H |
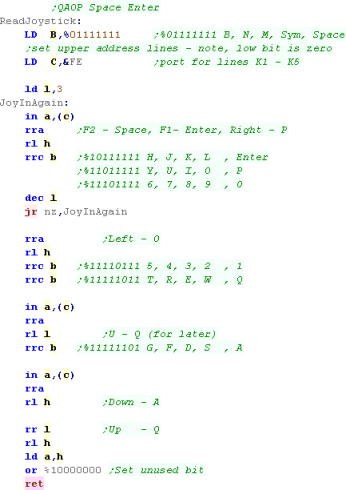 |
| Our wait for fire will wait for fire to be pressed an released. The Random number generation routine will be called during this to re-seed the random numbers |
 |
Clear Screen
| The Clear screen routine will write zero bytes to the display | 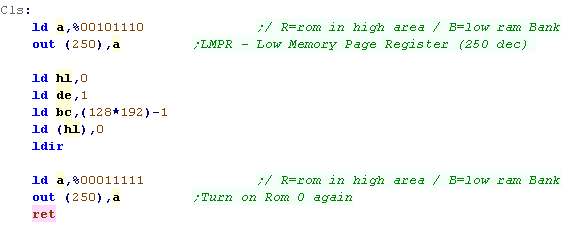 |
| We've used the
keyboard here for our controls, but we could use a cursor joystick
or different keys if we prefer, we'd just need to reconfigure the
controls accordingly. |
|
| So we can support multiple platforms with different screen
sizes we have platform specific screen size definitions Also note the game ram is at &7000. |
|
| Next we need to start our program... we're starting with a
base of &8000 We need to turn layer 2 on, set it's position up, and load in the 1 byte per color palette |
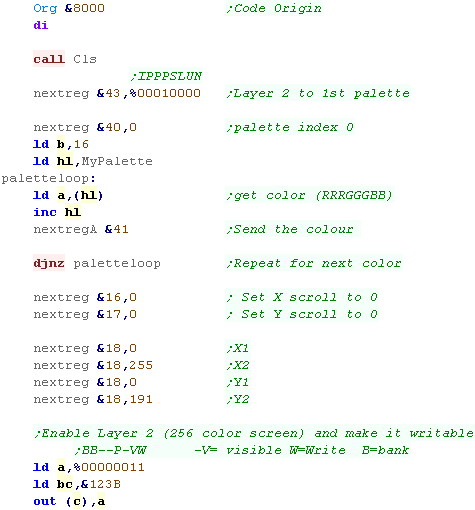  |
|
Screen
Layer 2 is 256 color - 1 byte per pixel... This makes a total
of 48k. We access it in 16k banks, through the first 16k of the memory area (&0000-&3FFF) - writes to this area go to VRAM, reads come from ROM. |
| When The title screen starts, we first reset the game settings
for a new game to start, Then we clear the screen. |
|
| We want to draw the tilescreen... it's held as a 1 byte per
tile data block in our code at 'TitlePic' We use our ShowSprite Routine to draw it to the screen... however we need to calculate the sprite address of the desired tile, so we use GetSpriteAddr to do so We need to multiply the tile X and Y pos by 8, as we need a pixel position and the 256 color layer 2 uses 1 byte per pixel |
 |
| We need to show a few text items to the screen A 'Press Fire' Message The 'LearnASM.Net' URL (Very Important!) The Highscore. |
|
| When the game or a new level starts, we first wait for fire to
be pressed. Next we clear the screen, Reset the player position Initialize the level enemies with LevelInit |
|
| We have to pause a while during the game loop, so we read in from the joystick during this time, and if the user presses a key we'll store it for later. | 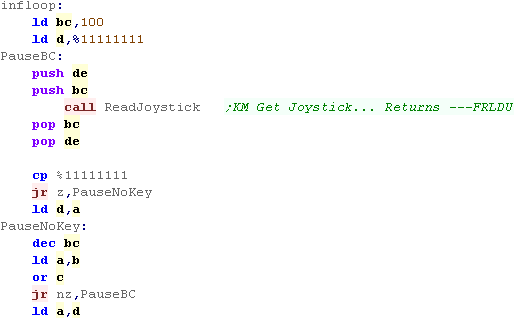 |
| First we draw the UI (Score etc) Next we clear the player sprite. |
|
| To slow down the acceleration, we have a 'timeout'... if a key was pressed, for a short time we'll ignore any other keys. | |
| We're going to process the input, We process each direction, (QAOP) and alter the acceleration of the player if a direction is pressed... We have a 'Bullet fire' routine (in the common code) for Fire 2 (Space) Fire 1 will immediately stop the player (Enter) If any button is pressed, the key timeout is set |
|
| Finally we run the multiplatform 'Draw and Move' routine, this draws the player, and handles movement and drawing of enemies and bullets | |
| We have a 'PrintChar' routine to show sprite characters from our
font... Note, part of the 'PrintChar' routine is in the multiplatform code. Each Character is 64 bytes, and there are no characters below 32 (space) We also need to multiply up the X,Y pos into an 8x8 position. |
 |
| We have a couple of ShowSprite routines... ShowSprite will draw Sprite A onscreen (at XY position BC) DoGetSpriteObj will show object IX to the screen, getting Sprite, and XY pos from IX BlankSprite will draw the empty sprite (Space in the font), using the object IX - to clear the old position of the object This Sprite routine is optimized for 8x8 tiles. |
 |
| Get SpriteAddr will calculate the address of the sprite frame Each sprite is 64 bytes, and each bank of 16 sprites is 1024 bytes |
 |
| The Layer 2 screen is a simple format... 8bpp (one byte per
pixel) 256 bytes wide, 192 lines tall. The only problem is that we need to bank in the correct 1/3rd of the screen so we can write to the screen. We mask out the top two bits of the Ypos to select the bank number, and out to &123B to select the bank (with the bottom two bits set, to make the screen visible and writable) |
 |
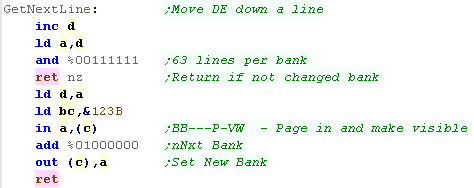
| Moving down a line is also pretty easy, We INC the top byte of our screen address However we need to check if we've reached line 64 - if we have we need to page in the next bank, and reset the top byte to zero. |
 |
Sprite Data and Palette
| We have 5 different files of sprites 96 for the font 16x4 for the 4 banks of sprites |
 |
Joystick Reading
| We're going to use a direct hardware reader this time. We select a row of the keyboard using port &FE... the 0 bit in B will select a line The byte we read in from the port. Each bit of that byte will contain the keys for that line - a bit 1 is an 'unpressed key'... a bit 0 is a 'pressed' key We shift the bits of the keys we actually want (QAOP Space Enter) into H |
|
| Our wait for fire will wait for fire to be pressed an released. The Random number generation routine will be called during this to re-seed the random numbers |
|
Clear Screen
| We need to page in the 3 16k banks of the screen and clear them
all separately, We do this by using GetScreenPos to page in the bank, then a LD command to zero the bytes. We cannot use LDIR, as while writes go to VRAM, reads come from ROM |
 |
Porting the Multiplatform Code
| We're going to have to port the multiplatform code to the GBZ80... it's missing many functions - so we're going to use Macro's to replace them | |
Z80 Version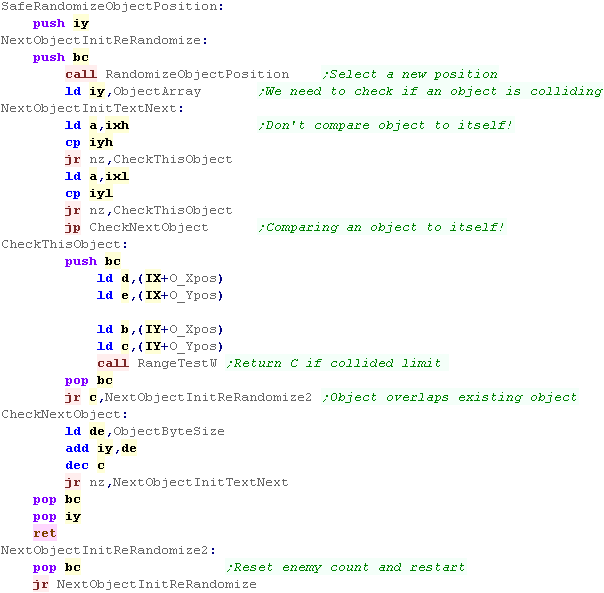 |
GBZ80 Version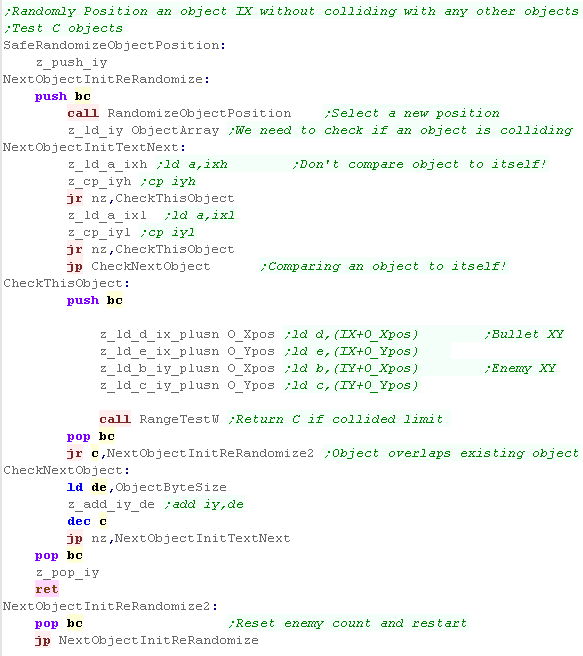 |
| Each command has a macro which emulates the commands that are
missing. Of course these are slower, but the game is too fast anyway, so it doesn't matter. |
 |
| There were so many changes
required, the GB version uses a different 'Multiplatform' file It's the same code, just with a lot of 'swapped out' commands like the ones shown above. |
|
| We need to define the screen size... also, as we're using the
Tilemap for graphics, the visible objects will be lower resolution
than the calculated position - so we need to reduce the resolution
of the Collision detection Also note the game ram is at &D000... the RAM area of the GameBoy |
 |
| We need to include some code to handle the GBZ80 processor, with the macros for the missing commands |  |
| Our header defines the RST's, interrupt handler and cartridge header... this is the same as the previous example | 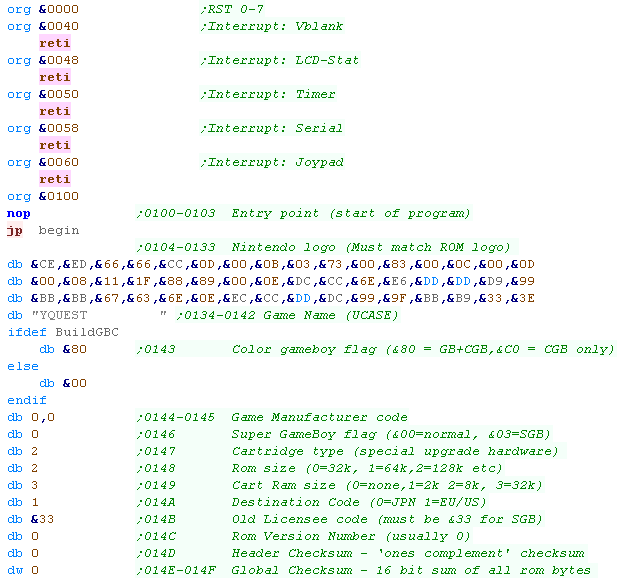 |
| The Header is basically the same as the previous simple bitmap
examples, we're turning on the screen, defining a palette and the
tile patterns for our font and game graphics We also clear the game ram. |
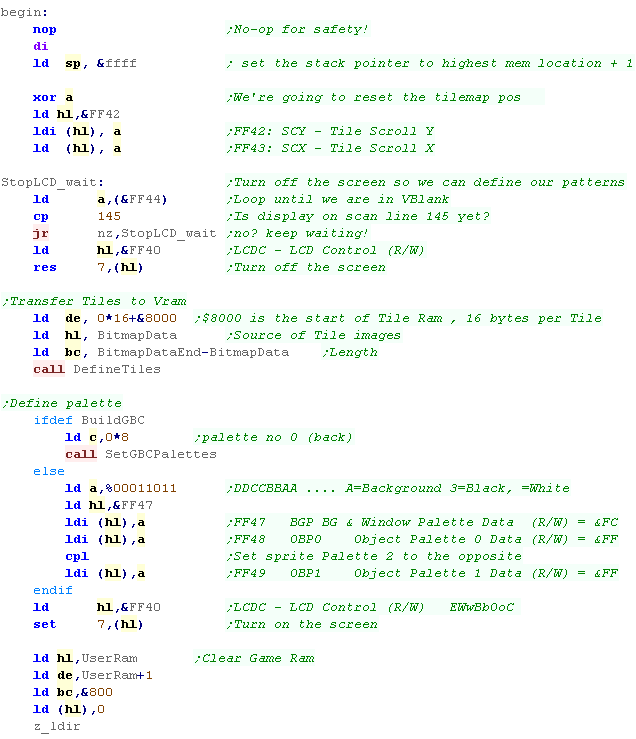 |
| When The title screen starts, we first reset the game settings
for a new game to start, Then we clear the screen. |
|
| We want to draw the tilescreen... it's held as a 1 byte per tile
data block in our code at 'TitlePic' We use our ShowSprite Routine to draw it to the screen... however our game graphics come after the font, so we add 96 to the tile number to calculate the pattern to send to 'ShowSprite' |
|
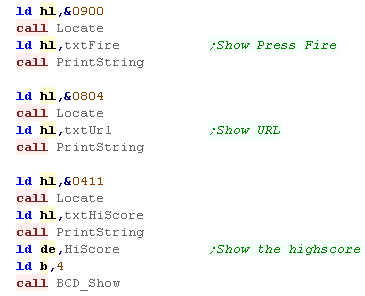
| We need to show a few text items to the screen A 'Press Fire' Message The 'LearnASM.Net' URL (Very Important!) The Highscore. |
 |
| When the game or a new level starts, we first wait for fire to
be pressed. Next we clear the screen, Reset the player position Initialize the level enemies with LevelInit |
|
| We have to pause a while during the game loop, so we read in from the joystick during this time, and if the user presses a key we'll store it for later. | |
| First we draw the UI (Score etc) Next we clear the player sprite. |
 |
| To slow down the acceleration, we have a 'timeout'... if a key was pressed, for a short time we'll ignore any other keys. | |
| We're going to process the input, We process each direction, and alter the acceleration of the player if a direction is pressed... We have a 'Bullet fire' routine (in the common code) for Fire 1 Fire 2 will immediately stop the player If any button is pressed, the key timeout is set |
|
| Finally we run the multiplatform 'Draw and Move' rotuine, this draws the player, and handles movement and drawing of enemies and bullets | |
| We have a 'PrintChar' routine to show sprite characters from our
font... our font only has 96 tiles... the first 32 characters are
not used. We load the Tile number in H... we load a color for the GBC in L Note, part of the 'PrintChar' routine is in the multiplatform code. |
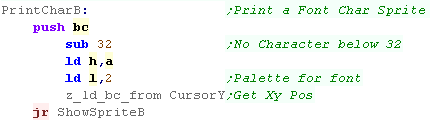 |
| We have a couple of ShowSprite routines... ShowSprite will set a tile onscreen (at XY position BC)...the position will show Tile H Because we're using the tilemap, we have to ignore many of the bits of the position we'd 'like' to show the sprite... there are 4 frames of animation per sprite - 16 sprites per bank. It will use a palette for the sprite too - all banks use the same color. The Sprites start after the 96 font characters. DoGetSpriteObj will show object IX to the screen, getting tilenumber, and XY pos from IX To show a tile, We set the 1 byte tile on the gameboy - on the GBC there is a second 'palette' byte in the GBC bank - we page this in with port &FF4F |
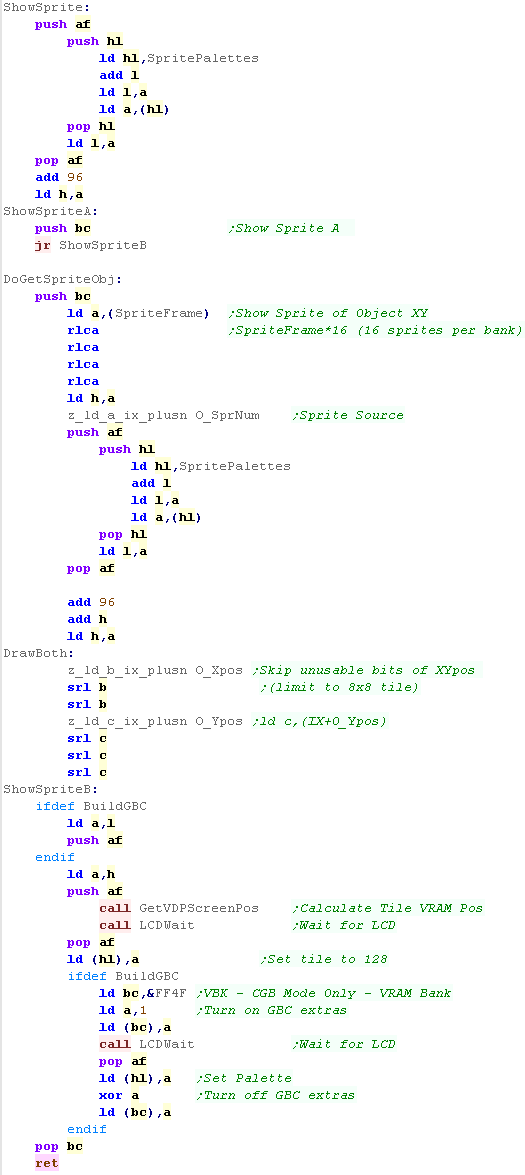 |
| BlankSprite will draw the empty sprite, using the object IX - to clear the old position of the object | 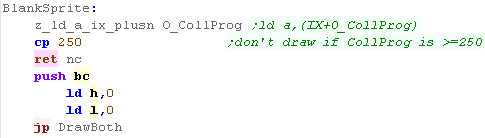 |
Clear Screen
| When we want to clear the screen, we set all the tiles to tile number 0 | |
Define Tiles,Vram Address and Get Screen Pos
| Define Tiles will transfer data from RAM to VRAM - it's transfers all the bytes from HL to DE (ByteCount BC) | 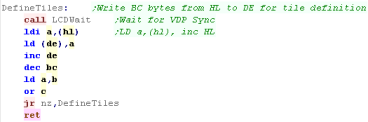 |
| GetVdpScreenPos will select will select a memory address of a Tile
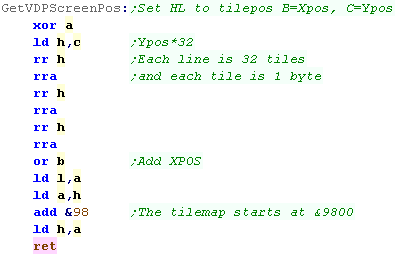
from an XY position in BC.... Each Tile is 1 bytes, and the screen is 32 bytes wide (32 tiles) The Tilemap base is &9800 |
 |
| We have to wait for Vblank (When the screen isn't being drawn) before transferring data to vram | 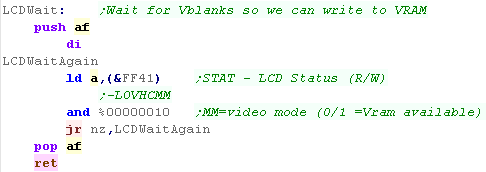 |
Sprite Data
| We have 5 different files of sprites (tiles) 96x1 Tiles for the font 16x4 tiles for the 4 banks of sprites |
 |
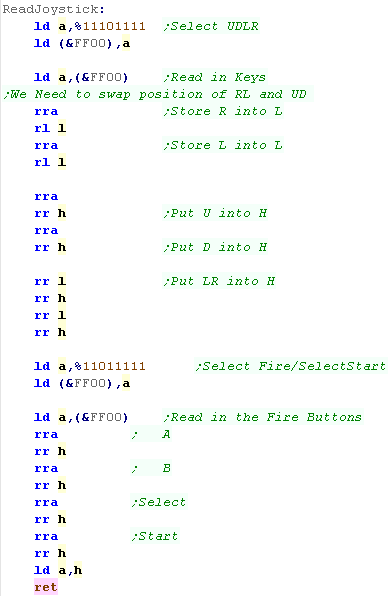
Joystick Reading
| We read the joypad in via &FF00 - but the keys are split into
two parts UDLR , and BA Select Start We select these by writing to port &FF00, the value we write selects one of the two banks We then read in from &FF00 to get the 4 keys ... in this code we shift them into H and the Accumulator |
 |
| We have a 'Wait for fire' function... this randomizes the seed,
and waits for fire to be released, then pressed. It's used for menus and between levels. |
 |
Palettes for the GBC
| For the GBC we need to define the palettes... We select an address in the palette with port &FF68 - we then write the byte of the color to &FF69 |
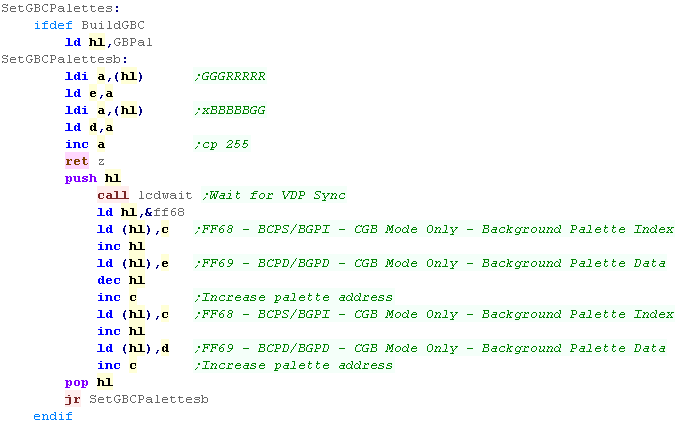 |
| We have one palette number for each sprite. | 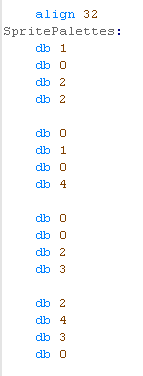 |
| We have our GBC palette... each entry uses 2 bytes in the format xBBBBBGGGGGRRRRR (5 bits per channel) | 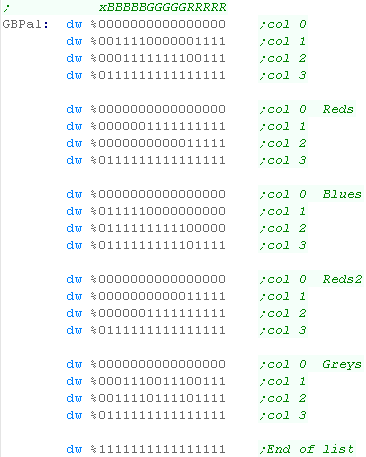 |
Multiplatform Sprite code
| We had an unused byte in the object definitions before... We're
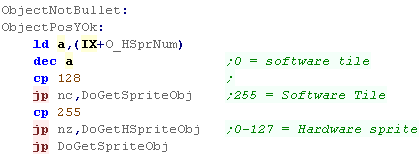
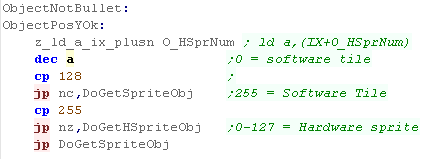
going to use it now! This will be the 'Hardware sprite number'... A Zero will be the same as before - a tile will be used 1+ will be a numbered hardware sprite - relating to one of the hardware sprites the system is capable of. This flexibility to use tiles or hardware sprites helps with systems with small numbers of hardware sprites |
 |
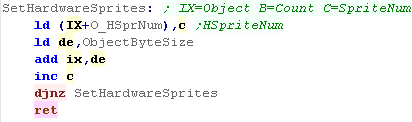
| We'll need to set banks of objects to consecutive sprite numbers
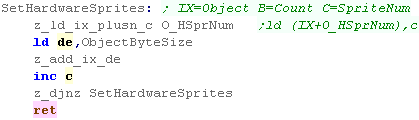
(EG bullets)... We use SetHardwareSprites to do this. |
 |
| We need to alter the DrawAndMove function and check the 'hardware
sprite number' Values 1-128 are hardware sprites... other values (0 / 255 etc) |
 |
SMS/GG Sprite code
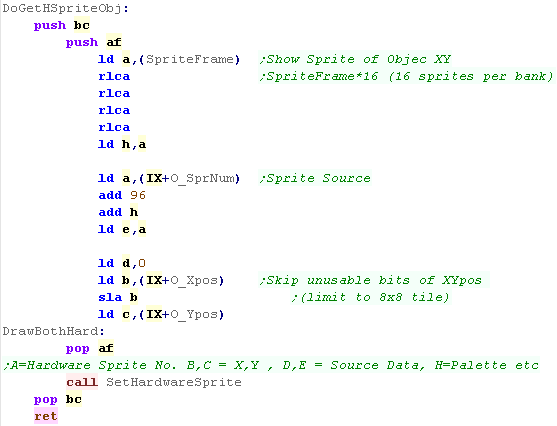
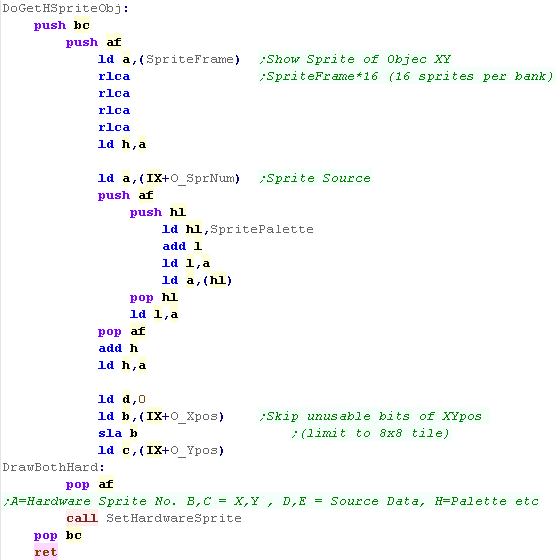
| DoGetHSpriteObj will draw a hardware sprite to the screen from
object IX... like before, the XY pos will be read from object IX,
the sprite frame will also be calculated Once these calculations are done We'll use 'SetHardwareSprite' to set the sprite onscreen |
 |
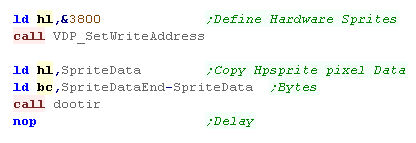
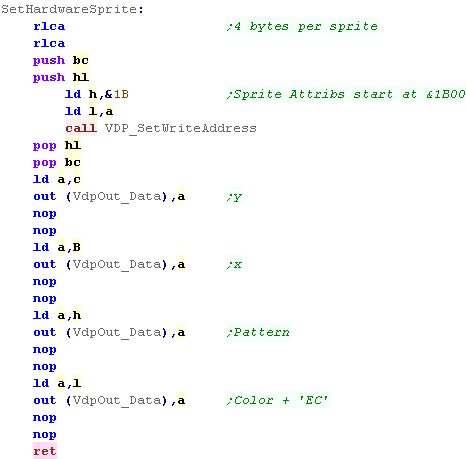
| We need to set the hardware sprite in VRAM... each sprite uses 3 bytes... one at &3F00 (Ypos) ... two at one at &3F80 (Xpos and Tile) | 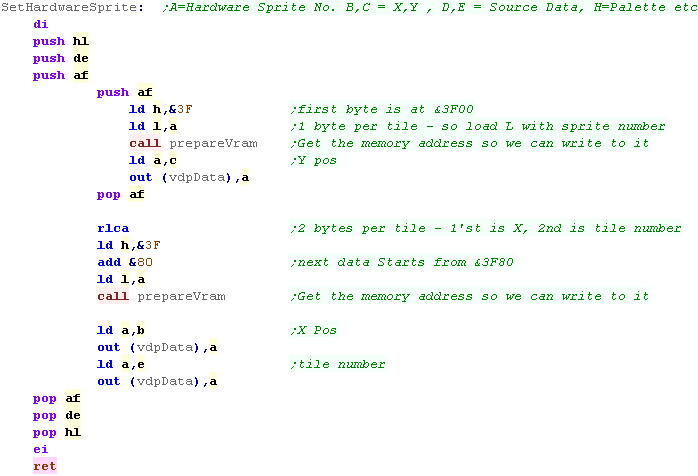 |
| The Clear Screen Routine needs to turn off all the hardware sprites | 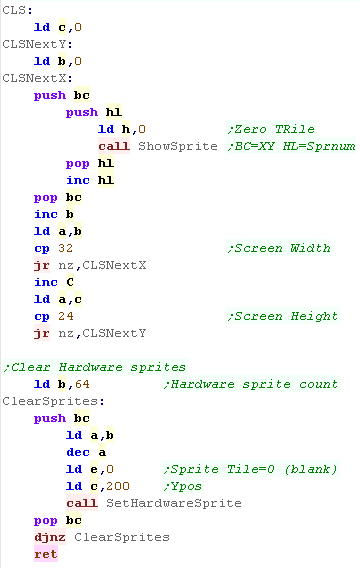 |
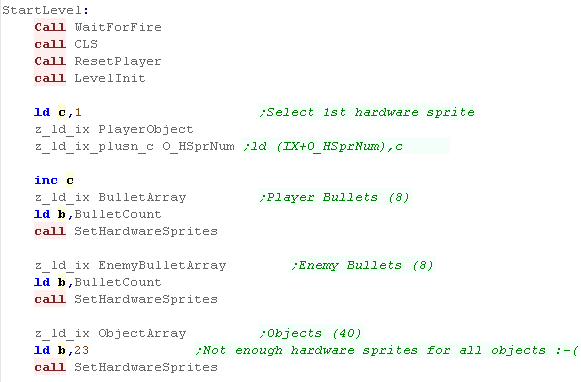
| Until we set the 'Hardware Sprite Numbers' of the objects they
will still use the old tile code... We do this in the 'StartLevel' routine... setting the player object to Hsprite 1... the player bullets to 2-9... and so on... |
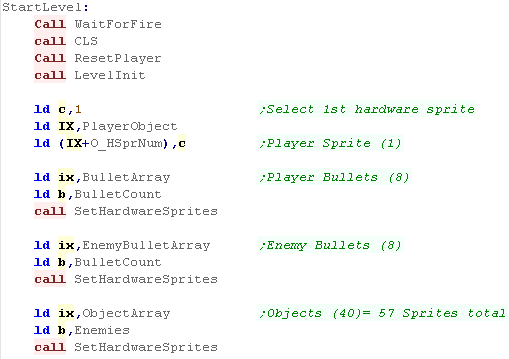 |
| As we only need 57
sprites - and the SMS can do 64, we're using hardware sprites for
all objects!... Of course the old Tile code still does the font and title screen. |
|
|
Lesson
YQuest14 - Adding hardware Sprites to the MSX1
* We used tiles before in our little Yquest game... lets extend it with Hardware sprites for better movement! |
|
See
YQuest folder folder
|
|
Multiplatform Sprite code
| We had an unused byte in the object definitions before... We're
going to use it now! This will be the 'Hardware sprite number'... A Zero will be the same as before - a tile will be used 1+ will be a numbered hardware sprite - relating to one of the hardware sprites the system is capable of. This flexibility to use tiles or hardware sprites helps with systems with small numbers of hardware sprites |
|
| We'll need to set banks of objects to consecutive sprite numbers
(EG bullets)... We use SetHardwareSprites to do this. |
|
| We need to alter the DrawAndMove function and check the 'hardware
sprite number' Values 1-128 are hardware sprites... other values (0 / 255 etc) |
|
MSX1 Sprite code
| The Hardware sprites don't use the same patterns as the tiles... We have to transfer the sprite patterns to address &3800 in VRAM We don't transfer the font - there's a limit of 64 sprite patterns, so it wouldn't be an option! |
 |
| We need a color number for each sprite (0-15) |  |
| DoGetHSpriteObj will draw a hardware sprite to the screen from
object IX... like before, the XY pos will be read from object IX,
the sprite frame will also be calculated We load a color in from the 'SpritePalette' Once these calculations are done We'll use 'SetHardwareSprite' to set the sprite onscreen |
 |
| We need to set the hardware sprite in VRAM... Each sprite uses 4 bytes ( X,Y, Pattern, Color)... the sprite data starts from &1B00 |
 |
| The Clear Screen Routine needs to turn off all the hardware sprites - we do this by moving all the sprites offscreen | 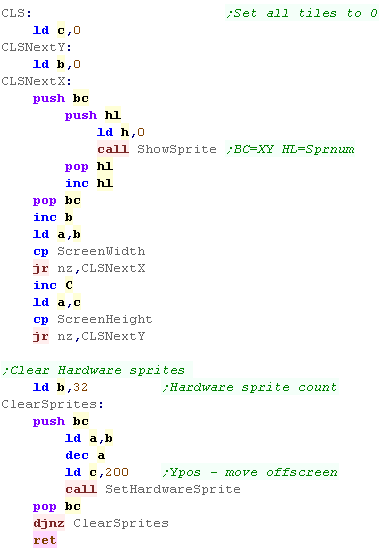 |
| Until we set the 'Hardware Sprite Numbers' of the objects they
will still use the old tile code... We do this in the 'StartLevel' routine... setting the player object to Hsprite 1... the player bullets to 2-9... and so on... |
 |
|
The MSX1 Doesn't have as many sprites as we
need!... it only has 32, but we need 40 just for the objects! For that reason, we'll leave the objects as Tiles - but use the sprites for the player and bullets. |
Multiplatform Sprite code
| We had an unused byte in the object definitions before... We're
going to use it now! This will be the 'Hardware sprite number'... A Zero will be the same as before - a tile will be used 1+ will be a numbered hardware sprite - relating to one of the hardware sprites the system is capable of. This flexibility to use tiles or hardware sprites helps with systems with small numbers of hardware sprites |
|
| We'll need to set banks of objects to consecutive sprite numbers
(EG bullets)... We use SetHardwareSprites to do this. |
 |
| We need to alter the DrawAndMove function and check the 'hardware
sprite number' Values 1-128 are hardware sprites... other values (0 / 255 etc) |
 |
Gameboy Sprite code - Interrupt handler
| We can't write sprites while the screen is redrawing... rather
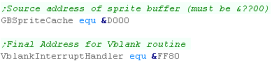
than waiting for Vblank we'll write them to a Cache (size &A0
Bytes... 160 = 4 bytes x 40 sprites) The interrupt handler needs to be transferred to address &FF80 as this is the only 'safe area' we can use for the interrupt handler. |
 |
| We need to transfer the interrupt handler to this address &FF80... we also init the buffer with zeros. | 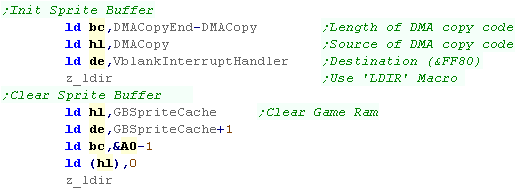 |
| The Jump to the routine needs to be at address &0040 |  |
| We need to enable sprites... enable the Vblank interrupt with port &FFFF bit 0 - and use EI to enable interrupts | 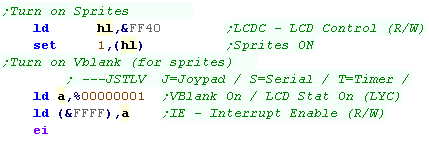 |
| We use a DMA transfer to copy the sprite data... to start this we transfer one byte to &FF46.. the byte transferred is the top half of the address... eg if the sprite cache is at &D000 ... we send &D0 | 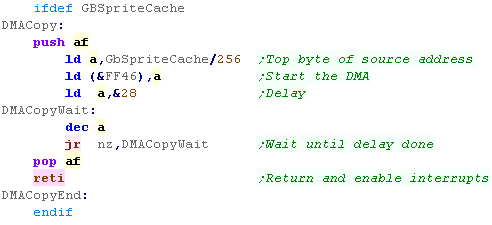 |
Gameboy Sprite code
| We need a Palette number for each sprite (0-15) | 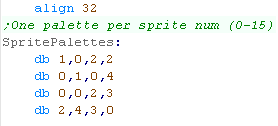 |
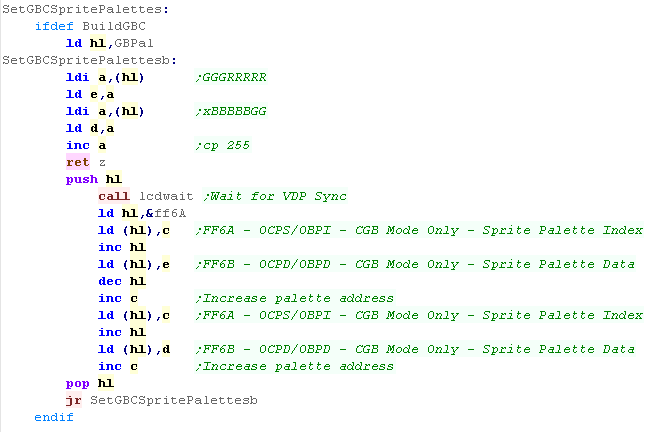
| The Sprites use an alternative set of 8 palettes. The procedure for setting the sprite palettes is the same as the tiles, but we need to set them with different ports &FF6A and &FF6B |
 |
| DoGetHSpriteObj will draw a hardware sprite to the screen from
object IX... like before, the XY pos will be read from object IX,
the sprite frame will also be calculated We load a color in from the 'SpritePalette' (0,0) is actually offscreen... the first visible pixel is (8,16) - so we add 8 to B and 16 to C to match the tilemap positions Once these calculations are done We'll use 'SetHardwareSprite' to set the sprite onscreen |
 |
| We need to set the hardware sprite in VRAM... Each sprite uses 4 bytes ( X,Y, Pattern, Attributes)... The actual sprite data starts at ram address &FE00, but we have to wait for Vblank - so we'll write to our sprite cache, and the data will be transferred via our interrupt handler |
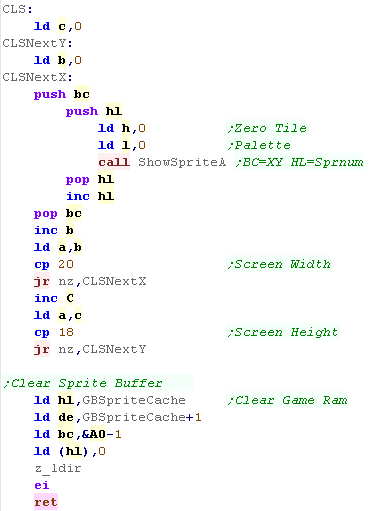 |
| The Clear Screen Routine needs to turn off all the hardware sprites - we do this by zeroing the sprite ram. | 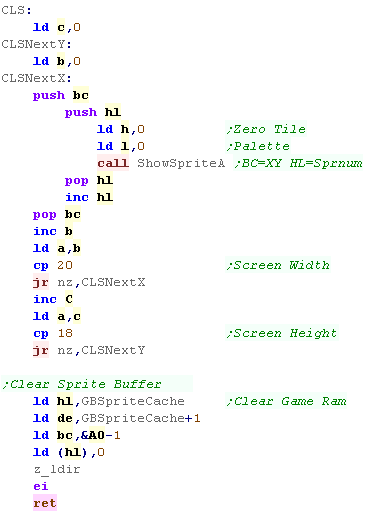 |
| Until we set the 'Hardware Sprite Numbers' of the objects they
will still use the old tile code... We do this in the 'StartLevel' routine... setting the player object to Hsprite 1... the player bullets to 2-9... and so on... Unfortunately we don't have enough sprites for all the objects ... we need 40 for the objects alone, and the GB only has 40 total... We'll define the first half as sprites - and the 2nd half will use the old tile functions. |
 |
|
The hardware
sprite cache is a bit of a pain... but we kind of need to do it... If we don't well end up with slow down |


