Y-Quest!
Introduction to the Y-Quest
Series...
Y-Quest is a small remake of the dos game '
X-Quest'...
This was originally written as part of my Livestream series, and is now
being ported to other platforms
The Y-Quest code was bases on the
simple
series, It's free and open source, so you can use it however you
wish
In this series, we'll look at the basic
codebase, and the platform specific modifications for each platform
Lesson
YQuest1 - Introduction and Data Structures
YQuest is a little game I wrote for multiple Z80 systems in my
Livestreams... it has now been ported to the 6502 machines
Lets start by having a quick look at the game, and the structure
of the game RAM, and the settings which define levels and enemies. |
 |
See
YQuest folder folder
|
|
 |
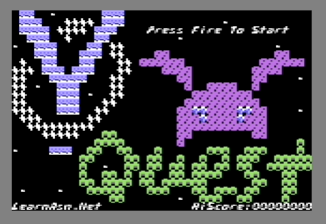
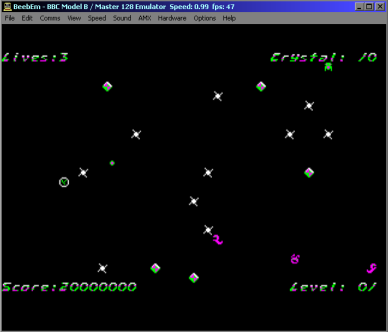
Y-Quest!
Y-Quest is an Action-Puzzle game... to complete each stage you
need to collect all the 'crystals' onscreen, by navigating your
'Y' Icon around the screen.
The original X-quest was controlled by mouse, however this version
is joystick controlled.
Unlike the original, the edges of the play area do not kill you.
Change acceleration with the joystick / keys UDLR... You can
shoot with the firebutton ... if you have a second fire you can
immediately stop with it.
There are 16 levels, after which the levels will repeat. |
|
Ram Definitions
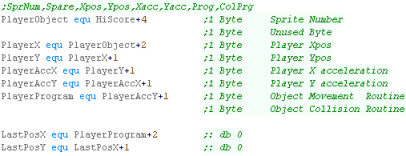
All Sprite Objects uses the same 8 byte definition..
The Sprite Number defines the graphic image
of the sprite from the sprite data bank... this is a single byte,
and the address is calculated by multiplying the sprite number by
the size of an 8x8 sprite
Xpos and Ypos are the
screen position of the sprite.
Xacc and Yacc are the
Acceleration of the sprite (how fast it moves in each direction
Program is the logic routine that handles
movement - this is used by enemies that change direction and fire.
Collision program is the logic routine that
handles collision - this defines enemies, crystals, bullets etc
and how they affect the player... a value of 255 is an unused
object... 254 is a dead object which will later respawn |
 |
The Ram is defined as offsets from the 'UserRam' Definition -
this is to allow the code to work consistently on ROM based
systems.
All values will be zeroed on startup, and any values with other
required values will be initialized accordingly
CursorX and CursorY are
the position of the next character draw - this is used by string
printing routines.
SpriteFrame is used by the bitmap drawing
routine... this selects which bank of sprites to use... there are
up to 4 banks (depending on system memory) |
 |
The BulletArray allows for 8 player
bullets - this uses the standard 'Sprite Object Layout'
The EnemyBulletArray allows for 8 enemy
bullets - this uses the standard 'Sprite Object Layout'
The ObjectArray allows for up to 40 objects
including enemies, crystals and mines - this uses the standard
'Sprite Object Layout' |
 |
Invincibility is a counter for how long the
player is invincible, either at the start of a level, or after
being killed
Random Seed is a 16 bit random seed - used by
the psuedorandom number generator
KeyTimeout is used as a delay for key
processing - this is to reduce the speed of acceleration of the
player
Lives is the number of lives of the player
Level is the Level number - starts from 0
Crystals is the number of crystals left to
collect - note: due to the object limit only 5 are shown at a time
- they respawn when collected.
PlayingSFX is used to control the current
sound
PlayingSFX2 is the last sound played - when
it does not match PlayingSFX we need to update the sound
Score is the current score, 8 binary coded
decimal packed digits (4 bytes)
HiScore is the best score so far. |
 |
The PlayerObject handles the player
sprite, this uses the standard 'Sprite Object Layout', however
there are labels to the component parts of the player object
There are also a backup of the X,Y position called LastPosX
and LastPosY |
 |
 |
Note:
All these addresses are relative to the base address
'UserRam'... this is so the RAM data can be located where ever
free ram exists on the target platform.
So the game can work on ROM machines, this is the only
writable data, The is no self modifying code or altered data
within the other areas of code.
|
Constants and Data definitions
The Player Object Backup is a copy of the
player settings, this is used to reset the player at the start of
a round
|
 |
We have some constant definitions next.
Object Byte Size is the number of bytes in an
object... The Player,Enemies and Bullets are all 8 bytes per
object
Enemies is the number of objects... this
includes Mines and Crystals.
Bullet Count is the number of bullets for
Players and Enemies... 8 means the Player can shoot 8 bullets, and
enemies can shoot a separate 8 bullets
Onscreen Crystals is the number of crystals
onscreen... this can be less than the number per level, as
crystals will respawn when collected as required
|
 |
The Level Map is a bank of pointers to the
Level data.
|
 |
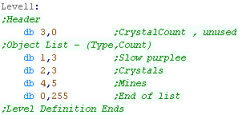
Each Level Definition has the same format.
First is a pair of header bytes... the first byte is the crystal
count... the second is unused.
Next comes pairs of object definitions... the first byte is an object type... the second is a count.
The definition is ended by an object of 0 and a count of 255
|
 |
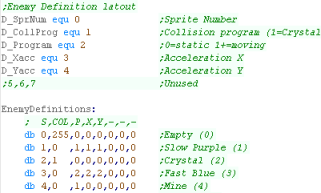
Although the contents have the same purpose, The Object
Type definitions are not in the same format as the Sprite
Objects
Each definition is a different enemy type, 0 is the 'empty object'
and is used for the end of the level definition |
 |
Next we have some Random Number Lookup tables
|
 |
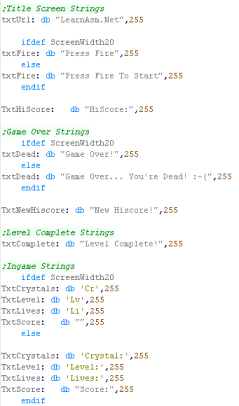
We have a set of 255 terminated Text strings.
These are used for ingame messages - for the Sega GameGear there
are shortened versions |
 |
The BCD Definitions are used to add points
to the current score...
The BCD code requires source and destination value to be 4 bytes -
little endian |
 |
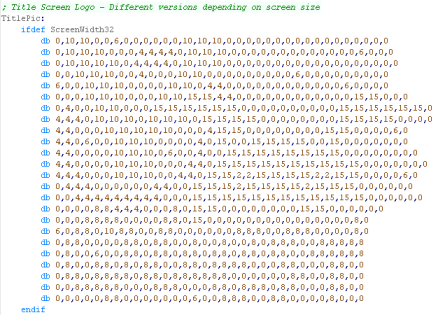
Finally we have the Title screen definition...
one tile per byte
These use the same sprite numbers (and sprite graphics) as the
enemy objects.
There are different versions depending on screen size. |
 |
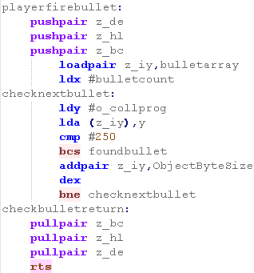
YQ_Multiplatform.asm - the multiplatform
code
Yquest 6502 was ported from the Z80 version, Like with my main
tutorials, I use zero page entries to simulate z80 registers.
Each subroutine of the multiplatform code has been recreated, with
the same layout function and purpose... for that reason I will not
be covering the multiplatform code of the 6502 version - as it
would repeat the content of
lessons 2-5 of the Z80 series.
If you want to see videos of these, please see the z80 series here. |
 |
 |
To assist
conversion the author uses a program he wrote called 'AsmConv'
(it's experimental, and is not publicly released)... this does a
crude job of converting the code, but much of the work is done
by hand.
To help convert the code many macros and functions are used...
these are found in BasicMacros.asm and BasicFunctions.ASM
|
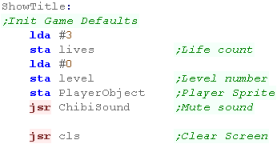
ShowTitle
When The title screen starts, we first reset the game
settings for a new game to start,
Then we clear the screen. |
 |
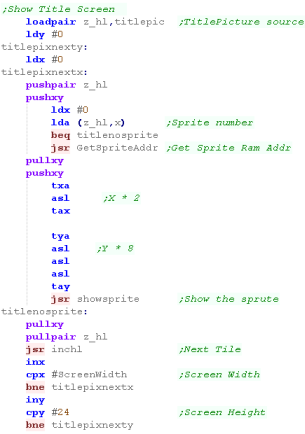
We want to draw the tilescreen... it's held as a 1 byte per
tile data block in our code at 'TitlePic'
We use our ShowSprite Routine to draw it to the screen...
however we need to calculate the sprite address of the desired
tile, so we use GetSpriteAddr to do so |
 |
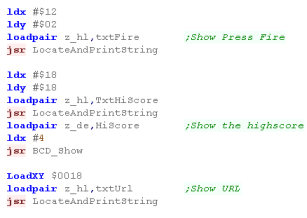
We need to show a few text items to the screen
A 'Press Fire' Message
The 'LearnASM.Net' URL (Very Important!)
The Highscore. |
 |
LevelStart
When the game or a new level starts, we first wait for fire
to be pressed.
Next we clear the screen,
Reset the player position
Initialize the level enemies with LevelInit |
 |
Level Loop
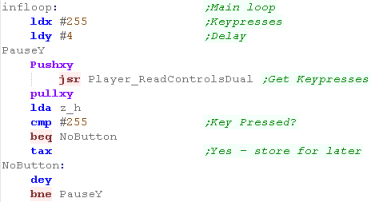
We have to pause a while during the game loop, so we read in
from the joystick during this time, and if the user presses a
key we'll store it for later.
we use Y for a loop counter - and X for any pressed button.
we use function call Player_ReadControlsDual - which will read
in the joystick and fire button |
 |
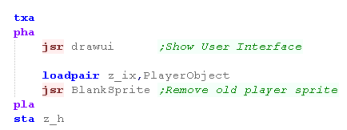
First we draw the UI (Score etc)
Next we clear the player sprite.
|
 |
| To slow down the acceleration, we have a 'timeout'... if a
key was pressed, for a short time we'll ignore any other keys. |
 |
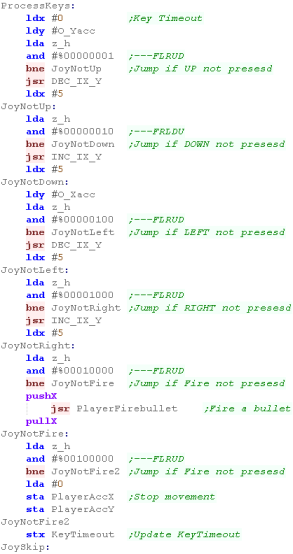
We're going to process the input,
We process each direction, and alter the acceleration of the
player if a direction is pressed...
We have a 'Bullet fire' routine (in the common code) for Fire
1
Fire 2 will immediately stop the player
If any button is pressed, the key timeout is set |
 |
| Finally we run the multiplatform 'Draw and Move' rotuine,
this draws the player, and handles movement and drawing of
enemies and bullets |
 |
Clear Screen and Print Char
| To clear the screen (CLS), we need to wipe the bitmap area
at address $4180 - we use the CLDIR0 command to do this, which
wipes z_bc bytes from address z_hl |
 |
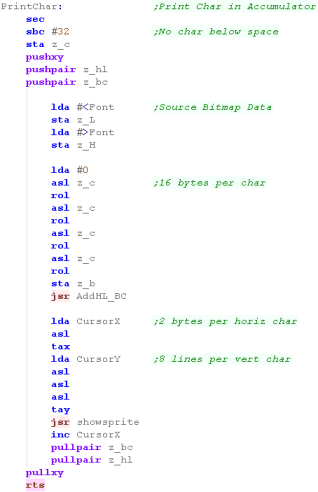
PrintChar will show a character to the screen, using a
bitmap font the same as the sprites...
We need to calculate the position in the font data of the
character
Each Character is 16 bytes, and there are no characters below
32 (space)
We also need to multiply up the X,Y pos into an 8x8 grid
position.
Once we've shown a character, we increment the X position for
the next character |
 |
Sprite routines
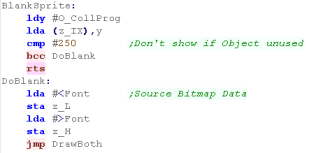
We have a couple of ShowSprite routines...
BlankSprite will draw the empty sprite (Space in the font),
using the object z_IX - to clear the old position of the object |
 |
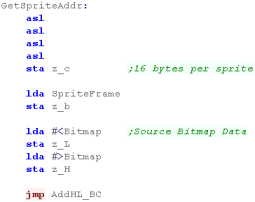
GetSpriteAddr will calculate the address in ram of the sprite
data we want to show to the screen
We also handle the sprite frame... there are 4 frames of
animation for each sprite - each bank is 256 bytes |
 |
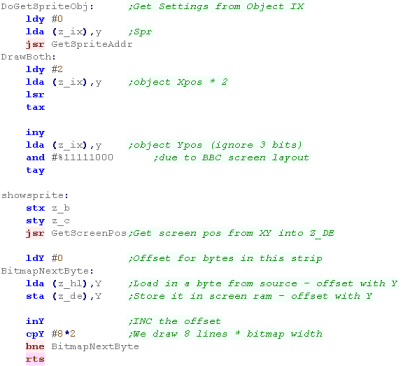
DoGetSpriteObj will show object IX to the screen, getting
Sprite, and XY pos from z_IX
ShowSprite will draw Sprite A onscreen (at XY position BC)
Note, due to the BBC screen layout, we're 'rounding' the Y
co-ordinates to an 8 line tall grid |
 |
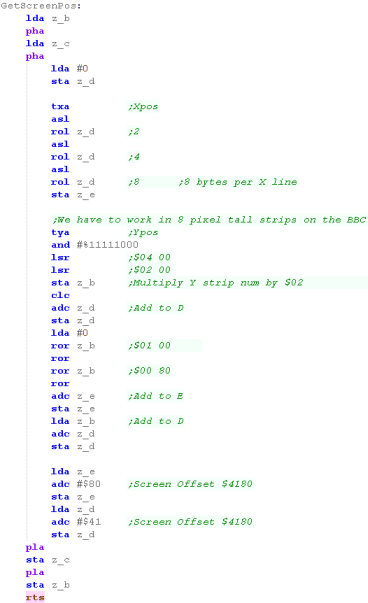
Get Screen Pos
The Get ScreenPos function will take an XY pos in z_B and
z_C... it will return a screen memory address in z_de
Our screen address starts at $4180...
Because of the screen layout (8 Y lines are consecutive in ram),
we're only going to look at the top 5 bits of the Y position
Each line is 320 pixels, and there are 4 pixels per byte... this
means our screen is 80 bytes wide, and because the 8 lines of
each horizontal strip are combined, the top 5 bits must be
multiplied by 640 ($280) (80*8=640)
Since the 8 Y lines are consecutive in memory, between each
horizontal byte, we multiply the Xpos by 8
Our formula is:
$4180 + ({Top 5 bits of Y} * $280) + Xpos * 8
We achieve the multiplication by bitshifting ops. |
 |
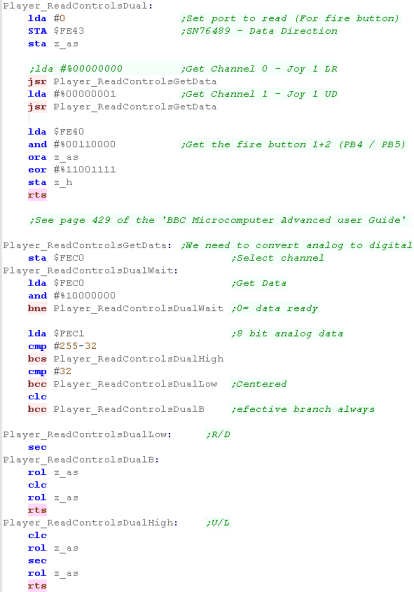
Joystick Reading
We're going to read in from the joystick - the BBC joystick is
analog - which is a bit of a pain.
We need to select an axis by writing to $FEC0, then read in from
$FEC1
We need to see if the result is outside of the 'dead zone' and
set the bits in z_h depending on the result. |
 |
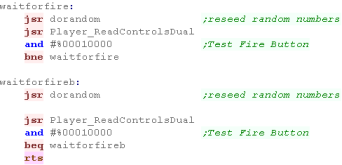
We also have a 'Wait for fire' function... this randomizes the
seed, and waits for fire to be released, then pressed.
It's used for menus and between levels. |
 |
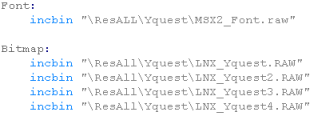
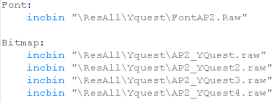
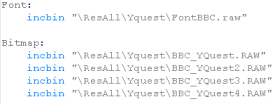
Sprite Data and Palette
We have 5 different files of sprites
96 for the font
16x4 for the 4 banks of sprites |
 |
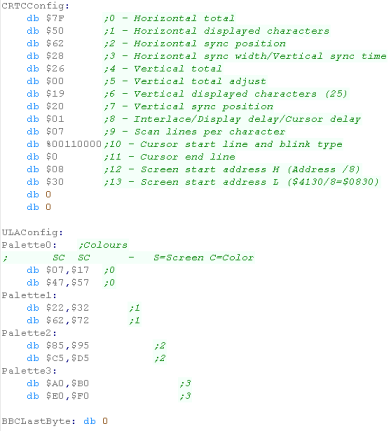
| We have settings to define the palette, and screen size and
position... these are transferred to the graphics hardware
during startup |
 |
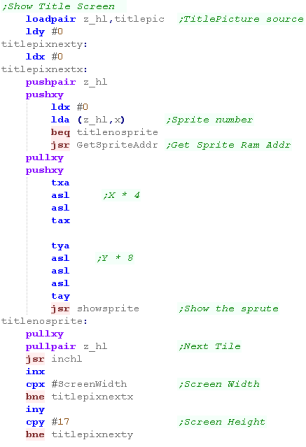
ShowTitle
When The title screen starts, we first reset the game
settings for a new game to start,
Then we clear the screen. |
 |
We want to draw the tilescreen... it's held as a 1 byte
per tile data block in our code at 'TitlePic'
We use our ShowSprite Routine to draw it to the screen...
however we need to calculate the sprite address of the
desired tile, so we use GetSpriteAddr to do so |
 |
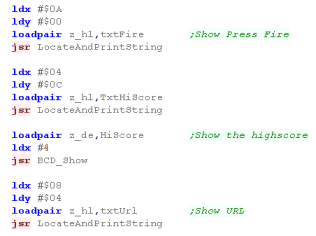
We need to show a few text items to the screen
A 'Press Fire' Message
The 'LearnASM.Net' URL (Very Important!)
The Highscore. |
 |
LevelStart
When the game or a new level starts, we first wait for
fire to be pressed.
Next we clear the screen,
Reset the player position
Initialize the level enemies with LevelInit |
 |
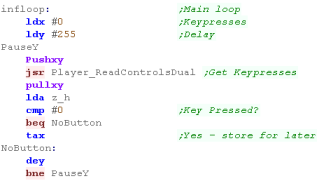
Level Loop
We have to pause a while during the game loop, so we read
in from the joystick during this time, and if the user
presses a key we'll store it for later.
we use Y for a loop counter - and X for any pressed button.
we use function call Player_ReadControlsDual - which will
read in the joystick and fire button |
 |
First we draw the UI (Score etc)
Next we clear the player sprite.
|
 |
| To slow down the acceleration, we have a 'timeout'... if a
key was pressed, for a short time we'll ignore any other
keys. |
 |
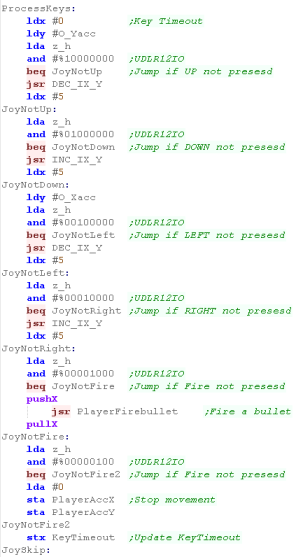
We're going to process the input,
We process each direction, and alter the acceleration of the
player if a direction is pressed...
We have a 'Bullet fire' routine (in the common code) for
Fire 1
Fire 2 will immediately stop the player
If any button is pressed, the key timeout is set |
 |
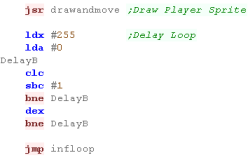
Finally we run the multiplatform 'Draw and Move' rotuine,
this draws the player, and handles movement and drawing of
enemies and bullets
Because the Lynx is so fast, we have a second delay to slow
things down with a delay loop. |
 |
Clear Screen and Print Char
To clear the screen (CLS), we need to wipe the bitmap area
at address $4180 - we use the CLDIR0 command to do this,
which wipes z_bc bytes from address z_hl
|
 |
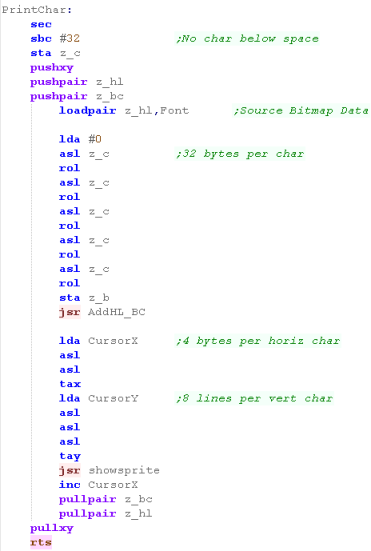
PrintChar will show a character to the screen, using a
bitmap font the same as the sprites...
We need to calculate the position in the font data of the
character
Each Character is 16 bytes, and there are no characters
below 32 (space)
We also need to multiply up the X,Y pos into an 8x8 grid
position.
Once we've shown a character, we increment the X position
for the next character
|
 |
Sprite routines
We have a couple of ShowSprite routines...
BlankSprite will draw the empty sprite (Space in the font),
using the object z_IX - to clear the old position of the
object |
 |
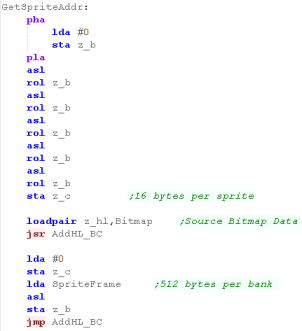
GetSpriteAddr will calculate the address in ram of the
sprite data we want to show to the screen
We also handle the sprite frame... there are 4 frames of
animation for each sprite - each bank is 512 bytes
|
 |
DoGetSpriteObj will show object z_IX to the screen, getting
Sprite, and XY pos from z_IX
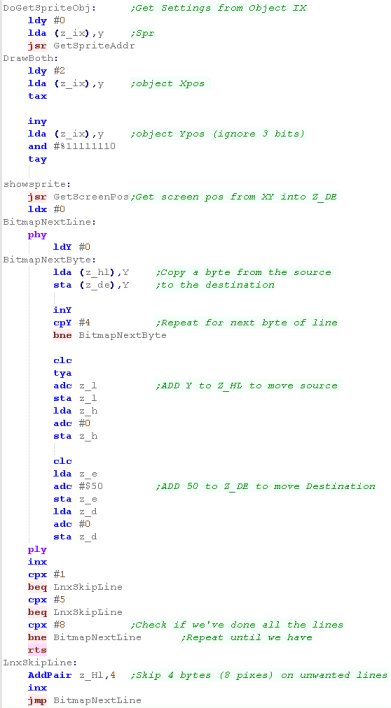
ShowSprite will draw Sprite A onscreen (at XY position BC)
The Bitmap routine skips lines 1 and 5 - this scales the
graphics down from 8x8 to 8x6 - allowing smaller graphics on
the lynx...
Of course, another option would be to use smaller font and
bitmap files (native 8x6) - however in this case storage space
was not a problem, so this solution was quicker.
|
 |
 |
Even with
the 8x6 graphics, the gameplay screen is a little small...
We could always scale down to 4x4, but this would make the
graphics very unclear!
|
Commodore 64 Header
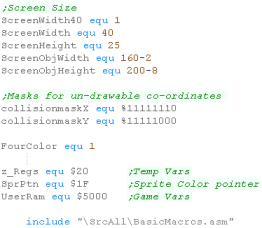
So we can support multiple platforms with different screen
sizes we have platform specific screen size definitions
Each system needs an area of ram for game variables, know as
'UserRam'... we also have a 'SpritePointer' - used as temp
storage for the color lookup
We use CollisionMasks - these will skip some bits of the
internal object positions, this is to ensure we don't detect
a collision that is not visible due to the low resolution of
screen co-ordinates.
|
 |
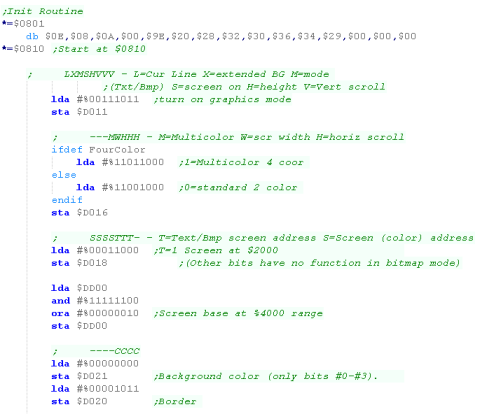
When our program loads we need to initialize the graphics
hardware and set up the screen.
As our program is so big...We need to offset the screen...
by default the screen ram is at $2000 - but we'll move it to
$6000 by setting a 'base' of $4000.
This also moves the colors from $400 to $4400... the $D800
color attributes are unmoved |
 |
| We zero the game's ram data. using CLDIR0 - which fills an
area with zeros |
 |
ShowTitle
When The title screen starts, we first reset the game
settings for a new game to start,
Then we clear the screen. |
 |
We want to draw the tilescreen... it's held as a 1 byte
per tile data block in our code at 'TitlePic'
We use our ShowSprite Routine to draw it to the screen...
however we need to calculate the sprite address of the
desired tile, so we use GetSpriteAddr to do so |
 |
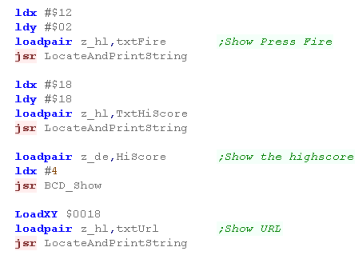
We need to show a few text items to the screen
A 'Press Fire' Message
The 'LearnASM.Net' URL (Very Important!)
The Highscore. |
 |
LevelStart
When the game or a new level starts, we first wait for
fire to be pressed.
Next we clear the screen,
Reset the player position
Initialize the level enemies with LevelInit |
 |
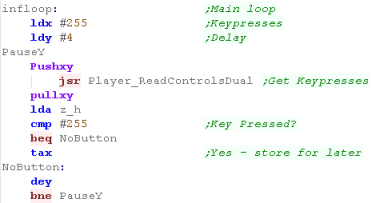
Level Loop
We have to pause a while during the game loop, so we read
in from the joystick during this time, and if the user
presses a key we'll store it for later.
we use Y for a loop counter - and X for any pressed button.
we use function call Player_ReadControlsDual - which will
read in the joystick and fire button |
 |
First we draw the UI (Score etc)
Next we clear the player sprite.
|
 |
| To slow down the acceleration, we have a 'timeout'... if a
key was pressed, for a short time we'll ignore any other
keys. |
 |
We're going to process the input,
We process each direction, and alter the acceleration of the
player if a direction is pressed...
We have a 'Bullet fire' routine (in the common code) for
Fire 1
Fire 2 will immediately stop the player
If any button is pressed, the key timeout is set |
 |
Finally we run the multiplatform 'Draw and Move' routine,
this draws the player, and handles movement and drawing of
enemies and bullets
|
 |
Clear Screen and Print Char
To clear the screen (CLS), we need to wipe the bitmap area
at address $6000 - we use the CLDIR0 command to do this,
which wipes z_bc bytes from address z_hl
|
 |
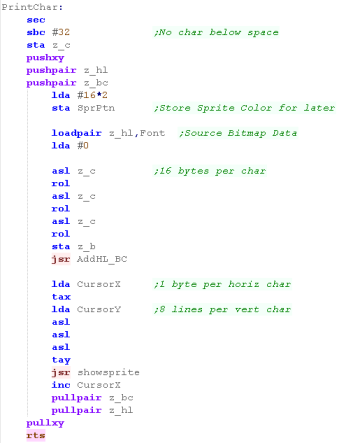
PrintChar will show a character to the screen, using a
bitmap font the same as the sprites...
We need to calculate the position in the font data of the
character
Each Character is 16 bytes, and there are no characters
below 32 (space)
We need to store the pointer to the palette entry for the
font (16*2)
We also need to multiply the Y position by 8
Once we've shown a character, we increment the X position
for the next character
|
 |
Sprite routines
We have a couple of ShowSprite routines...
BlankSprite will draw the empty sprite (Space in the font),
using the object z_IX - to clear the old position of the
object |
 |
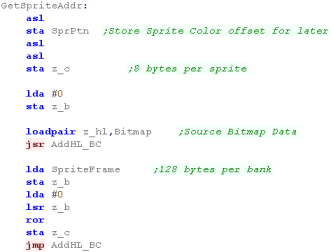
GetSpriteAddr will calculate the address in ram of the
sprite data we want to show to the screen
We also calculate the sprite color pointer
We also handle the sprite frame... there are 4 frames of
animation for each sprite - each bank is 128 bytes
|
 |
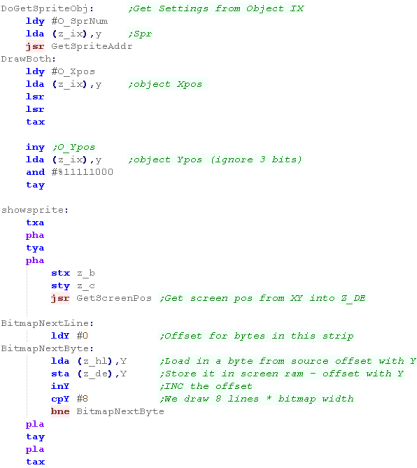
DoGetSpriteObj will show object z_IX to the screen, getting
Sprite, and XY pos from z_IX
ShowSprite will draw Sprite A onscreen (at XY position BC)
|
 |
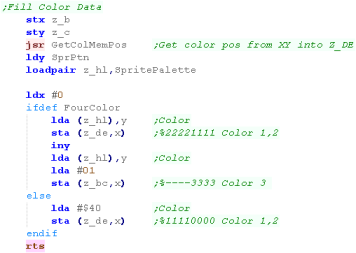
Once we've done the sprite bitmap data we need to transfer
the colors to the color attribute ram areas.
we use the calculate sprite color pointer (SprPtn) to get the
correct color bytes from the palette |
 |
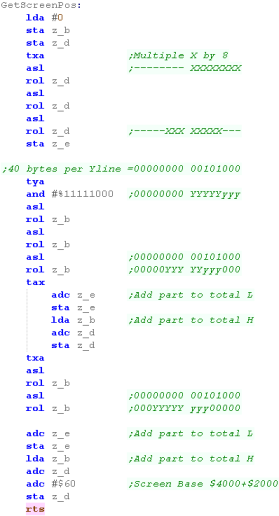
Get Screen Pos
The GetScreenPos calculation is pretty tricky!
Normally our screen address starts at $2000... however
we've offset the screen by $4000, so it's at $6000 now
Because of the screen layout (8 Y lines are consecutive in
ram), we're only going to look at the top 5 bits of the Y
position
Each line is 320 pixels, and there are 8 pixels per byte (160
pix and 4 px per byte in 4 color mode)... this means our
screen is 40 bytes wide, and because the 8 lines of each
horizontal strip are combined, the top 5 bits must be
multiplied by 640 ($140) (40*8=320)
Since the 8 Y lines are consecutive in memory, between each
horizontal byte, we multiply the Xpos by 8
Our formula is:
$6000 + (Y * 40) + Xpos * 8
We achieve the multiplication by bitshifting ops. |
 |
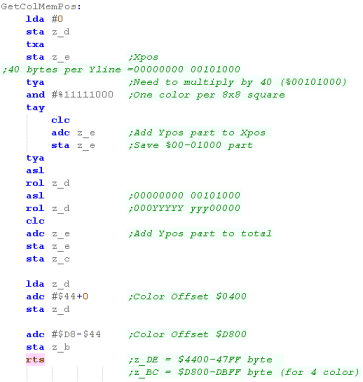
Each 8x8 square has it's own color attributes... these are
stored at two memory addresses $D800+ and $4400+
There is one byte per 8x8 block at each of these addresses...
we calculate these using formulas below:
Address1= $4400 + (Ypos * 40) + Xpos
Address2= $D800 + (Ypos * 40) + Xpos
We calculate these in pretty much the same way as before. |
 |
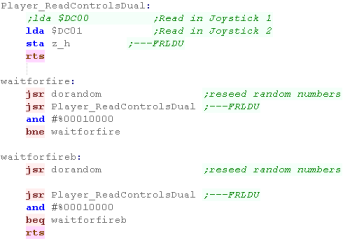
Joystick Reading
When we want to read in from the joystick we just use port
$DC01
We also have a 'Wait for fire' function... this randomizes the
seed, and waits for fire to be released, then pressed.
It's used for menus and between levels. |
 |
Sprite Data and Palette
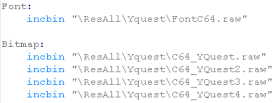
We have 5 different files of sprites
96 for the font
16x4 for the 4 banks of sprites
|
 |
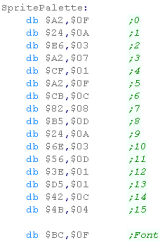
| We define a 2 byte palette for each sprite (0-15), and a
16th entry for the font. |
 |
ShowTitle
When The title screen starts, we first reset the game
settings for a new game to start,
Then we clear the screen. |
 |
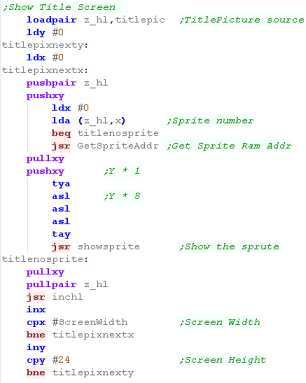
We want to draw the tilescreen... it's held as a 1 byte per
tile data block in our code at 'TitlePic'
We use our ShowSprite Routine to draw it to the screen...
however we need to calculate the sprite address of the desired
tile, so we use GetSpriteAddr to do so |
 |
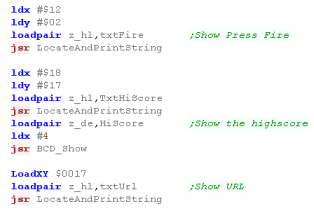
We need to show a few text items to the screen
A 'Press Fire' Message
The 'LearnASM.Net' URL (Very Important!)
The Highscore. |
 |
LevelStart
When the game or a new level starts, we first wait for fire
to be pressed.
Next we clear the screen,
Reset the player position
Initialize the level enemies with LevelInit |
 |
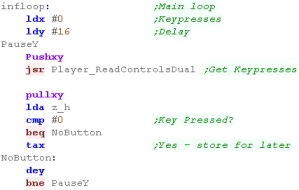
Level Loop
We have to pause a while during the game loop, so we read in
from the joystick during this time, and if the user presses a
key we'll store it for later.
we use Y for a loop counter - and X for any pressed button.
we use function call Player_ReadControlsDual - which will read
in the joystick and fire button |
 |
First we draw the UI (Score etc)
Next we clear the player sprite.
|
 |
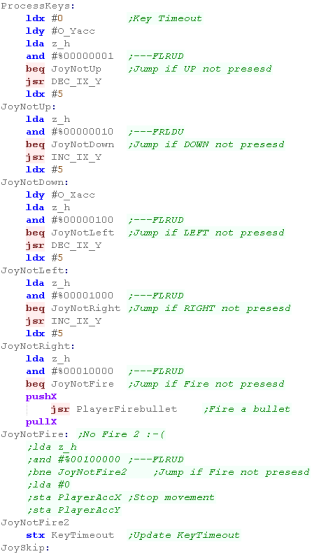
| To slow down the acceleration, we have a 'timeout'... if a
key was pressed, for a short time we'll ignore any other keys. |
 |
We're going to process the input,
We process each direction, and alter the acceleration of the
player if a direction is pressed...
We have a 'Bullet fire' routine (in the common code) for Fire
1
Fire 2 will immediately stop the player - but we don't have a
fire 2 set up on the Apple II version
If any button is pressed, the key timeout is set |
 |
| Finally we run the multiplatform 'Draw and Move' rotuine,
this draws the player, and handles movement and drawing of
enemies and bullets |
 |
Clear Screen and Print Char
| To clear the screen (CLS), we need to wipe the bitmap area
at address $4000 - we use the CLDIR0 command to do this, which
wipes z_bc bytes from address z_hl |
 |
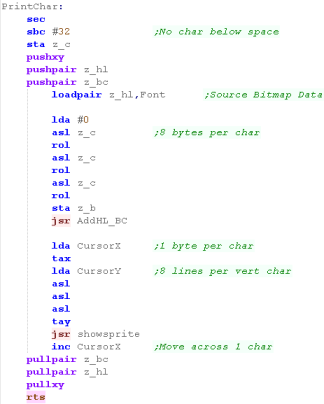
PrintChar will show a character to the screen, using a
bitmap font the same as the sprites...
We need to calculate the position in the font data of the
character
Each Character is 8 bytes, and there are no characters below
32 (space)
We also need to multiply up the X,Y pos into an 8x8 grid
position.
Once we've shown a character, we increment the X position for
the next character |
 |
Sprite routines
We have a couple of ShowSprite routines...
BlankSprite will draw the empty sprite (Space in the font),
using the object z_IX - to clear the old position of the object |
 |
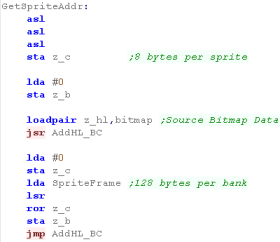
GetSpriteAddr will calculate the address in ram of the sprite
data we want to show to the screen
We also handle the sprite frame... there are 4 frames of
animation for each sprite - each bank is 256 bytes |
 |
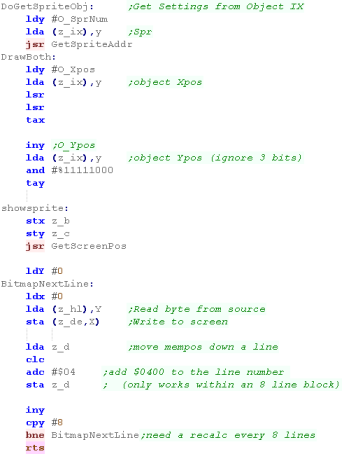
DoGetSpriteObj will show object IX to the screen, getting
Sprite, and XY pos from z_IX
ShowSprite will draw Sprite A onscreen (at XY position BC)
Note, due to the BBC screen layout, we're 'rounding' the Y
co-ordinates to an 8 line tall grid |
 |
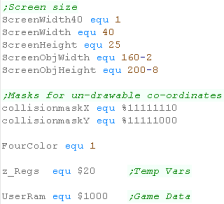
Atari 800 / 5200 Header
So we can support multiple platforms with different screen
sizes we have platform specific screen size definitions
Each system needs an area of ram for game variables, know as
'UserRam'
We use CollisionMasks - these will skip some bits of the
internal object positions, this is to ensure we don't detect a
collision that is not visible due to the low resolution of
screen co-ordinates. |
 |
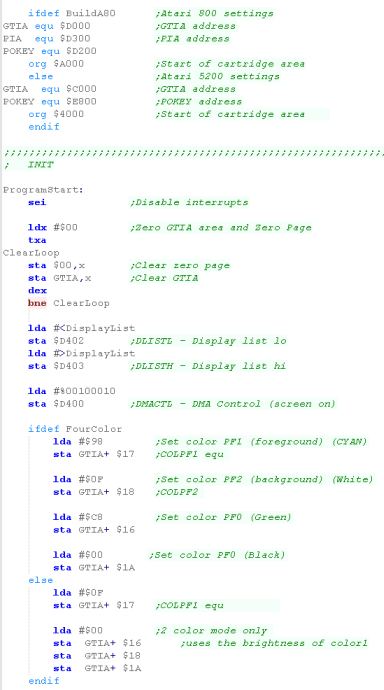
Our program start depends on the system we're building for,
Our first task is to clear the GITA and zero page,
Next we set up the screen Display List and colors |
 |
| We zero the game's ram data. using CLDIR0 - which fills an
area with zeros |
 |
The Game is intended
to work in 4 color mode, however if you wish, you could run it
in 2 color mode instead, the Graphics routines which do the 2
color option have been left intact.
|
 |
ShowTitle
When The title screen starts, we first reset the game
settings for a new game to start,
Then we clear the screen. |
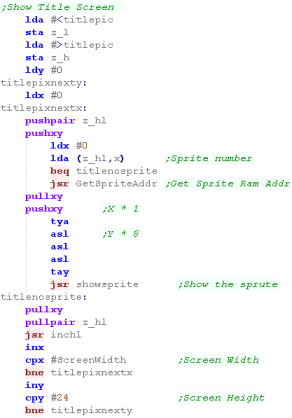
 |
We want to draw the tilescreen... it's held as a 1 byte
per tile data block in our code at 'TitlePic'
We use our ShowSprite Routine to draw it to the screen...
however we need to calculate the sprite address of the
desired tile, so we use GetSpriteAddr to do so |
 |
We need to show a few text items to the screen
A 'Press Fire' Message
The 'LearnASM.Net' URL (Very Important!)
The Highscore. |
 |
LevelStart
When the game or a new level starts, we first wait for
fire to be pressed.
Next we clear the screen,
Reset the player position
Initialize the level enemies with LevelInit |
 |
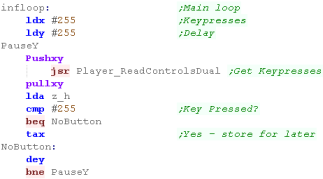
Level Loop
We have to pause a while during the game loop, so we read
in from the joystick during this time, and if the user
presses a key we'll store it for later.
we use Y for a loop counter - and X for any pressed button.
we use function call Player_ReadControlsDual - which will
read in the joystick and fire button |
 |
First we draw the UI (Score etc)
Next we clear the player sprite.
|
 |
| To slow down the acceleration, we have a 'timeout'... if a
key was pressed, for a short time we'll ignore any other
keys. |
 |
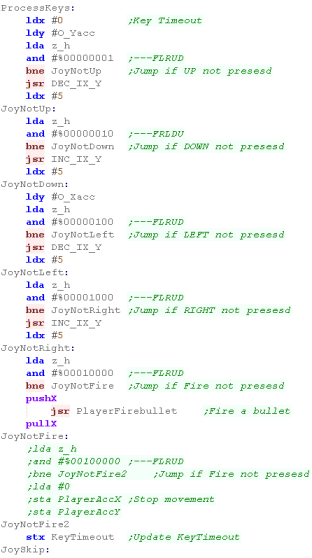
We're going to process the input,
We process each direction, and alter the acceleration of the
player if a direction is pressed...
We have a 'Bullet fire' routine (in the common code) for
Fire 1
Fire 2 will immediately stop the player - or it would, but
we've not mapped a button to this function!
If any button is pressed, the key timeout is set |
 |
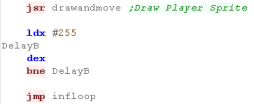
Finally we run the multiplatform 'Draw and Move' rotuine,
this draws the player, and handles movement and drawing of
enemies and bullets
The system is still too fast... so we slow things down a
little more. |
 |
Clear Screen and Print Char
| To clear the screen (CLS), we need to wipe the bitmap area
at address $2060 - we use the CLDIR0 command to do this,
which wipes z_bc bytes from address z_hl |
 |
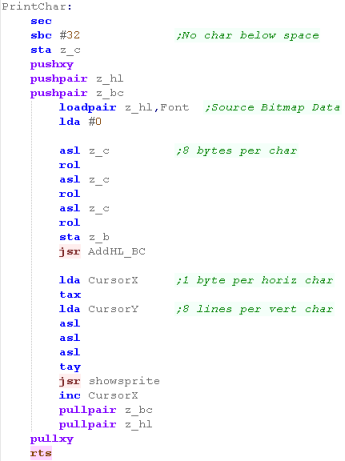
PrintChar will show a character to the screen, using a
bitmap font the same as the sprites...
We need to calculate the position in the font data of the
character
Each Character is 16 bytes, and there are no characters
below 32 (space)
We also need to multiply up the X,Y pos into an 8x8 grid
position.
Once we've shown a character, we increment the X position
for the next character |
 |
Sprite routines
We have a couple of ShowSprite routines...
BlankSprite will draw the empty sprite (Space in the font),
using the object z_IX - to clear the old position of the
object |
 |
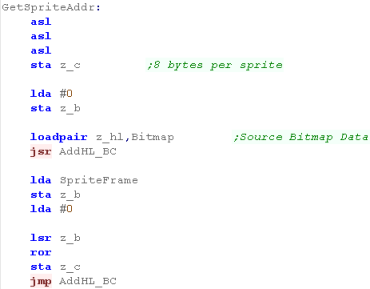
GetSpriteAddr will calculate the address in ram of the
sprite data we want to show to the screen
We also handle the sprite frame... there are 4 frames of
animation for each sprite - each bank is 128 bytes |
 |
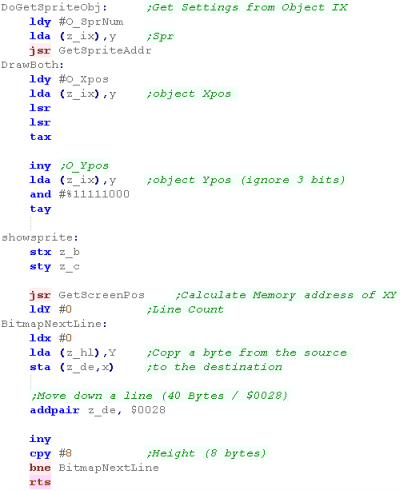
DoGetSpriteObj will show object IX to the screen, getting
Sprite, and XY pos from z_IX
ShowSprite will draw Sprite A onscreen (at XY position BC)
Note, due to the Atari 5200 screen layout, we're 'rounding'
the Y co-ordinates to an 8 line tall grid, and the X position
to to a 4 pixel wide (one character) grid |
 |
PC Engine Header
So we can support multiple platforms with different screen
sizes we have platform specific screen size definitions
Each system needs an area of ram for game variables, know as
'UserRam'
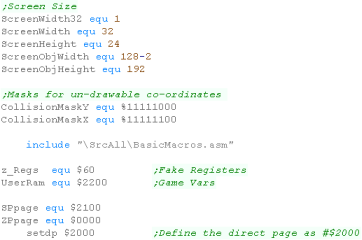
We use CollisionMasks - these will skip some bits of the
internal object positions, this is to ensure we don't detect a
collision that is not visible due to the low resolution of
screen co-ordinates.
We also need to define the memory address of the Direct page,
and set up some symbols for the common code.
|
 |
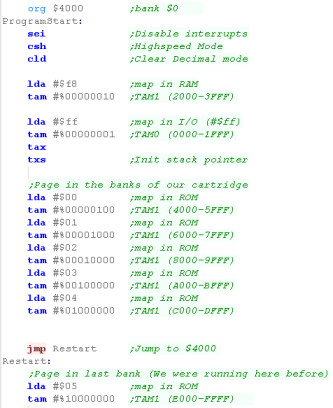
Our Header needs to set up the pages of Rom...
each page is just 8k, but our program is too big for that, so we
need to page multiple banks in... when the system starts only
the first bank is paged in at $E000... so our first task is to
page in the other banks (with our code running from $E000) then
run the actual address (around $4000)
We page the last bank in after the jump, as that was the bank
our program was running from before the jump! |
 |
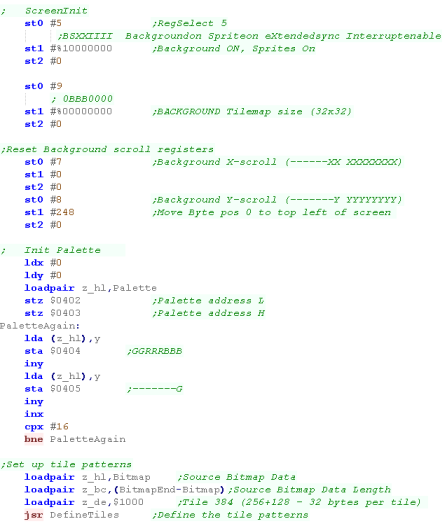
| We need to turn on the screen, Reset the tilemap, init the
palette, and load the tile patterns |
 |
| We zero the game's ram data. using CLDIR0 - which fills an
area with zeros |
 |
The "org $4000"
represents the running address the code will finally run from,
not the address it will run at startup...
Because of this before the "Restart" we can cannot use JSR or
JMP commands as they use absolute addresses, but we can use
branches OK if we wish
|
 |
ShowTitle
When The title screen starts, we first reset the game
settings for a new game to start,
Then we clear the screen. |
 |
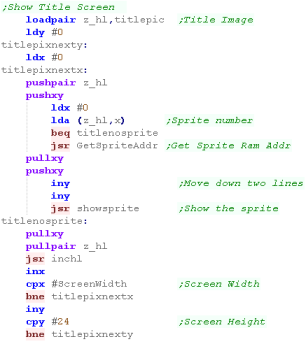
We want to draw the tilescreen... it's held as a 1 byte per
tile data block in our code at 'TitlePic'
We use our ShowSprite Routine to draw it to the screen...
GetSpriteAddr calculates the pattern number for the sprite. |
 |
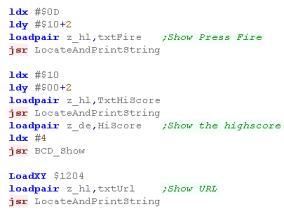
We need to show a few text items to the screen
A 'Press Fire' Message
The 'LearnASM.Net' URL (Very Important!)
The Highscore. |
 |
LevelStart
When the game or a new level starts, we first wait for fire
to be pressed.
Next we clear the screen,
Reset the player position
Initialize the level enemies with LevelInit |
 |
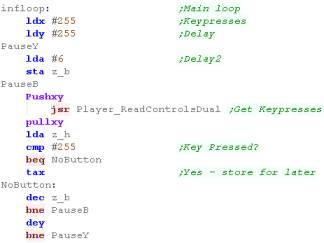
Level Loop
We have to pause a while during the game loop, so we read in
from the joystick during this time, and if the user presses a
key we'll store it for later.
we use Y for a loop counter - and X for any pressed button.
we use function call Player_ReadControlsDual - which will read
in the joystick and fire button |
 |
First we draw the UI (Score etc)
Next we clear the player sprite.
|
 |
| To slow down the acceleration, we have a 'timeout'... if a
key was pressed, for a short time we'll ignore any other keys. |
 |
We're going to process the input,
We process each direction, and alter the acceleration of the
player if a direction is pressed...
We have a 'Bullet fire' routine (in the common code) for Fire
1
Fire 2 will immediately stop the player
If any button is pressed, the key timeout is set |
 |
Finally we run the multiplatform 'Draw and Move' rotuine,
this draws the player, and handles movement and drawing of
enemies and bullets
The system is still too fast... so we slow things down a
little more. |
 |
Clear Screen and Print Char
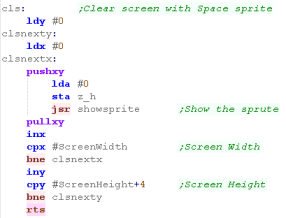
| To clear the screen (CLS), we need to set all the tiles to 0
(Space in the font) |
 |
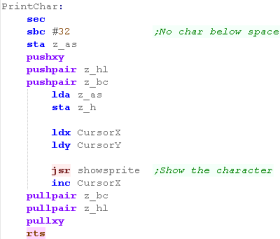
| Printchar will show a character to the screen... the first
96 patterns of the tilemap are the font... the first character
is space (Char 32) |
 |
Sprite routines
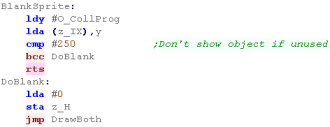
We have a couple of ShowSprite routines...
BlankSprite will draw the empty sprite (Space in the font),
using the object z_IX - to clear the old position of the object |
 |
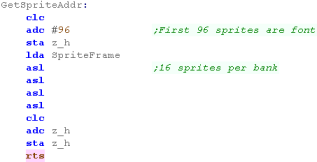
GetSpriteAddr will calculate the pattern we want to show to
the screen.
The first 96 are our font.
We also handle the sprite frame... there are 4 frames of
animation for each sprite - each bank is 16 tiles |
 |
DoGetSpriteObj will show object IX to the screen, getting
Sprite, and XY pos from z_IX
ShowSprite will draw Sprite A onscreen (at XY position BC)
Note, due to the Atari 5200 screen layout, we're 'rounding' the
Y co-ordinates to an 8 line tall grid, and the X position
to to a 4 pixel wide (one character) grid
|
 |
Get VDPScreenPos, PrepareVram and
DefineTiles
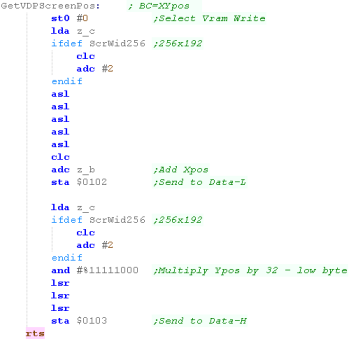
We're going to define a function called GetVDPScreenPos to
select an X,Y Tilemap position in Vram memory
As the tilemap is at VRAM address $0000 and each line is 32
tiles wide, our formula is:
Address=(Ypos *32) + X
We multiply Y by 32 by bishifts, and select the calculated
address... |
 |
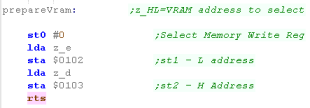
We're going to define a command called PrepareVram - which
will select a memory address to write to, we'll need this for
our define tiles function... we write the Low address byte to
$0102, and the High address to $0103 when register 0 is selected
with ST0
We'll use zero page entries z_de to store the address we want to
use. |
 |
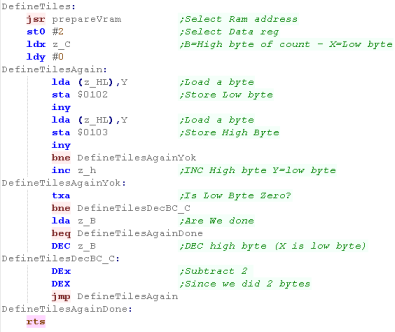
When we want to define tiles -we'll store a source address in
VRAM z_de... a source address in ROM in z_hl, and a byte count
in z_bc
We use the PrepareVram function to select an address, then write
new bytes to $0102/3 after selecting Reg 0 with ST0 |
 |
Joystick Reading
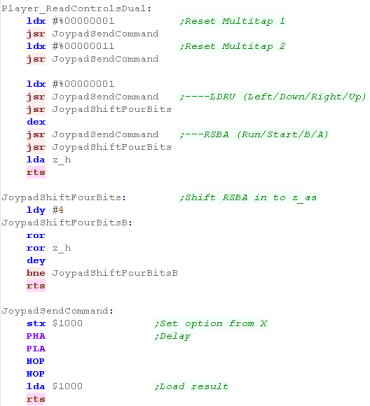
We need to reset the 'multitap' hardware by sending 1,3 to
port $1000
We then send a 1 - read in 4 bits... and a 0 and read in 4 bits
This returns a byte in the format:
Run / Start / B / A / Left / Down / Right / Up |
 |
We also have a 'Wait for fire' function... this randomizes the
seed, and waits for fire to be released, then pressed.
It's used for menus and between levels. |
 |
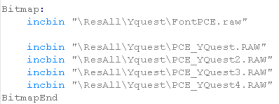
Sprite Data and First bank header
We have 5 different files of sprites
96 for the font
16x4 for the 4 banks of sprites |
 |
At the end of the first 8k bank we need the rom header, with
the start address,
This will end up at $FFFE when the system starts, and will
boot-strap our banking routine on startup |
 |
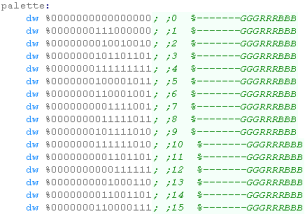
| We now have our palette in native format |
 |
Finally we need to pad the rom out to an 8k boundary
|
 |
ShowTitle
When The title screen starts, we first reset the game settings
for a new game to start,
Then we clear the screen. |
 |
We want to draw the tilescreen... it's held as a 1 byte per
tile data block in our code at 'TitlePic'
We use our ShowSprite Routine to draw it to the screen...
however we need to calculate the sprite address of the desired
tile, so we use GetSpriteAddr to do so
We're using the same title screen as the Atari Lynx... but our
screen is a little bigger, so we offset by 1 horizontal
character |
 |
We need to show a few text items to the screen
A 'Press Fire' Message
The 'LearnASM.Net' URL (Very Important!)
The Highscore. |
 |
LevelStart
When the game or a new level starts, we first wait for fire to
be pressed.
Next we clear the screen,
Reset the player position
Initialize the level enemies with LevelInit |
 |
Level Loop
We have to pause a while during the game loop, so we read in
from the joystick during this time, and if the user presses a
key we'll store it for later.
we use Y and B for a loop counter - and X for any pressed
button.
we use function call Player_ReadControlsDual - which will read
in the joystick and fire button |
 |
First we draw the UI (Score etc)
Next we clear the player sprite.
|
 |
| To slow down the acceleration, we have a 'timeout'... if a key
was pressed, for a short time we'll ignore any other keys. |
 |
We're going to process the input,
We process each direction, and alter the acceleration of the
player if a direction is pressed...
We have a 'Bullet fire' routine (in the common code) for Fire 1
Fire 2 would immediately stop the player, but we don't have a
2nd fire configured on the VIC
If any button is pressed, the key timeout is set |
 |
Finally we run the multiplatform 'Draw and Move' routine, this
draws the player, and handles movement and drawing of enemies
and bullets
|
 |
Clear Screen and Print Char
To clear the screen (CLS), we need to wipe the screen area at
address $1E00 - we use the CLDIR command to do this, which wipes
z_bc bytes from address z_hl
To clear the screen, we use Character 32 - which has been offset
by 128 by our custom characters
|
 |
Due to hardware limitations, we can't use our custom font, and
have to use the internal one.
PrintChar will show a character to the screen, the VIC does not
use ASCII, and some of the characters are in different places,
to compensate for this, we have to subtract 64 from A-Z... we
also strip the top 3 bits, as there is no lowercase characters
in the font.
We then add 128, as our custom characters are 0+ in the
characters set.
Once we've drawn the character, we need to set the color of the
matching screen character
|
 |
 |
Characters
and 'sprites' are basically the same thing on the VIC, as
we're using custom characters for our configured graphics.
When we show characters to the screen We're drawing the font
as White (Color 1)
|
Sprite routines
We have a couple of ShowSprite routines...
BlankSprite will draw the empty character (Space in the system
font), using the object z_IX - to clear the old position of the
object |
 |
GetSpriteAddr will calculate the address in ram of the sprite
data we want to show to the screen
We also calculate the sprite color pointer
We also handle the sprite frame... there are 4 frames of animation
for each sprite - each bank is 128 bytes
|
 |
DoGetSpriteObj will show object z_IX to the screen, getting
Sprite, and XY pos from z_IX
ShowSprite will draw character A onscreen (at XY position BC)
After the character tile has been set we also need to set the
correct color at address $9600+
we use the calculate sprite color pointer (SprPtn) to get the
correct color bytes from the palette
|
 |
NES Header
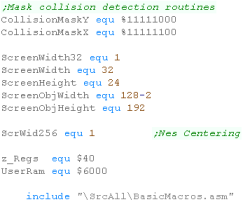
So we can support multiple platforms with different screen sizes
we have platform specific screen size definitions
Each system needs an area of ram for game variables, know as
'UserRam'
We use CollisionMasks - these will skip some bits of the internal
object positions, this is to ensure we don't detect a collision
that is not visible due to the low resolution of screen
co-ordinates.
We also need to define the memory address of the Direct page, and
set up some symbols for the common code.
|
 |
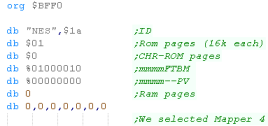
| We need a rom header... We selected Mapper 4 - it has 8k VRAM ,
8K Sram and 128k rom |
 |
We need to declare some more symbols...
We have an address for the VDPBuffer (Tilemap) the SpriteBuffer
(not actually needed for this program)
VDP_CT is the offset within the buffer of the next free byte of
the tilemap buffer.... the buffer will be sent to VRAM during next
vblank |
 |
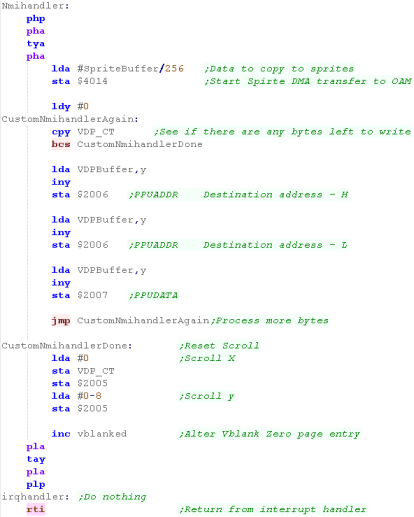
We need to define an interrupt handler which will transfer the
data from our buffer to VRAM... this will run during VBLANK
We use a DMA to transfer the sprite data, and the data in the
tilemap buffer is transferred manually
The VDPBuffer contains 3 bytes per entry... HL VRAM Memory
address, and a new byte to write to that address |
 |
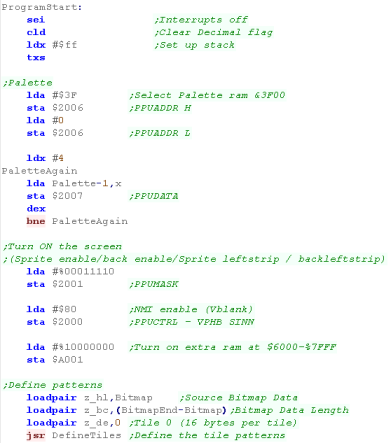
We need to turn on the screen, Define the palette and pattern
data (tiles)
We also need to turn on the extra 'in cartridge' vram with
register $A001 |
 |
| We zero the game's ram data. using CLDIR0 - which fills an area
with zeros |
 |
 |
Our NMI routine will write some data to
VRAM, but speed is a problem, as we don't have much time... this
routine will write up to 32 tiles per vblank - too many more and
it will overrun the Vblank...
If you're being a smarty pants, you could write a RLE routine
that compresses the data, so you could set larger numbers of
tiles in one go!
|
ShowTitle
When The title screen starts, we first reset the game settings
for a new game to start,
Then we clear the screen. |
 |
We want to draw the tilescreen... it's held as a 1 byte per
tile data block in our code at 'TitlePic'
We use our ShowSprite Routine to draw it to the screen...
GetSpriteAddr calculates the pattern number for the sprite. |
 |
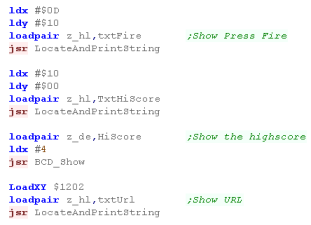
We need to show a few text items to the screen
A 'Press Fire' Message
The 'LearnASM.Net' URL (Very Important!)
The Highscore. |
 |
LevelStart
When the game or a new level starts, we first wait for fire to
be pressed.
Next we clear the screen,
Reset the player position
Initialize the level enemies with LevelInit |
 |
Level Loop
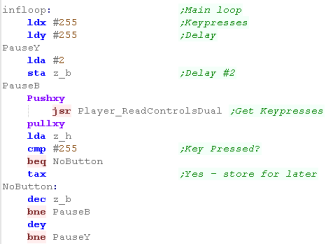
We have to pause a while during the game loop, so we read in
from the joystick during this time, and if the user presses a
key we'll store it for later.
we use Y and z_b for a loop counter - and X for any pressed
button.
we use function call Player_ReadControlsDual - which will read
in the joystick and fire button |
 |
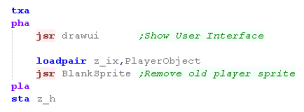
First we draw the UI (Score etc)
Next we clear the player sprite.
|
 |
| To slow down the acceleration, we have a 'timeout'... if a key
was pressed, for a short time we'll ignore any other keys. |
 |
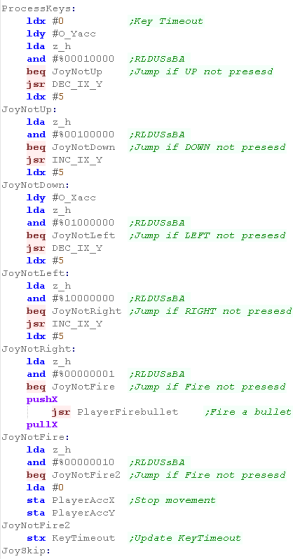
We're going to process the input,
We process each direction, and alter the acceleration of the
player if a direction is pressed...
We have a 'Bullet fire' routine (in the common code) for Fire 1
Fire 2 will immediately stop the player
If any button is pressed, the key timeout is set |
 |
Finally we run the multiplatform 'Draw and Move' routine, this
draws the player, and handles movement and drawing of enemies
and bullets
The system is still too fast... so we slow things down a little
more. |
 |
Clear Screen and Print Char
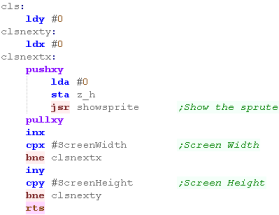
| To clear the screen (CLS), we need to set all the tiles to 0
(Space in the font) |
 |
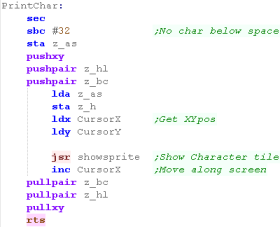
| Printchar will show a character to the screen... the first 96
patterns of the tilemap are the font... the first character is
space (Char 32) |
 |
Sprite routines
We have a couple of ShowSprite routines...
BlankSprite will draw the empty sprite (Space in the font), using
the object z_IX - to clear the old position of the object |
 |
GetSpriteAddr will calculate the pattern we want to show to the
screen.
The first 96 are our font.
We also handle the sprite frame... there are 4 frames of animation
for each sprite - each bank is 16 tiles |
 |
DoGetSpriteObj will show object IX to the screen, getting
Sprite, and XY pos from z_IX
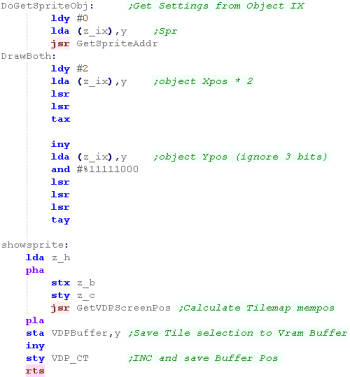
ShowSprite will draw Sprite A onscreen (at XY position BC).... It
doesn't do this directly however, GetVdpScreenPos calculates a
position in the VDPbuffer (The buffer for the tilemap) and sets
the byte corresponding to the tile...
It will be shown onscreen next vblank
|
 |
Get VDPScreenPos, PrepareVram,
DefineTiles and More
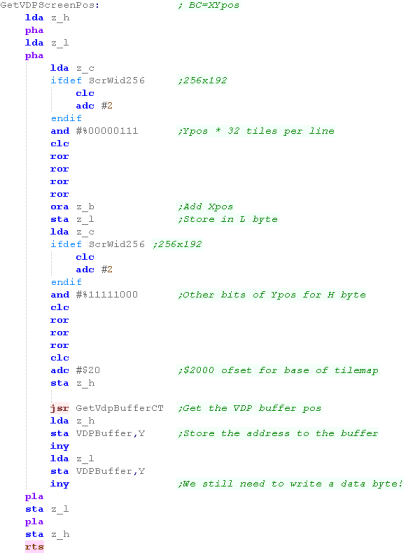
We're going to define a function called GetVDPScreenPos to
select an X,Y Tilemap position in Vram memory
The tilemap is 32 tiles (bytes wide).. and the tilemap starts from
$2000, so the formula is...
Address=$2000 + (Ypos *32) + X
We multiply Y by 32 by bitshifts, and select the calculated
address...
We don't actually write into the Tilemap... we write to the buffer
'VDPBUFFER'
First We write the HL address in vram we want to write to, then we
write the byte to change ... writing the byte to change occurs in
the sprite routine. |
 |
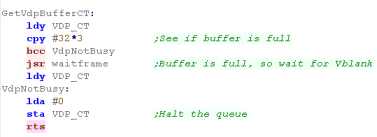
GetVdpBufferCT calculates the next free entry in the buffer...
the buffer has a limit of 32 bytes to change (during vblank)... so
if it's reached 32x3 then we wait for the next vblank (when it
clears down)
We write a Zero to VDP_CT during processing - in case the VBLANK
runs while we're writing more data. |
 |
When we want to define tiles we do this directly to VRAM (not
via the buffer)... we use PrepareVram to select a destination VRAM
address
We write z_bc bytes of data from z_hl to the VRAM via port $2007 |
 |
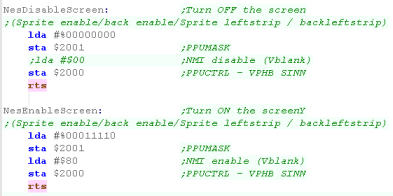
When we want to define tiles, we can turn off the screen, this
means we don't need to wait for VBLANK before writing.
We use $2001 to set the PPUMASK which turns off the tilemap layer
We use $2000 to turn off the NMI interrupt handler |
 |
| PrepareVram will select a destination VRAM address for writing
to, we write the address (from z_de) to $2006 , High byte then Low
byte |
 |
| Waitframe will wait for VBLANK... we check this by writing a 0
to zero page entry 'Vblanked' to change... this will occur when
our NMI runs. |
 |
Joystick Reading
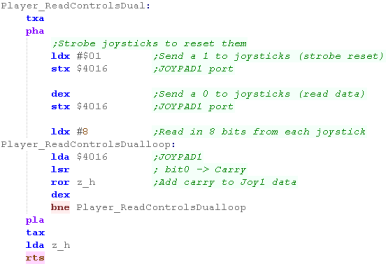
We need to read in a sequence of 8 bits from port $4016 to get
each direction key... we also need to strobe the port by writing 1
then 0 to the same port...
The 8 reads from the port will return the directions:
Read 1 - A
Read 2 - B
Read 3 - Select
Read 4 - Start
Read 5 - Up
Read 6 - Down
Read 7 - Left
Read 8 - Right |
 |
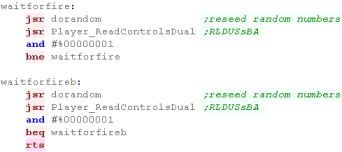
We also have a 'Wait for fire' function... this randomizes the
seed, and waits for fire to be released, then pressed.
It's used for menus and between levels. |
 |
Sprite Data and First bank header
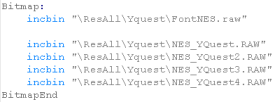
We have 5 different files of sprites
96 for the font
16x4 for the 4 banks of sprites |
 |
| We now have our palette in native format |
 |
At the end of our cartridge we have the 'footer'... it has a
link to the Start of the program and the NMI interrupt handler
|
 |
SNES Header
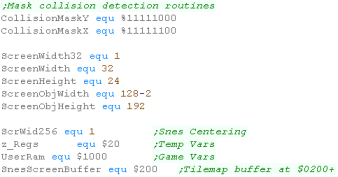
So we can support multiple platforms with different screen
sizes we have platform specific screen size definitions
Each system needs an area of ram for game variables, know as
'UserRam'
We use CollisionMasks - these will skip some bits of the
internal object positions, this is to ensure we don't detect a
collision that is not visible due to the low resolution of
screen co-ordinates.
We also need to define the memory address of the Direct page,
and set up some symbols for the common code.
We also need a 'ScreenBuffer' in RAM - this will contain the
tilemap, and will be transferred fom RAM to VRAM
|
 |
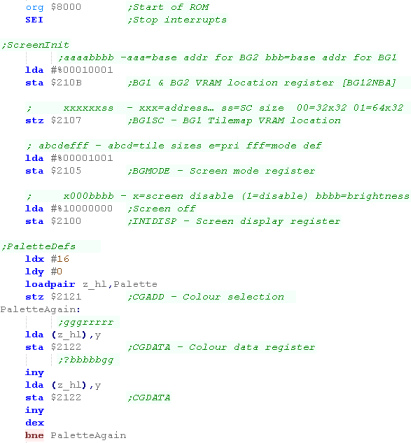
| We need to turn on the Tile layer and set up the palette |
 |
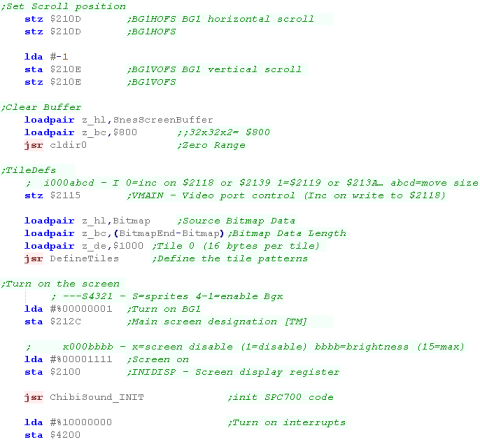
We need to set the scroll position of the tilemap,
We clear the RAM buffer (Tilemap copy, transferred to VRAM
during Vblank)
We transfer our tile patterns to vram with 'DefineTiles',
Finally we turn on the screen.
We then initialize the 'ChibiSound' Sound driver - which copies
the program code to the SPC700 sound chip |
 |
| We zero the game's ram data. using CLDIR0 - which fills an
area with zeros |
 |
Sound on the SNES is
painfully complex, the SPC700 is separate processor with
separate ram, and Is NOT a 6502 based chip... for more details
see here
|
 |
ShowTitle
When The title screen starts, we first reset the game
settings for a new game to start,
Then we clear the screen. |
 |
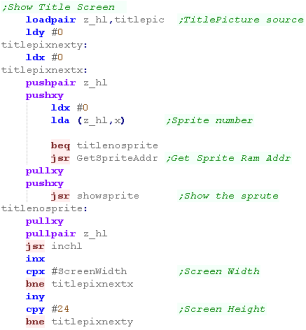
We want to draw the tilescreen... it's held as a 1 byte per
tile data block in our code at 'TitlePic'
We use our ShowSprite Routine to draw it to the screen...
GetSpriteAddr calculates the pattern number for the sprite. |
 |
We need to show a few text items to the screen
A 'Press Fire' Message
The 'LearnASM.Net' URL (Very Important!)
The Highscore. |
 |
LevelStart
When the game or a new level starts, we first wait for fire
to be pressed.
Next we clear the screen,
Reset the player position
Initialize the level enemies with LevelInit |
 |
Level Loop
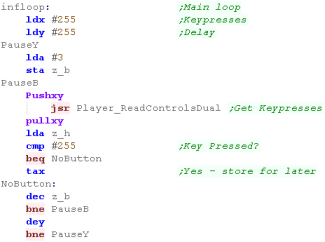
We have to pause a while during the game loop, so we read in
from the joystick during this time, and if the user presses a
key we'll store it for later.
we use Y and z_b for a loop counter to slow down the game -
and X for any pressed button.
we use function call Player_ReadControlsDual - which will read
in the joystick and fire button |
 |
First we draw the UI (Score etc)
Next we clear the player sprite.
|
 |
| To slow down the acceleration, we have a 'timeout'... if a
key was pressed, for a short time we'll ignore any other keys. |
 |
We're going to process the input,
We process each direction, and alter the acceleration of the
player if a direction is pressed...
We have a 'Bullet fire' routine (in the common code) for Fire
1
Fire 2 will immediately stop the player
If any button is pressed, the key timeout is set |
 |
Finally we run the multiplatform 'Draw and Move' routine,
this draws the player, and handles movement and drawing of
enemies and bullets
The system is still too fast... so we slow things down a
little more. |
 |
Clear Screen and Print Char
| To clear the screen (CLS), we need to set all the tiles to 0
(Space in the font) |
 |
| Printchar will show a character to the screen... the first
96 patterns of the tilemap are the font... the first character
is space (Char 32) |
 |
Sprite routines
We have a couple of ShowSprite routines...
BlankSprite will draw the empty sprite (Space in the font),
using the object z_IX - to clear the old position of the object |
 |
GetSpriteAddr will calculate the pattern we want to show to
the screen.
The first 96 are our font.
We also handle the sprite frame... there are 4 frames of
animation for each sprite - each bank is 16 tiles |
 |
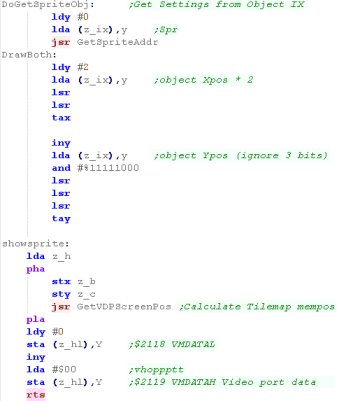
DoGetSpriteObj will show object IX to the screen, getting
Sprite, and XY pos from z_IX
ShowSprite will draw Sprite A onscreen (at XY position BC)....
It doesn't do this directly however, GetVdpScreenPos calculates
a position in the tilemap buffer in z_hl...
We then transfer the two bytes that define the tiles in to ram.
It will be shown onscreen next vblank
|
 |
Get VDPScreenPos, PrepareVram,
DefineTiles and More
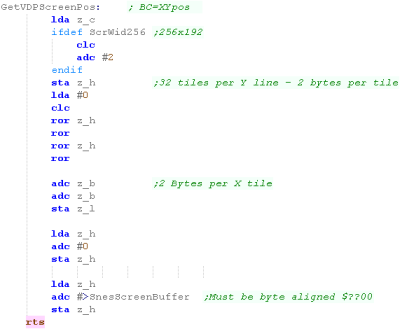
We're going to define a function called GetVDPScreenPos to
select an X,Y Tilemap position in Vram memory
We need to calculate an address in the ScreenBuffer for the
tile.
Each tile is 2 bytes, and the tilemap is 32 tiles wide... so the
formula is:
Address= SnesScreenBuffer + (Ypos * 32 * 2) + (Xpos * 2) |
 |
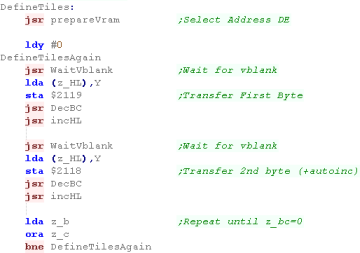
When we want to define tiles we do this directly to VRAM (not
via the buffer)... we use PrepareVram to select a destination
VRAM address
We wait for Vblank before writing any data.
We write z_bc bytes of data from z_hl to the VRAM via ports
$2119 and $2118...
We have to write in this order, as we've set Autoinc to occur on
$2118 |
 |
| To Check if we're currently in Vblank, we test the top bit of
$4212 - while this is Zero we're not currently in vbank |
 |
| PrepareVram will select a destination VRAM address for writing
to, we write the address (from z_de)... low byte to to
$2116 , High byte to $2117 |
 |
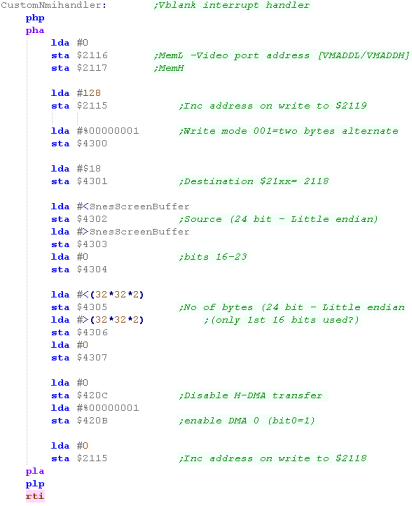
We've defined a Custom NMI handler... this will run during
VBlank.... we're going to use a DMA to quickly transfer the
SnesScreenBuffer from ram to VRAM
We have to select a destination Vram address with $2116/7.
We define the autoinc mode to update on the write to $2119 - we
d this with port $2115
Next and select the destination port with $4301 - we select
$2118 - as we'll write in word pairs.
We specify the source (as a 24 bit number) using $4302/3/4...
and the number of bytes to transfer with $4305/6/7
We disable the H-DMA (it's a special function we don't want)
with $420C
Finally we start the DMA transfer with bit 0 of $420B.
Once we've finished, we set the AutoInc with port $2115 back to
update on $2118 |
 |
Joystick Reading
We need to read in a sequence of 8 bits from port $4016 to get
each direction key... we also need to strobe the port by writing
1 then 0 to the same port...
The 8 reads from the port will return the directions:
Read 1 - A
Read 2 - B
Read 3 - Select
Read 4 - Start
Read 5 - Up
Read 6 - Down
Read 7 - Left
Read 8 - Right |
 |
We also have a 'Wait for fire' function... this randomizes the
seed, and waits for fire to be released, then pressed.
It's used for menus and between levels. |
 |
Sprite Data and First bank header
We have 5 different files of sprites
96 for the font
16x4 for the 4 banks of sprites |
 |
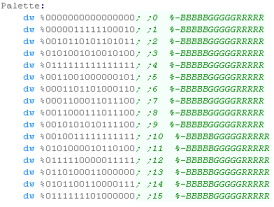
| We now have our palette in native format |
 |
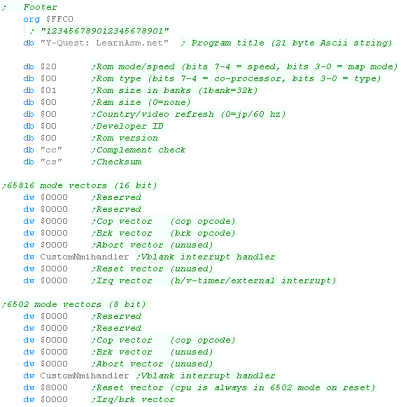
At the end of our cartridge we have the 'footer'... it has a
link to the Start of the program (Reset Vector) and the NMI
interrupt handler
We need an 8 and 16 bit set of Vectors
|
 |
 |
As with most
things on the PC-Engine, the hardware sprites are pretty
poweful - and easy!
Each sprite is 16x16, and we have 64 - far more than Yquest
needs!
|
Multiplatform Sprite code
We had an unused byte in the object definitions before...
We're going to use it now!
This will be the 'Hardware sprite number'...
A Zero will be the same as before - a tile will be used
1+ will be a numbered hardware sprite - relating to one of the
hardware sprites the system is capable of.
This flexibility to use tiles or hardware sprites helps with
systems with small numbers of hardware sprites |
 |
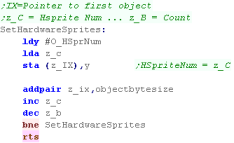
We'll need to set banks of objects to consecutive sprite
numbers (EG bullets)...
We use SetHardwareSprites to do this. |
 |
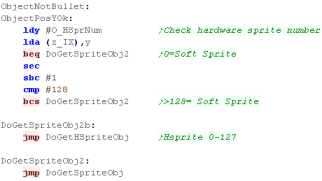
We need to alter the DrawAndMove function and check the
'hardware sprite number'
Values 1-128 are hardware sprites... other values (0 / 255
etc) are soft sprites |
 |
NES Sprites
Sprites on the NES are defined by 256 bytes of OAM
memory- 4 bytes per sprite
The byte is selected by setting the OAM-address with memory location
$2003 - effectively with 4x the sprite number... then by
writing the 4 bytes to $2004 (the OAM address autoincs)
| Byte |
Purpose |
Bits |
Meaning |
| 1 |
Ypos |
YYYYYYYY
|
|
| 2 |
Tilenum |
TTTTTTTT
|
|
| 3 |
Attribs |
VHB---PP |
Vflip Hflip Background priority Palette |
| 4 |
Xpos |
XXXXXXXX
|
|
NES Sprite code
| We need to copy our sprite buffer to the 'OAM' duirng our
NMI Vblank handler... we do this by writing the top byte of
the address to port $4014... this will transfer 256 bytes of
data to the video hardware |
 |
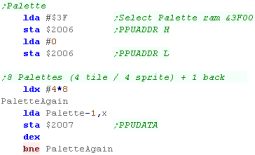
| In this case the sprites use the same patterns, but separate
palettes - the first 4 palettes are for the tilemap... the
second 4 palettes are for the sprites. |
 |
| We need to turn on the hardware sprites with port $2001, and
zero the sprite buffer |
 |
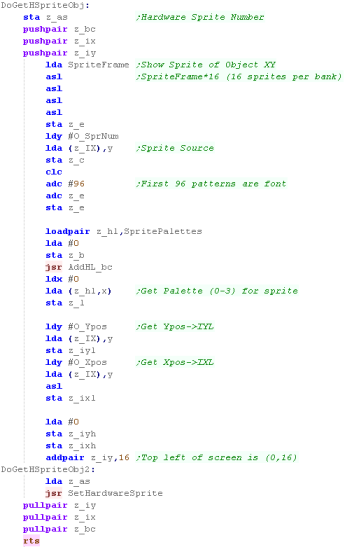
DoGetHSpriteObj will draw a hardware sprite to the screen
from object z_IX... like before, the XY pos will be read from
object z_IX, the sprite frame will also be calculated
We need to calculate the pattern number for the current
sprite, and the XY pos...
We've defined which of the 4 palettes to use for each of our
defined sprites, we store this in z_l
For sprites, The top left corner of the screen is 16 pixels
down, so we add 16 to z_iy
|
 |
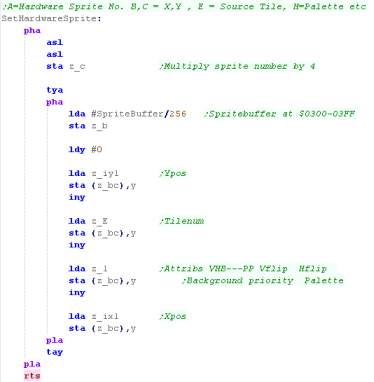
| We need to set the hardware sprite in the SATB (Sprite
attribute table buffer) - but we can't write it directly, so
we write to VRAM $7F00-7FFF - then execute a transfer to copy
these to the video hardware (Showing the sprite) |
 |
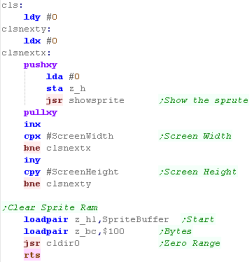
| The Clear Screen Routine needs to turn off all the hardware
sprites, we do this by zeroing the sprite buffer |
 |
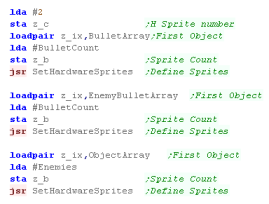
Until we set the 'Hardware Sprite Numbers' of the objects
they will still use the old tile code...
We do this in the 'StartLevel' routine... setting the player
object to Hsprite 1... the player bullets to 2-9... and so
on... |
 |
 |
Getting NES sprites to work is a bit of
a pain, but once we have the buffer code set up, it's all
pretty easy!
The Nes has 64 sprites, and each can use one of the 4 color
palettes - giving our game some nice color too!...
especially considering palettes are set for the tilemap only
for every 4 tiles (2x2 blocks)
|
Multiplatform Sprite code
We had an unused byte in the object definitions before...
We're going to use it now!
This will be the 'Hardware sprite number'...
A Zero will be the same as before - a tile will be used
1+ will be a numbered hardware sprite - relating to one of the
hardware sprites the system is capable of.
This flexibility to use tiles or hardware sprites helps with
systems with small numbers of hardware sprites |
 |
We'll need to set banks of objects to consecutive sprite
numbers (EG bullets)...
We use SetHardwareSprites to do this. |
 |
We need to alter the DrawAndMove function and check the
'hardware sprite number'
Values 1-128 are hardware sprites... other values (0 / 255
etc) are soft sprites |
 |
 |
We're
going to use the same kind of DMA as we did to transfer the
tiles, however unlike tile data, we don't write pairs of
bytes to two different addresses, we write all the data to a
single address.
|
SNES Sprite code
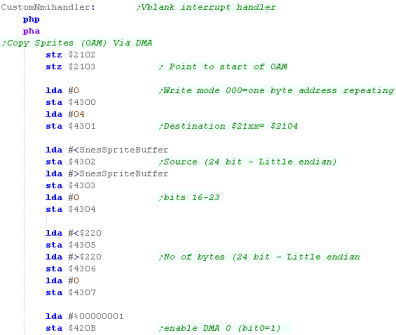
We need to copy our sprite buffer to the 'OAM' duirng our
NMI Vblank handler... we use the DMA to do this
The sprite buffer uses a total of $220 bytes - we need to
write these bytes to $2104
To select an 'address' in the OAM to write to we use ports
$2102/3 - we write a zero to these to select the start of the
OAM.
We want the bytes of data to all write to $2104... first we
select 'single address' with $4300.... we select port $2104
with port $4301
We select the source address (our SnesSpriteBuffer) with port
$4302/3/4
We select the number of bytes $220 with ports $4305/6/7
we start the transfer with bit 0 of port $420B |
 |
| The sprites use palette entries from 128 onwards... we
define them in the same way as our regular tile palette |
 |
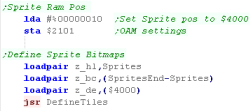
| We define the Sprite patterns at address $4000 - and
transfer the sprite patterns to the VRAM... they don't use the
same pattern definitions as the tilemap |
 |
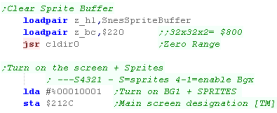
| Finally, we clear the buffer, and turn on the
Tilemap+Sprites with port $212C |
 |
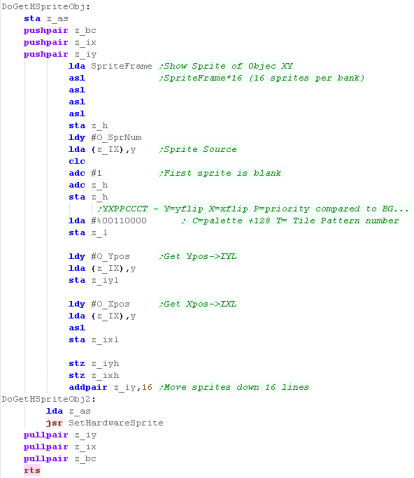
DoGetHSpriteObj will draw a hardware sprite to the screen
from object z_IX... like before, the XY pos will be read from
object z_IX, the sprite frame will also be calculated
We select the pattern with z_h - the first sprite is blank (So
we can hide the sprites) so we add 1 to skip the blank sprite
We need to calculate the pattern number for the current
sprite, and the XY pos...
We define the palette, and how the sprites overlay the tiles
with z_l
To line up the sprites with our Tilemap, we add 16 to z_iy
|
 |
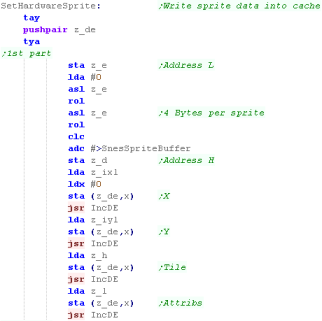
We need to set the two bytes in the buffer...
In the first part, there are 4 bytes per sprite - Xpos, Ypos,
Tile number and attribs |
 |
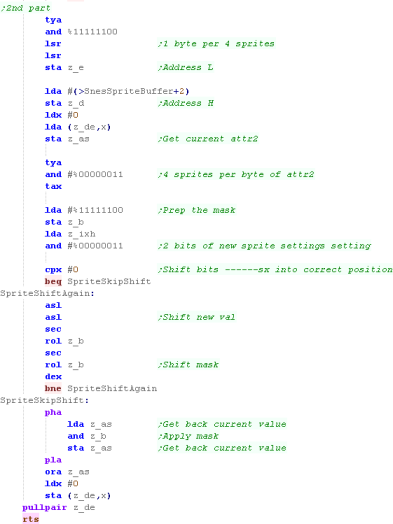
in the second part, there are 2 bits per sprite in a byte -
so 4 sprites per byte... these are the 8th bit of the Xpos,
and the scaling option
We have to bit shift these into the correct position and OR
them into the current value at that memory position!... what a
pain! |
 |
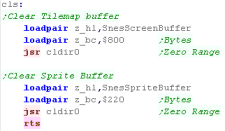
| The Clear Screen Routine needs to turn off all the hardware
sprites, we do this by zeroing the sprite buffer |
 |
Until we set the 'Hardware Sprite Numbers' of the objects
they will still use the old tile code...
We do this in the 'StartLevel' routine... setting the player
object to Hsprite 1... the player bullets to 2-9... and so
on... |
 |
The C64 can only do 8
hardware sprites - and we would need 40 to do all the enemy
objects!
Many games get around this limitation by altering and moving the
sprites as the screen redraws, so one hardware sprite draws
multiple objects in multiple different horizontal lines of the
screen, but this is complex, and outside of the scope of this
tutorial.
|
 |
Multiplatform Sprite code
We had an unused byte in the object definitions before... We're
going to use it now!
This will be the 'Hardware sprite number'...
A Zero will be the same as before - a tile will be used
1+ will be a numbered hardware sprite - relating to one of the
hardware sprites the system is capable of.
This flexibility to use tiles or hardware sprites helps with
systems with small numbers of hardware sprites |
 |
We'll need to set banks of objects to consecutive sprite numbers
(EG bullets)...
We use SetHardwareSprites to do this. |
 |
We need to alter the DrawAndMove function and check the
'hardware sprite number'
Values 1-128 are hardware sprites... other values (0 / 255 etc)
are soft sprites |
 |
C64 Sprites
The Sprite pointers for the bitmap data are a single byte...
multiplying the sprite pointer by 64 will give the address of the sprite
*within the 16k bank of Vram* (so must be in the range $0000-$3FFF)...
$1000-$2000 and $9000-$A000 are seen by the VIC as character ROM, so
sprites cannot be in this area!
We can move our screen base to something more convenient... so for
example with a screen base of $4000 (Screen ram at $6000)- our sprites
can be at $5000
Sprites are 21 vertical lines and 63 bytes each...
In 1bpp (2 color) mode this makes sprites 24x63...
In 2bpp (4 color) mode they are 12x63...
In both modes, Color 0 is Transparent
In 2bpp mode color 1,2 are read from $D025/6... and color 3 is the
sprite color.
| Address |
Purpose |
Bits |
Meaning |
| $07F8-$07FF
|
Sprite
pointers (default - will change if screen moved) |
SSSSSSSS |
s*64=memory
address |
| $D000 |
Sprite #0
X-coordinate |
XXXXXXXX |
(only bits
#0-#7). |
| $D001 |
Sprite #0
Y-coordinate |
YYYYYYYY |
|
| $D002 |
Sprite #1
X-coordinate |
XXXXXXXX |
(only bits
#0-#7). |
| $D003 |
Sprite #1
Y-coordinate |
YYYYYYYY |
|
| $D004 |
Sprite #2
X-coordinate |
XXXXXXXX |
(only bits
#0-#7). |
| $D005 |
Sprite #2
Y-coordinate |
YYYYYYYY |
|
| $D006 |
Sprite #3
X-coordinate |
XXXXXXXX |
(only bits
#0-#7). |
| $D007 |
Sprite #3
Y-coordinate |
YYYYYYYY |
|
| $D008 |
Sprite #4
X-coordinate |
XXXXXXXX |
(only bits
#0-#7). |
| $D009 |
Sprite #4
Y-coordinate |
YYYYYYYY |
|
| $D00A |
Sprite #5
X-coordinate |
XXXXXXXX |
(only bits
#0-#7). |
| $D00B |
Sprite #5
Y-coordinate |
YYYYYYYY |
|
| $D00C |
Sprite #6
X-coordinate |
XXXXXXXX |
(only bits
#0-#7). |
| $D00D |
Sprite #6
Y-coordinate |
YYYYYYYY |
|
| $D00E |
Sprite #7
X-coordinate |
XXXXXXXX |
(only bits
#0-#7). |
| $D00F |
Sprite #7
Y-coordinate |
YYYYYYYY |
|
| $D010 |
Sprite
#0-#7 X-coordinates |
76543210 |
(bit #8) |
| $D015 |
Sprite
enable register |
76543210 |
1=on
|
| $D017 |
Sprite
double height register |
76543210 |
|
| $D01B |
Sprite
priority register |
76543210 |
|
| $D01C |
Sprite
multicolor mode register |
76543210 |
0=2 color
1=4color
|
| $D01D |
Sprite
double width register |
76543210 |
|
| $D01E |
Sprite-sprite
collision register |
76543210 |
|
| $D01F |
Sprite-background
collision
reg |
76543210 |
|
| $D025 |
Sprite
extra color #1 |
----CCCC |
|
| $D026 |
Sprite
extra color #2 |
----CCCC |
|
| $D027 |
Sprite #0
color |
----CCCC |
|
| $D028 |
Sprite #1
color |
----CCCC |
|
| $D029 |
Sprite #2
color |
----CCCC |
|
| $D02A |
Sprite #3
color |
----CCCC |
|
| $D02B |
Sprite #4
color |
----CCCC |
|
| $D02C |
Sprite #5
color |
----CCCC |
|
| $D02D |
Sprite #6
color |
----CCCC |
|
| $D02E |
Sprite #7
color |
----CCCC |
|


