
Let's look at the basics, Lets learn how to draw a simple bitmap onto the screen... effectively a software sprite.
We'll be able to use this to make a simple game!

x68_Bitmap.asm

Learn Multi platform 6502 Assembly Programming... For Monsters!
Super Simple Series
In this series we'll take a look at a variety of basic tasks that you may need to look at when you're starting out with programming these classic systems...
In each case the source-code will be a single file with no Includes to make things easy if you're using a different assembler (though some may include a binary.)
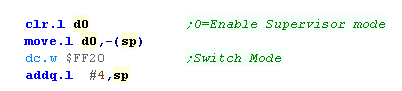
Supervisor mode on XM7
| On WinX68kHighSpeed we can access hardware registers in USER mode,
but emulator XM6 is more strict. We will need to enter 'Supervisor mode'... we do this with DOSCALL function _SUPER ($FF20)... Thanks to viewer 'Mugsy' for this info |
 |
Starting our program
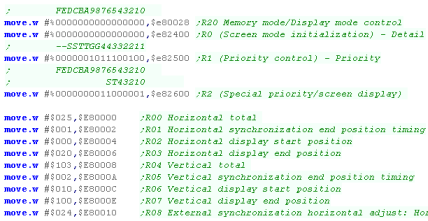
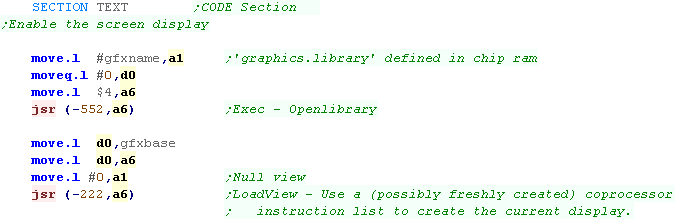
| First we need to turn on our screen - we need to send a variety of
settings to hardware registers. Here we're setting up a 256x256 screen mode - if you want to see the full range of settings see here |
 |
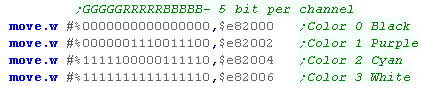
| Next we need to set up our palette... we need 4 colors, defined by
$E82000+ Each color is defined by 5 bits. We're now set up... so we can work on drawing our sprite! |
 |
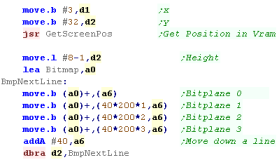
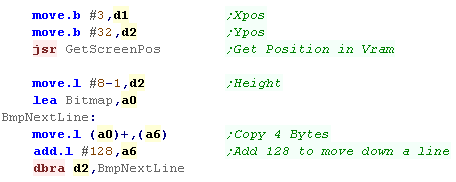
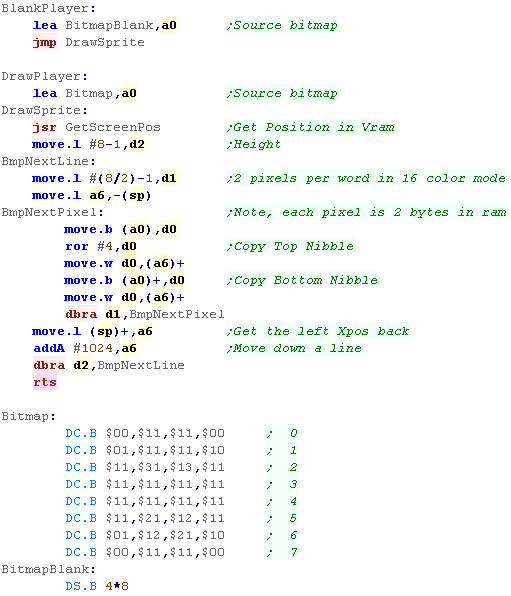
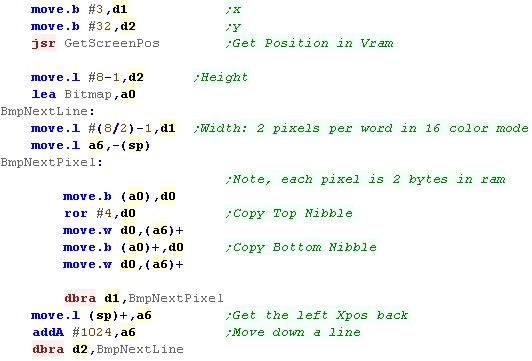
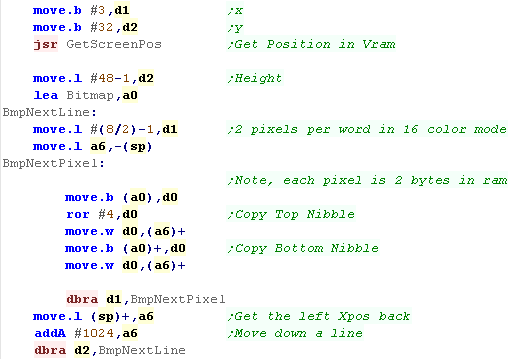
Drawing an 8x8 sprite
Drawing a larger bitmap
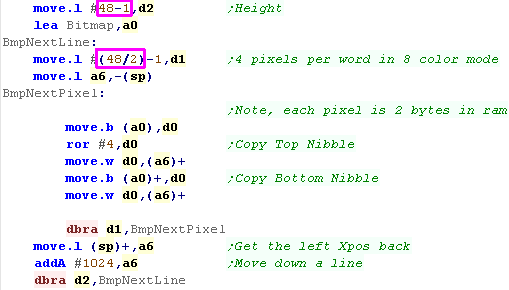
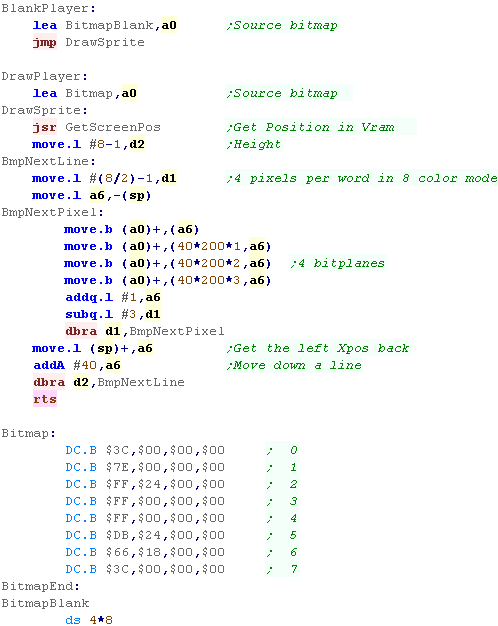
| We're going to draw a 48x48 sprite, we'll include it as a binary file. | 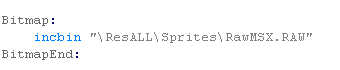 |
| We now need an extra loop for the number of '8 pixel Y strips'... After we've done each strip, we reset our start position, and add $280 (the bytes used by one 8x320 pixel Y-strip) We repeat until the image has been drawn. |
 |
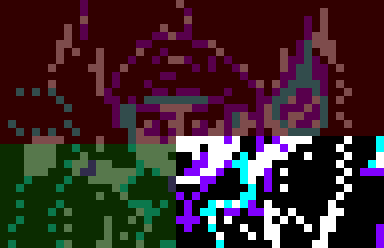
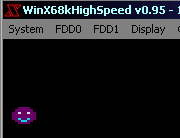
| Our Chibiko Character will be shown on the screen. |  |
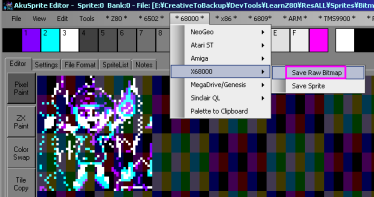
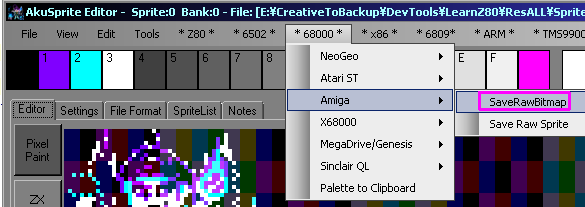
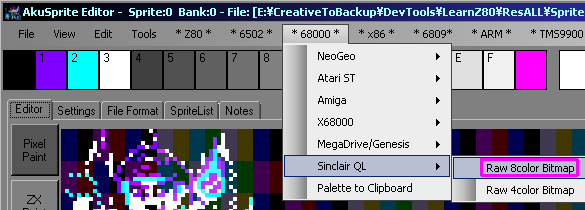
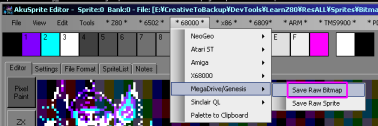
| My AkuSprite Editor can export files in the correct format for
this tutorial - it's free and open source. (included in the sources.7z) Use Save Raw Bitmap from the x68000 menu |
 |
| We've used bitmap
graphics here to draw our 'sprite'... it's easier for a beginner
getting started to just work with bitmaps. if you want to use actual hardware sprites take a look here |
 |

|
Lesson
S2 - Simple Bitmap Drawing on the Atari ST Let's look at the basics on the Atari, Lets learn how to draw a simple bitmap onto the screen... effectively a software sprite. |
|
AST_Bitmap.asm
|
|
Starting our program
| First we're going to need to kick the system into supervisor mode via a system call. | 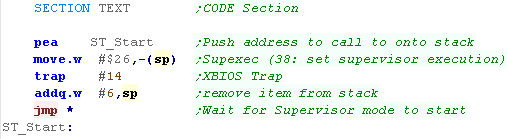 |
| Next we need to define the screen mode, we're going to use 320x00
@ 16 colors. We've got some memory in the 'BSS' section - this will be the bytes of our screen, we need to propare this address, and transfer it to the screen registers at $ff8200 |
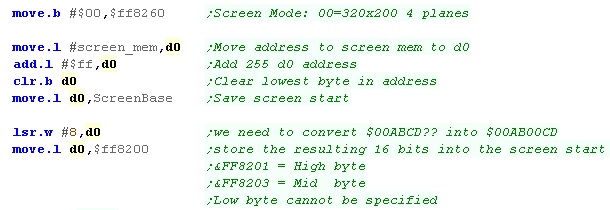 |
| We've defined our screen ram in the BSS section | 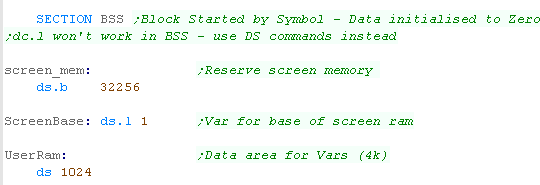 |
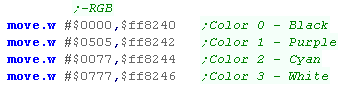
| Once we've set up our screen, we need to set up our palette we use
address $ff8240+ to set up 4 colors. We're ready to draw our sprite. |
 |
Drawing an 8x8 sprite
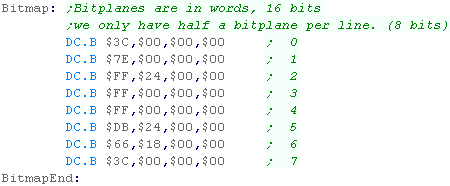
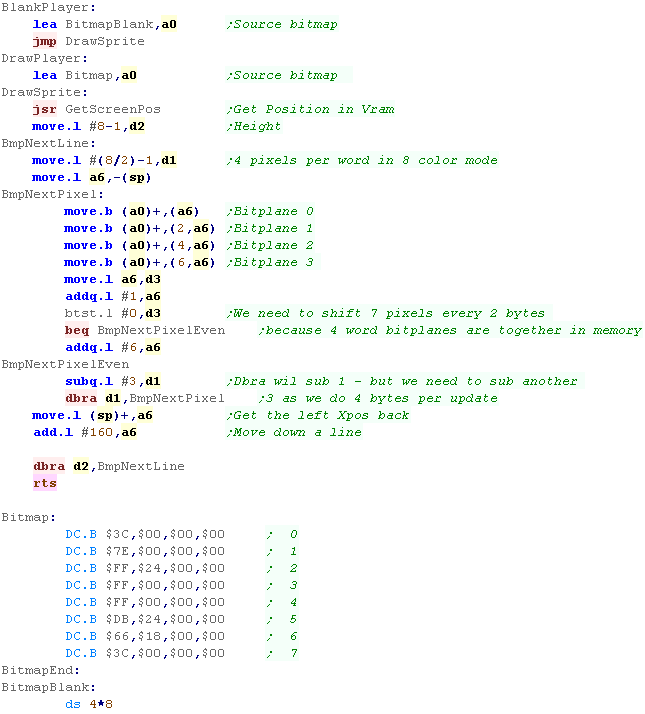
| We need to define our smiley. Atari ST memory is split into bitplane WORDS... each consecutive 2 bytes of screen ram will be a separate bitplane 0,1,2,3... our sprite is only 8 pixels wide, so the second byte of the bitplane word is unused. Our smiley's face is in color 1, and the mouth and eyes are color 2 and 3 |
 |
| When we want to show the bitmap to the screen, we need to
calculate the destination memory address for the screen... We use GetScreenPos... which takes an XY position in D1,D2 The formula for the screen address is Screenbase+(Ypos * 160) + (XposWithBottomBitRemoved *4) + BottomBitOfXpos |
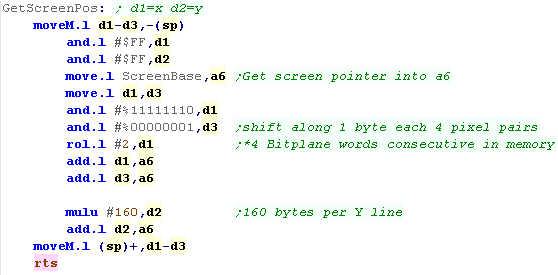 |
| Our sprite is 8 pixels wide... each bitplane uses 2 bytes and
contains 16 pixels... we write each of the 4 bitplanes to offsets
0,2,4,6 to the X position We then move down a line by adding 160 |
 |
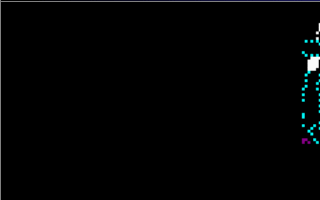
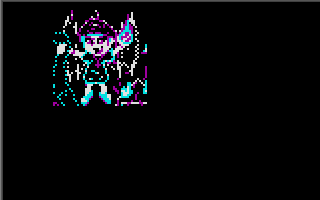
| Our Smiley will be shown to the screen |  |
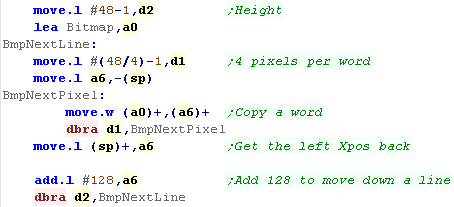
Drawing a larger bitmap
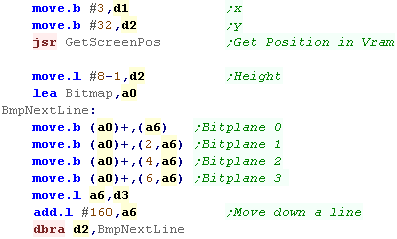
| We're going to try a larger sprite this time... We'll show our
Chibiko mascot as a 48 x 48 sprite We'll include this as a file. |
 |
| We need to change our drawing routine - this time we need to write pairs of bytes to screen... to do this we'll treat odd and even bytes differently | 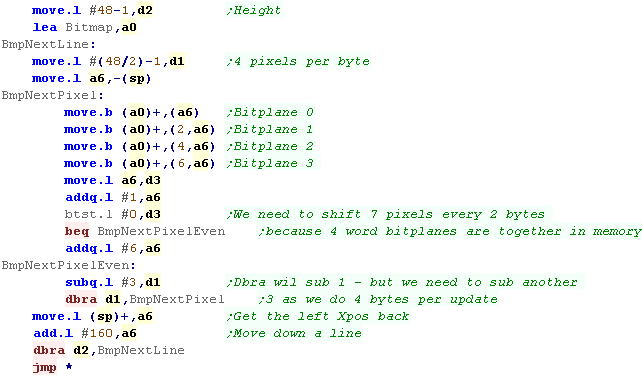 |
| Here is the result! |  |
| My AkuSprite Editor can export files in the correct format for
this tutorial - it's free and open source. (included in the
sources.7z) Use Save Raw Bitmap from the Atari ST menu |
 |
 |
If we preferred we could
write in words, which would be faster, but less flexible for
different widths most systems work in 8 pixel bitplanes - not the Atari ST's 16 pixels - so we've written this code to work with the format used by other systems. |
Starting our program
| We're going to define some symbols for graphics settings we need to control. | 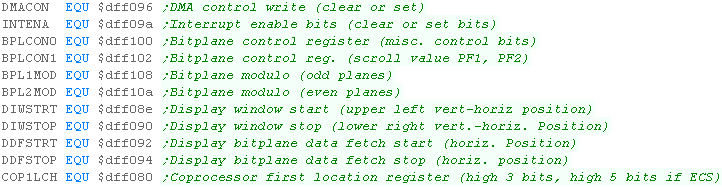 |
| We need to call to the operating system and request a video
screen... this will set up as screen for us to use We need some variables and pointer space (shown below) |
 |
| We need to set up the graphics hardware with the format of our screen. | 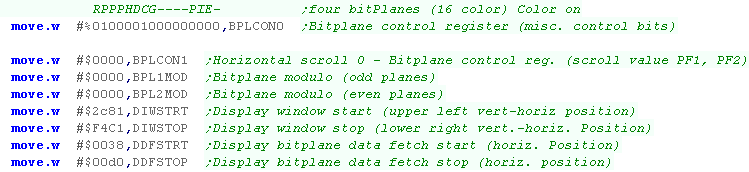 |
| We now need to turn on the interrupts to start drawing the screen. Unfortunately we've not done enough to actually draw the screen! |
 |
| Our screen needs some space for the actual data, and pointers returned by the OS | 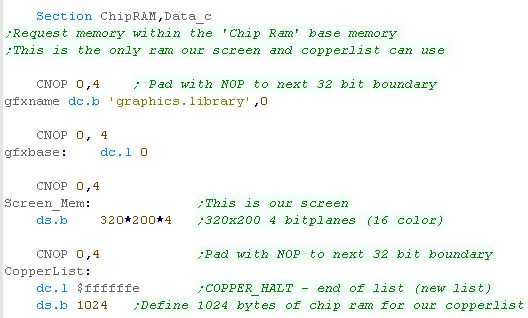 |
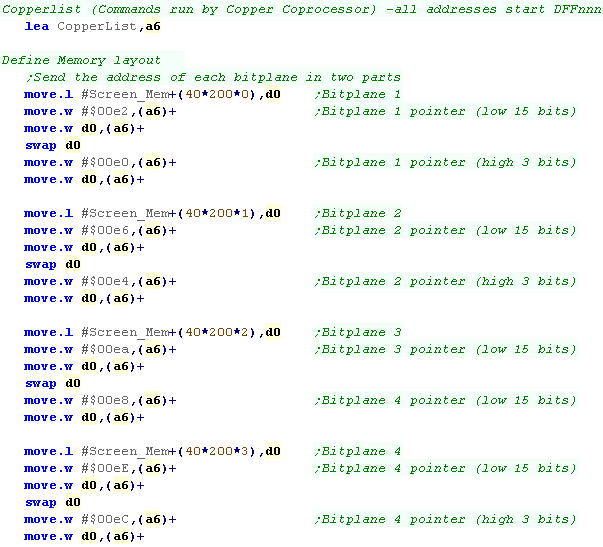
| We now need to define a 'copperlist' - this is a set of byte
'commands' to the graphics hardware that define the screen. Here we're defining a 16 color 320x200 screen |
 |
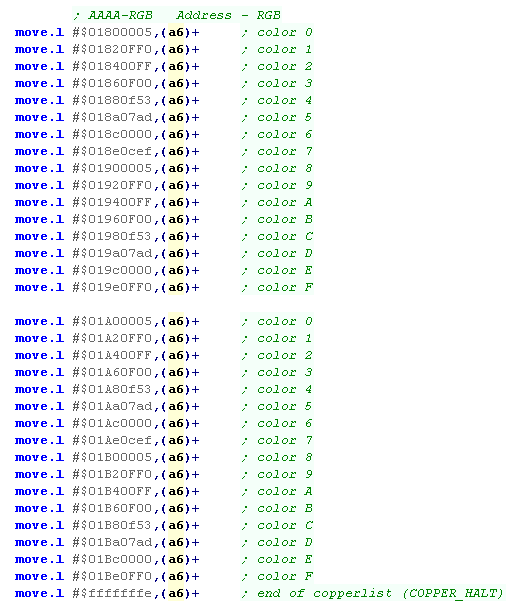
| We also need to define the screen colors. Although we're only using 16, we're defining all 32 in this definition. |
 |
| We need to wait for Vblank (When the screen is not drawing) then apply our new 'copperlist' - this draws the screen in the correct colors. |  |
| Here is the routine to wait for Vblank. |  |
Drawing an 8x8 sprite
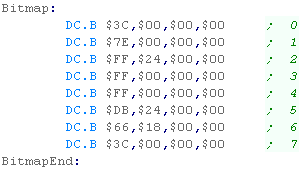
| We're going to define our Sprite... the screen is in 'bitplanes' -
so our 16 color (4 bit per pixel) 8 pixel wide smiley needs 4 bytes
per line (each contains a single bit of the line)... The face is in color 1... the smile is color 2, the eyes are color 3... colors 4+ are unused ... so bitplanes 2 and 3 contain zeros |
 |
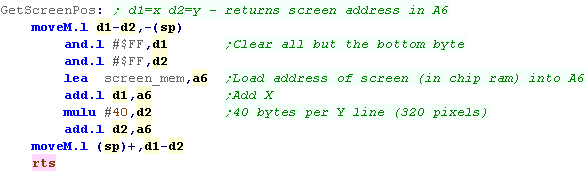
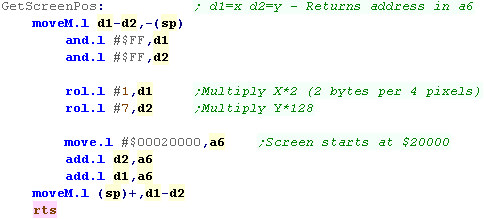
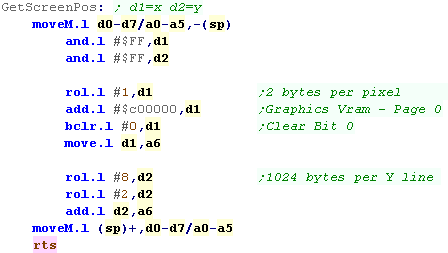
| We're going to use a function called 'GetScreenPos' to calculate
the address of an XY screenpos. The screen is split into bitplanes - all 320x200 pixels of bit 0 come first - then all the bits 1,2,3 For this reason, our formula to calculate memory address is: Addr = ScreenMem + (Ypos * 40) + Xpos |
 |
| When we want to draw our smiley, we need to calculate the memory
position. Next we write 4 consecutive bytes to each of the 4 bitplanes (40*200 bytes apart in the screen memory) We move down 40 bytes to move to the next line, and repeat until all 8 lines are drawn |
 |
| Here is the result |  |
Drawing a larger bitmap
| We're going to draw our 48x48 mascot this time. We'll load the bitmap file with an INCBIN statement |
 |
| We're going to need to change our bitmap drawing routine - we'll need to write a byte for each 8 pixels along the sprite. | 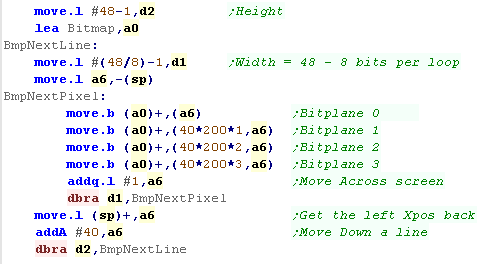 |
| Here is the result. |  |
| My AkuSprite Editor can export files in the correct format for
this tutorial - it's free and open source. (included in the
sources.7z) Use Save Raw Bitmap from the Amiga menu |
 |
| The Copperlist
is quite complex, but it's needed to do everything with the amiga
screen... Unfortunately the 'Chibiko' mascot isn't in the right colors, but we can fix that... see here |
 |
 |
Lesson
S4 - Simple
Bitmap Drawing on the
Sinclair QL Lets take a look at the Sinclair QL - we'll use 8 color mode to draw a simple smiley, and our mascot |
|
SQL_Bitmap.asm
|
|
Drawing an 8x8 sprite
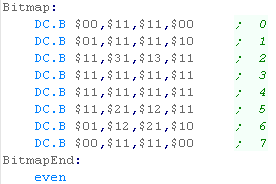
| First we need to turn on our 8 color screen - we do this with a write of %1000 to $18063 |  |
| We need a bitmap to show Here is our 8 color smiley...4 pixels are defined by a pair of bytes Alternating bits in the first byte are Green and Flashing Alternating bits in the second byte are Red and Blue |
 |
| We're going to need a function to calculate a screen memory
address from an XY position As the screen is 128 bytes wide, each 4 pixels takes 2 bytes , and our screen starts at $20000 our formula is: Address = $20000 + (Ypos * 128) + (Xpos * 2) |
 |
| We need to calculate the screen address, then write 4 bytes (one
Long - 8 pixels) per line We repeat until the sprite is done. |
 |
| Here is the result! |  |
Drawing a larger sprite
| We need to rewrite our drawing routine... as each cluster of 4
pixels has 2 bytes, we'll copy in WORDS, We also need to divide our width by 4 for the horizontal drawing loop. |
 |
| Our chibiko character will be shown onscreen. |  |
| My AkuSprite Editor can export files in the correct format for
this tutorial - it's free and open source. (included in the
sources.7z) Use Raw 8 color Bitmap from the Sinclair QL menu |
 |
 |
We've looked at
8 color mode here... but the QL also supports a higher resolution
4 color mode. But I won't tell you about it!... What you really want to? well... ok - see this lesson here! |
| This tutorial
will extend the 'Hello World' Episode... We're not going to cover
the code that is the same as that episode.. If you've not seen the Hello World episode, see it here. |
 |
Drawing a single 8x8 tile
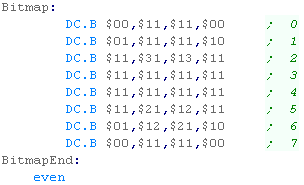
| We're going to need to define a tile... The pattern format uses a single nibble for each color... Here we're defining a 8x8 smiley... it's face is color 1, the mouth is color 2, the eyes are color 3 |
 |
| We're going to create a function called 'DefineTiles' This will take a source Ram address... a Length in bytes... and a destination VRAM address |
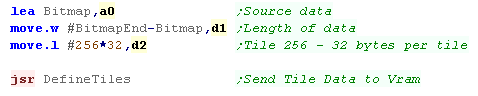 |
| The Define Tiles function will select the destination VRAM address with the 'Prepare Vram' function - then all the pattern bytes will be trans | 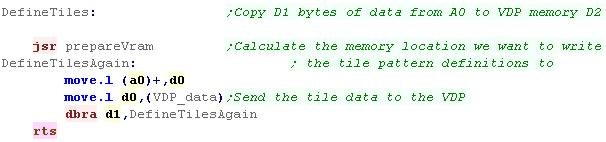 |
| The layout of the Vram address we want to write to has to be 'converted' moving the bits around into the correct layout before we send it to VDP_CTRL | 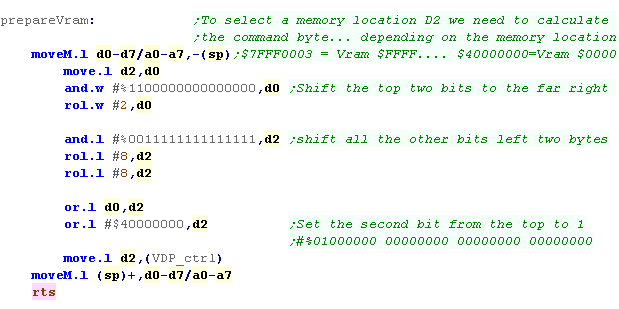 |
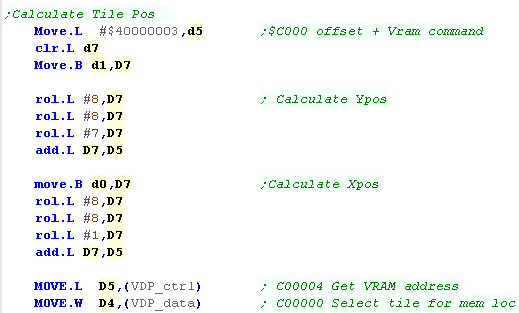
| Ok, we need to calculate the X,Y position of the Tile in the
tilemap , and we need to remap that Vram address for the weird
format of the Vram select The Tilemap 'Scroll-A' starts at $C000 - and each entry in the tilemap is 2 bytes... The tilemap is 64 tiles wide, so to calculate the Vram address our formula is: VRAM Addr = $C000 + (Ypos * 64* 2) + (Xpos *2) |
 |
| Here is the result |  |
Drawing a larger image
| This time we'll draw a larger
image ... our Chibiko mascot image is 48x48... we'll have to split
it up into 8x8 patterns, and rebuild it in the tilemap We'll include the source image from a file. (The format is the same as the MSX2) |
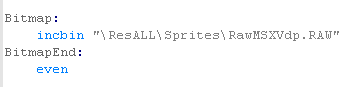 |
| We use 'Define tiles' as before to transfer the pattern data to Vram |  |
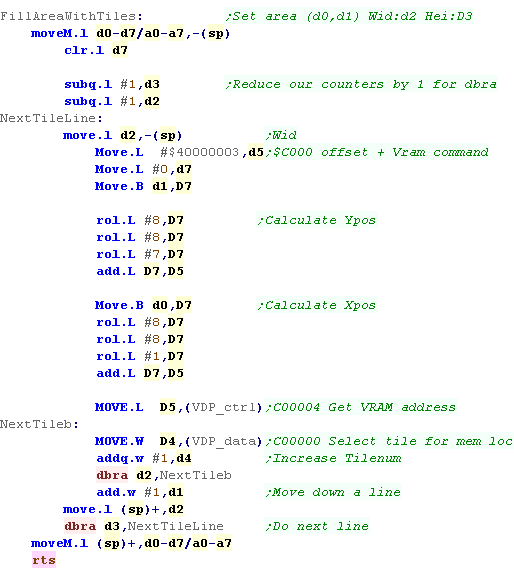
| We're going to use a new function called 'Fill Area With Tiles'... this fills a grid area with consecutively numbered tiles. | 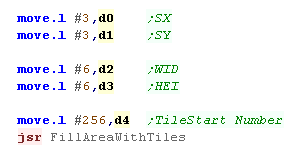 |
| At the start of each row, We calculate the Vram Destination for
the XY pos... We then write consecutive bytepairs for that line We then move down a line and repeat until the tile grid is drawn. |
 |
| Here is the result! | 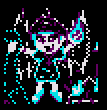 |
| My AkuSprite Editor can export files in the correct format for
this tutorial - it's free and open source. (included in the
sources.7z) Use Save Raw Bitmap from the Genesis Menu |
 |
| This tutorial
assumes you've watched the 'Hello World' Episode, and adds to that
lesson.. Not watched it yet? Don't worry, there's still hope for you... just check it out after you read through this episode - ok? |
|
Drawing a single 8x8 tile
| We're going to need some sprite data for our test - the format for
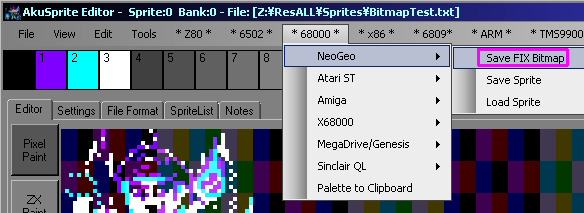
DIX tiles is rather annoying! We can export valid data with the Save Fix Bitmap option of AkuSprite Editor, it's included in the sources.7z - it's free and open source |
 |
We need to export our files, and include
them in the XML file for our game: |
|
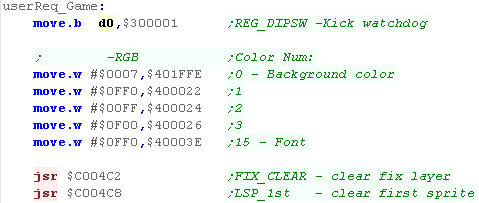
| Let's start our program - first we need to set up the palette, and
reset the layers and sprites. We also need to 'kick the watchdog' to stop the CPU resetting itself. |
 |
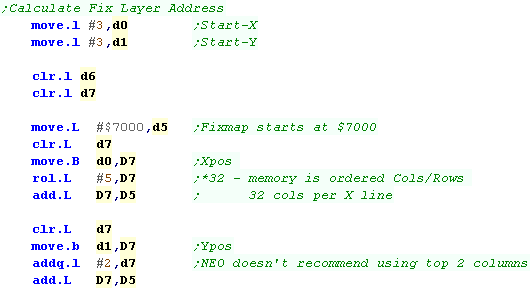
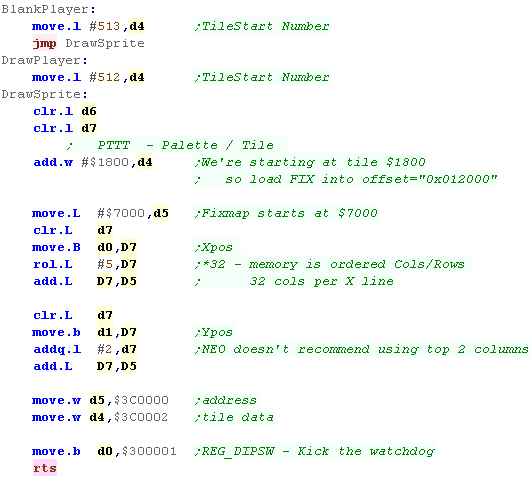
| First we'll calculate the address of the tile we want to draw... We need to make sure the address of the FIX data we put into the XML |  |
| We need to calculate the address in the Fix map of the tile we
want to change. We'll then use this address to set the visible tile. |
 |
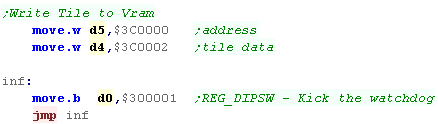
| We select the Vram address with $3C0000 - then write data to that
address with $3C0002 Once we've written the tile number, we're done, but we need to stop the 'crash protection' resetting the CPU - so we have to 'kick the watchdog' to keep the system running |
 |
| The Smiley tile will be shown onscreen | 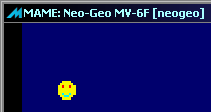 |
Drawing a larger image
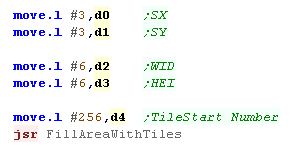
| This time we're going to draw a 48x48 image, we'll do this by
splitting it into 8x8 tiles (AkuSprite Editor does this for us) We'll define a function called 'Fill Area With Tiles' - this will draw a grid of consecutively numbered tiles on the fix layer |
 |
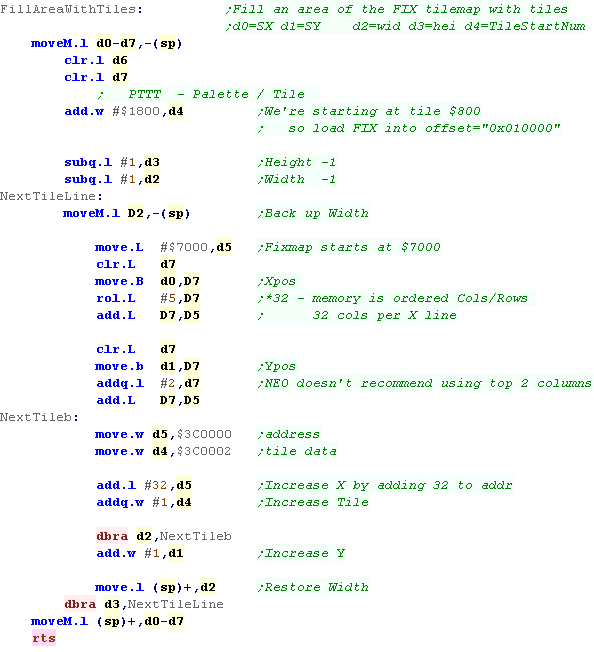
| FillAreaWithTiles will calculate the memory address of the start
of a row, then write all the consecutive tile numbers to that row. This procedure will repeat until all the rows are drawn. |
 |
| Here is the result |  |
|
This example used the FIX map, Want to use sprites? Check out this tutorial! |
The Code
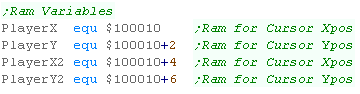
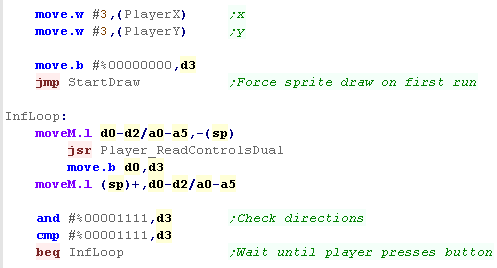
| We're going to need some variables for our player position... one for the Current position, and one for the previous position (so we can remove the old sprite) | 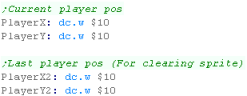 |
| We're going to need some sprite routineWe're going to need two
versions of our previous sprite drawing routine - one which draws
our smiley, and one that blanks out the previous sprite... One will draw our player - the smiley from the previous example The other will clear our player, drawing a blank area. |
 |
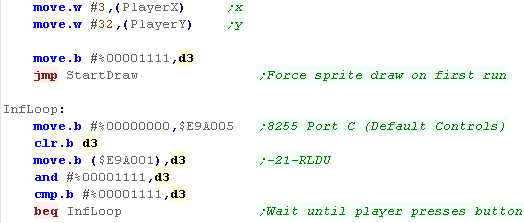
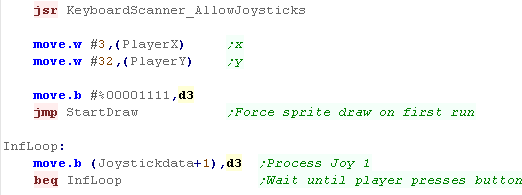
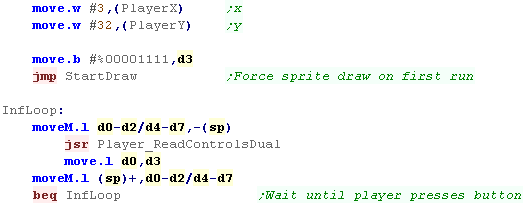
| Our code will only redraw the character when the joystick is
pressed... so the first run we need to FORCE a draw - otherwise we
wouldn't be able to see our character! When we want to test the joystick we read from $E9A001 ... the bottom 4 bits are the UDLR directions - if a bit is 1 the button is not pressed, if it's 0 the direction is pressed down |
 |
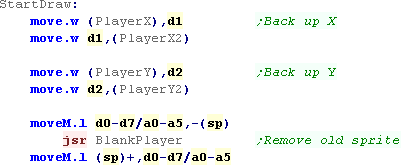
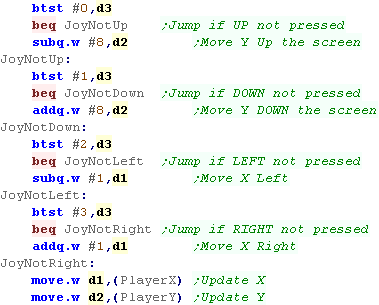
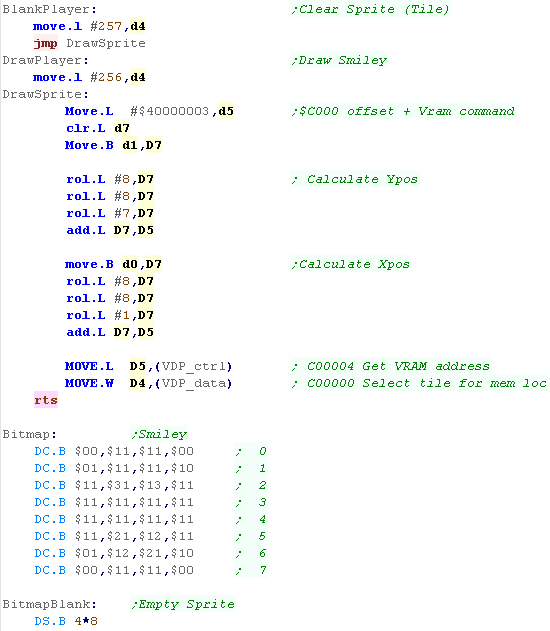
| OK, our joystick has been pressed... We need to back up the current position of the player... We're going to run our 'blank player' function... this is just our previous sprite drawing routine, with an all zero sprite |
 |
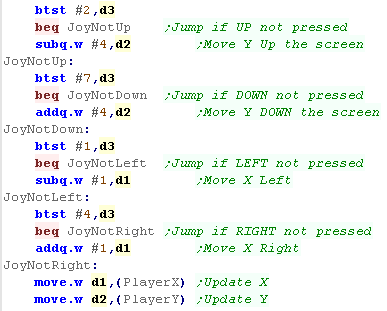
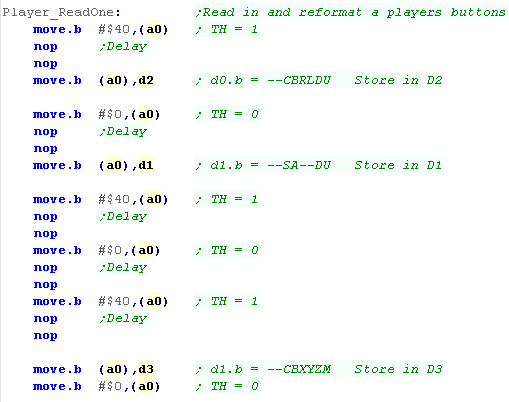
| We need to process the joystick. We need to test each bit of the value of D3 with the joystick directions... D2 is the Y axis... D1 is the X axis |
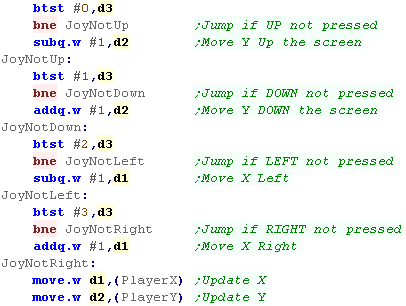 |
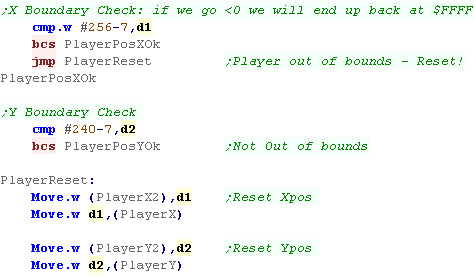
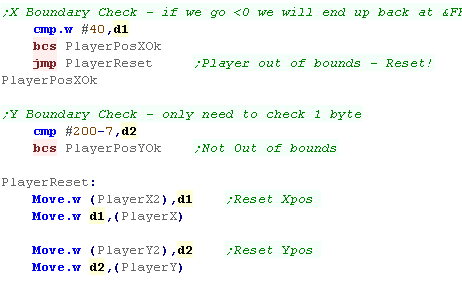
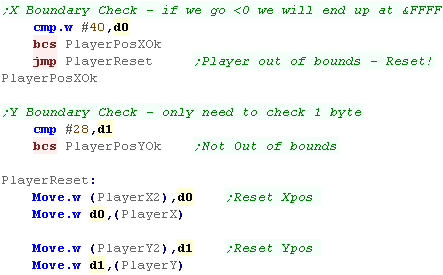
| Ok, we've moved our player, but we need to check if the sprite
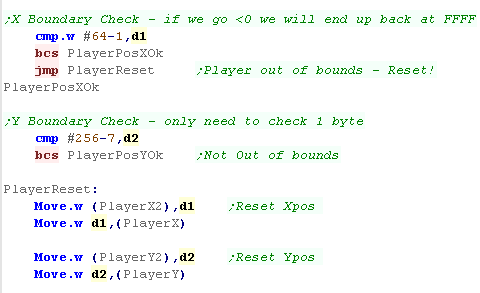
will go off the screen If the player Xpos is greater than 256-7 then it's off the screen (our character is 8 bytes wide)... also if it's below 0 that's a problem, but the value will have wrapped round to 65535, so we don't need to check this! If the player Ypos is over 240-7 we're also over the screen... If the position fails any of these boundary checks, we need to reset the position from the backup |
 |
| We need to draw the sprite in the new position... finally we wait a bit and repeat | 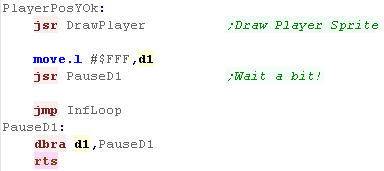 |
| We can now move our smiley around the screen | 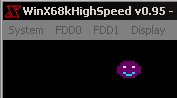 |
| If you want to
use more joystick buttons, take a look at this tutorial Here...
the x68k can use MSX type or Genesis type joypads! |
|
|
|
Lesson
S8 - Simple Joystick Reading on the Atari ST Lets extend our Atari Example, and use traps and vectors to read in the Joystick |
|
AST_Joystick.asm
|
|
The Code
| We're going to need some variables for our player position... one for the Current position, and one for the previous position (so we can remove the old sprite) | 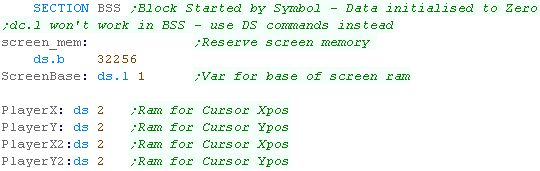 |
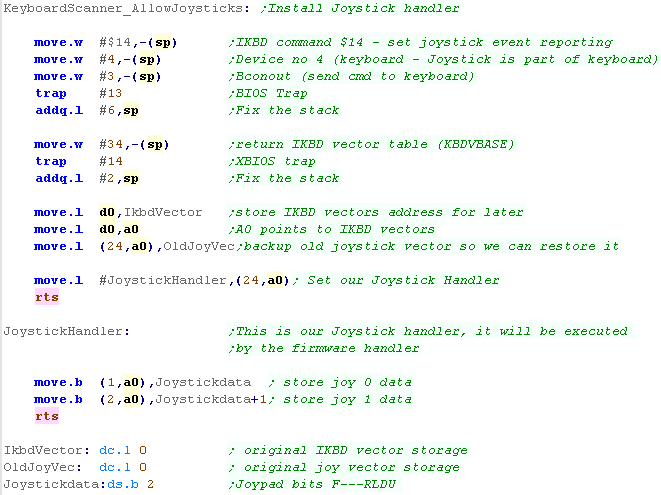
| To operate the joysticks we need to add a handler to the Atari OS. We need to get the 'IKBD' vector table, then put our 'Joystick Handler' into it This makes 'Joystick Handler' run every time a button is pressed - we then store the data from the joysticks in two bytes of 'Joystick Data' for later. The format of the read in byte is %F----RLDU |
 |
| We're going to need two versions of our previous sprite drawing
routine - one which draws our smiley, and one that blanks out the
previous sprite. We're going to need some sprite routines... One will draw our player - the smiley from the previous example The other will clear our player, drawing a blank area. |
 |
| Our code will only redraw the character when the joystick is
pressed... so the first run we need to FORCE a draw - otherwise we
wouldn't be able to see our character! When we want to test the joystick we read from the second byte at 'JoystickData' (This is set by the interrupt handler we defined in the vector table earlier...The format of the read in byte is %F---RLDU |
 |
| OK, our joystick has been pressed... We need to back up the current position of the player... We're going to run our 'blank player' function... this is just our previous sprite drawing routine, with an all zero sprite |
|
| We need to process the joystick. We need to test each bit of the value of D3 with the joystick directions... D2 is the Y axis... D1 is the X axis |
 |
| Ok, we've moved our player, but we need to check if the sprite
will go off the screen If the player Xpos is greater than 40 then it's off the screen (our character is 8 bytes wide)... also if it's below 0 that's a problem, but the value will have wrapped round to 65535, so we don't need to check this! If the player Ypos is over 200-7 we're also over the screen... If the position fails any of these boundary checks, we need to reset the position from the backup |
 |
| We need to draw the sprite in the new position... finally we wait a bit and repeat | 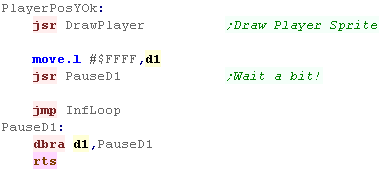 |
| We can now move our smiley around the screen |  |
|
Want more
details on the Joystick of the Atari ST? Check out This tutorial here |
The Code
| We're going to need some variables for our player position... one for the Current position, and one for the previous position (so we can remove the old sprite) | 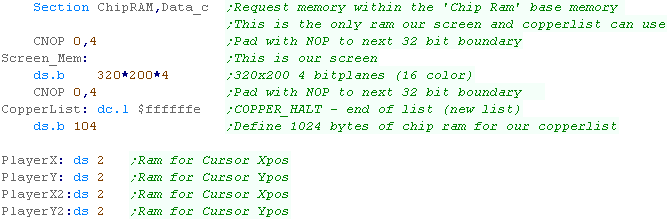 |
| To read in from the joystick in port 2 we need to read in the Axis
from $dff00c, and the fire buttons from $bfe001 There are 4 direction bits, but we have to XOR two bits together for the up and down directions. Right is bit 1 Left is bit 9 Down is bit 1 XORed with 0 UP is bit 9 XORed with 8 |
 |
| We're going to need two versions of our previous sprite drawing
routine - one which draws our smiley, and one that blanks out the
previous sprite. We're going to need some sprite routines... One will draw our player - the smiley from the previous example The other will clear our player, drawing a blank area. |
 |
| Our code will only redraw the character when the joystick is
pressed... so the first run we need to FORCE a draw - otherwise we
wouldn't be able to see our character! When we want to test the joystick we read from the second byte at 'JoystickData' (This is set by the interrupt handler we defined in the vector table earlier...The format of the read in byte is %F----RLDU |
 |
| OK, our joystick has been pressed... We need to back up the current position of the player... We're going to run our 'blank player' function... this is just our previous sprite drawing routine, with an all zero sprite |
|
| We need to process the joystick. We need to test each bit of the value of D3 with the joystick directions... D2 is the Y axis... D1 is the X axis |
|
| Ok, we've moved our player, but we need to check if the sprite
will go off the screen If the player Xpos is greater than 40 then it's off the screen (our character is 8 bytes wide)... also if it's below 0 that's a problem, but the value will have wrapped round to 65535, so we don't need to check this! If the player Ypos is over 200-7 we're also over the screen... If the position fails any of these boundary checks, we need to reset the position from the backup |
|
| We need to draw the sprite in the new position... finally we wait a bit and repeat | |
| We can now move our smiley around the screen | 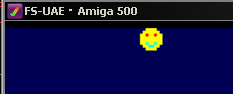 |
| This example
builds on the Hello World and bitmap examples... See Hello world here. |
|
The Code
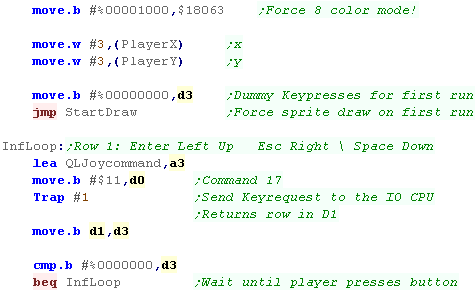
| We're going to need some variables for our player position... one for the Current position, and one for the previous position (so we can remove the old sprite) | 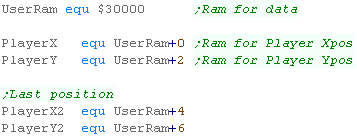 |
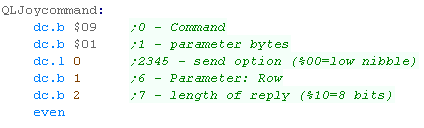
| Reading in from the keyboard has to be done with Trap 1 - command
9 We have to send a sequence of command bytes - with byte 6 as the row number - the trap will return a byte in D1 - with a bit high when the button is down. We're going to use Trap #1 to read in from the keyboard, we need to pass the command we just defined to the trap in A3 The function will return the bits of the line in D1 We're going to use the bits in D1 to build up the result in D0 We're going to move each of the controls in one by one, We'll use D2 as a temporary copy of the the register, and shift the required key bit into D0 We'll use Escape as a start button and Space,Enter and \ as Fire 1-3, shifting them into D0 Finally we'll shift in all the bits of UDLR into D0 |
 |
| We're going to need two versions of our previous sprite drawing
routine - one which draws our smiley, and one that blanks out the
previous sprite. We're going to need some sprite routines... One will draw our player - the smiley from the previous example The other will clear our player, drawing a blank area. |
|
| Our code will only redraw the character when the joystick is
pressed... so the first run we need to FORCE a draw - otherwise we
wouldn't be able to see our character! When we want to test the joystick we read from the second byte at 'JoystickData' (This is set by the interrupt handler we defined in the vector table earlier...The format of the read in byte is %F----RLDU |
 |
| OK, our joystick has been pressed... We need to back up the current position of the player... We're going to run our 'blank player' function... this is just our previous sprite drawing routine, with an all zero sprite |
|
| We need to process the joystick. We need to test each bit of the value of D3 with the joystick directions... D2 is the Y axis... D1 is the X axis |
 |
| Ok, we've moved our player, but we need to check if the sprite
will go off the screen If the player Xpos is greater than 63 then it's off the screen (our character is 8 bytes wide)... also if it's below 0 that's a problem, but the value will have wrapped round to 65535, so we don't need to check this! If the player Ypos is over 200-7 we're also over the screen... If the position fails any of these boundary checks, we need to reset the position from the backup |
 |
| We need to draw the sprite in the new position... finally we wait a bit and repeat | |
| We can now move our smiley around the screen | 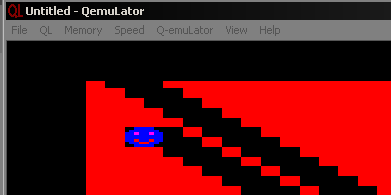 |
| The Sinclair QL does
have joystick ports... but they emulate cursor keys!... so we
don't need to do anything special to use the plug in Joysticks
(although they are super rare!) |
|

|
Lesson
S11 - Joypad Reading on
the Sega Genesis Lets extend the previous bitmap example, and learn how to move an 8x8 smiley tile around the screen. |
|
GEN_Joystick.asm
|
|
The Code
| We're going to need some variables for our player position... one
for the Current position, and one for the previous position (so we
can remove the old sprite) We define these in the ram area of the console |
|
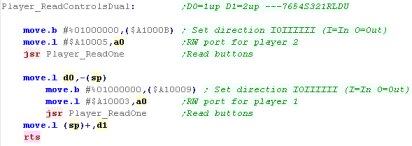
| We're going to need some sprite routines We're going to need two versions of our previous sprite drawing routine - one which draws our smiley, and one that blanks out the previous sprite... One will draw our player - the smiley from the previous example The other will clear our player, drawing a blank area. We're using the Tilemap to draw the graphic in this case... the tilemap starts at $C000 - each tile is 2 bytes |
 |
| Our code will only redraw the character when the joystick is
pressed... so the first run we need to FORCE a draw - otherwise we
wouldn't be able to see our character! We use the 'ReadControlsDual' function to read in from the joypad, and look until a direction is pressed. |
 |
| OK, our joystick has been pressed... We need to back up the current position of the player... We're going to run our 'blank player' function... this is just our previous sprite drawing routine, with an all zero sprite |
|
| We need to process the joystick. We need to test each bit of the value of D3 with the joystick directions... D2 is the Y axis... D1 is the X axis |
|
| Ok, we've moved our player, but we need to check if the sprite
will go off the screen If the player Xpos is greater than 40 then it's off the screen (our character is 8 bytes wide)... also if it's below 0 that's a problem, but the value will have wrapped round to 65535, so we don't need to check this! If the player Ypos is over 28 we're also over the screen... If the position fails any of these boundary checks, we need to reset the position from the backup |
 |
| We need to draw the sprite in the new position... finally we wait a bit and repeat | 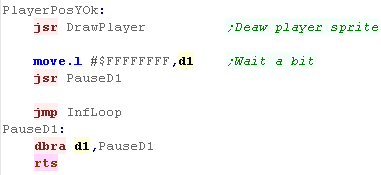 |
| We can now move our smiley around the screen | 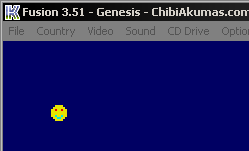 |
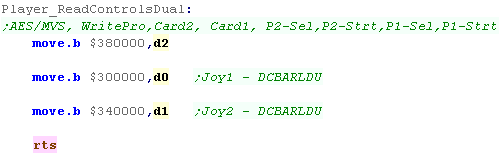
Joystick Reading
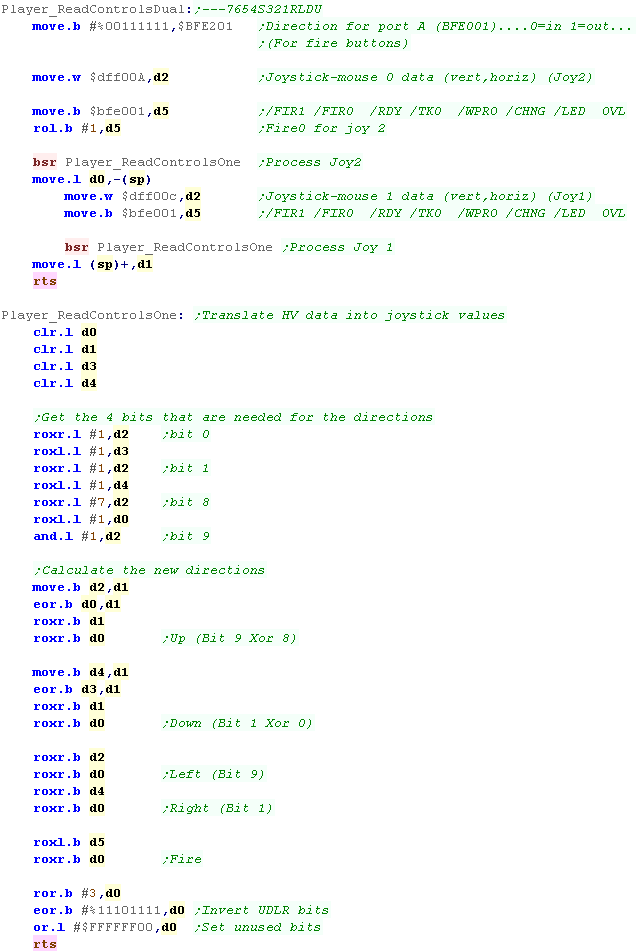
| There are two ports which are read and written for the joypad... Joypad 1 is at address $A10005 Joypad 2 is at address $A10003 First, however, we need to set one of the bits of these ports to WRITE... we do this with 2 ports... Joypad 1 is at address $A1000B Joypad 2 is at address $A10009 |
 |
| The Joypad needs a sequence of writes to select the 'sections' of
the joypad... this is achieved by writes with bit 6 as a 1 The first batch returns Up, Down, Left, Right... button C and Button B The second batch returns Button A and Start The final batch are Button X, Button Y and Button Z... as well as Mode. Note: some of the buttons are duplicated... eg Up is returned in the first and second batch. |
 |
| Finally, we shift around the bits, so we have all the buttons in a neat order in a single register. | 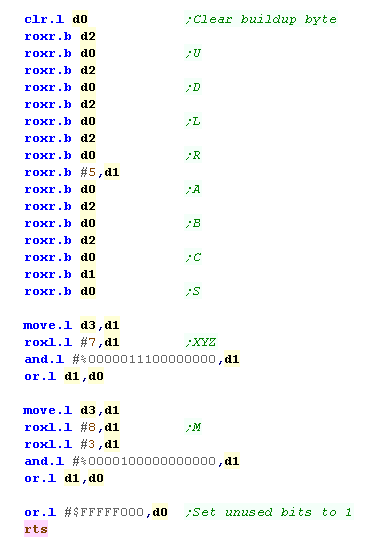 |
|
The weird layout and
splitting of the buttons is to maintain compatibility with the old
Master System controllers... The genesis has basically an entire master system built in, with sound chip... Z80 and backwards compatible video. |
The Code
| We're going to need some variables for our player position... one
for the Current position, and one for the previous position (so we
can remove the old sprite) We define these in the ram area of the console |
 |
| We're going to need some sprite routines We're going to need two versions of our previous sprite drawing routine - one which draws our smiley, and one that blanks out the previous sprite... One will draw our player - the smiley from the previous example The other will clear our player, drawing a blank area. We're using the Fixmap to draw the graphic in this case... the Fixmap starts at $7000 - each tile is 2 bytes |
 |
| Our code will only redraw the character when the joystick is
pressed... so the first run we need to FORCE a draw - otherwise we
wouldn't be able to see our character! We use the 'ReadControlsDual' function to read in from the joypad, and look until a direction is pressed. |
 |
| OK, our joystick has been pressed... We need to back up the current position of the player... We're going to run our 'blank player' function... this is just our previous sprite drawing routine, with an all zero sprite |
|
| We need to process the joystick. We need to test each bit of the value of D3 with the joystick directions... D2 is the Y axis... D1 is the X axis |
|
| Ok, we've moved our player, but we need to check if the sprite
will go off the screen If the player Xpos is greater than 40 then it's off the screen (our character is 8 bytes wide)... also if it's below 0 that's a problem, but the value will have wrapped round to 65535, so we don't need to check this! If the player Ypos is over 28 we're also over the screen... If the position fails any of these boundary checks, we need to reset the position from the backup |
|
| We need to draw the sprite in the new position... finally we wait a bit and repeat | |
| We can now move our smiley around the screen | 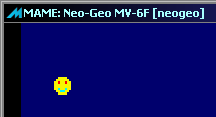 |
Joystick Reading
| There are 3 ports we want to use to read in the buttons $380000 allows us to read in Select and Start for Joy 1 and 2 $30000 allows us to read in the directions and buttons of Joystick 1 $34000 allows us to read in the directions and buttons of Joystick 1 |
 |
| Don't forget!...
The Fixmap bitmap data for the smiley is never transferred to VRAM
- it's all in ROM, and is defined by the MAME XML. |
|
Logical Units and clipping
| To allow us to crop our sprites, we'll need to move our sprite
around 'logical space' - only a portion of this will be the visible
screen. We'll use this to crop the sprite. |
 |
We're designing our code for screens of 256x192 - and we'll use 'Logical Co-ordinates' which define a visible screen of 192x96 (2 pixels per logical unit) The visible logical screen is in the center of the logical space area to allow the sprite to be 'partially offscreen' on any side. |
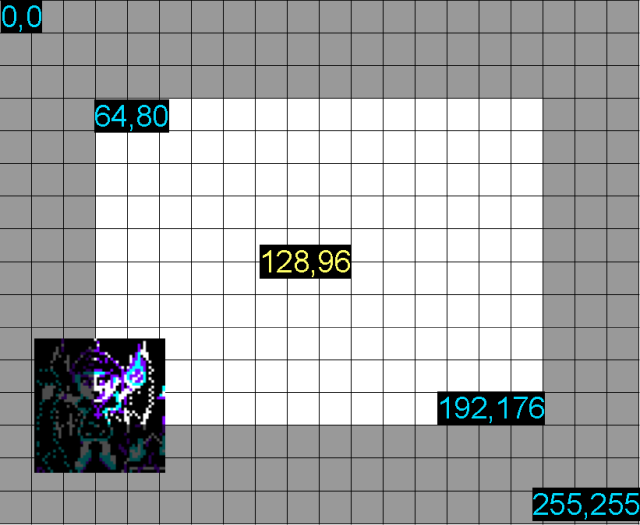 |
| We need to crop any offscreen part to
get to the first visible pixel of the sprite. After each line We also need to crop the unused pixels to the next visible pixel |
 |
| The X68000 actually
allows for easy per pixel movement, so our Logical units of 2x2
pixels will be a little less smooth than is possible. The main reason we're using this constant logical unit definition is to allow easy porting of code between platforms. |
|
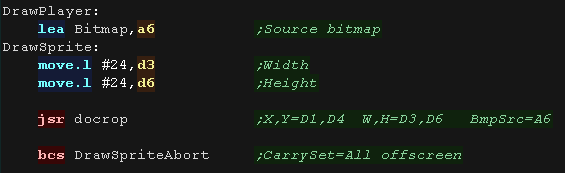
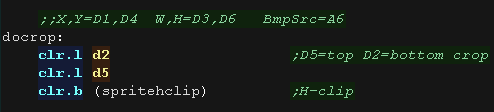
Our Sprite Routine
| Before we draw our sprite we need to crop it with "DoCrop" registers D1,D4 is the X,Y co-ordinate in logical units registers D3,D6 is the Width,Height in logical units register A6 is the address of the source bitmap data. If there is nothing onscreen, 'DoCrop' will return the Carry set. |
 |
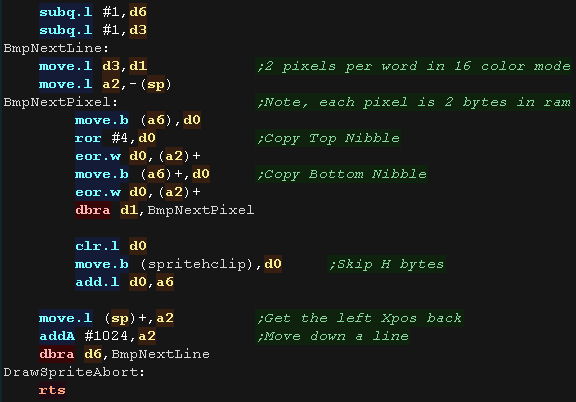
GetVDPScreenPos will calculate the VRAM destination into A2 We then transfer bytes from A6 to A2 to move the VRAM destination down one line we add 1024 after each line we update the source bitmap, adding the transferred bytes, and any bytes that need to be skipped at the end of a line (SpriteHClip) |
 |
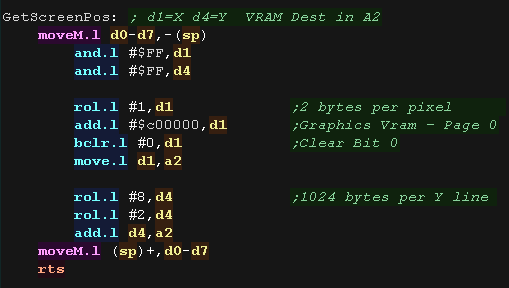
| GetVDPScreenPos will calculate the VRAM destination A2 from X,Y
pos (D1,D4) The formula is $C00000 + Ypos *1024 + Xpos |
 |
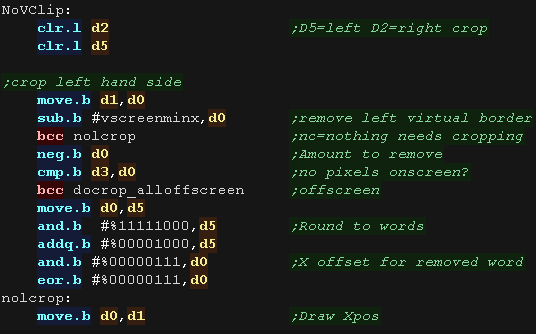
Logical Cropping
| Our cropping routine will work out the X,Y pos in bytes, and width
and height + any skipped pixels from the source data registers D1,D4 is the X,Y co-ordinate in logical units registers D3,D6 is the Width,Height in logical units register A6 is the address of the source bitmap data. First we zero D2,D5 - they are used for temp values, and spritehclip which is used for the horizontally skipped bytes after each line |
 |
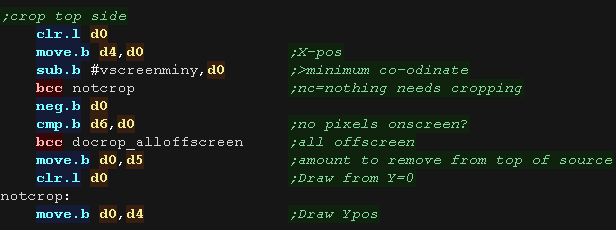
| Ok... lets crop the top of the sprite... First we remove the ypos of the first visible pixel from the draw ypos (D4)... if the result is greater than zero, then nothing is off the screen at the top. if the result is less than zero we need to crop... we convert the negative to a positive and compare to the height of our sprite (D6), if the amount to crop is not less than the height then the sprite is completely offscreen. Anything else is the number of lines we need to remove from the top, we store this in D5 and set the new 'draw position' to Ypos (D4) =0 |
 |
| Next we do the same for the bottom, We add the height to the Ypos, and subtract the height of the logical screen, if it's over the screen height (greater than zero) we need to crop again - the result is the amount to crop |
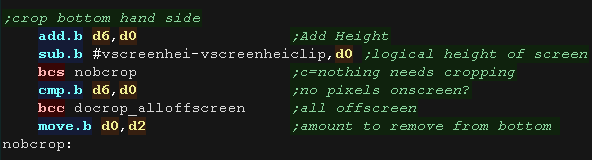 |
| We've calculated the top (d5) and bottom (d2) crop... we now use these to calculate the new height of the sprite (D6). | 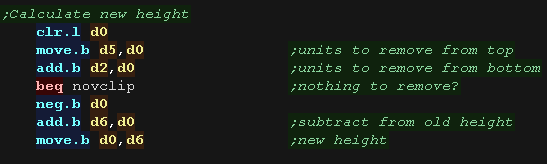 |
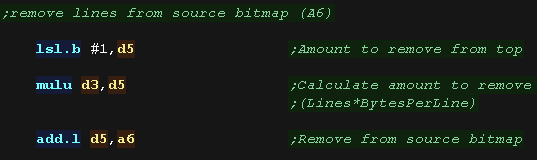
| We then skip over any bytes in the source (A6) based on the number
of lines we need to remove from the top. |
 |
| now we do the same for the X axis First we remove the xpos of the first visible pixel from the draw Xpos (D1) ... if the result is greater than zero, then nothing is off the screen at the left. if the result is less than zero we need to crop... we convert the negative to a positive and compare to the width of our sprite (D3), if the amount to crop is not less than the width then the sprite is completely offscreen. Anything else is the number of lines we need to remove from the left, we store this in D5 and set the new 'draw position' to Xpos (D1) =0 |
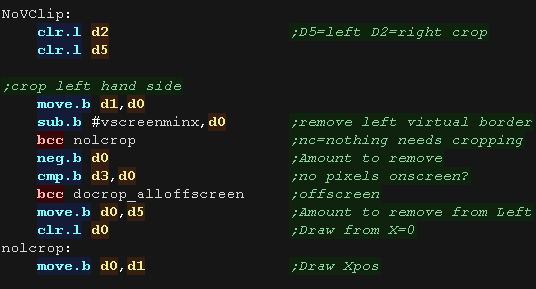 |
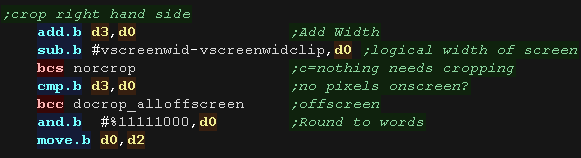
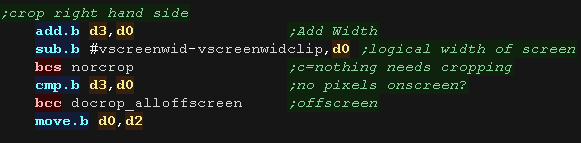
| Next we do the same for the right, We add the width (D3) to the Xpos, and subtract the width of the logical screen, if it's over the screen width (greater than zero) we need to crop again - the result is the amount to crop from the right (d2) |
 |
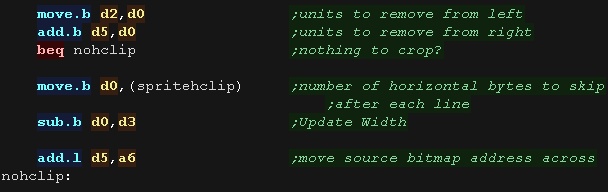
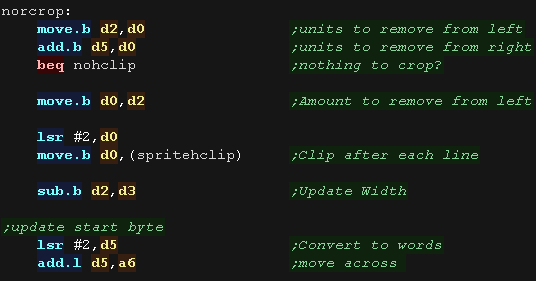
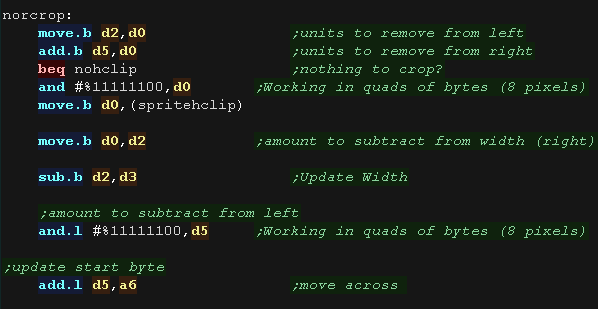
| We've calculated the left and right crop... we now use these to
calculate the new width of the sprite (D3). We then skip over any bytes in the source (A6) based on the number of bytes we need to remove from the left (D5). |
 |
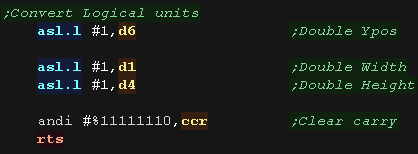
| We've finished cropping our sprite!... but we need to convert our
co-ordinates from logical units (pairs of pixels) to a tile count -
effectively muultiplying Xpos,Ypos and Height by 2. We clear the carry to tell the calling routine we cropped the sprite successfully (it needs drawing) and return. |
 |
| If the sprite is completely offscreen, there's no point trying to draw, so we set the carry and return |  |
Logical Units and clipping
| To allow us to crop our sprites, we'll need to move our sprite
around 'logical space' - only a portion of this will be the visible
screen. We'll use this to crop the sprite. |
 |
We're designing our code for screens of 256x192 - and we'll use 'Logical Co-ordinates' which define a visible screen of 192x96 (2 pixels per logical unit) The visible logical screen is in the center of the logical space area to allow the sprite to be 'partially offscreen' on any side. |
|
| We need to crop any offscreen part to
get to the first visible pixel of the sprite. After each line We also need to crop the unused pixels to the next visible pixel |
|
| The blitting code
works in 16 bit words, so chunks of the sprite disappear when we
get to the edge of the screen. If we want to fix this, we need to define a wider screen with an 'offscreen' area of at least 1 word on the left and right. |
|
Our Sprite Routine
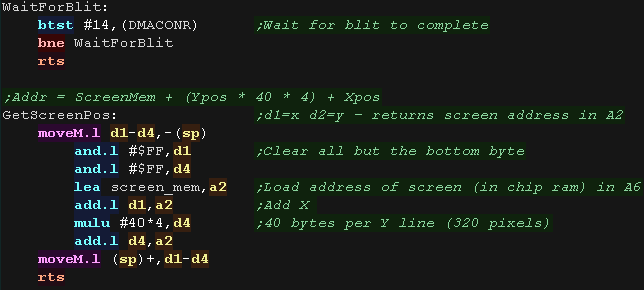
| Before we can use the blitter, we need to enable the Blitter DMA with $DFF096 |  |
| Before we draw our sprite we need to crop it with "DoCrop" registers D1,D4 is the X,Y co-ordinate in logical units registers D3,D6 is the Width,Height in logical units register A6 is the address of the source bitmap data. If there is nothing onscreen, 'DoCrop' will return the Carry set. |
|
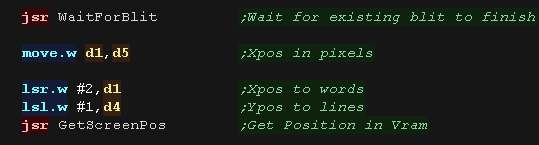
| First we need to ensure the last blit finished... we do this with
WaitForBlit! Then we convert our X,Ypos from Logical units to horizontal words, and vertical lines. We then Use GetScreenPos to calculate the VRAM destination position. |
 |
There are a lot of settings we need to set up for the drawing of our sprite via BLIT we can only work in 16 bit words, but we can bit shift the bits of the sprite to allow for smooth movement between 2 byte blocks. We XOR the sprite with the current screen contents, we use the function $5A = !AC+A!C to do this... where A is the sprite, and C is the current screen contents. |
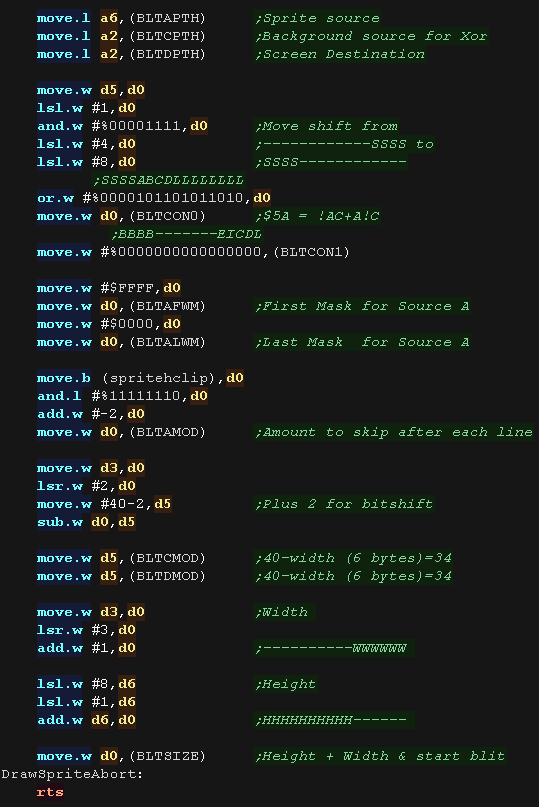 |
| GetVDPScreenPos will calculate the VRAM destination A2 from X,Y
pos (D1,D4) We have So our formula is Addr = ScreenMem + (Ypos * 40 * 4) + Xpos |
 |
Logical Cropping
| Our cropping routine will work out the X,Y pos in bytes, and width
and height + any skipped pixels from the source data registers D1,D4 is the X,Y co-ordinate in logical units registers D3,D6 is the Width,Height in logical units register A6 is the address of the source bitmap data. First we zero D2,D5 - they are used for temp values, and spritehclip which is used for the horizontally skipped bytes after each line |
|
| Ok... lets crop the top of the sprite... First we remove the ypos of the first visible pixel from the draw ypos (D4)... if the result is greater than zero, then nothing is off the screen at the top. if the result is less than zero we need to crop... we convert the negative to a positive and compare to the height of our sprite (D6), if the amount to crop is not less than the height then the sprite is completely offscreen. Anything else is the number of lines we need to remove from the top, we store this in D5 and set the new 'draw position' to Ypos (D4) =0 |
|
| Next we do the same for the bottom, We add the height to the Ypos, and subtract the height of the logical screen, if it's over the screen height (greater than zero) we need to crop again - the result is the amount to crop |
|
| We've calculated the top (d5) and bottom (d2) crop... we now use these to calculate the new height of the sprite (D6). | |
| We then skip over any bytes in the source (A6) based on the number
of lines we need to remove from the top. |
|
| now we do the same for the X axis First we remove the xpos of the first visible pixel from the draw Xpos (D1) ... if the result is greater than zero, then nothing is off the screen at the left. if the result is less than zero we need to crop... we convert the negative to a positive and compare to the width of our sprite (D3), if the amount to crop is not less than the width then the sprite is completely offscreen. Anything else is the number of lines we need to remove from the left, we store this in D5 and set the new 'draw position' to Xpos (D1) =0 |
 |
| Next we do the same for the right, We add the width (D3) to the Xpos, and subtract the width of the logical screen, if it's over the screen width (greater than zero) we need to crop again - the result is the amount to crop from the right (d2) |
 |
| We've calculated the left and right crop... we now use these to
calculate the new width of the sprite (D3). We then skip over any bytes in the source (A6) based on the number of bytes we need to remove from the left (D5). |
 |
| We clear the carry to tell the calling routine we cropped the sprite successfully (it needs drawing) and return. |  |
| If the sprite is completely offscreen, there's no point trying to draw, so we set the carry and return | |
|
|
Lesson
S15 - Simple Sprite Clipping on the Atari ST Lets extend our Atari Example, and add sprite clipping so the sprite can go partially offscreen. |
|
AST_BitmapClipping.asm
|
|
Logical Units and clipping
| To allow us to crop our sprites, we'll need to move our sprite
around 'logical space' - only a portion of this will be the visible
screen. We'll use this to crop the sprite. |
 |
We're designing our code for screens of 256x192 - and we'll use 'Logical Co-ordinates' which define a visible screen of 192x96 (2 pixels per logical unit) The visible logical screen is in the center of the logical space area to allow the sprite to be 'partially offscreen' on any side. |
|
| We need to crop any offscreen part to
get to the first visible pixel of the sprite. After each line We also need to crop the unused pixels to the next visible pixel |
|
| Our sample code does
not bitshift the bits of the sprite, this means we can only move
horizontally in 8 pixel blocks... This means jerky horizontal movement, but pixel shifting all the blocks would be quite slow. |
|
Our Sprite Routine
| Before we draw our sprite we need to crop it with "DoCrop" registers D1,D4 is the X,Y co-ordinate in logical units registers D3,D6 is the Width,Height in logical units register A6 is the address of the source bitmap data. If there is nothing onscreen, 'DoCrop' will return the Carry set. |
|
| We need to fix up our co-ordinates. Our routine works horizontally in 8 pixel blocks, and we need to reduce our width (in D3) by one for DBRA We vconvert the Xpos to byte blocks (8 pixels) We need to convert our height (D6) and Ypos (D4) from logical units to lines We then use GetScreenPos to get the VRAM destionation (in register A2) |
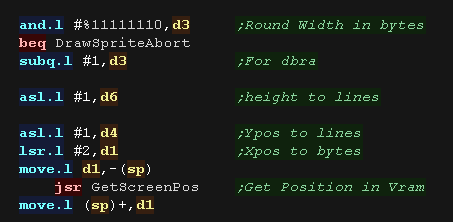 |
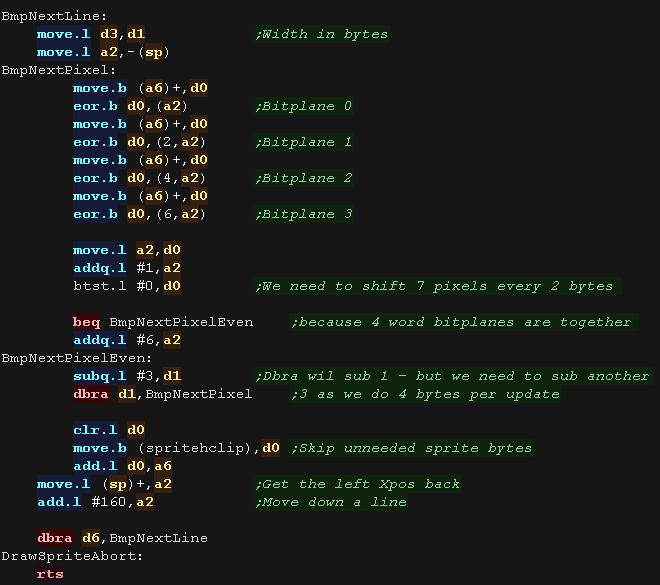
Our Sprite routine transfers 4 bytes of our source sprite to the 4 bitplanes. We XOR (eor) the source data with the screen data, this inverts the screen data, and allows us to remove the sprite by drawing it a second time. The 4 bitplanes are in 4 consecutive words in VRAM, so after 2 bytes we need to skip the next 6 bytes. We repeat until the sprite is done. |
 |
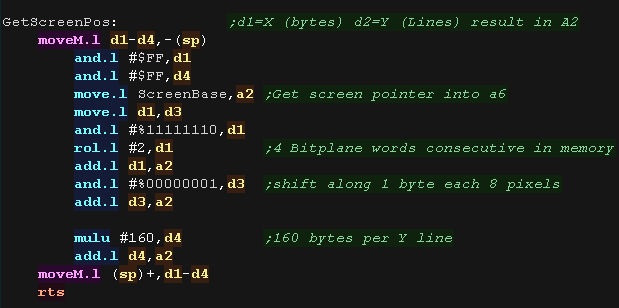
| GetVDPScreenPos will calculate the VRAM destination A2 from X,Y
pos (D1,D4) We have each 320 pixel line is 160 bytes, but we have to cope with the fact that pairs of bytes are grouped together, but the bitplanes of those pairs are in 8 consecutive bytes in vram. |
 |
Logical Cropping
| Our cropping routine will work out the X,Y pos in bytes, and width
and height + any skipped pixels from the source data registers D1,D4 is the X,Y co-ordinate in logical units registers D3,D6 is the Width,Height in logical units register A6 is the address of the source bitmap data. First we zero D2,D5 - they are used for temp values, and spritehclip which is used for the horizontally skipped bytes after each line |
|
| Ok... lets crop the top of the sprite... First we remove the ypos of the first visible pixel from the draw ypos (D4)... if the result is greater than zero, then nothing is off the screen at the top. if the result is less than zero we need to crop... we convert the negative to a positive and compare to the height of our sprite (D6), if the amount to crop is not less than the height then the sprite is completely offscreen. Anything else is the number of lines we need to remove from the top, we store this in D5 and set the new 'draw position' to Ypos (D4) =0 |
|
| Next we do the same for the bottom, We add the height to the Ypos, and subtract the height of the logical screen, if it's over the screen height (greater than zero) we need to crop again - the result is the amount to crop |
|
| We've calculated the top (d5) and bottom (d2) crop... we now use these to calculate the new height of the sprite (D6). | |
| We then skip over any bytes in the source (A6) based on the number
of lines we need to remove from the top. |
|
| now we do the same for the X axis First we remove the xpos of the first visible pixel from the draw Xpos (D1) ... if the result is greater than zero, then nothing is off the screen at the left. if the result is less than zero we need to crop... we add 4 to round up the amount to crop. Anything else is the number of lines we need to remove from the left, we store this in D5 and set the new 'draw position' to Xpos (D1) =0 |
 |
| Next we do the same for the right, We add the width (D3) to the Xpos, and subtract the width of the logical screen, if it's over the screen width (greater than zero) we need to crop again - the result is the amount to crop from the right (d2) |
 |
| We've calculated the left and right crop... we now use these to
calculate the new width of the sprite (D3). We then skip over any bytes in the source (A6) based on the number of bytes we need to remove from the left (D5). |
 |
| We clear the carry to tell the calling routine we cropped the sprite successfully (it needs drawing) and return. | |
| If the sprite is completely offscreen, there's no point trying to draw, so we set the carry and return | |

