
Hello World Series
Introduction to the Hello
World Series...
In this series of tutorials we create the classic 'Hello World' program... a basic program to just show a text message onscreen!... each example will be a single ASM file (with font where required) and we'll look at the stages required to compile the ASM, and get it onto a disk or cartridge.
In this series of tutorials we create the classic 'Hello World' program... a basic program to just show a text message onscreen!... each example will be a single ASM file (with font where required) and we'll look at the stages required to compile the ASM, and get it onto a disk or cartridge.
Once we've got 'hello world' working,
we'll extend it, adding a 'Monitor' to show registers, and MemDump,
to display part of the RAM to the screen... these are a useful
starting point if you're building something new.
Coding Hello World
Building our disk image
We build our file with Vasm - Vasm has
support for the special Xfile format used by the x68 for
executable files... I use this build command in my batch files. We need to specify the source asm file to compile we're specifying the processor type as 68000 We're specifying that VASM should ignore case, and check if labels look like commands (in case we forgot our tab on a command) I define a couple of symbols, but you won't need them for the simple example... We're telling VASM We need to tell vasm to build an Xfile - this is the executable file type of the x68k Finally, we specify a filename for the output file |
|
| We're using NDC
to alter disk image, I use a template disk that has a
basic dos boot, and automatically starts prog.x We first delete the old version of the program from the disk... then we add the new file to the disk image |
 |
| We start X68K high speed - the configuration of the program is
set up to pre-insert the disk image. |
 |
 |
The X68000
needs an operating system boot disk... this tutorial uses a
'minimal' disk with starts a Human68k Dos command line - the
autoexec.bat will start up the program. Just because it has an Autoexec.bat, Don't think that Human68k is the same thing as MS-DOS - it's similar but a totally different OS! |
Xfile format
If you're not using Vasm, or another
assembler that can output Xfiles you're going to have to build
your own header with the correct header... I used to attach a
template header into the file, then patch in a new length into
the filename. |
|
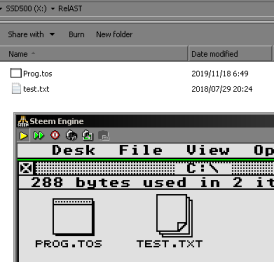
| The binary file is shown to the right, we can see the
following sections... The Header is at the start of the file The Code (text) segment - it's size can be seen in the header The Data segment - it's size is also in the header The Symbol table - it's size is also in the header. The Relocation table has the addresses of code which needs it's addresses altering - it's size is also in the header |
 |
Monitor Tools
 |
Lesson
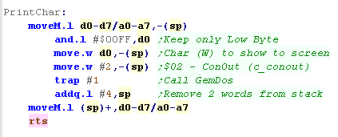
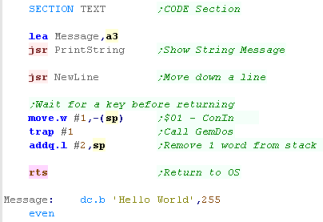
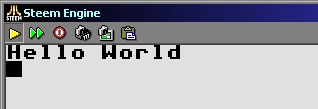
H2 - Hello World on the Atari ST This time, lets take a look at the Atari ST!... we'll use operating system calls to show Hello World to the screen. |
 |
 |
|
 |
Coding Hello World
Building and Starting our program
Monitor Tools
 |
We're
just using Text console mode in this example... if you
want to see the same functions in bitmap mode, please see
the platform specific series. That's probably what you'll want to do if you're writing a game... unless it's a text adventure! |
 |
Lesson
H3
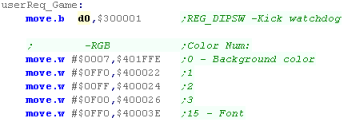
- Hello World on the NeoGeo The NeoGeo uses 5 bits per channel, has 16 colors per palette, and up to 256 palettes! Lets learn how to set the colors on the Neo Geo! |
 |
 NEO_HelloWorld.asm |
|
 |
Starting a NeoGeo Cartridge
Setting up our screen
Printing a Character to the screen
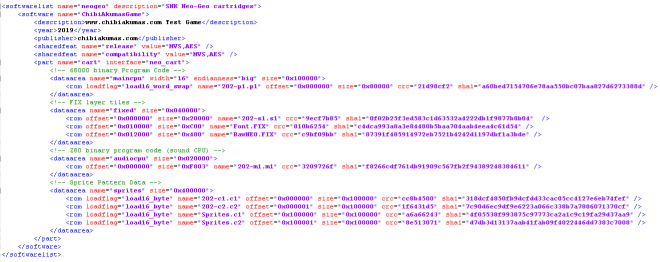
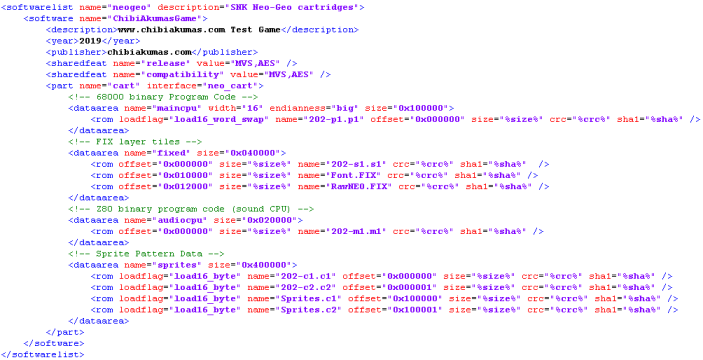
The XML! (MAME ROM Layout)
| Sprites and Tiles MUST be defined in romfiles,
and included in the XML, this is the only way ROMS can be
built on the NeoGeo... This is because of the way the hardware is designed, each 'module' (Graphics sound etc) has it's own physically independent rom files. The NeoGeo CD is different, it has ram that can be filled by our program, but it's slower as a result. |
 |
Building the ASM file
We build our file with Vasm - Vasm
has support for the special Xfile format used by the x68 for
executable files... I use this build command in my batch
files. We need to specify the source asm file to compile We're specifying that VASM should ignore case, and check if labels look like commands (in case we forgot our tab on a command) I'm specifying to output 68000 CPU code I define a couple of symbols, but you won't need them for the simple example... We're telling VASM to output a listing. This is a text file which shows how the asm commands convert to bytecode... We don't need it - but it may help us if we have problems! We need to tell vasm to build an BINary file Our source sample will only compile correctly in DevPac mode Finally, we specify a filename for the output file |
Our File is built, but we need to
do more, we need to convert the byte data into the correct
format for the NeoGeo by swaing the byte pairs... we also
need to pad the file |
We need to make sure the SIZE, CRC
and SHA are correct in the XML for each file... I've written
a little program to calculate the hashes If your hashes are wrong, MAME will whine... if your Size is wrong MAME may crash! |
Finally, we can load MAME and start our game.  |
Monitor Tools
| As part of my tutorials, I wrote some simple 'Monitor
Tools' which will help with debugging By including a few extra files we can use those tools with this example. |
  |
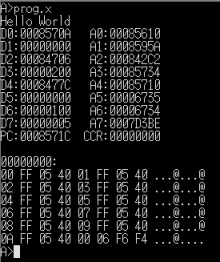
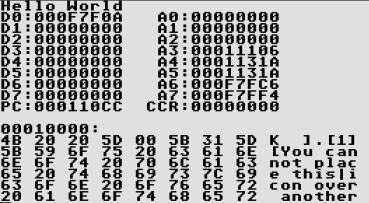
| These tools provide two useful functions... "Monitor" will show the register contents to the screen "Memdump" Will output some lines of memory to the screen from the specified memory address |
 |
| The registers and requested memory area will be shown to the screen. | 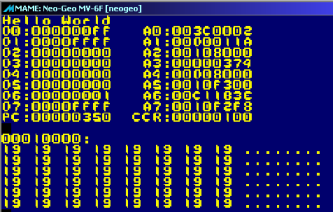 |
Coding Hello World
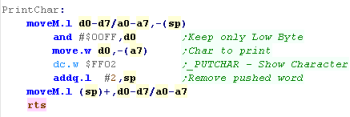
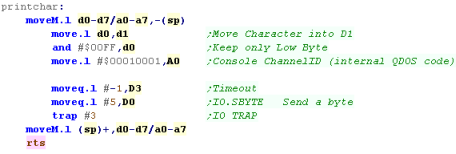
| We're going to use an OS trap to draw characters to the
screen Trap #3 - Function #5 (In D0) will send a byte to the screen... we need to set the Timeout (D3) and Channel ID (A0) as well... and make sure the character code is in D0 |
 |
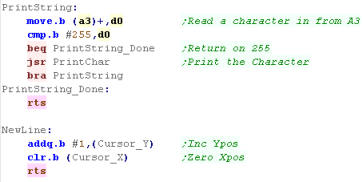
| We're going to extend our PrintChar routine into a
PrintString Routine - it'll use Char 255 terminated strings. We just send each character to PrintChar until we get to the 255 |
 |
| We can start a new line by printing a character 10 to the screen. |  |
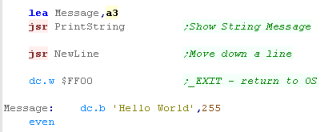
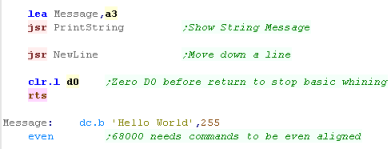
| Let's start our program! We load the address of our string into A3, before calling Printstring Before we return to basic we need to load D0 with zero - otherwise basic will complain! |
 |
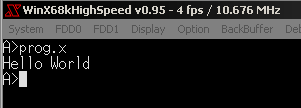
| And here's the result! | 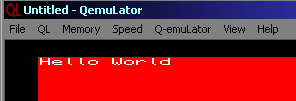 |
Building and Starting our program
We build our file with Vasm - Vasm
has support for the special Xfile format used by the x68 for
executable files... I use this build command in my batch
files. We need to specify the source asm file to compile We're specifying that VASM should ignore case, and check if labels look like commands (in case we forgot our tab on a command) I define a couple of symbols, but you won't need them for the simple example... We're telling VASM to output a listing. This is a text file which shows how the asm commands convert to bytecode... We don't need it - but it may help us if we have problems! We need to tell vasm to build an BIN file Finally, we specify a filename for the output file |
|
| We need to set up QemuLator to use the destination directory as a drive... we do this by right clicking on a drive number, and Attaching Directiory |  |
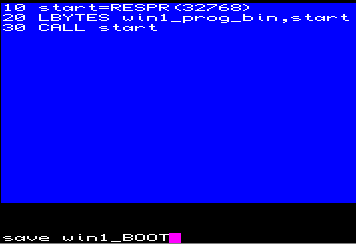
| We need to create a startup file called BOOT on drive
WIN1... this will cause our program to launch with the
emulator. The basic program to the right will load the program to ram address 32768 and launch it. This program can be saved with the command "save win1_BOOT" |
 |
| We can save a settings file with correct settings for the disk image, and load it on the commandline with QemuLator |  |
| Our program will run as soon as the emulator starts (after we select monitor type with F2) |  |
Monitor Tools
| s part of my tutorials, I wrote some simple 'Monitor
Tools' which will help with debugging By including a few extra files we can use those tools with this example. |
  |
| These tools provide two useful functions... "Monitor" will show the register contents to the screen "Memdump" Will output some lines of memory to the screen from the specified memory address |
 |
| The registers and requested memory area will be shown to the screen. | 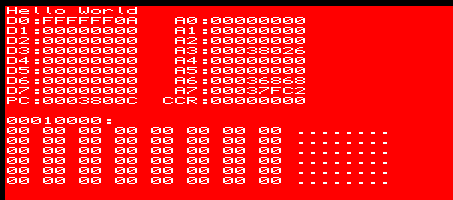 |
| We've only used the basic text mode, which isn't too useful for gaming... Take a look at the 'Platform Specific' series, where we covered the bitmap modes for more 'useful' code! |  |
 |
Lesson
H5 - Hello World on the Genesis / Megadrive The Genesis is another Tile/Sprite system... we're going to have to define a bitmap font as Tiles in VRAM, then use those tiles to draw characters to the screen, Lets get started! |
 |
 GEN_HelloWorld.asm |
|
 |
Starting our program
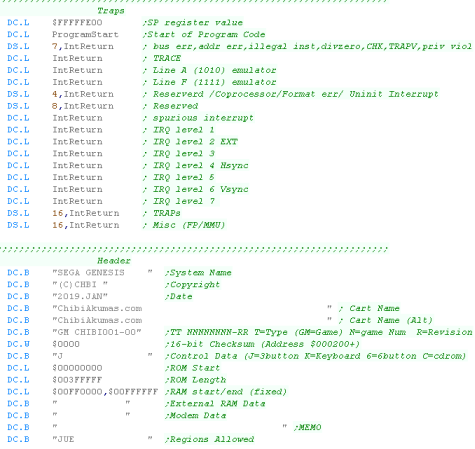
| The start of the Genesis cartridge needs to define the
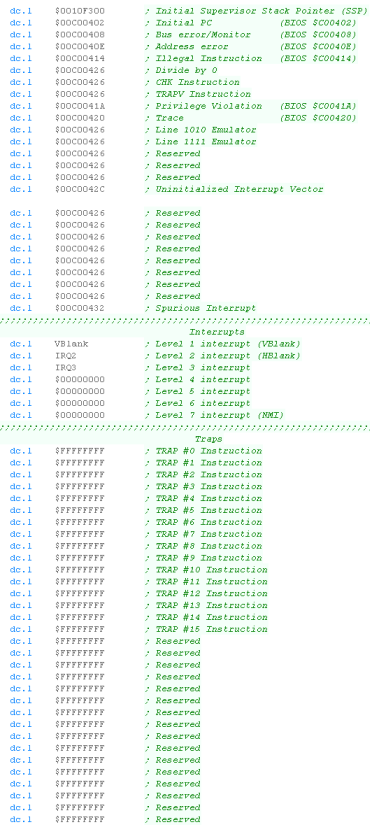
'Traps' - these are needed by the processor. We then need the cartridge header... a sample one is shown. |
 |
| We're going to define two symbols for ram addresses (Cursor
X and Y) we need these for our text writing. We're also going to define two symbols for VRAM data and VRAM address/control - we'll need these for writing to VRAM |
 |
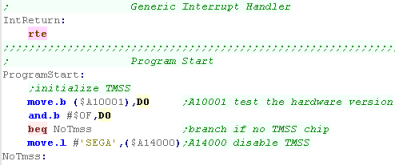
| Our Header needs a dummy interrupt handler (Just a
return)... We now need to start our program... first we'll disable the TMSS if it exists (TradeMark Security System) |
 |
Initialize the Graphics
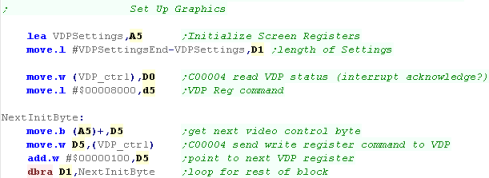
| We're going to need to set up the screen... we do this by
writing words to the control port... the top byte is the Reg
Num (the top BIT must be 1)... the bottom byte is the value
for that register. We read in the values from a table 'VDP Settings' |
 |
| We' define one byte for each register... we've got a set of settings to set up a basic screen for our purposes here. | 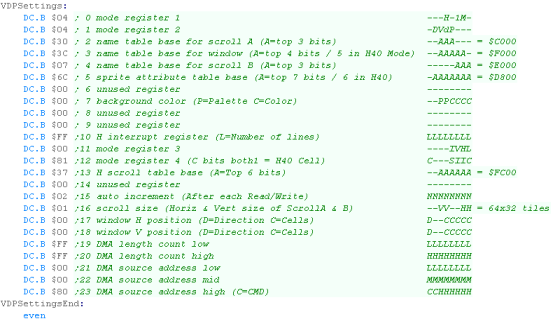 |
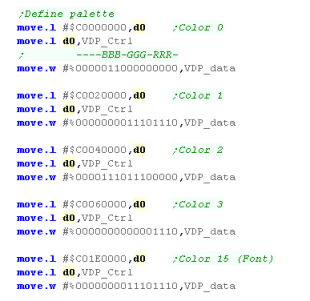
| We need to define some colors - We need to at least define
the background color 0... and the font color (15)... We do this by writing an 'address' to the VDP control port, then a pair of bytes for the color to the data port. The address format for the palette is $C0nn0000 - where nn is the color address (Color *2 as we have 2 bytes per color) |
 |
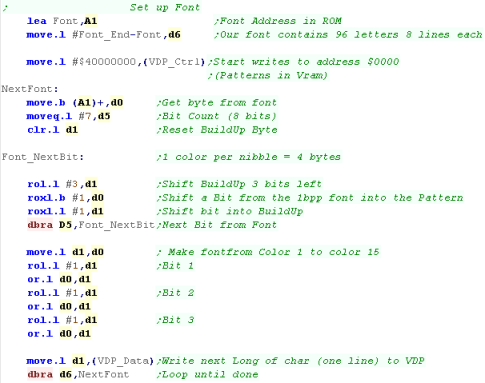
| We're using a bitmap font for our characters... it uses 96
characters (First is character 32 - space) each character is 8x8 1bpp - so each character is 8 bytes We need to convert it from 1bpp (2 color) to 4bpp (16 color) We need to start our VDP writes to VRAM address $0000 (the tile definitions) We do this by writing $40000000 to the control port We now need to convert the font lines... We shift one bit from the font in ROM, shift it to the left 3 times, and repeat this 7 times, this puts the bits in the 4 bytes of the font Long as color 1... We then do 3 shifts and ORs - effectively copying the bits to all 3 other positions in the nibble, converting it to color 15 |
  |
| OK, Our screen is finally set up! We reset our cursor position to zero... and turn on the screen! |
 |
Printing a character to the screen
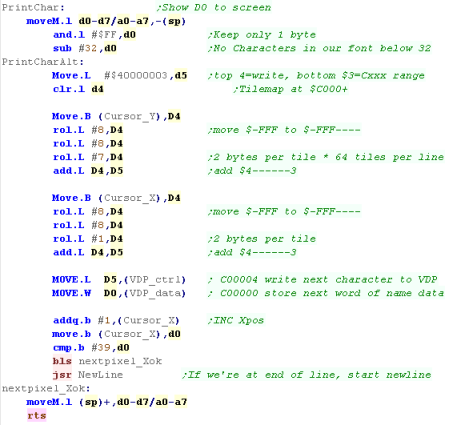
| We're going to define a PrintChar routine - this will print
a character in D0 to the screen. We need to calculate the VRAM address for the next tile we're going to set... the tilemap is 64x64, starts at $C000, and each tile is two bytes so the formula is: VRAM address= $C000 + (Ypos *128) + (Xpos * 2) Because of the strange format of the ram commands, to specify the base of $C000 we add to the long $40000003 Once we've calculated the address... we write the address to VDP Ctrl, and the Tile number word to VDP Data. After we've set the tile, we need to check if we're at the end of a line - if we are we start a newline |
 |
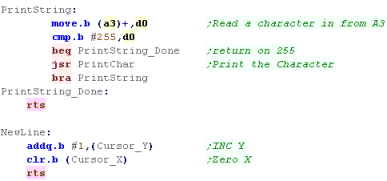
| We're going to extend our PrintChar routine into a
PrintString Routine - it'll use Char 255 terminated strings. We just send each character to PrintChar until we get to the 255 We also need a newline function to zero the Xpos, and INC the Ypos |
 |
| The hello world message will be shown to screen. |  |
| We've
learned how to use the tilemap for 8x8 characters here...
next time we'll take things further, and actually draw some
nice graphics! Tune in next time in the 'Simple Series' to see more! |
 |
Building and Starting our program
We build our file with Vasm - Vasm
has support for the special Xfile format used by the x68 for
executable files... I use this build command in my batch
files. We need to specify the source asm file to compile We're specifying that VASM should ignore case, and check if labels look like commands (in case we forgot our tab on a command) I define a couple of symbols, but you won't need them for the simple example... We're telling VASM to output a listing. This is a text file which shows how the asm commands convert to bytecode... We don't need it - but it may help us if we have problems! We need to tell vasm to build an BIN file Finally, we specify a filename for the output file |
|
| We can start Fusion with the cartridge specified on the command line |  |
Monitor Tools
| s part of my tutorials, I wrote some simple 'Monitor
Tools' which will help with debugging By including a few extra files we can use those tools with this example. |
  |
| These tools provide two useful functions... "Monitor" will show the register contents to the screen "Memdump" Will output some lines of memory to the screen from the specified memory address |
 |
| The registers and requested memory area will be shown to the screen. | 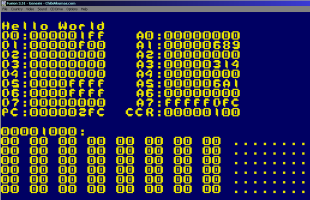 |
 |
Lesson
H6 - Hello World on the Amiga Lets take a look at the Amiga, and look at a simple way to get 'Hello World' onto the screen... We'll use OS calls this time, and get a 'Hello World' message onto the command line... Lets get to work! |
 |
 AMI_HelloWorld.asm |
|
 |
Coding Hello World
| OK, lets get started!... we're going to Jump to some OS Functions
to get access to the console screen... First we need to use the 'Exec' function to gain access to the 'dos.library' Library, we call this with a JSR, and get the dos handle back in D0... which we save for later! When we make the call, we load A1 with a string containing the library name... we'll also define one for the 'Console:' which we'll need in the next stage. We also need to define some ram bytes to store the handles returned by the OS... we also use a single byte as a character buffer - as we need to pass an address to the printing routine to get our characters onscreen. |
   |
| Next we need to use the Dos function "Dos: Open" to get access to
the Console handle, we'll need to pass the address of the string
'CONSOLE:' in D1 This function returns a handle for the console in D0... we'll store this for later. |
 |
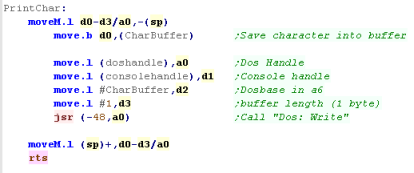
| We're now ready to print a character... we use the "Dos: Write"
function to send a character to the console... this function can
actually handle strings, but we just do 1 character at a time.... We need to pass an address of a buffer to the function, the DosHandle, and the ConsoleHandle we got before... We load the single character into the buffer before we call the function |
 |
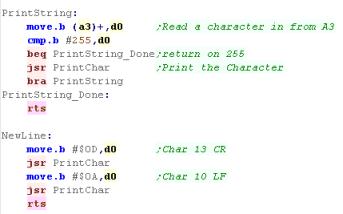
| We're going to extend our PrintChar routine into a PrintString
Routine - it'll use Char 255 terminated strings. We just send each character to PrintChar until we get to the 255 Note: It would be more efficient to use the Dos:Write with a longer string, I'm using this method for consistency with other platforms in my tutorials. We also need a newline function to zero the Xpos, and INC the Ypos |
 |
| We use the PrintString routine to get our message onto the screen, We start a new line and return to the OS with a RTS |
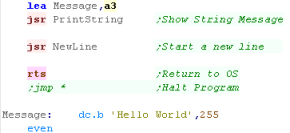 |
| Our hello world will be shown to the screen! | 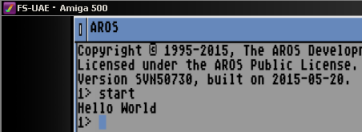 |
Building and Starting our program
We build our file with Vasm - Vasm has
support for the special Xfile format used by the x68 for
executable files... I use this build command in my batch files. We need to specify the source asm file to compile We're specifying that VASM should ignore case, and check if labels look like commands (in case we forgot our tab on a command) I define a couple of symbols, but you won't need them for the simple example... We're telling VASM to output a listing. This is a text file which shows how the asm commands convert to bytecode... We don't need it - but it may help us if we have problems! We need to specify to output a valid amiga executable file Finally, we specify a filename for the output file |
|
We need to specify the path we save our
file to as a virtual hard drive in FSUAE... we can then save a
template config file, which will start our emulator ready to run. |
|
| We can start UAE with the config file. |  |
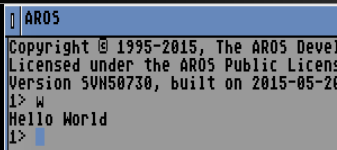
| We can speed up UAE with WARP MODE, via Alt-W... starting the
emulator in WarpMode will save us some testing time as it reduced
boot time I even save the program with the name 'w' so we can start the program with a single key. |
 |
Monitor Tools
| s part of my tutorials, I wrote some simple 'Monitor Tools'
which will help with debugging By including a few extra files we can use those tools with this example. |
  |
| These tools provide two useful functions... "Monitor" will show the register contents to the screen "Memdump" Will output some lines of memory to the screen from the specified memory address |
 |
| The registers and requested memory area will be shown to the screen. | 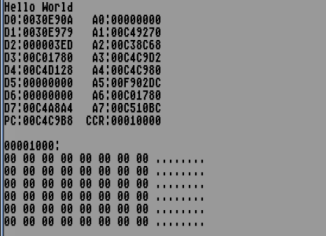 |
 |
We've learned
how to get text to the screen... slowly!... but it's just an
example... We'll look at bitmap graphics to do more proper stuff later... We've already covered it in the Platform specific series... but we'll look at it in the 'Simple Series' too. |
 |
Lesson
H7 - Hello World on the X68000 with native tools. We looked at writing a 'hello world' example before using cross compilation from windows. This time we'll compile using an assembler from within the X6800 itself!... Lets learn how! |
 |
 x68_HelloWorld.asm |
 |
Assembling with the X68000 assembler AS
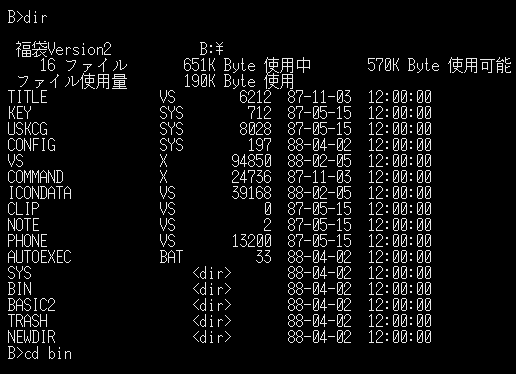
| Lets have a go with the 'THE福袋 V2.0 システムディスク' also known as 'The
Luckybag V2.0 system disk' for you non japanese speakers! You can get the assembler here This disk contains a few tools, and includes and assembler, linker and text editor. We need to go into the BIN folder, so we should type CD BIN |
 |
||||||||||||
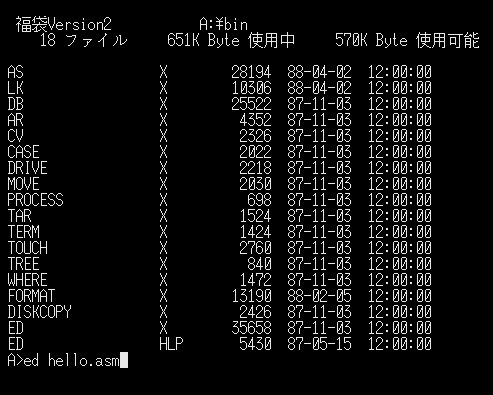
| We have a few useful programs ED is our text editor - we'll use it to make our asm file AS is our assembler - we'll use it to assembler the asm. LK is our liner - we'll use it to make an executable. First we need to create our ASM file with ED.... type ED hello.asm to create a new file for our program The ED program is in japanese, but you'll only need a few essential keypresess (Shown below)... for a full list of commands see here
|
 |
||||||||||||
| We need to type in our program, Then press ESC-X to save and close |
 |
||||||||||||
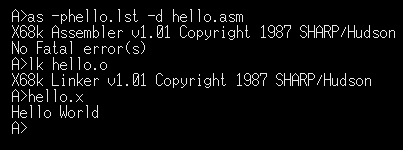
| Once we've written our ASM file we need to assemble it! First we use AS to compile the file into object code - we type as -phello.lst -d hello.asm If that went OK, Next we use LK to link it into an executable (X file) - we type lk hello.o If that went OK, we can run our compiled program! - we type hello.x |
 |
||||||||||||
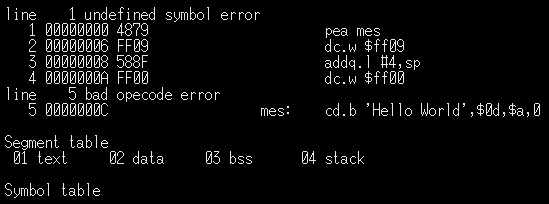
| If there were any problems, we can look at the listing file we
created during assembly by typing ed
hello.lst Here we made a mistake on line 5 - we wrote CD.B, not DC.B! |
 |
Making a batch file
| Like DOS, we can create Batch files on the X68000 with basically
the same syntax. Here's a batch file to assemble, link and run our program - if at any stage an error occurs, the process will jump to the abort label. Create this in ED with the command ED assemble.bat |
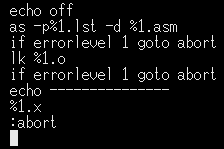 |
| If we save the file as assemble.bat We can compile our program with the command assemble hello |
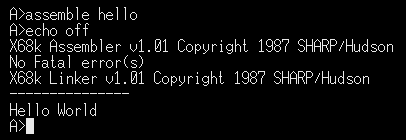 |
| Here something went wrong with the AS command's assemble... This set the errorlevel>0, and the batch file stopped! |
 |
 |
With a little work it's not so bad compiling
on the native assembler, especially since we can automate things
with batch files! All you need to do now is find some sprite editors and the like for your native gamedev! |
| the X68000 DOS doesn't seem to support @echo off, or
the @ symbol at all! This means we can't exclude certain lines from being shown, which is a shame! but at least we have reasonable batch functionlity! |
 |
| View Options |
| Default Dark |
| Simple (Hide this menu) |
| Print Mode (white background) |
| Top Menu |
| ***Main Menu*** |
| Youtube channel |
| Patreon |
| Introduction to Assembly (Basics for absolute beginners) |
| Amazon Affiliate Link |
| AkuSprite Editor |
| ChibiTracker |
| Dec/Bin/Hex/Oct/Ascii Table |
| Alt Tech |
| Archive.org |
| Bitchute |
| Odysee |
| Rumble |
| DailyMotion |
| Please note: I wlll upload more content to these alt platforms based on the views they bring in |
| Z80 Content |
| ***Z80 Tutorial List*** |
| Learn Z80 Assembly (2021) |
| Learn Z80 Assembly (old) |
| Hello World |
| Simple Samples |
| Advanced Series |
| Multiplatform Series |
| Platform Specific Series |
| ChibiAkumas Series |
| Grime Z80 |
| Z80 Downloads |
| Z80 Cheatsheet |
| Sources.7z |
| DevTools kit |
| Z80 Platforms |
| Amstrad CPC |
| Elan Enterprise |
| Gameboy & Gameboy Color |
| Master System & GameGear |
| MSX & MSX2 |
| Sam Coupe |
| TI-83 |
| ZX Spectrum |
| Spectrum NEXT |
| Camputers Lynx |
| 6502 Content |
| ***6502 Tutorial List*** |
| Learn 6502 Assembly |
| Advanced Series |
| Platform Specific Series |
| Hello World Series |
| Simple Samples |
| Grime 6502 |
| 6502 Downloads |
| 6502 Cheatsheet |
| Sources.7z |
| DevTools kit |
| 6502 Platforms |
| Apple IIe |
| Atari 800 and 5200 |
| Atari Lynx |
| BBC Micro |
| Commodore 64 |
| Commodore PET |
| Commander x16 |
| Super Nintendo (SNES) |
| Nintendo NES / Famicom |
| PC Engine (Turbografx-16) |
| Vic 20 |
| 68000 Content |
| ***68000 Tutorial List*** |
| Learn 68000 Assembly |
| Hello World Series |
| Platform Specific Series |
| Simple Samples |
| Grime 68000 |
| 68000 Downloads |
| 68000 Cheatsheet |
| Sources.7z |
| DevTools kit |
| 68000 Platforms |
| Amiga 500 |
| Atari ST |
| Neo Geo |
| Sega Genesis / Mega Drive |
| Sinclair QL |
| X68000 (Sharp x68k) |
| 8086 Content |
| Learn 8086 Assembly |
| Platform Specific Series |
| Hello World Series |
| Simple Samples |
| 8086 Downloads |
| 8086 Cheatsheet |
| Sources.7z |
| DevTools kit |
| 8086 Platforms |
| Wonderswan |
| MsDos |
| ARM Content |
| Learn ARM Assembly |
| Learn ARM Thumb Assembly |
| Platform Specific Series |
| Hello World |
| Simple Samples |
| ARM Downloads |
| ARM Cheatsheet |
| Sources.7z |
| DevTools kit |
| ARM Platforms |
| Gameboy Advance |
| Nintendo DS |
| Risc Os |
| Risc-V Content |
| Learn Risc-V Assembly |
| Risc-V Downloads |
| Risc-V Cheatsheet |
| Sources.7z |
| DevTools kit |
| MIPS Content |
| Learn Risc-V Assembly |
| Platform Specific Series |
| Hello World |
| Simple Samples |
| MIPS Downloads |
| MIPS Cheatsheet |
| Sources.7z |
| DevTools kit |
| MIPS Platforms |
| Playstation |
| N64 |
| PDP-11 Content |
| Learn PDP-11 Assembly |
| Platform Specific Series |
| Simple Samples |
| PDP-11 Downloads |
| PDP-11 Cheatsheet |
| Sources.7z |
| DevTools kit |
| PDP-11 Platforms |
| PDP-11 |
| UKNC |
| TMS9900 Content |
| Learn TMS9900 Assembly |
| Platform Specific Series |
| Hello World |
| TMS9900 Downloads |
| TMS9900 Cheatsheet |
| Sources.7z |
| DevTools kit |
| TMS9900 Platforms |
| Ti 99 |
| 6809 Content |
| Learn 6809 Assembly |
| Learn 6309 Assembly |
| Platform Specific Series |
| Hello World Series |
| Simple Samples |
| 6809 Downloads |
| 6809/6309 Cheatsheet |
| Sources.7z |
| DevTools kit |
| 6809 Platforms |
| Dragon 32/Tandy Coco |
| Fujitsu FM7 |
| TRS-80 Coco 3 |
| Vectrex |
| 65816 Content |
| Learn 65816 Assembly |
| Hello World |
| Simple Samples |
| 65816 Downloads |
| 65816 Cheatsheet |
| Sources.7z |
| DevTools kit |
| 65816 Platforms |
| SNES |
| eZ80 Content |
| Learn eZ80 Assembly |
| Platform Specific Series |
| eZ80 Downloads |
| eZ80 Cheatsheet |
| Sources.7z |
| DevTools kit |
| eZ80 Platforms |
| Ti84 PCE |
| IBM370 Content |
| Learn IBM370 Assembly |
| Simple Samples |
| IBM370 Downloads |
| IBM370 Cheatsheet |
| Sources.7z |
| DevTools kit |
| Super-H Content |
| Learn SH2 Assembly |
| Hello World Series |
| Simple Samples |
| SH2 Downloads |
| SH2 Cheatsheet |
| Sources.7z |
| DevTools kit |
| SH2 Platforms |
| 32x |
| Saturn |
| PowerPC Content |
| Learn PowerPC Assembly |
| Hello World Series |
| Simple Samples |
| PowerPC Downloads |
| PowerPC Cheatsheet |
| Sources.7z |
| DevTools kit |
| PowerPC Platforms |
| Gamecube |
| Work in Progress |
| ChibiAndroids |
| Misc bits |
| Ruby programming |
Buy my Assembly programming book
on Amazon in Print or Kindle!


Available worldwide!
Search 'ChibiAkumas' on
your local Amazon website!
Click here for more info!

Buy my Assembly programming book
on Amazon in Print or Kindle!


Available worldwide!
Search 'ChibiAkumas' on
your local Amazon website!
Click here for more info!


Buy my Assembly programming book
on Amazon in Print or Kindle!


Available worldwide!
Search 'ChibiAkumas' on
your local Amazon website!
Click here for more info!


