`
Learn Multi platform
6502 Assembly Programming... For
Monsters!
Platform
Specific Lessons
Platform Specific Series - Now we
know the basics, lets look at the details of the platforms we're covering!
ChibiSound PRO!
ChibiSound is the sound driver that handles the particularities of a
system, there is typically one driver per system, though the CPC and MSX
drivers are essentially identical except for the AY register setting
routines.
The original 'ChibiSound' gave us one channel, one
Volume bit, six pitch bits, and the ability to turn noise on. Pitches were
not matched across systems, so sound 32 won't sound the same on all
systems.
The updated 'ChibiSound Pro' gives us all the channels
provided by the hardware, 8 volume bits, 16 pitch bits, and the ability to
turn noise on. Pitches were not matched across systems, however the
'ChibiOctave' lookup table provides values which ARE matched across all
systems.
ChibiSound PRO is essentially a reduced subset of AY functionality, and
was designed on the Z80 - it's 'PRO' suffix is a parody of the
'SoundBlaster PRO' - which could only do 8 bit sound so wasn't up to
professional standards! (neither is ChibiSound PRO)
ChibiSound PRO provides a standard interface to the underlying hardware,
it allows the following features to be set for each channel on the
underlying hardware:
Function
|
Zero page entry
|
Notes:
|
Channel Number (bit 0-6)
Noise On/Off (bit 7) |
H |
Multiple channels can be supported, but on single channel systems
only Channel 0 will be sure to play.
If possible Channel 0 will be a center channel, Channels 1+ may be
left/right
Noise bit turns the noise effect on (1) or off (0) - this can be set
on any channel, if the underlying hardware only supports one noise
channel, this will be resolved by the driver. |
| Volume |
L |
Set volume of the channel (0-255). Higher numbers are louder. O is
off |
| Pitch |
DE |
Set the pitch of the channel (0-65535). Higher numbers are higher
pitch.
Using DE does not standardize the resulting pitch - however a
'Lookup table' of notes 'ChibiOctave' provides a standardized way of
getting the correct DE value to get a pitch correct note on the
platform. |
Chibisound PRO does not offer features like Envelope, LFE etc, as providing
consistent functionality across different platforms would not be realistic.
The
new driver is a big improvement on the old one but doesn't really
deserve the PRO suffix!
It's a parody of the early 'Soundblaster Pro' sound cards, which
could only do 8 bit digital sound, so weren't really of 'pro spec'
either!
|
 |
Pokey Sound
The Pokey is at memory mapped port $D200 on A800 and $E800 on
A5200
| Group |
Name |
Description |
Address
A80 |
Address
A52 |
Bits |
Meaning |
| POKEY |
AUDF1 |
Audio
frequency 1 control |
$D200 |
$E800 |
FFFFFFFF |
F=Frequency
(0=highest tone)
|
| POKEY |
AUDC1 |
Audio
channel 1 control |
$D201 |
$E801 |
NNNNVVVV |
N=Noise (0=noise / 10=Square wave)
V=Volume (15=loudest) |
| POKEY |
AUDF2 |
Audio
frequency 2 control |
$D202 |
$E802 |
FFFFFFFF |
F=Frequency (0=highest tone) |
| POKEY |
AUDC2 |
Audio
channel 2 control |
$D203 |
$E803 |
NNNNVVVV |
N=Noise (0=noise / 10=Square wave)
V=Volume (15=loudest) |
| POKEY |
AUDF3 |
Audio
frequency 3 control |
$D204 |
$E804 |
FFFFFFFF |
F=Frequency (0=highest tone) |
| POKEY |
AUDC3 |
Audio
channel 3 control |
$D205 |
$E805 |
NNNNVVVV |
N=Noise (0=noise / 10=Square wave)
V=Volume (15=loudest) |
| POKEY |
AUDF4 |
Audio
frequency 4 control |
$D206 |
$E806 |
FFFFFFFF |
F=Frequency (0=highest tone) |
| POKEY |
AUDC4 |
Audio
channel 4 control |
$D207 |
$E807 |
NNNNVVVV |
N=Noise (0=noise / 10=Square wave)
V=Volume (15=loudest) |
| POKEY |
AUDCTL |
general
audio control |
$D208 |
$E808 |
N1234HHS |
N=Noise bit
depth 1234=Channel Clocks HH=highpass filters S=main clockspeed |
 |
We have a
whopping 4 channels! that's beats the AY's channels by 1.
Unfortunately the range of octaves is a little more limited, but
it's still pretty good!
|
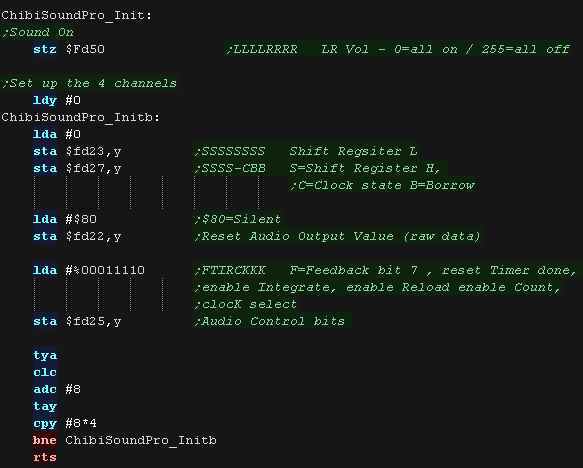
The Chibisound Pro driver
Before we start using the Pokey, we need to set up AUDCTL, we do
this by writing a zero to port $D208/$E808, to set up the hardware
to a known state.
|

|
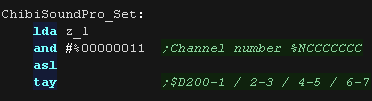
We have a symbol set up called POKEY - this will point to $D200 or
$E800 depending on the system we're building for.
We want to select the correct address offset for the channel (0-3)
we want to set. |
 |
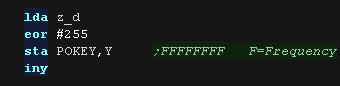
First we set the frequency, ChibiSound PRO is designed to use 16
bits, but the pokey only uses an 8 bit frequency.
We store the frequency to the first channel register |
 |
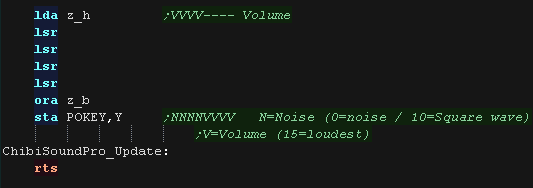
Next we need to select an 'instrument'
If noise is on, we set the top 4 bits to %0000----, if not we make a
square wave with %1010----
Noise is one if bit 7 of L is one
|
 |
We need to get the 4 bit volume... we take the top 4 bits of H and
shift them into the correct position.
We then OR in the 4 bits for the 'instrument' , and store the result
to the second channel register.
That's all we need to do! |
 |
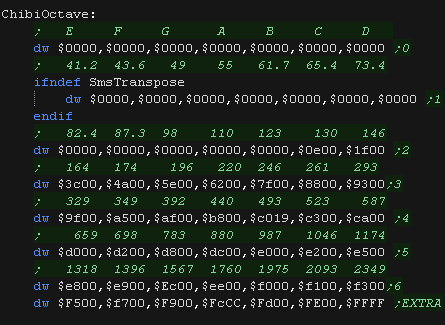
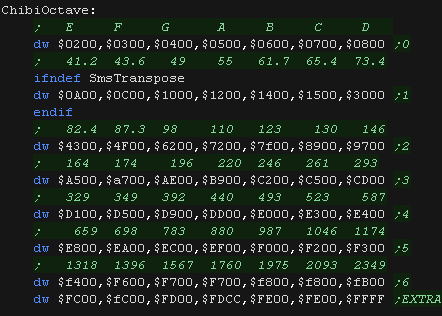
| We have a lookup table to define the notes of the octave, we can
calculate sharps or flats by taking two tones, and dividing them by
two. |
 |
ChibiSound PRO!
ChibiSound is the sound driver that handles the particularities of a
system, there is typically one driver per system, though the CPC and MSX
drivers are essentially identical except for the AY register setting
routines.
The original 'ChibiSound' gave us one channel, one
Volume bit, six pitch bits, and the ability to turn noise on. Pitches were
not matched across systems, so sound 32 won't sound the same on all
systems.
The updated 'ChibiSound Pro' gives us all the channels
provided by the hardware, 8 volume bits, 16 pitch bits, and the ability to
turn noise on. Pitches were not matched across systems, however the
'ChibiOctave' lookup table provides values which ARE matched across all
systems.
ChibiSound PRO is essentially a reduced subset of AY functionality, and
was designed on the Z80 - it's 'PRO' suffix is a parody of the
'SoundBlaster PRO' - which could only do 8 bit sound so wasn't up to
professional standards! (neither is ChibiSound PRO)
ChibiSound PRO provides a standard interface to the underlying hardware,
it allows the following features to be set for each channel on the
underlying hardware:
Function
|
Zero page entry
|
Notes:
|
Channel Number (bit 0-6)
Noise On/Off (bit 7) |
H |
Multiple channels can be supported, but on single channel systems
only Channel 0 will be sure to play.
If possible Channel 0 will be a center channel, Channels 1+ may be
left/right
Noise bit turns the noise effect on (1) or off (0) - this can be set
on any channel, if the underlying hardware only supports one noise
channel, this will be resolved by the driver. |
| Volume |
L |
Set volume of the channel (0-255). Higher numbers are louder. O is
off |
| Pitch |
DE |
Set the pitch of the channel (0-65535). Higher numbers are higher
pitch.
Using DE does not standardize the resulting pitch - however a
'Lookup table' of notes 'ChibiOctave' provides a standardized way of
getting the correct DE value to get a pitch correct note on the
platform. |
Chibisound PRO does not offer features like Envelope, LFE etc, as providing
consistent functionality across different platforms would not be realistic.
While we're
writing a new Sound driver for the 65816 processor, we'll still
use the same SPC700 driver from the original ChibiSound - You can
find it HERE
That driver does the work of setting the registers on the SPC700
hardware, so we can do almost everything from the easier 65816
CPU!
|
 |
The SPC700 Registers
| Address |
Register |
Description |
Bits |
Meaning |
| c0 |
VOL
(L) |
Left
Volume |
-VVVVVVV |
Volume |
| c1 |
VOL
(R) |
Right
Volume |
-VVVVVVV |
Volume |
| c2 |
P
(L) |
Pitch
L |
PPPPPPPP |
Pitch |
| c3 |
P
(H) |
Pitch
H |
--PPPPPP |
Pitch |
| c4 |
SRCN |
Source
number (references the source directory) |
SSSSSSSS |
Source |
| c5 |
ADSR
(1) |
If
bit7 is set, ADSR is enabled. If cleared GAIN is used. |
EDDDAAAA |
Enable,
Dr, Ar |
| c6 |
ADSR
(2) |
These
two registers control the ADSR envelope. |
LLLRRRRR |
sL,sR |
| c7 |
GAIN |
This
register provides function for software envelopes. |
GGGGGGGG |
G=Envelope
bits |
| c8 |
-ENVX |
(auto
updated) Readable current Envelope Value |
0VVVVVVV |
Value |
| c9 |
-OUTX |
(auto
updated) Readable current Waveform Value |
SVVVVVVV |
Signed
Value |
| 0C |
MVOL
(L) |
Main
Volume Left |
-VVVVVVV |
Volume |
| 1C |
MVOL
(R) |
Main
Volume Right |
-VVVVVVV |
Volume |
| 2C |
EVOL
(L) |
Echo
Volume Left |
-VVVVVVV |
Volume |
| 3C |
EVOL
(R) |
Echo
Volume Right |
-VVVVVVV |
Volume |
| 4C |
KON |
Key
On |
CCCCCCCC |
Channel |
| 5C |
KOF |
Key
Off |
CCCCCCCC |
Channel |
| 6C |
FLG |
DSP
Flags. (used for MUTE,ECHO,RESET,NOISE CLOCK) |
RMENNNNN |
Reset
(0=off) Mute (0=off) Echo (1=0ff) N=Noise clock
|
| 7C |
-ENDX |
(auto
updated) read to see if channel done |
CCCCCCCC |
Channel |
| 0D |
EFB |
Echo
Feedback |
SFFFFFFF |
Signed
Feedback |
| 2D |
PMON |
Pitch
modulation |
CCCCCCC- |
Channel
(1-7) |
| 3D |
NON |
Noise
enable |
CCCCCCCC |
Channel (0=off) |
| 4D |
EON |
Echo
enable |
CCCCCCCC |
Channel
(0=off)
|
| 5D |
DIR |
Offset
of source directory (DIR*100h = memory offset) |
OOOOOOOO |
Offset
$oo00 |
| 6D |
ESA |
Echo
buffer start offset (ESA*100h = memory offset) |
OOOOOOOO |
Offset
$oo00 |
| 7D |
EDL |
Echo
delay, 4-bits, higher values require more memory. |
----EEEE |
Echo
delay |
| fF |
COEF |
8-tap
FIR Filter coefficients |
SCCCCCCC |
Signed
Coeficcient |
| c = Channel 0-7� f = filter coefficient 0-7 |
|
|
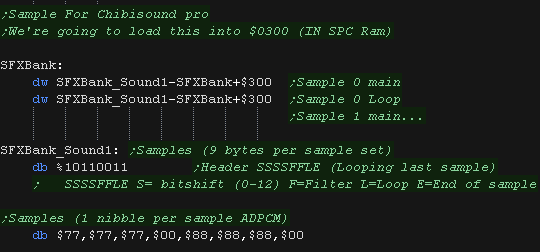
The Chibisound Pro driver
| Our chibisound driver uses a single sound sample, we'll need to
define it's ADPCM wave. |
 |
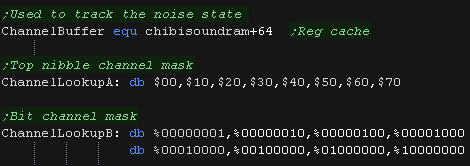
We also need to define some bytes of ram, to record the state of
the 'noise'
We also define two channel lookups, one is to select the 'base
register' of a channels parameters,
the other is to set/clear the 'bit' relating to that channel (for
KON/KOFF etc) |
 |
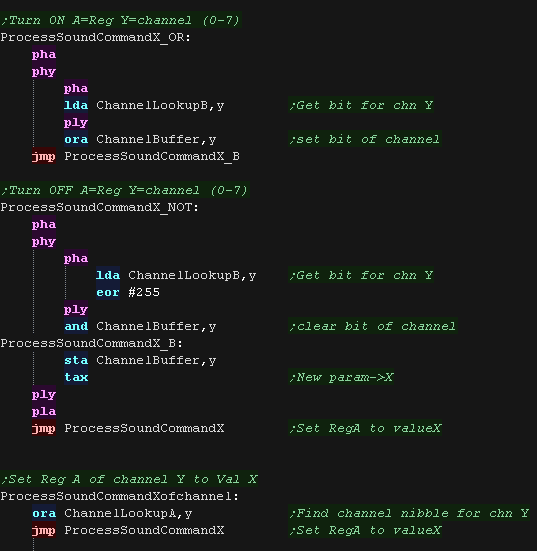
We have some functions to help us control the registers.
ProcessSoundCommandX_OR will turn on the bit for channel Y in reg A
ProcessSoundCommandX_XOR will turn off the bit for channel Y in reg
A
as these registers contain bits for all channels, both of these use
the cache at ChannelBuffer
ProcessSoundCommandXofchannel will deal with the channel registers
$_0-$_9 , looking up the top nibble via the channel number in Y
|
 |
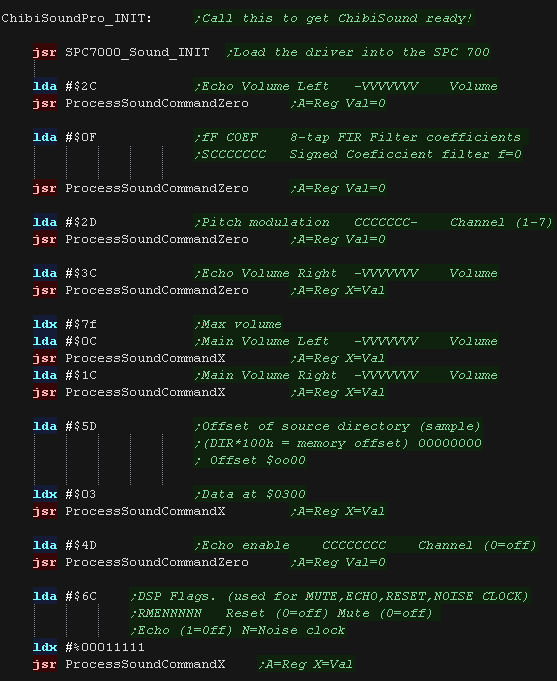
Lets do some INIT!
We need to set up all the registers before the hardware will work
for us well.
Many things like Echo and Moduclation we just set to zero, but
others like master volume, and the source address of our samples we
need to set to the correct values for our sounds to play.
|
 |
we also need to INIT the channels.
we're only using one sample, and all these settings are the same all
the time, so we'll set them all here.
If they weren't we'd want to set them for each note.
|
 |
First we clear any previous key off commands with reg $5C
Next we load the channel number from z_L into Y... we can support up
to 8 channels |
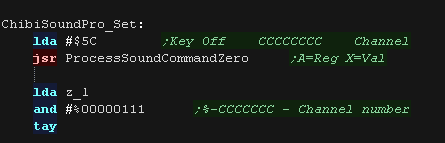 |
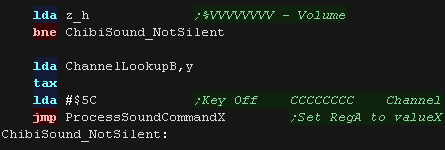
Next we check the volume level in z_H
If it's zero we run the silence routine, by setting Key Off for this
channel |
 |
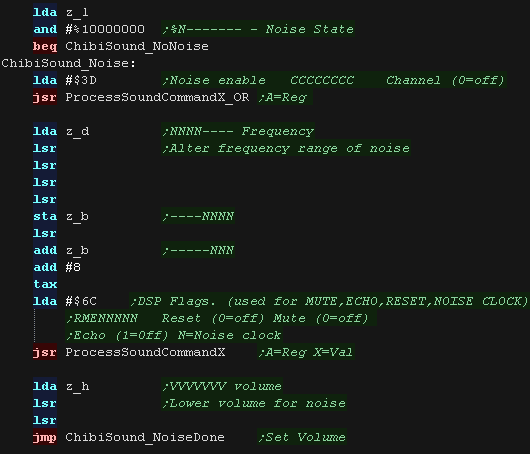
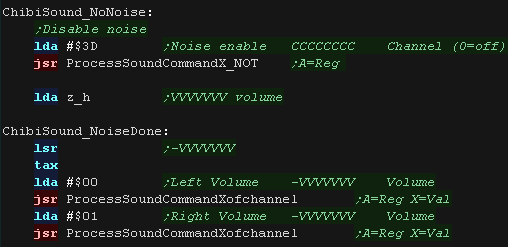
We check the top bit of z_L ... this defines if noise is on or off
If noise is ON we need to shift our frequency (z_D) and volume (z_H)
we turn on the nose with reg $3D
we set the noise frequency with reg $6C |
 |
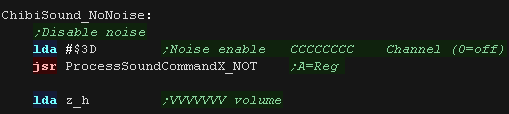
If noise is off, we clear noise with register $3D
we then load in our volume from z_H |
 |
| We only need a 7 bit volume, we then set both L/R channels to the
new volume |
 |
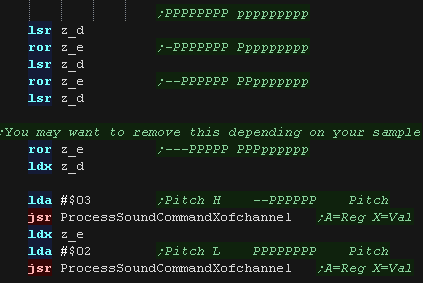
We set the 14 bit pitch of our channel with reg $03/2
We need to convert the 16 bit value in z_DE, but depending on our
sample we may need to alter the amount of shifts we do, to get a
good frequency range. |
 |
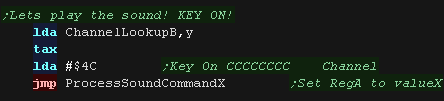
| OK, we're ready to play our channel, so we set KEY ON for that
channel! |
 |
We've only
really used the SPC700 to simulate an AY sound chip here!
This is a bit of a waste of it's capabilities, but then again, the
SPC700 is a bit of a pain, so we're even!!
|
|
ChibiSound PRO!
ChibiSound is the sound driver that handles the particularities of a
system, there is typically one driver per system, though the CPC and MSX
drivers are essentially identical except for the AY register setting
routines.
The original 'ChibiSound' gave us one channel, one
Volume bit, six pitch bits, and the ability to turn noise on. Pitches were
not matched across systems, so sound 32 won't sound the same on all
systems.
The updated 'ChibiSound Pro' gives us all the channels
provided by the hardware, 8 volume bits, 16 pitch bits, and the ability to
turn noise on. Pitches were not matched across systems, however the
'ChibiOctave' lookup table provides values which ARE matched across all
systems.
ChibiSound PRO is essentially a reduced subset of AY functionality, and
was designed on the Z80 - it's 'PRO' suffix is a parody of the
'SoundBlaster PRO' - which could only do 8 bit sound so wasn't up to
professional standards! (neither is ChibiSound PRO)
ChibiSound PRO provides a standard interface to the underlying hardware,
it allows the following features to be set for each channel on the
underlying hardware:
Function
|
Zero page entry
|
Notes:
|
Channel Number (bit 0-6)
Noise On/Off (bit 7) |
H |
Multiple channels can be supported, but on single channel systems
only Channel 0 will be sure to play.
If possible Channel 0 will be a center channel, Channels 1+ may be
left/right
Noise bit turns the noise effect on (1) or off (0) - this can be set
on any channel, if the underlying hardware only supports one noise
channel, this will be resolved by the driver. |
| Volume |
L |
Set volume of the channel (0-255). Higher numbers are louder. O is
off |
| Pitch |
DE |
Set the pitch of the channel (0-65535). Higher numbers are higher
pitch.
Using DE does not standardize the resulting pitch - however a
'Lookup table' of notes 'ChibiOctave' provides a standardized way of
getting the correct DE value to get a pitch correct note on the
platform. |
Chibisound PRO does not offer features like Envelope, LFE etc, as providing
consistent functionality across different platforms would not be realistic.
Beeper sound!
The Apple II has a simple 'Beeper', when we read from $C030
, this will cause a sound 'blip'. by waiting for a short time before doing
this again, we can make a tone.
The length of the wait will define the frequency, but playing continuous
sound will use basically all our cpu power!
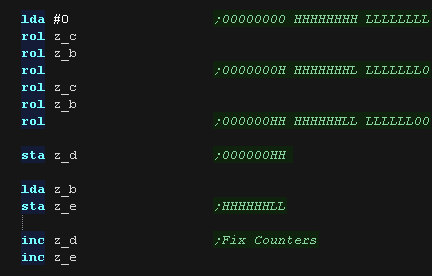
The Chibisound Pro driver
We'll need a few variables for our code.
Our hardware can only play one sound at a time, but our music player
expects 3 channels, so we'll 'cache' the requested channels, and
only play the loudest at a given time.
We also need a random data source, we'll use NoisePos as an offset
for this
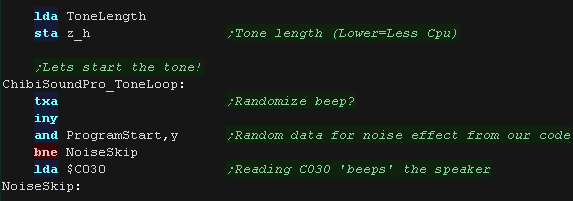
Finally we need to be able to configure the length of sounds that
are played each iteration, ToneLength will define this (Default 16) |
 |
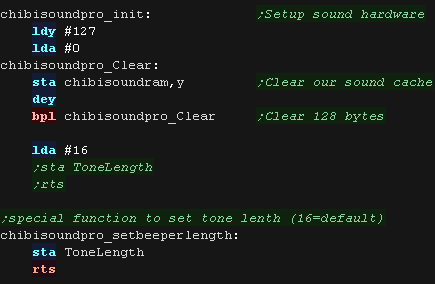
Before we use ChibiSoundPro we need to use the INIT routine.
This will clear the cache data, and set the default sound length to
16.
If we want a shorter sound (for example, if we're playing sound
during interrupts) we can override this with
chibisoundpro_setbeeperlength
|
 |
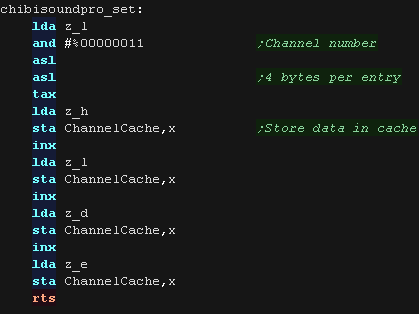
When we want to set the sound a channel should play, we use chibisoundpro_set
this will set the virtual channels entry in the cache, for playing
later.
Each channel uses 4 bytes |
 |
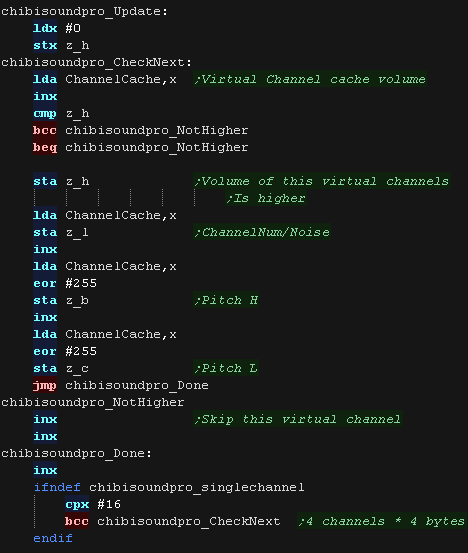
As we have no hardware maintaining the tone, We need to 'replay'
the sound every tick.
First we scan the ChannelCache for the loudest of the virtual
channels - this is the one we'll play this tick!
|
 |
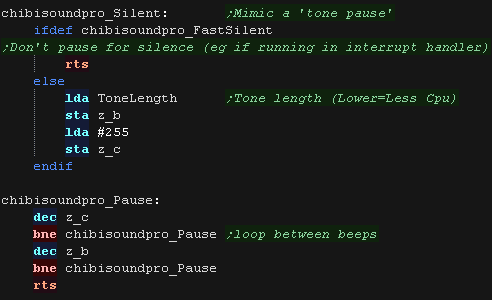
We check the volume - we can't actually change volume on this
hardware, so if the channel isn't very loud we treat it as silent.
In this case, we just pause for a while, to ensure any music plays
at a consistent rate.
|

 |
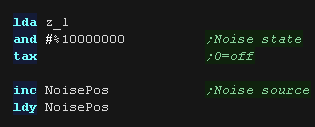
Next we need to deal with the noise - this is enabled by bit 7 of
L
We transfer this to X - if X=0 noise will be off, if any bit in it
was set, it will be on.
We need some 'random' byte data for our noise source - we actually
use our program code!... but we use Y as the offset within this for
the next psuedo-random data. |
 |
Now we use the 16 bit pitch setting
We convert this to a 10 bit 'pitch' - which is effectively the
length of our delay loop.
We bitshift it as required into DE, which will be our 16 bit loop
counters. |
 |
It's time to actually make our tone!
We are going to 'blip' $C030 to make the sound, but if we want the
sound to be noisy, sometimes we wont!
We use X register ANDed with our random data to define if this sound
will be noisy or not! |
 |
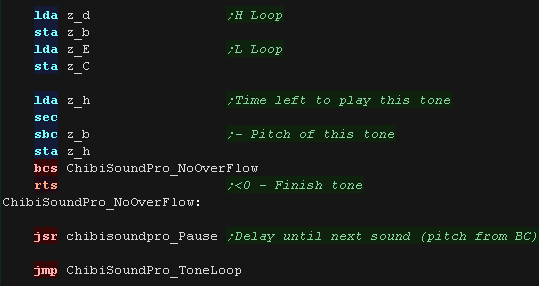
We need to do our loops.
We need to delay a bit before the next sound blip - longer delays
means lower pitch.
We also need to decide how 'long' we want to play this sound, we use
the length count in H to do this, and we subtract the high byte of
our pitch. This is so that whether the pitch of the tone is high or
low, the length it plays will be roughly consistent. |
 |
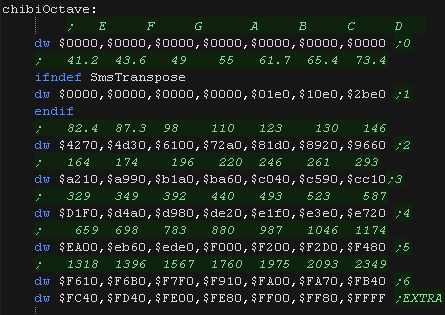
| We have a lookup table to define the notes of the octave, we can
calculate sharps or flats by taking two tones, and dividing them by
two. |
 |
ChibiSound PRO!
ChibiSound is the sound driver that handles the particularities of a
system, there is typically one driver per system, though the CPC and MSX
drivers are essentially identical except for the AY register setting
routines.
The original 'ChibiSound' gave us one channel, one
Volume bit, six pitch bits, and the ability to turn noise on. Pitches were
not matched across systems, so sound 32 won't sound the same on all
systems.
The updated 'ChibiSound Pro' gives us all the channels
provided by the hardware, 8 volume bits, 16 pitch bits, and the ability to
turn noise on. Pitches were not matched across systems, however the
'ChibiOctave' lookup table provides values which ARE matched across all
systems.
ChibiSound PRO is essentially a reduced subset of AY functionality, and
was designed on the Z80 - it's 'PRO' suffix is a parody of the
'SoundBlaster PRO' - which could only do 8 bit sound so wasn't up to
professional standards! (neither is ChibiSound PRO)
ChibiSound PRO provides a standard interface to the underlying hardware,
it allows the following features to be set for each channel on the
underlying hardware:
Function
|
Zero page entry
|
Notes:
|
Channel Number (bit 0-6)
Noise On/Off (bit 7) |
H |
Multiple channels can be supported, but on single channel systems
only Channel 0 will be sure to play.
If possible Channel 0 will be a center channel, Channels 1+ may be
left/right
Noise bit turns the noise effect on (1) or off (0) - this can be set
on any channel, if the underlying hardware only supports one noise
channel, this will be resolved by the driver. |
| Volume |
L |
Set volume of the channel (0-255). Higher numbers are louder. O is
off |
| Pitch |
DE |
Set the pitch of the channel (0-65535). Higher numbers are higher
pitch.
Using DE does not standardize the resulting pitch - however a
'Lookup table' of notes 'ChibiOctave' provides a standardized way of
getting the correct DE value to get a pitch correct note on the
platform. |
Chibisound PRO does not offer features like Envelope, LFE etc, as providing
consistent functionality across different platforms would not be realistic.
Atari Lynx sound.
There are a variety of memory mapped ports we'll need to use to control
the sound
| From |
To |
Name |
Description |
Bits |
Meaning |
| FD20 |
FD20 |
|
Audio Channel
0 � 2�s compliment Volume control |
|
0-127
|
| FD21 |
FD21 |
|
Audio Channel
0 � Shift register feedback enable |
|
eg %00010000
|
| FD22 |
FD22 |
|
Audio Channel
0 � Audio Output Value (Raw Data) |
|
Eg $80
|
| FD23 |
FD23 |
|
Audio Channel
0 �Lower 8 bits of shift register |
|
Eg 0
|
| FD24 |
FD24 |
|
Audio Channel
0 � Audio Timer Backup Value |
|
eg 0-63
|
| FD25 |
FD25 |
|
Audio Channel
0 � Audio Control Bits
|
FTIRCKKK |
eg %00011110
|
| FD26 |
FD26 |
|
Audio Channel
0 � Audio Counter |
|
|
| FD27 |
FD27 |
|
Audio Channel
0 �Other Audio Bits |
|
Eg 0 |
| FD28 |
FD2F |
|
Audio Channel 1 � Same as Channel 0
|
|
|
| FD30 |
FD37 |
|
Audio Channel
2 � Same as Channel 0 |
|
|
| FD38 |
FD3F |
|
Audio Channel 3 � Same
as Channel 0 |
|
|
| FD40 |
FD40 |
ATTENREG0 |
LLLLRRRR �
Audio Attenuation |
|
|
| FD41 |
FD41 |
ATTENREG1 |
LLLLRRRR �
Audio Attenuation |
|
|
| FD42 |
FD42 |
ATTENREG2 |
LLLLRRRR �
Audio Attenuation |
|
|
| FD43 |
FD43 |
ATTENREG3 |
LLLLRRRR �
Audio Attenuation |
|
|
| FD44 |
FD44 |
MPAN |
Stereo
attenuation selection |
|
|
| FD50 |
FD50 |
MSTEREO |
Stereo
disable |
LLLLRRRR |
0=all on
255=all off |
The Chibisound Pro driver
Before we use ChibiSoundPro we need to use the INIT routine.
First we set the channels to on.
Then we configure the defaults for each of the 4 channels (8 bytes
apart)
Whatever sound we're making we don't change these settings again. |
 |
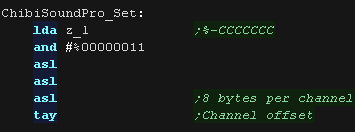
When we want to set the sound a channel should play, we use chibisoundpro_set
We are supporting up to 4 channels, and each channel has 8 byte data
ports from $FD20/28/30/38 |
 |
| First we set the volume, the Lynx uses a 7 bit volume |
 |
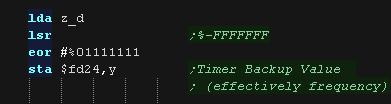
Next we set the frequency.
We only use 7 of the bits from out top byte of the DE pair
|
 |
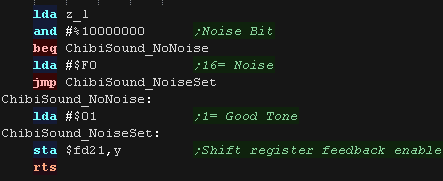
The final thing we need to do is set the shift register feedback.
A value of $01 will make a good clean tone
A value of $F0 will make a noise sound
Once we've done this, the channel setup is complete and the sound
will play. |
 |
| We have a lookup table to define the notes of the octave, we can
calculate sharps or flats by taking two tones, and dividing them by
two. |
 |
MinTile is a
multiplatform 'engine' which allows us to define our game code in
a common way, and let the platform specific code handle the
platform specific work!... it was used to write 'ChibiFighter' on
the Z80.
For more details on Mintile, see the Mintile series here...
|
|
Tile Drawing Routines
Our example shows an onscreen tilemap and two software 'sprites'.
Mintile supports scrolling and X-Flip (but not Y-flip)
The 'sprites' are actually miniature tile maps, this is to reduce
the amount of platform specific code.
these are all created via the DoStrip platform specific routine,
which we'll look at here. |
 |
The MinTile shared routine provides calculation and tilemap
planning, however we need to do the actual job of 'Drawing' in the
platform code.
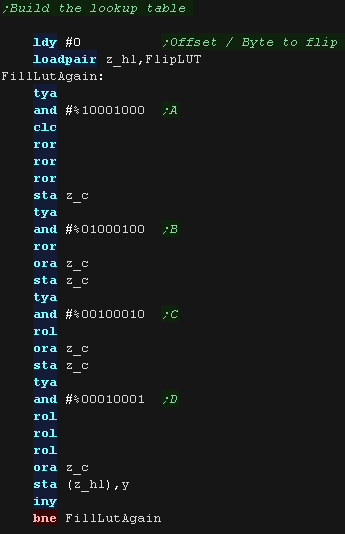
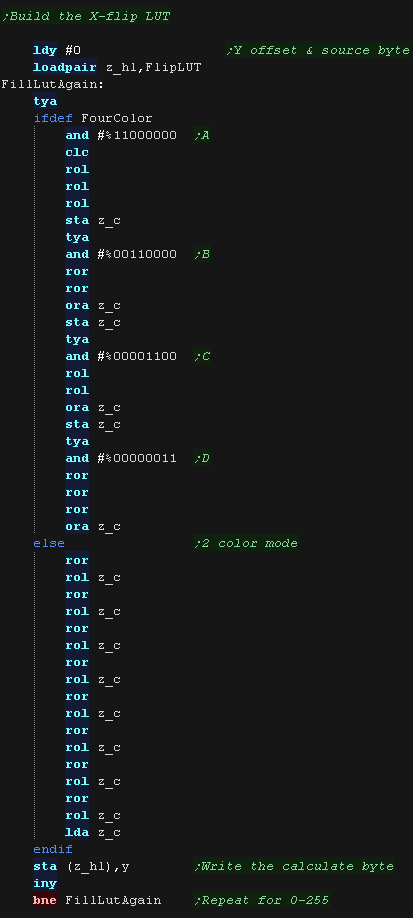
The code can horizontally flip tiles, on the BBC we use a 256 byte
lookup table, to 'pre-calculate the flipping of the 4 pixels in a
Mode 1 byte |
 |
| The LUT needs to be byte aligned, so &8100 or &FE00 would
be fine, but &FE01 would not! |
 |
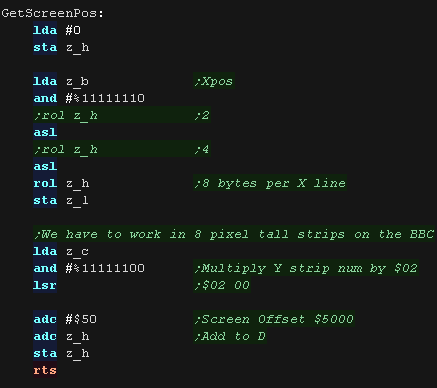
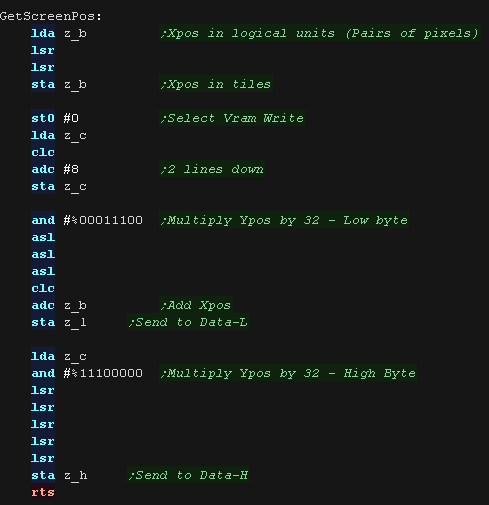
We have a 'GetScreenPos' function , which calculates the VRAM
destination for the sprite objects.
It calculates a VRAM destination in z_H and z_L, from an X,Y source
in z_B,Z_c in logical units (pairs of pixels)
The BBC version is limited to Y movements of 8 pixel blocks.
|
 |
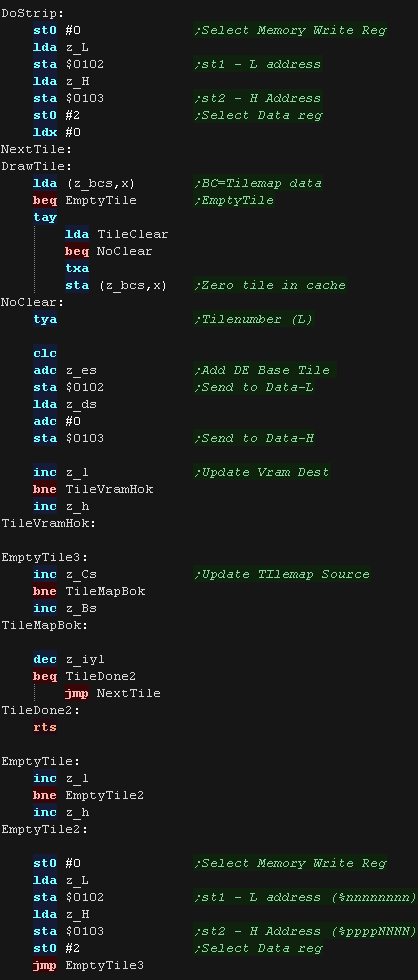
DoStrip will draw one horizontal strip of tiles.
The job is defined by the following zero page entries
z_HL = VRAM Dest
z_BCs = Tilemap
z_DEs = Pattern data
z_IYL = TileMap Width
X=0 throughout the function
The tilemap will either be the TileCache (for the background) or a
mini tilemap (for sprites)
If using the tile cache we zero the tiles after they are drawn.
We calculate the address of the source pattern data by multiplying
the tile number by 16
|
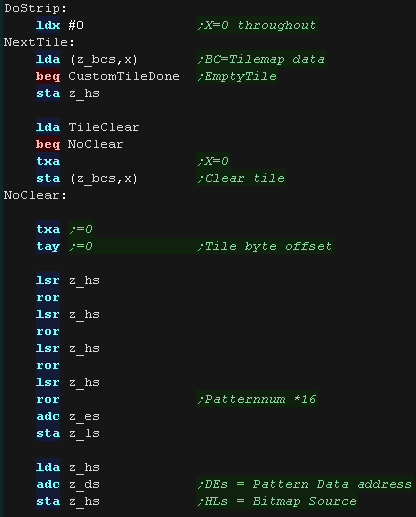 |
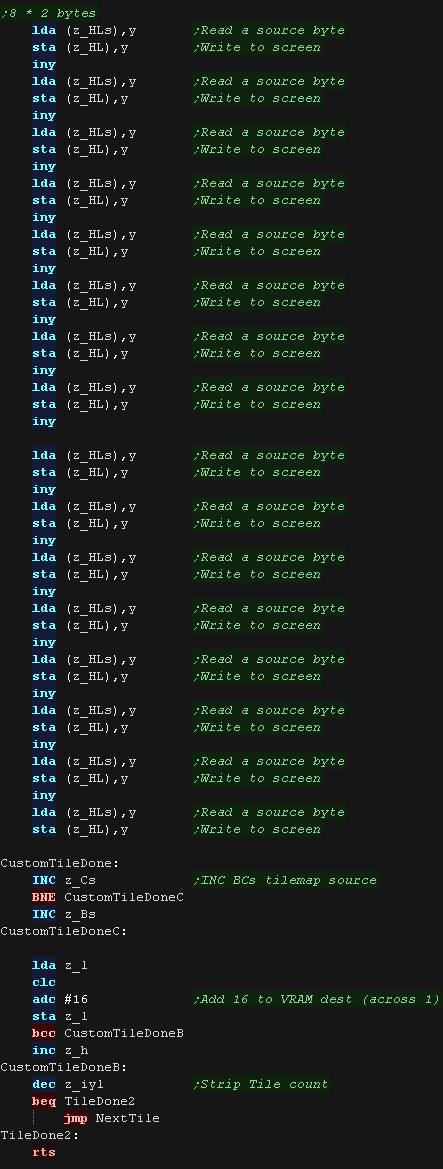
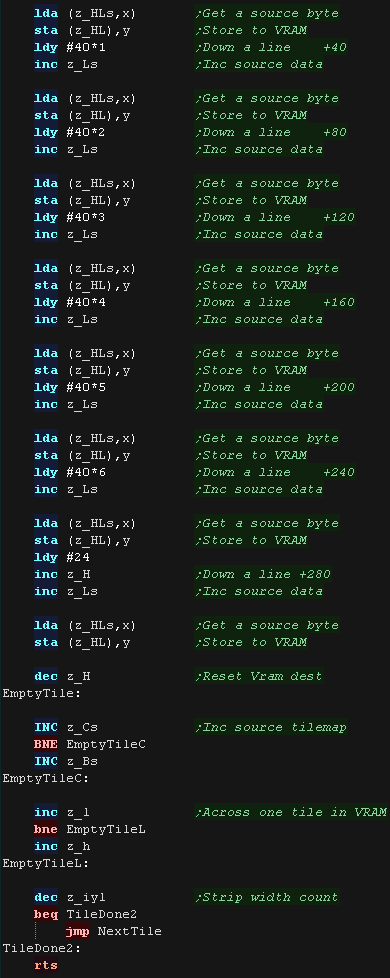
The tile on the BBC uses 16 bytes, in 2 vertical
'strips'
we use Y as the offset for both the source tile, and VRAM
destination
We repeat until the strip is drawn
|
 |
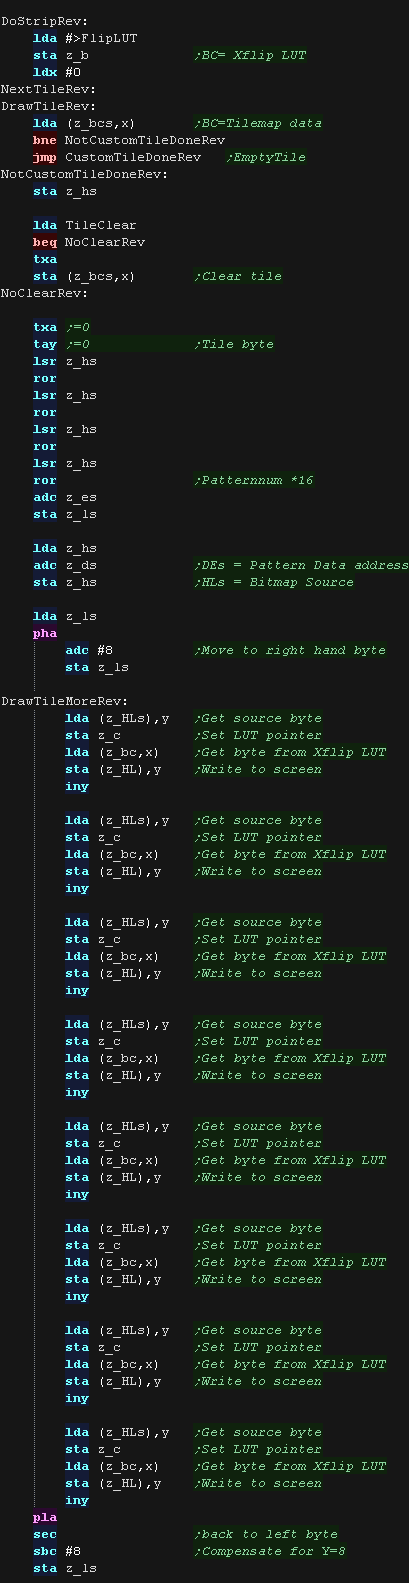
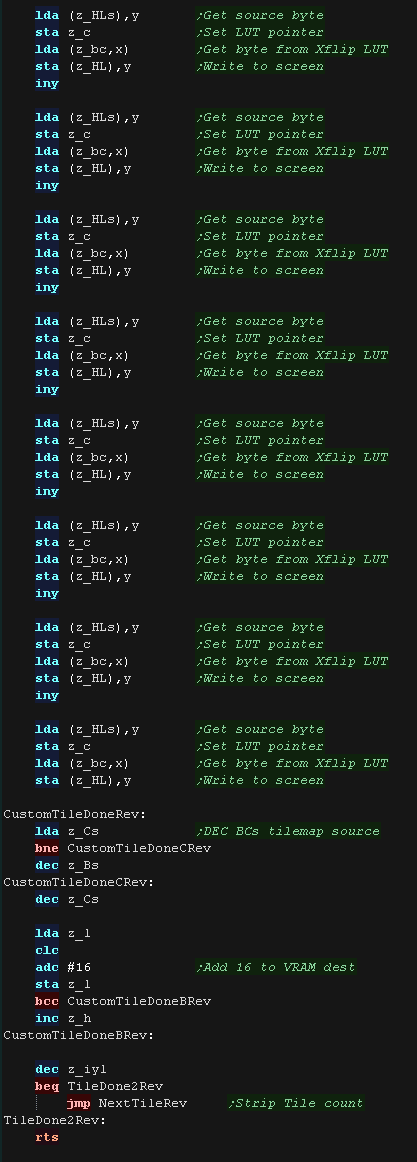
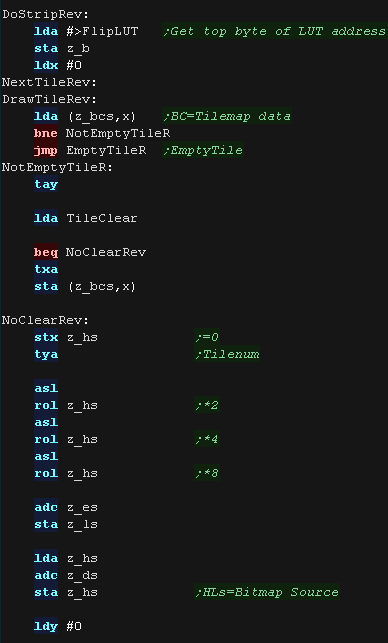
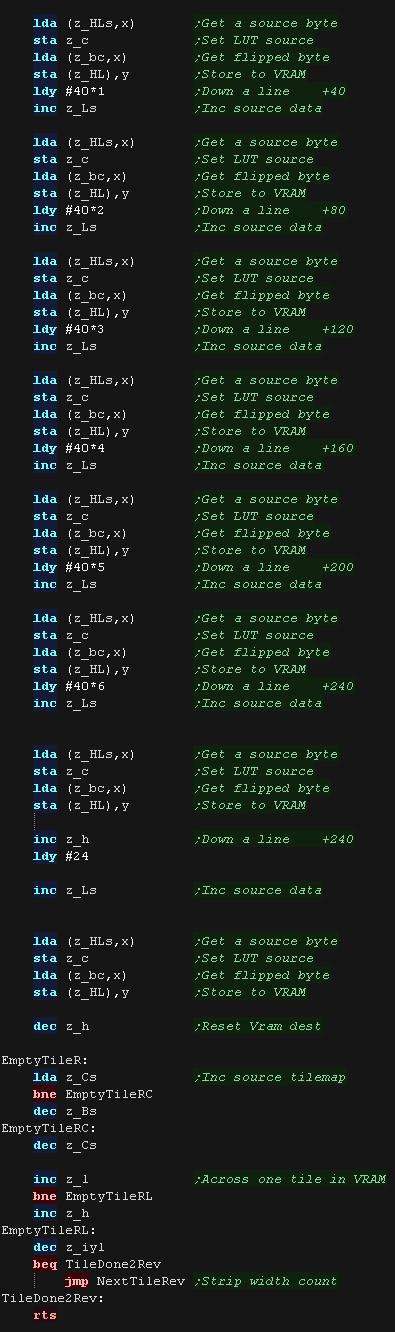
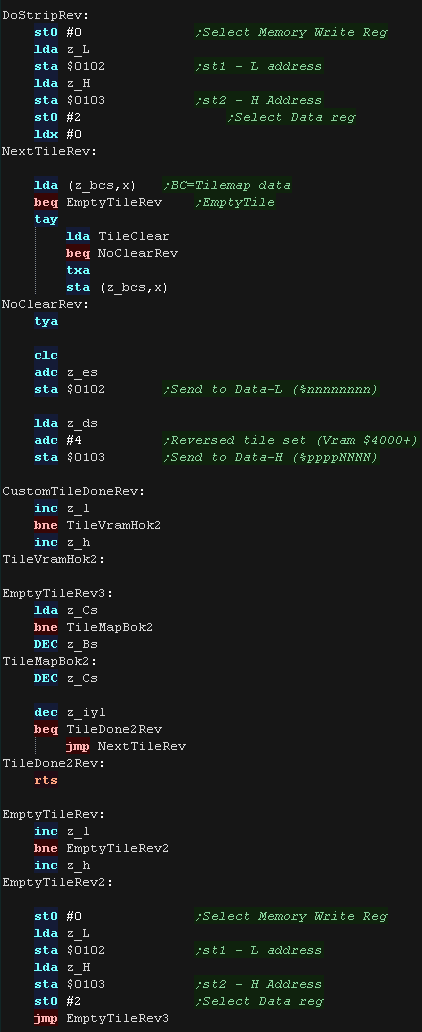
DoStripRev has essentially the same function, however
it horizontally flips the pattern data via the lookup table.
We're using z_BC to point to our lookup table, by loading z_c with
the data we want to Xflip, we can read back the flipped byte from
(z_bc)
We work from right to left on the screen
|
|
MinTile is a
multiplatform 'engine' which allows us to define our game code in
a common way, and let the platform specific code handle the
platform specific work!... it was used to write 'ChibiFighter' on
the Z80.
For more details on Mintile, see the Mintile series here...
|
|
Tile Drawing Routines
Our example shows an onscreen tilemap and two software 'sprites'.
Mintile supports scrolling and X-Flip (but not Y-flip)
The 'sprites' are actually miniature tile maps, this is to reduce
the amount of platform specific code.
these are all created via the DoStrip platform specific routine,
which we'll look at here.
In 4 color mode the tiles are 4x8 pixels, giving a screen of 32x24
visible tiles. |
 |
The MinTile shared routine provides calculation and tilemap
planning, however we need to do the actual job of 'Drawing' in the
platform code.
The code can horizontally flip tiles, on the Atari we use a 256 byte
lookup table, to 'pre-calculate the flipping of the 4 pixels in a 4
color byte, or 8 pixels in a 2 color byte |
 |
| The LUT needs to be byte aligned, so &8100 or &FE00 would
be fine, but &FE01 would not! |
 |
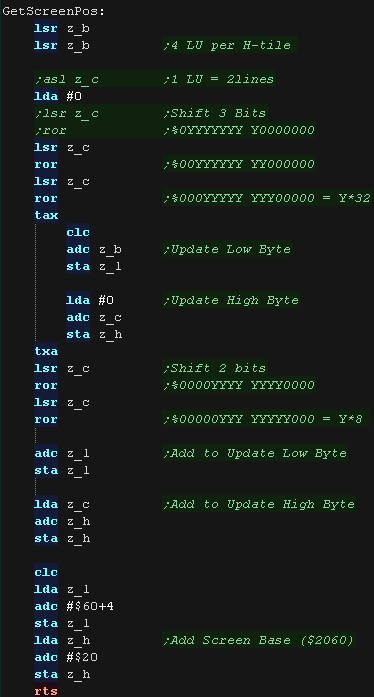
We have a 'GetScreenPos' function , which calculates the VRAM
destination for the sprite objects.
It calculates a VRAM destination in z_H and z_L, from an X,Y source
in z_B,Z_c in logical units (pairs of pixels)
The screen is 40 bytes wide, so we multiply the Y-line by 40.
The screen base is $2060, but our tilemap is only 32 bytes wide, so
we center it by adding 4
|
 |
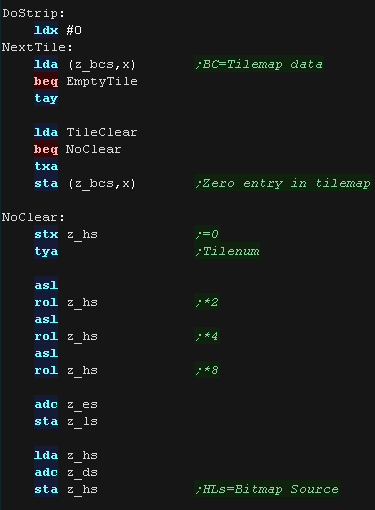
DoStrip will draw one horizontal strip of tiles.
The job is defined by the following zero page entries
z_HL = VRAM Dest
z_BCs = Tilemap
z_DEs = Pattern data
z_IYL = TileMap Width
X=0 throughout the function
The tilemap will either be the TileCache (for the background) or a
mini tilemap (for sprites)
If using the tile cache we zero the tiles after they are drawn.
We calculate the address of the source pattern data by multiplying
the tile number by 8
|
 |
We need to transfer the 8 bytes of the tile.
we use z_HLs as the offset for the source tile, and Y as the
VRAM destination.
We add #40 to the Ypos to move down a line.
We repeat until the strip is drawn
|
 |
DoStripRev has essentially the same function, however
it horizontally flips the pattern data via the lookup table.
We're using z_BC to point to our lookup table, by loading z_c with
the data we want to Xflip, we can read back the flipped byte from
(z_bc)
|
 |
MinTile is a
multiplatform 'engine' which allows us to define our game code in
a common way, and let the platform specific code handle the
platform specific work!... it was used to write 'ChibiFighter' on
the Z80.
For more details on Mintile, see the Mintile series here...
|
|
Tile Drawing Routines
Our example shows an onscreen tilemap and two software 'sprites'.
Mintile supports scrolling and X-Flip (but not Y-flip)
The 'sprites' are actually miniature tile maps, this is to reduce
the amount of platform specific code.
these are all created via the DoStrip platform specific routine,
which we'll look at here.
On the Apple 2 the tiles are 7x8 pixels, giving a screen of 32x24
visible tiles. |
 |
The MinTile shared routine provides calculation and tilemap
planning, however we need to do the actual job of 'Drawing' in the
platform code.
The code can horizontally flip tiles, on the Apple II we use a 256
byte lookup table, to 'pre-calculate the flipping of the pixels
The first bit in a byte is the color attribute - this is not
flipped.
The remaining bits are the bitmap data, their order is reversed |
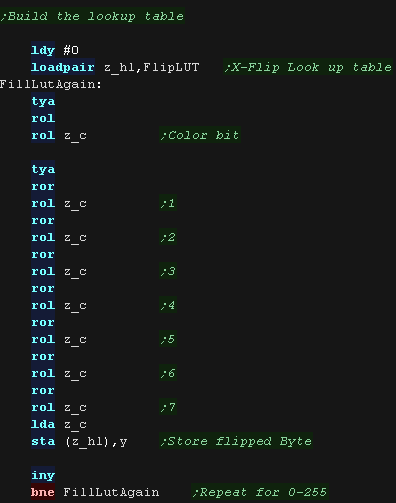 |
| The LUT needs to be byte aligned, so &8100 or &FE00 would
be fine, but &FE01 would not! |
|
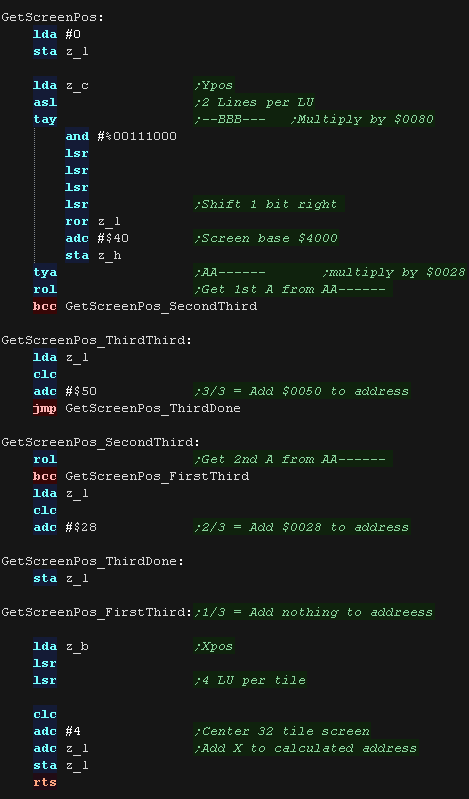
We have a 'GetScreenPos' function , which calculates the VRAM
destination for the sprite objects.
It calculates a VRAM destination in z_H and z_L, from an X,Y source
in z_B,Z_c in logical units (pairs of pixels)
The Screen layout is split in 3 parts according to Y line
The bits of the Yline number are split and multiplied in the
following format:
%AABBBCCC - AA*$0028 BBB*$0080 CCC*$0400
|
 |
DoStrip will draw one horizontal strip of tiles.
The job is defined by the following zero page entries
z_HL = VRAM Dest
z_BCs = Tilemap
z_DEs = Pattern data
z_IYL = TileMap Width
X=0 throughout the function
The tilemap will either be the TileCache (for the background) or a
mini tilemap (for sprites)
If using the tile cache we zero the tiles after they are drawn.
We calculate the address of the source pattern data by multiplying
the tile number by 16
|
|
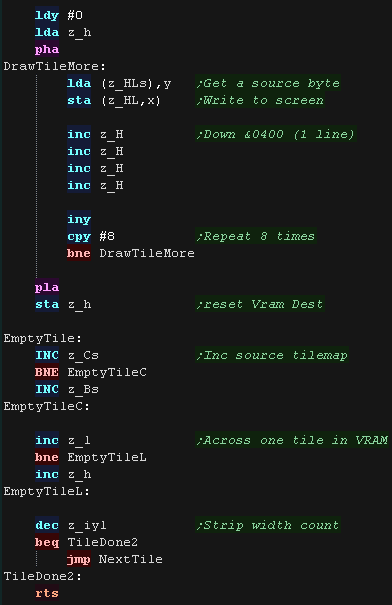
we use z_HLs as the offset for the source tile,
and Y as the VRAM destination.
We add #4 to the High byte of the Vram Destination to move down a
line
We repeat 8 times until the strip is drawn
|
 |
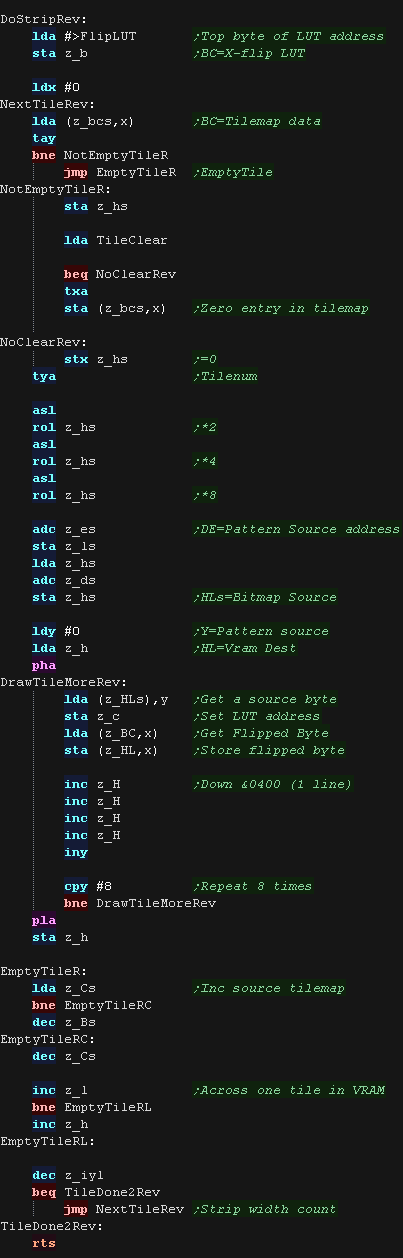
DoStripRev has essentially the same function, however
it horizontally flips the pattern data via the lookup table.
We're using z_BC to point to our lookup table, by loading z_c with
the data we want to Xflip, we can read back the flipped byte from
(z_bc)
|
 |
MinTile is a
multiplatform 'engine' which allows us to define our game code in
a common way, and let the platform specific code handle the
platform specific work!... it was used to write 'ChibiFighter' on
the Z80.
For more details on Mintile, see the Mintile series here...
|
|
Tile INIT
Our example shows an onscreen tilemap and two software 'sprites'.
Mintile supports scrolling and X-Flip (but not Y-flip)
The 'sprites' are actually miniature tile maps, this is to reduce
the amount of platform specific code.
these are all created via the DoStrip platform specific routine,
which we'll look at here.
The drawn tilemap is 32x24 in size, and simulates X-flip by
precalculating flipped tiles. |
 |
Before we can use the tiles, we need to transfer the tile patterns
from cartridge ROM to VRAM.
We use DefineTilesCombo to send the data.
|
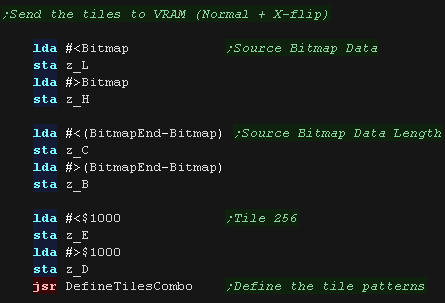 |
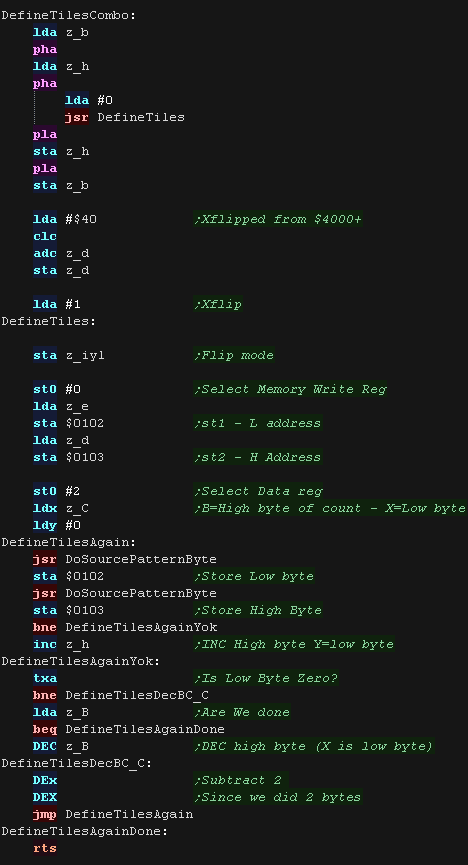
DefineTiles transfers the source data (in bitplanes) to VRAM
We use three 16 bit pairs defined in the zero page
BC is the total Bytes
DE is the Destination Ram
HL is the Source Bytes
The subroutine is executed twice, once with the normal patterns (to
address $1000) and once Xflipped (to address $1000+$4000)
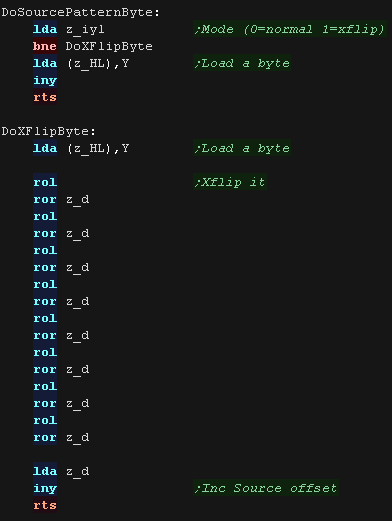
DoSourcePatternByte handles the X-flip as required.
|
 |
DoSourcePatternByte loads the source data in and INCs Y (the
offset to the source data)
IYL in the zero page defines if we're using X-flip or not... if we
are the bits in the byte are flipped.
|
 |
Tile Drawing Routines
The MinTile shared routine provides calculation and tilemap
planning, however we need to do the actual job of 'Drawing' in the
platform code.
We have a 'GetScreenPos' function , which calculates the VRAM
destination for the sprite objects.
It calculates a VRAM destination in z_H and z_L, from an X,Y source
in z_B , z_C in logical units (pairs of pixels)
The Tilemap base is memory address $0000 in VRAM - but we skip the
first two lines (64 bytes)
The formula is effectively:
Vram Dest= (Ypos in Tiles * 32) + Xpos in Tiles
|
 |
DoStrip will draw one horizontal strip of tiles.
The job is defined by the following zero page entries
z_HL = VRAM Dest
z_BCs = Tilemap
z_DEs = Pattern data
z_IYL = TileMap Width
X=0 throughout the function
The tilemap will either be the TileCache (for the background) or a
mini tilemap (for sprites)
If using the tile cache we zero the tiles after they are drawn.
We select our tile number, adding the DE to the tile number (to skip
over the tilemap at VRAM $0000)
|
 |
DoStripRev has essentially the same function, however
we add $400 to the tile number, effectively skipping to the flipped
tiles at memory address $4000+
|
 |
MinTile is a
multiplatform 'engine' which allows us to define our game code in
a common way, and let the platform specific code handle the
platform specific work!... it was used to write 'ChibiFighter' on
the Z80.
For more details on Mintile, see the Mintile series here...
|
|
Tile INIT
Our example shows an onscreen tilemap and two software 'sprites'.
Mintile supports scrolling and X-Flip (but not Y-flip)
The 'sprites' are actually miniature tile maps, this is to reduce
the amount of platform specific code.
these are all created via the DoStrip platform specific routine,
which we'll look at here.
The drawn tilemap is 32x24 in size. The Nes cannot Xflip tiles, and
is limited to only 256 tiles for the background, so to flip our
sprites, we'll use the hardware sprites (which can X flip) to draw
the flipped character. |
 |
Before we can use the tiles, we need to transfer the tile patterns
from cartridge ROM to VRAM.
We use DefineTiles to send the data.
|
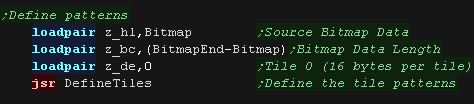 |
DefineTiles transfers the source data (in bitplanes) to VRAM
We use three 16 bit pairs defined in the zero page
BC is the total Bytes
DE is the Destination Ram
HL is the Source Bytes
|
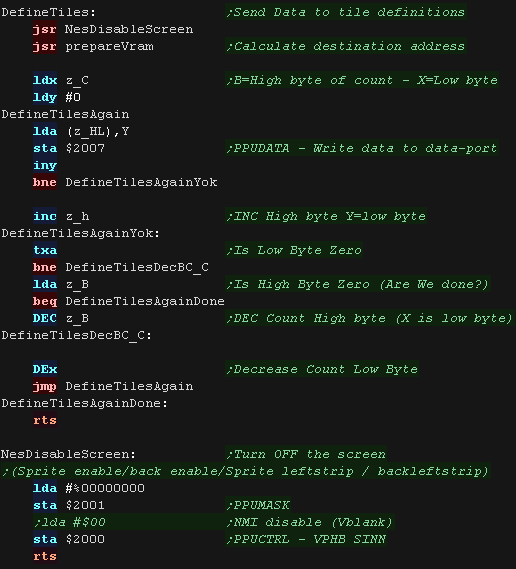 |
Caches and Interrupts
We can't write to Tilemap VRAM
or sprite RAM outside of Vblank.
To work around this we'll write our changes to two caches.
We'll transfer the sprites via DMA each Vblank
We send around 1/4 of the Tile cache to Vram each vblank - there
isn't time to copy more. |
 |
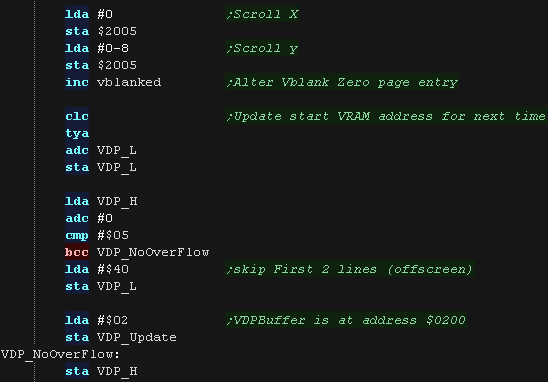
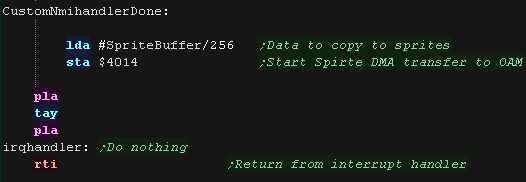
At the start of our vblank we stream as many tiles as
we can to Vram ($B0 worth!)
|
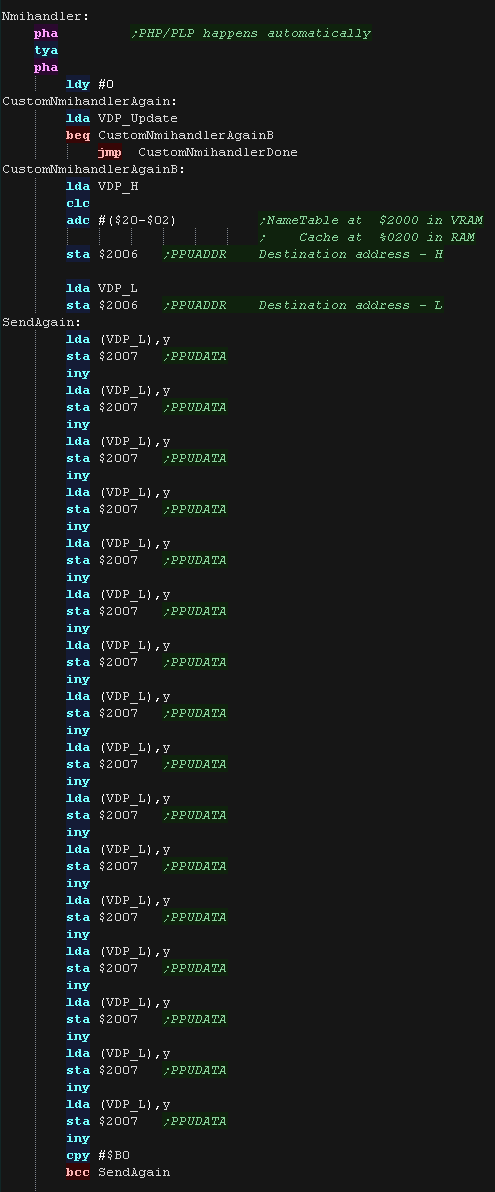 |
After transferring the tiles we reset the scroll position (it
changes when we write to Vram!)
we check if we've gone over the end of the cache, and reset if we
have. |
 |
| We use video register $4014 to start a DMA which will
transfer our Sprite Cache to the sprite ram in the video chip. |
 |
Tile Drawing Routines
The MinTile shared routine provides calculation and tilemap
planning, however we need to do the actual job of 'Drawing' in the
platform code.
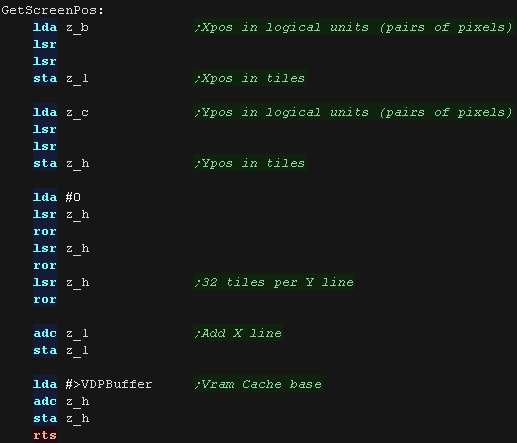
We have a 'GetScreenPos' function , which calculates the VRAM
destination for the sprite objects.
It calculates a VRAM cache destination in z_H and z_L, from an X,Y
source in z_B , z_C in logical units (pairs of pixels)
The formula is effectively:
Dest= Cache Base + (Ypos in Tiles * 32) + Xpos in Tiles
This is used for the Tilemap, but X-flipped hardware sprites use the
the pixel co-ordinate in B,C
|
 |
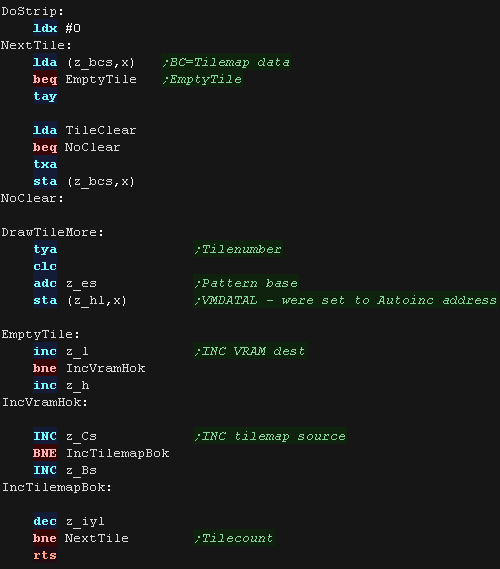
DoStrip will draw one horizontal strip of tiles.
The job is defined by the following zero page entries
z_HL = VRAM Dest
z_BCs = Tilemap
z_DEs = Pattern data
z_IYL = TileMap Width
X=0 throughout the function
The tilemap will either be the TileCache (for the background) or a
mini tilemap (for sprites)
If using the tile cache we zero the tiles after they are drawn.
We select our tile number, adding the E to the tile number.
These are written into the tile cache at HL
|
 |
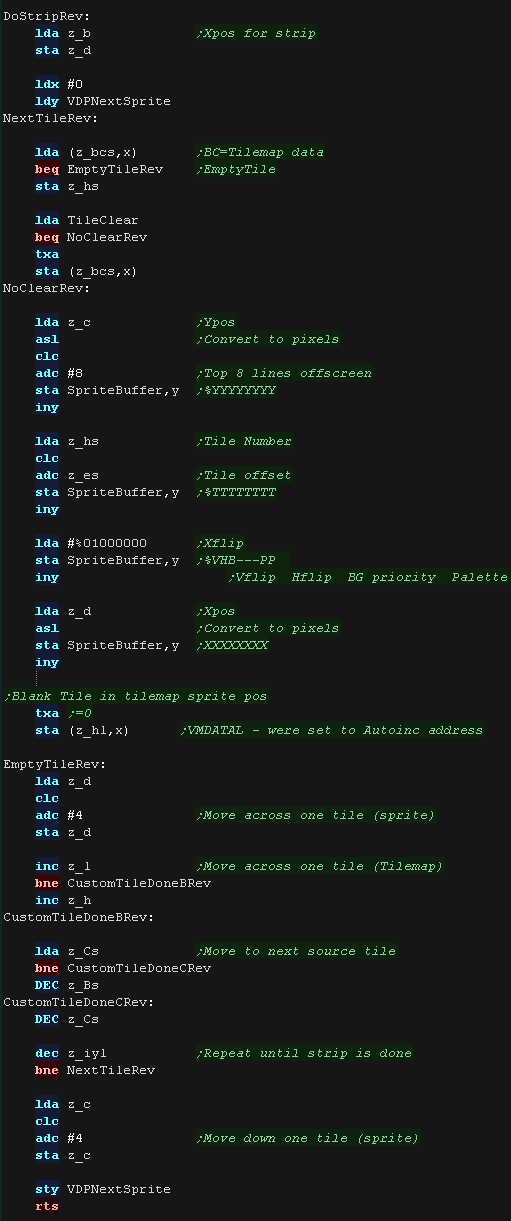
DoStripRev uses the hardware sprites. VDPNextSprite
is used to keep track of the next free sprite.
we write the co-ordinates (in pixels) and pattern number, and set
the Xflip attribute (%01000000)
We increase the X position by 4 logical units (8 pixels) after each
tile to position the next sprite.
We also write a zero tile to HL to clear the tilemap under the
sprite, to give the same effect as the unflipped tiles.
|
 |
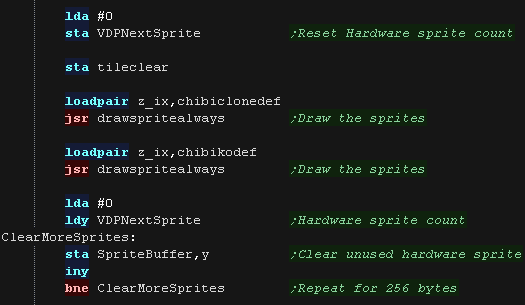
We need to zero the hardware sprite count before each draw, and
redraw the sprites each time.
As our character goes offscreen the number of hardware sprites
needed may change, to remove the unneeded ones, we clear all sprites
which were unused during the draw.
|
 |
|
Hardware
sprites are more powerful, but there are very few of them!
On the NES we have only 64, and we used 40 of them for a single
character... if the cpu controlled character wasn't drawn with the
tilemap, we'd have run out!
|