
We've written a minimal multiplatform Tile/Sprite routine in the Mintile series, Now, lets take a look at the platform specific code to quickly draw tiles to the screen on the Commodore 64.

c64_MinTile.asm

`
Learn Multi platform 6502 Assembly Programming... For Monsters!
Platform Specific Lessons
|
Lesson
P60 - Multiplatform Software tilemap on the Commodore 64 (Mintile) We've written a minimal multiplatform Tile/Sprite routine in the Mintile series, Now, lets take a look at the platform specific code to quickly draw tiles to the screen on the Commodore 64. |
|
c64_MinTile.asm
|
|
| MinTile is a
multiplatform 'engine' which allows us to define our game code in
a common way, and let the platform specific code handle the
platform specific work!... it was used to write 'ChibiFighter' on
the Z80. For more details on Mintile, see the Mintile series here... |
 |
Tile Drawing Routines
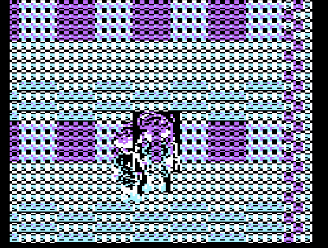
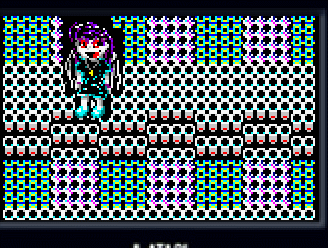
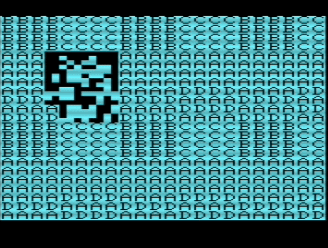
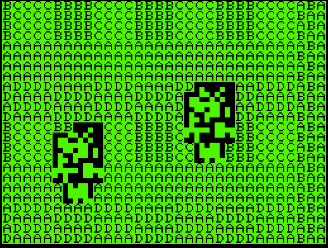
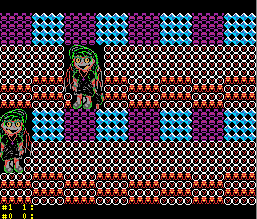
| Our example shows an onscreen tilemap and two software 'sprites'. Mintile supports scrolling and X-Flip (but not Y-flip) The 'sprites' are actually miniature tile maps, this is to reduce the amount of platform specific code. these are all created via the DoStrip platform specific routine, which we'll look at here. In 4 color mode the tiles are 4x8 pixels, giving a screen of 32x24 visible tiles. We don't use the full screen width on the C64 - this is to make porting games from the other 256x192 screen systems easier. |
 |
| The MinTile shared routine provides calculation and
tilemap planning, however we need to do the actual job of 'Drawing'
in the platform code. The code can horizontally flip tiles, on the C64 we use a 256 byte lookup table, to 'pre-calculate the flipping of the 4 pixels in a 4 color byte, or 8 pixels in a 2 color byte |
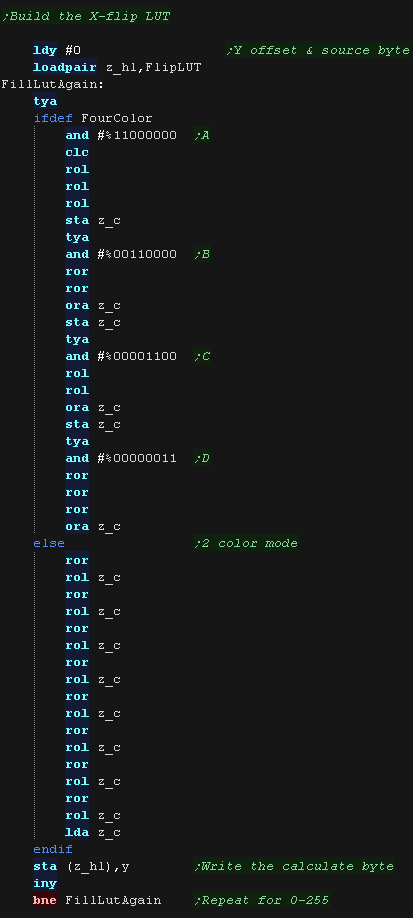 |
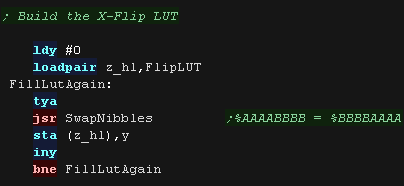
| The LUT needs to be byte aligned, so &8100 or &FE00 would be fine, but &FE01 would not! | 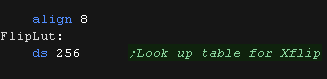 |
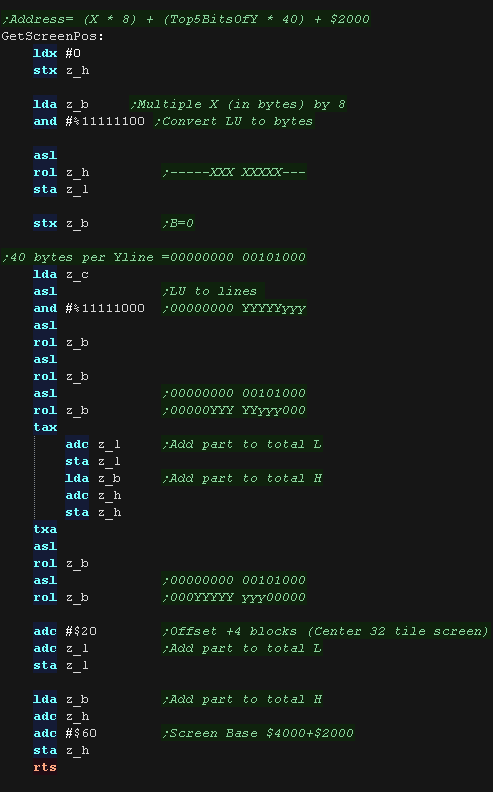
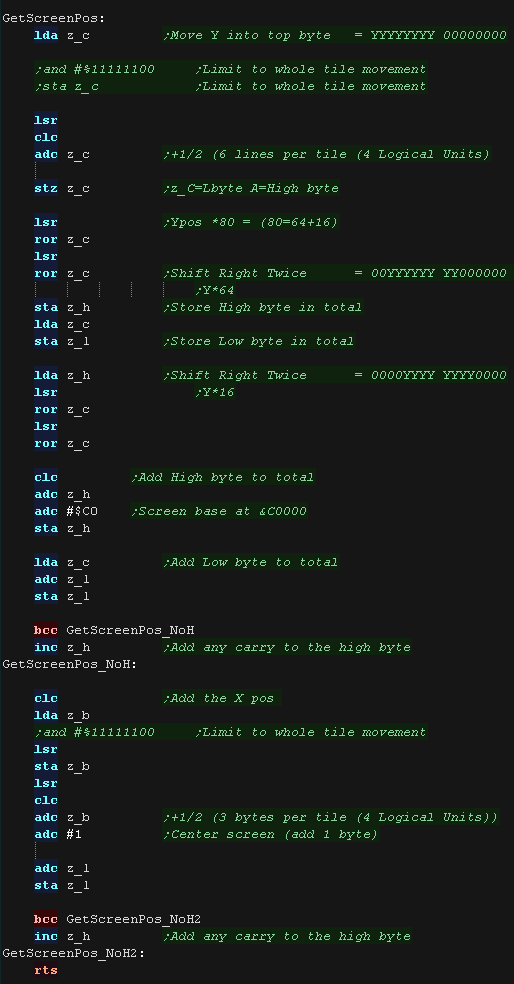
| We have a 'GetScreenPos' function , which calculates the VRAM
destination for the sprite objects. It calculates a VRAM destination in z_H and z_L, from an X,Y source in z_B,Z_c in logical units (pairs of pixels) For speed and convenience, we limit our Y co-ordinates to whole tiles. The screen is 40 bytes wide, and bytes are consecutive in ram within an 8 pixel tall block, so we multiply the Y-line by 40*8. The screen base is $6000, and as our tilemap is only 32 bytes wide, we center it by adding $20 - skipping 4 blocks |
 |
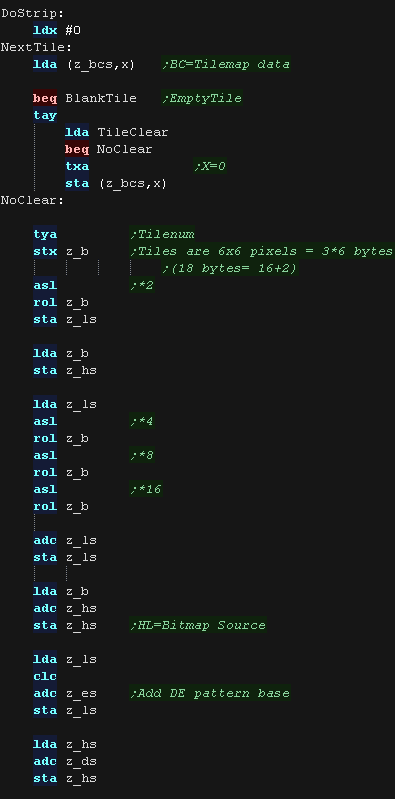
| DoStrip will draw one horizontal strip of tiles. The job is defined by the following zero page entries z_HL = VRAM Dest z_BCs = Tilemap z_DEs = Pattern data z_IYL = TileMap Width X=0 throughout the function The tilemap will either be the TileCache (for the background) or a mini tilemap (for sprites) If using the tile cache we zero the tiles after they are drawn. We calculate the address of the source pattern data by multiplying the tile number by 8 |
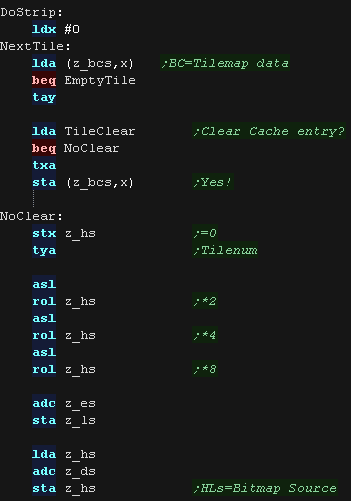 |
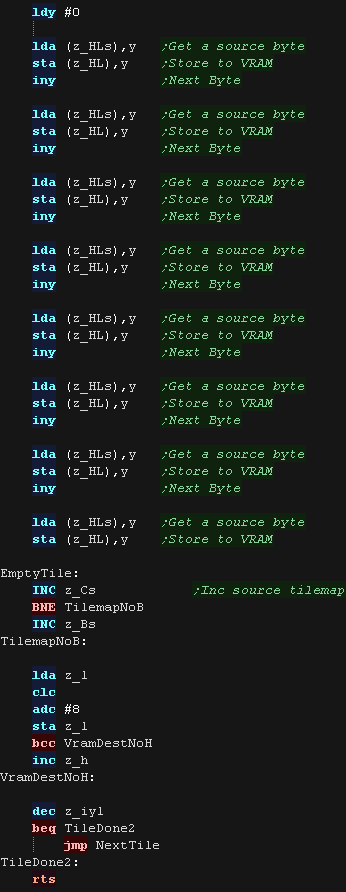
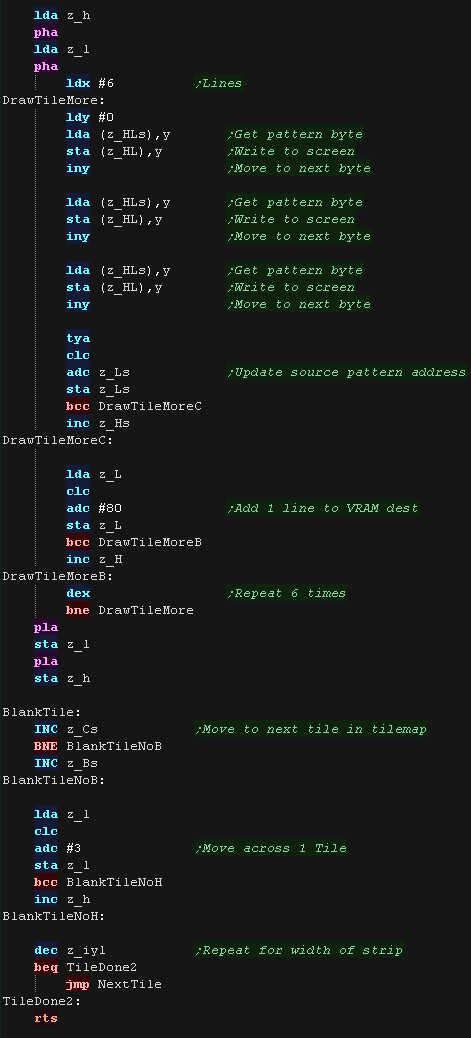
| We need to transfer the 8 bytes of the tile. as all the vertical bytes in a tile are in consecutive VRAM addresses, We use Y as the offset for the pattern source and VRAM destination We transfer all 8 bytes, then Increment our Tilemap source, and move to the next horizontal tile by adding 8 to the VRAM destination. |
 |
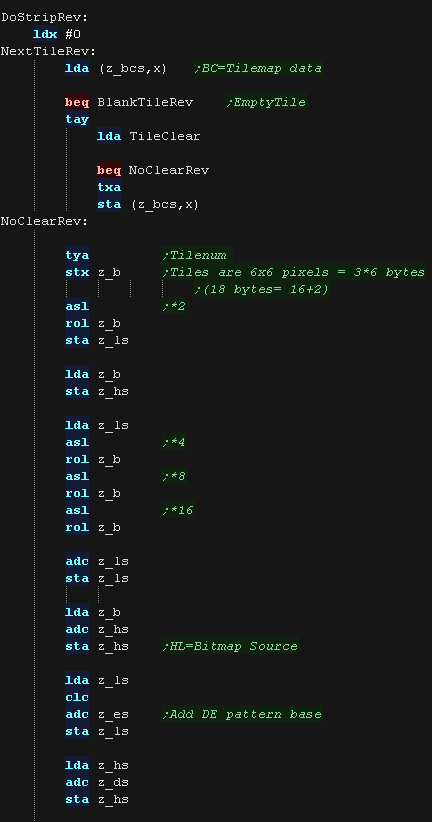
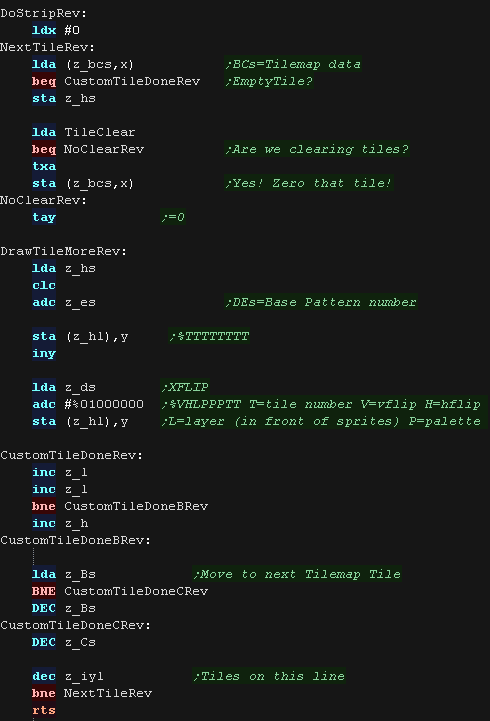
| DoStripRev has essentially the same function, however
it horizontally flips the pattern data via the lookup table. We're using z_BC to point to our lookup table, by loading z_c with the data we want to Xflip, we can read back the flipped byte from (z_bc) |
 |
 |
Lesson
P61 - Multiplatform Software tilemap on the Atari Lynx (Mintile) We've written a minimal multiplatform Tile/Sprite routine in the Mintile series, Now, lets take a look at the platform specific code to quickly draw tiles to the screen on the Atari Lynx. |
|
LNX_MinTile.asm
|
|
| MinTile is a
multiplatform 'engine' which allows us to define our game code in
a common way, and let the platform specific code handle the
platform specific work!... it was used to write 'ChibiFighter' on
the Z80. For more details on Mintile, see the Mintile series here... |
|
| On the Lynx due to the small screen size we'll use
tiles of 6x6. This is rather irregular compared to our normal 8x8, however it's a reasonable trade off between our typical 8x8, and a tiny 4x4 |
 |
Tile Drawing Routines
| Our example shows an onscreen tilemap and two software 'sprites'. Mintile supports scrolling and X-Flip (but not Y-flip) The 'sprites' are actually miniature tile maps, this is to reduce the amount of platform specific code. these are all created via the DoStrip platform specific routine, which we'll look at here. On the Atari Lynx we're using 6x6 tiles giving a screen size of 26x17 tiles with a 2 pixel border on the left and right of the screen |
 |
| The MinTile shared routine provides calculation and
tilemap planning, however we need to do the actual job of 'Drawing'
in the platform code. The code can horizontally flip tiles, on the Lynx we use a 256 byte lookup table, to 'pre-calculate the flipping of the 2 pixels in a 16 color byte |
 |
| The LUT needs to be byte aligned, so &8100 or &FE00 would be fine, but &FE01 would not! |  |
| We have a 'GetScreenPos' function , which calculates the VRAM
destination for the sprite objects. It calculates a VRAM destination in z_H and z_L, from an X,Y source in z_B,Z_c in logical units (pairs of pixels) Mintile is designed for tiles of 4x4... As we're using an irregular tile size of 6x6 one tile is still 4x4 logical units - so one Logical unit is 1.5 pixels on the Lynx! we multiply our Ypos by 1.5, and multiply this by 80 bytes (80 bytes per line) The screen base is memory address $C000 The screen has a 1 byte border around the 26x17 visible tilemap, so we add 1 to compensate. |
 |
| DoStrip will draw one horizontal strip of tiles. The job is defined by the following zero page entries z_HL = VRAM Dest z_BCs = Tilemap z_DEs = Pattern data z_IYL = TileMap Width X=0 throughout the function The tilemap will either be the TileCache (for the background) or a mini tilemap (for sprites) If using the tile cache we zero the tiles after they are drawn. We calculate the address of the source pattern data by multiplying the tile number by 18 (As that's how many bytes a 6x6 pixel tile uses) |
 |
| We need to transfer 3 bytes per line, for 6 lines we add 80 bytes to the VRAM destination after each line. Once the tile is done we move to the next tile position in BC, and move across the screen 1 tile by adding 3 to HL |
 |
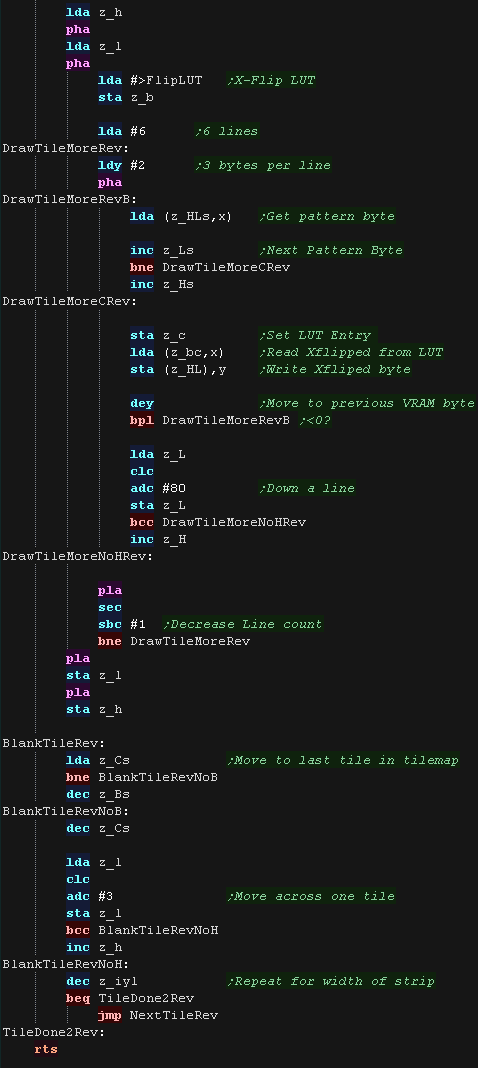
| DoStripRev has essentially the same function, however
it horizontally flips the pattern data via the lookup table. We're using z_BC to point to our lookup table, by loading z_c with the data we want to Xflip, we can read back the flipped byte from (z_bc) |
  |
 |
Lesson
P62 - Multiplatform Software tilemap on the Vic 20 We've written a minimal multiplatform Tile/Sprite routine in the Mintile series, Now, lets take a look at the platform specific code to quickly draw tiles to the screen on the Vic 20 |
|
VIC_MinTile.asm
|
|
| MinTile is a
multiplatform 'engine' which allows us to define our game code in
a common way, and let the platform specific code handle the
platform specific work!... it was used to write 'ChibiFighter' on
the Z80. For more details on Mintile, see the Mintile series here... |
|
| The VIC 20 doesn't have 'real' bitmap graphics, it
uses character blocks! We'll export our character with Akusprite Editor, and create a 'translation table' to flip the blocks to do the best we can on this system. |
|
Tile Drawing Routines
| Our example shows an onscreen tilemap and two software 'sprites'. Mintile supports scrolling and X-Flip (but not Y-flip) The 'sprites' are actually miniature tile maps, this is to reduce the amount of platform specific code. these are all created via the DoStrip platform specific routine, which we'll look at here. On the VIC Each tile is a single character block |
 |
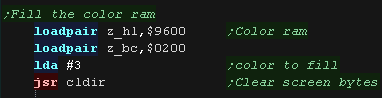
| Mintile sets the graphics blocks, but does not
currently use colors. here we fill the entire screen with a solid color |
 |
| We have a 'GetScreenPos' function , which calculates the VRAM
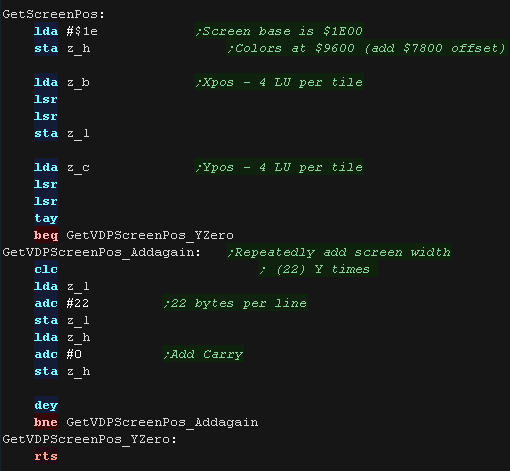
destination for the sprite objects. It calculates a VRAM destination in z_H and z_L, from an X,Y source in z_B,Z_c in logical units (pairs of pixels) each logical unit is 2 pixels, so a tile is 4x4 logical units (LU) on the VIC, each line has 22 characters, so we multiply our Yline by 22. Our screen base is $1E00 |
 |
| DoStrip will draw one horizontal strip of tiles. The job is defined by the following zero page entries z_HL = VRAM Dest z_BCs = Tilemap z_DEs = Pattern data z_IYL = TileMap Width X=0 throughout the function The tilemap will either be the TileCache (for the background) or a mini tilemap (for sprites) If using the tile cache we zero the tiles after they are drawn. We add z_E to the character number, this is an offset to our 'patterns' |
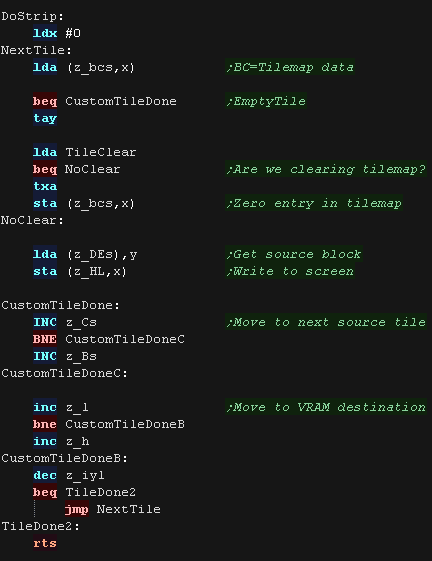 |
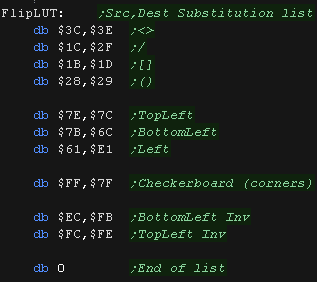
| To 'X-flip' the graphic, we have a lookup table of
conversions for flipped equivalent characters. The last entry in the LUT is a 0 |
 |
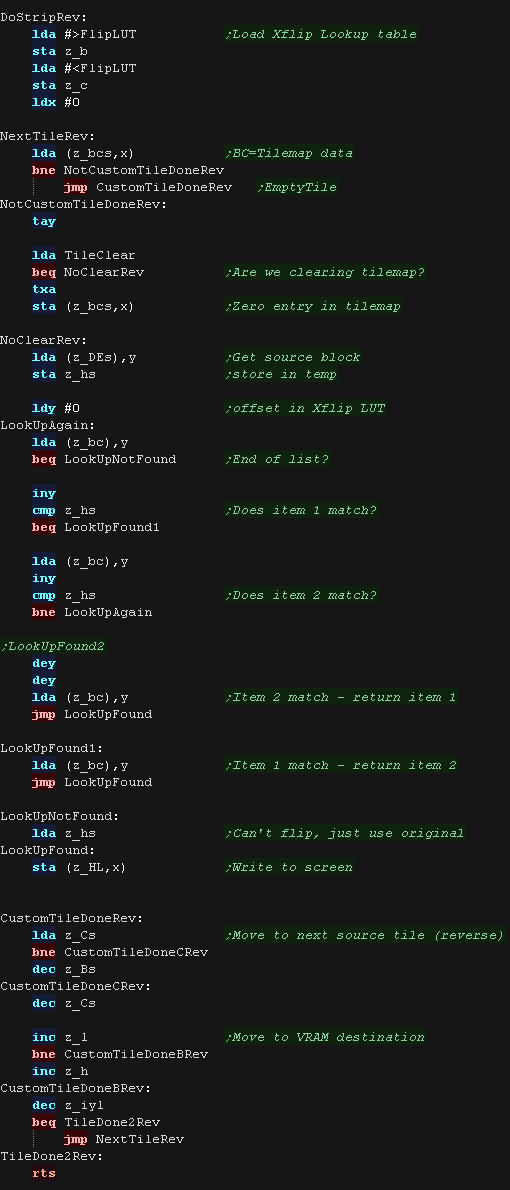
| DoStripRev has essentially the same function, however
it horizontally flips the pattern data via the lookup table. We're using z_DEs to point to our lookup table, we check each pair of entries in the table, if either matches our source pattern, the other is the flipped equivalent. If nothing matches, we just write the original character to the screen as is. |
 |
 |
Lesson
P63 - Multiplatform Software tilemap on the PET We've written a minimal multiplatform Tile/Sprite routine in the Mintile series, Now, lets take a look at the platform specific code to quickly draw tiles to the screen on the Commodore PET |
|
PET_MinTile.asm
|
|
| MinTile is a
multiplatform 'engine' which allows us to define our game code in
a common way, and let the platform specific code handle the
platform specific work!... it was used to write 'ChibiFighter' on
the Z80. For more details on Mintile, see the Mintile series here... |
|
| The PET doesn't have 'real' bitmap graphics, it uses
character blocks! We'll export our character with Akusprite Editor, and create a 'translation table' to flip the blocks to do the best we can on this system. |
|
Tile Drawing Routines
| Our example shows an onscreen tilemap and two software 'sprites'. Mintile supports scrolling and X-Flip (but not Y-flip) The 'sprites' are actually miniature tile maps, this is to reduce the amount of platform specific code. these are all created via the DoStrip platform specific routine, which we'll look at here. On the PET Each tile is a single character block |
 |
| We have a 'GetScreenPos' function , which calculates the VRAM
destination for the sprite objects. It calculates a VRAM destination in z_H and z_L, from an X,Y source in z_B,Z_c in logical units (pairs of pixels) each logical unit is 2 pixels, so a tile is 4x4 logical units (LU) on the PET, each line has 40 characters, so we multiply our Yline by 40. Our screen base is $8000. Our virtual screen is 32x24 tiles, so we center the screen by adding 4 |
 |
| DoStrip will draw one horizontal strip of tiles. The job is defined by the following zero page entries z_HL = VRAM Dest z_BCs = Tilemap z_DEs = Pattern data z_IYL = TileMap Width X=0 throughout the function The tilemap will either be the TileCache (for the background) or a mini tilemap (for sprites) If using the tile cache we zero the tiles after they are drawn. We add z_E to the character number, this is an offset to our 'patterns' |
|
| To 'X-flip' the graphic, we have a lookup table of
conversions for flipped equivalent characters. The last entry in the LUT is a 0 |
|
| DoStripRev has essentially the same function, however
it horizontally flips the pattern data via the lookup table. We're using z_DEs to point to our lookup table, we check each pair of entries in the table, if either matches our source pattern, the other is the flipped equivalent. If nothing matches, we just write the original character to the screen as is. |
|
 |
Lesson
P64 - Multiplatform Software tilemap on the SNES We've written a minimal multiplatform Tile/Sprite routine in the Mintile series, Now, lets take a look at the platform specific code to quickly draw tiles to the screen on the SNES. |
|
SNS_MinTile.asm
|
|
| MinTile is a
multiplatform 'engine' which allows us to define our game code in
a common way, and let the platform specific code handle the
platform specific work!... it was used to write 'ChibiFighter' on
the Z80. For more details on Mintile, see the Mintile series here... |
|
Tile INIT
| Our example shows an onscreen tilemap and two software 'sprites'. Mintile supports scrolling and X-Flip (but not Y-flip) The 'sprites' are actually miniature tile maps, this is to reduce the amount of platform specific code. these are all created via the DoStrip platform specific routine, which we'll look at here. The drawn tilemap is 32x24 in size. |
 |
| Before we can use the tiles, we need to transfer the tile patterns
from cartridge ROM to VRAM. We use DefineTiles to send the data. |
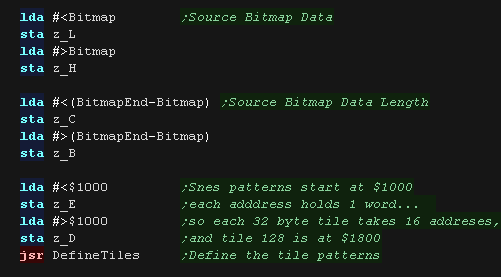 |
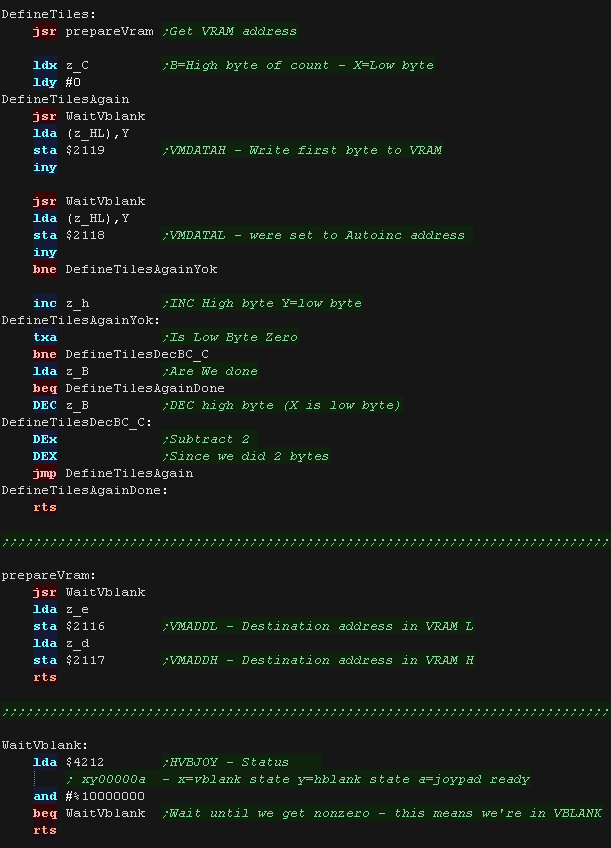
| DefineTiles transfers the source data (in bitplanes) to VRAM We use three 16 bit pairs defined in the zero page BC is the total Bytes DE is the Destination Ram HL is the Source Bytes We select a VRAM address with port $2116-7 We write the bytes of data to port $2118-9 |
 |
Caches and Interrupts
| We can't write to Tilemap VRAM
outside of Vblank. We define a screen buffer of $800 bytes to cache the contents of the tilemap, and transfer the cache during vblank |
 |
| During VBLANK We use a DMA to transfer all the bytes
of the buffer from RAM to VRAM |
 |
| We define the address of our interrupt handler in the footer at address $FFC0 | 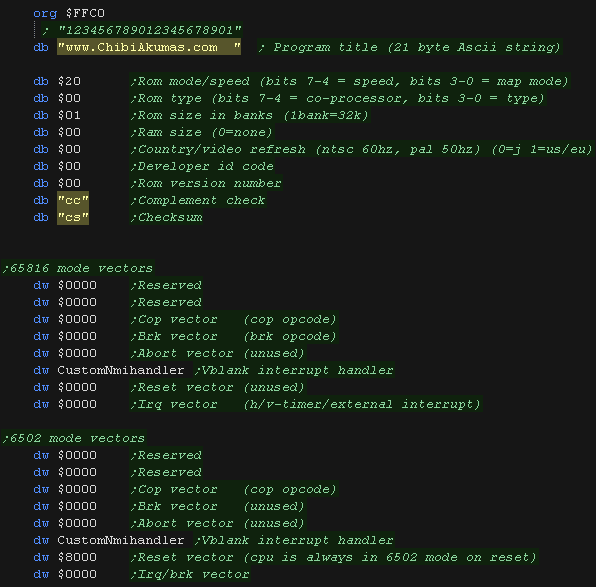 |
Tile Drawing Routines
| The MinTile shared routine provides calculation and tilemap
planning, however we need to do the actual job of 'Drawing' in the
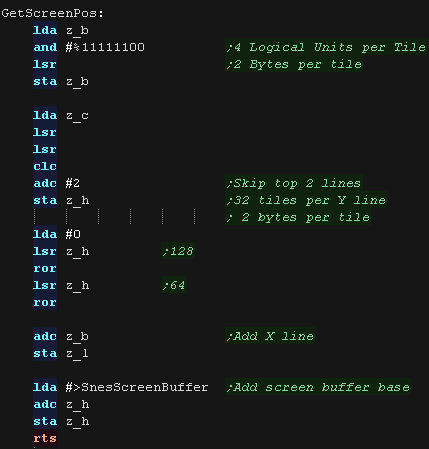
platform code. We have a 'GetScreenPos' function , which calculates the VRAM destination for the sprite objects. It calculates a VRAM cache destination in z_H and z_L, from an X,Y source in z_B , z_C in logical units (pairs of pixels) - Each tile is effectively 4 logical units. Each tile uses 2 bytes of VRAM in the tilemap The formula is effectively: Dest= Cache Base + (Ypos in Tiles * 64) + Xpos in Tiles *32 |
 |
| DoStrip will draw one horizontal strip of tiles. The job is defined by the following zero page entries z_HL = VRAM Dest z_BCs = Tilemap z_DEs = Pattern data z_IYL = TileMap Width X=0 throughout the function The tilemap will either be the TileCache (for the background) or a mini tilemap (for sprites) If using the tile cache we zero the tiles after they are drawn. We select our tile number, adding the DE to the tile number. These are written into the tile cache at HL The two tile definition bytes are in the format %TTTTTTTT %VHLPPPTT where T=tile number V=vflip H=hflip L=layer (in front of sprites) P=palette |
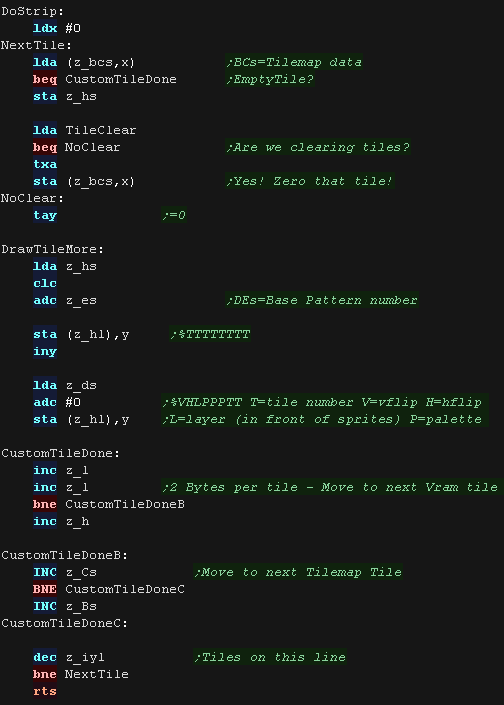 |
| DoStripRev is virtually identical! We just set the Xflip flag, and walk through the tilemap from right to left. |
 |
 |
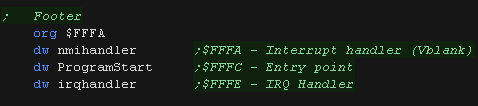
The
firmware ROM is in the high are of the address space where the
interrupt vectors are ($FFFA-$FFFF) so we'll have to 'chain
onto' the firmware handler. |
The standard 6502 interrupt vectors from $FFFA+ are ROM, however these jump to vectors in low memory addresses (Jumps to the address at...)
IRQ and BRK interrupts back up A at address $00FC.
NMI is different, it causes a jump to address $0D00 - the firmware puts an RTI command here during reset.
| Vector Address |
Remaps
to |
Function
|
Registers
stored
by Firmware |
| $FFFE-$FFFF | Vector at $0202-$0203
|
BRK | STA $FC |
| $FFFE-$FFFF |
Vector at $0204-$0205 | IRQ1
(Primary IRQ) |
STA $FC |
| $FFFE-$FFFF | Vector at $0206-$0207 | IRQ2
(Unrecognised IRQ) |
STA $FC |
| $FFFA-$FFFB |
Jumps to $0D00 | NMI |
We need to clear the interrupt, we can do this by writing #255 to $FE4D
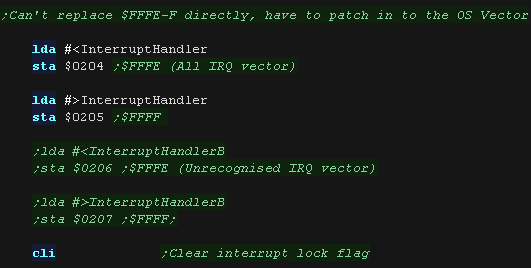
| To hook into the firmware interrupt handler we need to patch
the address of our interrupt handler to address $0204 We use CLI to turn on interrupts |
 |
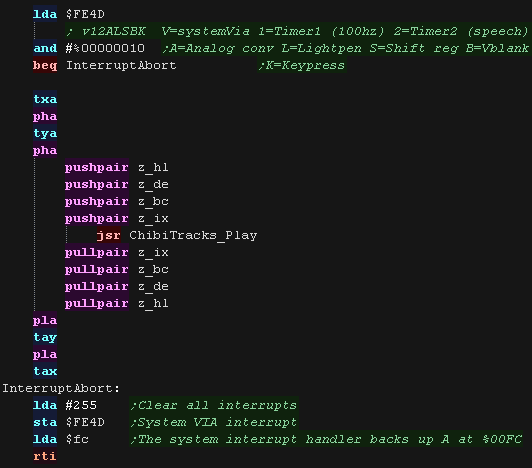
| First we need to check what caused the interrupt - we do this
with the register at $FE4D If bit 1=one then this is our VBLANK, and we need to update the sound. otherwise we just restore A from $00FC (the firmware backed it up) We also need to clear the interrupt, we do this by writing $255 to FE4D ChibiTracks uses the Zeropage entries z_hl,z_bc,z_de and z_ix,as well as X,Y and A |
 |
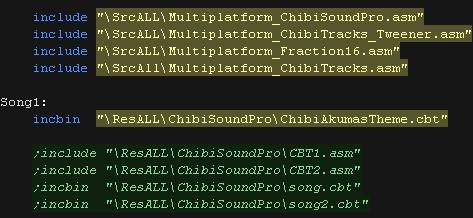
| To use ChibiTracks, we need to include the modules of the
music player, We also need the platform specific "Chibisound Pro" sound driver. We need to have a ChiBiTracks music file to play. |
 |
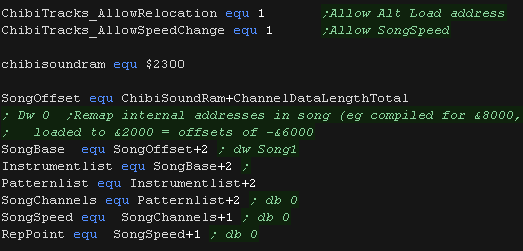
| We have two options 'Allow Speed change' allows us to change
the speed of our song. This is useful to keep the song playing
the same speed on 50hz and 60hz screens. NOTE: Whether this will
work effectively depends on if the speed was pre-multiplied on
export (faster playback, but stops this function working) AllowRelocation allows the binary to be loaded at any memory address, not just the one 'compiled' into the binary at export time - while disabling this will save a little speed/memory it's recommended you keep this enabled! |
 |
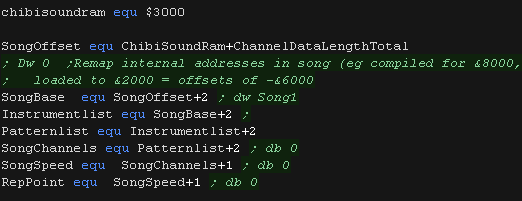
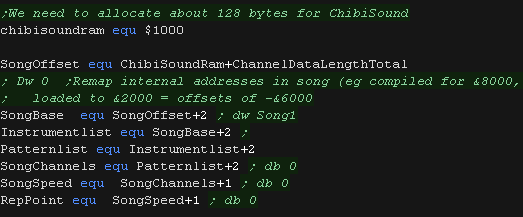
| We need to allocate up to 128 bytes of memory for
ChibiSoundPro, and ChibiTracks player. We define pointers to the ChibiTracks variables within this ram. |
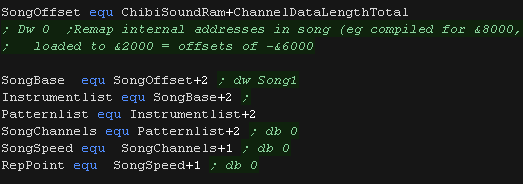 |
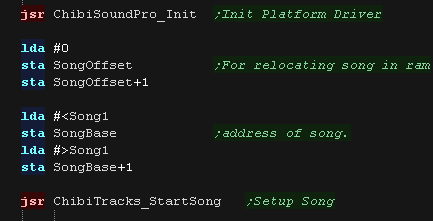
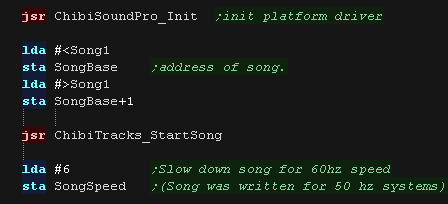
| Before we play anything we need to init the ChibiSoundPro
Driver. To start our song, we set SongBase to point to the music file we want to play, and call StartSong - we do this any time we want the music to change |
 |
| All that's left is to execute the PLAY routine to update the playing music. | |
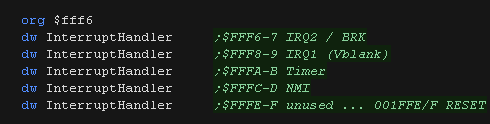
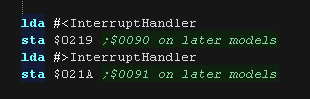
| We need to define a pointer to our Interrupt handler at
address $FFF8-9 in the logical address space (Visible to the
CPU). This handles IRQ1 - which is triggered by Vblank. |
 |
| We need to set the video hardware to generate Vblank, by setting bit 3 of video reg 5 |  |
| First we need to check what caused the interrupt - we do
this with the register at $1403 If bit 1=one then this is our VBLANK, and we need to update the sound. Otherwise we just clear whatever the interrupt was , by writing 255 to $1403 the Video interrupt can't be cleared like that, to clear the VBLANK we read from the VDC status at address $0100 ChibiTracks uses the Zeropage entries z_hl,z_bc,z_de and z_ix,as well as X,Y and A |
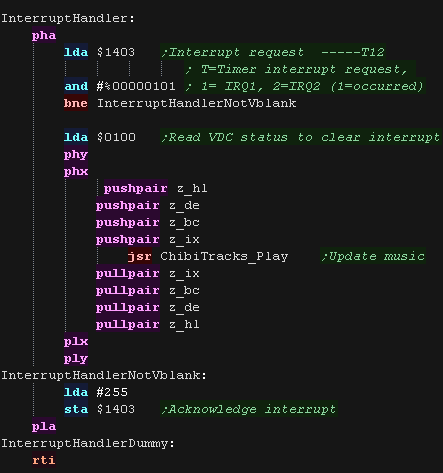 |
| To use ChibiTracks, we need to include the modules of the
music player, We also need the platform specific "Chibisound Pro" sound driver. We need to have a ChiBiTracks music file to play. |
|
| We have two options 'Allow Speed change' allows us to change
the speed of our song. This is useful to keep the song playing
the same speed on 50hz and 60hz screens. NOTE: Whether this
will work effectively depends on if the speed was
pre-multiplied on export (faster playback, but stops this
function working) AllowRelocation allows the binary to be loaded at any memory address, not just the one 'compiled' into the binary at export time - while disabling this will save a little speed/memory it's recommended you keep this enabled! |
|
| We need to allocate up to 128 bytes of memory for
ChibiSoundPro, and ChibiTracks player. We define pointers to the ChibiTracks variables within this ram. |
 |
| Before we play anything we need to init the ChibiSoundPro
Driver. To start our song, we set SongBase to point to the music file we want to play, and call StartSong - we do this any time we want the music to change Here we've slowed down the song a little, it was designed to play on 50 hz systems, not the 60hz of the PC Engine. |
 |
| All that's left is to execute the PLAY routine to update the playing music. | |
| The
Address of the interrupt vector in ram differs depending on
the ROM version! Here, in the code we're using the original ROM address $0219, but the later ones use $0090 |
|
The standard 6502 interrupt vectors from $FFFA+ are ROM, however these jump to vectors in low memory addresses. IRQ and BRK interrupts push A,X and Y onto the stack in that order.
Immediately after the pushes, the interrupt handler at the addresses below are executed.
Note: The vector addresses were different on the first generation 2001-8 machine.
| 2001-8 | Others | ||||
| From | To | From | To | Function | Registers Pushed |
| $0219
|
$021A | $0090 | $0091 | IRQ | A X Y |
| $021B | $021C | $0092 | $0093 | BRK | A X Y |
| None | None | $0094 | #0095 | NMI | |
| We need to load the address of Interrupt handler into
address $0219-A This handles various interrupts, including the Timer and Vblank! |
 |
| We don't actually need to do anything to enable the Vblank interrupt, but if we want to be certain it's on, we can do so by setting bit 0 of $E813 |  |
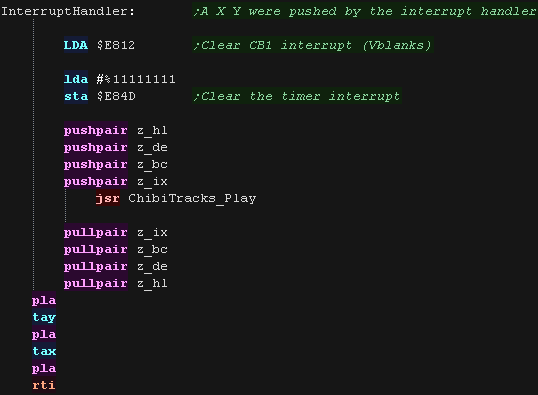
| First we need to check what caused the interrupt - we do
this by reading at $E812 The ROM interrupt handler pushed A,X and Y ... but we've taken over control, so we need to pop these in the correct order after we're done. NOTE: We also clear the timer interrupt, by writing 255 to $E84D - we don't actually need to do this if we're using the Vblank interrupt, but we'll use it in our second example next! ChibiTracks uses the Zeropage entries z_hl,z_bc,z_de and z_ix,as well as X,Y and A |
 |
| First we want to disable the VBLANK interrupt, we do this by
setting bit 0 to zero of $E813 Next we set the 16 bit speed value - $4000 is about the right speed, a lower number will speed up the music. We need to enable only the timer interrupt, interrupts are controlled by $E84E. The top bit 7 defines the action (1=enable 0=disable).. bits 0-6 apply that action to the interrupts. so writing %01111111 to $E84E disables all interrupts writing %11000000 enables the interrupt controlled by bit 6 - the timer interrupts We're not quite done though, to run the timer we need to set bit 6 of $E84B |
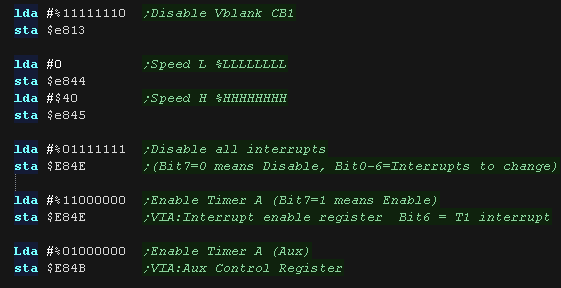 |
| The same address and interrupt is executed by the timer
interrupt. This time we actually want to clear the interrupts, we do this by writing 255 to $E84D Each 1 bit in the value written clears a different interrupt - writing 255 clears them all! |
|
| To use ChibiTracks, we need to include the modules of the
music player, We also need the platform specific "Chibisound Pro" sound driver. We need to have a ChiBiTracks music file to play. |
|
| We have two options 'Allow Speed change' allows us to change
the speed of our song. This is useful to keep the song playing
the same speed on 50hz and 60hz screens. NOTE: Whether this
will work effectively depends on if the speed was
pre-multiplied on export (faster playback, but stops this
function working) AllowRelocation allows the binary to be loaded at any memory address, not just the one 'compiled' into the binary at export time - while disabling this will save a little speed/memory it's recommended you keep this enabled! |
|
| We need to allocate up to 128 bytes of memory for
ChibiSoundPro, and ChibiTracks player. We define pointers to the ChibiTracks variables within this ram. |
 |
| Before we play anything we need to init the ChibiSoundPro
Driver. To start our song, we set SongBase to point to the music file we want to play, and call StartSong - we do this any time we want the music to change Here we've slowed down the song a little, it was designed to play on 50 hz systems, not the 60hz of the PC Engine. |
|
All that's left is to execute the PLAY routine to update the playing music. |
|
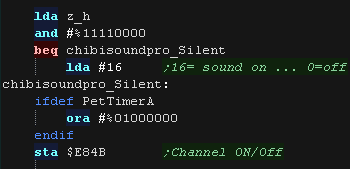
| If we're using the TimerA to time our song, we need to
ensure we keep int enabled. Making sound also requires writes to $E84B, so we have to patch in to set bit 6 if we want the timer to work. |
 |
| The SNES has
two interrupt vectors... which occurs depends on if the CPU
is in 6502 mode or 65816 mode! In these tutorials we use the CPU as a 6502, so it's that one which we need to use. |
 |
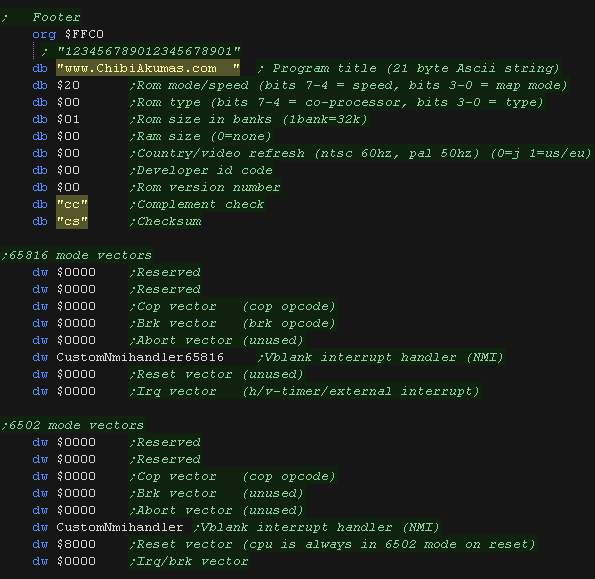
| Address | Bytes | Category | Purpose | Example |
| $FFE0 | 2 | 65816 Mode | $0000 | |
| $FFE2 | 2 | 65816 Mode | $0000 | |
| $FFE4 | 2 | 65816 Mode | COP Vector | $0000 |
| $FFE6 | 2 | 65816 Mode | Brk Vector | $0000 |
| $FFE8 | 2 | 65816 Mode | Abort Vector (Unused) | $0000 |
| $FFEA | 2 | 65816 Mode | NMI Vector (V-blank) | $0000 |
| $FFEC | 2 | 65816 Mode | Reset Vector (Unused) | $0000 |
| $FFEE | 2 | 65816 Mode | IRQ Vector (H/V/External) | $0000 |
| $FFF0 | 2 | 6502 Mode | $0000 | |
| $FFF2 | 2 | 6502 Mode | $0000 | |
| $FFF4 | 2 | 6502 Mode | COP Vector | $0000 |
| $FFF6 | 2 | 6502 Mode | BRK Vector (unused) | $0000 |
| $FFF8 | 2 | 6502 Mode | Abort Vector (Unused) | $0000 |
| $FFFA | 2 | 6502 Mode | NMI Vector (V-blank) | $0000 |
| $FFFC | 2 | 6502 Mode | Reset Vector (6502 Mode) | $8000 |
| $FFFE | 2 | 6502 Mode | IRQ/BRK Vector | $0000 |
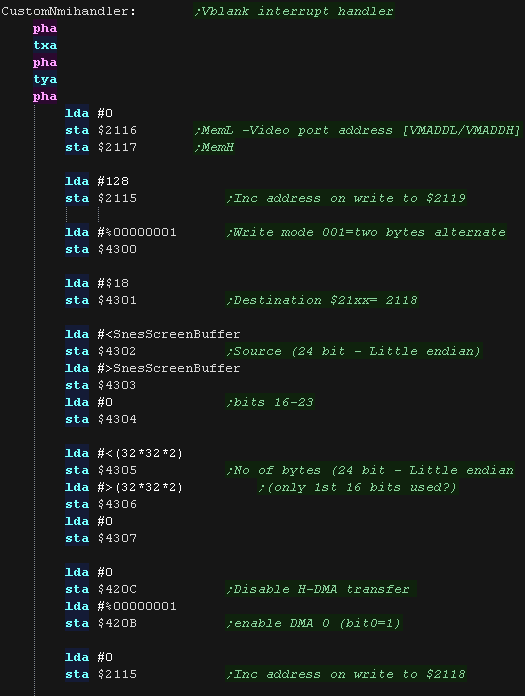
| We're going to define an interrupt handler called
'CustomNmihandler' We need to put this at address $FFFA-FFFB in the cartridge footer. for clarity we've defined CustomNmihandler65816 - but this isn't actually used by todays example. |
 |
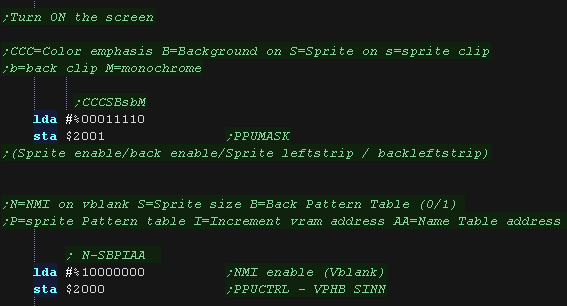
| We turn on the VBLANK NMI with bit 7 of port $4200 This causes the video hardware to cause interrupts which will execute our interrupt handler |
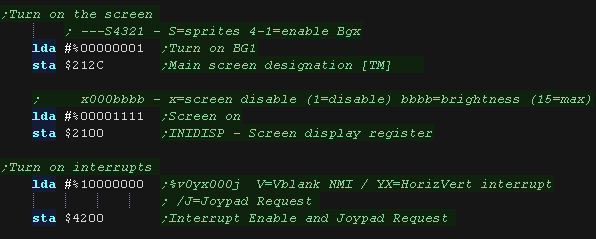 |
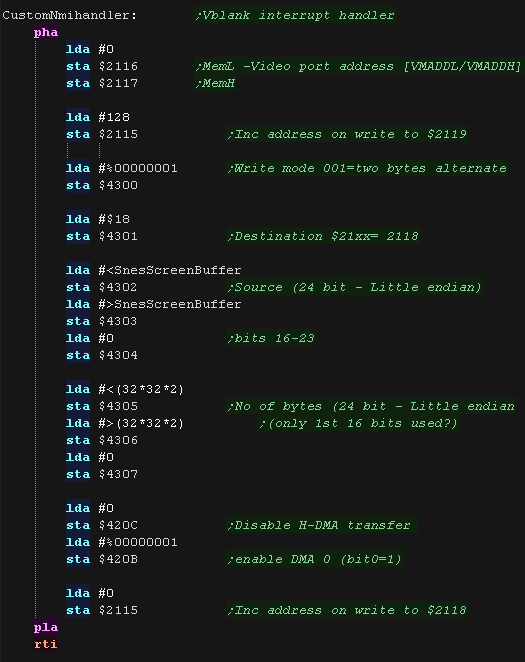
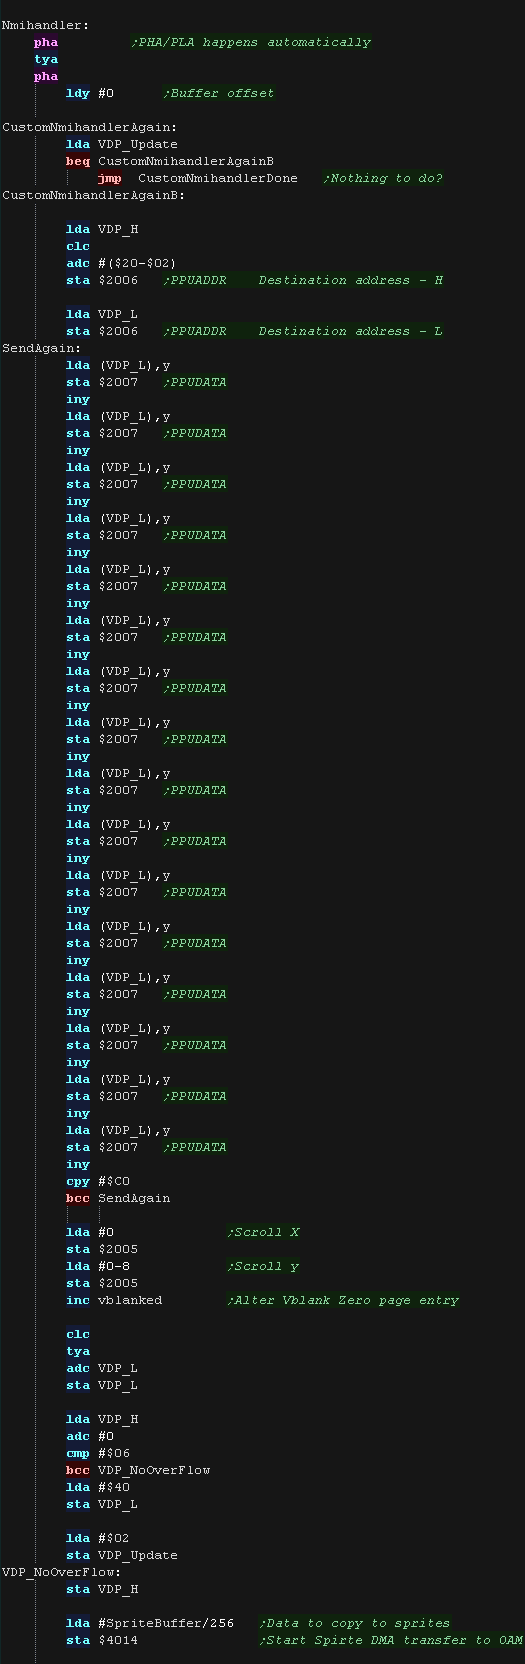
| Our graphics routines need to do some work
during VBLANK. As VBLANK time is limited, we do them before our music tasks. We transfer the screen buffer using a DMA transfer. |
 |
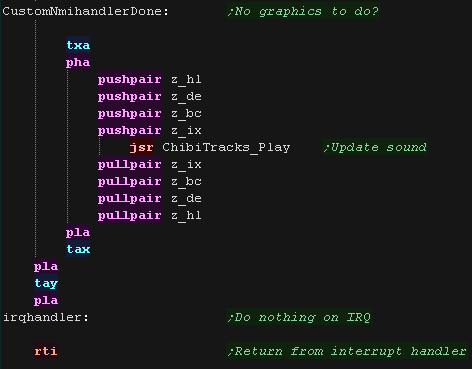
| Now the graphics jobs are done we update our music! ChibiTracks uses the Zeropage entries z_hl,z_bc,z_de and z_ix,as well as X,Y and A |
 |
| Just to confirm it's the 6502 version running, we've created
a dummy 65816 interrupt handler which does nothing. This isn't actually executed during our example. |
 |
| To use ChibiTracks, we need to include the modules of the
music player, We also need the platform specific "Chibisound Pro" sound driver. We need to have a ChiBiTracks music file to play. |
|
| We have two options 'Allow Speed change' allows us to change
the speed of our song. This is useful to keep the song playing
the same speed on 50hz and 60hz screens. NOTE: Whether this
will work effectively depends on if the speed was
pre-multiplied on export (faster playback, but stops this
function working) AllowRelocation allows the binary to be loaded at any memory address, not just the one 'compiled' into the binary at export time - while disabling this will save a little speed/memory it's recommended you keep this enabled! |
|
| We need to allocate up to 128 bytes of memory for
ChibiSoundPro, and ChibiTracks player. We define pointers to the ChibiTracks variables within this ram. |
 |
| Before we play anything we need to init the ChibiSoundPro
Driver. To start our song, we set SongBase to point to the music file we want to play, and call StartSong - we do this any time we want the music to change Here we've slowed down the song a little, it was designed to play on 50 hz systems, not the 60hz of the PC Engine. |
|
| All that's left is to execute the PLAY routine to update the playing music. | |
| The SNES has
two interrupt vectors... which occurs depends on if the
CPU is in 6502 mode or 65816 mode! In these tutorials we use the CPU as a 6502, so it's that one which we need to use. |
|
| We're going to define an interrupt handler called
'Nmihandler' We need to put this at address $FFFA-FFFB in the cartridge footer. |
 |
| We turn on the VBLANK NMI with bit 7 of port $2000 This causes the video hardware to cause interrupts which will execute our interrupt handler |
 |
| Our graphics routines need to do some work
during VBLANK. We need to transfer tile updates to Vram, and this must be done during vblank. As VBLANK time is limited, we do them before our music tasks, as it doesn't matter if our sound is updated while the screen is being drawn. |
 |
| Now the graphics jobs are done we update our music! ChibiTracks uses the Zeropage entries z_hl,z_bc,z_de and z_ix,as well as X,Y and A |
 |
| To use ChibiTracks, we need to include the modules of the
music player, We also need the platform specific "Chibisound Pro" sound driver. We need to have a ChiBiTracks music file to play. |
|
| We have two options 'Allow Speed change' allows us to
change the speed of our song. This is useful to keep the
song playing the same speed on 50hz and 60hz screens. NOTE:
Whether this will work effectively depends on if the speed
was pre-multiplied on export (faster playback, but stops
this function working) AllowRelocation allows the binary to be loaded at any memory address, not just the one 'compiled' into the binary at export time - while disabling this will save a little speed/memory it's recommended you keep this enabled! |
|
| We need to allocate up to 128 bytes of memory for
ChibiSoundPro, and ChibiTracks player. We define pointers to the ChibiTracks variables within this ram. |
|
| Before we play anything we need to init the ChibiSoundPro
Driver. To start our song, we set SongBase to point to the music file we want to play, and call StartSong - we do this any time we want the music to change Here we've slowed down the song a little, it was designed to play on 50 hz systems, not the 60hz of the PC Engine. |
|
| All that's left is to execute the PLAY routine to update the playing music. | |


