We'll be using VASM for our assembler, and MOT syntax, but
most other 68000 assemblers use the same formats... however coming from
Z80, they can be a little confusing, so lets make it clear which is which!
Some Registers can support special versions, for example
ADD... there are special versions for different cases!
if we use Q we can speed up our code, and X will be needed to use the
carry (though with 32 bit registers we probably won't need it!)
Technically we should use A and I when using Address registers, or
immediate values - but actually our assembler will do it for us!
Many (but not all) of the 68000 commands can work on different data sizes,
and working at smaller sizes will save us processing time... With commands
like Move we have up to 3 different options
We don't have a 24 bit option! which may seem strange considering on the
68000 our addresses are 24 bits, but that's the way it is... so we use L
for 32 bits with addresses... the later 68020 DID have a 32 bit address
bus!
in fact commands where the destination is an address register always
affect all 32 bits of the destination - and the source register is
extended if it's smaller.
When using B or W with data registers, the other 24 or 16 bits of the will
be left untouched... THEY PROBABLY ARE NOT ZERO - so beware if you use
more bits later!
There are also some special commands like INC and DEC called ADDQ and
SUBQ... these can add or subtract a value upto (and including) 8... and do
so as a 'single command' with no parameter when compiled to bytes
The 68000 has multiple addressing modes, to make things a bit
strange, modern notification has changed compared to the older one, lets
take a look!
Stack Pointers
technically, the 68000 has no unique 'SP' register... and no
Push Pop commands... but don't panic! A7 works as the stack
pointer... SP and A7 are the SAME REGISTER.... when you specify SP the
assembler will treat it as A7.
In fact we can use ANY address register a bit like a stack pointer...
though they will work differently when we move a Byte (A7 always moves
in word increments even when a byte is moved)... and we can't use
A0-A6 to remember subroutine calls caused by BSR/JSR/RTS
On the 68000 we have many clever functions, We can use the
Postincrement, and Predecrement commands to do our stack commands...
even better we can back up and restore MANY or ALL registers in one
go!... lets take a look!
| Action |
68000 command |
| PUSH D0 |
move.l a6,-(sp) |
| POP DO |
move.l (sp)+,d0 |
| PUSH EVERYTHING |
moveM.L d0-d7/a0-a7,-(sp) |
| PULL EVERYTHING |
moveM.L (sp)+,d0-d7/a0-a7 |
GCC wants to make our life hard with special formatting!
If you're working with code online, it may be in GCC forrmat,
which is really annoying, here's the MOT equivalent.
| GCC |
MOT |
Note |
| move.l %d1,-(%sp) |
MOVE.L D1,-(sp) |
All registers are preceeded by % |
| move.l %a1, %sp@- |
MOVE.L A1,-(SP) |
@ symbol denotes memory address like brackets in MOT |
| move.l %a0@(0x34), %d0 |
MOVE.L ($34,A0),D0 |
displacement specified in brackets |
| clr.l %a5@+ |
CLR.L (A5)+ |
Postincrement specified after address |
|
|
|
|
|
|
Code alignment
Because the 68000 is a 16 bit processor, commands need to be 16
bit aligned... you won't need to worry about this if you're only using
command code, but if you define byte data (like strings or bytes) you
need to ensure the next commands are word aligned, do this by putting
an
even
command in before your next code line.
Effective Addresses
Unlike the 8 bit systems, on our computer
systems like the (AtariST and Amiga), we can't be sure where our code
will actually end up running
lets take an example where we have a label (eg mystring):
mystring: dc.b "Hello World"
Rather than loading it's address with
MOVE.L
mystring,A0... we should use LEA mystring (load effective
address) or PEA mystring (push effective address... to stack) to get
the address...
On some systems, our
MOVE.L
mystring,A0 command may actually work - due to address
relocation (where the OS will alter the addresses in the code!)... but
on others it will not, and you'll be left wondering why your code is
malfunctioning! therefore, you should always use
PEA
and
LEA to be sure!
The need for SPEED!
Compared to 8 bit processor's, the 68000 is so fast you may not
need to worry about speed, but there are some things worth knowing,
Firstly, you'll notice there are no INC or DEC commands, but we don't
need to keep using the slow MOVE commands...
This job is done by the 'QUICK commands'... why are they Quick?...
because the 'parameter' is included in the command... so the whole
line compiles to a single word... just like INC and DEC on the 8 bits!
We also have a CLEAR command... not only can it wipe registers... it
can wipe memory addresses!
| Action |
68000 command |
RANGE |
| INC / DEC |
ADDQ.L #-1 , d0 |
-8 to +8 |
| LOAD |
MOVEQ.L # , d0 |
-128 to 127 |
| CLEAR (set to 0) |
CLR.L ($1000) |
does not work on address registers |
Compare command and branches
| Basic
command |
Comparison
|
6502
command |
Z80
equivalent |
68000
equivalent |
|
|
CMP Val2 |
CP Val2 |
CMP Val2,Val1 |
| if Val2>=Val1 then goto label |
>= |
BCS label |
JP NC,label |
BCC label |
| if Val2<Val1 then goto label |
< |
BCC label |
JP C,label |
BCS label |
| if Val2=Val1 then goto label |
= |
BEQ label |
JP Z,label |
BEQ label |
| if Val2<>Val1 then goto label |
<> |
BNE label |
JP NZ,label |
BNE label |
The 68000 has much more flexibility than the 6502 - though some
of it's commands are the same!...
When we're doing comparisons, the commands we use depend on whether
our data should be treated as signed or unsigned.
| CMP
D0,D1 |
Signed
|
Unsigned |
| D1
< D0 |
BLT |
BCS |
| D1
<= D0 |
BLE |
BLS |
| D1
= D0 |
BEQ |
BEQ |
| D1
<>
D0 |
BNE |
BNE |
| D1
> D0 |
BGT |
BHI |
| D1
>= D0 |
BGE |
BCC |
Lesson 1 - Getting started with 68000
68000 is far more powerful than the 8-bit systems... the
advantage is that it can do some things far more easily than
the 8-bits... but the disadvantage is it can be a bit more
tricky, and there are a few mistakes we can make!
Lets take a look at the power of 68000! |
 |
 |
|
 |
Vasm, Build scripts and Emulators
In these tutorials, we'll be
using VASM for our assembly, VASM is free, open source and
supports 6502, Z80 and 68000!
We will be testing on various 68000 systems, and you may need
to do extra steps (such as adding a header or checksum)... if
you download my DevTools, batch files are provided to create
the resulting files tested on the emulators used in these
tutorials.

Note: the Genesis and NeoGeo also have a Z80 processor for
sound... you may want to Learn
Z80 as well for those systems...
You can do some sound from the 68000 on the Genesis... but you
MUST use the Z80 for sound on the NeoGeo
|
My sources will use a symbolic definition to define the platform we're
buiilding for, if you use my batch files this will occur
automatically, but if you're using your own scripts, you need to
define this with an EQU statement.
Here's the platform, symbol I use, and emulators we'll be looking at!
| Platform |
Symbol Definition
Required |
Emulator used |
| Atari ST |
BuildAST equ 1 |
Steem |
| Commodore Amiga |
BuildAMI equ 1 |
FSUAE |
| Genesis
(megadrive) |
BuildGEN equ 1 |
Fusion |
| NeoGeo |
BuildNEO equ 1 |
MAME |
| Sharp X68000 |
BuildX68 equ 1 |
WinX68kHighSpeed |
For these tutorials, I have
provided a basic set of include files that will allow us to
look at the technicalities of each platform and just worry
about the workings of 68000 for now...
We will look at ALL of this code later, in the Platform
specific series... but we can't do that until we understand
68000 itself!
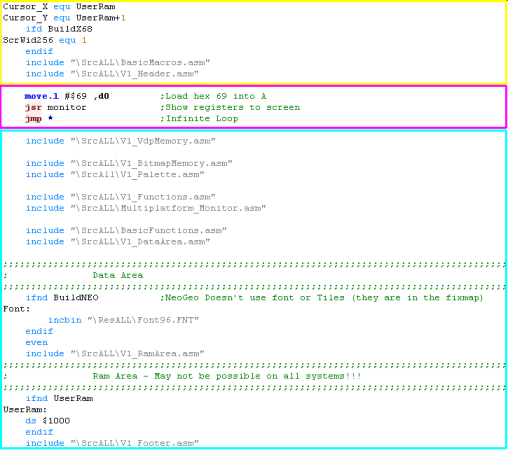
The example to the right is split into 3 parts:
The generic
header - this will set
up the system to a text screen
The program
- this is where we do our work
The generic
footer - The functions and resources needed for the
example to work
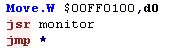
The example here will load HEX 69 as a 32 bit value into
register D0 - then it will show the monitor
It's important
to notice all the commands are inset by one tab...
otherwise the Assembler will interpret them as labels.
Also, Make
sure you do not put any spaces in between the parameters...
on
VASM 'move.l #$69,d0'
will compile fine....'move.l
#$69 ,d0' will NOT (notice the space after 69)... you
will get an 'instruction not supported on selected
architecture' error |
 |
The sample
scripts provided with these tutorials will allow us to just
look at the commands for the time being... we'll look at the
contents of the Header+Footer in another series...
Of course if you want to do everything yourself that's
cool... We're lerning the fundamentals of the 68000 - and
they will work on any system with that processor... but
you'll need to have some other kind of debugger/monitor or
other way to view the results of the commands if you're
going it alone!... Good luck! |
 |
Registers and Numbers
Compared to the 8 bits... The 68000 is a monster processor!
it has 8 data registers (for storing maths) and 8 Address
registers (for storing addresses for read and write)...
having 16 registers wouldn't be bad at all... but ALL these
are 100% 32 bit registers... if you're used to accumulators,
and one stack pointer - forget that!... all the Data registers
are equally functional... and all 8 Address registers can push
and pop data like a stack pointer (Don't worry if you don't
know what that means - we'll learn about stack pointers
later!)
The Data registers are named
D0-D7 - All are 32 bit -
you can use them in any way you want.
The Address registers are named
A0-A7 - All are 32 bit - even though the Address bus
on the 68000 is only 24 bit (meaning 16mb ram max)... Note:
the system uses A7 as the stack pointer...if you use 'SP' the
assembler will translate this to A7... so you probably only
want to use A0-A6
for your own use
Lets learn a command!... MOVE.L...
Move
is very powerful - it can move a 'fixed' value into a
register... move a value from memory into a register... or
from a register to memory... or even copy one register to
another!
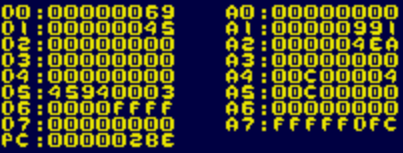
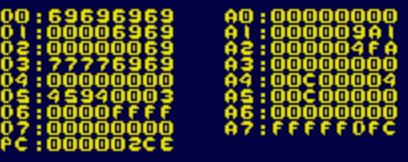
Take a look at the example to the right... we're going to load
D0, D1 and D2... but notice... we're going to load them in
different ways... D0 will be loaded with #$69... D1 will be
loaded with #69... and D2 will be loaded with 69... what will
the difference be?? |

OR:

|
Well here's the result... the values are shown in Hex...
so D0=69... because specifying #$69 tells the assembler
to use a HEX VALUE
but D1=45... this is because without the $ the assembler
used a Decimal value (45 hex = 69 decimal)
D2=0... why? well when we don't use a # the assembler gets the
memory address.... so we read from memory address decimal
000069!... of course we can do $69 or $0069 to read from
address hex 000069 too!
So #$xx
= hex value
.... #xx
= decimal
value.... and xx
means read
from address!
This is the same as the 6502 - but different to the Z80!...
Note - if you prefer, you can put addresses in brackets..in
VASM. move.l (69),d2
works the same as move.l
69,d2 |
 |
If you
forget the # you're code is going to malfunction - as the
assembler will use an address rather than a fixed value!
It's an easy mistake to make, and it'll mean your code won't
work... so make sure you ALWAYS put a # at the start of
fixed values!... or you WILL regret it!
68000 also lets you put brackets around an address like
Move.L ($FFFFFF),d0 |
 |
|
The 68000
can address 24bits of memory... so memory addresses can be
from $00000000 to $00FFFFFF...
the top two digits of the 32 bit register won't work!
Beware though! 68000 isn't like 8 bit - there's an operating
system handling the memory, and it may not like us 'Messing'
with memory our program shouldn't have - we'll learn about
this later! |
Here are all the 68000 Assembler ways of representing values, and how
they will be treated.
| Prefix |
Example |
Z80 equivalent
|
Meaning |
| # |
#16384 |
16384 |
Decimal Number |
| #% |
#%00001111 |
%00001111 |
Binary Number |
| #$ |
#$4000 |
&4000 |
Hexadecimal number |
| #' |
#'a |
'a' |
ascii value |
|
12345
or (12345) |
(16384) |
decimal memory address |
| $ |
$4000
or ($4000) |
(&4000) |
Hexadecimal memory address |
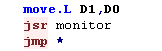
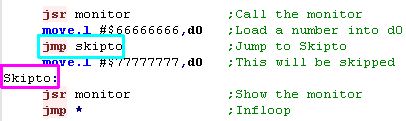
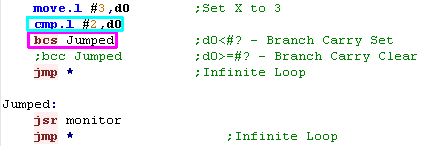
What's this JSR thing?... Jump to SubRoutine!
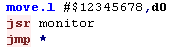
We've been using this JSR
command... but what does it do?
Well JSR jumps to a subroutine... in this case JSR monitor will run the
'monitor' debugging subroutine... when the subroutine is done,
the processor runs the next command
In this case that command is 'JMP *' which tricks the 68000
into an infinite loop!
JSR in 68000 is the
equivalent of GOSUB
in basic or CALL in
z80, it's identical to the 6502 JSR command!.... we'll look at
how to make our own subroutine in a later lesson! |
 |
 |
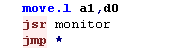
JMP is a
jump command ... and * is a special command that means 'the
current line' to the assembler... so 'JMP *' means jump to
this line...
This causes the 68000 to jump back to the start of the
line... so it ends up running the jump command forever!...
it's an easy way to stop the program for testing! |
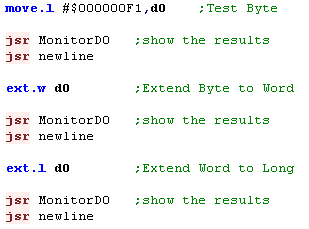
Bytes, Words and Long!
Despite being sold as 16 bit (because it has a 16 bit data bus -
meaning 16 'wires' coming out the cpu for data) Internally the 68000
is a 32 bit processor - all it's registers are 32 bit - that's not to
say it isn't faster to work at 8 bit... the 68000 can work in Bytes,
Words or Longwords!... lets take a look at what they mean!
| Size |
Letter |
Bits |
Range (decimal
integer) |
Range (hex) |
| Byte |
B |
8 |
0-255 |
$00-$FF |
| Word |
W |
16 |
0-65535 |
$0000-$FFFF |
| Long |
L |
32 |
0-4294967295 |
$00000000-$FFFFFFFF |
Did you notice that 'L' in the Move.L command we used before? did you
wonder what it meant!... well it meant LONG!... you see, whenver we
use a command, we can specify if we want to work in Bytes - Words or
Longs!... some commands can't do all the kinds (see the cheatsheet)...
but it will be fastest....
Note... it is
not possible to load a Word or Long from an ODD address...
we can do Move.W (68),d0 but we CANNOT do Move.W (69),d0...
of course we can do Move.B
(69),d0... Byte reading can be on an odd or even address...
It's worth noting that FUSION seems to ignore the invalid
command and make it work anyway. |
 |
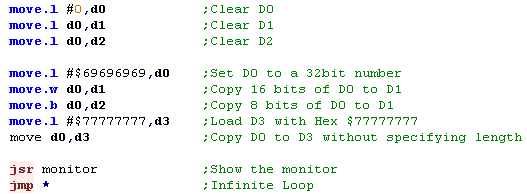
The Move command has 3
different options Move.B
to move 8 bits... Move.W
to move 16 bits... or Move.L
to move 32 bits
In this example we'll clear all 32 bits of registers D0-D2
Then we'll set all 32 bits of D0 using Move.L.... next we'll copy
16 bits to D1 with Move.W....
and we'll copy 8 bits to D2 using Move.B
Finally we'll copy to D3 without specifying B W or L... what
will happen? |
 |
Here's the result - of course we set all 32 bits of D0 to
$69696969
When we copied 16 bits to D1, the top 16 bits were still 0
(because of that original 32 bit MOVE of #0 to all the
registers)
When we copied 8 bits to D2, the top 24 bits were still 0
When we didn't specify any length with D3 - the assembler
assumed we were working at 16 bits... however I'd reccomend
for clarity that you always specify B W or L for your own
clarity... NOTE: Some commands ALWAYS work as L or B commands
- like LEA or SBCD... so do not assume anything! |
 |
VERY IMPORTANT!
When you copy a B or W from one register to another - the remaining
bits will be unchanged! this can cause problems... for example if you
do
Move.B #0,D1
Add.L D0,D1
You will not be able to rely on the value of D1.... why? because the
top 24 bits of D0 could have been
ANYTHING....
and you just added them to D1! - either you should have done Add.B -
or Cleared the top bits of D0
NOTE: There is no 24bit command - even though all our addresses are 24
bit - so we need to use Long commands (32 bit) for address registers!
The Many faces of Move... and why we probably don't need them!
(Except CLR!)
Technically, the move command is different depending on what
we do with it, for example if we're setting an address we
really should use MoveA... this is because the Move command
cannot set an Address register...
if we do Move.L $00111111,A0 it WILL work... even though it
shouldn't!.... why? because VASM is kind - it knows we should
have used MoveA - so it converts it for us... there is no
negative to this - we're not 'Technically' correct - but who
cares!
another is MoveQ.L - which only works with L (32 bit) this
will set a register to a value between -127 and 128... why use
it? well it's FAST!..... MoveQ will compile to 2 bytes
where as Move.L would take 6.... BUT VASM is kind again!
it will detect if you could have used the MoveQ.L command -
and convert your code to it automatically...
There is one similar command we may want to use... CLR.L D0.... this clears
(sets to 0) a register, and works with B, W or L... VASM will
NOT automatically convert MOVE.L #0,D0 to CLR.L D0... it
converts to MoveQ #0,D0 because MoveQ is faster. |
|
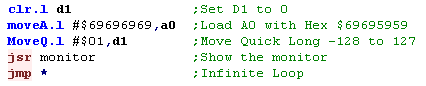
We've used CLR.L to clear D1... this compiles to a small 16
bit command.
You can see we used MoveA.L to load $69696969 into A0...
remember - while it's not 'technically correct'... we could
have just used Move.L
Next we used MoveQ.L to move $01 to D1... note we could have
used Move.L in THIS CASE... and VASM would have automatically
converted it to MoveQ... but remember, ther is no MoveQ.W or
MoveQ.B
|
 |
 |
If you're
confused by all this MoveA MoveQ and all this .B .W
and .L - Just forget it!
Just use Move.L for everything!!! - it may not be quite as
fast, but it will work, and the assembler will fix most of
the times you should have used something else! |
If you do not
want this kind of optimization to occur, you can use the
'-no-opt' switch in VASM
This will turn of the Optimisations Vasm would otherwise
perform, which you may need to do if you're doing self
modifying code!... though that's not something these
tutorials will cover. |
|
Adding and subtracting
The 68000 has an ADD and
SUB
command for adding and subtracting at 8, 16 or 32 bit with
Add.B, Add.W or Add.L
Like with Move, there are some 'Special versions' we should
use ... Like AddI and
SubI with a # number
(immediate number) or AddA
/ SubA for addreses -
but once again VASM will worry about that for us!
One more interesting one is ADDQ
and SUBQ...
these
allow the addition or subtraction of a value up to 8...
If you're familiar with Z80 - these are effectively our
inc
and dec
commands - they're super fast, and compile to 2 bytes (the
minimum for the 68000) - and we can inc or dec by up to 7 in
one go!... these work with Data Registers, and Address
Registers.... that said - the Assembler wil work out when we
could have used them if we don't! |
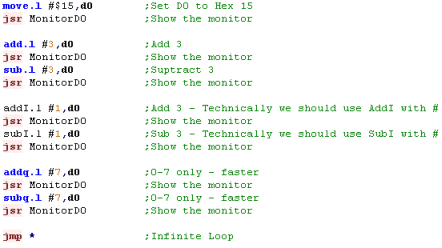 |
The commands will all work as
we expect, but note, We could have used Add and Sub in all of these cases, and it would
have worked just fine...
Just forget about AddI
and SubI... the
Assembler will do it for us... and don't worry too much about
AddQ and SubQ
if you don't understand them!
|
 |
Storing back to memory!
The 68000 is a bit different to
the 8 bits... usually there will be an 'Operating system'
doing memory management for us, and this may mean we
don't know where our program ends up running, or what RAM
we've been given for out variables...
Fortunately there is a simple solution... the LEA command will Load the
Effective Address of a 'label' - the result... we don't need
to worry about where the data really is!...
Labels always appear at the far left of the code - and mark a
'defined line' of the code... but don't worry too much about
'Labels' yet - we'll cover them in a later lesson
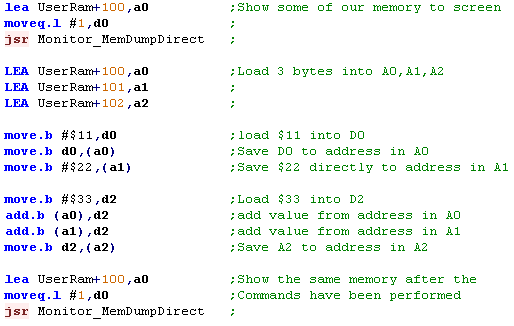
In this example 'UserRam' is a 'label' pointing to some RAM we
want to use - and store some data into that ram...
We'll use a function Monitor_MemDumpDirect
to show some bytes of RAM to the screen!
Note in this example we're working at the Byte level. |
 |
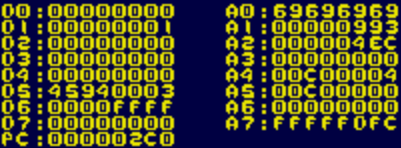
Here's the result of the
programm running... you can see the bytes $11, $22 and $66
were written... these are the two values stored at the
start... and then the result of these two added to the $33
loaded into D2
But Note: Depending on the system the program is compiled for
- and even the operating system and running drivers, the
address the program uses will change! |
 |
|
The 68000
is BIG ENDIAN... what's that mean... well... if you store
&1234 in addresses &0000 and &0001 then &12
will be stored in &0000, and &34 is stored in
&0001... Bytes are stored in descending order... BIG
numbers at the front END
What? that sounds perfectly logical? Well maybe! but it's
the opposite of the Z80 and 6502... not to mention the ARM
and PC processors... all of which do it the other way round! |
Don't
go
writing to areas you don't know about and expect it to
work... on the 68000 many areas will have nothing there
(unused areas)... or ROM - or hardware 'registers'...
If you write to one of those hardware registers something
strange could happen! |
|

Lesson 2 - Addressing Modes of the 68000
The 68000 has a wide variety of addressing modes - some
of which are quite complex... and of course, all the
registers are 32 bit - so we have a lot of flexability when
it comes to memory addressing
Lets look at all the addressing modes and try them out!
|
|
|
|
|
Prepearation...
Before we do anything in todays lesson, we need to prepare
some 'test data' in memory and a couple of the registers.
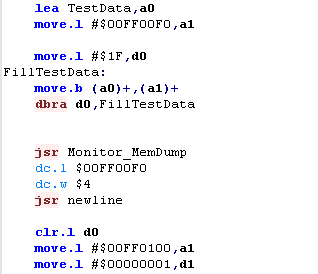
We're going to load a bank of 32 bytes into ram, and point the
A1 register at the middle of them... we're also going to set
D1 to 1, and clear D0 to start.
These examples are designed for the GENESIS / Megadrive -
because we're using a fixed memory address - they will not
work on other systems - however the concepts of the different
Addressing modes are universal, and will work on all 68000
systems. |
 |
Prepearation... the result...
| We've loaded a variety of test values into memory - and
we'll be using these with our indirect addressing modes |
 |
Usage with ASM commands
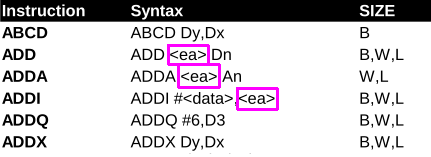
Lets's take a look at the cheatsheet
You'll see on various commands an <ea>
marker.... this means Effective Address
In most cases, whenver you see this, you can use any of the
Addressing modes we'll look at today.
|
 |
|
We're
going to try our all the addressing modes with READ
commands... but most of these commands also work with
WRITING - and in fact, a wide variety of commands! |
1. Immmediate Addressing
| Immediate addressing is where a
'fixed' value is used as a source... this means it will start
with a # Symbol |
 |
| In this example we've moved
#$12345678 directly into D0 - this is known as immediate
addressing! |
 |
2. Absolute Addressing
Absolute addressing is where we read from a 'fixed' memory
address... of course the address is specified WITHOUT a #
symbol
On a 68000 system, we need to be sure what we're doing, and
what will actually be at the address we're reading/writing
to... |
 |
In this example we've loaded a WORD (+16 bits - 2 bytes)
from memory address $FF0100 - the middle of our test data...
Note: the 68000 is BIG ENDIAN... this means D0 ends up with
the value $F0F1
(on a little endian system it would be $F1F0) |
 |
|
Note...
it's not possible to Read or Write a Word or Long to an ODD
address... so we could not do Move.W $00FF0101,d0
This is a limitation of the CPU - it can only work with
Words or Longs on even byte boundaries.
|
3. Data Register Direct Addressing
Data register direct is where the source is the value held
in a Data Register D0-D7
|
 |
| The Specified Data register
will be copied to the destination |
 |
4. Address Register Direct Addressing
Address register direct is where the source is the value
held in a Address Register A0-A7
|
 |
| The Specified Address register will be copied to the
destination |
 |
5. Address Register Indirect Addressing
Address Register indirect looks at the data held at the
address in the address register...
|
 |
In this example A1=$FF0100... so the result loaded into D0
will be read from address $FF0100
Note: The 68000 is BIG ENDIAN... so when a Word or Long is
read in the larger value byte in the word or long (in
this case F0) is loaded from the first address... and the
smaller from the second (in this case F1) |

 |
6. Address register Indirect Addressing with PostIncrement
Address Register with PostIncrement starts the same as
Address Register Indirect,
The data is read from the address in the Address Register...
however afterwards the address is incremented by the number of
bytes read...
For example if we read in a Word... then 2 will be added to
the address...
When used with
SP/A7 This is effectively the 68000 POP command
|
 |
In our example we're reading in a Word... we read in $F0F1 -
and 2 is added to A1.... if we had read in a Long, 4
bytes would have been added to A1
|
 |
| Because
A7 is the stack pointer it works differently to other
Address registers - if we write 1 byte to A7 with
Postincrement, it will actually move 2... this is because it
needs to stay byte aligned to work with Words and Longs |
|
7. Address register Indirect Addressing with PreDecrement
Address Register With Predecrement starts by decreasing the
specified address register with the amount to be read... then
it ends the same as Address Register Indirect - reading in the
amount to be read from the address in the address register
When used with
a WRITING command and SP/A7 This is effectively the 68000
PUSH command |
 |
In this case we're reading in a Word... so 2 is subtracted
from the address register - and then the data is read from the
address in the address register... if we were reading a Byte 1
would be subtracted...
This command is typically used with WRITING commands - and is
effectively the PUSH command for the 68000 |
 |
8. Address register indirect, with 16-bit displacement
This is another inderect addressing mode, however with a
'fixed' displacement - the data is read from the Address
register plus the offset - however the address register is
unchanged.
This is similar to (IY+n) on the Z80... it can also be used
for reading values pushed onto the stack |
 |
In this example a byte was read from A1+2.... Note A1 was
unchanged...
The displacement does not have to be positive - it can also be
negative. |

 |
9.Address register indirect with indexing and 8-bit displacement
This is the most advanced addressing mode available... the
address in the Address register is used PLUS the Data register
PLUS a fixed offset ... the value is read from the resulting
address...
If you want to do a command like (A0,D0) then use this
mode with a ZERO displacement - eg (0,A0,D0) |
 |
In this example D1=1 and our displacement is 2... the result
is we're reading in from A1+3
As before A1, and D1 are unchanged by this command |
 |
When
we specify MOVE (2,A1,D1),D0 then D1 will be treated as
a WORD register... So if D1=$00010001 it will actually be
treated as $0001
If we want to use the full Long, we need to specify the
whole of D0 we need to specif MOVE (2,A1,D1.L),D0
|
|
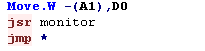
10.Program counter relative addressing with a 16-bit offset
The 'Program Counter' is the current position in the
program... this addressing mode allows for data to be read
from and address relative to the program counter... this is
useful for 'relocatable code'... where you don't know where
your program will actually end up running...
That said, it's possible you will never need this addressing
mode, so don't worry about it if you don't understand it!
Note: This
command can only be used for READING |
 |
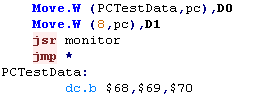
In this example we're going to load bytes $68 and $69 into
registers D0 and D1...
For D0 we're going to specify the offset as a number... for D1
we'll use the more reliable option of using a label. |
 |
|
It's
important to bear in mind that our assembler may well be
doing optimizations of our code, and we cannot predict how
many bytes each command will take, therefore it's better to
use a label to specify the offset in real word code than the
(8,pc) we used here in this example.
|
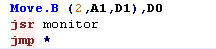
11.Program counter
relative addressing with an 8-bit offset plus an index register.
This 'Program Counter' Relative addressing mode is similar,
however it also allows for a Data register to be added to the
offset and the result read from the final address...
the Address and Data register are unchanged
Note: This
command can only be used for READING |
 |
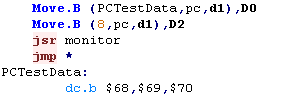
In this example we're going to load a byte from the 'Test
Data' adding the D1 register as an offset (D1=1)
The first time we'll do this using a label... the second using
a numerical value... either way the result is the same.
In the example we'll read a byte from the 'Test Data' - offset
by D1 (1)... the result is we'll load in byte $69 into D0 and
D2 |
 |
The PC
relative modes are something you can do without - they were
never used in Grime 68000
But you need to know about them as they're pretty powerful!
They save space, and allow for relocatable code... it's also
important to understand there are MORE addressing modes on
the later processors... but we're only covering the 68000 in
these tutorials |
|
Lesson 3 - Loops and Conditions
We've looked at quite a few topics, but we've still not
learned enough to really get started... this time, we'll
learn about Loops and Conditions - and a bit more about
Labels and Subroutines
|
|
|
|
|
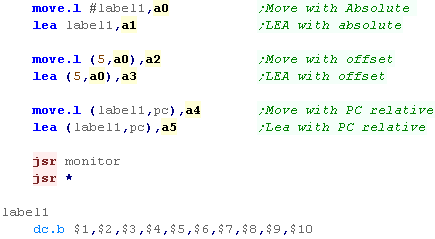
LEA - Load Effective Address
We mentioned LEA before, but we didn't discuss what it does...
LEA is like a special version of the Move command for Addresses
With Absolute addressing, it's the same as a move command,
However with commands like Program counter relative with offset - like
(Label,PC) - it will return the resulting address - where as a move
command would have returned the value in that address - whereas a move
would have returned the value.
This makes LEA good for making relocatable code which can work even
when it has been repositioned in memory... it also allows us to
save time if we're using the same complex address calculation - for
example (5,A0,D0) - many times... we can store the result in an
address register, and use that address register
It should be noted that VASM will convert MOVE commands like Move
$000011,A0 into a relative LEA command automatically wherever possible
as an optimization.
Below is a table showing different address modes - and how they work
with LEA and Move... we'll try the same commands in an example below
| Command |
Move #label,A1 |
LEA label,A1 |
|
Move (5,A0),A1 |
LEA (5,A0),A1 |
|
Move
(Label,PC) |
LEA (Label,PC) |
| Stage 1 |
Get address
of label |
Get address
of label |
|
Calculate
address A0+5 |
Calculate address
A0+5 |
|
Calculate
address of PC+-offset from label |
Calculate
address of PC+-offset from label |
| Stage 2 |
|
|
|
Get Value
from calculated address |
|
|
Get Value
from calculated address |
|
| Result A1= |
label |
label |
|
Value at (A0+5) |
Address of A0+5 |
|
value at calculated address |
resulting address from PC+-offset |
We're going to try each of the
addressing modes with the MOVE command, and then again with
the LEA command...
We have some test data at Label1, and we'll try using it's
address with various commands... |
 |
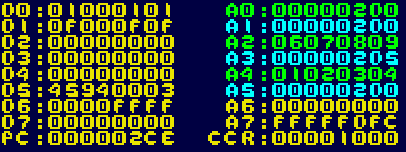
The results of the move
commands are all shown in Green,
the results of the LEA commands are shown in Cyan...
Note that in all cases except for Move
with #label, the result in the register is values from the
label - not the address we wanted....
With LEA
we have the effective address resulting from the command... |
 |
Some overlooked fundamentals - Labels and Symbols and subs
We've been rushing ahead to learn some commands, but we've
overlooked some real basics! Now Lrets fix that!
Labels are a 'Named' line in our compiled code...
Once we've used a label,
we can use it again later to Jump to it with a JMP, or use it as a
subprogram with JSR
|
 |
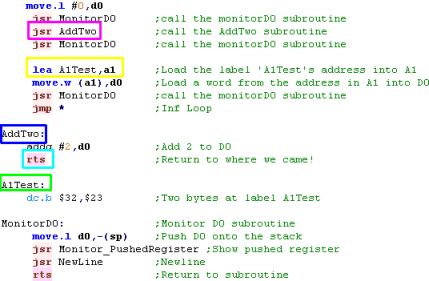
A subprogram called with JSR
is like a GOSUB in basic - it jumps to the named label runs some commands,
then returns back to the line after the JSR... the return
command in 68000 is RTS
We're going to call a simple subroutine called AddTwo, it adds 2 to D0,
then returns
- not much use, but you can see the subroutine worked between
the two calls to Monitor D0
we can also use labels
to mark data, and use that data with a LEA
command!.... effectively the Label name is converted to the
line number by the assembler |
 |
Jump and Branch... and why we don't need to worry!
The 68000 has two pairs of Commands, JMP and BRA for Jumping, and JSR
and BSR for calling a subroutine...
While the result is the same, In theory BRA/BSR will save some memory
- it saves the offset to the label - rather than the whole label -
saving a byte or two!... but VASM will optimize our code and do this
for us, so we can just ignore BRA and BSR if we want!
Defining Fixed values with Symbols
We can give named 'symbols' a value with the EQU command
We can then use that
named symbol later to get the same value... we can
use symbols to store fixed values or memory addresses...
Symbols are not memory, however... once we've defined them
they can never change, though we can use a symbol to define a
memory address!
|
 |
Comparing and Branching on conditions (Bcc)
Of course there will be many times we need to do things
depending on the value of a register...
We can do this with the CMP command... this compares a
register to another register, a register to an Immediate
value, or a register to a memory address - effectively all the
options we saw in Lesson 2
there are a wide variety of branch commands - they're often
known collectively as 'Bcc' - where cc will be a two letter
description of the command
These will 'Branch' (jump) to a label if the condition is
true...
in this example we're using BranchCarrySet - this effectively
checks if the value is Less than the register (for an
'usigned' register)...
The reason 'Carry is Set' is technical... it relates to the
'Carry flag' and the fact the 'CMP' command simulates a
subtraction... don't worry about it yet, we'll cover all this
later!
|
 |
Instead of BCS - there are a wide variety of other commands we can
use... when we do CMP D0,D1 we can use the following Bcc command
depending on the branch we want to do.
| CMP
D0,D1 |
Signed
|
Unsigned |
| D1
< D0 |
BLT |
BCS |
| D1
<= D0 |
BLE |
BLS |
| D1
= D0 |
BEQ |
BEQ |
| D1
<>
D0 |
BNE |
BNE |
| D1
> D0 |
BGT |
BHI |
| D1
>= D0 |
BGE |
BCC |
|
We
can Branch on a condition... but there's no BSR/JSR
equivalent on conditions... If we want to Call a Subroutine
on a condition being true, we need to SKIP a BSR command if
the condition is not true... or Jump, and jump back of
course! |
Be careful of B W L with Branch!
This time we're going to use the BEQ command - this will
branch if D0 is equal to the compared #0...
But Wait! It doesn't work!... can you spot why?
We set D0 to Zero at the Byte level with Move.B... but when we
did CMP we didn't specify a level... so it worked at the word
level! |
 |
if we change CMP to CMP.B - it will now work...
alternatively we could change MOVE.B #0,d0 to MOVE.W #0,D0...
The important thing is we compare at the same B/W/L level as
we set the register to #0 if we want the expected result.
This is very important, and you're likely to make the mistake
a lot! |
 |
DBRA - Decrement and BRAnch - for easy looping!
Often we may want to loop a certain number of times, running
a command 6 times for example...
We can do this easily with the DBRA command - it will decrease
a register, and jump to a label if it's not gone below zero
yet.
Note... DBRA works at the WORD level.. so we need to set d0 to
the count with a Move.W
This command is similar to DJNZ on the Z80, but it's important
to notice DJNZ on the Z80 stops AT zero... but DBRA stops when
it goes BELOW zero |
 |
Multiple conditions for a Case statement
It's important to understand
that ALL other languages convert to assembly... so anything
Basic or C++ can do can be done in ASM!
We can chain multiple branches together to create 'If Then
ElseIf' commands or even create 'Case' Statements in assembly,
just by chaining multiple branch commands together. |
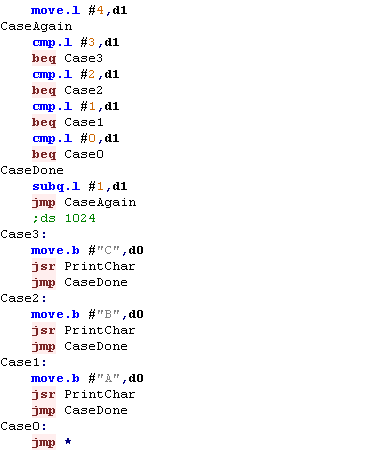 |
| The result is shown on screen |
 |
On
the 6502 branch commands can only jump 128 bytes away, but
the 68000 has no such limitation
We can enable the 'ds 1024' command in the axample above, to
add a bunch of space - and the branches will still work
fine! |
|
Lesson 4 - Stack, Traps, and Maths!
Now we know how to do conditions, jumping and the other
basics, it's time to look at some more advanced commands and
principles of Assembly..
Lets take a look!
|
|
|
|
|
Stacks for temporary storage
'Stacks' in assembly are like
an 'In tray' for temporary storage...
Imagine we have an In-Tray... we can put items in it, but only
ever take the top item off... we can store lots of paper - but
have to take it off in the same order we put it on!... this is
what a stack does!
If we want to temporarily store a register - we can put it's
value on the top of the stack... but we have to take them off
in the same order...
|
|
Push and Pop.... or -(sp) and (sp)+ as
they're known on the 68000
On the 68000 we use A7 - also known as SP as
our stack pointer - we use predecrement and postincrement to alter the
stack pointer
When we want to add a new item to the stack (PUSH) we use a command
like:
Move.W D0,-(SP)
When we want to take an item of the stack (POP) we use:
Move.W (SP)+,D0
We can Push Registers, or Immediate values, really anything
from the Addressing modes lesson last week!
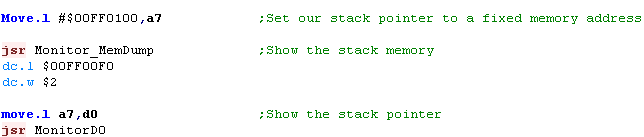
We're going to use a fake stack
at a fixed location - so we can easily see what's going on...
this example will work on the GENESIS... but as always, the
principles will work on all systems.
Remember A7 and SP are THE SAME THING...
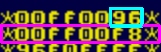
We can see the result... the stack pointer is set to $FF0100 -
and the preceding 16 bytes are shown to screen.... the current
Stack pointer is shown as a Magenta
Bar |

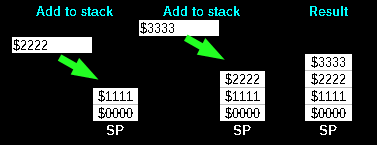
 |
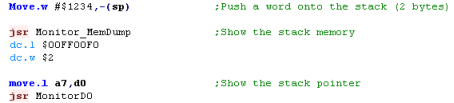
First lets push a word to the stack ($1234)... because
we pushed two bytes, the
Stack Pointer goes down by two to $FF00FE
You can see the two
bytes have been inserted into the stack memory
|

|
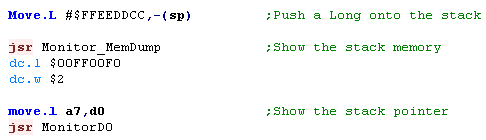
| This time we'll push a Long onto the stack... the
Stack pointer will
go down 4 bytes - which is what we'd expect! |
 |
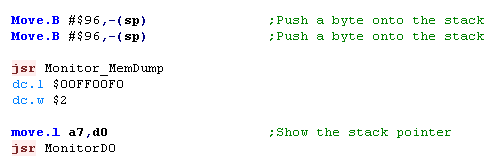
This time we'll push two
individual Bytes on the stack... what will happen?
well... we'd probably expect the stack to go down by 2... but
it actually
goes down by 4!
Why? well the stack needs to work with Bytes, Words and
Longs... and W/L can only be used on even memory addresses -
so when we push
a byte to a7- the value is padded
by 1 byte...
Note:
This does not happen with
Move.B #$96,-(A6)... A7/SP is a special case! |
 |
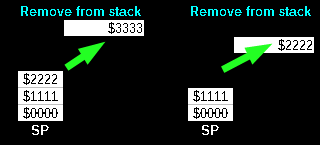
When it comes to removing from
the stack, the reverse happens,if we 'pop' off a byte,
the Stack
pointer goes up by two
the register will be set to the popped
off value |

 |
We don't 'have' to pop things
off the stack in the same way we pushed them on...
In this case, we've popped off a Long... and got the Word we pushed before, and half
another long!
The stack
pointer doesn't care what we do - but if you don't
know what you're doing your code may break |

 |
We'll pop off another Long....
Our Stack
pointer is back to it's starting value |

 |
The Stack and JSR
We can use the stack pointer to backup and
restore register values ... the processor uses it too, to handle
calling Subroutines!... lets take a look!
We're going to do a test
here... we'll show the stack to the screen...
Then we're going to use JSR to jump to subroutine
StackTest.... we'll show the stack again... and for reference,
we'll also see the address of 'ReturnPos'
Then we'll return to the main program and show the stack
again... what will happen? |
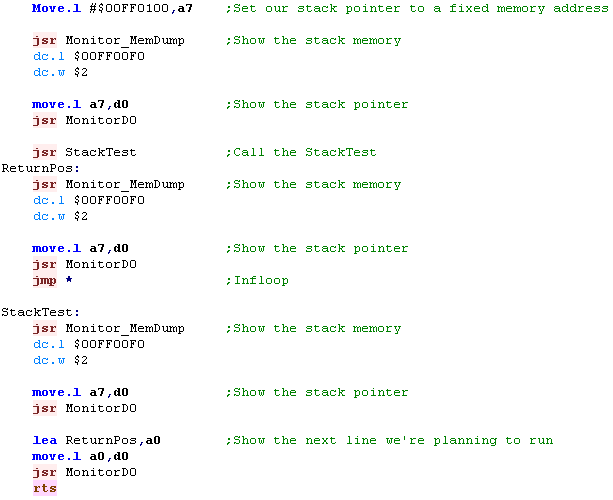 |
When we call the Subroutine...
the Return
address is pushed
onto the Stack, and the stack pointer decreases by 1 Long (4
bytes)
When we do a RTS - the address is Popped off the stack - we
can confirm this because the stack pointer has returned to it's original value...
For this reason, it's important to ensure that any changes we
make to the stack during a subroutine are undone before the
subroutine ends! |
 |
MoveM - Moving Multiple items onto the
stack!
There will be times we may want
to move multiple registers on to, or from the stack, we can do
this with MoveM!
we can specify a range of registers with a minus -
Lets try it out!
|
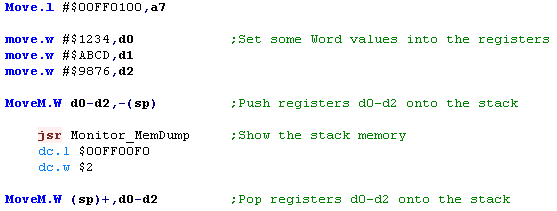 |
| In this example, D0, D1
and D2
are pushed onto the stack |
 |
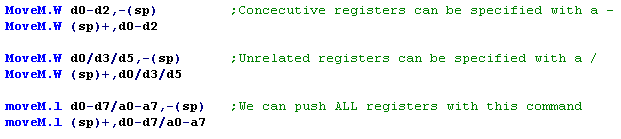
We can specify ranges of
registers with a minus -,
We can specify 'unrelated' registers with a slash /
We can even combine the two, and push ALL the registers onto
the stack, or pop them off |
 |
If
we pop with MoveM.W then the results will be sign extended -
if we pop $1234 then our register will contain $00001234...
but if we pop $ABCD then the result will be $FFFFABCD.
The normal Move.W (SP)+ command does not sign extend in this
way.
|
|
PEA
- LEA for the stack!
We learned before We can use
LEA to load the effective address of a label - which will work
reliably if our code is relocated by the operating system,
however there is another command.
There may be times when we want to push the address of a label
onto the stack, we can do this with a single command PEA |
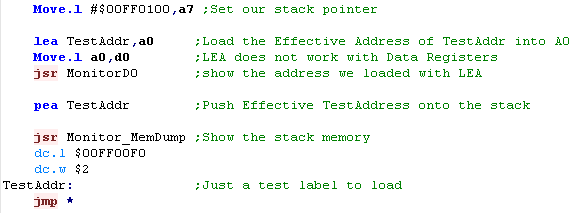 |
| We can see that the Address pushed on the stack
with PEA is the same as the one we got with LEA |
 |
|
We often
push the parameters a function will use onto the stack
before calling the function - so PEA may be useful for
pushing addresses straight onto the stack in this case! |
Maths
commands, NEG, DIVS, DIVU... MULS, MULU
Lets take a look at some more advanced maths commands!
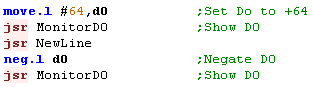
Neg
Neg converts a positive number to a negative one...
Negative numbers in Hex can be calculated by flipping all the
bits and adding 1... so $01 negated is $FF... and $02 negated
is $FE... this means a signed byte can go from -128 to
+127 |
 |
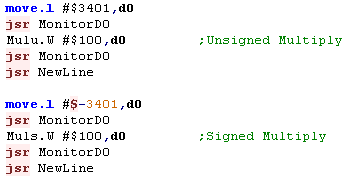
Mulu -
Muls
Unlike the 8 bits, the 68000 has multiply! we can give two
values - and Multiply them together!
MULU is for
MULtiplying Unsigned numbers
MULS is for
MULtiplying Signed numbers
|
 |
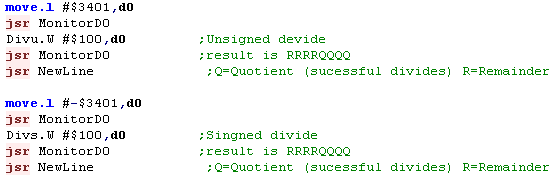
Divu - Divs
But why stop there? We even have a Divide command for
integer division!
The values returned are interesting, the returned long (4
bytes) are in the following format:
| Byte
1 |
Byte
2 |
Byte
3 |
Byte
4 |
| RR |
RR |
QQ |
QQ |
Q=Quotient
(Successful
divisions)
R=Remainder
If we Divide 301 by 10, we would have a Quotient of 30, and a
Remainder of 1
If we're using signed numbers, we need to use a different
commands...
MULU is for
MULtiplying Unsigned numbers
MULS is for
MULtiplying Signed numbers |
 |
|
Be careful
you don't divide by zero! anything divided by zero is
infinity - which is a mathematical impossibility and will
make the WHOLE WORLD EXPLODE!!!1
Well ok, that won't happen, but your computer will crash, so
don't do it, K?
|
It's a TRAP!
'Traps' in 68000 assembly are responsible for Error
handling, such as overflow within the processor... they are
numbered 0-15 and resemble RST's on the Z80...
While we are unlikely to want to 'Cause' errors on our
processor, some computers use them for operating system
calls... for example on the AtariST TRAP #13 is effectively a
bios call, and depending on your hardware, you may need to use
them - but what the will do will depend on that system
For now you just need to understand that TRAP #n is a system
call - and you'll need to research that system to work out
what it does.
|
 |
Lesson 5 - Bits and swaps!
We've looked at maths and comparison commands, but quite
often we'll need to do things at the BIT level...
fortunately the 68000 has an incredible range of commands to
do everything we could want,
Lets take a look!
|
|
|
|
|
AND, OR and EOR... and NOT!
There will be many times when we need to change some of the bits in a
register, we have a range of commands to do this!
AND will return a bit as 1 where the bits of both parameters are
1
OR will set a bit to 1 where the bit of either parameter is 1
EOR is nothing to do with donkeys... it means Exclusive OR... it will
invert the bits of parameter 2 with parameter 1 - it's called XOR on
the z80!
NOT is similar to EOR - it flips ALL the bits and doesn't take
an extra parameter
Effectively, when a bit is 1 - AND will keep it... OR will set it, and
EOR will invert it
A summary of each command can be seen below:
| Command |
Parameter 1 |
Parameter 2 |
Result |
| AND |
1
0
1
0 |
1
1
0
0 |
1
0
0
0 |
| OR |
1
0
1
0 |
1
1
0
0 |
1
1
1
0 |
| EOR |
1
0
1
0 |
1
1
0
0 |
0
1
1
0 |
| NOT |
1
0 |
|
0
1 |
| Command |
move.b #%10101010,d0
eor.b
#%11110000,d0
|
move.b #%10101010,d0
and.b
#%11110000,d0 |
move.b #%10101010,d0
or.b
#%11110000,d0
|
move.b #%10101010,d0
not.b d0 |
| Result |
#%01011010 |
#%10100000 |
#%11111010 |
#%01010101 |
| Meaning |
Invert the bits where the
mask bits are 1 |
return 1 where both bits are1 |
Return 1 when either bit is 1 |
Invert all the bits |
In the Z80 tutorials, we saw a visual representation of how these
commands changed the bits - it may help you understand each command.
| Sample |
EOR %11110000
Invert Bits that are 1 |
AND %11110000
Keep Bits that are 1 |
OR %11110000
Set Bits that are 1 |
 |
 |
 |
 |
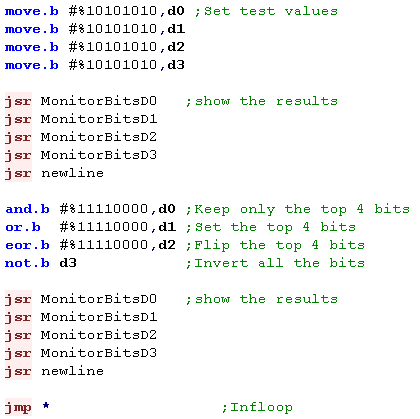
Lets try these commands on
the 68000!
We'll use the commands at the byte level for simplicity, and
try each of the commands on a different register.... however
these commands also work at the Word or Long level.
|
 |
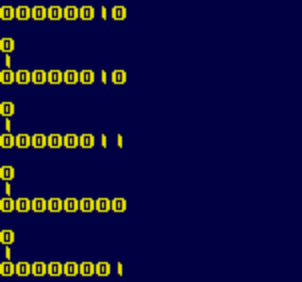
| The bits of each register will be set according to the
logical command. |
 |
As with many commands on the 68000 - Technically we should use a
special version of the command when using an immediate value, however
actually the assembler does the work for us!
| Normal command |
Immediate command |
| And |
AndI |
| Or |
OrI |
| Eor |
EorI |
Testing and changing single bits with BTST,BSET,BCLR
and BCHG
There will be many times we want to test a bit of a register - we
could do this with AND commands, but there are more powerful commands.
we can specify a bit number, and a register and test that bit... the
Zero flag will be set if the bit was ZERO - or cleared if the bit was
ONE
This would effectively be the same as the 'bit' command on the Z80,
but on the 68000 we can change the bit at the same time!
| Command |
Meaning |
Bit Before |
Bit After |
| BTST |
TeST a Bit - bit unchanged |
1
0 |
1
0
|
| BSET |
test a Bit - and SET |
1
0 |
1
1 |
| BCLR |
test a Bit - and CLeaR |
1
0 |
0
0 |
| BCHG |
test a Bit - and CHanGe |
1
0 |
0
1 |
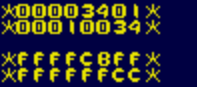
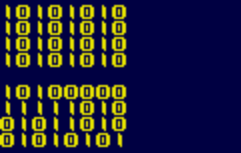
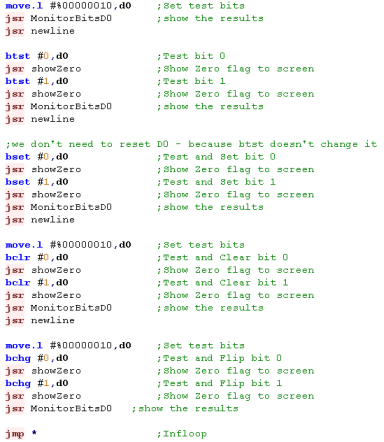
Lets try out all these
commands... we'll set the bottom two bits of D0 to 1 and 0 ...
and we'll try each command out on these bits.
We'll show the contents of the ZeroFlag with a function called
ShowZero, and we'll show the results of each command on D0 |
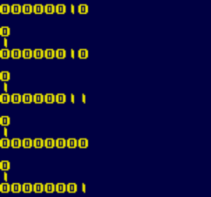
 |
The BTST command does not
change the bits... all the other commands had the same effect
on the Zero flag
BSET set both bits to 1
BLCR cleared both bits to 0
BCHG changed both bits to the opposite of what they were |
 |
|
We're
using a fixed Immediate value in the examples... but
commands like btst d1,d0 are valid too!
Remember, the 68000 has LOTS of different possibilities, so
check the Cheatsheet,
or the 68000
documentation for all the details |
Rotating and shifting bits with ROL,ROR, LSL and LSR
There will be many times when we want to shift bits around... If we
shift all the bits in a byte left, we'll effectively double the number
- if we shift them right, we'll halve it
We may want to use 3 bits from the middle of a byte or word as a
'lookup' - and we'll need to get them in the right position...
You may not immediately see the need for bit shifting - but as you
program, you'll come across many times you need to do it...
The 68000 has a variety of commands - this time we'll look at ROtating
and Logical Shift commands...
Rotating is where we move the bits left or right, and any bit that
goes off the top or bottom of the byte (or word/long) will come back
on the other side of the byte... so if we rotate a byte 8 times, we'll
end up with what we started!
Logically Shifting is where we move the bits left or right, and any
bits that go off the top or bottom are lost - bits that are 'added'
are always 0... we can use this command for halving or doubling an
unsigned number.... if we Logically shift a byte 8 times, we'll end up
with 0!
We can Rotate or Logically shift Left or Right... there are two other
commands... Arithmetic Shift, and ROtate with EXtend - we'll cover
these next lesson!
| Command |
Left |
Right |
| ROtate |
ROL |
ROR |
| ROtate with
eXtend |
ROXL |
ROXR |
| Logical Shift |
LSL |
LSR |
| Arithmetic Shift |
ASL |
ASR |
Lets try out the ROtate and
Logical Shift commands!
We'll set some bits, and rotate things around, and see the
difference between the results! |
 |
We can see the difference
between the rotate and shift commands....
as bits are Rotated they come back, when they are Shifted they
don't!
Pretty obvious by the name of the commands really! |
 |
|
Don't
forget -There are two other pairs of shift commands -
ROXL/ROXR and ASL/ASR... but we've already covered a lot of
ground here - we'll have a look at those next lesson! |
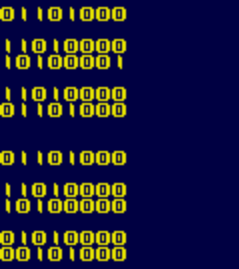
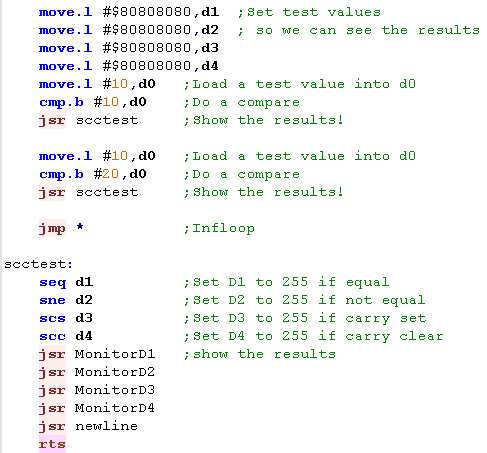
Scc - Set on condition
There will be times we'll want
to do things based on a condition, and unlike on the 8 bit's,
with the 68000 we can set a byte of a register based on a
condition!
If the condition is true - the register will be set to $FF
(255 is considered to be true on the 68k)
If the condition is false - the register will be set to $00 (0
is considered to be false on the 68k)
the 'cc' part of Scc is an abbreviation - we can replace that
cc with any condition code, so like BEQ and BNE we can use SEQ
and SNE to set if EQual or Not Equal
|
 |
| The command only sets the
register at the BYTE level, and can only set $FF or $00 - but
you can use AND and OR commands to alter the values. |
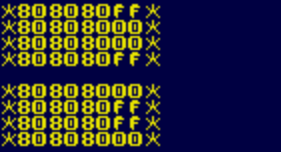 |
SWAP and EXG - For exchanging registers and words!
There will be times we want to move data around
registers... it may be useful to swap two registers without using any
temporary registers or the stack, and we can do this with EXG...
also we may want to swap the top and bottom two parts of a Long... and
the SWAP command will do this for us - this may be useful for DIVide
commands - remember - they return the Remainer in one part of the
long, and the Quotient in the other
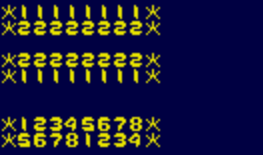
| Let's test the EXG and SWAP
commands with some sample values. |
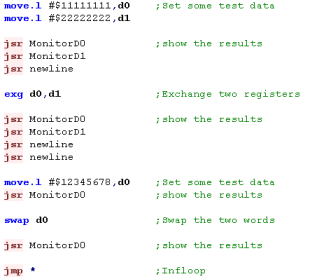 |
We can see in the first example
the registers were swapped...
in the second, we swapped the top and bottom word of the
register. |
 |
Rather
than EXG, We could use the stack to exchange registers...
but that would be slower - EXG is fast!
Also, we could swap parts of a register with Rotate or shift
commands - but again SWAP is more powerful! |
|
Lesson 6 - More Bits... Extends and Macros
We covered bits last time, but the 68000 has so many
commands, there's still more to do!
The main thing we need to cover is the eXtend flag (X) !
|
|
|
|
The Extend flag (X) the CCR and the SR
The 68000 cpu is a bit odd in that it has an eXtend flag and a Carry
flag... in most cases they will have the same value - but the commands
use the eXtend bit and are ADDX not ADC...so we'll refer to the
commands as using the Extend flag, not the carry flag.
That said, the purpose of the Extend flag X is basically the same as
the carry on the Z80 or 6502, it contains bits 'pushed' out of a
register by an overflowing command with ADDX, or a rotation
command with ROXL
In the 68000 cpu, the flags are held in and 8 bit register called the
Condition Code Register (CCR)... the CCR is part of the 16 bit Status
Register (SR).... because of the CPU protection, we can't normally
change the SR, but we can read it at any time... we can however set
the bits of the CCR - and we need to do this to set or the eXtend and
Zero flag.
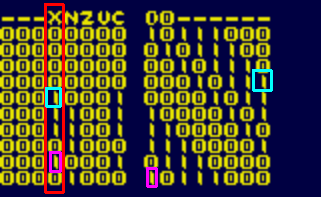
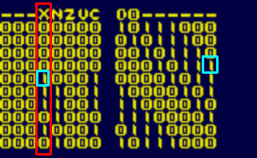
The SR / CCR bits
Here are the content and meaning of the CCR /SR Bits
| F |
E |
D |
C |
B |
A |
9 |
8 |
|
7 |
6 |
5 |
4 |
3 |
2 |
1 |
0 |
| T |
- |
S |
- |
- |
I |
I |
I |
|
- |
- |
- |
X |
N |
Z |
V |
C |
T-S--III ---XNZVC
| Flag |
Name |
Meaning |
| T |
Trace bit |
1 if tracing |
| S |
Supervisor |
1 if in supervisor mode |
| I |
Interrupt |
interrupt level (0-7) |
| X |
eXtend |
1 if value of the C-bit is 1 |
| N |
Negative |
1 if topmost bit of result is 1 |
| Z |
Zero |
1 if result equals zero |
| V |
Overflow |
1 if arithmetic overflow occurred |
| C |
Carry |
1 if the last operation resulted in a Carry/borrow |
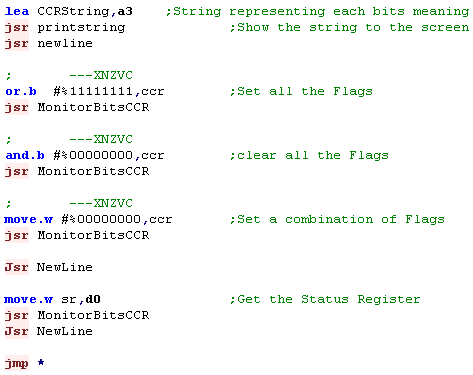
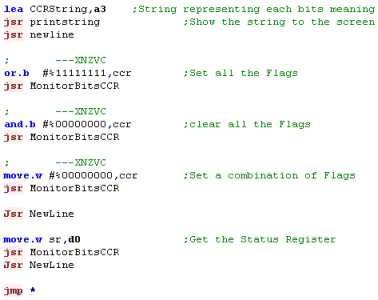
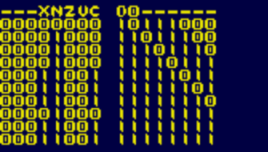
Setting and Getting the CCR
When it comes to setting the
CCR, we have three options, AND to clear values , OR to set
values, and MOVE to move a combination of bits to the
ccr...
We can use these commands to make any changes to the CCR we
require...
If we want to get the current state of the CCR, we cannot move
the CCR to a register - however we can move the SR to a
register - and the bottom byte of the SR *is* the CCR |
 |
The OR command can be used to set bits -we've set them all
to 1... note the top 3 bits didn't do anything!
The AND command can be used to clear bits
The MOVE command can be used to set all the flags to any set
of bits
If we want to get the contents of the CCR, we can use the Move
command to move the SR to a register - the bottom byte will be
the CCR |
 |
|
We can
only write to the Status Register in Supervisor mode - and
that may not be possible on all systems....
It doesn't matter, as it's probably not something you'll
need anyway - so don't worry about it!
|
We can use
MOVE SR,Dn to get the CCR on the 68000 - however this
command was REMOVED on later versions of the processor... on
those systems we have to use MOVE CCR,Dn ... which doesn't
exist on the original 68000!
It's about the only time when the 68010 was not backwards
compatible with the original commands
|
|
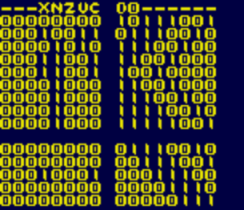
Rotating bits with extend
We've learned how to use ROL
and ROR to move bits around a register, but sometimes we
may want to move them out of, or into a register - and we do
that via the extend bit with ROXL and ROXR
|
 |
When we rotate to the right
with ROXR, the extend bit is pushed into Bit 7, and Bit Zero
is pushed out into the extend bit ...
This can be done with Words and Longs too... and we can shift
by more than 1 bit if we want with ROXR #2 or ROXR #n
And of course we can rotate Left with ROXL as well! |
 |
| If we set the X flag to 1
before the rotate we can fill the new bits with 1's |
 |
| As all the new bits are now 1,
the byte will eventually be filled with 1s |
 |
|
You
can
use ROXL or ROXR with numbers of bits more than one, the
eXchange flag will contain the final bit - this can be
useful if you've (for example) read in a byte from a
hardware device, and need a single status flag from the
middle of the byte. |
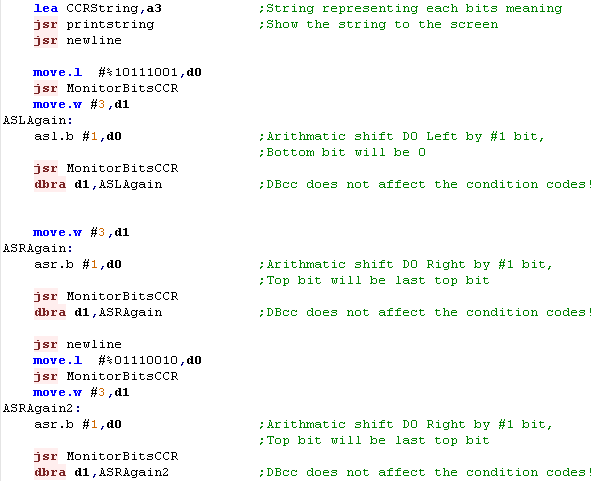
Arithmetic shifting with ASL and ASR
Arithmetic shift Left and Right
store bits that are pushed out of the byte into the eXtend
flag, but they do not fill extra bits with eXtend
ASL fills extra bits with 0,
ASR fills extra bits with the last top bit - this is so that
ASRing a negative number will STAY negative.
|
 |
| You can see the results of
these commands here! |
 |
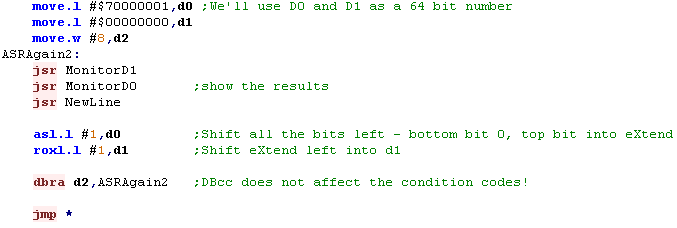
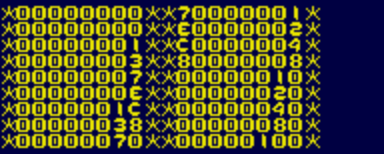
| By combining ASL and ROXL we
can use 2x 32 bit registers to effectively double 1x
64 bit value! |
 |
| We can see the result here! |
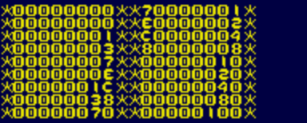 |
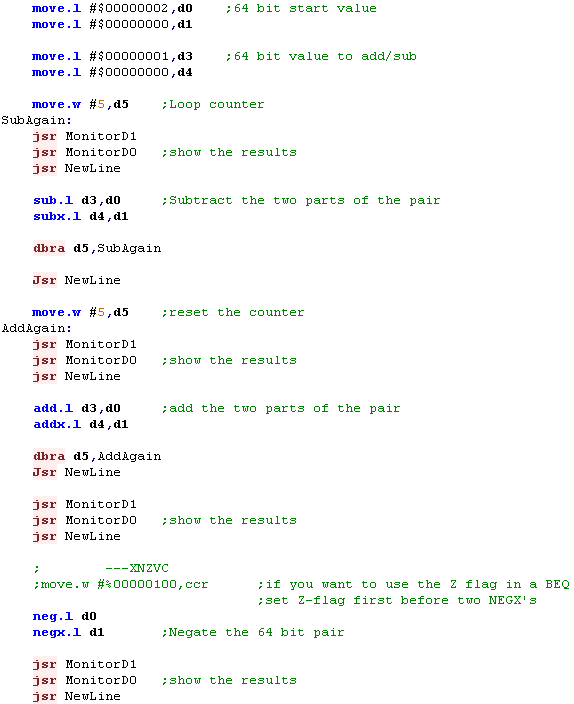
SUBX, ADDX and NEGX!
We can work on 64 bit or
greater numbers by using SUBX, ADDX and NEGX - these use the
eXtend bit to allow carry from each command to flow into the
next register
We'll use D0 and D1 and a 64 bit pair - and repeatedly Add and
Subtract 1 from the pair... we'll show the pair to screen each
time to see how they roll over as the pair go below Zero
The NEGX command will invert multiple registers...
One odd thing... if we do NEGX both times, the Z flag is not
set - so if we want to do a compare after the commands, we
need to set the flag manually before we start. |
 |
| The results can be seen here...
any 'carry' or 'borrow' from D0 will pass through to D1 |
 |
|
The
formula for negating a number is 'flip the bits and add
one'... for this reason, we can't just use NEG on both DO
and D1 - as one would be subtracted from both, not just
the lowest one
|
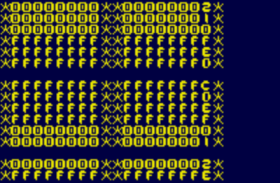
EXT - Sign Extending Byte to Word... or Word to Long
The EXT command 'Sign Extends'
a register - effectively the top bit is expanded to fill the
register - this means a negative byte is converted to a
negative word, or a negative word is converted to a long
|
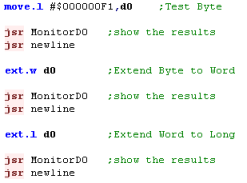 |
The result with a negative
number is the sign is extended...
With a positive number there is no appararent effect. |
Negative:

Positive:

|
NOP - Doing nothing.... and Macros for saving typing!
the NOP command does nothing -
it's mainly used for 'self modifying code' where code is
changed while it's running... but it can be used as a crude
way to slow things down.
Because the 68000 is so fast... NOP doesn't slow things down
much... so it's not really a good idea in practace!
Using the assembler we can create something called a 'macro' -
we can create a set of commands and give them a name - when we
use that name later, the assembler will replace the name with
the lines of code - note this is not the same as a call...
We'll use a macro here to create an EightNoOps command to slow
things down more
|
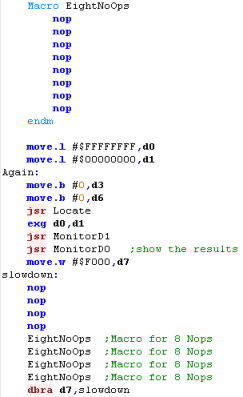 |
| This example will swap the two registers - if we remove some
of the NOPS it will speed up |

 |
Conditional compilation
There may be times you want to compile two versions of a
program with parts of the program different...
One option would be to use branches and conditions - but this
adds size to the binary and slows down the program.
Another option is conditional compilation - we can define a
symbol with EQU - and use IFD, and ENDIF to define a
range of code that will ONLY compile if the symbol is
defined... and ELSE or IFND
This allows us to compile two versions of the code depending
on if the symbol is defined or not. |
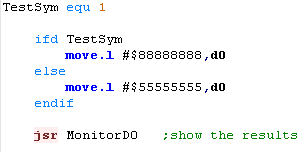 |
The results of the program will be different depending on if
the symbol is defined... |
with Testsym defined

with Testsym not defined:
 |
Remember
- code excluded by the condition DOES NOT EXIST in the
resulting file...
These IFD are how the example code is able to compile for so
many systems - different modules are compiled in and out
depending on the platform we develop to...
Symbols can be defined on the VASM command line - so
different batch files can compile different versions of your
program |
|