

Y-Quest!
Introduction to the Y-Quest
Series...
Y-Quest is a small remake of the dos game 'X-Quest'...
This was originally written as part of my Livestream series, and is now
being ported to other platforms
The Y-Quest code was bases on the simple
series, It's free and open source, so you can use it however you
wish
In this series, we'll look at the basic
codebase, and the platform specific modifications for each platform
Y-Quest!
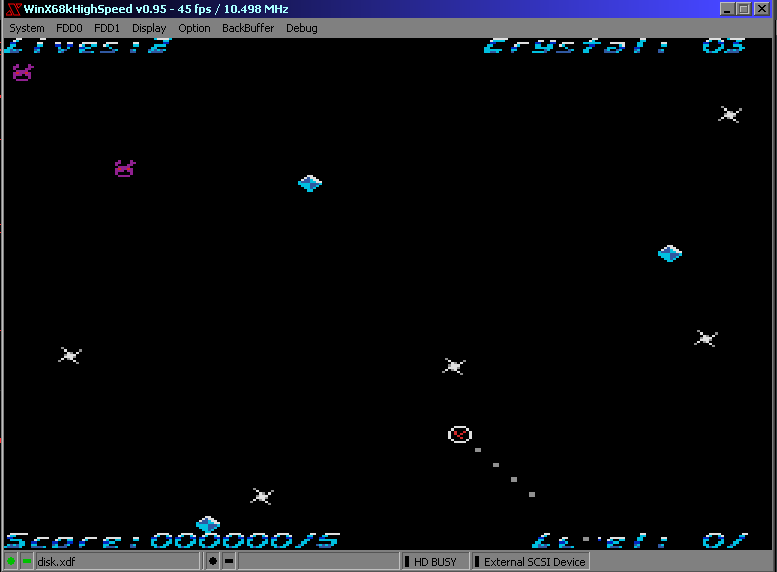
| Y-Quest is an Action-Puzzle game... to complete each stage you
need to collect all the 'crystals' onscreen, by navigating your
'Y' Icon around the screen. The original X-quest was controlled by mouse, however this version is joystick controlled. Unlike the original, the edges of the play area do not kill you. Change acceleration with the joystick / keys UDLR... You can shoot with the firebutton ... if you have a second fire you can immediately stop with it. There are 16 levels, after which the levels will repeat. |
|
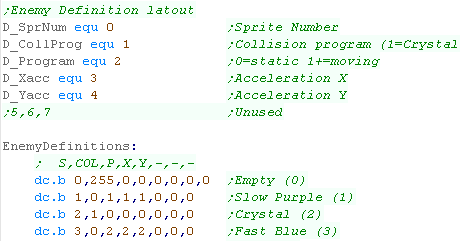
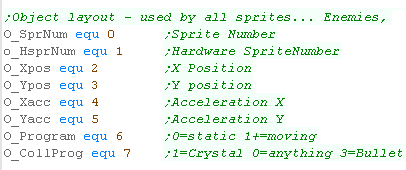
Ram Definitions
| All Sprite Objects uses the same 8 byte definition.. The Sprite Number defines the graphic image of the sprite from the sprite data bank... this is a single byte, and the address is calculated by multiplying the sprite number by the size of an 8x8 sprite Xpos and Ypos are the screen position of the sprite. Xacc and Yacc are the Acceleration of the sprite (how fast it moves in each direction Program is the logic routine that handles movement - this is used by enemies that change direction and fire. Collision program is the logic routine that handles collision - this defines enemies, crystals, bullets etc and how they affect the player... a value of 255 is an unused object... 254 is a dead object which will later respawn |
 |
| The Ram is defined as offsets from the 'UserRam' Definition -
this is to allow the code to work consistently on ROM based
systems. All values will be zeroed on startup, and any values with other required values will be initialized accordingly CursorX and CursorY are the position of the next character draw - this is used by string printing routines. SpriteFrame is used by the bitmap drawing routine... this selects which bank of sprites to use... there are up to 4 banks (depending on system memory) |
 |
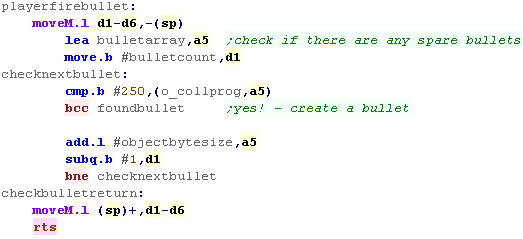
| The BulletArray allows for 8 player
bullets - this uses the standard 'Sprite Object Layout' The EnemyBulletArray allows for 8 enemy bullets - this uses the standard 'Sprite Object Layout' The ObjectArray allows for up to 40 objects including enemies, crystals and mines - this uses the standard 'Sprite Object Layout' |
 |
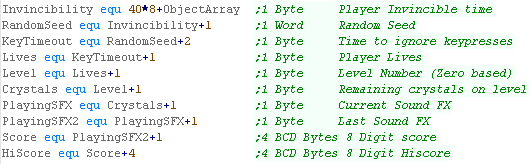
| Invincibility is a counter for how long the
player is invincible, either at the start of a level, or after
being killed Random Seed is a 16 bit random seed - used by the psuedorandom number generator KeyTimeout is used as a delay for key processing - this is to reduce the speed of acceleration of the player Lives is the number of lives of the player Level is the Level number - starts from 0 Crystals is the number of crystals left to collect - note: due to the object limit only 5 are shown at a time - they respawn when collected. PlayingSFX is used to control the current sound PlayingSFX2 is the last sound played - when it does not match PlayingSFX we need to update the sound Score is the current score, 8 binary coded decimal packed digits (4 bytes) HiScore is the best score so far. |
 |
| The PlayerObject handles the player
sprite, this uses the standard 'Sprite Object Layout', however
there are labels to the component parts of the player object There are also a backup of the X,Y position called LastPosX and LastPosY |
 |
 |
Note:
All these addresses are relative to the base address
'UserRam'... this is so the RAM data can be located where ever
free ram exists on the target platform. So the game can work on ROM machines, this is the only writable data, The is no self modifying code or altered data within the other areas of code. |
Constants and Data definitions
| The Player Object Backup is a copy of the
player settings, this is used to reset the player at the start of
a round |
|
| We have some constant definitions next. Object Byte Size is the number of bytes in an object... The Player,Enemies and Bullets are all 8 bytes per object Enemies is the number of objects... this includes Mines and Crystals. Bullet Count is the number of bullets for Players and Enemies... 8 means the Player can shoot 8 bullets, and enemies can shoot a separate 8 bullets Onscreen Crystals is the number of crystals onscreen... this can be less than the number per level, as crystals will respawn when collected as required |
|
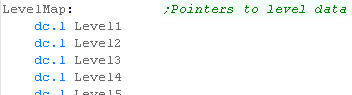
| The Level Map is a bank of pointers to the
Level data. |
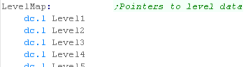 |
| Each Level Definition has the same format. First is a pair of header bytes... the first byte is the crystal count... the second is unused. Next comes pairs of object definitions... the first byte is an object type... the second is a count. The definition is ended by an object of 0 and a count of 255 |
 |
| Although the contents have the same purpose, The Object
Type definitions are not in the same format as the Sprite
Objects Each definition is a different enemy type, 0 is the 'empty object' and is used for the end of the level definition |
|
| Next we have some Random Number Lookup tables |
 |
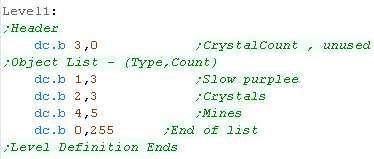
| We have a set of 255 terminated Text strings. These are used for ingame messages |
 |
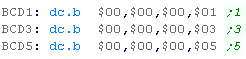
| The BCD Definitions are used to add points
to the current score... The BCD code requires source and destination value to be 4 bytes - little endian |
 |
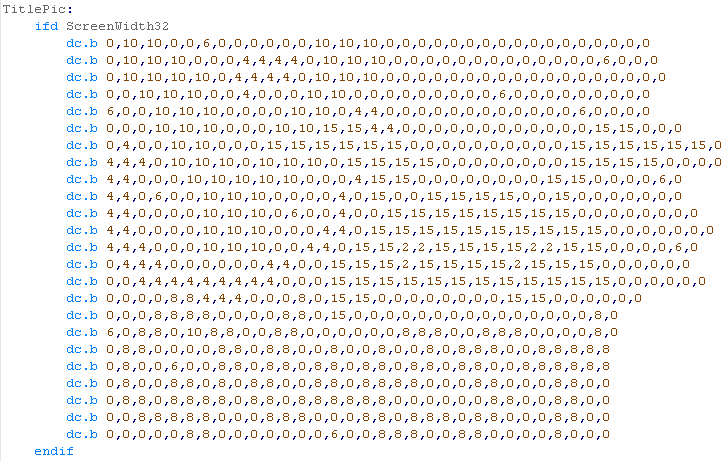
| Finally we have the Title screen definition...
one tile per byte These use the same sprite numbers (and sprite graphics) as the enemy objects. There are different versions depending on screen size. |
 |
YQ_Multiplatform.asm - the multiplatform
code
| Yquest 6502 was ported from the Z80 version, Like with my main
tutorials, I use zero page entries to simulate z80 registers. Each subroutine of the multiplatform code has been recreated, with the same layout function and purpose... for that reason I will not be covering the multiplatform code of the 6502 version - as it would repeat the content of lessons 2-5 of the Z80 series. If you want to see videos of these, please see the z80 series here. |
 |
 |
To assist
conversion the author uses a program he wrote called 'AsmConv'
(it's experimental, and is not publicly released)... this does a
crude job of converting the code, but much of the work is done
by hand. To help convert the code many macros and functions are used... these are found in BasicMacros.asm and BasicFunctions.ASM |

X68000 Header
| So we can support multiple platforms with different screen sizes we have platform specific screen size definitions |  |
| We need to set up all the screen registers for a 256x256 @
16 color bitmap screen. We set up our palette of 16 colors... we do this by writing to $E82000+ |
 |
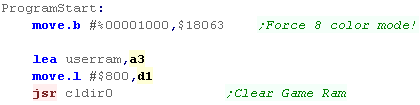
| We zero the game's ram data. using function CLDIR0 - which fills an area with zeros |  |
| We're only
using bitmap 'soft sprites' on the x68000 - of course the
X68000 has hardware sprites, but they're more than what we
need for such a simple game, so we won't use them here. |
 |
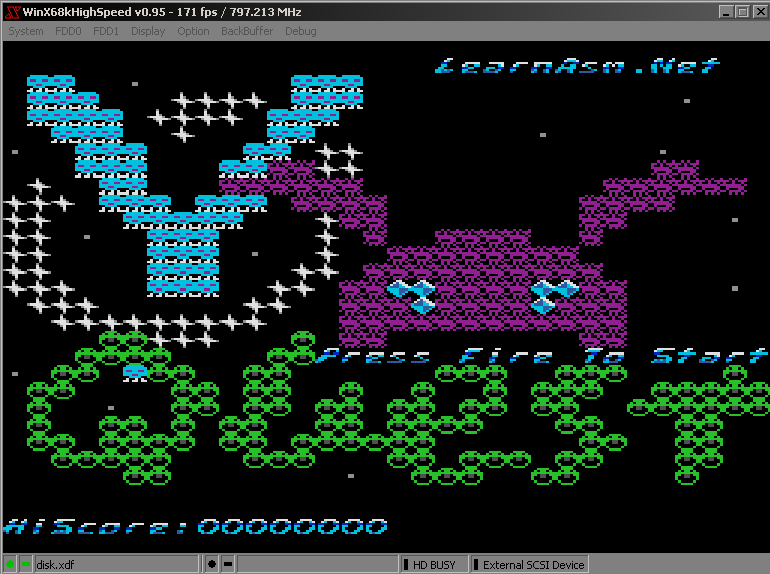
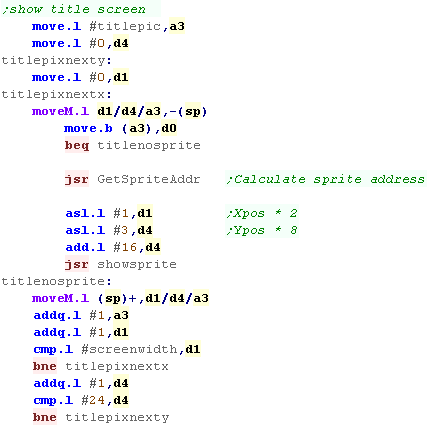
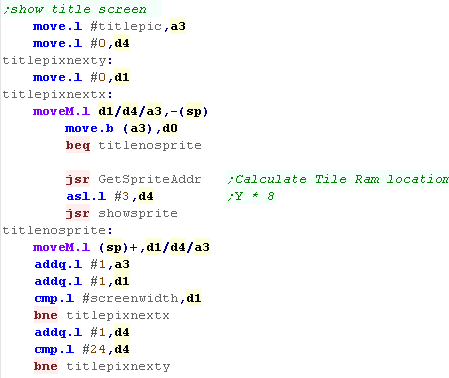
ShowTitle
| When The title screen starts, we first reset the game
settings for a new game to start, Then we clear the screen. |
 |
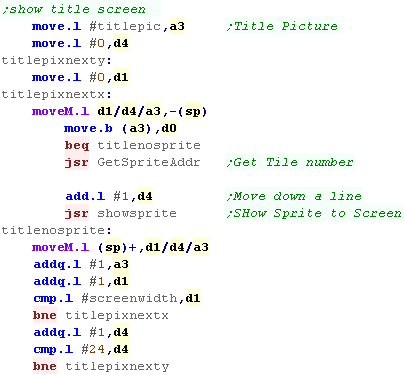
| We want to draw the tilescreen... it's held as a 1 byte per
tile data block in our code at 'TitlePic' We use our ShowSprite Routine to draw it to the screen... however we need to calculate the sprite address of the desired tile, so we use GetSpriteAddr to do so |
 |
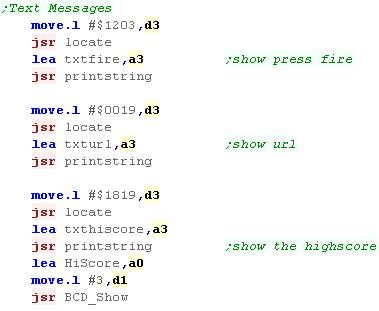
| We need to show a few text items to the screen A 'Press Fire' Message The 'LearnASM.Net' URL (Very Important!) The Highscore. |
 |
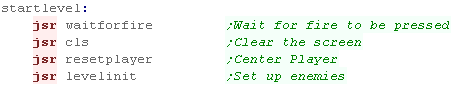
LevelStart
| When the game or a new level starts, we first wait for fire
to be pressed. Next we clear the screen, Reset the player position Initialize the level enemies with LevelInit |
 |
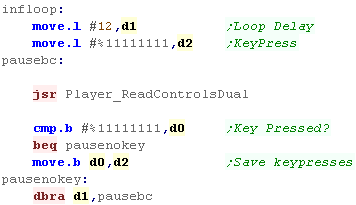
Level Loop
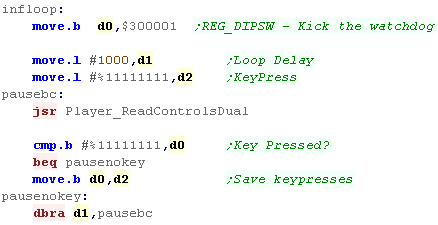
| We have to pause a while during the game loop, so we read in
from the joystick during this time, and if the user presses a
key we'll store it for later. we use D1 for a loop counter - and D2 for any pressed button. we use function call Player_ReadControlsDual - which will read in the joystick and fire button |
 |
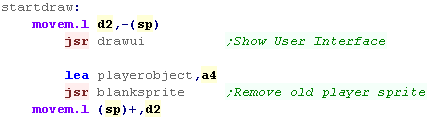
| First we draw the UI (Score etc) Next we clear the player sprite. |
 |
| To slow down the acceleration, we have a 'timeout'... if a key was pressed, for a short time we'll ignore any other keys. |  |
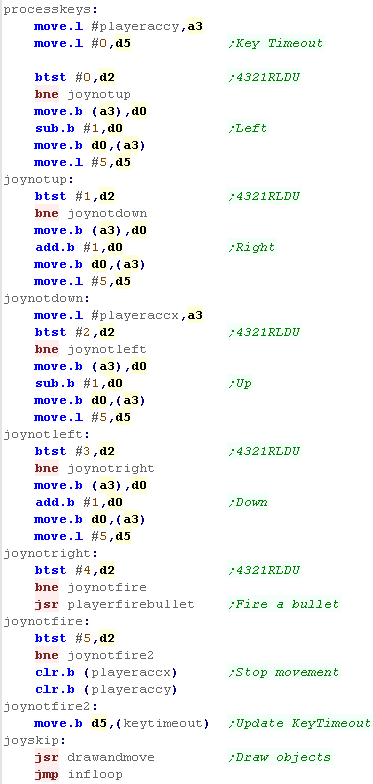
| We're going to process the input, We process each direction, and alter the acceleration of the player if a direction is pressed... We have a 'Bullet fire' routine (in the common code) for Fire 1 Fire 2 will immediately stop the player If any button is pressed, the key timeout is set |
 |
| Finally we run the multiplatform 'Draw and Move' routine, this draws the player, and handles movement and drawing of enemies and bullets |  |
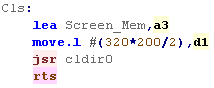
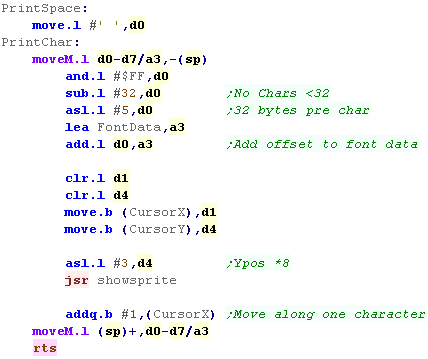
Clear Screen and Print Char
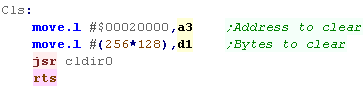
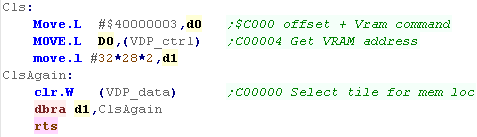
| To clear the screen (CLS), we need to wipe the bitmap area
at address $C00000 - we use the CLDIR0 command to do this We set the number of bytes to clear with D1... although our screen is 256 pixels wide, the memory layout means we have to clear 1024 bytes of width |
 |
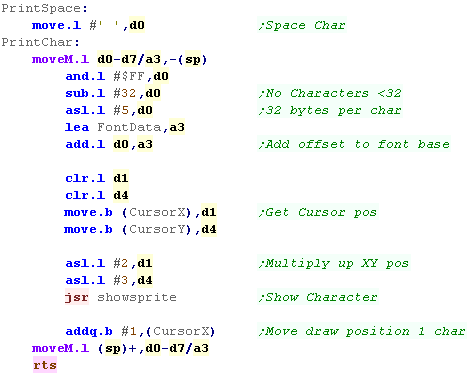
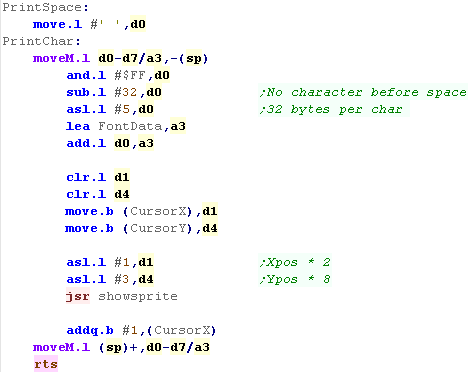
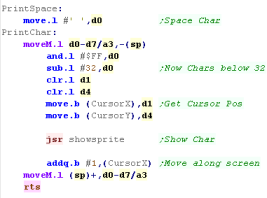
| PrintChar will show a character to the screen, using a
bitmap font the same as the sprites... We need to calculate the position in the font data of the character Each Character is 32 bytes, and there are no characters below 32 (space) We also need to multiply up the X,Y pos into an 8x8 grid position. Once we've shown a character, we increment the X position for the next character |
 |
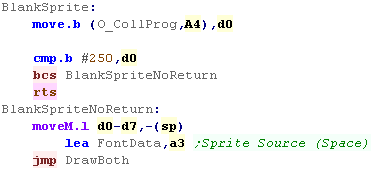
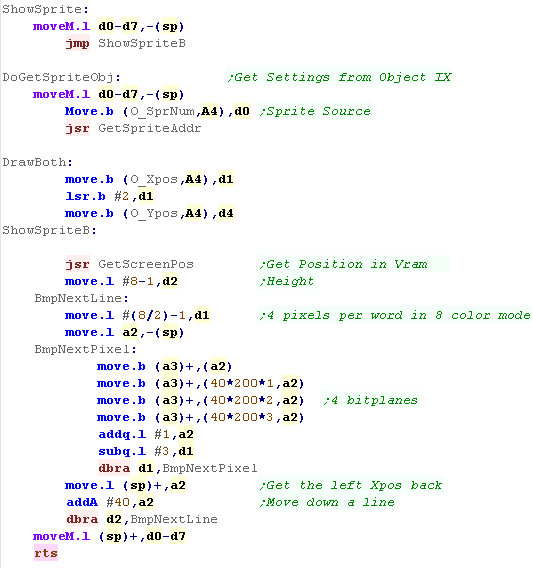
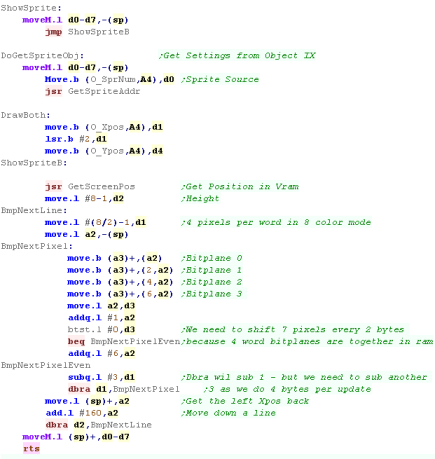
Sprite routines
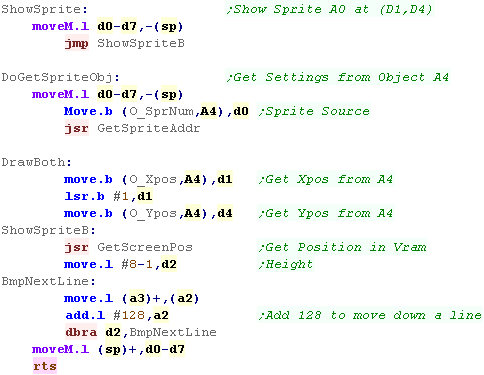
| We have a couple of ShowSprite routines... BlankSprite will draw the empty sprite (Space in the font), using the object A4 - to clear the old position of the object |
 |
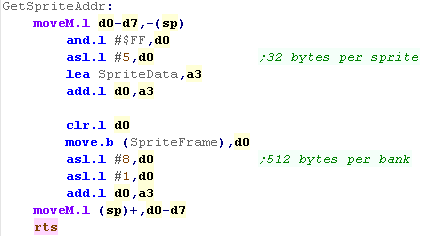
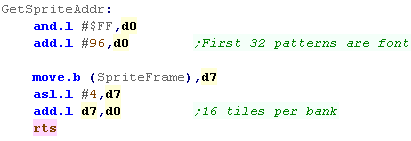
| GetSpriteAddr will calculate the address in ram of the sprite
data we want to show to the screen... each sprite is 32 bytes We also handle the sprite frame... there are 4 frames of animation for each sprite - each bank is 512 bytes (16 sprites) |
 |
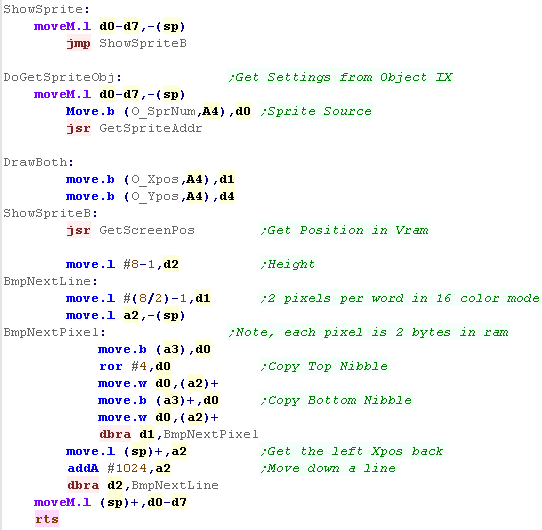
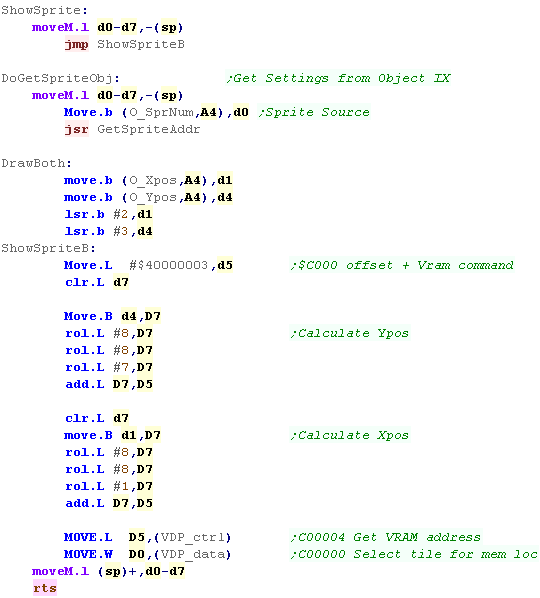
| DoGetSpriteObj will show object A4 to the screen, getting
Sprite, and XY pos from A4 ShowSprite will draw Sprite D0 onscreen (at XY position D1,D4) |
 |
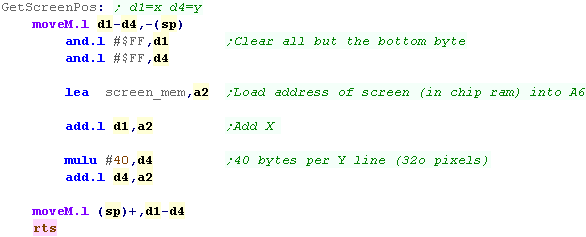
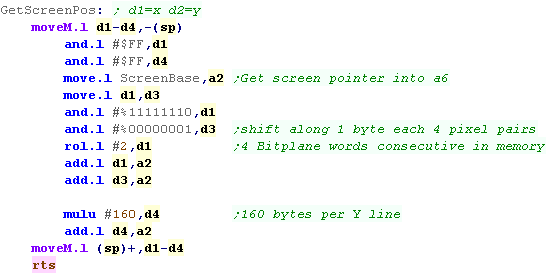
Get Screen Pos
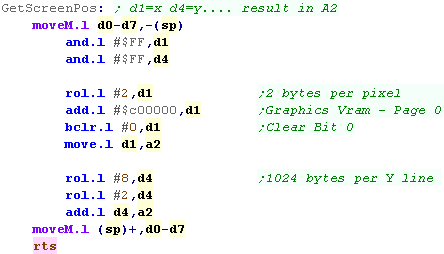
| The Get ScreenPos function will take an XY pos in D1 and D4...
it will return a screen memory address in A2 Our screen address starts at $C00000.. Each pixel is stored in a separate word... so we multiply the Xpos by 2 Each line is 1024 bytes wide (irrespective of resolution)... so we multiply the Ypos by 1024 |
 |
Joystick Reading
| We read in the Joystick buttons from $E9A001... we need
to select which set of controls using $E9A005... if we want more
than 2 fire buttons, we need to do this. We return the results in D0 |
  |
| We also have a 'Wait for fire' function... this randomizes the
seed, and waits for fire to be released, then pressed. It's used for menus and between levels. |
 |
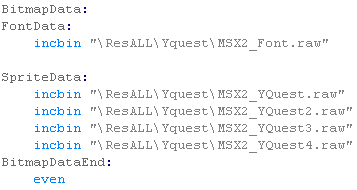
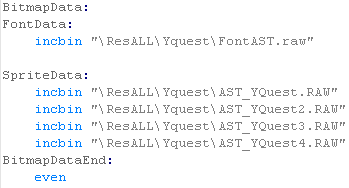
Sprite Data and Palette
| We have 5 different files of sprites 96 for the font 16x4 for the 4 banks of sprites |
 |
| WE have the palette words... on per color - these are in native x68000 format. | 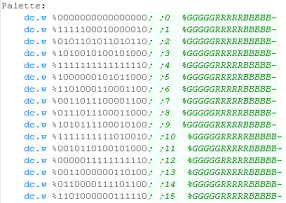 |
| We need to define $800 bytes of ram for game variables |  |
 |
Lesson
YQuest3 - Sinclair QL Specific code The Sinclair QL also uses a bitmap screen - with 8 color graphics.... let take a look at the QL version |
 |
 See
YQuest folder
|
 |
Sinclair QL Header
| So we can support multiple platforms with different screen sizes we have platform specific screen size definitions | |
| We need to turn on 8 color mode.w We zero the game's ram data. using function CLDIR0 - which fills an area with zeros |
 |
 |
We
don't know where our program code will run in the final
memory - due to VASM's optimization JMP's and JSR's will
be switched to relative commands, but we need to fix the
common code so the Level address reading works. |
Modifications to the multiplatform
code
| Because we don't know where in ram the program will run, we to adjust the read routine for the level data... by adding the effective address of the program start, we will get the correct address for the level data. | 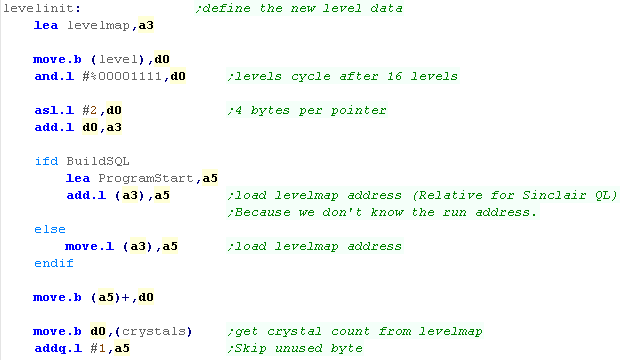 |
ShowTitle
| When The title screen starts, we first reset the game
settings for a new game to start, Then we clear the screen. |
|
| We want to draw the tilescreen... it's held as a 1 byte
per tile data block in our code at 'TitlePic' We use our ShowSprite Routine to draw it to the screen... however we need to calculate the sprite address of the desired tile, so we use GetSpriteAddr to do so |
 |
| We need to show a few text items to the screen A 'Press Fire' Message The 'LearnASM.Net' URL (Very Important!) The Highscore. |
|
LevelStart
| When the game or a new level starts, we first wait for
fire to be pressed. Next we clear the screen, Reset the player position Initialize the level enemies with LevelInit |
|
Level Loop
| We have to pause a while during the game loop, so we read
in from the joystick during this time, and if the user
presses a key we'll store it for later. we use D1 for a loop counter - and D2 for any pressed button. we use function call Player_ReadControlsDual - which will read in the joystick and fire button |
 |
| First we draw the UI (Score etc) Next we clear the player sprite. |
|
| To slow down the acceleration, we have a 'timeout'... if a key was pressed, for a short time we'll ignore any other keys. | |
| We're going to process the input, We process each direction, and alter the acceleration of the player if a direction is pressed... We have a 'Bullet fire' routine (in the common code) for Fire 1 Fire 2 will immediately stop the player If any button is pressed, the key timeout is set |
|
| Finally we run the multiplatform 'Draw and Move' routine, this draws the player, and handles movement and drawing of enemies and bullets | |
Clear Screen and Print Char
| To clear the screen (CLS), we need to wipe the bitmap area
at address $20000 - we use the CLDIR0 command to do this We set the number of bytes to clear with D1... the screen is 256x256... and each byte has 2 pixels |
 |
| PrintChar will show a character to the screen, using a
bitmap font the same as the sprites... We need to calculate the position in the font data of the character Each Character is 32 bytes, and there are no characters below 32 (space) We also need to multiply up the X,Y pos into an 8x8 grid position. Once we've shown a character, we increment the X position for the next character |
 |
Sprite routines
| We have a couple of ShowSprite routines... BlankSprite will draw the empty sprite (Space in the font), using the object A4 - to clear the old position of the object |
|
| GetSpriteAddr will calculate the address in ram of the
sprite data we want to show to the screen... each sprite is 32
bytes We also handle the sprite frame... there are 4 frames of animation for each sprite - each bank is 512 bytes (16 sprites) |
|
| DoGetSpriteObj will show object A4 to the screen, getting
Sprite, and XY pos from A4 ShowSprite will draw Sprite D0 onscreen (at XY position D1,D4) |
 |
Get Screen Pos
| The Get ScreenPos function will take an XY pos in D1 and
D4... it will return a screen memory address in A2 Our screen address starts at $20000.. Each pixel is stored in a separate word... so we multiply the Xpos by 2 Each line is 128 bytes - so we multiply the Ypos by 128 |
 |
Joystick Reading
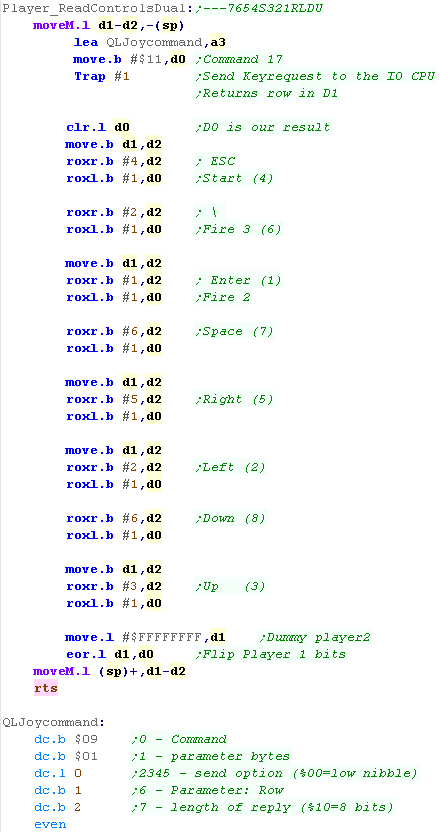
| Reading in from the keyboard has to be done with Trap 1 -
command 9 We have to send a sequence of command bytes - with byte 6 as the row number - the trap will return a byte in D1 - with a bit high when the button is down. We're going to use Trap #1 to read in from the keyboard, we need to pass the command we just defined to the trap in A3 The function will return the bits of the line in D1 We're going to use the bits in D1 to build up the result in D0 We're going to move each of the controls in one by one, We'll use D2 as a temporary copy of the the register, and shift the required key bit into D0 We'll use Escape as a start button and Space,Enter and \ as Fire 1-3, shifting them into D0 Finally we'll shift in all the bits of UDLR into D0 The Cursor Keys are also used by an external Joystick if one is connected |
 |
| We also have a 'Wait for fire' function... this randomizes
the seed, and waits for fire to be released, then pressed. It's used for menus and between levels. |
|
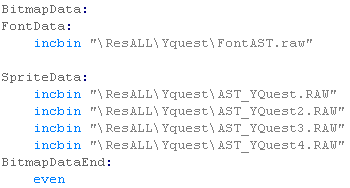
Sprite Data
| We have 5 different files of sprites 96 for the font 16x4 for the 4 banks of sprites |
|
 |
Lesson
YQuest4 - Amiga Specific code Lets Port to the Amiga... we won't use hardware sprites on this system, we'll do the graphics in software |
|
See
YQuest folder
|
|
Amiga Header
| So we can support multiple platforms with different
screen sizes we have platform specific screen size
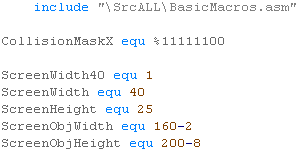
definitions Because the Amiga screen is split into bitplanes, it's difficult to offset a sprite horizontally by anything other than 8 pixel blocks... Therefore we're limiting the horizontal collision detection to match. |
 |
| The Amiga needs quite a lot of config... We need to connect to the graphics driver, set up the screen and interrupts |
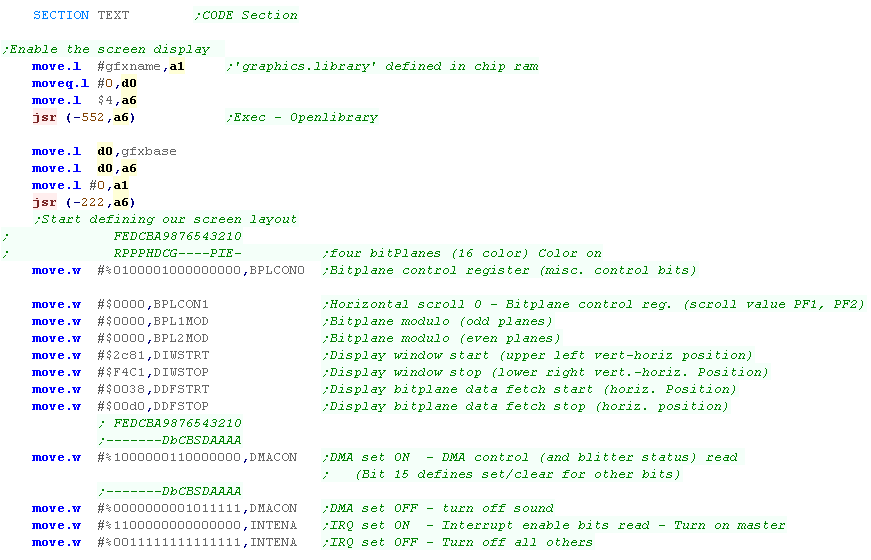 |
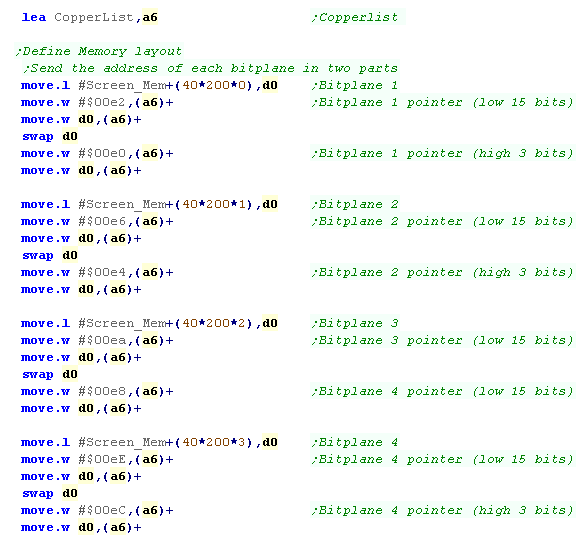
| We've got some ram for the screen... we do this with the
'Copperlist' - a set of commands for the coprocessor We need to set it up with the video hardware |
 |
| We need to init the palette, and turn on the coprocessor | 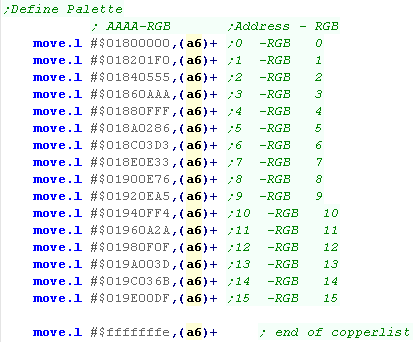 |
| We zero the game's ram data. using function CLDIR0 - which fills an area with zeros | |
| We're only
using bitmap 'soft sprites' on the Amiga - of course the
Amiga has hardware sprites, but they're more than what
we need for such a simple game, so we won't use them
here.... Later we'll upgrade this program with smoother
sprite movement, but for now it's limited to 8x8 blocks |
|
ShowTitle
| When The title screen starts, we first reset the game
settings for a new game to start, Then we clear the screen. |
|
| We want to draw the tilescreen... it's held as a 1 byte
per tile data block in our code at 'TitlePic' We use our ShowSprite Routine to draw it to the screen... however we need to calculate the sprite address of the desired tile, so we use GetSpriteAddr to do so |
 |
| We need to show a few text items to the screen A 'Press Fire' Message The 'LearnASM.Net' URL (Very Important!) The Highscore. |
|
LevelStart
| When the game or a new level starts, we first wait for
fire to be pressed. Next we clear the screen, Reset the player position Initialize the level enemies with LevelInit |
|
Level Loop
| We have to pause a while during the game loop, so we
read in from the joystick during this time, and if the
user presses a key we'll store it for later. we use D1 for a loop counter - and D2 for any pressed button. we use function call Player_ReadControlsDual - which will read in the joystick and fire button |
|
| First we draw the UI (Score etc) Next we clear the player sprite. |
|
| To slow down the acceleration, we have a 'timeout'... if a key was pressed, for a short time we'll ignore any other keys. | |
| We're going to process the input, We process each direction, and alter the acceleration of the player if a direction is pressed... We have a 'Bullet fire' routine (in the common code) for Fire 1 Fire 2 will immediately stop the player If any button is pressed, the key timeout is set |
|
| Finally we run the multiplatform 'Draw and Move' routine, this draws the player, and handles movement and drawing of enemies and bullets | |
Clear Screen and Print Char
| To clear the screen (CLS), we need to wipe the bitmap
area at address "ScreenRam" The screen is 320 * 200 and each byte has 2 pixels |
 |
| PrintChar will show a character to the screen, using a
bitmap font the same as the sprites... We need to calculate the position in the font data of the character Each Character is 32 bytes, and there are no characters below 32 (space) We also need to multiply up the X,Y pos into an 8x8 grid position. Once we've shown a character, we increment the X position for the next character |
 |
Sprite routines
| We have a couple of ShowSprite routines... BlankSprite will draw the empty sprite (Space in the font), using the object A4 - to clear the old position of the object |
|
| GetSpriteAddr will calculate the address in ram of the
sprite data we want to show to the screen... each sprite is
32 bytes We also handle the sprite frame... there are 4 frames of animation for each sprite - each bank is 512 bytes (16 sprites) |
|
| DoGetSpriteObj will show object A4 to the screen, getting
Sprite, and XY pos from A4 ShowSprite will draw Sprite D0 onscreen (at XY position D1,D4) We transfer the bytes of the sprite to the 4 bitplanes of the graphics screen. |
 |
Get Screen Pos
| The Get ScreenPos function will take an XY pos in D1 and
D4... it will return a screen memory address in A2 Each line is 40 bytes - the base is 'Screen_Ram' (in chip ram. |
 |
Joystick Reading
| We read in the Joystick buttons from $E9A001... we
need to select which set of controls using $E9A005... if we
want more than 2 fire buttons, we need to do this. We return the results in D0 |
|
| We also have a 'Wait for fire' function... this randomizes
the seed, and waits for fire to be released, then pressed. It's used for menus and between levels. |
|
Sprite Data and Chip ram
| We need to wait for Vblank before we turn on the chip ram, we do this by testing port $DFF004 |  |
| We have 5 different files of sprites 96 for the font 16x4 for the 4 banks of sprites |
 |
| We need to define the area of memory for the screen and Copperlist - these need to be in 'Chip Ram' | 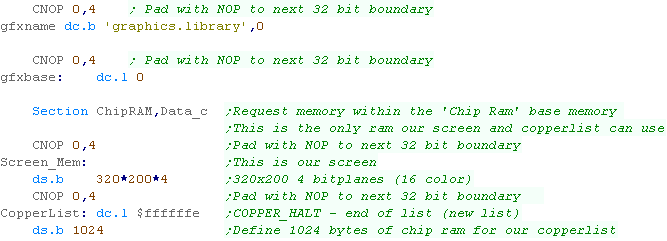 |
| We need to define some sound samples for the sound driver (chibisound) to use. these also must be in chip ram. |  |
| We need to define $800 bytes of ram for game variables | |
|
The
graphics routine here is based on the old simple series The horizontal movement is pretty jerky here... we'll need to make a better sprite routine to fix that, but we'll look at that next time! |
 |
Lesson
YQuest5 - Genesis Specific code Let's look at making Yquest work on the Genesis... we'll use the tilemap to draw graphics to the screen. |
|
See
YQuest folder
|
|
Genesis Header
Sprite Data and Palette
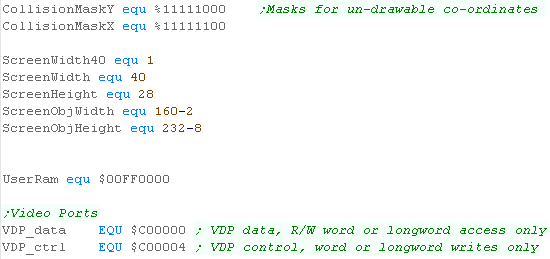
| So we can support multiple platforms with different screen
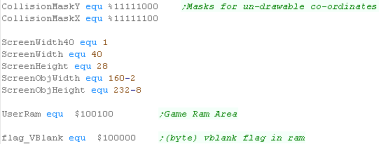
sizes we have platform specific screen size definitions We're using the tilemap - which is limiting movement to 8x8 blocks We also need to define the 'user ram' area which is used for the game vars. |
 |
| We need a cartridge header for our game. | 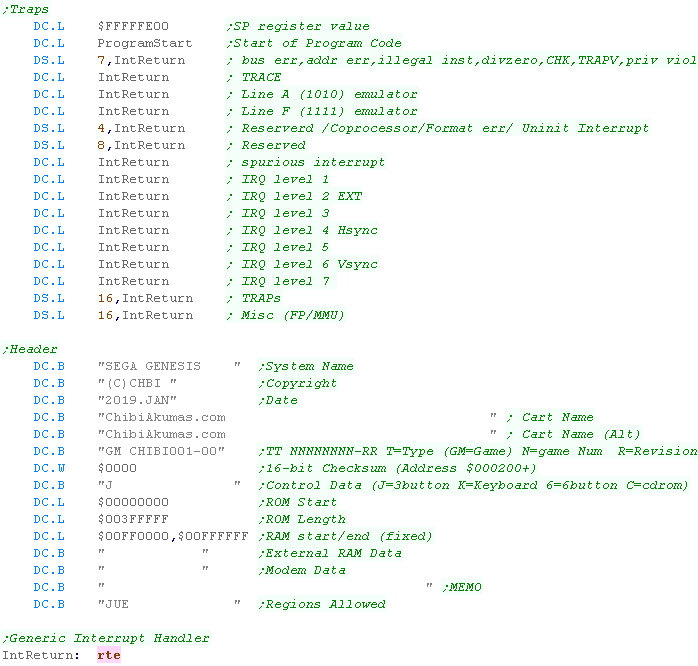 |
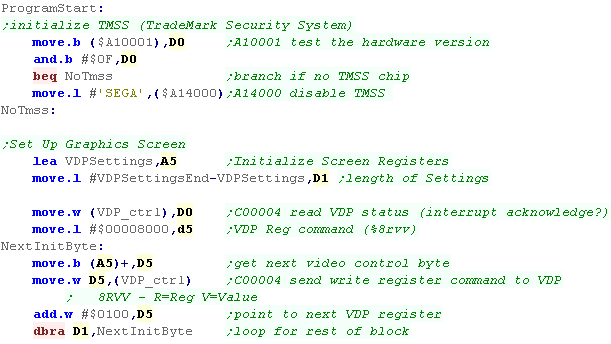
| We need to Disable the TMSS chip (copy protection) We also set up our screen, by transferring the VDP registers to the screen hardware |
 |
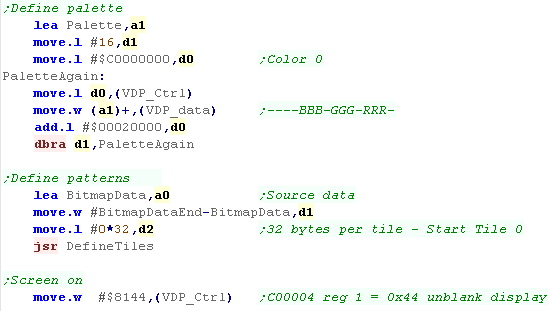
| We need to define our color palette. We also need to define the pattern data for the tiles. Finally we turn on the screen. |
 |
| We zero the game's ram data. using function CLDIR0 - which fills an area with zeros | |
 |
We're only going to use the tilemap for
graphics in todays version - this will make the movement
'blocky.... Later we'll upgrade the game with hardware sprites, which will make it better. |
ShowTitle
| When The title screen starts, we first reset the game
settings for a new game to start, Then we clear the screen. |
|
| We want to draw the tilescreen... it's held as a 1 byte
per tile data block in our code at 'TitlePic' We use our ShowSprite Routine to draw it to the screen... however we need to calculate the sprite address of the desired tile, so we use GetSpriteAddr to do so |
 |
| We need to show a few text items to the screen A 'Press Fire' Message The 'LearnASM.Net' URL (Very Important!) The Highscore. |
 |
LevelStart
| When the game or a new level starts, we first wait for
fire to be pressed. Next we clear the screen, Reset the player position Initialize the level enemies with LevelInit |
|
Level Loop
| We have to pause a while during the game loop, so we read
in from the joystick during this time, and if the user
presses a key we'll store it for later. we use D1 for a loop counter - and D2 for any pressed button. we use function call Player_ReadControlsDual - which will read in the joystick and fire button |
|
| First we draw the UI (Score etc) Next we clear the player sprite. |
|
| To slow down the acceleration, we have a 'timeout'... if a key was pressed, for a short time we'll ignore any other keys. | |
| We're going to process the input, We process each direction, and alter the acceleration of the player if a direction is pressed... We have a 'Bullet fire' routine (in the common code) for Fire 1 Fire 2 will immediately stop the player If any button is pressed, the key timeout is set |
|
| Finally we run the multiplatform 'Draw and Move' routine, this draws the player, and handles movement and drawing of enemies and bullets | |
Clear Screen and Print Char
| To clear the screen (CLS), we need to wipe the Tilemap
area from $C000 onwards... the tilemap is 32 * 28... and
each tile is 2 bytes We set the number of bytes to clear with D1... although our screen is 256 pixels wide, the memory layout means we have to clear 1024 bytes of width |
 |
| PrintChar will show a character to the screen, using a
tile of the tilemap. We need to calculate the position in the Tilemapof the character Each Character is 32 bytes, and there are no characters below 32 (space) We also need to multiply up the X,Y pos into an 8x8 grid position. Once we've shown a character, we increment the X position for the next character |
 |
Sprite routines
| We have a couple of ShowSprite routines... BlankSprite will draw the blank tile, using the object A4 - to clear the old position of the object |
|
| GetSpriteAddr will calculate the address in the pattern
data... the first 96 tiles are the font We also handle the sprite frame... there are 4 frames of animation for each of the 16 sprites |
 |
| DoGetSpriteObj will show object A4 to the screen, getting
Sprite, and XY pos from A4 ShowSprite will draw Sprite D0 onscreen (at XY position D1,D4) We need to calculate the vram address of the tile we want to change, we then write the bytes of that tile with the new tile number. |
 |
Joystick Reading
| There are two ports which are read and written for the
joypad... Joypad 1 is at address $A10005 Joypad 2 is at address $A10003 First, however, we need to set one of the bits of these ports to WRITE... we do this with 2 ports... Joypad 1 is at address $A1000B Joypad 2 is at address $A10009 |
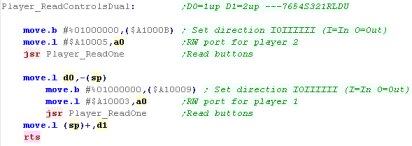 |
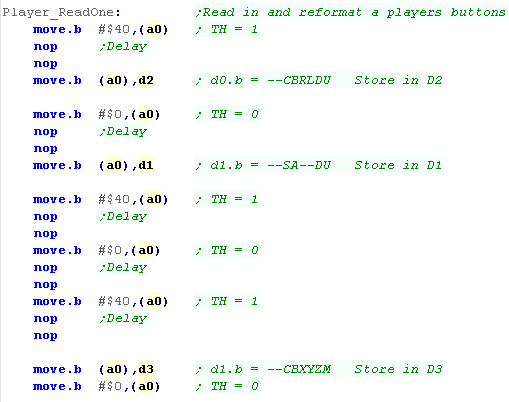
| The Joypad needs a sequence of writes to select the
'sections' of the joypad... this is achieved by writes with
bit 6 as a 1 The first batch rerturns Up, Down, Left, Right... button C and Button B The second batch returns Button A and Start The final batch are Button X, Button Y and Button Z... as well as Mode. Note: some of the buttons are duplicated... eg Up is returned in the first and second batch. |
 |
| Finally, we shift around the bits, so we have all the buttons in a neat order in a single register. | 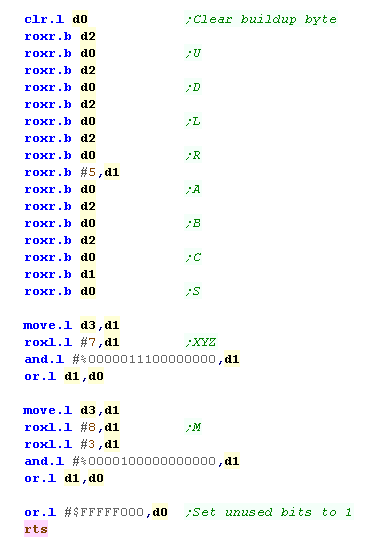 |
| We also have a 'Wait for fire' function... this randomizes
the seed, and waits for fire to be released, then pressed. It's used for menus and between levels. |
|
| We have 5 different files of sprites 96 for the font 16x4 for the 4 banks of sprites |
|
| WE have the palette words... on per color - these are in native Genesis format. | 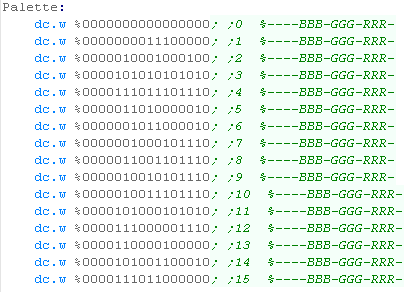 |
| Finally, we have our screen Init settings | 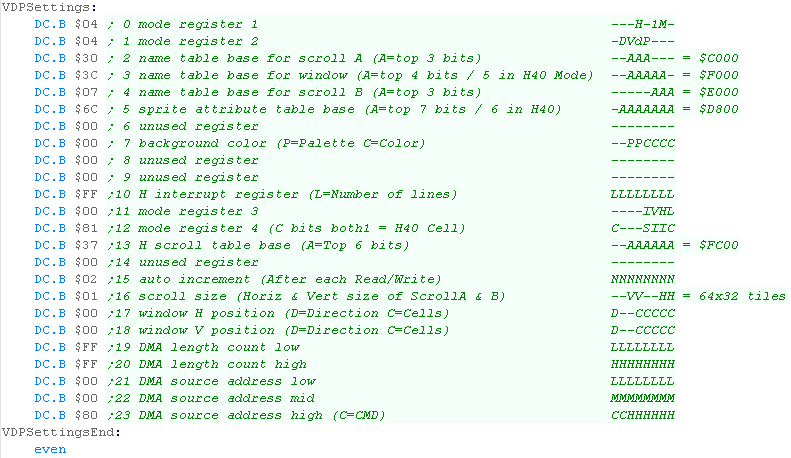 |

NeoGeo Header
| So we can support multiple platforms with different screen
sizes we have platform specific screen size definitions We're using the tilemap - which is limiting movement to 8x8 blocks We also need to define the 'user ram' area which is used for the game vars. |
 |
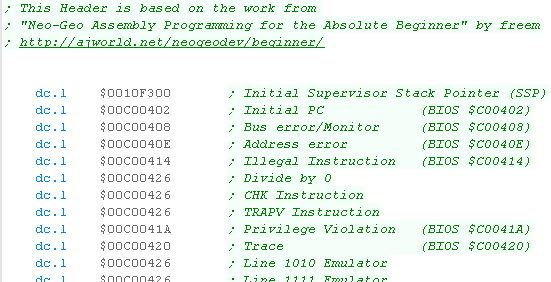
| We need a cartridge header for our game. This is very long, and is based on "Neo-Geo Assembly Programming for the Absolute Beginner" by freem |
 |
| We need to define our color palette, we define the common
background color, then transfer the other 16 colors. We use firmware calls to clear the Fix layer and Sprites. |
 |
| We zero the game's ram data. using function CLDIR0 - which fills an area with zeros | |
|
The example
today uses the FIX layer for all the graphics, it doesn't give
good movement, but it gets things working quickly and easily. We'll add hardware sprites in a later episode |
ShowTitle
| When The title screen starts, we first reset the game settings
for a new game to start, Then we clear the screen. |
|
| We want to draw the tilescreen... it's held as a 1 byte per
tile data block in our code at 'TitlePic' We use our ShowSprite Routine to draw it to the screen... however we need to calculate the sprite address of the desired tile, so we use GetSpriteAddr to do so |
|
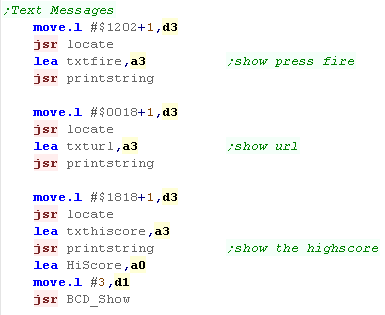
| We need to show a few text items to the screen A 'Press Fire' Message The 'LearnASM.Net' URL (Very Important!) The Highscore. |
 |
LevelStart
| When the game or a new level starts, we first wait for fire to
be pressed. Next we clear the screen, Reset the player position Initialize the level enemies with LevelInit |
|
Level Loop
| We have to pause a while during the game loop, so we read in
from the joystick during this time, and if the user presses a
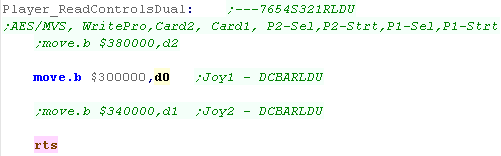
key we'll store it for later. We also 'kick the watchdog'... if we don't do this regularly, the machine will reset (a crash protection for the arcade NeoGeo) We use D1 for a loop counter - and D2 for any pressed button. we use function call Player_ReadControlsDual - which will read in the joystick and fire button |
 |
| First we draw the UI (Score etc) Next we clear the player sprite. |
|
| To slow down the acceleration, we have a 'timeout'... if a key was pressed, for a short time we'll ignore any other keys. | |
| We're going to process the input, We process each direction, and alter the acceleration of the player if a direction is pressed... We have a 'Bullet fire' routine (in the common code) for Fire 1 Fire 2 will immediately stop the player If any button is pressed, the key timeout is set |
|
| Finally we run the multiplatform 'Draw and Move' routine, this draws the player, and handles movement and drawing of enemies and bullets | |
Clear Screen and Print Char
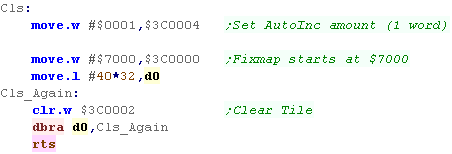
| To clear the screen (CLS), we need to wipe the Fix layer from
Vram address $7000+ We need to set the AutoInc mode by writing to $3C004 (This isn't usually a problem, as we usually don't write consecutive tiles. The Fix layer is 40 tiles wide and 32 tiles tall - each tile is 2 bytes |
 |
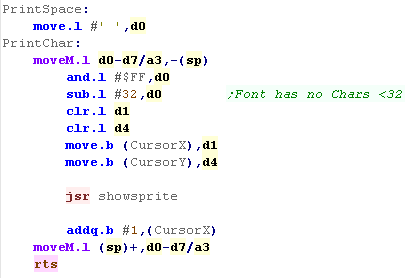
| PrintChar will show a character to the screen, using a tile of
the Fix Layer. We also need to multiply up the X,Y pos into an 8x8 grid position. Once we've shown a character, we increment the X position for the next character |
 |
Sprite routines
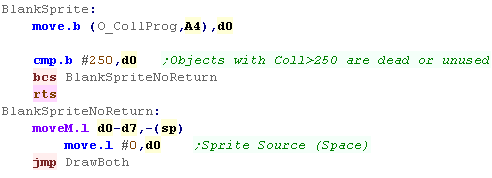
| We have a couple of ShowSprite routines... BlankSprite will draw the blank tile, using the object - to clear the old position of the object |
 |
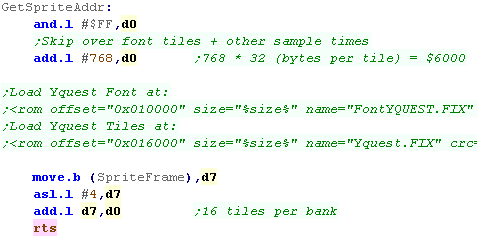
| GetSpriteAddr will calculate the address in the pattern data...
The font is loaded at address $10000 (tile $800) The sprite graphics are loaded at address $16000 (768 tiles after the font) We also handle the sprite frame... there are 4 frames of animation for each of the 16 sprites |
 |
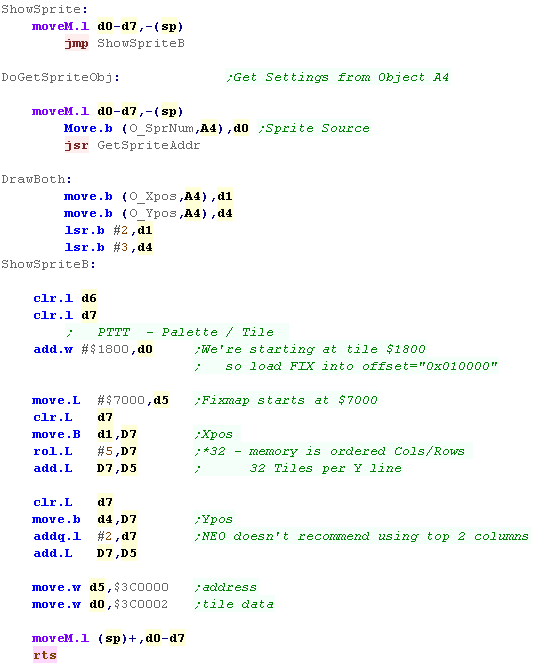
| DoGetSpriteObj will show object A4 to the screen, getting
Sprite, and XY pos from A4 ShowSprite will draw Sprite D0 onscreen (at XY position D1,D4) We need to calculate the vram address of the tile we want to change, we then write the bytes of that tile with the new tile number. Remember: the Fix tilemap is 40 tiles wide, and 32 tiles tall, but consecutive tiles go DOWN the screen not across, so the formula is: Address = $7000 + (Ypos * 32) + Xpos |
 |
Joystick Reading
| There are 3 ports we want to use to read in the buttons $380000 allows us to read in Select and Start for Joy 1 and 2 $30000 allows us to read in the directions and buttons of Joystick 1 $34000 allows us to read in the directions and buttons of Joystick 1 |
 |
Palette data
| We have the palette words... one per color - these are in native NeoGeo format. | 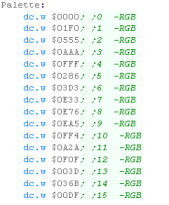 |
 |
Lesson
YQuest7 - Atari ST Specific code Lets Port to the Atari ST... The ST can't do hardware sprites, and unfortunately it's screen layout is a bit of a pain. |
|
See
YQuest folder
|
|
Atari ST Header
| So we can support multiple platforms with different screen
sizes we have platform specific screen size definitions Because the Atari ST's screen is split into bitplanes, it's difficult to offset a sprite horizontally by anything other than 8 pixel blocks... Therefore we're limiting the horizontal collision detection to match. |
|
| To Start the Atari ST verstion, we need to enable
supervisor mode, Next we need to turn on the screen, and init the screen ram. |
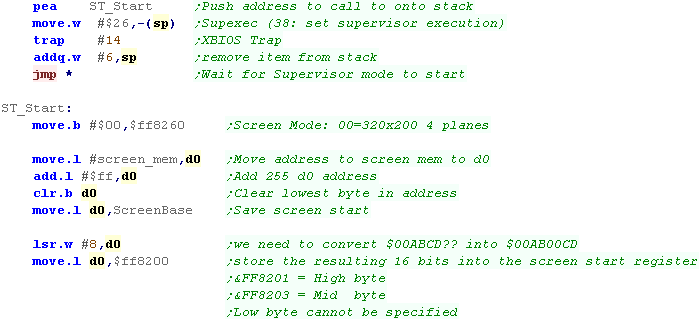 |
| We need to init the palette, and turn on the joystick handling routine | 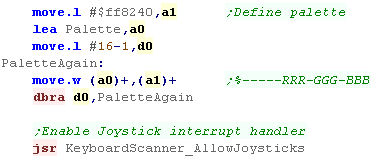 |
| We zero the game's ram data. using function CLDIR0 - which fills an area with zeros | |
| The software
sprites in this example are limited to 8 pixel horizontal
blocks like the simple series, later we'll upgrade the
code with smoother movment. |
|
ShowTitle
| When The title screen starts, we first reset the game
settings for a new game to start, Then we clear the screen. |
|
| We want to draw the tilescreen... it's held as a 1 byte
per tile data block in our code at 'TitlePic' We use our ShowSprite Routine to draw it to the screen... however we need to calculate the sprite address of the desired tile, so we use GetSpriteAddr to do so |
|
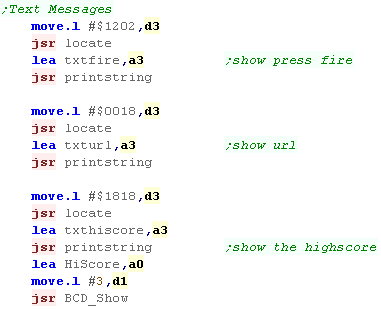
| We need to show a few text items to the screen A 'Press Fire' Message The 'LearnASM.Net' URL (Very Important!) The Highscore. |
 |
LevelStart
| When the game or a new level starts, we first wait for
fire to be pressed. Next we clear the screen, Reset the player position Initialize the level enemies with LevelInit |
|
Level Loop
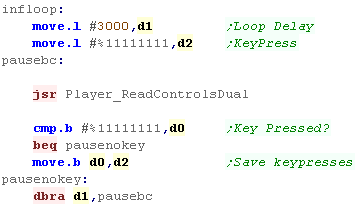
| We have to pause a while during the game loop, so we read
in from the joystick during this time, and if the user
presses a key we'll store it for later. we use D1 for a loop counter - and D2 for any pressed button. we use function call Player_ReadControlsDual - which will read in the joystick and fire button |
 |
| First we draw the UI (Score etc) Next we clear the player sprite. |
|
| To slow down the acceleration, we have a 'timeout'... if a key was pressed, for a short time we'll ignore any other keys. | |
| We're going to process the input, We process each direction, and alter the acceleration of the player if a direction is pressed... We have a 'Bullet fire' routine (in the common code) for Fire 1 Fire 2 will immediately stop the player If any button is pressed, the key timeout is set |
|
| Finally we run the multiplatform 'Draw and Move' routine, this draws the player, and handles movement and drawing of enemies and bullets | |
Clear Screen and Print Char
| To clear the screen (CLS), we need to wipe the bitmap area
at address "ScreenRam" The screen buffer is 32256 bytes |
 |
| PrintChar will show a character to the screen, using a
bitmap font the same as the sprites... We need to calculate the position in the font data of the character Each Character is 32 bytes, and there are no characters below 32 (space) We also need to multiply up the X,Y pos into an 8x8 grid position. Once we've shown a character, we increment the X position for the next character |
 |
Sprite routines
| We have a couple of ShowSprite routines... BlankSprite will draw the empty sprite (Space in the font), using the object A4 - to clear the old position of the object |
|
| GetSpriteAddr will calculate the address in ram of the
sprite data we want to show to the screen... each sprite is 32
bytes We also handle the sprite frame... there are 4 frames of animation for each sprite - each bank is 512 bytes (16 sprites) |
|
| DoGetSpriteObj will show object A4 to the screen, getting
Sprite, and XY pos from A4 ShowSprite will draw Sprite D0 onscreen (at XY position D1,D4) We transfer the bytes of the sprite to the 4 bitplanes of the graphics screen (in 4 consecutive words of vram) **** |
 |
Get Screen Pos
| The Get ScreenPos function will take an XY pos in D1 and
D4... it will return a screen memory address in A2 Each line is 160 bytes , 4 bitplanes are next to each other as words, eg $0000 $1111 $2222 $3333 |
 |
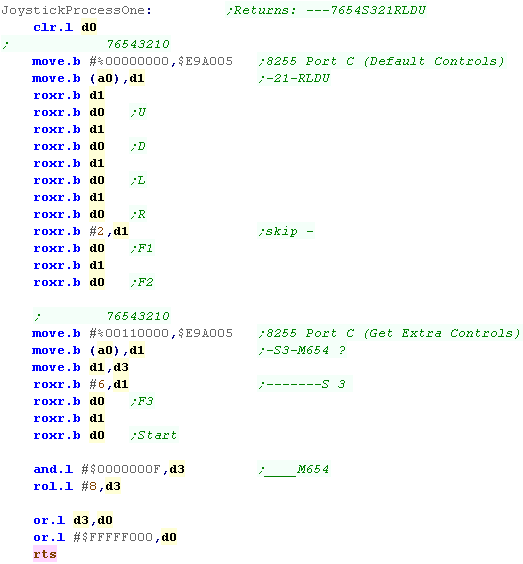
Joystick Reading
| To operate the joysticks we need to add a handler to the
Atari OS. We need to get the 'IKBD' vector table, then put our 'Joystick Handler' into it This makes 'Joystick Handler' run every time a button is pressed - we then store the data from the joysticks in two bytes of 'Joystick Data' for later. The format of the read in byte is %F---RLDU |
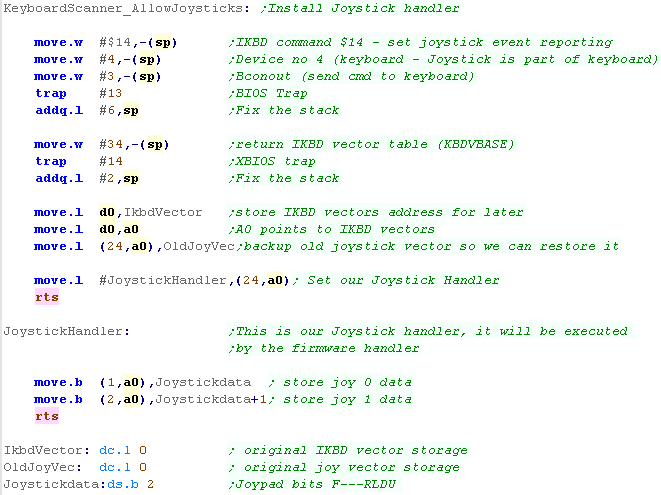 |
| We convert this into the format %---FRLDU | 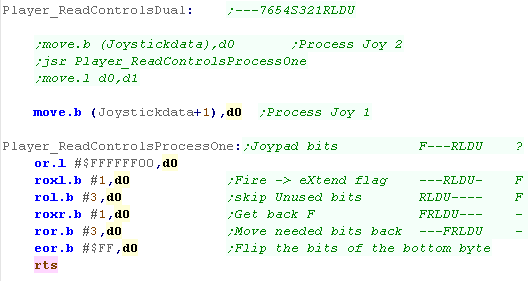 |
| We also have a 'Wait for fire' function... this randomizes
the seed, and waits for fire to be released, then pressed. It's used for menus and between levels. |
|
Sprite Data, Palette and screen ram
| We have 5 different files of sprites 96 for the font 16x4 for the 4 banks of sprites |
 |
| We need to define a palette (in Atari ST format) | 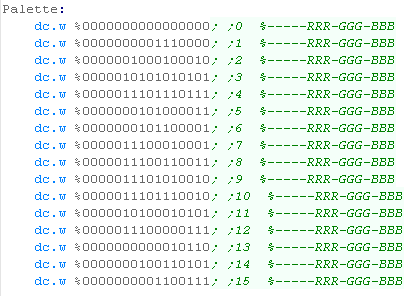 |
| We need to define enough space for the screen ram, the
screen is 32000 bytes in size, but we need it to be aligned on
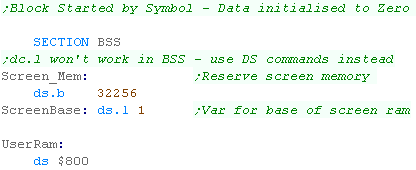
a byte boundary, so we allocate 32256 bytes We need to define $800 bytes of ram for game variables |
 |
|
The
graphics routine here is based on the old ones The horizontal movement is pretty jerky here... we'll need to make a better sprite routine to fix that, but we'll look at that next time! |
Multiplatform Sprite code
| We had an unused byte in the object definitions before... We're
going to use it now! This will be the 'Hardware sprite number'... A Zero will be the same as before - a tile will be used 1+ will be a numbered hardware sprite - relating to one of the hardware sprites the system is capable of. This flexibility to use tiles or hardware sprites helps with systems with small numbers of hardware sprites |
 |
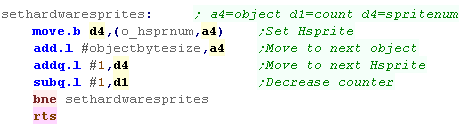
| We'll need to set banks of objects to consecutive sprite numbers
(EG bullets)... We use SetHardwareSprites to do this. |
 |
| We need to alter the DrawAndMove function and check the
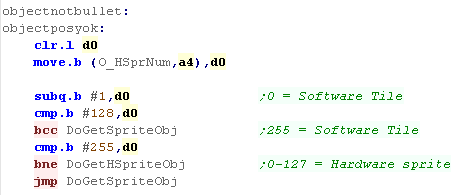
'hardware sprite number' Values 1-128 are hardware sprites... other values (0 / 255 etc) are soft sprites |
 |
x68000 Hardware sprite code
| We need to extend the display init routine... we need some extra
settings for hardware sprites to set them up and enable them... Note, these settings are different depending on the screen mode... take a look here |
 |
|||||||||||||||||||||||||||||||||||||||||||||||||||||||||||||||||||||||||||||||||||||||||||||||
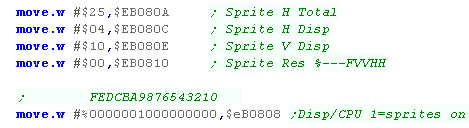
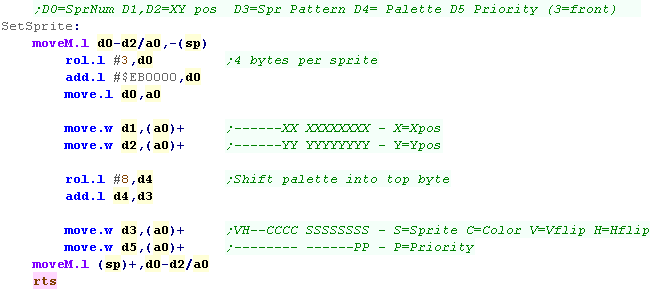
| Hardware sprites don't use the same palette... we use address
$E82200+ for the palette (In the same format as the normal
palette. The hardware sprites are 16x16, and are split into 4x 8x8 blocks in sprite ram... Sprite pattern ram is address $EB8000+ |
   |
|||||||||||||||||||||||||||||||||||||||||||||||||||||||||||||||||||||||||||||||||||||||||||||||
| We need to space out our sprites to convert them from 8x8 to
16x16 Use Tools menu ->Sprites->SpriteSpace in my Akusprite editor Of course AkuSprite Editor can export x68000 format sprites |
 |
|||||||||||||||||||||||||||||||||||||||||||||||||||||||||||||||||||||||||||||||||||||||||||||||
When we want to set a sprite, we write 4 consecutive words from
address $EB0000+
|
 |
|||||||||||||||||||||||||||||||||||||||||||||||||||||||||||||||||||||||||||||||||||||||||||||||
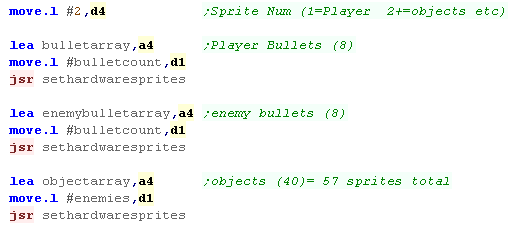
| Because each hardware sprite can only appear on the screen once,
We need to allocate hardware sprites to each object... we use the 'SetHardwareSprites' function to do this |
 |
|||||||||||||||||||||||||||||||||||||||||||||||||||||||||||||||||||||||||||||||||||||||||||||||
| We have a new DoGetHspriteObj function - this will do the same as the old DoGetSpriteObj, however it uses the new hardware sprite code, rather than software sprites. | 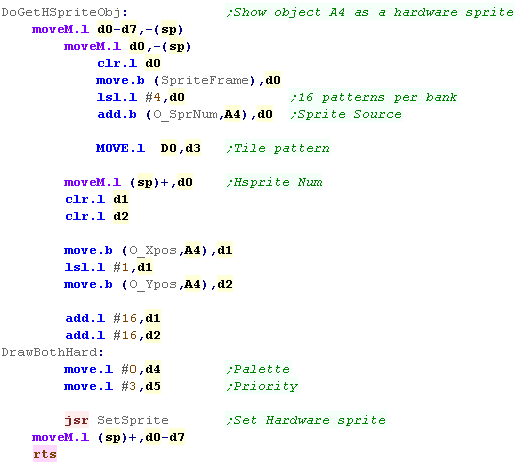 |
|||||||||||||||||||||||||||||||||||||||||||||||||||||||||||||||||||||||||||||||||||||||||||||||
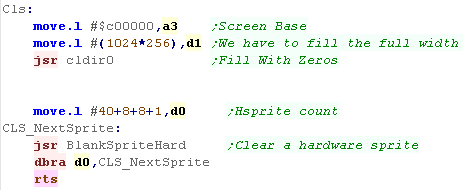
| Because hardware sprites are a separate 'layer' - we need to
alter our Clear Screen Routine. We need to go through each hardware sprite, and remove it from the screen. |
 |
|||||||||||||||||||||||||||||||||||||||||||||||||||||||||||||||||||||||||||||||||||||||||||||||
| To remove a sprite we can just change it's XY co-ordinate to 0,0 - this is completely offscreen, so the sprite won't be drawn. | 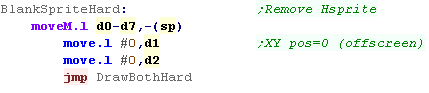 |
|||||||||||||||||||||||||||||||||||||||||||||||||||||||||||||||||||||||||||||||||||||||||||||||
| The fonts are still drawn with software sprites, but because objects are now drawn with Hardware sprites, they can now properly overlap. |  |
|
the
X68000 has incredibly powerful graphics, with multiple bitmap
layers, and 128 hardware sprites. It shouldn't really be a surprise though, as it's graphically as powerful as the Capcom CPS arcade system. |
Smooth movement - theory.
| Our sprite is 8 pixels wide... To move smoothly across the
screen, as it moves across the 'byte boundary' we'll need to split
its bits up and shift them accordingly.. in this screenshot, the code has been altered, so the 2nd byte is shifted a few pixels down...as the sprite moves, the shifted 2nd part will be clearly separate. |
 |
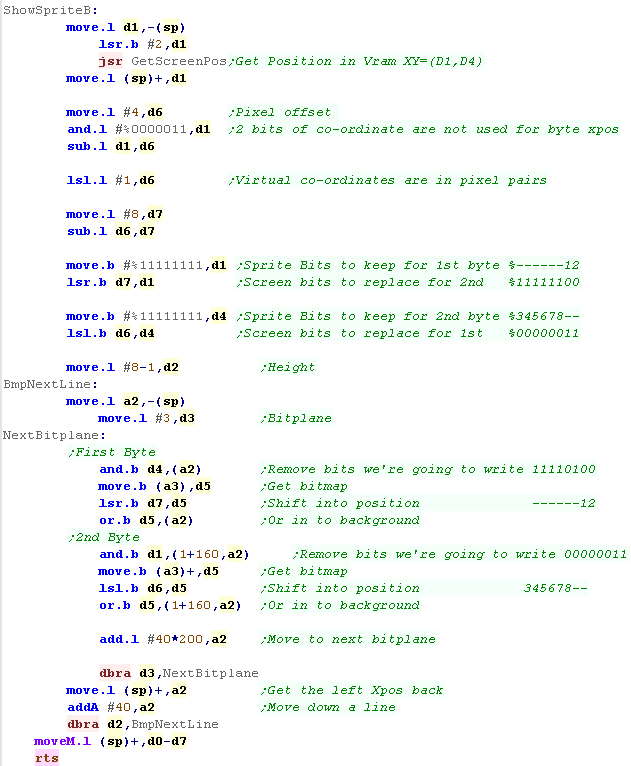
| We need to 'chop up' our 8 pixel sprite
into 2 parts... We'll need an AND mask for the background pixels to keep, then we'll shift our sprite pixels into those locations - we do this for the 2 horizontal bytes the 8 pixel wide sprite may occupy (if it's entirely in the first one, the second will actually be blank) We need to 'chop up' our 8 pixel sprite into 2 parts... Sprite
bits ------12
345678--Our virtual co-ordinates work at 128 units wide, meaning there's 4 possible positions for our sprite |
|
Amiga code
| Our code is similar to before. Once again, we calculate the screen byte position. We now use the 4 unused bits of the virtual position to calculate a 'shift' (D7/D6) and 'mask' (D1/D4) We use the mask to clear the bits of the background our sprite will overwrite, and the shifts to move the sprite into those positions. As before, we need to do this for all 4 bitplanes, and each of the 8 lines of our sprite. |
 |
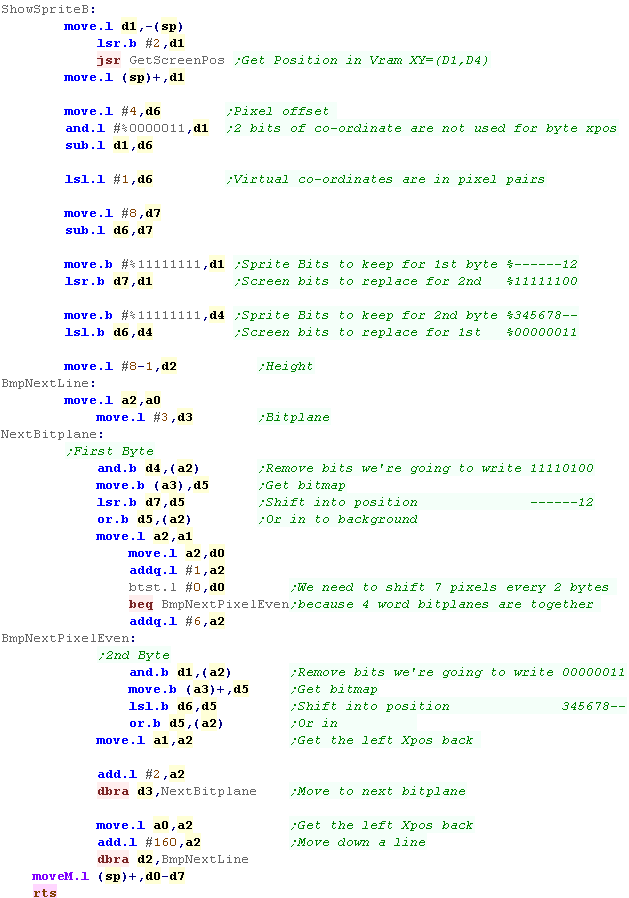
Atari ST code
The Atari ST code is basically the same as the Amiga, only on the Atari bitplanes are in neighboring words in RAM, making the 'next byte' code a little different. Once again, we calculate the screen byte position. We now use the 4 unused bits of the virtual position to calculate a 'shift' (D7/D6) and 'mask' (D1/D4) We use the mask to clear the bits of the background our sprite will overwrite, and the shifts to move the sprite into those positions. As before, we need to do this for all 4 bitplanes, and each of the 8 lines of our sprite. |
 |
|
Our code here
only works with 8 pixel sprites... a 24 pixel wide sprite would
be more complex, the 1st and 3rd byte would need masking, and
all 3 would need bitshifts. It's outside of the scope of what we're doing here, but it may be easier to design your game with a fixed sprite size, and make larger sprites out of multiple smaller ones, that way you can test and optimize one good sprite fast routine, rather than having a complex one that's not as well optimized |
| |
Lesson
YQuest10 - Hardware sprites on the Genesis We got Yquest working before with tilemap graphics, but that's not really enough! Lets extend Yquest and use hardware sprites. |
|
See
YQuest folder
|
|
Multiplatform Sprite code
| We had an unused byte in the object definitions before... We're
going to use it now! This will be the 'Hardware sprite number'... A Zero will be the same as before - a tile will be used 1+ will be a numbered hardware sprite - relating to one of the hardware sprites the system is capable of. This flexibility to use tiles or hardware sprites helps with systems with small numbers of hardware sprites |
|
| We'll need to set banks of objects to consecutive sprite numbers
(EG bullets)... We use SetHardwareSprites to do this. |
|
| We need to alter the DrawAndMove function and check the
'hardware sprite number' Values 1-128 are hardware sprites... other values (0 / 255 etc) are soft sprites |
|
Sprites
| In H40 mode (the mode used in these tutorials), we can have up
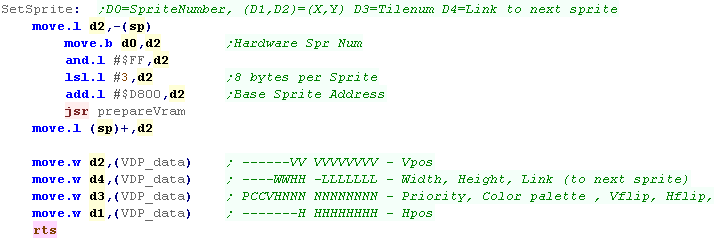
to 80 sprites onscreen... (H32 mode can do only 64) Each sprite can be 8x8 to 32x32 The position (and other settings) are defined by 8 by (4 Words) per sprite. The 'Link' Connects the sprites together, each sprite should point to the next (starting from Sprite 0) and the last sprite should point back to sprite 0, this is not like neogeo chaining,it doesn't make the sprites move together it doesn't make the sprites move together - it defines the 'draw order' of the active sprites. |
|
As we can see, Each sprite has 4 words, they use the same pattern data as the background...
| Address | F | E | D | C | B | A | 9 | 8 | |
7 | 6 | 5 | 4 | 3 | 2 | 1 | 0 | Details |
| $D800 | - | - | - | - | - | - | Y | Y | Y | Y | Y | Y | Y | Y | Y | Y | Y-Pos | |
| $D802 | - | - | - | - | W | W | H | H | - | L | L | L | L | L | L | L | Width (8,16,24,32), Height (8,16,24,32), Link (to next sprite) | |
| $D804 | P | C | C | V | H | N | N | N | N | N | N | N | N | N | N | N | Priority, Color palette , Vflip, Hflip, tile Number | |
| $D806 | - | - | - | - | - | - | - | X | X | X | X | X | X | X | X | X | X-pos |
MegaDrive (genesis) Hardware
sprite code
| The 'Link' part of hardware sprites builds a 'display order'... if it's not set for a hardware sprite, the sprite won't show... for this reason, we init all the hardware sprites we need with a link to the next using our 'Blank Sprite' routine. |  |
| When we want to set a sprite, we write 4 consecutive words
from Vram address $D800+ |
 |
| Because each hardware sprite can only appear on the screen
once, We need to allocate hardware sprites to each object... we use the 'SetHardwareSprites' function to do this |
|
| We have a new DoGetHspriteObj function - this will do the same
as the old DoGetSpriteObj, however it uses the new hardware
sprite code, rather than software sprites. We use the same patterns as the tile data. The top left visible screen position is (128,128) We need to calculate the 'link' for each sprite... each sprite 'links' to the next, except the last, which links to sprite 0 |
 |
| Because hardware sprites are a separate 'layer' - we need to
alter our Clear Screen Routine. We need to go through each hardware sprite, and remove it from the screen. |
|
| To remove a sprite we can just change it's XY co-ordinate to 0,0 - this is completely offscreen, so the sprite won't be drawn. | |
|
The Genesis makes using hardware sprites
easy!... we can use the same 8x8 patterns, and the sprites are
simple to use. The only tricky bit is that LINK parameter - if we don't set that up, we'll have no sprites visible! |
Multiplatform Sprite code
| We had an unused byte in the object definitions before...
We're going to use it now! This will be the 'Hardware sprite number'... A Zero will be the same as before - a tile will be used 1+ will be a numbered hardware sprite - relating to one of the hardware sprites the system is capable of. This flexibility to use tiles or hardware sprites helps with systems with small numbers of hardware sprites |
|
| We'll need to set banks of objects to consecutive sprite
numbers (EG bullets)... We use SetHardwareSprites to do this. |
|
| We need to alter the DrawAndMove function and check the
'hardware sprite number' Values 1-128 are hardware sprites... other values (0 / 255 etc) are soft sprites |
|
Hardware Sprites
| On the NeoGeo Sprites are 16
pixels wide, and are made up of tiles 16 pixels tall... they
are 16 colors (4 bitplanes) so each tile is 128 bytes... The
NeoGeo is capable of up to 380 sprites total. A sprite can be made up of up to 32 tiles to make the sprite taller... there is also a 'Chain' bit - this will connect a sprite to the previous sprite (Sharing its position) to make a sprite wider! Hardware sprite Tiles are not in the same format as the FIX layer - they are 16x16 pixels in size and use bitplanes, but the layout is odd, and they are split onto two rom files (C1/C2 or C3/C4 etc) The sprite is split into 2x 8 pixel wide 'columns' the rightmost one is stored first - each pair of bitplanes 0 & 1 are stored together in ROM C1 - and 2 & 3 are stores in ROM C2 - all 16 lines of the right half are stored first - then the 16 lines of the left side are stored - making a total of 128 bytes (64 in each file) |
Sprite Attributes
Each sprite is defined by 1-32 tile definitions, A palette/flip byte, a Scale byte, a Ypos/Height byte and an Xpos... lets see what all these bits do in detail!
Note, it's possible to scale a sprite DOWN, but it's not possible to scale them up...
| Address of | Bit | ||||||||||||||||||||
| Function | Sprite 1 | F | E | D | C | B | A | 9 | 8 | 7 | 6 | 5 | 4 | 3 | 2 | 1 | 0 | Purpose | Sample | ||
| TileAddr 1,2..32 | $0040,$0042�$007E | N | N | N | N | N | N | N | N | N | N | N | N | N | N | N | N | N=Tile Number L | $2000 | ||
| TilePal 1,2..32 | $0041,$0043...$007F | P | P | P | P | P | P | P | P | N | N | N | N | A | A | V | H | P=Pallete, N=tile Number H, A=Animate (4/8) V=Vflip H=Hflip | $0100 | ||
| Shrink | $8001 | - | - | - | - | H | H | H | H | V | V | V | V | V | V | V | V | H=H shrink (F=off), V=V shrink (FF=off) | $0FFF | ||
| Ypos | $8201 | Y | Y | Y | Y | Y | Y | Y | Y | Y | C | T | T | T | T | T | T | Y=Y pos (from bottom, so 248-Y) C=Chain another sprite on right, T=Tile count vertically | $E002 | ||
| Xpos | $8401 | X | X | X | X | X | X | X | X | X | - | - | - | - | - | - | - | X=X pos (from left) | $0800 | ||
Valid Tile Counts (T) are 1-12 , 32 and 33 (13-31 are invalid)
A special Tile Height of 33 makes the sprite the Full height of
screen - use for building a 'tilemap'
We need to set various addresses in the Sprite Attribute data... to do this we use two 68000 addresses...
First we write the Address of the Sprite Attribute we want to change to $3C0000, then we write the new word value for the address to $3C0002
| Sprite
Num |
TileAddr (1st) | TilePal (1st) | TileAddr (32nd) | TilePal (32nd) | Shrink | Ypos | Xpos |
| 0 | $0000 | $0001 | $003E | $003F | $8000 | $8200 | $8400 |
| 1 | $0040 | $0041 | $007E | $007F | $8001 | $8201 | $8401 |
| 2 | $0080 | $0081 | $00BE | $00BF | $8002 | $8202 | $8402 |
| 3 | $00C0 | $00C1 | $00FE | $00FF | $8003 | $8203 | $8403 |
| � | � | � | � | � | � | � | � |
| 379 | $5EC0 | $5EC1 | $5EC0 | $5EC1 | $817B | $837B | $857B |
NeoGeo Hardware sprite code
| Hardware sprites are defined in ROM - we need to set up our XML file so MAME knows where the files are, and where to map them in VRAM |  |
| Because each hardware sprite can only appear on the screen
once, We need to allocate hardware sprites to each object... we use the 'SetHardwareSprites' function to do this |
|
| We have a new DoGetHspriteObj function - this will do the
same as the old DoGetSpriteObj, however it uses the new
hardware sprite code, rather than software sprites. We get the X,Y pos of the sprite from the object... The Ypos on the NeoGeo is reversed (from the bottom) so we subtract our Ypos from 288+207 We use SetSprite to actually set the hardware sprite |
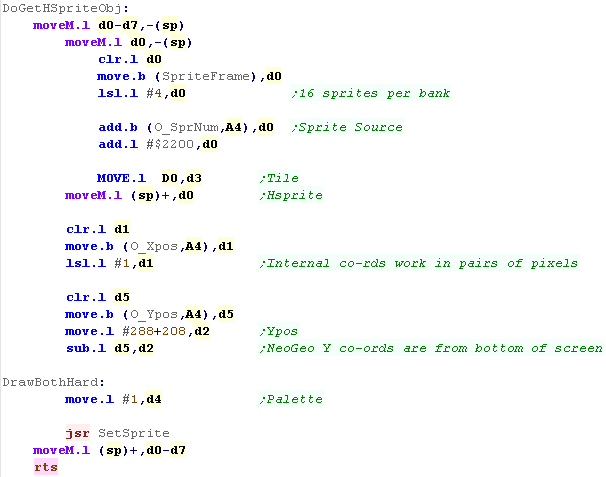 |
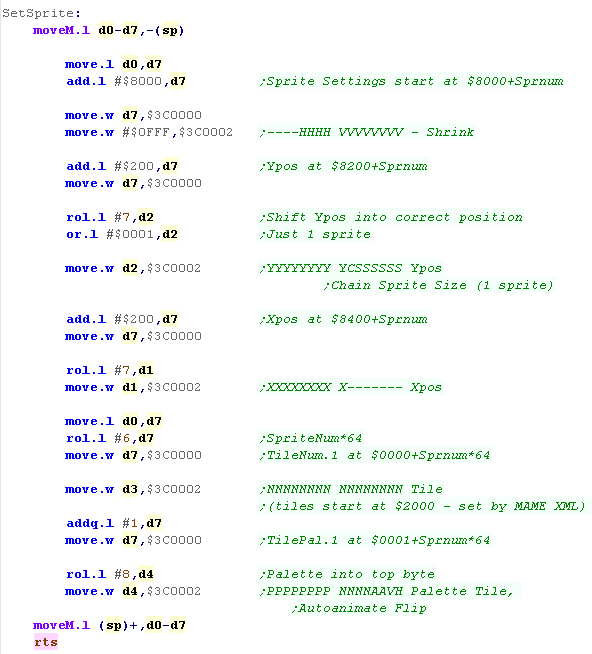
| SetSprite will set a hardware sprite of a single Tile
(16x16) We pass the Hardware sprite number in D0... the XY pos in D1,D2... the pattern in D3 and the palette in D4 |
 |
| Because hardware sprites are a separate 'layer' - we need to
alter our Clear Screen Routine. We need to go through each hardware sprite, and remove it from the screen. |
 |
| To remove a sprite we can just change it's XY co-ordinate to 0,0 - this is completely offscreen, so the sprite won't be drawn. | |
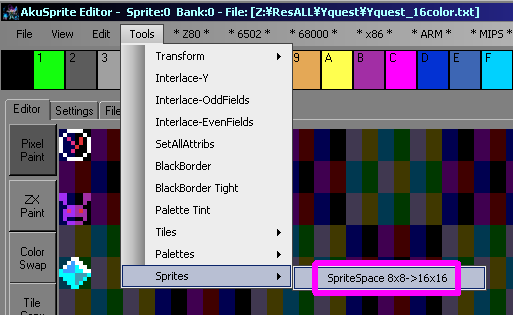
| The sprites on the neo-geo are 16x16, but our graphics are
8x8... We can covert our 8x8 tiles into 16x16 ones using the 'SpriteSpace' function of AkuSprite Editor |
 |
|
Remember, a
neogeo sprite can be more than 1 tile... and can be scaled. Here' we just using a single unscaled tile16x16 tile... but the neogeo is capable of much more. |
| View Options |
| Default Dark |
| Simple (Hide this menu) |
| Print Mode (white background) |
| Top Menu |
| ***Main Menu*** |
| Youtube channel |
| Patreon |
| Introduction to Assembly (Basics for absolute beginners) |
| Amazon Affiliate Link |
| AkuSprite Editor |
| ChibiTracker |
| Dec/Bin/Hex/Oct/Ascii Table |
| Alt Tech |
| Archive.org |
| Bitchute |
| Odysee |
| Rumble |
| DailyMotion |
| Please note: I wlll upload more content to these alt platforms based on the views they bring in |
| 68000 Content |
| ***68000 Tutorial List*** |
Learn 68000 Assembly  |
| Hello World Series |
| Platform Specific Series |
| Simple Samples |
| Grime 68000 |
| 68000 Downloads |
| 68000 Cheatsheet |
| Sources.7z |
| DevTools kit |
| 68000 Platforms |
| Amiga 500 |
| Atari ST |
| Neo Geo |
| Sega Genesis / Mega Drive |
| Sinclair QL |
| X68000 (Sharp x68k) |
| 8086 Content |
| Learn 8086 Assembly |
| Platform Specific Series |
| Hello World Series |
| Simple Samples |
| 8086 Downloads |
| 8086 Cheatsheet |
| Sources.7z |
| DevTools kit |
| 8086 Platforms |
| Wonderswan |
| MsDos |
| ARM Content |
| Learn ARM Assembly |
| Learn ARM Thumb Assembly |
| Platform Specific Series |
| Hello World |
| Simple Samples |
| ARM Downloads |
| ARM Cheatsheet |
| Sources.7z |
| DevTools kit |
| ARM Platforms |
| Gameboy Advance |
| Nintendo DS |
| Risc Os |
| Risc-V Content |
| Learn Risc-V Assembly |
| Risc-V Downloads |
| Risc-V Cheatsheet |
| Sources.7z |
| DevTools kit |
| MIPS Content |
| Learn Risc-V Assembly |
| Platform Specific Series |
| Hello World |
| Simple Samples |
| MIPS Downloads |
| MIPS Cheatsheet |
| Sources.7z |
| DevTools kit |
| MIPS Platforms |
| Playstation |
| N64 |
| PDP-11 Content |
| Learn PDP-11 Assembly |
| Platform Specific Series |
| Simple Samples |
| PDP-11 Downloads |
| PDP-11 Cheatsheet |
| Sources.7z |
| DevTools kit |
| PDP-11 Platforms |
| PDP-11 |
| UKNC |
| TMS9900 Content |
| Learn TMS9900 Assembly |
| Platform Specific Series |
| Hello World |
| TMS9900 Downloads |
| TMS9900 Cheatsheet |
| Sources.7z |
| DevTools kit |
| TMS9900 Platforms |
| Ti 99 |
| 6809 Content |
| Learn 6809 Assembly |
| Learn 6309 Assembly |
| Platform Specific Series |
| Hello World Series |
| Simple Samples |
| 6809 Downloads |
| 6809/6309 Cheatsheet |
| Sources.7z |
| DevTools kit |
| 6809 Platforms |
| Dragon 32/Tandy Coco |
| Fujitsu FM7 |
| TRS-80 Coco 3 |
| Vectrex |
| 65816 Content |
| Learn 65816 Assembly |
| Hello World |
| Simple Samples |
| 65816 Downloads |
| 65816 Cheatsheet |
| Sources.7z |
| DevTools kit |
| 65816 Platforms |
| SNES |
| eZ80 Content |
| Learn eZ80 Assembly |
| Platform Specific Series |
| eZ80 Downloads |
| eZ80 Cheatsheet |
| Sources.7z |
| DevTools kit |
| eZ80 Platforms |
| Ti84 PCE |
| IBM370 Content |
| Learn IBM370 Assembly |
| Simple Samples |
| IBM370 Downloads |
| IBM370 Cheatsheet |
| Sources.7z |
| DevTools kit |
| Super-H Content |
| Learn SH2 Assembly |
| Hello World Series |
| Simple Samples |
| SH2 Downloads |
| SH2 Cheatsheet |
| Sources.7z |
| DevTools kit |
| SH2 Platforms |
| 32x |
| Saturn |
| PowerPC Content |
| Learn PowerPC Assembly |
| Hello World Series |
| Simple Samples |
| PowerPC Downloads |
| PowerPC Cheatsheet |
| Sources.7z |
| DevTools kit |
| PowerPC Platforms |
| Gamecube |
| Work in Progress |
| ChibiAndroids |
| Misc bits |
| Ruby programming |
Buy my Assembly programming book
on Amazon in Print or Kindle!


Available worldwide!
Search 'ChibiAkumas' on
your local Amazon website!
Click here for more info!


Buy my Assembly programming book
on Amazon in Print or Kindle!
Available worldwide!
Search 'ChibiAkumas' on
your local Amazon website!
Click here for more info!
Buy my Assembly programming book
on Amazon in Print or Kindle!
Available worldwide!
Search 'ChibiAkumas' on
your local Amazon website!
Click here for more info!