

|
Photon does not use bitmap graphic,
all the graphics are drawn at the pixel level... to port to a
new system you just need a PSET function to set a pixel and a
POINT function to read a pixel back...
All other graphics are drawn using
a LINE function, which uses the PSET function - PHOTON is
essentially a simple game, a tutorial on LINE and VECTOR image
drawing (With Scaling) AND a tutorial in Pixel plotting on each
system.
photon uses VECTREX packet format
for it's title graphics (Yes it uses the same format as the old
home console!), and a slightly tweaked Cpacket format (2 bytes
per line rather than 3) I designed to save space for it's font
and other bits... Akusprite Editor now has crude export
functions for these formats!
Photon is available on the CPC, Spectrum, MSX1, MSX2, Sam Coupe, Elan Enterprise, Master System, Game Gear... and now it's being ported to the 6502 and 68000 systems! |
 |
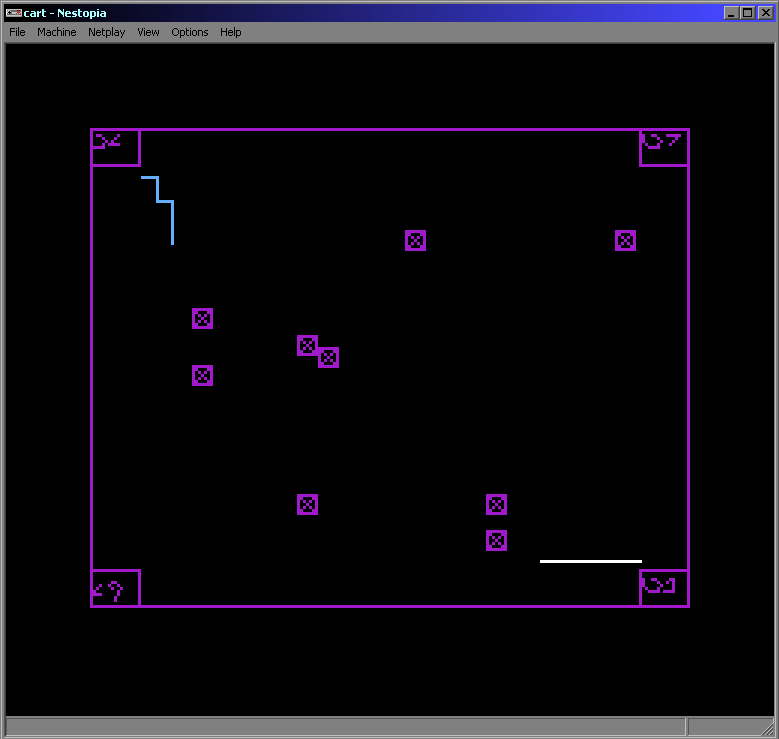
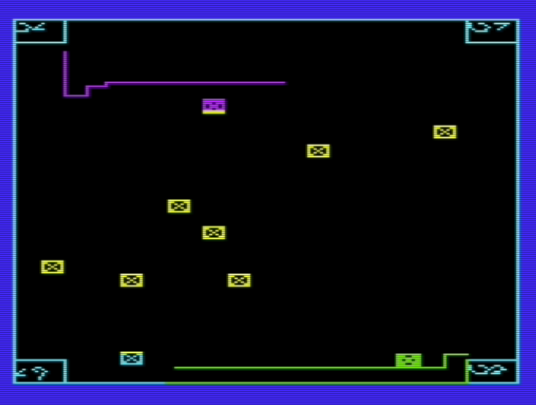
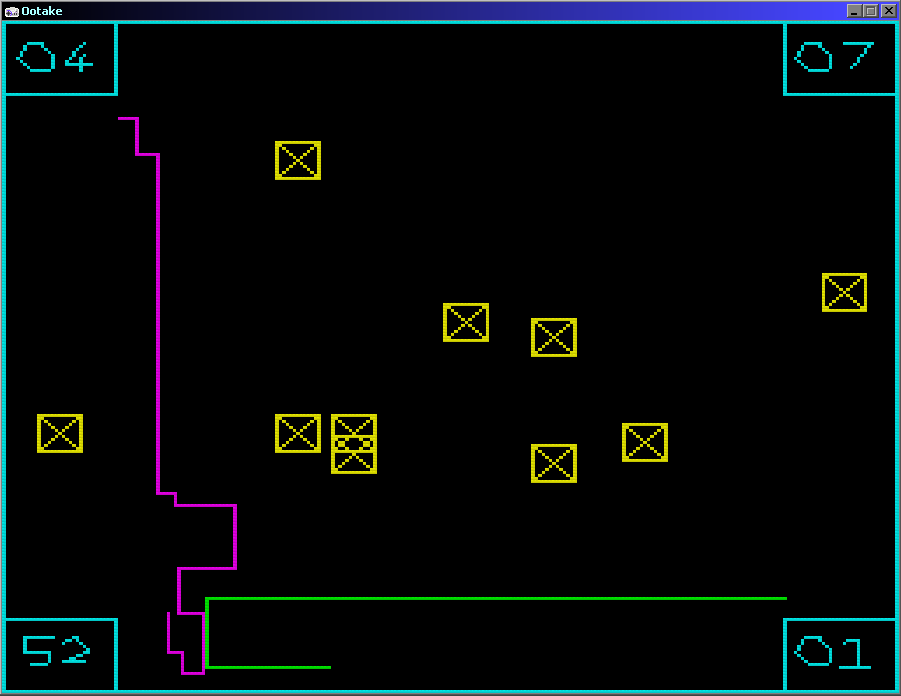
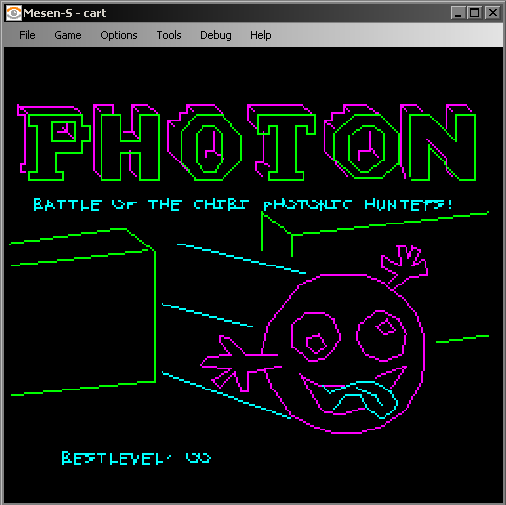
| Photon is a one player (Vs CPU) Light Cycle game - you have to
stay alive longer than your opponent to win a level. Death occurs when you hit a wall or light trail. Each win progresses the level (Shown bottom right), and increases CPU difficulty (Shown top right), and adds objects to the screen. The player has a 'boost' power (count in bottom left) to accelerate... you have four lives per game (shown top left) Photon's CPU AI is hardly amazing - the game is really a 'tech demo' for pixel plotting and multiplatform vector drawing. |
 |
| The drawing engine has it's own vector font, and is capable of
scaling all vector objects (only powers of 2... eg 1/4x 1/2x 1x 2x
4x) This allows the same title screen data to be drawn smaller on the gamegear... and fonts to be shown at different sizes |
 |
| Photon supports many different 8 bit systems - porting it to a new system really just consists of substituting the PSET and POINT routines |  |
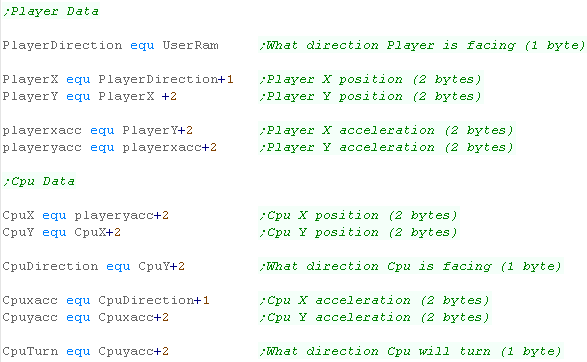
| The Player and CPU have various parameters for their position Direction is the current direction of movement - the game is controlled with Left and Right to turn - this is the current direction. X and Y are the current position in pixels (2 byte word) Xacc and Yacc are the current 'acceleration' - these are added/subtracted from the position each tick. CpuTurn is used by the AI to decide which direction the CPU will turn next time. |
 |
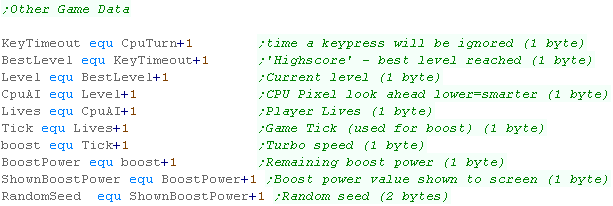
| The Game Engine needs some settings for the Level logic. KeyTimeout is for 'ignoring' player keys after a press BestLevel is the highest level the player has got to - effectively a highscore. Level is the current level (duh!) CpuAI is the CPU intelligence... lower means tighter corner turning making the CPU harder to trap. Lives is player lives Tick is used to handle player boost - normal speed is an update every other tick... boost is an update every tick Boost is used to mark player boost as enabled (Cpu doesn't use boost) BoostPower is the remaining 'Boost' - 99 units per level ShownBoostPower is the visible boost - used when redrawing the boost in the bottom left corner RandomSeed is the random seed for random number generation |
 |
| The Line and vector routines need some bytes of data XposDir and YposDir define if the movement are Up/Left or Down/Right Xpos24 and Ypos24 are the current pixel position (24 bit) Scale is the scaling factor... 1 2 4 = 1x 2x 4x ... -1 -2 -4 = 1/2 1/4 1/8 LineColor is the line color (obviously!) |
 |
 |
Note:
All these addresses are relative to the base address
'UserRam'... this is so the RAM data can be located where ever
free ram exists on the target platform. So the game can work on ROM machines, this is the only writable data, The is no self modifying code or altered data within the other areas of code. |
| Directions defines the 4 directions in the form of 2 words... these can be added to the position to affect a move | 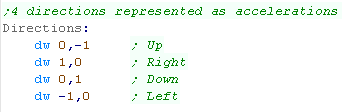 |
| Next we have some Random Number Lookup tables | 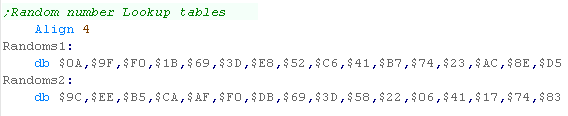 |
| We need to reset the player and Cpu location and settings each
level... we have the defaults here. |
 |
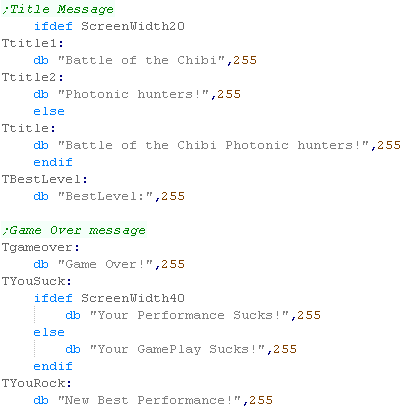
| Next we have the text messages used in the
game. |
 |
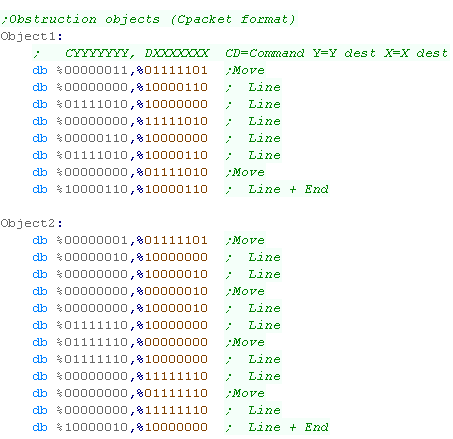
| Finally we have the Obstruction objects...
These are put in random places in the level to get in the way! These are in 'Cpacket format' (Compressed Vectrex Packet)... a format I made based on the 'Packet' format used by the Vectrex console. It uses a 7 bit X movement, a 7 bit Y movement, and a 2 bit Command There are 2 possible command - 1.Move drawing cursor to position (Byte 2 bit 7 = 0) 2. Draw from drawing cursor to position (Byte 2 bit 7 = 1) A Byte 2 bit 7 = 1 is the end of the list. |
 |
 |
The
Multiplatform code handles most of the game logic and vector
drawing routines - As they are converted from the Z80 version
we're not going to cover them here - all the function and
variable names are the same as is the structure - so please
watch Z80 lessons Photon 2-5 if you want to know more about how
the multiplaform code works. |

| Much of the code of
Photon is the same as the code in Yquest and the Simple series...
we're not going to cover things like setting up the screen or
reading the Joypad... We've covered it so many times before it's getting boring! |
 |
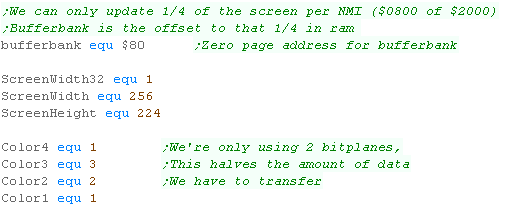
Data Definitions & Starting the game
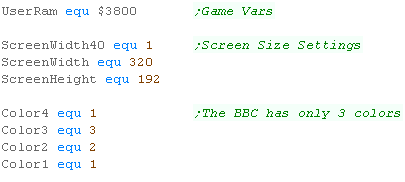
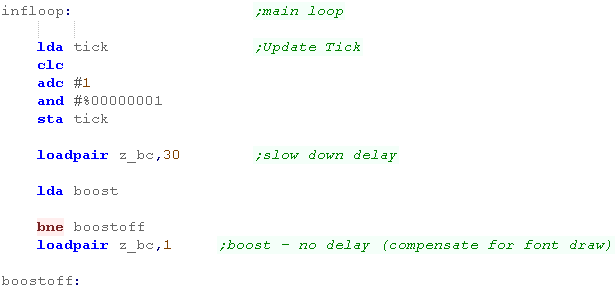
| Each system needs some platform specific settings. The first is an address of RAM for system vars - the game needs less than 256 bytes - this is the entirety of the RAM needed - the rest of the game can run from ROM We define some screen size vars - these set the scale for objects and font., and the boundaries of the screen for drawing the level. We also define some 'colors' ... the game uses up to 5 colors (Background 0 and 4 more) BUT some systems have fewer... on the BBC we have only 0-3... so we use color 1 for Colors 1+4 |
 |
| When the game starts we clear the game ram... We then show the Main menu. | 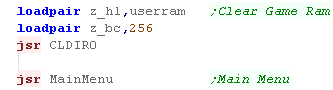 |
Main Game Loop
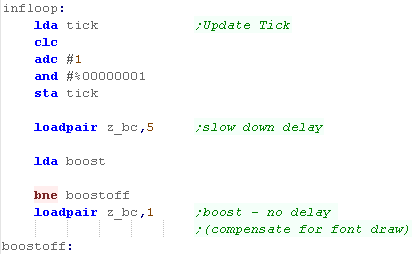
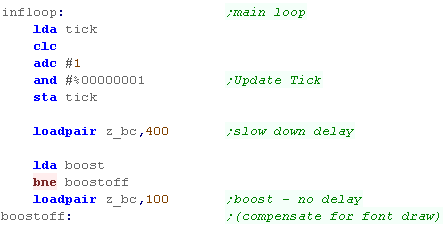
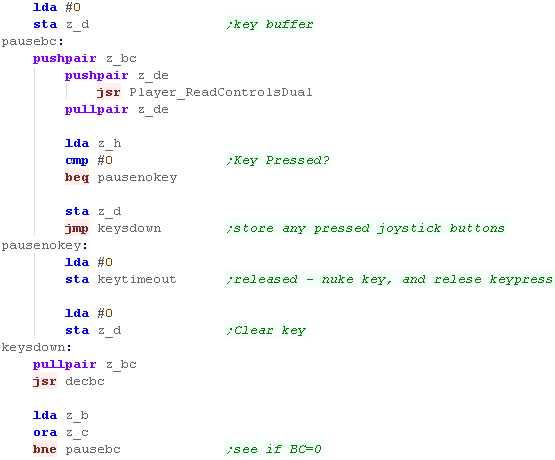
| At the start of the loop, we update the 'Tick' The Tick is 1 or 0 - this is used by the multiplatform code for boost (during which player moves at 2x speed) If Boost is ON we lower the delay - we need to speed the game up because redrawing the 'Boost counter' is too slow. |
 |
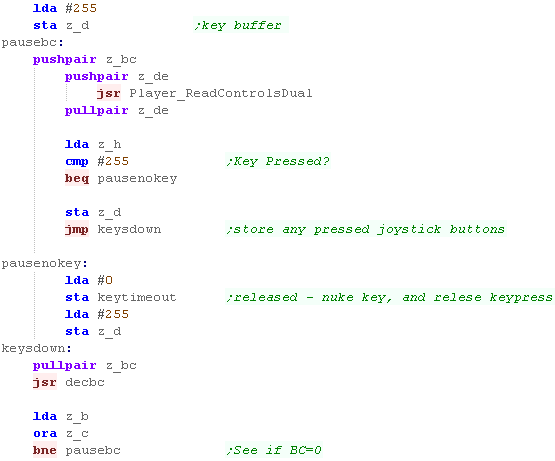
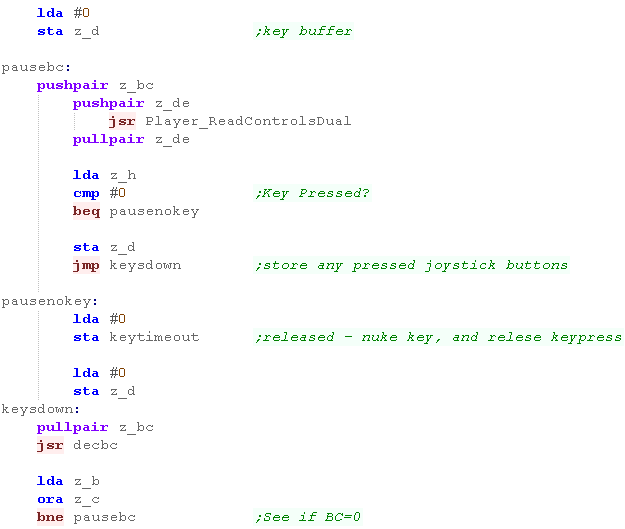
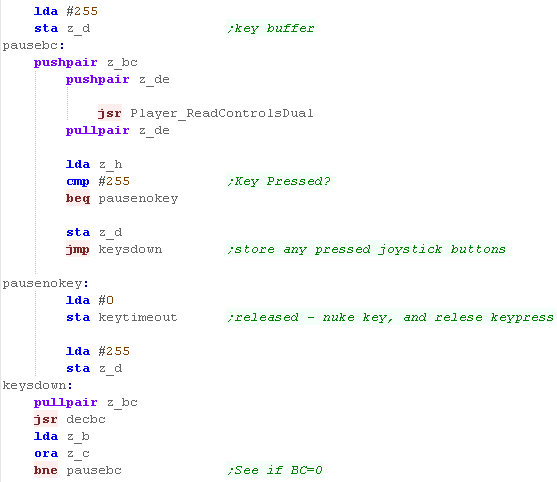
| During the pause loop we check the keypreses... if a key is not
held down we release the keytimeout The timeout means if we hold left we don't keep rotating around... we have to press left multiple times We store any keypresses in z_D - and wait until z_BC reaches Zero |
 |
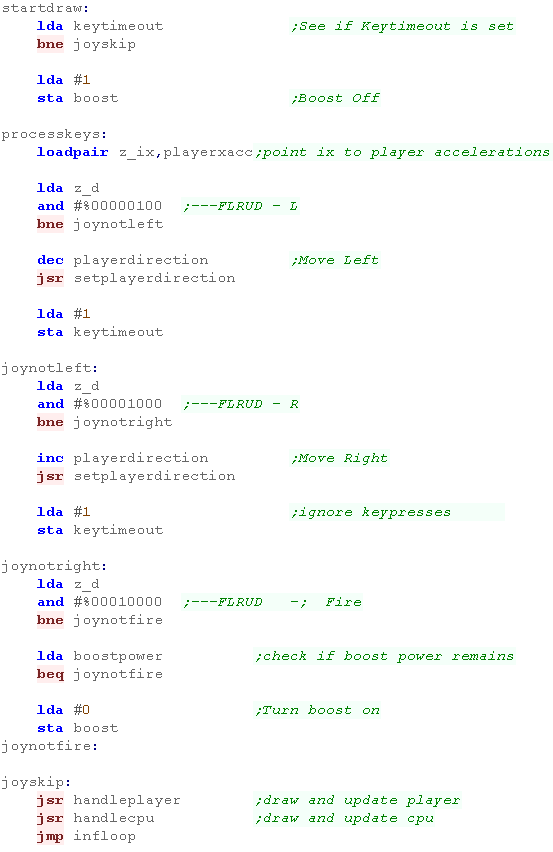
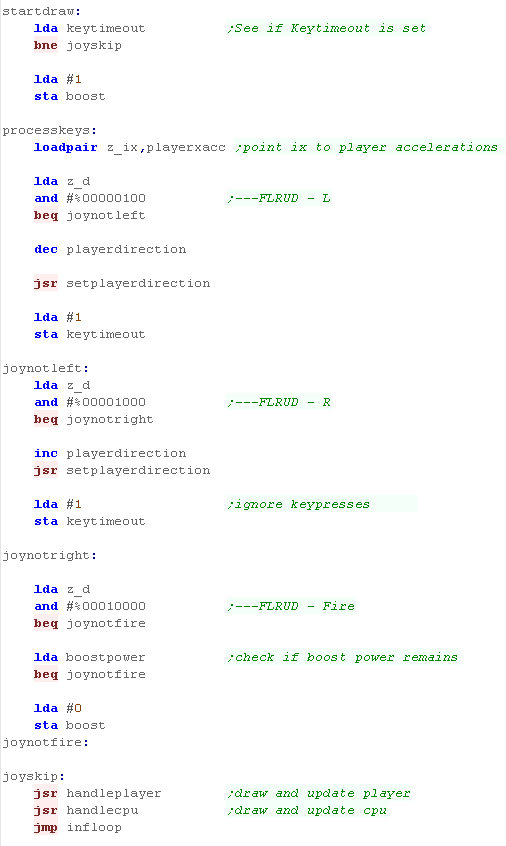
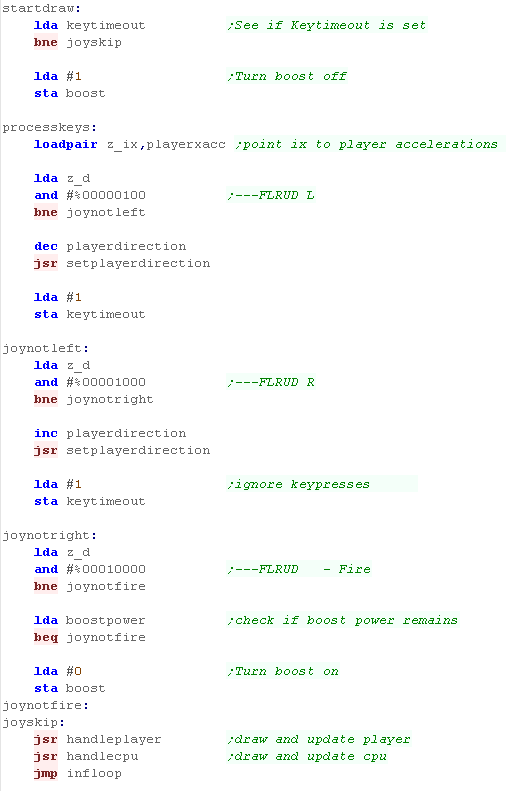
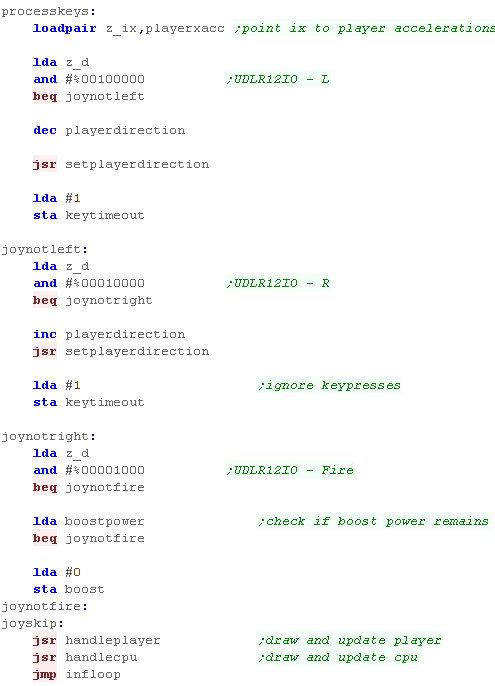
| If the Keytimeout is not cleared we will ignore Left / Right
keypresses. First we turn off Boost (it will be turned back on if FIRE is held) When we process Left or Right we INC/DEC the 'Player Direction' then run the SetPlayerDirection routine which handles the rest of setting the movement for the player. If Fire is pressed then we check if any 'Boost power' is left.. If there is, then we turn boost power on. Once the keypresses are handled, we update the player with 'Handle Player' Then we update the CPU with 'Handle CPU' That's it... We jump back to the start of the loop for the next tick. |
 |
PSET - Plot Pixel / POINT - Read pixel color
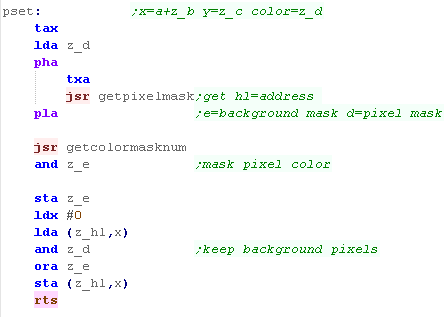
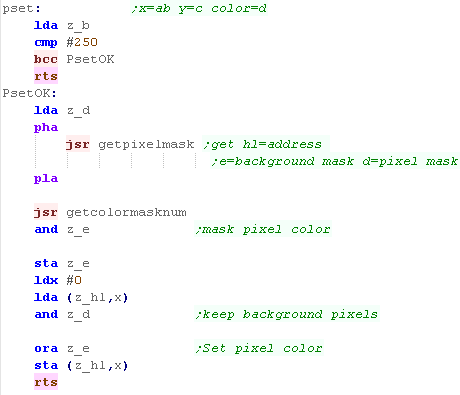
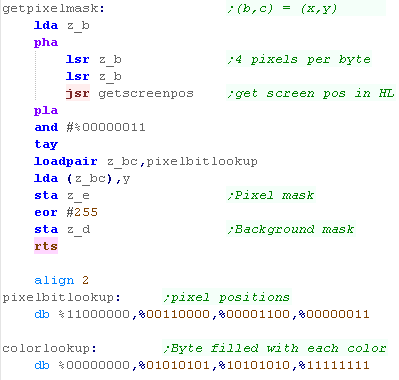
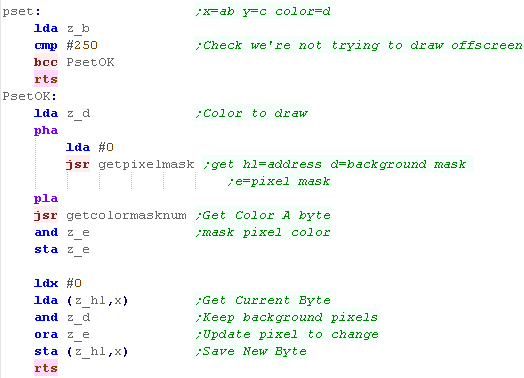
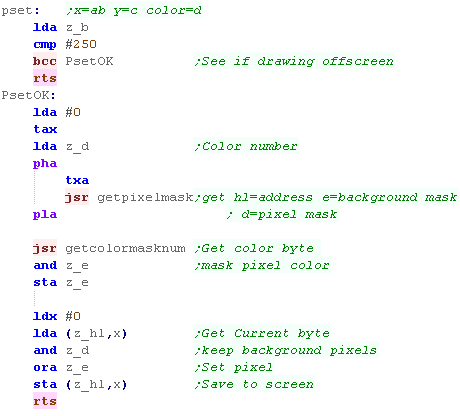
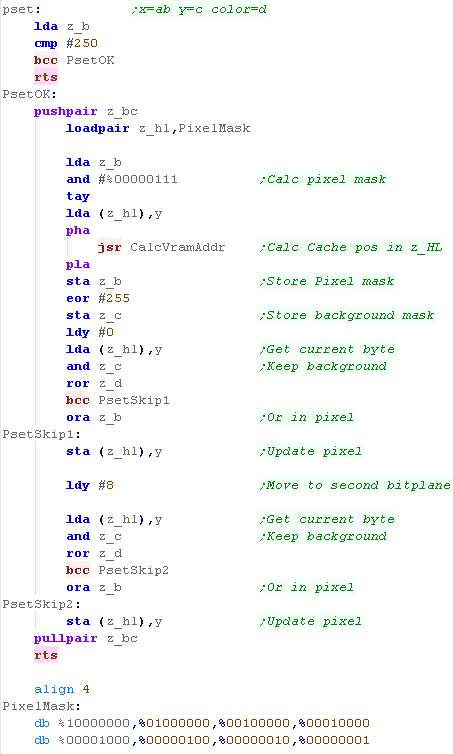
| The PSET command will set a pixel of the screen... The 16 bit X co-ordinate is defined by registers A z_B (A= High byte z_B= Low byte)... this is so we can support a 320 pixel wide screen The 8 Bit Y co ordinate is defined by z_C... only 8 bits, as our maximum screen is 200 pixels tall z_D is the new color for the pixel (0-3) GetPixelMask will calculate the screen byte we want to change (in z_HL)... the mask to keep the screen pixels we don't want to change will be in z_D... the mask for the pixel we want to change is z_E We next need to work out the bytes for the pixel color... we use GetColorMaskNum ANDing the result with E - this gives us the new value for the one pixel Finally we get the current screen byte... AND it with z_D - removing any pixel data for the pixel we want to change... then OR in the new pixel color from z_E |
 |
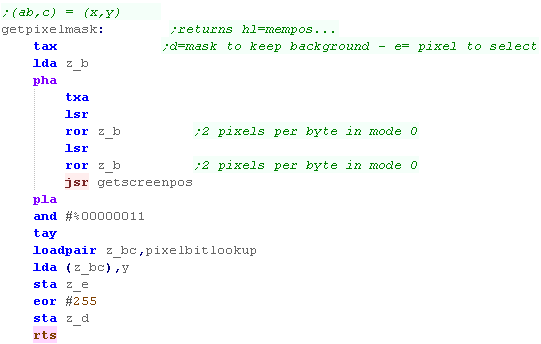
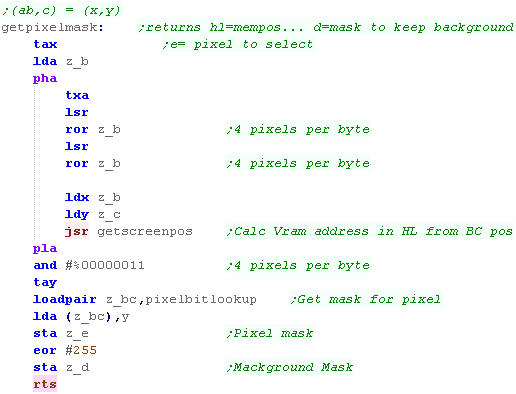
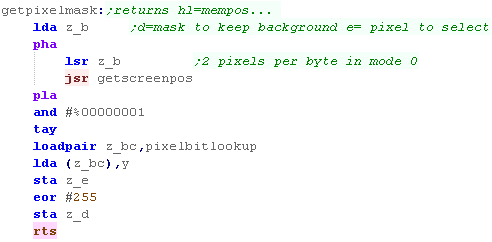
| Groups of 4 pixels are held in a single byte - the top and bottom
nibbles are effectively 'bitplanes' where one bit of each make up
the color number. depending on which of the 4 pixels in the byte we want to change, we'll return E as a mask for the pixel we want to change... and D as a mask we can AND with the background to clear the pixel we want to change. We first get the screen address with GetScreenPos to calculate the VRAM address of the byte containing the pixel.... Next we read the pixel mask for z_E from a lookup table... and flip the bits with EOR to get the background mask. The GetScreenPos routine is the same as Yquest. |
 |
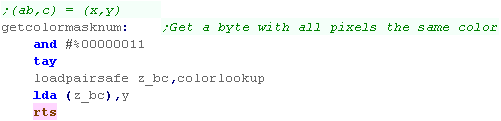
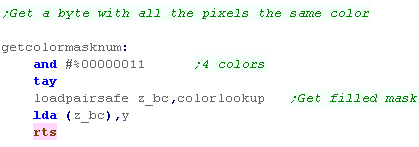
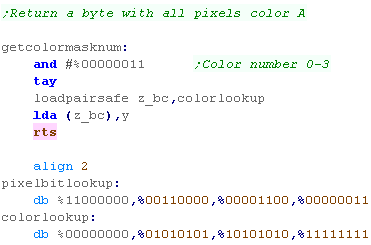
| GetColorMask number will get a byte where all 4 pixels are the
selected color in A We AND this with E from Get Pixel Mask to get the bits for the pixel we want, in the color we want. |
 |
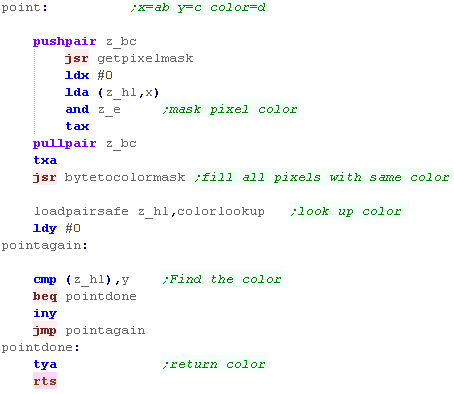
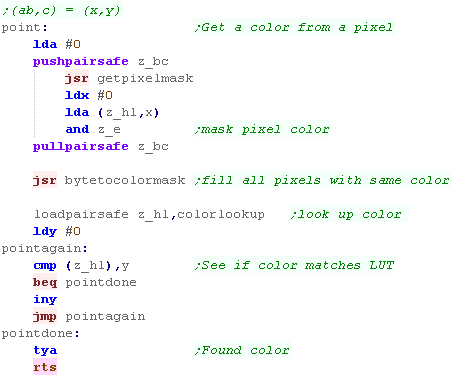
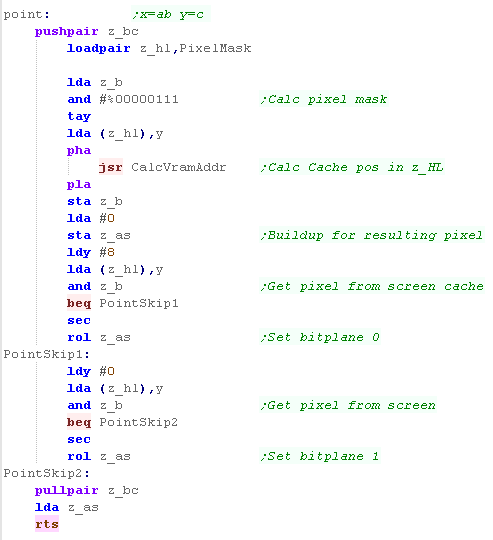
| POINT works in reverse to PSET... returning the color in A for
pixel AB,C Once again, we get the pixel mask, and read in the screen byte, ANDing it with E to get one pixel. We're going to convert this to a byte where all the pixels are the same color (so we can search for it in the Color Lookup) with Byte to Color Mask |
 |
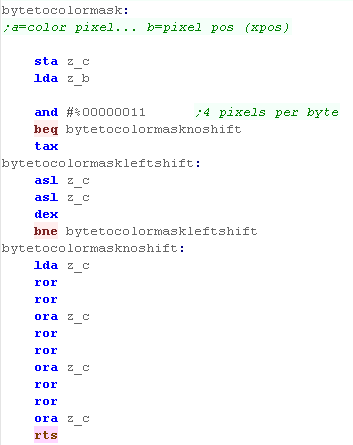
| Byte to color mask will take a single colored pixel, and fill all
the pixels in that byte with the same color. This is done by bit shifts and ORs to copy 1 pixel to all 4 |
 |
 |
The POINT routine here is excessive - as
PHOTON doesn't care what color a pixel is, just if it's black or
not. ALSO, it would be quicker to calculate the color number via bitshifts, rather than filling a byte and looking it up... but POINT is hardly used in this game, so speed isn't a problem, and the example here is easily ported to other systems, or converted for other screen modes |
 |
Lesson
Photon3 - Apple 2 - ASM PSET and POINT for Pixel
Plotting Lets look at the Apple II - working with the apple II is a bit tricky, as the screen layout uses 7 pixels per byte |
 |
 See
Photon folder
|
 |
| Much of the code of
Photon is the same as the code in Yquest and the Simple series...
we're not going to cover things like setting up the screen or
reading the Joypad... We've covered it so many times before it's getting boring! |
|
Data Definitions & Starting the game
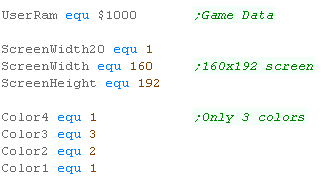
| Each system needs some platform specific settings. The first is an address of RAM for system vars - the game needs less than 256 bytes - this is the entirety of the RAM needed - the rest of the game can run from ROM We define some screen size vars - these set the scale for objects and font., and the boundaries of the screen for drawing the level. We also define some 'colors' ... the game uses up to 5 colors (Background 0 and 4 more) BUT some systems have fewer... on the Apple we're just using Black and White |
 |
| When the game starts we clear the game ram... We then show the Main menu. | |
Main Game Loop
| At the start of the loop, we update the 'Tick' The Tick is 1 or 0 - this is used by the multiplatform code for boost (during which player moves at 2x speed) If Boost is ON we lower the delay - we need to speed the game up because redrawing the 'Boost counter' is too slow. |
 |
| During the pause loop we check the keypreses... if a key is not
held down we release the keytimeout The timeout means if we hold left we don't keep rotating around... we have to press left multiple times We store any keypresses in z_D - and wait until z_BC reaches Zero |
 |
| If the Keytimeout is not cleared we will ignore Left / Right
keypresses. First we turn off Boost (it will be turned back on if FIRE is held) When we process Left or Right we INC/DEC the 'Player Direction' then run the SetPlayerDirection routine which handles the rest of setting the movement for the player. If Fire is pressed then we check if any 'Boost power' is left.. If there is, then we turn boost power on. Once the keypresses are handled, we update the player with 'Handle Player' Then we update the CPU with 'Handle CPU' That's it... We jump back to the start of the loop for the next tick. |
 |
PSET - Plot Pixel / POINT - Read pixel color
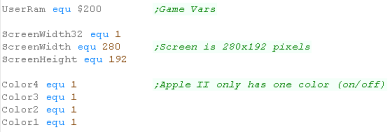
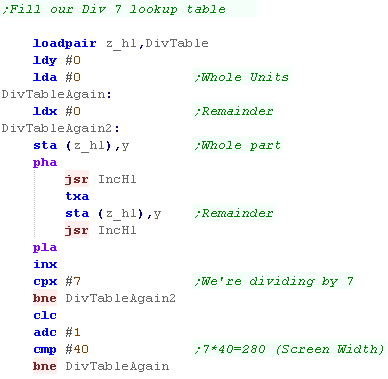
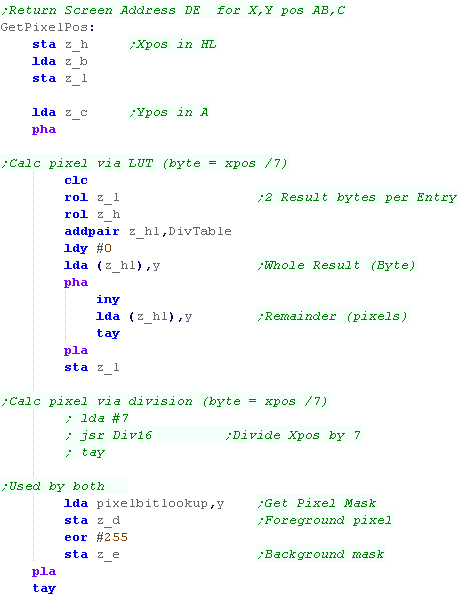
| The Apple II has a 280 pixel wide screen... this odd width comes
from the fact there are 7 pixels per byte (The top bit is a color
attribute bit) This poses a problem, we'll need to divide the Xpos by 7 to get the horizontal byte, but we can't do this by bitshifting. We could use a generic 16 bit divide command (Div16) - it's quite fast, but it's much slower than on other systems with 4 or 8 pixels per byte. The alternative is to create a 280x2 lookup table with pairs of bytes - each pair will be a 'result' of division of a number 0-279 by 7 The first byte is the 'whole number part' (0-39) - this is the horizontal byte. The second byte is the 'remainder part' (0-7) - this is the pixel within the byte. |
 |
| The PSET command will set a pixel of the screen... The 16 bit X co-ordinate is defined by registers A z_B (A= High byte z_B= Low byte)... this is so we can support a 280 pixel wide screen The 8 Bit Y co ordinate is defined by z_C... only 8 bits, as our screen is 192 pixels tall z_D is the new color for the pixel (0-3) GetPixelpos wiill calculate the screen byte we want to change (in z_DE)... the mask to keep the screen pixels we don't want to change will be in z_L... the mask for the pixel we want to change is z_H We get the current screen byte from (z_DE)... AND it with z_H- removing any pixel data for the pixel we want to change... then OR in the new pixel color from z_L - if we want to set the pixel (z_D=1) |
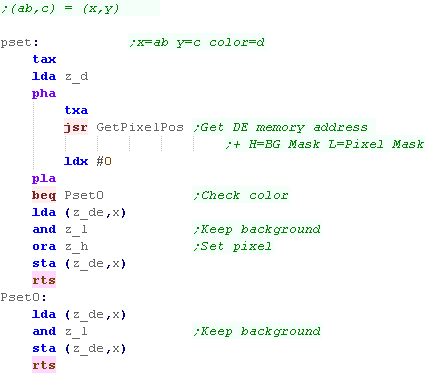 |
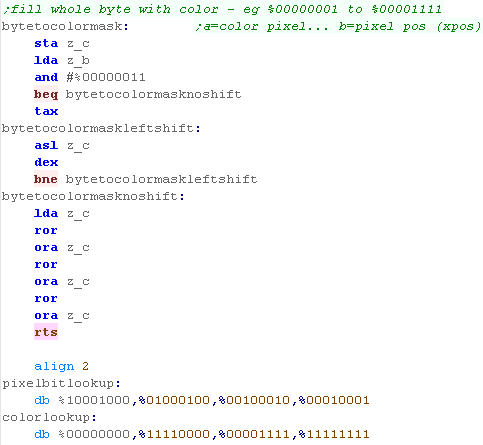
| GetPixelPos will calculate the memory address of the byte we want
to change in DE, and a mask for the background in H and a a
mask for the pixel in L We can calculate the horizontal byte in one of two ways... using a function 'Div16' - which is slow or with a lookuptable 'DivTable' - which takes a lot of memory... we have to make a choice! We use 'PixelBitLookup' to get the bitmask for the pixel within the byte, and flip it with EOR to get a mask for the remaining pixels. |
 |
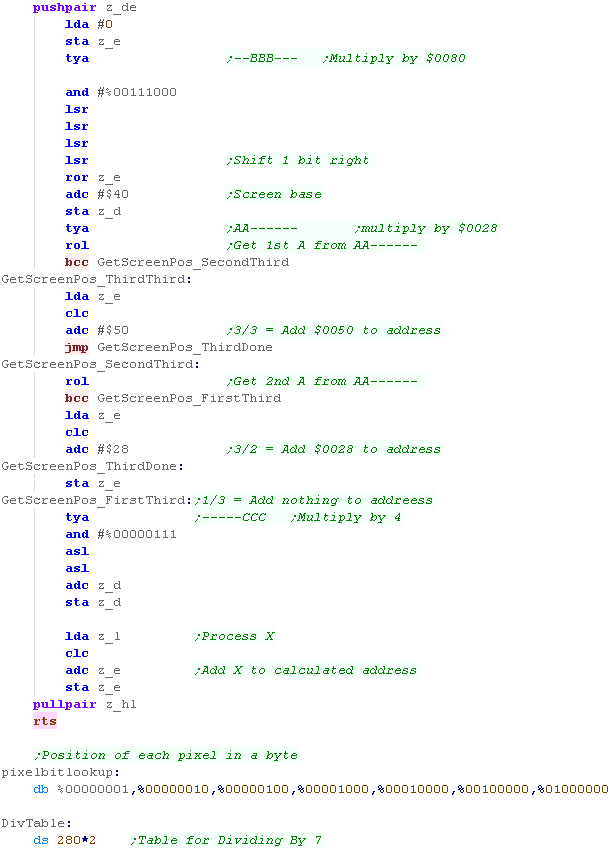
| We now need to calculate the memory address via the same X byte Y
line calculation we used in Yquest We also have the "pixelbitlookup" which has the masks for each pixel within a byte, and the 280x2 byte lookup table for our divide routine |
 |
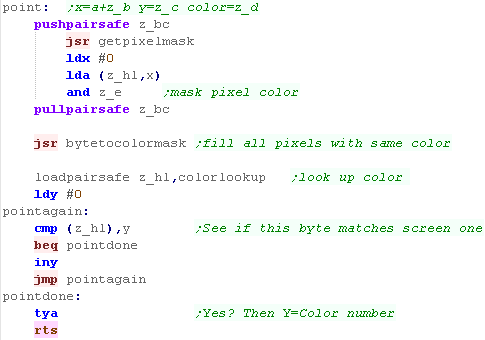
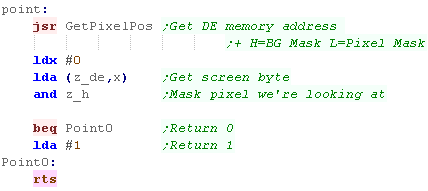
| POINT works in reverse to PSET... returning the color in A for
pixel AB,C Once again, we get the pixel mask, and read in the screen byte, ANDing it with H to get one pixel. If it's non-zero... 1 is returned to denote the pixel is on. |
 |
| This example
just works in black and white... you could use halve the
horizontal resolution, and the color attributes to make colored
graphics if you prefer. |
 |
 |
Lesson
Photon4 - Atari 800 / 5200 - ASM PSET and POINT for
Pixel Plotting Lets look at the Atari systems, we'll make the PSET and POINT routines for the Atari 4 color mode. |
|
See
Photon folder
|
|
| Much of the code of
Photon is the same as the code in Yquest and the Simple series...
we're not going to cover things like setting up the screen or
reading the Joypad... We've covered it so many times before it's getting boring! |
|
Data Definitions & Starting the game
| Each system needs some platform specific settings. The first is an address of RAM for system vars - the game needs less than 256 bytes - this is the entirety of the RAM needed - the rest of the game can run from ROM We define some screen size vars - these set the scale for objects and font., and the boundaries of the screen for drawing the level. We also define some 'colors' ... the game uses up to 5 colors (Background 0 and 4 more) BUT some systems have fewer... on the Atari we have only 0-3... so we use color 1 for Colors 1+4 |
 |
| When the game starts we clear the game ram... We then show the Main menu. | |
Main Game Loop
| At the start of the loop, we update the 'Tick' The Tick is 1 or 0 - this is used by the multiplatform code for boost (during which player moves at 2x speed) If Boost is ON we lower the delay - we need to speed the game up because redrawing the 'Boost counter' is too slow. |
 |
| During the pause loop we check the keypreses... if a key is not
held down we release the keytimeout The timeout means if we hold left we don't keep rotating around... we have to press left multiple times We store any keypresses in z_D - and wait until z_BC reaches Zero |
 |
| If the Keytimeout is not cleared we will ignore Left / Right
keypresses. First we turn off Boost (it will be turned back on if FIRE is held) When we process Left or Right we INC/DEC the 'Player Direction' then run the SetPlayerDirection routine which handles the rest of setting the movement for the player. If Fire is pressed then we check if any 'Boost power' is left.. If there is, then we turn boost power on. Once the keypresses are handled, we update the player with 'Handle Player' Then we update the CPU with 'Handle CPU' That's it... We jump back to the start of the loop for the next tick. |
 |
PSET - Plot Pixel / POINT - Read pixel color
| The PSET command will set a pixel of the screen... The 16 bit X co-ordinate is defined by registers A z_B (A= High byte z_B= Low byte)... this is so we can support a 320 pixel wide screen (On systems that have one) The 8 Bit Y co ordinate is defined by z_C... only 8 bits, as our maximum screen is 200 pixels tall z_D is the new color for the pixel (0-3) GetPixelMask will calculate the screen byte we want to change (in z_HL)... the mask to keep the screen pixels we don't want to change will be in z_D... the mask for the pixel we want to change is z_E We next need to work out the bytes for the pixel color... we use GetColorMaskNum ANDing the result with E - this gives us the new value for the one pixel Finally we get the current screen byte... AND it with z_D - removing any pixel data for the pixel we want to change... then OR in the new pixel color from z_E |
 |
| Groups of 4 pixels are held in a single byte - 2 neighboring bits
for each pixel depending on which of the 4 pixels in the byte we want to change, we'll return E as a mask for the pixel we want to change... and D as a mask we can AND with the background to clear the pixel we want to change. We first get the screen address with GetScreenPos to calculate the VRAM address of the byte containing the pixel.... Next we read the pixel mask for z_E from a lookup table... and flip the bits with EOR to get the background mask. The GetScreenPos routine is the same as Yquest. |
 |
| GetColorMask number will get a byte where all 4 pixels are the
selected color in A We AND this with E from Get Pixel Mask to get the bits for the pixel we want, in the color we want. |
 |
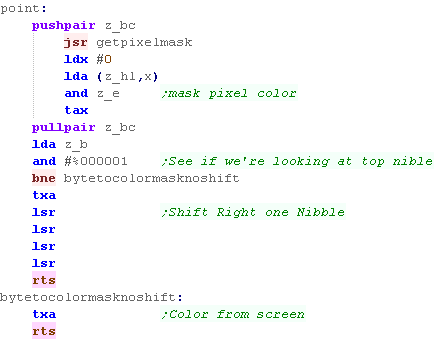
| POINT works in reverse to PSET... returning the color in A for
pixel AB,C Once again, we get the pixel mask, and read in the screen byte, ANDing it with E to get one pixel. We're going to convert this to a byte where all the pixels are the same color (so we can search for it in the Color Lookup) with Byte to Color Mask |
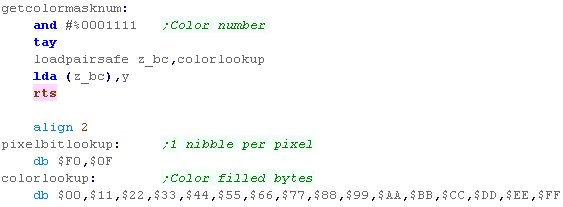
 |
| Byte to color mask will take a single colored pixel, and fill all
the pixels in that byte with the same color. This is done by bit shifts and ORs to copy 1 pixel to all 4 |
 |
|
The POINT routine here is excessive - as
PHOTON doesn't care what color a pixel is, just if it's black or
not. ALSO, it would be quicker to calculate the color number via bitshifts, rather than filling a byte and looking it up... but POINT is hardly used in this game, so speed isn't a problem, and the example here is easily ported to other systems, or converted for other screen modes |

| Much of the code of
Photon is the same as the code in Yquest and the Simple series...
we're not going to cover things like setting up the screen or
reading the Joypad... We've covered it so many times before it's getting boring! |
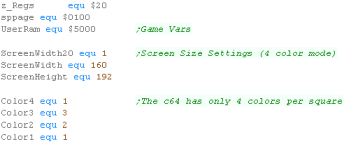
|
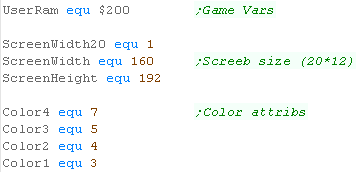
Data Definitions & Starting the game
| Each system needs some platform specific settings. The first is an address of RAM for system vars - the game needs less than 256 bytes - this is the entirety of the RAM needed - the rest of the game can run from ROM We define some screen size vars - these set the scale for objects and font., and the boundaries of the screen for drawing the level. We also define some 'colors' ... the game uses up to 5 colors (Background 0 and 4 more) BUT some systems have fewer... on the C64 we have only 0-3... so we use color 1 for Colors 1+4 |
 |
| When the game starts we clear the game ram... We then show the Main menu. | |
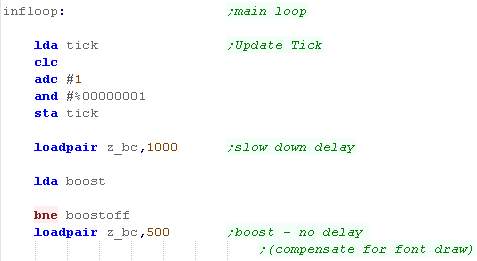
Main Game Loop
| At the start of the loop, we update the 'Tick' The Tick is 1 or 0 - this is used by the multiplatform code for boost (during which player moves at 2x speed) If Boost is ON we lower the delay - we need to speed the game up because redrawing the 'Boost counter' is too slow. |
 |
| During the pause loop we check the keypreses... if a key is not
held down we release the keytimeout The timeout means if we hold left we don't keep rotating around... we have to press left multiple times We store any keypresses in z_D - and wait until z_BC reaches Zero |
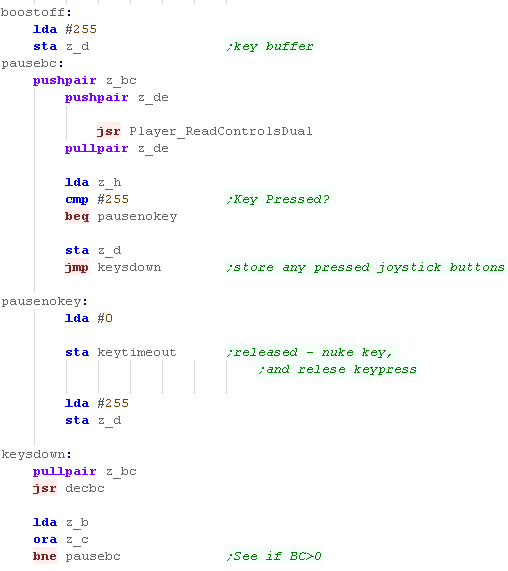 |
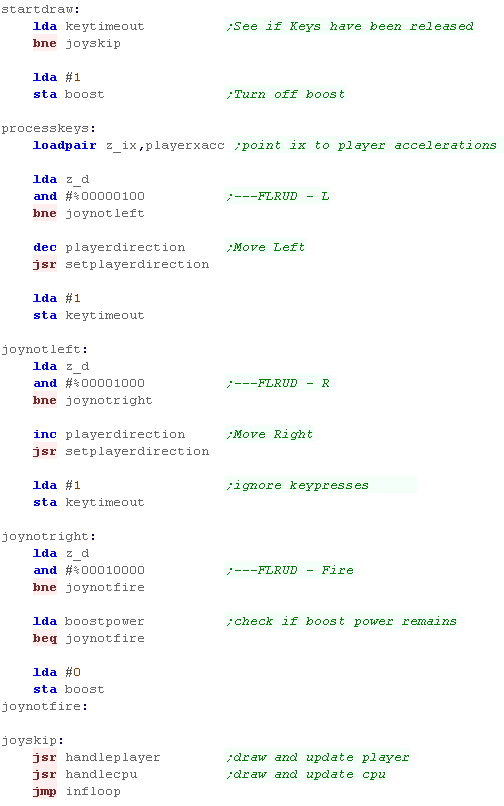
| If the Keytimeout is not cleared we will ignore Left / Right
keypresses. First we turn off Boost (it will be turned back on if FIRE is held) When we process Left or Right we INC/DEC the 'Player Direction' then run the SetPlayerDirection routine which handles the rest of setting the movement for the player. If Fire is pressed then we check if any 'Boost power' is left.. If there is, then we turn boost power on. Once the keypresses are handled, we update the player with 'Handle Player' Then we update the CPU with 'Handle CPU' That's it... We jump back to the start of the loop for the next tick. |
 |
PSET - Plot Pixel / POINT - Read pixel color
| The PSET command will set a pixel of the screen... The 16 bit X co-ordinate is defined by registers A z_B (A= High byte z_B= Low byte)... this is so we can support a 320 pixel wide screen The 8 Bit Y co ordinate is defined by z_C... only 8 bits, as our maximum screen is 200 pixels tall z_D is the new color for the pixel (0-3) GetPixelMask will calculate the screen byte we want to change (in z_HL)... the mask to keep the screen pixels we don't want to change will be in z_D... the mask for the pixel we want to change is z_E We next need to work out the bytes for the pixel color... we use GetColorMaskNum ANDing the result with E - this gives us the new value for the one pixel Finally we get the current screen byte... AND it with z_D - removing any pixel data for the pixel we want to change... then OR in the new pixel color from z_E |
 |
| Groups of 4 pixels are held in a single byte... pairs of bits
define the color for each pixel depending on which of the 4 pixels in the byte we want to change, we'll return E as a mask for the pixel we want to change... and D as a mask we can AND with the background to clear the pixel we want to change. We first get the screen address with GetScreenPos to calculate the VRAM address of the byte containing the pixel.... Next we read the pixel mask for z_E from a lookup table... and flip the bits with EOR to get the background mask for z_D. The GetScreenPos routine is the same as Yquest. |
 |
| GetColorMask number will get a byte where all 4 pixels are the
selected color in A We AND this with E from Get Pixel Mask to get the bits for the pixel we want, in the color we want. |
 |
| POINT works in reverse to PSET... returning the color in A for
pixel AB,C Once again, we get the pixel mask, and read in the screen byte, ANDing it with E to get one pixel. We're going to convert this to a byte where all the pixels are the same color (so we can search for it in the Color Lookup) with Byte to Color Mask |
 |
| Byte to color mask will take a single colored pixel, and fill all
the pixels in that byte with the same color. This is done by bit shifts and ORs to copy 1 pixel to all 4 |
 |
| While the PSET command sets colors 0-3, it does not set the color
attributes for the blocks. This is done during the CLS routine |
 |
|
The POINT routine here is excessive - as
PHOTON doesn't care what color a pixel is, just if it's black or
not. ALSO, it would be quicker to calculate the color number via bitshifts, rather than filling a byte and looking it up... but POINT is hardly used in this game, so speed isn't a problem, and the example here is easily ported to other systems, or converted for other screen modes |

| Much of the code of
Photon is the same as the code in Yquest and the Simple series...
we're not going to cover things like setting up the screen or
reading the Joypad... We've covered it so many times before it's getting boring! |
|
Data Definitions & Starting the game
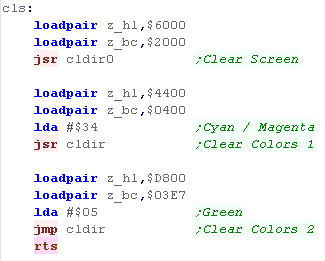
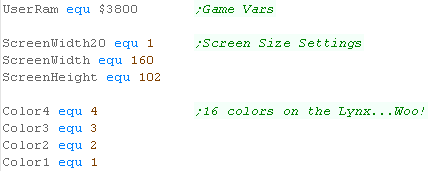
| Each system needs some platform specific settings. The first is an address of RAM for system vars - the game needs less than 256 bytes - this is the entirety of the RAM needed - the rest of the game can run from ROM We define some screen size vars - these set the scale for objects and font., and the boundaries of the screen for drawing the level... this configures the game engine for a smaller screen. We also define some 'colors' ... the game uses up to 5 colors (Background 0 and 4 more) and the lynx can use all of these |
 |
| When the game starts we clear the game ram... We then show the Main menu. | |
Main Game Loop
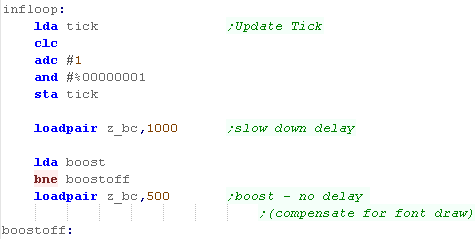
| At the start of the loop, we update the 'Tick' The Tick is 1 or 0 - this is used by the multiplatform code for boost (during which player moves at 2x speed) If Boost is ON we lower the delay - we need to speed the game up because redrawing the 'Boost counter' is too slow. |
 |
| During the pause loop we check the keypreses... if a key is not
held down we release the keytimeout The timeout means if we hold left we don't keep rotating around... we have to press left multiple times We store any keypresses in z_D - and wait until z_BC reaches Zero |
 |
| If the Keytimeout is not cleared we will ignore Left / Right
keypresses. First we turn off Boost (it will be turned back on if FIRE is held) When we process Left or Right we INC/DEC the 'Player Direction' then run the SetPlayerDirection routine which handles the rest of setting the movement for the player. If Fire is pressed then we check if any 'Boost power' is left.. If there is, then we turn boost power on. Once the keypresses are handled, we update the player with 'Handle Player' Then we update the CPU with 'Handle CPU' That's it... We jump back to the start of the loop for the next tick. |
 |
PSET - Plot Pixel / POINT - Read pixel color
| The PSET command will set a pixel of the screen... The 16 bit X co-ordinate is defined by registers A z_B (A= High byte z_B= Low byte)... this is so we can support a 320 pixel wide screen on systems that use it The 8 Bit Y co ordinate is defined by z_C... only 8 bits, as our maximum screen is 200 pixels tall z_D is the new color for the pixel (0-15) GetPixelMask will calculate the screen byte we want to change (in z_HL)... the mask to keep the screen pixels we don't want to change will be in z_D... the mask for the pixel we want to change is z_E We next need to work out the bytes for the pixel color... we use GetColorMaskNum ANDing the result with E - this gives us the new value for the one pixel Finally we get the current screen byte... AND it with z_D - removing any pixel data for the pixel we want to change... then OR in the new pixel color from z_E |
 |
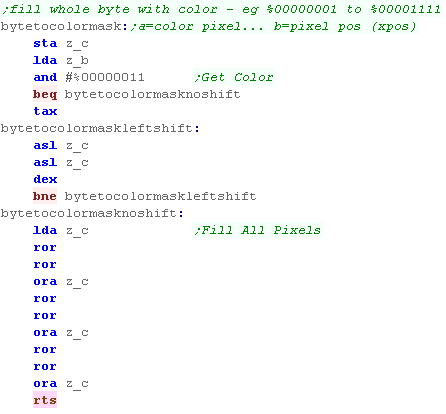
| Pairs of pixels are held in a single byte - the top and bottom
nibbles are separate pixels depending on which of the 2 pixels in the byte we want to change, we'll return E as a mask for the pixel we want to change... and D as a mask we can AND with the background to clear the pixel we want to change. We first get the screen address with GetScreenPos to calculate the VRAM address of the byte containing the pixel.... Next we read the pixel mask for z_E from a lookup table... and flip the bits with EOR to get the background mask. The GetScreenPos routine is the same as Yquest. |
 |
| GetColorMask number will get a byte where both pixels are the
selected color in A We AND this with E from Get Pixel Mask to get the bits for the pixel we want, in the color we want. |
 |
| POINT works in reverse to PSET... returning the color in A for
pixel AB,C Once again, we get the pixel mask, and read in the screen byte, ANDing it with E to get one pixel. We're going to convert this to a number from 0-15, we shift if the pixel we've loaded was the left pixel, it doesn't need shifting if it's the right one. |
 |
|
The POINT routine here is excessive - as
PHOTON doesn't care what color a pixel is, just if it's black or
not. ALSO, it would be quicker to calculate the color number via bitshifts, rather than filling a byte and looking it up... but POINT is hardly used in this game, so speed isn't a problem, and the example here is easily ported to other systems, or converted for other screen modes |

Data Definitions & Starting the game
| We're going to 8x16 chars, then configure the bits of those to set
pixels... because each character has a single color our pixels will
be pretty low res. We'll be using a ROM cartridge so we can have all the memory for our use. |
 |
| Each system needs some platform specific settings. The first is an address of RAM for system vars - the game needs less than 256 bytes - this is the entirety of the RAM needed - the rest of the game can run from ROM We define some screen size vars - these set the scale for objects and font., and the boundaries of the screen for drawing the level... this configures the game engine for a smaller screen. We also define some 'colors' - on the VIC these are the color attributes we'll transfer to the character when we set a pixel |
 |
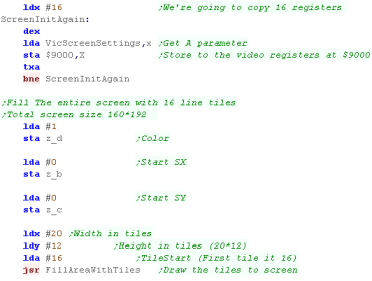
| We're going to set up our screen with some different settings this
time We set Bit 0 of reg $9003 to 1 to enable 16 pixel tall mode We set $9005 to CC - this defines both Screen and Char base as $1000 The First Char we use is 16 at $1100 - out the way of the screen ram. Color attributes are at $9400 as usual, though they will cover an 8*16 area now. Once we've set up the screen we use 'Fill Area With Tiles' to set each character of the screen to a consecutive character, we then alter those pixels that make up the character. |
 |
| Here are the screen settings we're using | 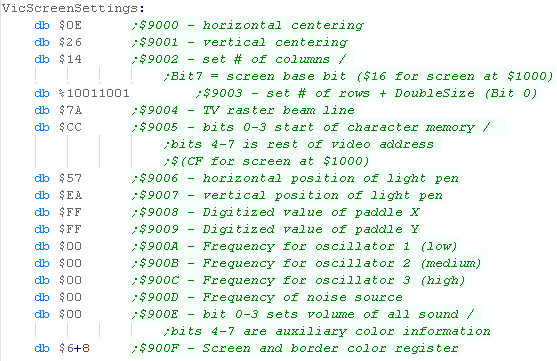 |
| When the game starts we clear the game ram... We then show the Main menu. | |
|
The FillAreaWithTiles
function is the same one we used in the SImple Series bitmap
example. You can find out more about it Here! |
Main Game Loop
| At the start of the loop, we update the 'Tick' The Tick is 1 or 0 - this is used by the multiplatform code for boost (during which player moves at 2x speed) If Boost is ON we lower the delay - we need to speed the game up because redrawing the 'Boost counter' is too slow. |
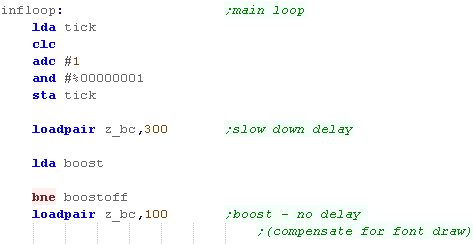 |
| During the pause loop we check the keypreses... if a key is not
held down we release the keytimeout The timeout means if we hold left we don't keep rotating around... we have to press left multiple times We store any keypresses in z_D - and wait until z_BC reaches Zero |
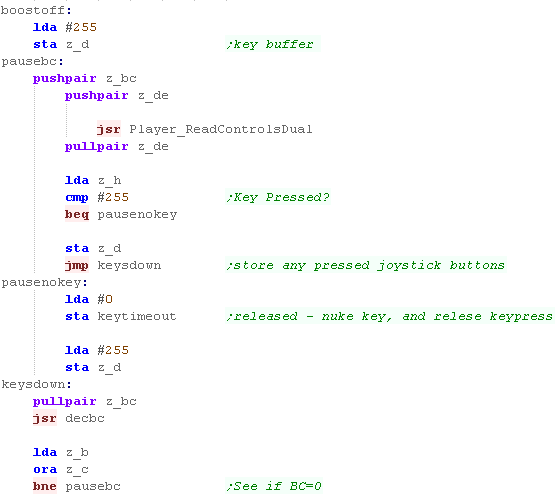 |
| If the Keytimeout is not cleared we will ignore Left / Right
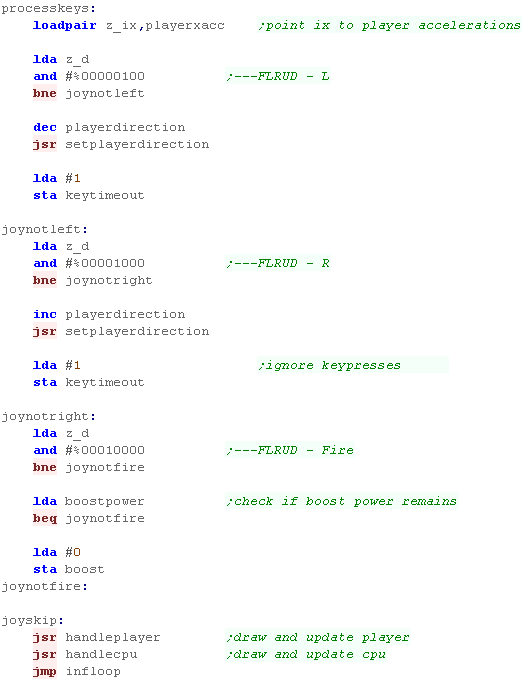
keypresses. First we turn off Boost (it will be turned back on if FIRE is held) When we process Left or Right we INC/DEC the 'Player Direction' then run the SetPlayerDirection routine which handles the rest of setting the movement for the player. If Fire is pressed then we check if any 'Boost power' is left.. If there is, then we turn boost power on. Once the keypresses are handled, we update the player with 'Handle Player' Then we update the CPU with 'Handle CPU' That's it... We jump back to the start of the loop for the next tick. |
 |
PSET - Plot Pixel / POINT - Read pixel color
| The PSET command will set a pixel of the screen... The 16 bit X co-ordinate is defined by registers A z_B (A= High byte z_B= Low byte)... this is so we can support a 320 pixel wide screen on systems that use it The 8 Bit Y co ordinate is defined by z_C... only 8 bits, as our maximum screen is 200 pixels tall z_D is the new color for the pixel (0-15) First we check if we're trying to draw offscreen (Minus Xpos) we return if we are. Next we need to calculate a the pixel pos within the byte - each byte contains 8 pixels. We use CalcVramAddr to get the pixel address within the characters definition (in z_HL) We have he mask to set a pixel in A, we store this in z_b, and flip the bits with EOR, This is now the background mask. - we store this in Z_C We now read in the current screen byte, and remove the pixel we're changing by ANDing with Z_c Next we check the color we're working with (Z_D).. if it's zero we need to skip setting the pixel, if we need to set the pixel with OR Z_B and store back to the screen. We've set the pixel, but we need to set the color - there's one color per 8x16 block, so we bitshift the B,C screenpos to a char number, and use GetVDPScreenpos to get the character base... We then add $8400 to get the address of the character color attribute. |
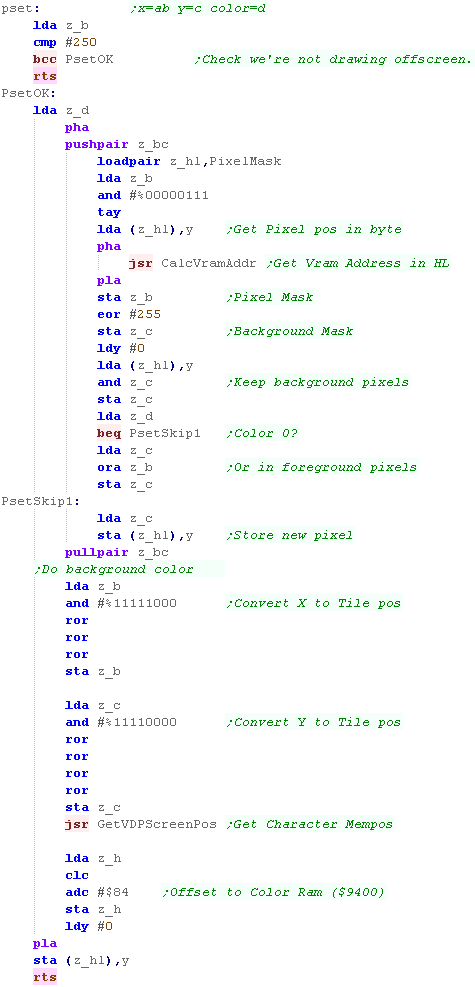 |
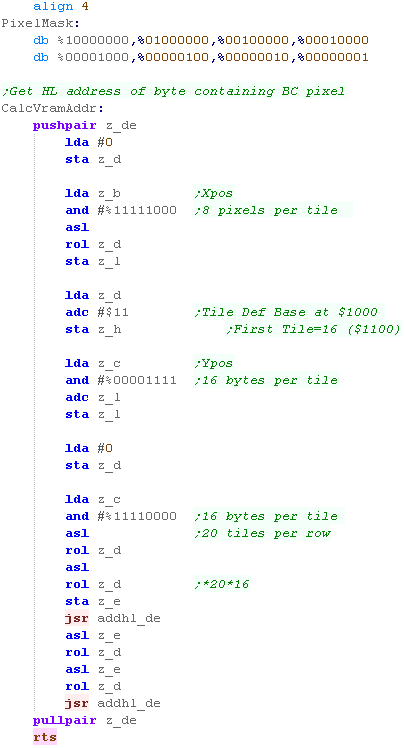
| We need to calculate the byte which contains the pixel we want to
change. There are 8 horizontal pixels per byte... 16 consecutive Y lines are contained in each single character (the bottom 4 bits) There are 20 characters per row, so we multiply the top 4 bits of the Y line by 16 * 20 - we do this by multiple bishifts and addition. |
 |
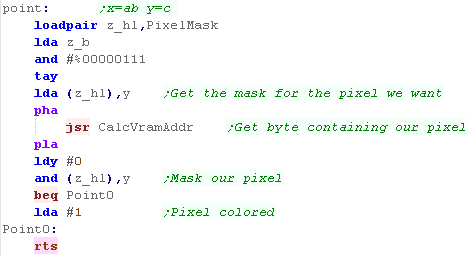
| POINT works in reverse to PSET... returning the color in A for
pixel AB,C Once again, we get the pixel mask, and read in the screen byte, ANDing it with E to get the pixel. We return 1 or 0 for if the pixel is colored or not. |
 |

Data Definitions & Starting the game
| We're going to fill the screen with tiles, and change the pixels
of the tile patterns to define our bitmap graphics. This gives us a 256x224 16 color screen! |
 |
| Each system needs some platform specific settings. The first is an address of RAM for system vars - the game needs less than 256 bytes - this is the entirety of the RAM needed - the rest of the game can run from ROM We define some screen size vars - these set the scale for objects and font., and the boundaries of the screen for drawing the level... this configures the game engine for a smaller screen. We also define some 'colors' - Some systems only support 4, but the PC Engine supports 16 |
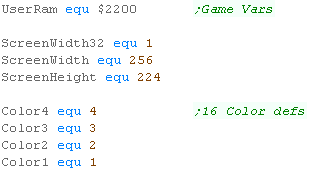 |
| We set up our screen in the same way as previous examples, turning
the tilemap on, and setting the palette We fill the entire tilemap with consecutive tiles, starting at tile 256 (VRAM address $1000+) We use the FillAreaWithTiles code from the simple series to do this. |
 |
| When the game starts we clear the game ram... We then show the Main menu. | |
| We start with tile
pattern 256, as the VRAM for tiles 0-255 are using the memory
the tilemap uses. You'll see VRAM address $1000 in the code as the pattern base for the first pixel of the screen. |
|
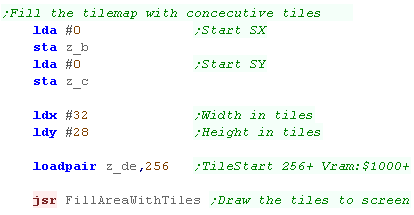
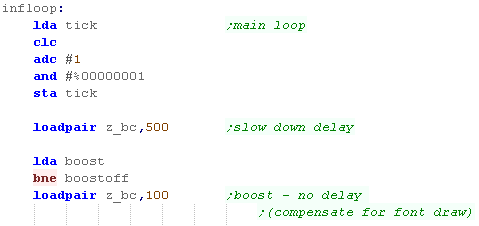
Main Game Loop
| At the start of the loop, we update the 'Tick' The Tick is 1 or 0 - this is used by the multiplatform code for boost (during which player moves at 2x speed) If Boost is ON we lower the delay - we need to speed the game up because redrawing the 'Boost counter' is too slow. |
 |
| During the pause loop we check the keypreses... if a key is not
held down we release the keytimeout The timeout means if we hold left we don't keep rotating around... we have to press left multiple times We store any keypresses in z_D - and wait until z_BC reaches Zero |
|
| If the Keytimeout is not cleared we will ignore Left / Right
keypresses. First we turn off Boost (it will be turned back on if FIRE is held) When we process Left or Right we INC/DEC the 'Player Direction' then run the SetPlayerDirection routine which handles the rest of setting the movement for the player. If Fire is pressed then we check if any 'Boost power' is left.. If there is, then we turn boost power on. Once the keypresses are handled, we update the player with 'Handle Player' Then we update the CPU with 'Handle CPU' That's it... We jump back to the start of the loop for the next tick. |
|
PSET - Plot Pixel / POINT - Read pixel color
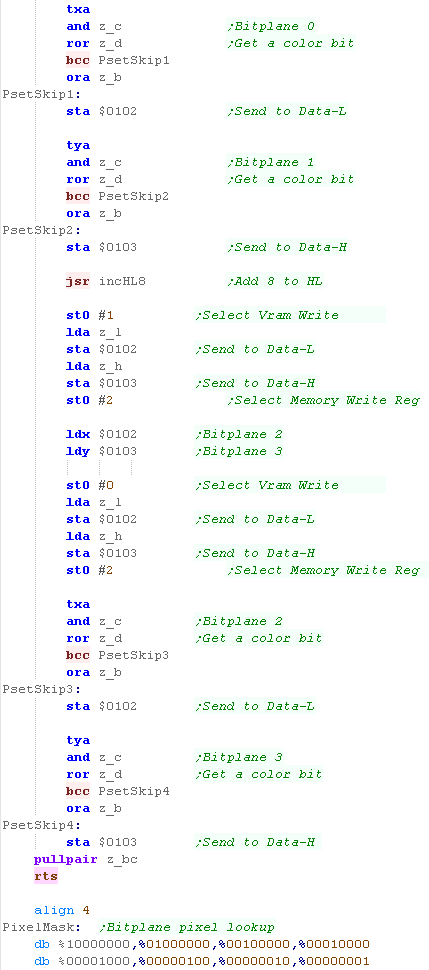
| The PSET command will set a pixel of the screen... The 16 bit X co-ordinate is defined by registers A z_B (A= High byte z_B= Low byte)... this is so we can support a 320 pixel wide screen on systems that use it The 8 Bit Y co ordinate is defined by z_C... only 8 bits, as our maximum screen is 200 pixels tall z_D is the new color for the pixel (0-15) First we need to calculate a the pixel pos within the byte of the bitplane plane - each byte contains 8 pixels, we use a lookup table to get the pixel mask. Next we use CalcVramAddr to get the pixel address within the vram pattern definitions (in z_HL) We get Bitplanes 0 and 1 into X and Y We have he mask to set a pixel in A, we store this in z_b, and flip the bits with EOR, This is now the background mask. - we store this in Z_C |
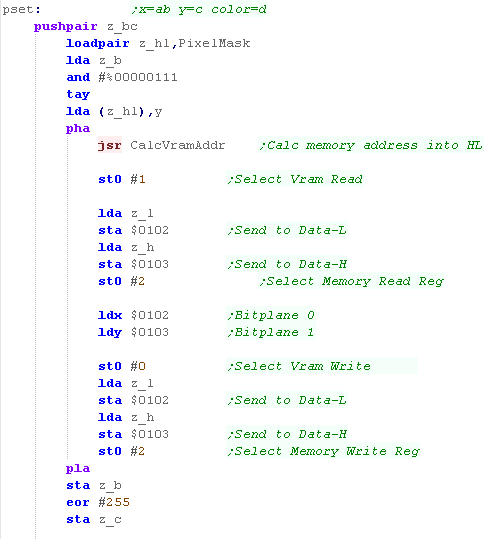 |
We now process the current screen bitplane, and remove the pixel we're changing by ANDing with Z_c Next we check the bit of color we're working with (Z_D).. if it's zero we need to skip setting the pixel, if we need to set the pixel with OR Z_B and store back to Vram Once we've done bitplanes 0 and 1, we add 8 to the VRAM address (8 in words - 16 bytes) and read in bit planes 2 and 3 We repeat again, checking the remaining 2 bits of z_D , and set the bitplanes 2 and 3. |
 |
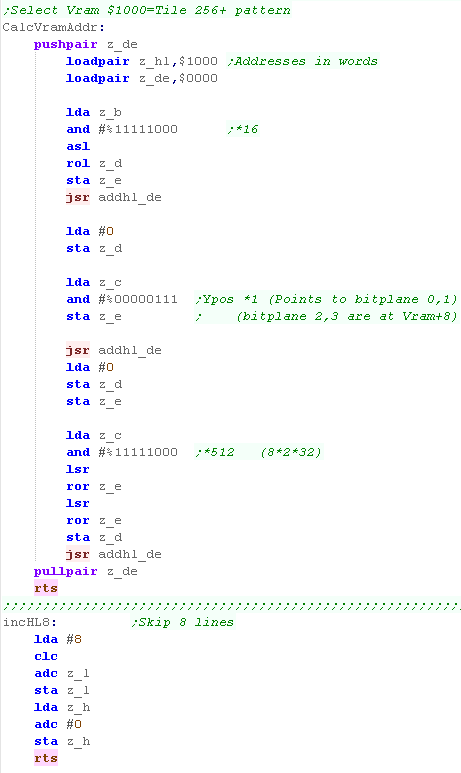
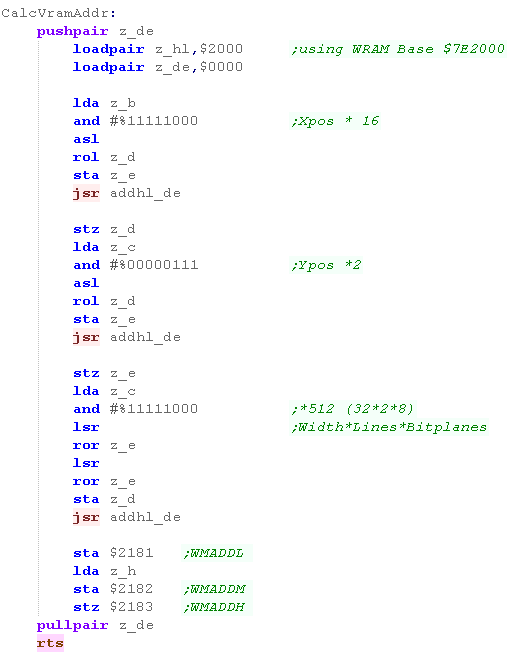
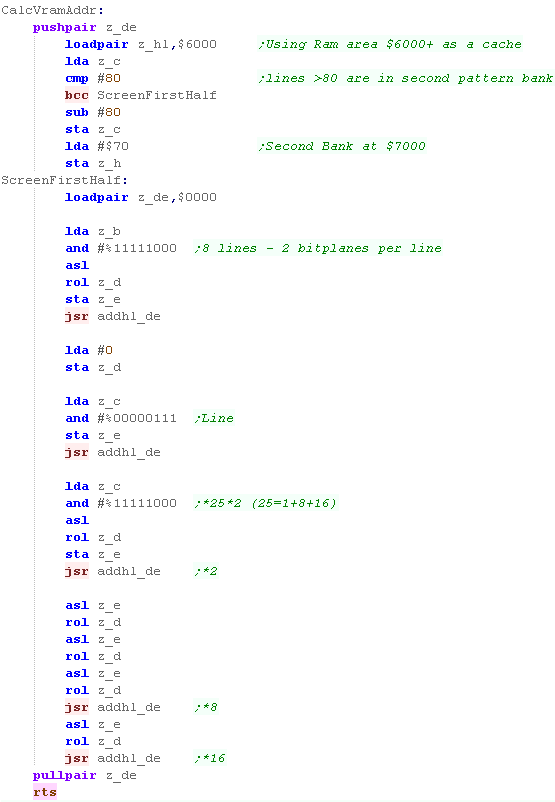
| We need to calculate the VRAM address... Each address in VRAM
holds 2 bytes. A pattern is 8 lines, and four bitplanes... As each VRAM address holds 2 bytes this means each tile is 16 addresses. Note the Pattern definition is split in two parts, The first 8 addresses are the bytes for Bitplanes 0,1 The next 8 addresses are the bytes for Bitplanes 2,3 We take the top 5 bits of the Xpos, and multiply this by 16 (the bottom 3 bits are within each tile) We add the bottom 3 bits of the Ypos - this gets the line within a pattern Next we take the top 5 bits and multiply by 512 (8*2*32 - 8 lines per tile, two words per line, 32 tiles per line) |
 |
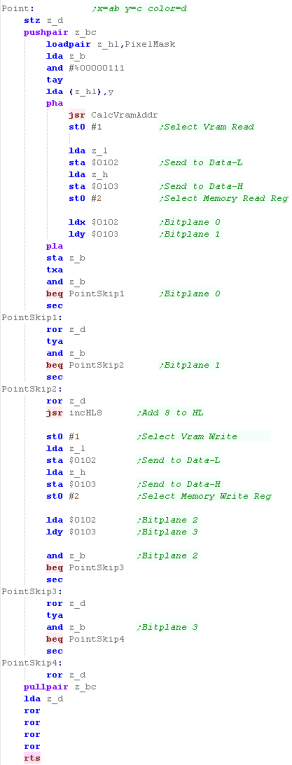
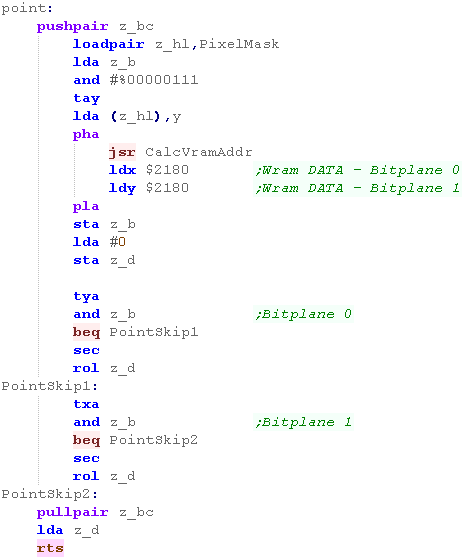
| POINT works in reverse to PSET... returning the color in A for
pixel AB,C Once again, we get the pixel mask, get the bytes for VRAM, and take each bitplane for the pixel. We return a valid pixel color for z_d |
 |
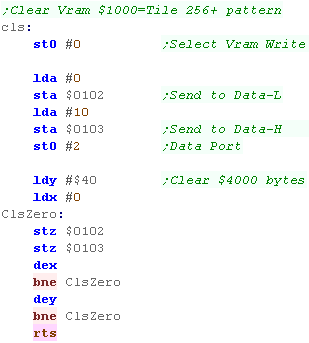
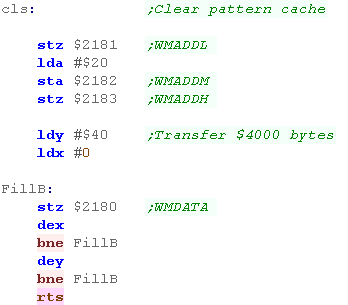
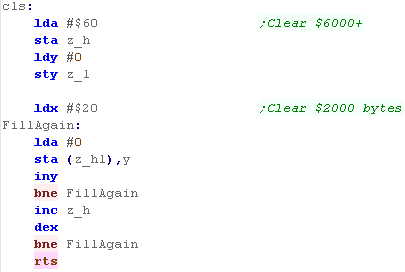
| We also need a clear screen routine, we just repeatedly write Zero
bytes to the pattern ram. |
 |

|
Todays example
uses WRAM Read/Write ports 2180h-2183h to access more memory. This wouldn't be necessary if the author of these tutorials wasn't too lazy to use 65816 mode! He claims he "Doesn't have time" to rewrite the tutorials for the 65816. If you agree that's not good enough, Please feel free to donate to the patreon account,so we can collect money to pelt him with rocks until he learns the error of his ways! |
Data Definitions & Starting the game
| We're going to fill the screen with tiles, giving a 256x224
screen. The SNES can support 16 colors, but we're going to have to transfer the buffer during the VBlank NMI - and it's not long enough. If we use 4 colors (2 bitplanes) it will take 4 NMI's to redraw the whole screen - if we used the full screen it would take 8. so we'll make do with 4 colors. We need $4000 of ram for our screen buffer, there isn't really space in the 6502 memory map for us to do this, but there is a workaround! There are 4 ports we can use to access the full 24 bit range, and gain access to the extra 128k ram (WRAM). This "WRAM" is 128k at address $7E0000-$7FFFFF We use 3 ports to select the address: $2181 - WMADDL - WRAM Address (lower 8bit) (W) $2182 - WMADDM - WRAM Address (middle 8bit) (W) $2183 - WMADDH - WRAM Address (upper 1bit) (W) Then read or write with port: $2180 - WMDATA - WRAM Data Read/Write (R/W) This port Autoincrements after each write. |
 |
| The first is an address of RAM for system vars - the game needs
less than 256 bytes - this is the entirety of the RAM needed - the
rest of the game can run from ROM We define some screen size vars - these set the scale for objects and font., and the boundaries of the screen for drawing the level... this configures the game engine for a smaller screen. Due to time limitations We can only write 1/4 of our buffer during each VBlank NMI, so we need to keep track of what section is next 'BufferBank' does this - working in VRAM Words (*2 for ram address) |
 |
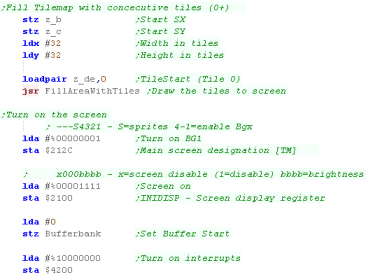
| We set up our screen in the same way as previous examples, but
this time using a 4 color Tilemap. turning the tilemap on, and setting the palette We fill the entire tilemap with consecutive tiles, starting at tile 0 (VRAM address $1000+) We then turn on the screen and enable the NMI |
 |
| When the game starts we clear the game ram... We then show the Main menu. | |
Main Game Loop
| At the start of the loop, we update the 'Tick' The Tick is 1 or 0 - this is used by the multiplatform code for boost (during which player moves at 2x speed) If Boost is ON we lower the delay - we need to speed the game up because redrawing the 'Boost counter' is too slow. |
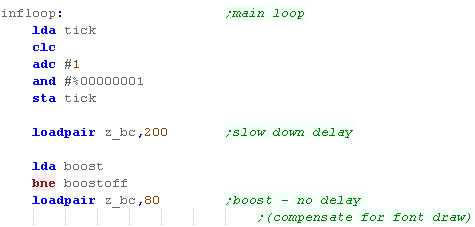 |
| During the pause loop we check the keypreses... if a key is not
held down we release the keytimeout The timeout means if we hold left we don't keep rotating around... we have to press left multiple times We store any keypresses in z_D - and wait until z_BC reaches Zero |
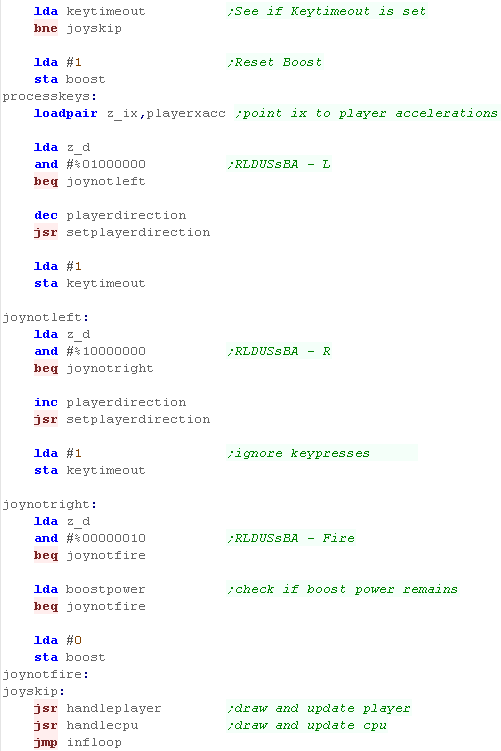
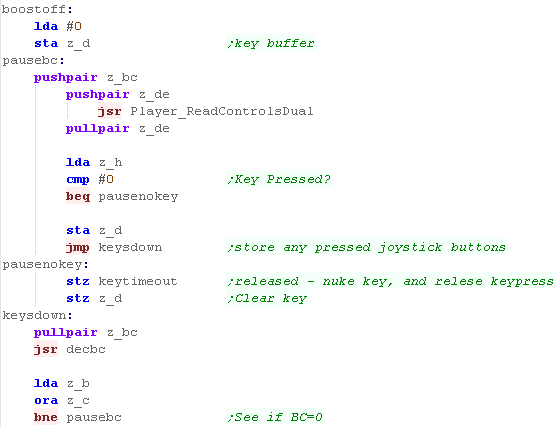 |
| If the Keytimeout is not cleared we will ignore Left / Right
keypresses. First we turn off Boost (it will be turned back on if FIRE is held) When we process Left or Right we INC/DEC the 'Player Direction' then run the SetPlayerDirection routine which handles the rest of setting the movement for the player. If Fire is pressed then we check if any 'Boost power' is left.. If there is, then we turn boost power on. Once the keypresses are handled, we update the player with 'Handle Player' Then we update the CPU with 'Handle CPU' That's it... We jump back to the start of the loop for the next tick. |
 |
The VBlank interrupt handler
| During the VBLANK we're going to use a DMA memory transfer to
transfer 1/4 of the buffer ($800 in VRAM addresses $1000 in RAM) We set up the DMA for the transfer, Copying part of the buffer from $7E2000+ to VRAM address $1000+ After the transfer we update BufferBank so we're pointing to the next section to transfer during the next Vblank. |
 |
PSET - Plot Pixel / POINT - Read pixel color
| The PSET command will set a pixel of the screen... The 16 bit X co-ordinate is defined by registers A z_B (A= High byte z_B= Low byte)... this is so we can support a 320 pixel wide screen on systems that use it The 8 Bit Y co ordinate is defined by z_C... only 8 bits, as our maximum screen is 200 pixels tall z_D is the new color for the pixel (0-15) First we need to calculate a the pixel pos within the byte of the bitplane plane - each byte contains 8 pixels, we use a lookup table to get the pixel mask. Next we use CalcVramAddr to get the pixel address within the cache (in z_HL) We get Bitplanes 0 and 1 into X and Y We have he mask to set a pixel in A, we store this in z_b, and flip the bits with EOR, This is now the background mask. - we store this in Z_C We now process the current screen bitplane, and remove the pixel we're changing by ANDing with Z_c Next we check the bit of color we're working with (Z_D).. if it's zero we need to skip setting the pixel, if we need to set the pixel with OR Z_B and store back into the buffer. |
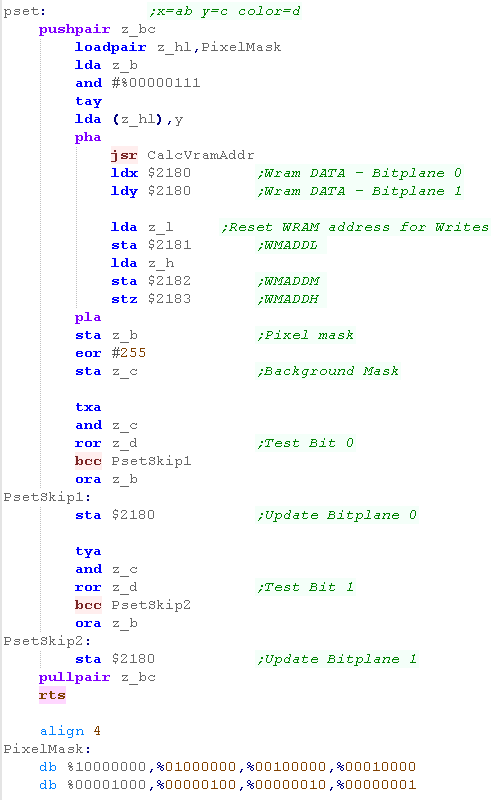 |
| We need to calculate the Buffer address... A pattern is 8 lines, and two bitplanes in 4 color mode. We take the top 5 bits of the Xpos, and multiply this by 16 (the bottom 3 bits are within each tile) We add the bottom 3 bits of the Ypos - this gets the line within a pattern - we multiply this by 2 (2 bitplanes per line) Next we take the top 5 bits and multiply by 512 (8*2*32 - 8 lines per tile, two bitplanes per line, 32 tiles per line) |
 |
| POINT works in reverse to PSET... returning the color in A for
pixel AB,C Once again, we get the pixel mask, get the bytes from the buffer, and take each bitplane for the pixel. We return a valid pixel color for z_d |
 |
| We also need a clear screen routine, we just repeatedly write Zero
bytes to the buffer |
 |
This example transferred the entire
screen in 4 chunks, this is most suitable for a game with a
lot of pixels changing each frame.
Actually Photon didn't really do that, so a 'list' of pixel
updates would probably have been better. though it didn't
really matter in this case.

|
The NES uses 1 byte per
tiledef for 256 tiles, BUT it supports 2 pattern maps. We'll switch
to the second pattern map half way down the screen with a line
interrupt (IRQ). The VBLANK isn't very long, so we can only update 11 tiles per vblank, we'll update 8 sequentially, and 3 every frame - these 3 can be used to focus on 'important' things (Our players!) |
Data Definitions & Starting the game
| We're going to fill the screen with tiles, as we only have 512,
our screen limit is 200x160, we'll create a small centralized 'pixel
screen' of 25x20 tiles We'll fill all the unused tiles with tile 255. Because the tilemap only supports 255 tiles, we'll switch to the second pattern table address at line 80 of our pixel screen. this means the first half of the screen will be defined by the patterns at vram address $0000, and the second at $1000 We'll need $2000 bytes of data for the pattern cache, so we'll use some cartridge ram (an upgrade in the cartridge) - this will appear at addresses $6000-7FFF We can only transfer patterns to VRAM during VBLANK, this isn't very long, so we'll only be able to update 11 tiles each VBLANK. |
 |
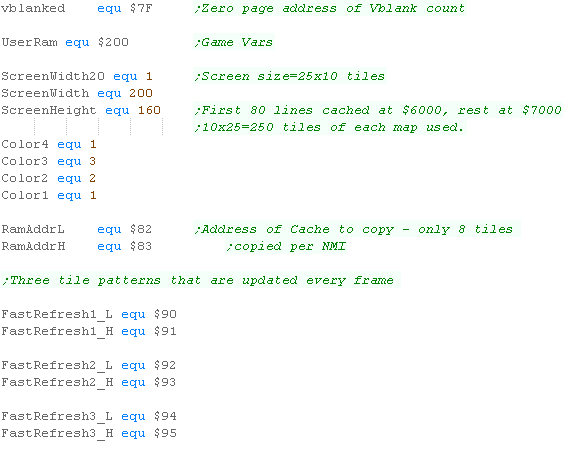
| The first is an address of RAM for system vars - the game needs
less than 256 bytes - this is the entirety of the RAM needed - the
rest of the game can run from ROM We define some screen size vars - these set the scale for objects and font., and the boundaries of the screen for drawing the level... this configures the game engine for a smaller screen. We also need some zero page entries to handle the buffer copy. RamAddrH/L will point to the next set of tile patterns to copy - 8 consecutive ones will be transferred each NMI The "FastRefresh" pairs are updated each frame and can point to important objects... The Vblank is long enough for 3, though we only use 2 |
 |
| We need to set up our screen, We also turn on the 'Cartridge ram'
with a write to $A001 Finally we initialize our zero page variable. |
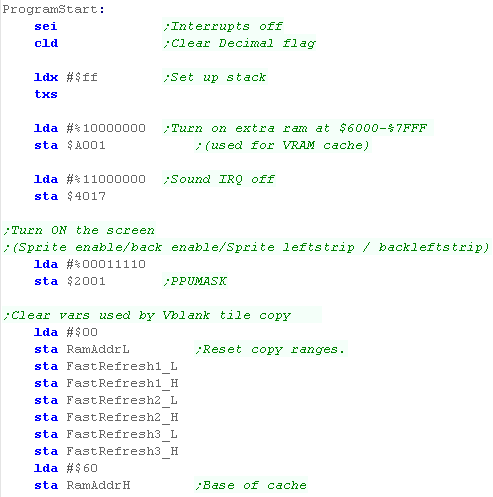 |
| We need to initialize the tilemap. First we fill the entire screen with an unused tile (255) Next we fill the two halves of our 'pixel screen' with tiles 0-250. We use the 'Fill Area With Tiles' Function from the simple series to do this. |
 |
| Our screen is ready, so we can start the interrupt handler, which will transfer the pattern data from the cache to actual VRAM | 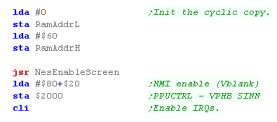 |
| When the game starts we clear the game ram... We then show the Main menu. | |
Main Game Loop
| At the first run, we need to wait for the level screen to redraw. this is because only 8 tiles transfer each VBLANK. | 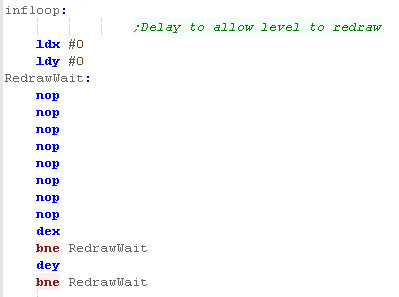 |
| At the start of the loop, we update the 'Tick' The Tick is 1 or 0 - this is used by the multiplatform code for boost (during which player moves at 2x speed) If Boost is ON we lower the delay - we need to speed the game up because redrawing the 'Boost counter' is too slow. |
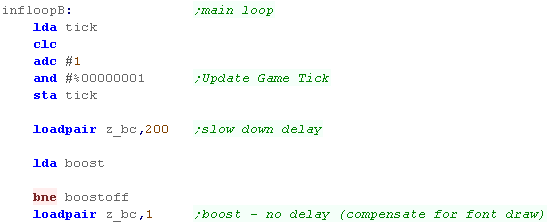 |
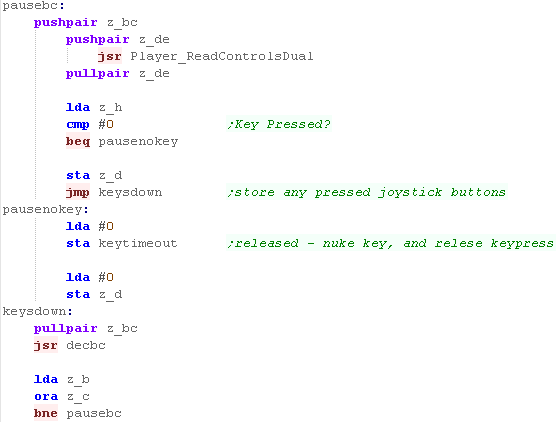
| During the pause loop we check the keypreses... if a key is not
held down we release the keytimeout The timeout means if we hold left we don't keep rotating around... we have to press left multiple times We store any keypresses in z_D - and wait until z_BC reaches Zero |
 |
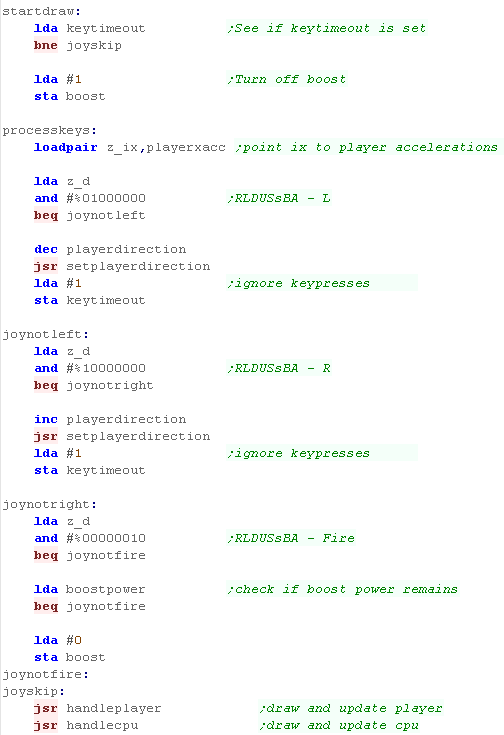
| If the Keytimeout is not cleared we will ignore Left / Right
keypresses. First we turn off Boost (it will be turned back on if FIRE is held) When we process Left or Right we INC/DEC the 'Player Direction' then run the SetPlayerDirection routine which handles the rest of setting the movement for the player. If Fire is pressed then we check if any 'Boost power' is left.. If there is, then we turn boost power on. Once the keypresses are handled, we update the player with 'Handle Player' Then we update the CPU with 'Handle CPU' |
 |
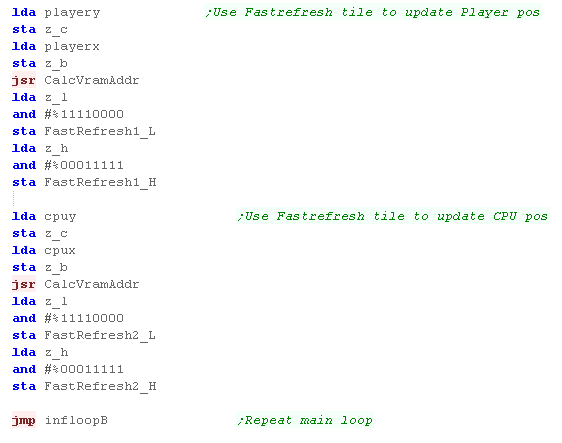
| We set two of the fast update tiles to point to the CPU and Player
position - this means they'll be updated quickly so the player can
see what's going on! That's it... We jump back to the start of the loop for the next tick. |
 |
The VBlank & IRQ interrupt handler
| During the VBLANK we're need to update the actual patterns in VRAM
from the cache. We only have enough time to do about 11! we can update one tile with "SetAndSendOneTile".. The address is defined by the HL Register pair AX First we update 3 tiles with unique memory addresses |
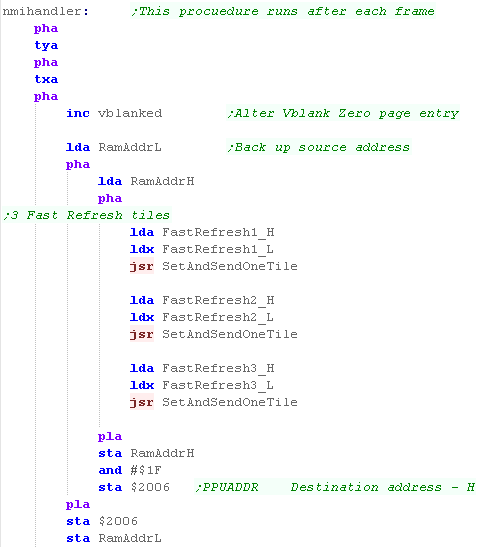 |
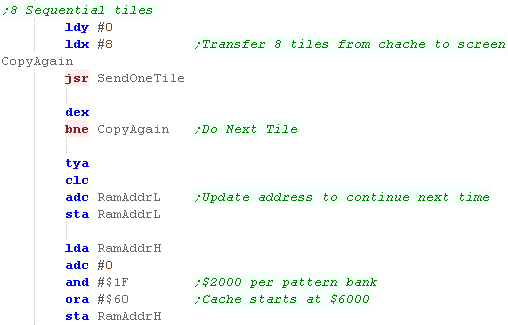
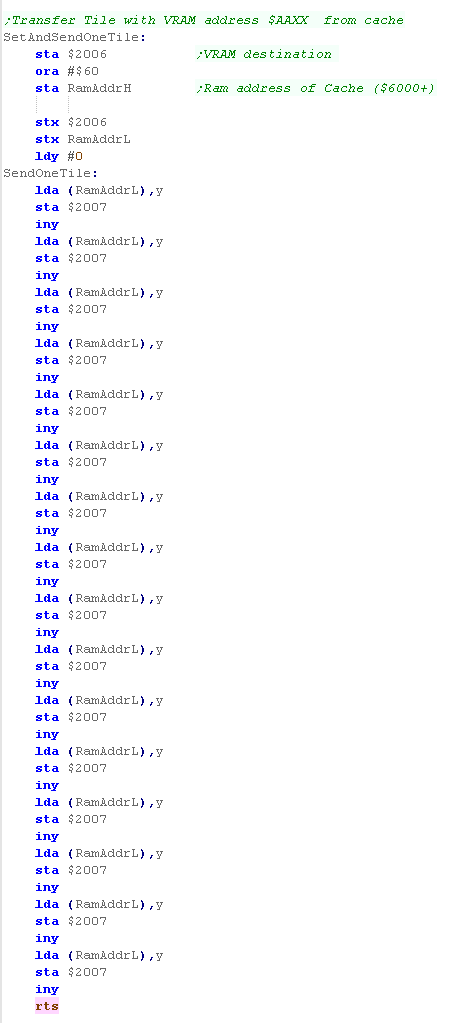
| We now transfer 8 tiles from the address 'RamADDR', Once these have been transferred, we update the address so we continue from the same position next time. |
 |
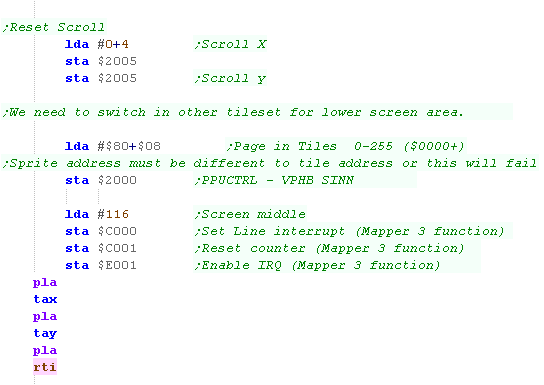
| Every VRAM write will mess up the scroll position, so we need to
reset it now. When the VBLANK ends, we need to set the first tile pattern position $0000 We also need to set the IRQ line interrupt to occur at line 116, we do this by writing this linenumber to $C000 We also need to write to $C001 and $E001 to start the interrupt... Note: This interrupt function is part of Cartridge Mapper 3 |
 |
| During the interrupt, we set the second pattern address $1000, and turn off the interrupt agian. | 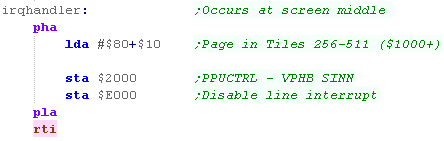 |
| The addresses of the interrupt handers are defined by the cartridge footer. |  |
| For speed, The transfer routine is an unwrapped loop. If needed we select an address with "Set and Send One Tile", this sends the destination VRAM address to $2006 we send the new data for that address to $2007 |
 |
PSET - Plot Pixel / POINT - Read pixel color
| The PSET command will set a pixel of the screen... The 16 bit X co-ordinate is defined by registers A z_B (A= High byte z_B= Low byte)... this is so we can support a 320 pixel wide screen on systems that use it The 8 Bit Y co ordinate is defined by z_C... only 8 bits, as our maximum screen is 200 pixels tall z_D is the new color for the pixel (0-15) First we check the Xposition, and see if we're being asked to draw offscreen. Next we calculate the pixel position within the byte - as each byte contains data for 8 pixels. Next we use CalcVramAddr to get the pixel address within the cache (in z_HL) We have the mask to set a pixel in A, we store this in z_b, and flip the bits with EOR, This is now the background mask. - we store this in Z_C We now process the current screen bitplane, and remove the pixel we're changing by ANDing with Z_c Next we check the bit of color we're working with (Z_D).. if it's zero we need to skip setting the pixel, if we need to set the pixel with OR Z_B and store back into the buffer. |
 |
| We need to calculate the Buffer address... A pattern is 8 lines, and two bitplanes We take the top 5 bits of the Xpos, and multiply this by 16 (the bottom 3 bits are within each tile) We add the bottom 3 bits of the Ypos - this gets the line within a pattern Next we take the top 5 bits and multiply it up, each strip is 25 tiles wide, and each tile is 16 bytes. We achieve this multiplication y repeated bitshifts. |
 |
| POINT works in reverse to PSET... returning the color in A for
pixel AB,C Once again, we get the pixel mask, get the bytes from the buffer, and take each bitplane for the pixel. We return a valid pixel color for z_d |
 |
| We also need a clear screen routine, we just repeatedly write Zero
bytes to the buffer |
 |
| The way we're
using the screen is pretty crude, and it's done the job in this
case, but it would probably be faster to have a 'pixel update
list' and alter the pixels in VRAM during the VBLANK, or have a
'tile update list' with the addresses of the tiles that should be
updated next Vblank. This is kind of a crude 'cover all' example solution to show what's possible. |
|
| View Options |
| Default Dark |
| Simple (Hide this menu) |
| Print Mode (white background) |
| Top Menu |
| ***Main Menu*** |
| Youtube channel |
| Patreon |
| Introduction to Assembly (Basics for absolute beginners) |
| Amazon Affiliate Link |
| AkuSprite Editor |
| ChibiTracker |
| Dec/Bin/Hex/Oct/Ascii Table |
| Alt Tech |
| Archive.org |
| Bitchute |
| Odysee |
| Rumble |
| DailyMotion |
| Please note: I wlll upload more content to these alt platforms based on the views they bring in |
| 68000 Content |
| ***68000 Tutorial List*** |
Learn 68000 Assembly  |
| Hello World Series |
| Platform Specific Series |
| Simple Samples |
| Grime 68000 |
| 68000 Downloads |
| 68000 Cheatsheet |
| Sources.7z |
| DevTools kit |
| 68000 Platforms |
| Amiga 500 |
| Atari ST |
| Neo Geo |
| Sega Genesis / Mega Drive |
| Sinclair QL |
| X68000 (Sharp x68k) |
| 8086 Content |
| Learn 8086 Assembly |
| Platform Specific Series |
| Hello World Series |
| Simple Samples |
| 8086 Downloads |
| 8086 Cheatsheet |
| Sources.7z |
| DevTools kit |
| 8086 Platforms |
| Wonderswan |
| MsDos |
| ARM Content |
| Learn ARM Assembly |
| Learn ARM Thumb Assembly |
| Platform Specific Series |
| Hello World |
| Simple Samples |
| ARM Downloads |
| ARM Cheatsheet |
| Sources.7z |
| DevTools kit |
| ARM Platforms |
| Gameboy Advance |
| Nintendo DS |
| Risc Os |
| Risc-V Content |
| Learn Risc-V Assembly |
| Risc-V Downloads |
| Risc-V Cheatsheet |
| Sources.7z |
| DevTools kit |
| MIPS Content |
| Learn Risc-V Assembly |
| Platform Specific Series |
| Hello World |
| Simple Samples |
| MIPS Downloads |
| MIPS Cheatsheet |
| Sources.7z |
| DevTools kit |
| MIPS Platforms |
| Playstation |
| N64 |
| PDP-11 Content |
| Learn PDP-11 Assembly |
| Platform Specific Series |
| Simple Samples |
| PDP-11 Downloads |
| PDP-11 Cheatsheet |
| Sources.7z |
| DevTools kit |
| PDP-11 Platforms |
| PDP-11 |
| UKNC |
| TMS9900 Content |
| Learn TMS9900 Assembly |
| Platform Specific Series |
| Hello World |
| TMS9900 Downloads |
| TMS9900 Cheatsheet |
| Sources.7z |
| DevTools kit |
| TMS9900 Platforms |
| Ti 99 |
| 6809 Content |
| Learn 6809 Assembly |
| Learn 6309 Assembly |
| Platform Specific Series |
| Hello World Series |
| Simple Samples |
| 6809 Downloads |
| 6809/6309 Cheatsheet |
| Sources.7z |
| DevTools kit |
| 6809 Platforms |
| Dragon 32/Tandy Coco |
| Fujitsu FM7 |
| TRS-80 Coco 3 |
| Vectrex |
| 65816 Content |
| Learn 65816 Assembly |
| Hello World |
| Simple Samples |
| 65816 Downloads |
| 65816 Cheatsheet |
| Sources.7z |
| DevTools kit |
| 65816 Platforms |
| SNES |
| eZ80 Content |
| Learn eZ80 Assembly |
| Platform Specific Series |
| eZ80 Downloads |
| eZ80 Cheatsheet |
| Sources.7z |
| DevTools kit |
| eZ80 Platforms |
| Ti84 PCE |
| IBM370 Content |
| Learn IBM370 Assembly |
| Simple Samples |
| IBM370 Downloads |
| IBM370 Cheatsheet |
| Sources.7z |
| DevTools kit |
| Super-H Content |
| Learn SH2 Assembly |
| Hello World Series |
| Simple Samples |
| SH2 Downloads |
| SH2 Cheatsheet |
| Sources.7z |
| DevTools kit |
| SH2 Platforms |
| 32x |
| Saturn |
| PowerPC Content |
| Learn PowerPC Assembly |
| Hello World Series |
| Simple Samples |
| PowerPC Downloads |
| PowerPC Cheatsheet |
| Sources.7z |
| DevTools kit |
| PowerPC Platforms |
| Gamecube |
| Work in Progress |
| ChibiAndroids |
| Misc bits |
| Ruby programming |
Buy my Assembly programming book
on Amazon in Print or Kindle!


Available worldwide!
Search 'ChibiAkumas' on
your local Amazon website!
Click here for more info!


Buy my Assembly programming book
on Amazon in Print or Kindle!
Available worldwide!
Search 'ChibiAkumas' on
your local Amazon website!
Click here for more info!
Buy my Assembly programming book
on Amazon in Print or Kindle!
Available worldwide!
Search 'ChibiAkumas' on
your local Amazon website!
Click here for more info!