

Learn Multi platform 6809 Assembly Programming... 8 bit resurrection!
Super Simple Series
In this series we'll take a look at a variety of basic tasks that you may need to look at when you're starting out with programming these classic systems...
In each case the source-code will be a single file with no Includes to make things easy if you're using a different assembler (though some may include a binary.)
 |
Lesson
S1 - Sprite Movement on the Dragon 32 Lets look at a simple example, here we'll create a simple sprite, and move it around the screen with the Joystick. |
 |
 DGN_Bitmap.asm
|
 |
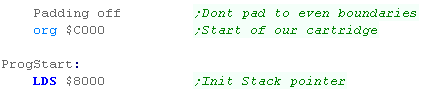
| At the start of our cartridge, we need to define the Origin of
$C000... we turn padding off, this means the assembler won't add any
zeros anywhere. We then define a valid Stack pointer! |
 |
| Our cartridge needs a footer!... it needs to define the reset vector | 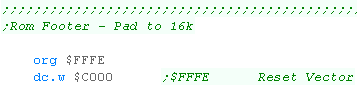 |
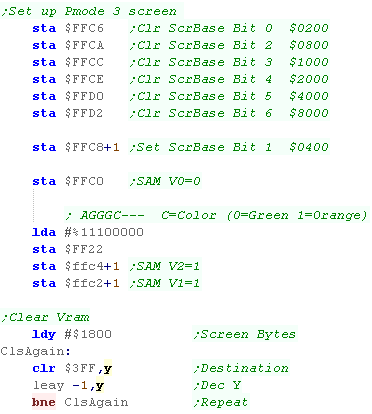
| We need to set up our graphics screen... this requires writing to
a variety of addresses, and also sending a few special values. These are specific to the screen we're using...in this case PMODE 3... Once we've set up our screen, we need to clear VRAM, we clear $1800 bytes from $400+ |
 |
 |
We're using 4 color PMODE 3
in this example... but other modes are available! If you want to try something different, take a look at this example here |
Drawing an 8x8 sprite
| We're going to show a 8x8 smiley face to the screen... we've set up the screen in 4 color mode - meaning each pixel uses 2 bits... |  |
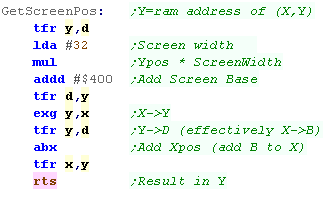
| When we want to show the bitmap to the screen, we need to
calculate the destination memory address for the screen... We use GetScreenPos... which takes an XY position, and calculates a destination memory address in Y The screen base is $0400, each line is 32 bytes, so our screen address formula is... ScreenAddr = $0400+(Ypos*32)+Xpos |
 |
| We need to transfer the sprite to screen ram... each line is 2
bytes, and there are 8 lines. We don't just write the bytes to the screen, we XOR them (eor)... this inverts the contents of the screen. We do this because it makes removing the sprite easy, we just draw it to the same position twice!. |
 |
| The result can be seen here! | 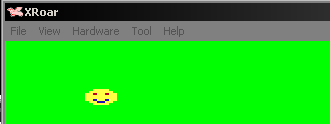 |
Reading the Joystick
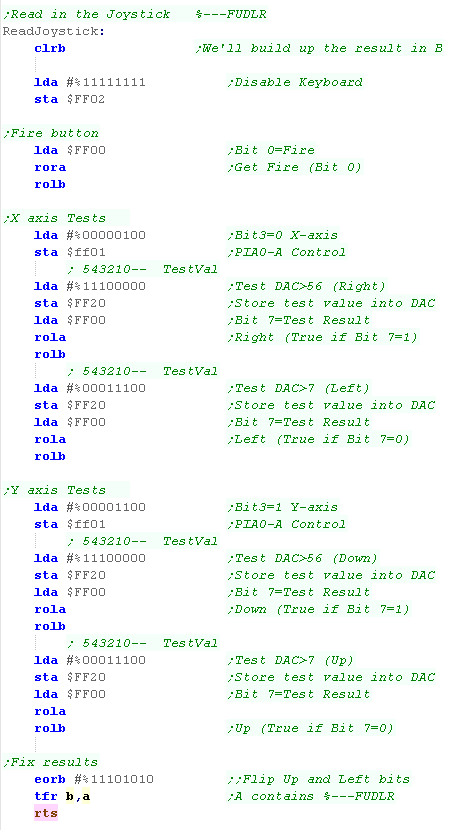
| The Dragon uses an analog
joystick. Using it is a bit annoying! We need to 'compare' the axis position toa value (written to $FF20)... we read back the result of the comparison in bit 7 of $FF00 (True or false) We select the X or Y axis with port $FF01 We also get the Fire button from $FF00 - it's always in Bit 0 |
 |
Moving our sprite
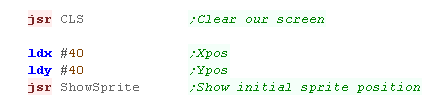
| We've got everything we need, now it's time to move our sprite
around the screen. We start by drawing the initial sprite position. |
 |
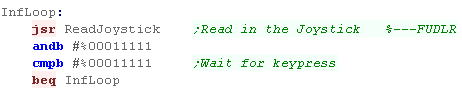
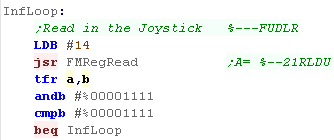
| Next we test the joystick, and see if any direction has been
pressed, we wait until one has been! |
 |
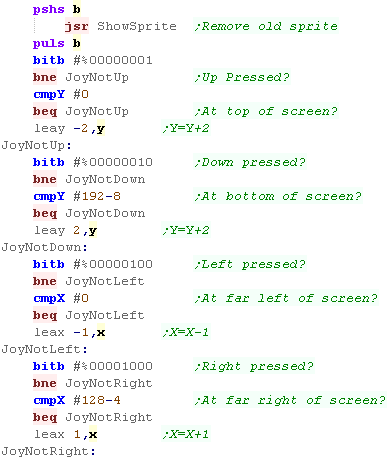
| We may need to move our sprite... First we remove the old one, by
redrawing in the same position - The XOR (Eor) function causes it to
be removed. We now test each direction - if the direction is pressed we test the current position... if the direction is pressed and we're not already at the edge of the screen, we move further in that direction. We do the moves via LEAX or LEAY... these can be used to effectively Add or Subtract an immediate from X or Y |
 |
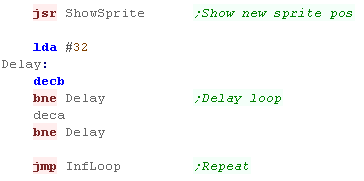
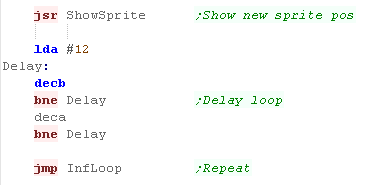
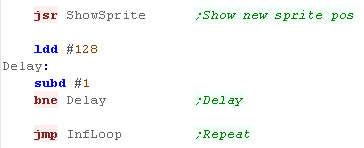
| We then show the new sprite position. Finally there's a delay, then we repeat the procedure. |
 |

Starting our program
| At the start of our cartridge, we need to define the Origin of
$C000... we turn padding off, this means the assembler won't add any
zeros anywhere. We then define a valid Stack pointer! |
|
| Our cartridge needs a footer!... it needs to define the reset vector | |
| We need to use bank switching for our VRAM, we enable thsi with port $FF90, and select the 'Task' with $FF91, this defines which ports select the banks. | 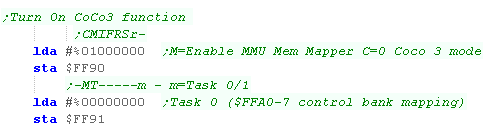 |
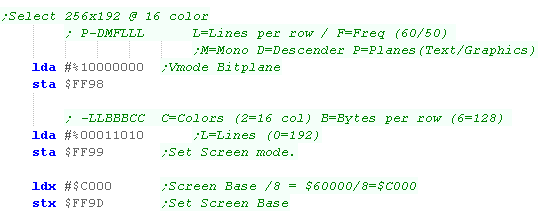
| Next we enable our 16 color screen with port $FF99. We need to select the VRAM base with $FF9D ($60000 in extended memory) |
 |
| Our Screen is not in
normal memory! it's in extended RAM and we need to page it into
accessible memory to write to it. In this example we'll page in just 8k at a time in the $2000-$3FFF range, so the third we select will depend on the Y line we want to write to. |
 |
Drawing an 8x8 sprite
| We're going to show a 8x8 smiley face to the screen... we've set up the screen in 16 color mode - meaning each pixel uses 4 bits - one nibble | 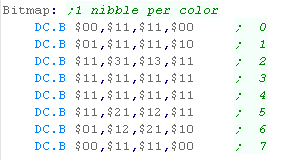 |
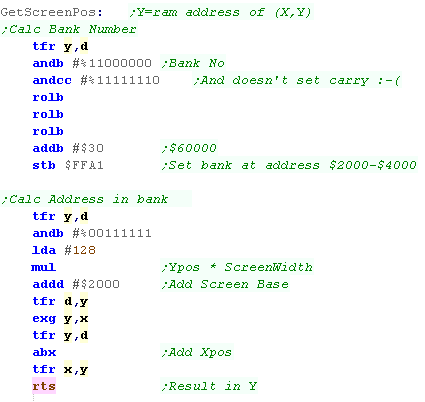
| When we want to show the bitmap to the screen, we need to
calculate the destination memory address for the screen... We use GetScreenPos... which takes an XY position, and calculates a destination memory address in Y But it's tricky... our 24k screen will be paged in to ram in 3 8k chunks... each will have 64 lines. To page in the correct bank, we take the top 2 bits of the Y line, shift them to the bottom two, then send the result to $FFA1 - this pages that bank into the $2000-$3FFF range Each line is 128 bytes, so after we've dealt with the bank, our screen address formula is... ScreenAddr = $2000+(Ypos*128)+Xpos |
 |
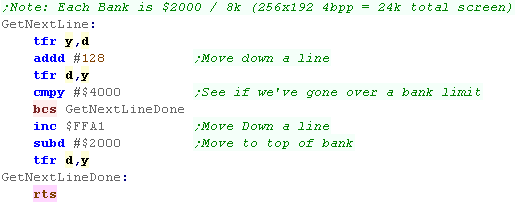
| Our next line function will move down one Y line... each line is
128 bytes, but we need to deal with the banks. If we've got to the bottom of the bank ($4000) then we need to increase the bank number with port $FFA1, and move back to the start of the paged range ($2000) |
 |
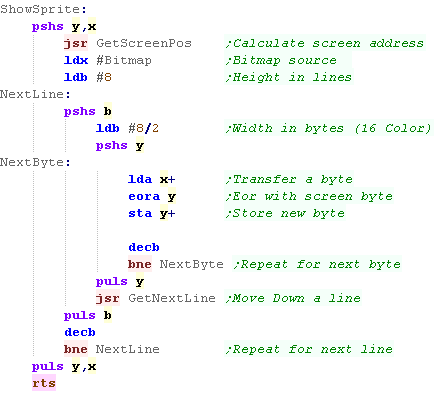
| We need to transfer the sprite to screen ram... each line is 4
bytes, and there are 8 lines. We don't just write the bytes to the screen, we XOR them (eor)... this inverts the contents of the screen. We do this because it makes removing the sprite easy, we just draw it to the same position twice!. |
 |
| The result can be seen here! | 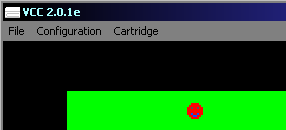 |
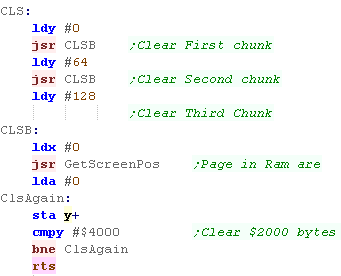
| We also need to be able to clear the screen! As we're only paging in one chunk of the screen at a time, we do this in 3 parts. |
 |
Reading the Joystick
| The Dragon uses an analog
joystick. Using it is a bit annoying! We need to 'compare' the axis position toa value (written to $FF20)... we read back the result of the comparison in bit 7 of $FF00 (True or false) We select the X or Y axis with port $FF01 We also get the Fire button from $FF00 - it's always in Bit 0 |
|
Moving our sprite
| We've got everything we need, now it's time to move our sprite
around the screen. We start by drawing the initial sprite position. |
 |
| Next we test the joystick, and see if any direction has been
pressed, we wait until one has been! |
|
| We may need to move our sprite... First we remove the old one, by
redrawing in the same position - The XOR (Eor) function causes it to
be removed. We now test each direction - if the direction is pressed we test the current position... if the direction is pressed and we're not already at the edge of the screen, we move further in that direction. We do the moves via LEAX or LEAY... these can be used to effectively Add or Subtract an immediate from X or Y |
 |
| We then show the new sprite position. Finally there's a delay, then we repeat the procedure. |
 |
 |
Lesson
S3 - Object Movement on the Vectrex Lets take a look at the vectrex! We'll draw an object on the screen, and move it around with the Joystick. |
|
VTX_Bitmap.asm
|
|
Starting our program
| Our cartridge starts at address $0000... we need a header at this
point. Next we need to initialize the Direct Page register DP... we're pointing it to the hardware registers $D0 - We need to do this to use the firmware functions |
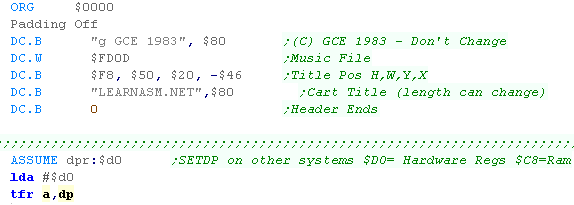 |
| Because the Zero
page is pointing to Registers not ram we'll be unable to use the
Zero page for temporary storage. if we need ram we 'll need to switch DP to $C8 for a while, but we'll have to switch it back to $D0 before using the firmware. |
|
Drawing an object
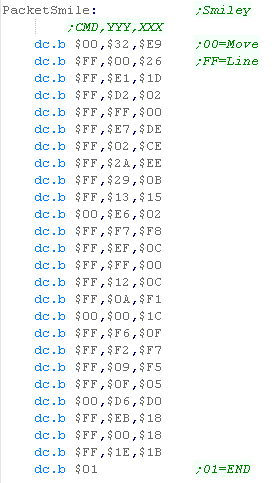
| We're going to draw a smiley to the screen... we define the image
in 'Packet' format. Each action is 3 bytes, a 'command' and a Y,X relative movement. |
 |
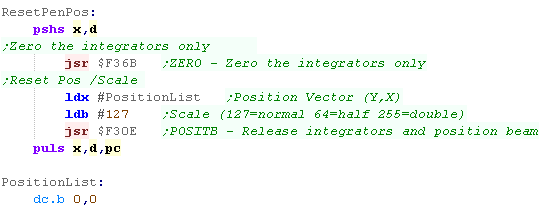
| Many Vectrex draw commands are relative to the 'pen position' We'll create a 'Reset Pen Pos' function to rezero everything, we'll use this before each draw. |
 |
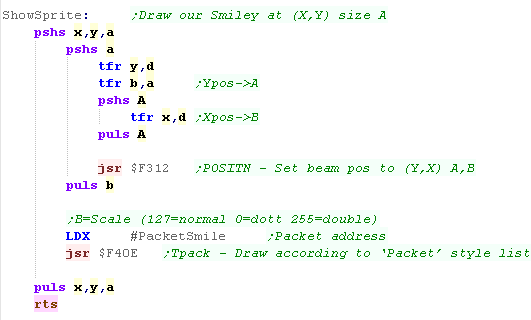
| we're going to draw our smiley at position X,Y. We use function $F313 to move the pen... but this needs the X,Y position to be in B,A We use $F40E to draw the packe... it takes a scale in B - 128 is 'normal size' |
 |
| The result can be seen here! | 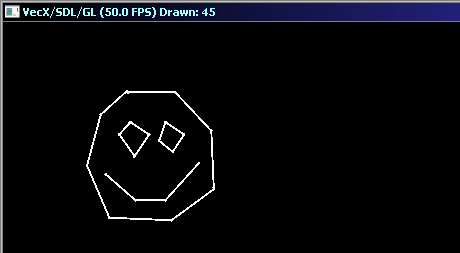 |
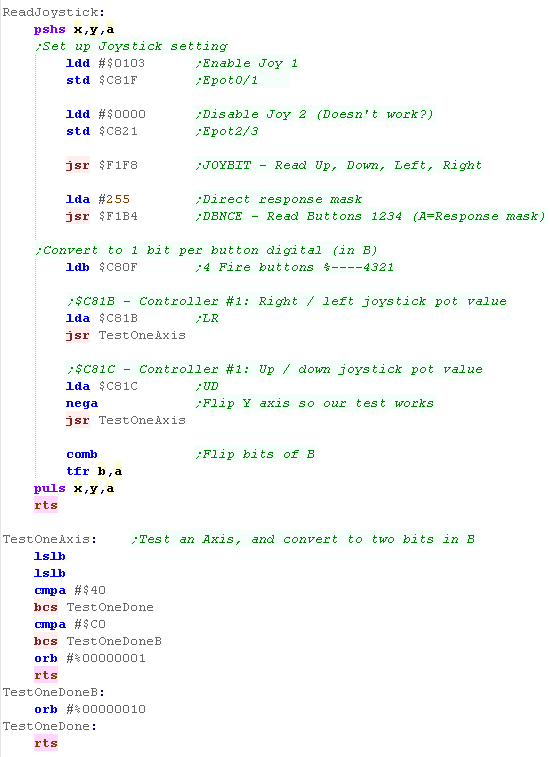
Reading the Joystick
| We're going to set up the osticks. We need to turn on Joystick 1, and turn off Joystick 2 - we do this by sending the correct values to $C81F/C821 Next we get the firmware to process the joystick with $F1F8 - we'll read the result later. We then enable the joystick fire buttons with $F1B4. Now we read back the results... we get the 4 fire buttons with $C80F. We then get the X and Y positions with $C818 and $C81C... These give an analog value, with a center point of $80. We convert these to a 'digital' value of 1/0 for each direction. |
 |
Moving our object
| We've got everything we need, now it's time to move our sprite
around the screen. We start by resetting the pen position and drawing the Sprite. There's no 'persistence of image', we need to redraw every frame or our smiley will disappear |
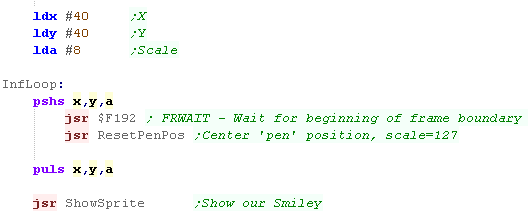 |
We now test each direction - if the direction is pressed we test the current position... if the direction is pressed and we're not already at the edge of the screen, we move further in that direction. We also use Fire 1 & 2 to alter the scale. We do the moves via LEAX or LEAY... these can be used to effectively Add or Subtract an immediate from X or Y. We then repeat. |
|

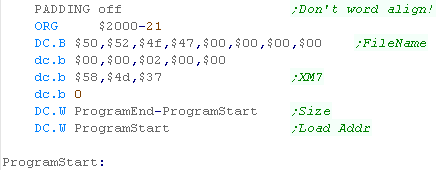
Starting our program
| We're creating a file on our disk, but we need to manually create
the header. The program starts at $2000 - and we need 21 bytes of header before that. |
 |
| We should also define a footer. | 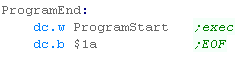 |
 |
The main CPU
can't draw the graphics... we have to tell the CPU to do it! All data is passed to the sub cpu through just 128 bytes of shared ram... we have to send our command and bytes in this area... if we're doing a big sprite, we'll have to split it up! See here for Various detailed graphics examples! |
Drawing an 8x8 sprite
| We're going to show a 8x8 smiley face to the screen... The FM7 uses 3 bitplanes for 8 colors total. |  |
| We need to define a 'script'... this is a sequence of bytes that
defines the task and it's parameters: 1. The command $1E - transfer block to screen), 2. The area covered by the sprite (StartXY- EndXY), 3. The method of drawing (4 - XOR - invert) and 4. The number of bytes (8 lines * 3 bitplanese> |
 |
| The Shared data area between the two cpu's is at $FC80 (though it
appears as $D380 on the other CPU'sside!) We need to transfer our command and bitmap to this area... But we also need to negotiate with the sub cpu, as we can't access this memory before HALTing the sub cpu. We need to wait for it to finish it's current job and HALT it before we send a command... we need to RELEASE the sub cpu so it can start the job. We do this with bit 7 of $FD05... if this is 1, the sub cpu is busy... if we write 1 to this bit 7, we will stop the cpu - if we write 0 it will restart. |
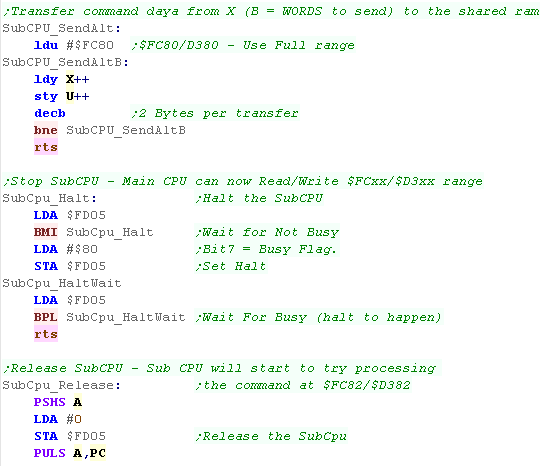 |
| We need to transfer the sprite to screen ram... to do this we
first update our 'script' with the new position of the sprite, We then halt the sub CPU, send the command and sprite data, then resume the CPU. The Sub Cpu will draw the sprite to the screen. |
 |
| The result can be seen here! | 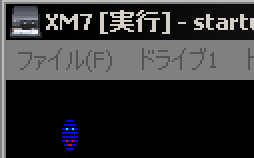 |
Reading the Joystick
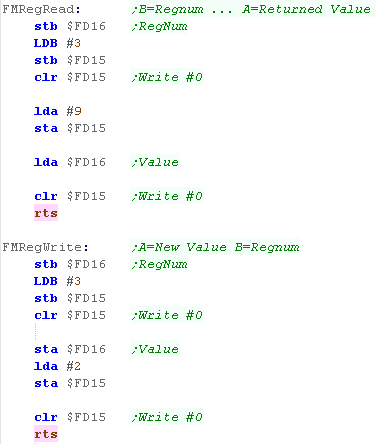
| We need to talk to the AY sound chip to use the Joystick. We have to send a 'sequence' of command bytes to $FD15 to select Read or Write, and send the data to $FD16 Here we've defined a Read and Write command to work with the AY registers. |
 |
| We need to send $5F or $2F to AY register 15 to select Joystick 2 or 1 |  |
| We then read from AY reg 14 to get the button state. | 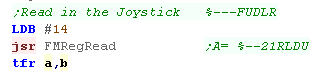 |
Moving our sprite
| We've got everything we need, now it's time to move our sprite
around the screen. We start by drawing the initial sprite position. |
 |
| Next we test the joystick, and see if any direction has been
pressed, we wait until one has been! |
 |
| We may need to move our sprite... First we remove the old one, by
redrawing in the same position - The XOR (Eor) function causes it to
be removed. We now test each direction - if the direction is pressed we test the current position... if the direction is pressed and we're not already at the edge of the screen, we move further in that direction. We do the moves via LEAX or LEAY... these can be used to effectively Add or Subtract an immediate from X or Y |
 |
| We then show the new sprite position. Finally there's a delay, then we repeat the procedure. |
 |
| View Options |
| Default Dark |
| Simple (Hide this menu) |
| Print Mode (white background) |
| Top Menu |
| ***Main Menu*** |
| Youtube channel |
| Patreon |
| Introduction to Assembly (Basics for absolute beginners) |
| Amazon Affiliate Link |
| AkuSprite Editor |
| ChibiTracker |
| Dec/Bin/Hex/Oct/Ascii Table |
| Alt Tech |
| Archive.org |
| Bitchute |
| Odysee |
| Rumble |
| DailyMotion |
| Please note: I wlll upload more content to these alt platforms based on the views they bring in |
| 68000 Content |
| ***68000 Tutorial List*** |
Learn 68000 Assembly  |
| Hello World Series |
| Platform Specific Series |
| Simple Samples |
| Grime 68000 |
| 68000 Downloads |
| 68000 Cheatsheet |
| Sources.7z |
| DevTools kit |
| 68000 Platforms |
| Amiga 500 |
| Atari ST |
| Neo Geo |
| Sega Genesis / Mega Drive |
| Sinclair QL |
| X68000 (Sharp x68k) |
| 8086 Content |
| Learn 8086 Assembly |
| Platform Specific Series |
| Hello World Series |
| Simple Samples |
| 8086 Downloads |
| 8086 Cheatsheet |
| Sources.7z |
| DevTools kit |
| 8086 Platforms |
| Wonderswan |
| MsDos |
| ARM Content |
| Learn ARM Assembly |
| Learn ARM Thumb Assembly |
| Platform Specific Series |
| Hello World |
| Simple Samples |
| ARM Downloads |
| ARM Cheatsheet |
| Sources.7z |
| DevTools kit |
| ARM Platforms |
| Gameboy Advance |
| Nintendo DS |
| Risc Os |
| Risc-V Content |
| Learn Risc-V Assembly |
| Risc-V Downloads |
| Risc-V Cheatsheet |
| Sources.7z |
| DevTools kit |
| MIPS Content |
| Learn Risc-V Assembly |
| Platform Specific Series |
| Hello World |
| Simple Samples |
| MIPS Downloads |
| MIPS Cheatsheet |
| Sources.7z |
| DevTools kit |
| MIPS Platforms |
| Playstation |
| N64 |
| PDP-11 Content |
| Learn PDP-11 Assembly |
| Platform Specific Series |
| Simple Samples |
| PDP-11 Downloads |
| PDP-11 Cheatsheet |
| Sources.7z |
| DevTools kit |
| PDP-11 Platforms |
| PDP-11 |
| UKNC |
| TMS9900 Content |
| Learn TMS9900 Assembly |
| Platform Specific Series |
| Hello World |
| TMS9900 Downloads |
| TMS9900 Cheatsheet |
| Sources.7z |
| DevTools kit |
| TMS9900 Platforms |
| Ti 99 |
| 6809 Content |
| Learn 6809 Assembly |
| Learn 6309 Assembly |
| Platform Specific Series |
| Hello World Series |
| Simple Samples |
| 6809 Downloads |
| 6809/6309 Cheatsheet |
| Sources.7z |
| DevTools kit |
| 6809 Platforms |
| Dragon 32/Tandy Coco |
| Fujitsu FM7 |
| TRS-80 Coco 3 |
| Vectrex |
| 65816 Content |
| Learn 65816 Assembly |
| Hello World |
| Simple Samples |
| 65816 Downloads |
| 65816 Cheatsheet |
| Sources.7z |
| DevTools kit |
| 65816 Platforms |
| SNES |
| eZ80 Content |
| Learn eZ80 Assembly |
| Platform Specific Series |
| eZ80 Downloads |
| eZ80 Cheatsheet |
| Sources.7z |
| DevTools kit |
| eZ80 Platforms |
| Ti84 PCE |
| IBM370 Content |
| Learn IBM370 Assembly |
| Simple Samples |
| IBM370 Downloads |
| IBM370 Cheatsheet |
| Sources.7z |
| DevTools kit |
| Super-H Content |
| Learn SH2 Assembly |
| Hello World Series |
| Simple Samples |
| SH2 Downloads |
| SH2 Cheatsheet |
| Sources.7z |
| DevTools kit |
| SH2 Platforms |
| 32x |
| Saturn |
| PowerPC Content |
| Learn PowerPC Assembly |
| Hello World Series |
| Simple Samples |
| PowerPC Downloads |
| PowerPC Cheatsheet |
| Sources.7z |
| DevTools kit |
| PowerPC Platforms |
| Gamecube |
| Work in Progress |
| ChibiAndroids |
| Misc bits |
| Ruby programming |
Buy my Assembly programming book
on Amazon in Print or Kindle!


Available worldwide!
Search 'ChibiAkumas' on
your local Amazon website!
Click here for more info!


Buy my Assembly programming book
on Amazon in Print or Kindle!
Available worldwide!
Search 'ChibiAkumas' on
your local Amazon website!
Click here for more info!
Buy my Assembly programming book
on Amazon in Print or Kindle!
Available worldwide!
Search 'ChibiAkumas' on
your local Amazon website!
Click here for more info!
Buy my Assembly programming book
on Amazon in Print or Kindle!
Available worldwide!
Search 'ChibiAkumas' on
your local Amazon website!
Click here for more info!
Buy my Assembly programming book
on Amazon in Print or Kindle!
Available worldwide!
Search 'ChibiAkumas' on
your local Amazon website!
Click here for more info!
Buy my Assembly programming book
on Amazon in Print or Kindle!
Available worldwide!
Search 'ChibiAkumas' on
your local Amazon website!
Click here for more info!
Buy my Assembly programming book
on Amazon in Print or Kindle!
Available worldwide!
Search 'ChibiAkumas' on
your local Amazon website!
Click here for more info!
Buy my Assembly programming book
on Amazon in Print or Kindle!
Available worldwide!
Search 'ChibiAkumas' on
your local Amazon website!
Click here for more info!