

Learn Multi platform 6809 Assembly Programming... 8 bit resurrection!
| The 6800 was too expensive for the
mainstream, and it had many of its features cut, and was released
as the 6502... it's second accumulator gone, it's command
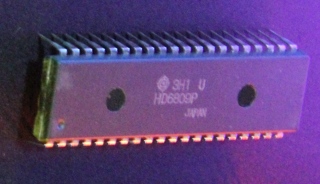
set cut back - and everyone forgot about the 6800.... But the 6800 came back - as the 6809... with new previously unheard-of powers!... armed with twin stack pointers , 16 bit Stack,X and Y registers- 16 bit capabilities and advanced addressing modes and even a MULTiply command (unheard of in most 8 bits)... the 6809 is the 'missing link' between the 6502 and the 68000! Powering the Dragon 32, the FM-7 machines - and the unique Vectrex... Lets see what the 6809 can do! |
 |
Platforms Covered in these tutorials
Other ChibiAkumas 6809 Tutorials
6309 Tutorials
| Lesson 1 - Getting started with 6309 Assembly [DGN] |
| Lesson 2 - Shifts, Compares and logical ops [DGN] |
| Lesson 3 - More new commands! [DGN] |
6809 Hello World Series
| Lesson H4 - Hello World on the Dragon / Tandy CoCo [DGN] |
| Lesson H5 - Hello World on the Tandy CoCo Disk BIN file [DGN] |
6809 MultiplatformLessons
| Lesson M1 - Random Numbers and Ranges |
| Lesson M2 - Binary Coded Decimal |
6809 Simple Samples
6809 Platform Specific Lessons
6809 SuckShoot Series
| Lesson SuckShoot1 - Suck Shoot on the Vectrex [VTX] |
| Lesson SuckShoot2 - Suck Shoot on the Dragon [DGN] |
| Lesson SuckShoot3 - Suck Shoot on the FM7 [FM7] |
 |
If
you
want to learn 6809 get the Cheatsheet
collection! it has all the 6809 commands, It will
give you a quick reference when you're stuck or confused, which
will probably happen a lot in the early days! it also covers the
6309. |
 |
 |
We'll be using
Macroassembler AS for our assembly in these tutorials... VASM is
an assembler which supports rarer CPU's like 6809 and 65816 and
many more, and also supports multiple syntax schemes... You can get the source and documentation for AS from the official website HERE |
What is the 6809 and what are 8 'bits' You can skip this if you know about binary and Hex (This is a copy of the same section in the Z80 tutorial)
The 6809 is an 8-Bit processor with a 16 bit Address bus!... it has two 8 bit accumulatrors, A and B, that can be combined to make up one 16 bit accumulator D (AB)
What's 8 bit... well, one 'Bit' can be 1 or 0
four bits make a Nibble (0-15)
two nibbles (8 bits) make a byte (0-255)
two bytes (16 bits) make a word (0-65535)
And what is 65535? well that's 64 kilobytes ... in computers Kilo is 1024, because four bytes is 1024 bytes
64 kilobytes is the amount of memory a basic 8-bit system can access
the 6809 is 8 bit so it's best at numbers less than 256... it can do numbers up to 65535 too more slowly... and really big numbers will be much harder to do! - we can design our game round small numbers so these limits aren't a problem.
 |
You probably
think 64 kilobytes doesn't sound much when a small game now
takes 8 gigabytes, but that's 'cos modern games are sloppy,
inefficient, fat and lazy - like the basement dwelling
losers who wrote them!!! 6809 code is small, fast, and super efficient - with ASM you can do things in 1k that will amaze you! |
Numbers in Assembly can be represented in different ways.
A 'Nibble' (half a byte) can be represented as Binary (0000-1111) , Decimal (0-15) or Hexadecimal (0-F)... unfortunately, you'll need to learn all three for programming!
Also a letter can be a number... Capital 'A' is stored in the computer as number 65!
Think of Hexadecimal as being the number system invented by someone wit h 15 fingers, ABCDEF are just numbers above 9!
Decimal is just the same, it only has 1 and 0.
In this guide, Binary will shown with a % symbol... eg %11001100 ... hexadecimal will be shown with & eg.. &FF.
| Assemblers will
use a symbol to denote a hexadecimal number, some use $FF or #FF
or even 0x, but this guide uses & - as this is how
hexadecimal is represented in CPC basic All the code in this tutorial is designed for compiling with WinApe's assembler - if you're using something else you may need to change a few things! But remember, whatever compiler you use, while the text based source code may need to be slightly different, the compiled "BYTES' will be the same! |
 |
| Decimal | 0 | 1 | 2 | 3 | 4 | 5 | 6 | 7 | 8 | 9 | 10 | 11 | 12 | 13 | 14 | 15 | ... | 255 |
| Binary | 0000 | 0001 | 0010 | 0011 | 0100 | 0101 | 0110 | 0111 | 1000 | 1001 | 1010 | 1011 | 1100 | 1101 | 1110 | 1111 | 11111111 | |
| Hexadecimal | 0 | 1 | 2 | 3 | 4 | 5 | 6 | 7 | 8 | 9 | A | B | C | D | E | F | FF |
Another way to think of binary is think what each digit is 'Worth' ... each digit in a number has it's own value... lets take a look at %11001100 in detail and add up it's total
| Bit position | 7 | 6 | 5 | 4 | 3 | 2 | 1 | 0 |
| Digit Value (D) | 128 | 64 | 32 | 16 | 8 | 4 | 2 | 1 |
| Our number (N) | 1 | 1 | 0 | 0 | 1 | 1 | 0 | 0 |
| D x N | 128 | 64 | 0 | 0 | 8 | 4 | 0 | 0 |
| 128+64+8+4= 204 So %11001100 = 204 ! | ||||||||
If a binary number is small, it may be shown as %11 ... this is the same as %00000011
Also notice in the chart above, each bit has a number, the bit on the far right is no 0, and the far left is 7... don't worry about it now, but you will need it one day!
| If you ever get confused, look at Windows
Calculator, Switch to 'Programmer Mode' and it has binary
and Hexadecimal view, so you can change numbers from one form to
another! If you're an Excel fan, Look up the functions DEC2BIN and DEC2HEX... Excel has all the commands to you need to convert one thing to the other! |
 |
But wait! I said a Byte could go from 0-255 before, well what happens if you add 1 to 255? Well it overflows, and goes back to 0!... The same happens if we add 2 to 254... if we add 2 to 255, we will end up with 1
this is actually usefull, as if we want to subtract a number, we can use this to work out what number to add to get the effect we want
| Negative number | -1 | -2 | -3 | -5 | -10 | -20 | -50 | -254 | -255 |
| Equivalent Byte value | 255 | 254 | 253 | 251 | 246 | 236 | 206 | 2 | 1 |
| Equivalent Hex Byte Value | FF | FE | FD | FB | F6 | EC | CE | 2 | 1 |
 |
All these number types can be confusing,
but don't worry! Your Assembler will do the work for you! You can type %11111111 , &FF , 255 or -1 ... but the assembler knows these are all the same thing! Type whatever you prefer in your ode and the assembler will work out what that means and put the right data in the compiled code! |
The 6809 Registers
Compared to the 6502, , the 6809 is seriously powerful - and even gives the Z80 something to think about!
|
Flags: EFHINZVC
|
||||||||||||||||||||||||||||||||||||||||||||||||||||||||||||||||||||||||
| The Direct page is like the 6502 Zero Page, however
it does not need to be at zero! We can load A with a value, then TFR A,DP to set the direct page... we need to tell the assembler where the direct page is, otherwise some commands may malfunction, we do this with ASSUME dpr:$xx - this is called SETDP on some assemblers |
|
Like the 68000, the 6809 is BIG
ENDIAN... this means a 16 bit pair stored to an address like $6000
will save the high byte to $6000, and the low byte to $6001
The Carry flag
works like the 68000, not the 6502... on the 6502, we set the carry before
a subtract command to 'disable it'... but on the 6809, a set carry is
'Enabled' and subtracts an extra 1.
Special Memory addresses on the 6809
Unlike the 6502, The 6809 has full 16 bit Stack pointers, U and S.... the 'Zero Page' (AKA Direct Page) can also be re positioned
Like the 6502, there are a variety of
'Interrupt Vectors' with fixed addresses...
| Address | Vector (Address) | Registers Auto-pushed onto stack |
| $FFF2 | SWi 3
Vector |
D,X,Y,U,DP,CC |
| $FFF4 | SWI 2
Vector |
D,X,Y,U,DP,CC |
| $FFF6 | FIRQ Vector | CC (E
flag cleared) |
| $FFF8 | IRQ Vector | D,X,Y,U,DP,CC |
| $FFFA | SWI 1 Vector | D,X,Y,U,DP,CC |
| $FFFC | NMI Vector | D,X,Y,U,DP,CC |
| $FFFE | RESET Vector | NA |
The 6809 Addressing Modes
The 6502 has 11 different addrssing modes... many have no comparable equivalent on the Z80
| Group | Addressing Mode | Details | Example |
| Inherent Addressing | Commands that don't take a parameter | ABX | |
| Register Addressing | Commands that only use registers | TFR A,DP | |
| Imm | Immediate Addressing | Direct Address of command | ADDA #$10 ADDD #$1000 |
| DirectPg | Direct Page addressing | Read from DP (zero page) | ADDA $10 |
| Ext | Extended Direct addressing | Read from an address | ADDA $1234 |
| Index | Indexed Addressing | Uses a 2nd setting byte - allows for Autoinc | ,R offset,R label,pcr ,R+ ,-R [] |
| Index | Extended Indirect Addressing | Read from the address specified... then get the value from that address | ADDA [$1234] |
| Index | Indexed Addressing: Zero Offset | Just use the address in the register | LDA ,Y LDA 0,Y LDA Y |
| Index | Indexed Addressing: Constant Offset from base register | 5 / 8 / 16 bit offset from X,Y,U,S ... Can be negative or positive | LDA 1000,Y |
| Index | Indexed Addressing: Constant Offset From PC | 8 / 16 bit offset from PC | LDA $10,PC |
| Index | Program counter relative | PCR is like PC, but is calculated by the assembler | ADDA label,PCR |
| Index | Indirect with constant offset from base register | Load from the address in the register + offset | LDA [1,X] |
| Index | Accumulator offset from Base register | Add accumulator (A/B/D) to a X,Y,U,S (not PC) | LDA B,Y |
| Index | Indirect Accumulator offset from Base register | Load from the address made up of a X,Y,U,S Plus the accumulator | LDA [B,Y] |
| Index | AutoIncrement | Add 1 or 2 to the register (no offset) | ADDA X+ ADDA ,X++ |
| Index | AutoDecrement | Subtract 1 or 2 from the register (no offset) | ADDA -X ADDA ,--X |
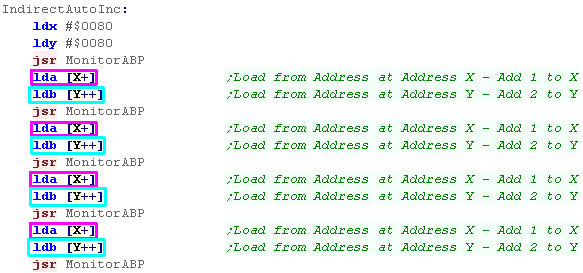
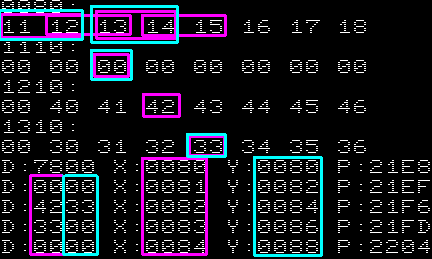
| Index | Indirect AutoIncrement | Load from the address in Register, then add 2 (can't add 1) | ADDA [,X++] |
| Index | Indirect AutoDecrement | Subtract 2 then Load from the address in Register (can't subtract 1) | ADDA [,--X] |
| Program relative | Offset to PC | BRA label |
Indexed Mode Summary
| Category | Version |
Direct Eg |
Indirect Eg |
| Constant Offset from base register | None 5 bit 8 bit 16 bit |
,X 1,X 32,X 16384,X |
[,X] {n/a - 8 bit only} [32,X] [16384,X] |
| Accumulator offset from Base register | A B D |
A,X B,X D,X |
[A,X] [B,X] [D,X] |
| AutoIncrement / AutoDecrement | + ++ - -- |
X+ X++ X- X-- |
{n/a} [X++] {n/a} [X--] |
| Constant Offset From PC | 8 bit 16 bit |
32,PC 16384,PC |
[32,PC] [16384,PC] |
| Extended Indirect | 16 bit | {n/a} | [$8000] |
Hints
Saving a byte on return:
Rather than returning, if your last command is a pop, just pop the PC with your other registers:
PULS B , X , PC
Addresses, Numbers and Hex... 6809 notification
We'll be using ASW for our assembler, but most other 6502 assemblers use the same formats... however coming from Z80, they can be a little confusing, so lets make it clear which is which!
| Prefix | Example | Z80 equivalent | Meaning |
| # | #16384 | 16384 | Decimal Number |
| #% | #%00001111 | %00001111 | Binary Number |
| #$ | #$4000 | &4000 | Hexadecimal number |
| #' | #'a | 'a' | ascii value |
| 12345 | (16384) | decimal memory address | |
| $ | $4000 | (&4000) | Hexadecimal memory address |
Missing Commands!
Commands we don't have, but might want!
Commands we don't have, but might want!
| DEX/DEY/INX/INY | Tfr X,D ;replace X with Y if required DecB ;or IncB as required Tfr D,X ;replace X with Y if required |
|
| CLC | AndCC #%11111110 | |
| SEC | OrCC #%00000001 | |
| DeX |
LEAX -1,X |
|
| ABY (Add B to Y) |
LEAY B,Y |

Structure of an ASM source file
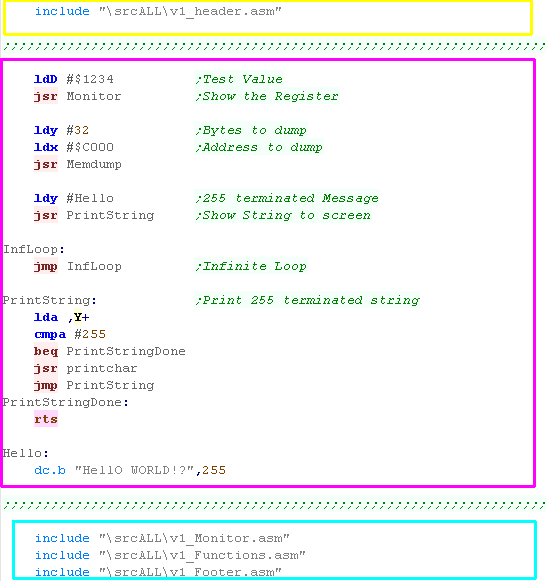
Lets look at a simple file (Minimal.asm) we have a header - We're including a header to do our setup In our body we're running a simple monitor program - this is where you would put your code In our footer we're including some useful files (with include statements) This example will show a hello world message, the status of the registers, and dump some bytes of memory. |
 |
|
This
example will work fine on the Dragon 32 and the FM7 It will not work on the Vectrex!... that's because the Vectrex is a vector based system, and the text routines will not work on that system. |
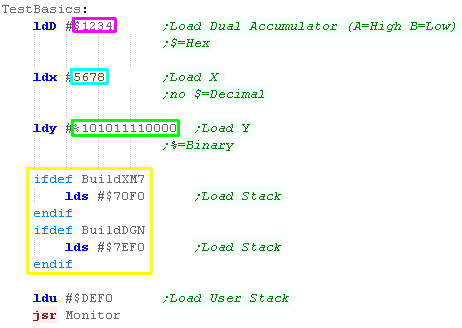
Loading Values From Immediates
| The 6809 has a 16 bit
accumulator (D - made up of AB), Two index registers (X,Y) and two
stack pointers (U,S) These are LoaDed with LD?...where ? is a register name... an immediate value can be loaded with # followed by a number. We can specify Hex Values using $ We can specify Decimal without the $ we can specify binary with % we can even load the Stack.. but beware, the stack is used by calls, so we need to be sure the new value will work OK |
 |
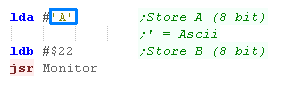
| The 16 bit Accumulator D is made up of two 8 bit accumulators A
and B (A is the High byte of D - B is the low byte) We can load these from an 8 bit immediate. We can specify an Ascii value with ' |
 |
| Here are the results |  |
|
You'll see lots of JSR command - this is
like a GOSUB in basic, it jumps to a subroutine... RTS is the
equivalent of RETURN... JMP is like GOTO... don't worry too much though... we'll see these again later. |
Loading and saving Values From
Addresses in memory
| Just like the 6502, If we don't specify the # then the number specified is an address... we can use ST? to Store register ? To an address | 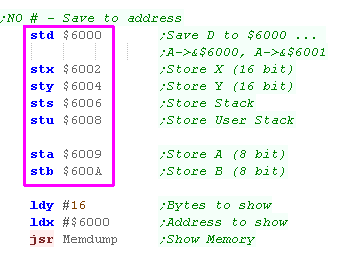 |
| Here are the results | 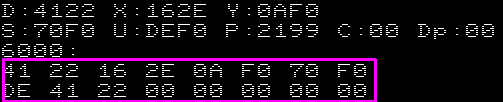 |
| Loading works the same way... We don't need to specify a two byte address... if we specify just one byte (like $60) then the data will be loaded from the DIRECT PAGE. This is like the 6502 Zero page, though register DP is used for the top byte of the address, and it doesn't have to be $00xx |
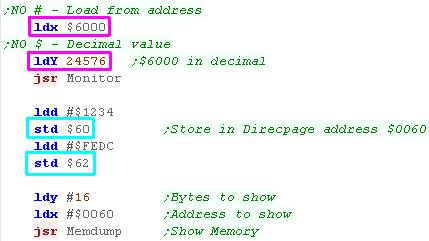
|
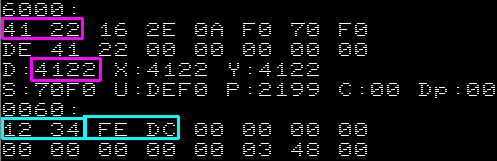
| We've loaded bytes from memory, And stored two words to the Direct Page (Zero Page) |
|
| Specifying
addresses in the direct page uses One byte, compared to the normal
Two, so memory in this area saves program code and is faster. The Direct page should be used as a 'Temporary store' for values you don't have enough register for. |
|
Transferring values between
registers
| As well as immediates and
memory, we have commands to transfer between registers. We can Copy the value from one register to another with TFR... the source register is on the LEFT of the comma, the Destination is on the RIGHT We can swap registers with EXG... the two registers values are swapped. |
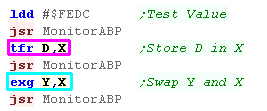 |
| Here are the results |  |
INCrease, DECrease and CLeaR!
| We can use INC? and DEC?
to add 1 or subtract 1 from a register - these are great
when doing loops We can also zero a register using CLR?... these only work on 8 Bit Registers A or B, not X,Y or D |
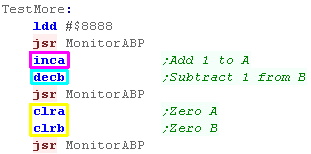 |
| Here are the result |  |
| We have versions for memory addresses too... INC, DEC and CLR - these are also all 8 bit. | 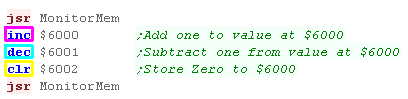 |
| Here are the results | 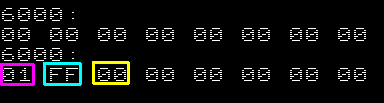 |
Addition and Subtraction
| We have ADD? and SUB?
commands... these can work with 8 bit registers... We also have ADDD and SUBD which work with the 16 bit accumulator We also have ABX - which adds B to X (X=X+B)... A is not used... ABX is the only such command, there's no AAX, ABY or ADX |
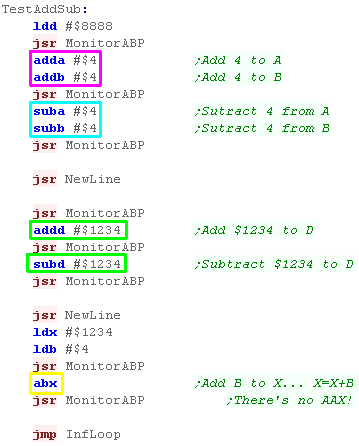 |
| Here is the result | 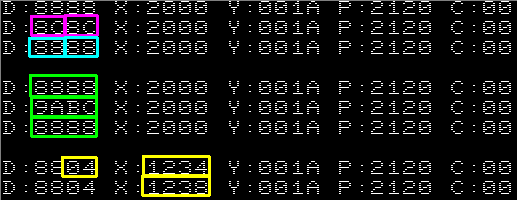 |
JuMPs... Jump to SubRoutine...
ReTurn from Subroutine... Labels
| There will be many times in our program that we want to call
subroutines, or jump to different places in our code. When we want to mark part of our code as a destination for a jump or a subroutine we use a Label - these are always at the far left of the source - whereas normal commands are tab indented. If we want to jump to a different position in our code we can use JMP - this sets the program counter to the address of the specified label (of course a fixed address can be used too) If we want to jump to a subroutine - and come back once the subroutine is done we use JSR.... the end of the subroutine is marked by a RTS return command... execution will continue on the line after the JSR command |
 |
 |
|
You'll notice that
many of the commands on the 6809 are the same as the 6502, but
many are different on the 6809 Both have their 'roots' in the 6800, and the 6809 has some compatibility with the old cpu, but code would need recompiling for the 6809... Next time we'll take a look at addressing modes - and we'll learn about all the impressive options the 6809 offers. |
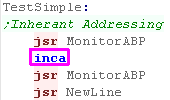
Inherant Addressing
| Inherent
addressing is commands which do not take a parameter, the
'destination' of the command is built into the command. In this case... INCA will always use A as a source and destination |
 |
| here is the result | 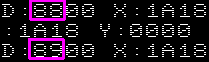 |
Register Addressing
| Register addressing is where we specify a register by name as a source or destination | 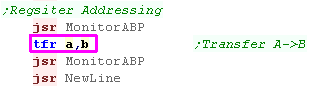 |
| The source and destination are registers - we copied A to B! | 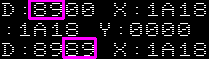 |
Immediate Addressing
| We've seen Immediate addressing before, this is where a fixed value is specified with the command with a # symbol, and that value is used as the parameter |  |
| Here is the result |  |
Direct Page addressing
| Direct
Page Addressing is basically the same as Zero Page
addressing... however thanks to the DP register the Direct Page
can be at any address! We specify a single byte (without a #)... this is used as the bottom byte of an address - the top byte is taken from the DP register... that address contains the source parameter for the command |
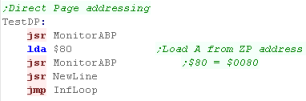 |
| In this example we specified $80 , and DP=00... so we loaded from address $0080 | 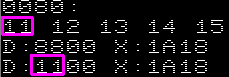 |
Indirect Direct Page Addressing
| Indirect Direct Page Addressing also uses
the DP - however the two bytes at the specified DP address are
used as an address... and the parameter is loaded from that
address! The one byte DP address is in square brackets |
 |
| The address specified is $81 in the example... so as DP=00 we
load in from $0081... the two bytes here are $1213... this becomes the source address for our parameter - at address $1213 is $42 - so this is the value that ends up being loaded into A |
 |
|
Don't forget!
Unlike the 6502 the 6809 is BIG ENDIAN... the value $1234 will
be stored in memory as $12 $34 It sounds logical if you're used to the 68000 - but it will be a shock to the 6502 or z80 users! |
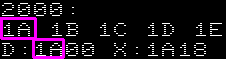
Extended Direct addressing
| Extended
Direct Addressing sounds complex, but it's not... If we specify a one byte address, we load from the direct page, but if extend our address to two bytes, we specify the Direct address to load from |
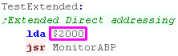 |
| In this case we specify $2000 - so the parameter is read from
address $2000 |
 |
Extended Indirect Addressing
| Extended indirect Addressing
is where we load our parameter from the address at an address
(specified in 16 bits - a full address) The two byte DP address is in square brackets |
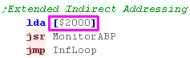 |
| In this example we specified [$2000]... at this address is $1A1B
(Big Endian)... so the parameter loaded into A is read from $1A1B
($CC) |
 |
Indexed Addressing
| Indexed Addressing uses a
register plus an offset... the offset comes first, followed by a
comma, then the register The offset can be Zero - in which case we can omit it. The offset can be positive or negative, and the register can be X,Y,S or U (not D) |
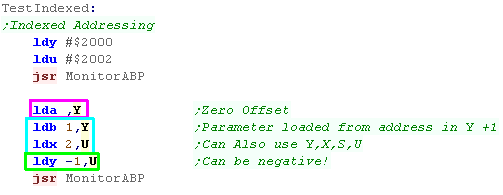 |
| Here are the results. Y was pointing to $2000 (the 1A)... U was pointing to $2002 (the 1C) |
 |
| We can use a symbol to give a numbered
offset a label. On the 6809 we can even have a 16 bit offset! |
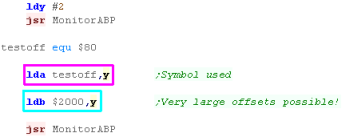 |
| Both these work just fine! | 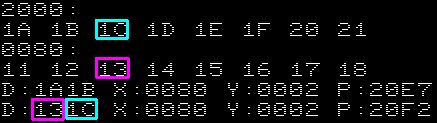 |
| There are multiple ways of specifying a zero offset |  |
| Here are the results | 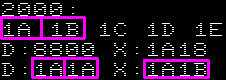 |
|
Actually, the offset doesn't have to be a
fixed number - we can use the Accumulator as an offset! This has a different name though... "Accumulator offset from Base register" |
Program Counter Relative
| We can specify a label as a parameter by offset using PCR
as the parameter, an the label as the offset, the assembler will calculate the offset for us. |
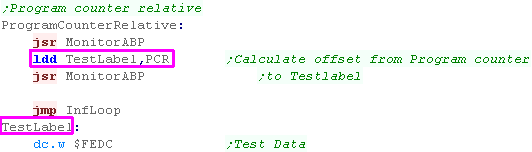 |
| The data has been loaded in | 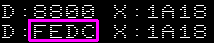 |
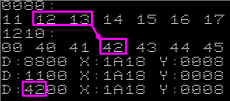
Indirect With Constant Offset
| Rather than reading a parameter from a register+offset, we can
read the parameter from the address at the address
register+offset... We specify an offset and a register in Square brackets [] this is Indirect With Constant Offset Addressing |
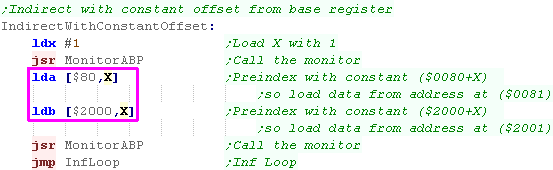 |
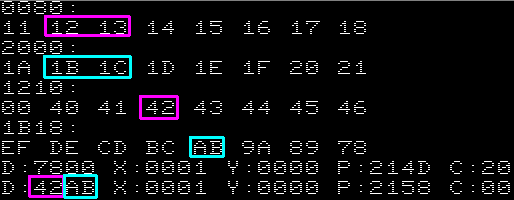
| in the first example we loaded from [$80,X]...
at address $0080+1 is $1213 - this becomes the source address of
the parameter... at address $1213 is value $42 in the second example we loaded from [$2000,X]... at address $2000+1 is $1B1C - this becomes the source address of the parameter... at address $1B1C is value $AB |
 |
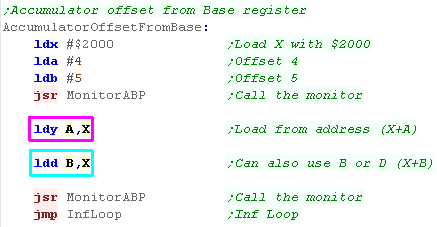
Accumulator offset from Base
register
| Rather than a fixed offset, we can use an accumulator (A,B or D) as an offset from an index register
(X,Y,S,U) this is known as Accumulator Offset From Base Register in this example The parameter will be loaded from the address in A+X or B+X |
 |
| Here are the results |  |
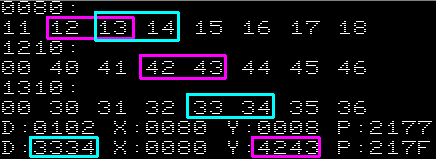
Indirect Accumulator Offset From
Base Register
| Rather than use the address Accumulator+Base as the address of the parameter... we can indirectly use the address at that address as the source. | 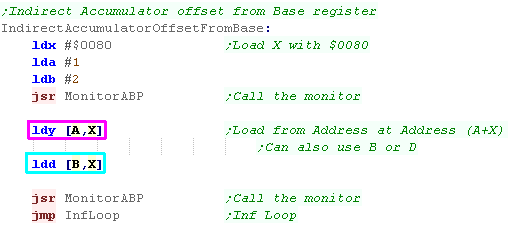 |
| For Y X=$0080 and A=1... so we look at address $0080 - at this address is $1213... so this becomes the source address of the parameter - at address $1213 is value $4243 For D X=$0080 and A=2... so we look at address $0080 - at this address is $1314... so this becomes the source address of the parameter - at address $1314 is value $3334 |
 |
Post Increment and Pre Decrement
| AutoIncrement will read from the address in a register,
and add 1 or 2 to the register AFTER the read. We just put a + or ++ at the end of the register - the register can be X,Y,S or U |
 |
| Here are the results | 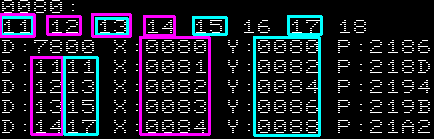 |
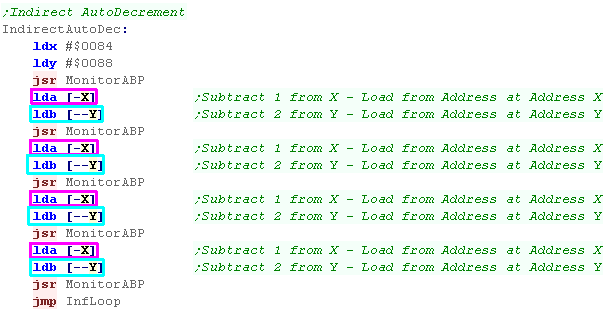
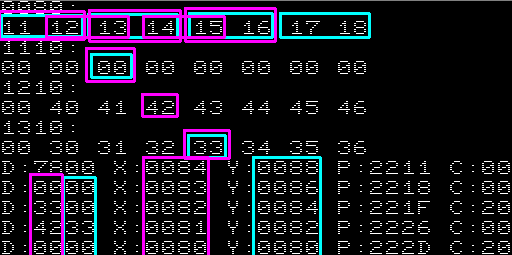
| AutoDecrement will decrease the register BEFORE the read
by 1 or 2 We just put a - or -- at the end of the register - the register can be X,Y,S or U |
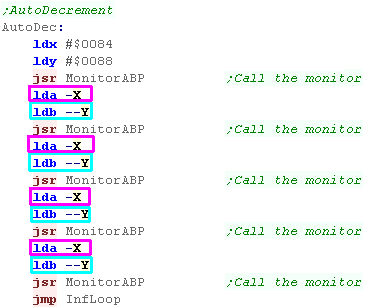 |
| Here are the results | 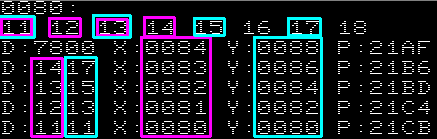 |
Indirect Post
Increment and Pre Decrement
Program Relative Addressing
| Branch commands use a 'relative offset'
to the destination, represented in the byte code as a positive or
negative number. This is calculated automatically by the assembler... BRA uses a single byte offset , so can only jump short distances... LBRA (Long Branch) can jump long distances |
 |
| Here are the results! |  |
Load Effective Address
| All the commands above will calculate an an address, and use the
parameter at that address. However, there may be times when we want to calculate the address, but save it for later... Load Effective Address does this for us! This is a handy 'time saver' if we need to use a calculated address several times - it's faster to store the address in a register, then use that pre-calculated address for future commands. |
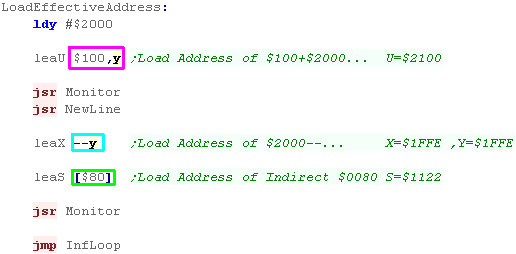 |
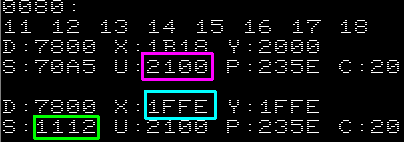
In the First example, we used an offset of $100 from Y. As Y=$2000, the result loaded into U is $2100 In the Second Example, we PreDecremented Y by 2. As Y was $2000, Y Went down to $1FFE, and that value is loaded int X In the Third Example, we loaded the indirect address at $0080... at address $0080 is $1112 - so this value is loaded into S |
 |
| Lesson
3 - Carry, Branch, Test We need to learn about conditions and branching... which brings up the topic of Flags! Lets learn about it all! |
 |
 |
 |
Branch to Subroutine, and Long
branch

Add with Carry, and Subtract with
Carry
| When we do a mathematical operation like ADD or SUB, there is
the possibility that the mathematical operation will cause the
value in the register to go over 255 or under 0, causing a 'Carry'
or 'Borrow' If we want, we can use an extra register as a second byte (in a 16 bit pair - or more) An ADD or SUB command will set the carry (also used as borrow)... we then use ADC for Add with Carry, or SBC for Subtract with carry - which will Add or subtract a value PLUS the Carry flag (if set) |
 |
| Here are the results... when the Carry flag was set, the High byte (A) is affected by the ADC or SBC. |  |
|
We've looked at
ADD and SUB, but many other commands affect and use the carry
flag, Rotate commands will shift bits around the register, and some will use the carry too. |
Branch on Carry
| We've learned ADD can set the carry... but what if we want to do
a different command depending on the Carry flag? We can use BCC to Branch if Carry Clear (no carry) We can use BCS to Branch if Carry Set (carry) |
|
| Depending on the Carry flag, one of the
two branches will occur! |
|
| To properly learn about how commands affect these
flags, and the branches, you really need to download the source,
and change the commands. If you REM (;) out the last ADDA, you'll leave the carry flag set, and the BCC branch will happen. What? you thought you didn't need to try things yourself? Good luck with that! |
|
Compare, and Branch on Equal / Not
Equal (Zero Flag)
| When we want to test a value in a register, we can do this with
Compare (CMP).... this will set the flags,
but not change any register - we have a whole range of CMP
commands for different registers. The easiest Branch we can try out is BEQ and BNE... our Compare command will set the Zero flag if the difference between the register and the compared value is Zero... BEQ (Branch if EQual) will branch if the Zero flag is set BNE (Branch if Not Equal) will branch if the Zero flag is set |
 |
| Which Branch occurs will depend on whether the Zero flag was set or not. |  |
|
The CMP
commands are actually a 'simulated subtraction' - in the sense
that they set the flags the same as a SUB would, but they leave
the register unchanged. That's why Z is set if the two compared values are the same. |
Comparisons of Unsigned numbers
| Depending if the values in our registers are Signed or Unsigned
numbers we need to use different branch commands for our
comparison If our number is UNSIGNED (0 to 255 or 0 to 65535) then we use the following commands: BHI will branch if Higher (>) BHS will branch if Higher or Same (>=) BLO will branch if Lower (<) BLS will branch if Lower or Same (<=) |
 |
| In this example D contained 28672... we compared to 24576, so BHI occurred - showing a > |  |
Comparisons of Signed numbers
Checking if Overflowed
| If our number is SIGNED (-128 to 127 or -32768 to 32767) then
we use the following commands: BGT will branch if Greater Than(>) BGE will branch if Greater or Even (>=) BLT will branch if Less Than (<) BLE will branch if Less or Even (<=) |
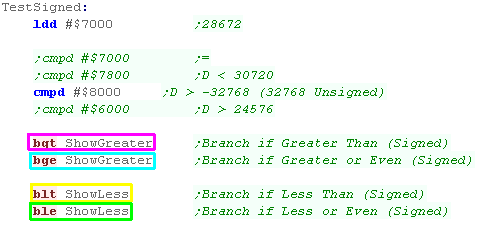 |
| In this example D contained 28672... we compared to -32768, so
BGT occurred - showing a > Note, If we had |
|
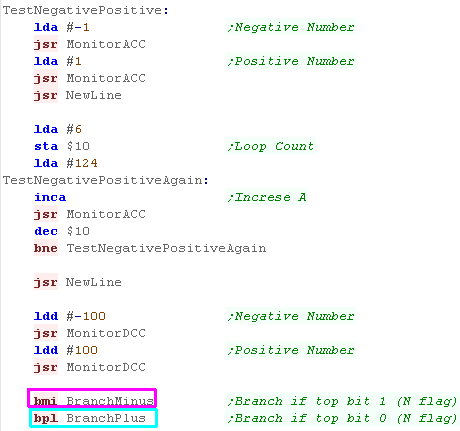
Checking if Signed or Unsigned
| We're going to do some tests on positive and negative numbers. We'll see how the flags change as a number goes from Positive to Negative The Negative flag denotes if a register is Negative - effectively if it's top bit is 1 the oVerflow flag denotes if a register just changed sign - for example if we add 1 to 127 ($7F) it will become -128 ($80) BMI will Branch if MInus (N flag set - top bit 1) BPL will Branch if PLus (N flag clear - top bit 0) |
 |
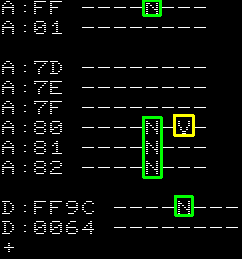
| the N flag will be set when a number is negative (the top bit
is 1) When the sign changes, the oVerflow flag is set. In this example the sign was positive, so BPL occurred, and a + was shown |
 |
Checking if Overflowed
| If our mathematical operation accidentally changes the sign of
a register we'll have a problem with our maths! In order to work around this, we can check the overflow flag (V) and see if the sign changed. We have two commands: BVS will Branch if oVerflow Set BVC will Branch if oVerflow Clear |
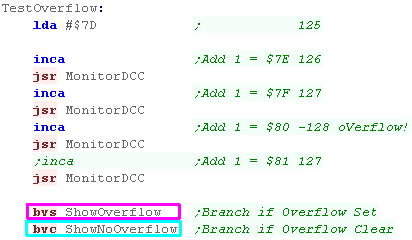 |
| Here's the result, in this case the V flag was set, so BVS occurred | 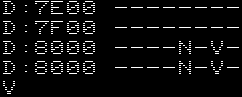 |
BRanch Always and Never!
| Finally we have to exceptions that don't look at the flags BRA will BRanch Always BRN will BRanch Never BRN is useless really, it's just a 'quirk' of the instruction set. |
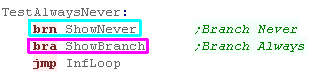 |
| Unsurprisingly BRA occurred! |  |
|
BRN is pretty useless, but it could be
handy for self modifying code! Self modifying code is code that re-writes itself, for example, you may wish to modify a jump to turn it off.. changing BRA to BRN will do this! |
Stack attack!
| 'Stacks' in assembly are like an
'In tray' for temporary storage... Imagine we have an In-Tray... we can put items in it, but only ever take the top item off... we can store lots of paper - but have to take it off in the same order we put it on!... this is what a stack does! If we want to temporarily store a register - we can put it's value on the top of the stack... but we have to take them off in the same order... The stack will appear in memory, and the stack pointer goes DOWN with each push on the stack... so if it starts at $01FF and we push 1 byte, it will point to $01FE |
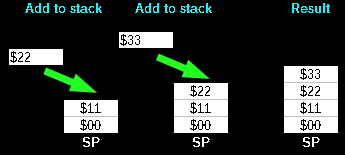  |
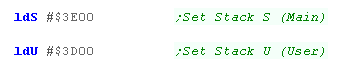
Using Stacks S and U
| Like most CPU's, the stack on the 6809 moves DOWN memory as
items are 'pushed' onto it... We'll need to point our stack
pointers to the top of a spare area of memory. When we want to set the stack up we use commands LDS and LDU (LoaD Stack and LoaD User stack) |
 |
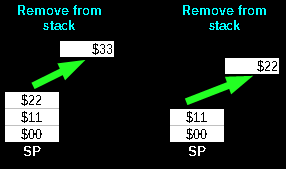
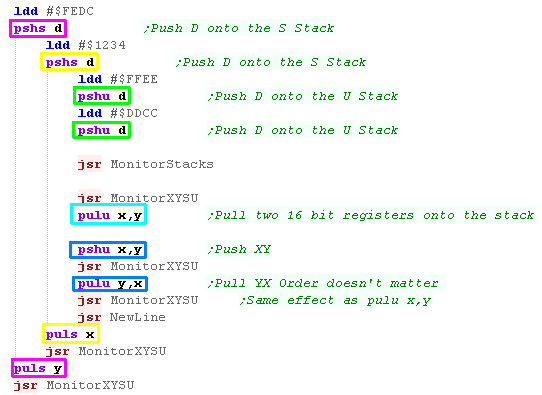
| When we want to put an item on the stack we use a PUSH command
PSHS/PSHD... we get it back with PULL command PULS/PULU.... The stack is in reverse order, so the items are pulled off the stack in the opposite order they were pushed... Pushed items can be pulled into different registers later. Multiple registers can be pushed or pulled at the same time... the order we list the registers in the source does not affect the order they are processed by the command. We can push one register onto the stack |
 |
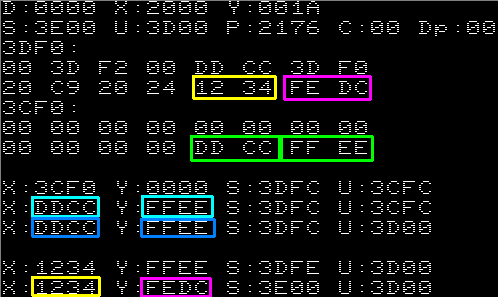
| Here are the results. With each push the stack pointer S or U will go down... with each pull S or U will go up |
 |
| We can push and pull any of the registers onto the stack... 8 Bit accumulators A or B, 16 bit registers X, Y or D, the Stack pointers themselves S, U the program counter PC, or the 8 bit flags (CC) | |
Combining Bytes and Words, and
pushing Stack registers!
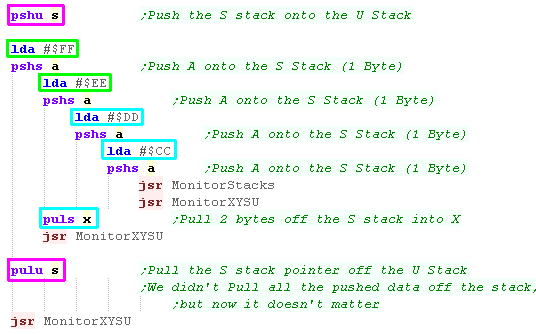
| We can push the 8 bit accumulators onto
the stack - when we do so a single byte is pushed onto the stack We can even then pull them off into a 16 bit register. We should always make sure our routines leave the stack as they found them - with the stack pointer in the same position at the end as the start, however we don't actually need to pull all the items off the stack - in this case we pushed the Stack register onto the User stack - and popped it off at the end... restoring the Stack pointer to it's starting state! |
 |
| Here are the results. | 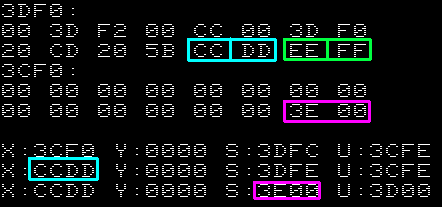 |
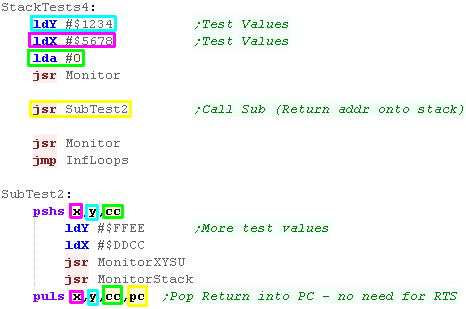
Subroutines and stacks
| Subroutines and returns also use the main stack (S) When we use JSR, the return address is pushed onto the stack... for this reason we need to ensure our stack is the same at the end of the subroutine as when it started. |
 |
| In this example we can see the Return address, surrounded by the Other values pushed onto the stack | 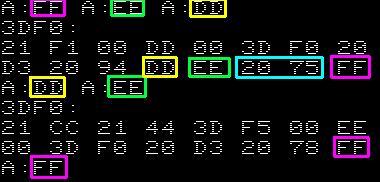 |
|
While JSR pushes
the address of the next command onto the stack, RTS effectively
pops an item off the main stack (S) into the Program counter
(PC) JSR always uses the main stack (S) not the user stack (U). |
Look Ma!... no RTS
| we can also back up the flags (CC)! In this example, our subroutine backs up X,Y and CC Normally our subroutine would end with RTS... but as RTS effectively pops the program counter (PC) off the stack, we can do this with the PULS, and save the command! |
 |
| Here are the results | 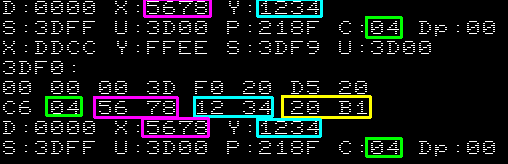 |
| No matter how many or few registers we push
or pull the command always ends up being two bytes. Therefore, if we need to end our sub with a PULS we can save one byte by adding the PC to the list... PC is always the last register popped off the stack if it's in the PULS list. |
|
Logical Operations... AND, OR and
EOR
There will be many times when we need to change some of the bits in a register, we have a range of commands to do this!
AND will return a bit as 1 where the bits of both the accumulator and parameter are 1
OR will set a bit to 1 where the bit of either the accumulator or the parameter is 1
EOR is nothing to do with donkeys... it means Exclusive OR... it will invert the bits of the accumulator with the parameter - it's called XOR on the z80!
Effectively, when a bit is 1 - AND will keep it... OR will set it, and EOR will invert it
A summary of each command can be seen below:
| Command | Accumulator | Parameter | Result |
| AND | 1 0 1 0 |
1 1 0 0 |
1 0 0 0 |
| ORA | 1 0 1 0 |
1 1 0 0 |
1 1 1 0 |
| EOR | 1 0 1 0 |
1 1 0 0 |
0 1 1 0 |
| Command | lda #%10101010 eor #%11110000 |
lda #%10101010 and #%11110000 |
lda #%10101010 ora #%11110000 |
| Result | #%01011010 | #%10100000 | #%11111010 |
| Meaning | Invert the bits where the mask bits are 1 |
return 1 where both bits are1 | Return 1 when either bit is 1 |
In the Z80 tutorials, we saw a visual representation of how these commands changed the bits - it may help you understand each command.
| Sample | EOR %11110000 Invert Bits that are 1 |
AND %11110000 Keep Bits that are 1 |
ORA %11110000 Set Bits that are 1 |
 |
 |
 |
 |
| Our commands need to specify the register we want to work on. We can only operate on A or B (Not D)... we can also use ANDCC to set Condition codes, or ORCC to clear them. AND will clear bits where the parameter bit is 0 OR will set bits where the parameter bit is 1 EOR will flip bits where the perameter bit is 1 COM will flip all the bits (complement) - it doesn't take a parameter NEG will negate a number (turn a positive to negative or vice versa) - effectively flipping the bits and adding 1 |
 |
| The bottom bits of the AND Test were 0,
so these were cleared in the test The bottom bits of the OR test were 1, so these were set in the test The bottom bits of the EOR test were 1, so these were flipped in the test When tested COM flipped all the bits When tested NEG negated the value - of course if we run it twice, we end up with the value we started |
|
Rotations and Shifts
The 6809 has 3 kinds of rotate command, these can work to the
Left, or Right, and can work on A, B or an address... they always
work on a single byte
|
|
||||||||||||
| ROL and ROR rotate the bits by 1 to
either the left or the right... Of course the register contains 8 bits, but the Carry acts as a 9th bit - so any bit pushed out of the register goes into the carry, and any carry is pushed into the "other side" of the registers |
 |
||||||||||||
| ASL and ASR are designed to work with
signed numbers... When the bits are shifted to the right with ASR, any new bit will be the same as the previous top bit (in this case 1)... ASL will fill any new bits with 0 ... though it's effectively the same as LSL ASR effectively halves signed number, but keeps the sign intact... so 8 will turn to 4, or -8 will turn to -4 ASL effectively doubles numbers so 4 becomes 8 |
 |
||||||||||||
| LSL and LSR are designed to work with
unsigned numbers... When the bits are shifted to the right with LSR or ASL, any new bits with 0 ... LSR effectively halves unsigned number, but breaks signed numbers... so 8 will turn to 4 ASL effectively doubles numbers so 4 becomes 8 |
 |
|
You need to
download the source code and unrem the alternate shifts to see
them in operation! What do you mean, you can't be bothered! Grr... I don't know, the youth of today are sooo lazy! |
Sign EXtending a register
with...SEX (oh dear!)
| There may be times when you
want to sign extend an 8 bit register to 16 bits - effectively
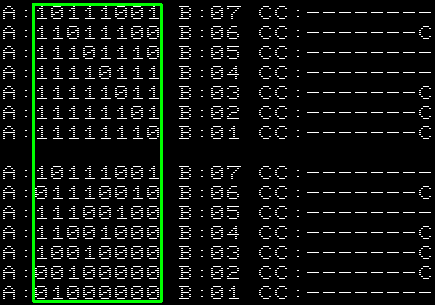
filling the top byte with the top bit of the low byte. We can do this with the dubiously named 'SEX' command.... this sign extends B into A... so the D register now contains a 16 bit version of the signed number In this example we load some junk into A - then we load a test number into B - and sign extend it. |
 |
| When the top bit was zero... A was
set to %00000000 ($00) When the top bit was one... A was set to %11111111 ($FF) |
 |
Test bits and set flags
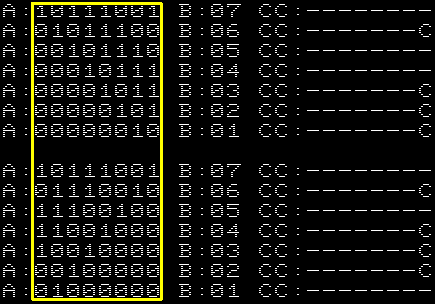
| We have some commands to set flags based on a register without
changing it the BIT commands allow us to provide a bitmask - this is effectively the equivalent of an AND command - but does not actually change the register TST sets the flags according to a register (or memory address) and sets the flags accordingly - we can use it to check if a register contains zero |
 |
| BIT will compare the selected bits, and
set the Z flag if the bits that were 1 in the parameter are 0 in
the tested register. TST will set the flags according to the register or memory address... in this case we set the Zero flag when A=0... and the Negative flag when A was <0 |
 |
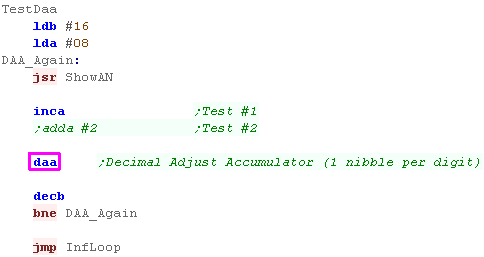
DAA - Decimal Adjust Accumulator
| Binary coded decimal is where we use a byte to store two decimal
digits (one per nibble).... Actually they are stored as 'hexadecimal' however the digits never go over 9... for example $09 + 1 = $10 and $0099 +1 = $0100 DAA will decimal adjust the A accumulator (it cannot work on B)... this should be done after addition, and will correct the accumulator, converting numbers like $0A to $10 |
 |
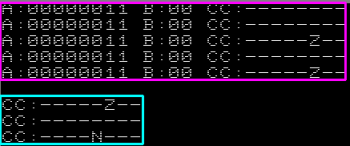
| The Two nibbles act as a pair of decimal numbers (even though they are actually base 16) |  |
Multiplication!
| The MUL command will multiply A * B and store the result in D | 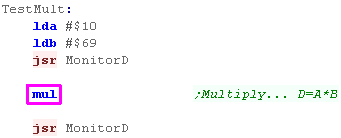 |
| in this example we multiplied $69 by $10 ... The result? $0690 | 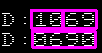 |
|
We've learned how
to Multiply... Wondering where the Divide command is?... Well,
um, there isn't one! You've got a MUL command - that's more than the Z80 or 6502 had... stop being so demanding! |
| View Options |
| Default Dark |
| Simple (Hide this menu) |
| Print Mode (white background) |
| Top Menu |
| ***Main Menu*** |
| Youtube channel |
| Patreon |
| Introduction to Assembly (Basics for absolute beginners) |
| Amazon Affiliate Link |
| AkuSprite Editor |
| ChibiTracker |
| Dec/Bin/Hex/Oct/Ascii Table |
| Alt Tech |
| Archive.org |
| Bitchute |
| Odysee |
| Rumble |
| DailyMotion |
| Please note: I wlll upload more content to these alt platforms based on the views they bring in |
| 68000 Content |
| ***68000 Tutorial List*** |
Learn 68000 Assembly  |
| Hello World Series |
| Platform Specific Series |
| Simple Samples |
| Grime 68000 |
| 68000 Downloads |
| 68000 Cheatsheet |
| Sources.7z |
| DevTools kit |
| 68000 Platforms |
| Amiga 500 |
| Atari ST |
| Neo Geo |
| Sega Genesis / Mega Drive |
| Sinclair QL |
| X68000 (Sharp x68k) |
| 8086 Content |
| Learn 8086 Assembly |
| Platform Specific Series |
| Hello World Series |
| Simple Samples |
| 8086 Downloads |
| 8086 Cheatsheet |
| Sources.7z |
| DevTools kit |
| 8086 Platforms |
| Wonderswan |
| MsDos |
| ARM Content |
| Learn ARM Assembly |
| Learn ARM Thumb Assembly |
| Platform Specific Series |
| Hello World |
| Simple Samples |
| ARM Downloads |
| ARM Cheatsheet |
| Sources.7z |
| DevTools kit |
| ARM Platforms |
| Gameboy Advance |
| Nintendo DS |
| Risc Os |
| Risc-V Content |
| Learn Risc-V Assembly |
| Risc-V Downloads |
| Risc-V Cheatsheet |
| Sources.7z |
| DevTools kit |
| MIPS Content |
| Learn Risc-V Assembly |
| Platform Specific Series |
| Hello World |
| Simple Samples |
| MIPS Downloads |
| MIPS Cheatsheet |
| Sources.7z |
| DevTools kit |
| MIPS Platforms |
| Playstation |
| N64 |
| PDP-11 Content |
| Learn PDP-11 Assembly |
| Platform Specific Series |
| Simple Samples |
| PDP-11 Downloads |
| PDP-11 Cheatsheet |
| Sources.7z |
| DevTools kit |
| PDP-11 Platforms |
| PDP-11 |
| UKNC |
| TMS9900 Content |
| Learn TMS9900 Assembly |
| Platform Specific Series |
| Hello World |
| TMS9900 Downloads |
| TMS9900 Cheatsheet |
| Sources.7z |
| DevTools kit |
| TMS9900 Platforms |
| Ti 99 |
| 6809 Content |
| Learn 6809 Assembly |
| Learn 6309 Assembly |
| Platform Specific Series |
| Hello World Series |
| Simple Samples |
| 6809 Downloads |
| 6809/6309 Cheatsheet |
| Sources.7z |
| DevTools kit |
| 6809 Platforms |
| Dragon 32/Tandy Coco |
| Fujitsu FM7 |
| TRS-80 Coco 3 |
| Vectrex |
| 65816 Content |
| Learn 65816 Assembly |
| Hello World |
| Simple Samples |
| 65816 Downloads |
| 65816 Cheatsheet |
| Sources.7z |
| DevTools kit |
| 65816 Platforms |
| SNES |
| eZ80 Content |
| Learn eZ80 Assembly |
| Platform Specific Series |
| eZ80 Downloads |
| eZ80 Cheatsheet |
| Sources.7z |
| DevTools kit |
| eZ80 Platforms |
| Ti84 PCE |
| IBM370 Content |
| Learn IBM370 Assembly |
| Simple Samples |
| IBM370 Downloads |
| IBM370 Cheatsheet |
| Sources.7z |
| DevTools kit |
| Super-H Content |
| Learn SH2 Assembly |
| Hello World Series |
| Simple Samples |
| SH2 Downloads |
| SH2 Cheatsheet |
| Sources.7z |
| DevTools kit |
| SH2 Platforms |
| 32x |
| Saturn |
| PowerPC Content |
| Learn PowerPC Assembly |
| Hello World Series |
| Simple Samples |
| PowerPC Downloads |
| PowerPC Cheatsheet |
| Sources.7z |
| DevTools kit |
| PowerPC Platforms |
| Gamecube |
| Work in Progress |
| ChibiAndroids |
| Misc bits |
| Ruby programming |
Buy my Assembly programming book
on Amazon in Print or Kindle!


Available worldwide!
Search 'ChibiAkumas' on
your local Amazon website!
Click here for more info!


Buy my Assembly programming book
on Amazon in Print or Kindle!
Available worldwide!
Search 'ChibiAkumas' on
your local Amazon website!
Click here for more info!
Buy my Assembly programming book
on Amazon in Print or Kindle!
Available worldwide!
Search 'ChibiAkumas' on
your local Amazon website!
Click here for more info!