

Learn Multi platform 6502 Assembly Programming... For Monsters!
Super Simple Series
In this series we'll take a look at a variety of basic tasks that you may need to look at when you're starting out with programming these classic systems...
In each case the source-code will be a single file with no Includes to make things easy if you're using a different assembler (though some may include a binary.)

Starting our program
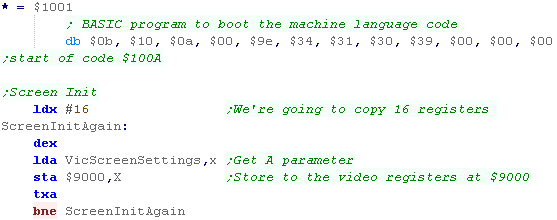
| When our program starts, the BBC may be making a noise!... we need to turn off the sound chip - we need to send some commands to $FE40-3 to do this. | 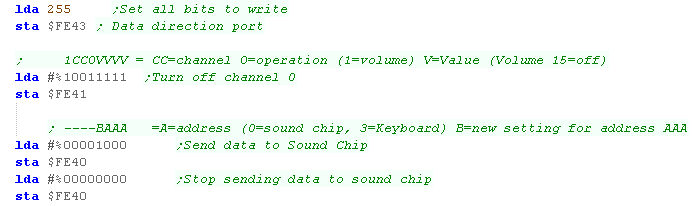 |
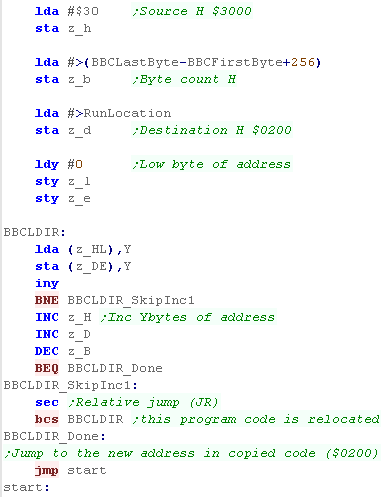
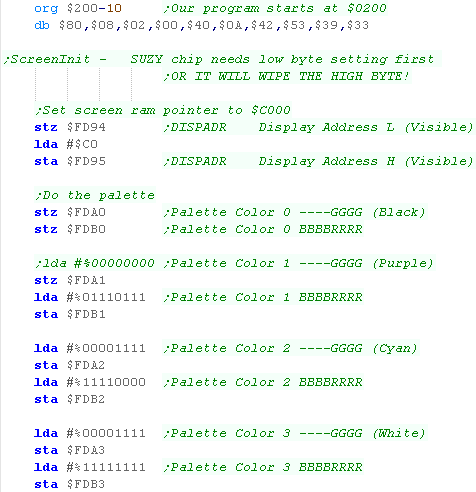
| Next we're going to move our running code... Our code Origin is
$0200 - but it actually loads at $3000 $3000 is good for basic - but bad for our graphics screen, so we're going to copy our program to $0200 then execute it. it's important there are no JSR or JMP commands before this routine completes - we do have a BCS, but this is a relative command which 'relocates fine' - don't worry if you don't know what this means yet! |
 |
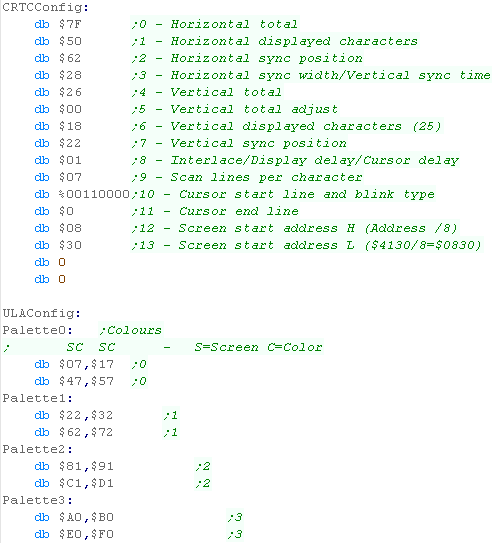
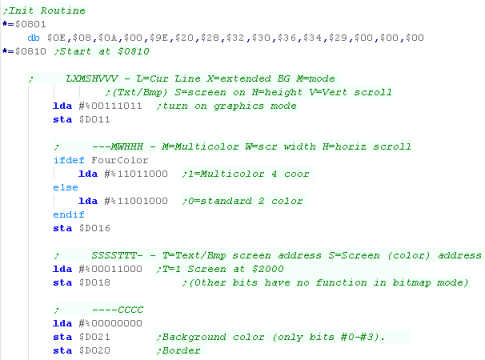
| We're going to need to initialize the screen We need to configure the CRTC which defines the screen shape and memory address. We also need to configure the ULA which configures the way the colors are defined. We have some arrays of data which we'll use to feed the correct settings for the screen layout we want. Our screen is finally set up... Phew! |
 |
Drawing an 8x8 sprite
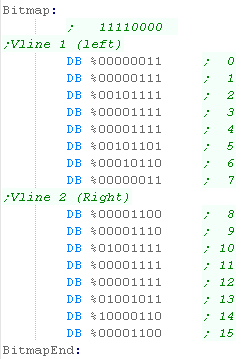
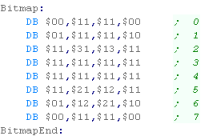
| We're going to show a 8x8
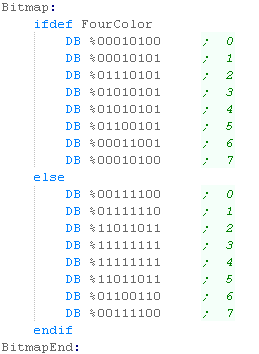
smiley face to the screen... we've set up the screen in 4 color mode
- meaning each pixel uses 2 bits... The screen layout of the BBC is a bit annoying!... the first 8 bytes go down the screen... then the 9th bit jumps back up to the top! - this is represented in the pixel data of our bitmap. |
 |
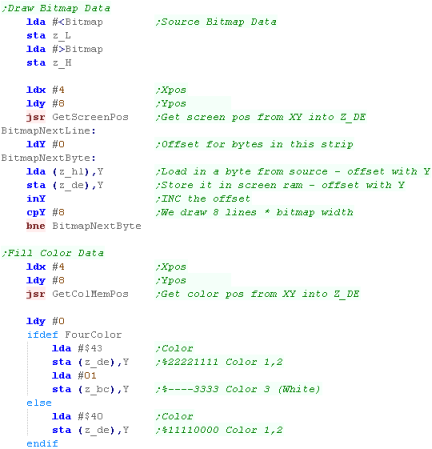
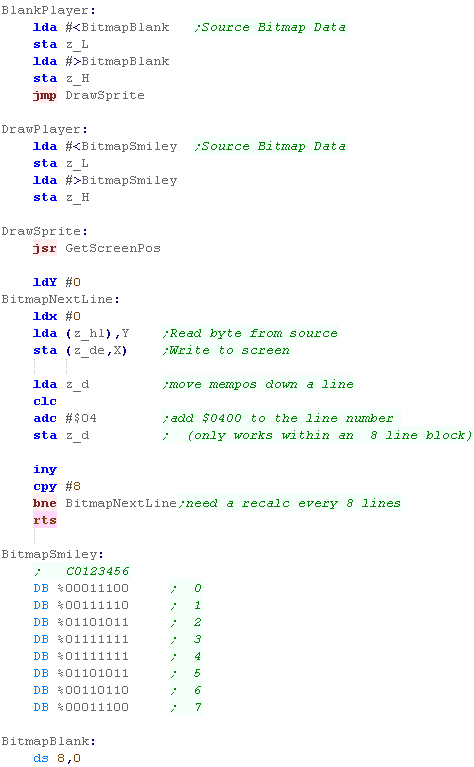
| When we want to show the bitmap to the screen, we need to
calculate the destination memory address for the screen... We use GetScreenPos... which takes an XY position, and calculates a destination memory address in zero page entries z_de (a 16 bit pair) We then copy the 16 bytes of the 8x8 smiley to the screen memory. |
 |
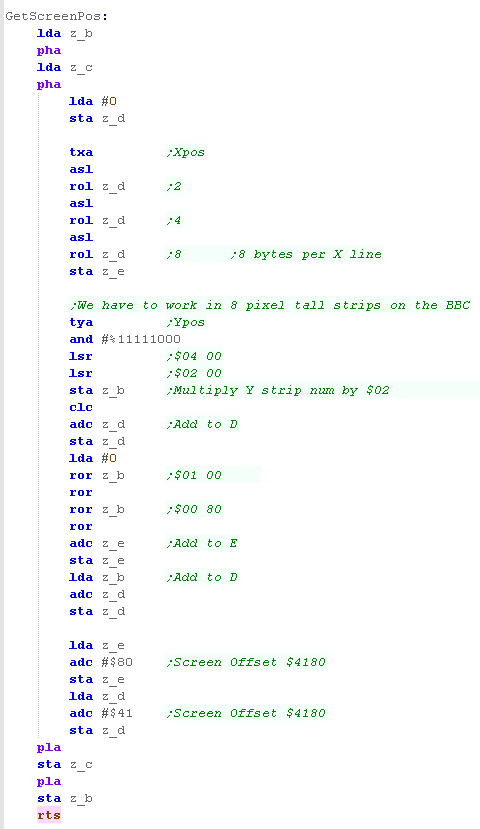
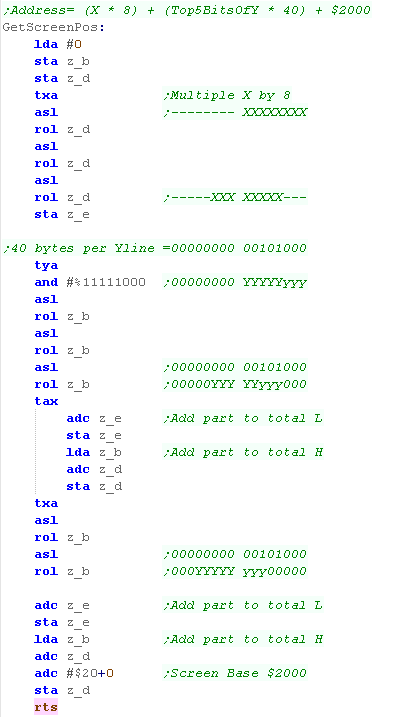
| The GetScreenPos calculation is pretty tricky! Our screen address starts at $4180... Because of the screen layout (8 Y lines are consecutive in ram), we're only going to look at the top 5 bits of the Y position Each line is 320 pixels, and there are 4 pixels per byte... this means our screen is 80 bytes wide, and because the 8 lines of each horizontal strip are combined, the top 5 bits must be multiplied by 640 ($280) (80*8=640) Since the 8 Y lines are consecutive in memory, between each horizontal byte, we multiply the Xpos by 8 Our formula is: $4180 + ({Top 5 bits of Y} * $280) + Xpos * 8 We achieve the multiplication by bitshifting ops. |
 |
| The result can be seen here! | 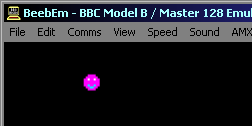 |
 |
The example code above only
works in 8x8 strips, you can make it draw to XY position 4,8 or
8,16... but it can't do 8,4... the Y-pos must be divisible by 8 if
it's not, it will be rounded down. Making a version which does not have this limitation would be more tricky. |
Drawing a larger bitmap
| Drawing a small bitmap is
useful, but what if we want to use a bigger sprite... well we'll
have to cope with the strange layout of the screen, but it's still
pretty easy. We're going to include a bitmap file to show |
 |
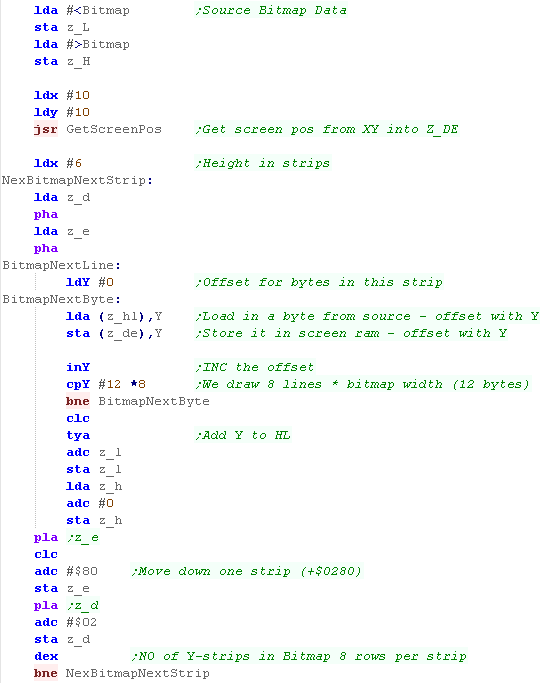
| We now need an extra loop for the number of '8 pixel Y strips'... After we've done each strip, we reset our start position, and add $280 (the bytes used by one 8x320 pixel Y-strip) We repeat until the image has been drawn. |
 |
| Our Chibiko Character will be shown on the screen. | 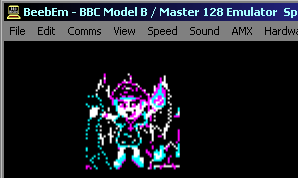 |
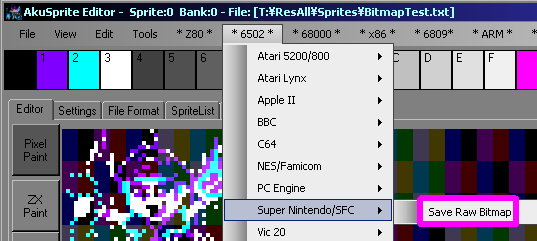
| My AkuSprite Editor can export files in the correct format for this tutorial - it's free and open source. | 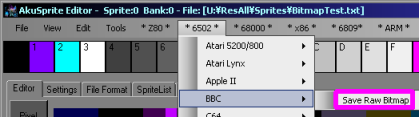 |

Starting our program
| The start of our program needs an INIT routine for the PRG file, Next we need to initialize the screen, we need to set the base address, and color depth We also need to define the background and border color... In these tutorials, we'll use an optional symbol 'FourColor' to enable 4 color mode - otherwise the example will be 2 colors |
 |
Drawing an 8x8 sprite
| We're going to draw an 8x8 sprite to screen in 2 or 4 color. Actually it'll be half the width on the 4 color screen... but who's counting! |
 |
| We're going to draw our image. We use 'GetScreenPos' to calculate a memory address of a screen position, it takes XY, and returns a zeropage pair z_de for the destination. We then need to copy the byte data. We also need to set the color attributes... we use GetColMemPos... In the case of the two color screen, we write one color byte to z_de... for four color screens we need two bytes (3 nibbles) to z_bc and z_de... the background color is constant and cannot be set per tile. |
 |
| The GetScreenPos calculation is pretty tricky! Our screen address starts at $2000... Because of the screen layout (8 Y lines are consecutive in ram), we're only going to look at the top 5 bits of the Y position Each line is 320 pixels, and there are 8 pixels per byte (160 pix and 4 px per byte in 4 color mode)... this means our screen is 40 bytes wide, and because the 8 lines of each horizontal strip are combined, the top 5 bits must be multiplied by 640 ($140) (40*8=320) Since the 8 Y lines are consecutive in memory, between each horizontal byte, we multiply the Xpos by 8 Our formula is: $2000 + (Y * 40) + Xpos * 8 We achieve the multiplication by bitshifting ops. |
 |
| Each 8x8 square has it's own color attributes... these are stored
at two memory addresses $D800+ and $0400+ There is one byte per 8x8 block at each of these addresses... we calculate these using formulas below: Address1= $0400 + (Ypos * 40) + Xpos Address2= $D800 + (Ypos * 40) + Xpos We calculate these in pretty much the same way as before. |
 |
| Our Smiley will be show onscreen | 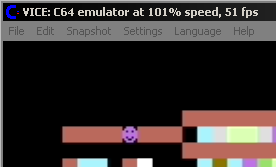 |
| The C64 screen is
rather a pain! 8 Consecutive bytes go down the screen, and the 9th
jumps back up!... this 'zigzag' layout probably makes font drawing
easier, but it's not very friendly for graphics! The example above will only work on an 8x8 grid. |
 |
Drawing a larger bitmap
| We're going to include a bitmap file, this will be shown to the screen. | 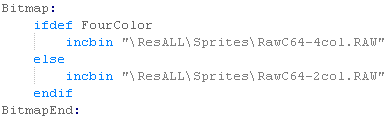 |
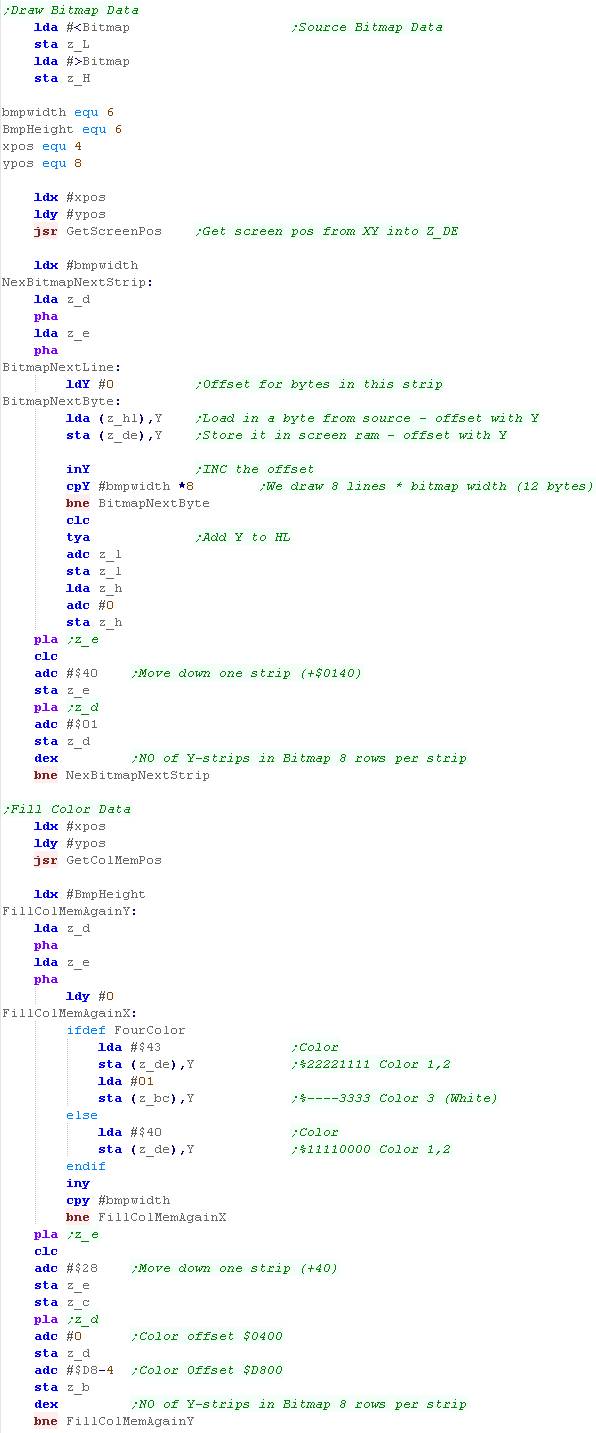
| We now need an extra loop for the number of '8 pixel Y strips'... After we've done each strip, we reset our start position, and add $140 (the bytes used by one 8x320 pixel Y-strip) We repeat until the image has been drawn. we then need to do the same for the color data. |
 |
| The sprite will be shown onscreen | 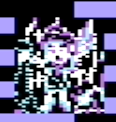 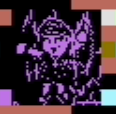 |
| You can use my AkuSprite Editor to export data in the correct format for this tutorial, it's free and open source (and included in the sources.7z | 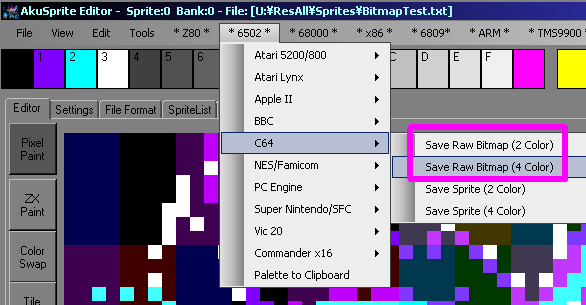 |

Starting our program
| To start our program we need a PRG header first... We then need to define the graphics screen settings, we do this by writing a bank of settings to address $9000+ This will set our screen up, we can now start our program! |
  |
Drawing an 8x8 sprite
| We're storing our bitmap data in memory... it's one bit per pixel, and the characters are 8x8 |  |
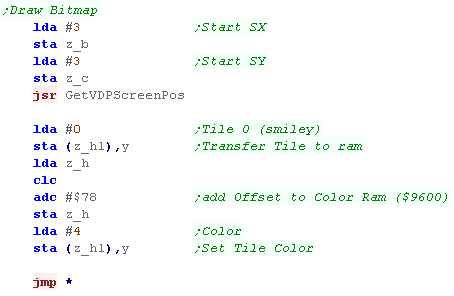
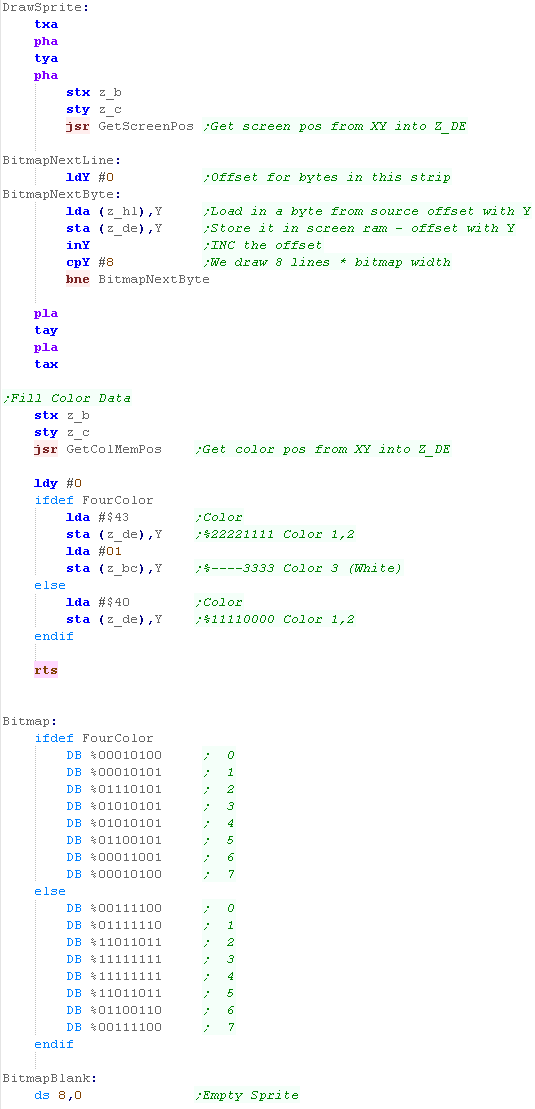
| Our first task will be to copy the Bitmap data into the definable
characters, we use a 'define tiles' function to do this We're using Zero page pairs z_HL as a source, z_DE as a destination and z_BC as a byte count Our destination is memory address $1C00 - Character 0 in the configurable characters. |
 |
| the 'Define Tiles' routine is essentially a 'LDIR' copy routine, it will copy from the source address to a destination. |  |
| When it comes to showing the character, we need to calculate the
memory address of the XY pos, and then det that character (0)
onscreen. Once we've set the character, we also want to color it... the address of the color for this tile is a +$7800 offset from the character number, so we just add $78 |
 |
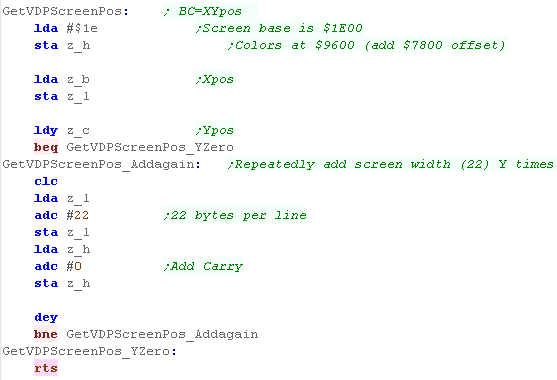
| When we want to calculate the memory address our formula is: Address= $1E00 + (Ypos * 22) + Xpos As multiplying by 22 isn't so easy (and our screen is pretty short) we'll use a loop and addition to effect the multiply |
 |
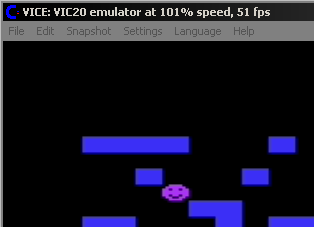 |
| Using the
redefinable characters will 'offset' the proper letters... If you want to show an 'A' in ths mode, you'll want to add 64... so use LDA #'A'+64 |
 |
Drawing a larger bitmap
| If we want to draw a larger bitmap, we'll have to split it into
characters... We can load those characters in with the same Define
Tiles function. Our test character is 6x6 characters (48 x 48 pixels) |
 |
| When it comes time to get the graphic on the screen, we'll need to draw the characters into the area to fill in order - the 'Fill Area with Tiles' function will do this for us! | 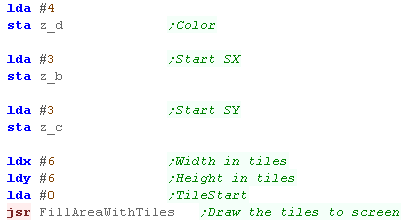 |
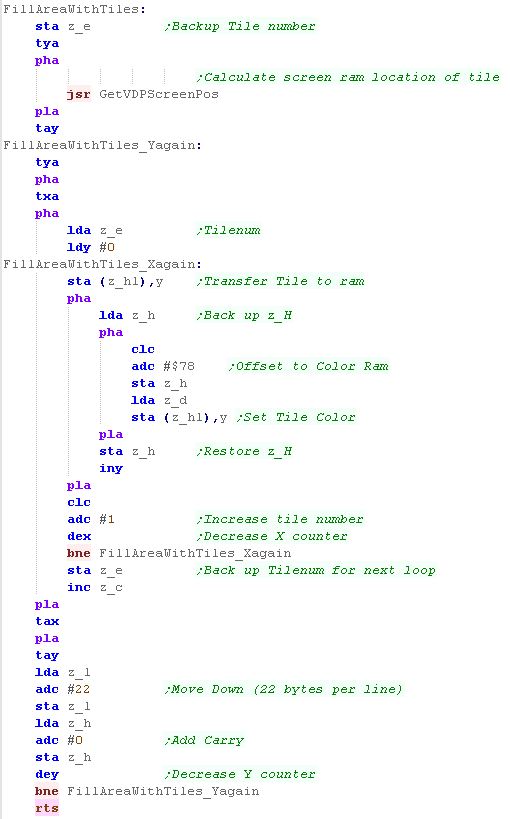
| The FillAreaWithTiles function is long, but the concept is pretty
simple... We load in tile numbers from z_E... and set the screen characters to those tile numbers, incrementing z_E each time. When we get to the end of a line, we move back to the start of the line, and add #22, to move down the screen a line. We repeat this procedure until our image is finished. |
 |
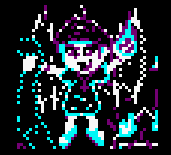
| And here's our Chibiko character! |  |
| To convert a bitmap to the correct format, you'll need to make it
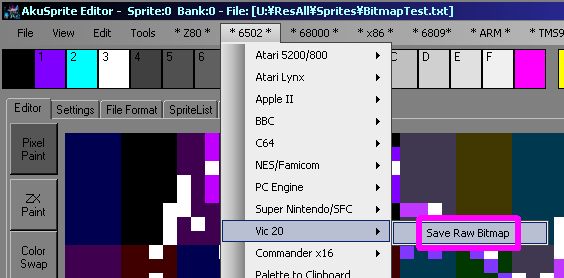
black and white, and split it up into 8x8 chunks... You can export a bitmap in the correct format for todays tutorial with my AkuSprite editor... it's free and open source, and included in the sources file. |
 |

Starting our program
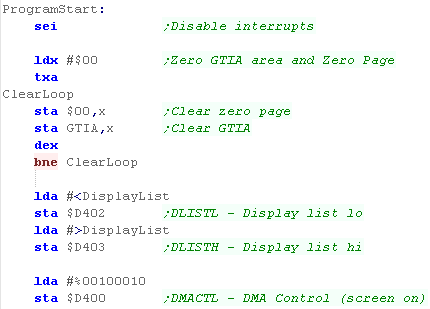
| At the start of our program, we'll first start by resetting the
Zeropage and GTIA (Graphics hardware) Once we're ready, we load the address of the Display List - this defines the screen settings, and turn on the display DMA |
 |
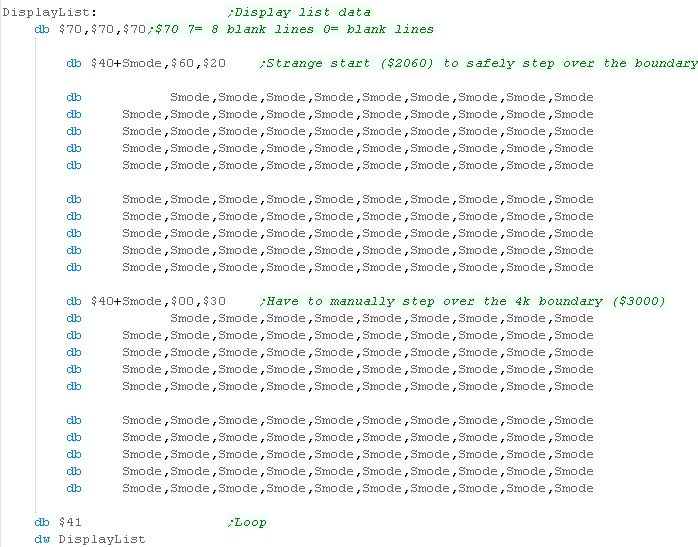
| The Display list defines the screen layout... we need one byte per
line for the bitmap modes, and because of limitations of the
hardware we have to manually define an offset when the VRAM reaches
address $3000 The end of the list contains a loop back to the start ... this defines the screen... if we set Smode to $0E we will have a 4 color screen... if we se Smode to $0F we will have a 2 color high res screen. |
 |
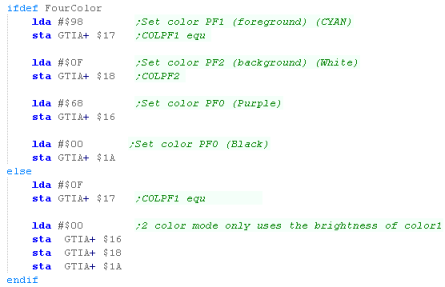
| We now want to define some colors... on the 2 color machine the
foreground and background have to be the same color (but different
brightness') We're now ready to start our program. |
 |
 |
The Displaylist
we've defined here is pretty boring... all the lines are the same
mode! We can define the lines to be different screen modes...
having part of the screen graphics, and part text... if this is
what we need we can save some memory! |
Drawing an 8x8 sprite
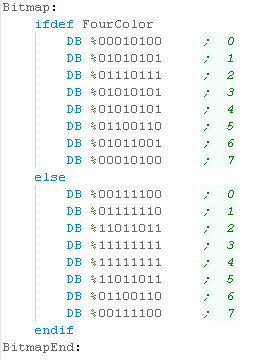
| We're going to draw an 8x8 smiley onto the screen. Depending on our Colordepth we'll want a 1bpp (1 bit per pixel) or 2bpp image |
 |
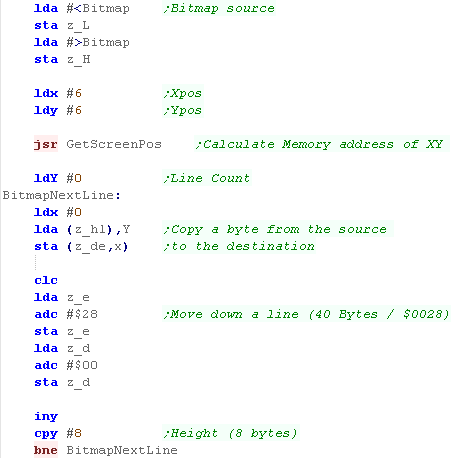
| When we want to draw lines of our smiley we first load in the
address of the byte data into zero page entries z_hl We need to calculate the destination address... we do this with the function Get ScreenPos... this loads the address of the screen pos XY into z_de we need to copy one byte per line from z_hl to z_de When we need to move down a line, we add 40 ($28) to z_de to do so, and repeat until all the lines are done. |
 |
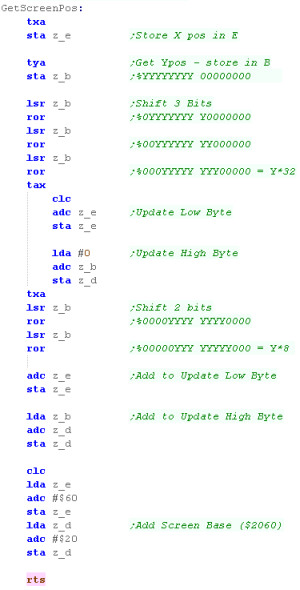
| GetScreenPos calculates the screen address from X,Y... our screen
base is $2060 - and each line is 40 bytes wide... so our calculation
is: Address= $2060 + (Ypos * 40) + Xpos Because the 6502 has no multiplication, we do bitshifts to double the value... it's easiest to split (Ypos * 40) into (Ypos * 32) + (Ypos * 8) We also add the Xpos and $2060 - this calculates the final address in memory... |
 |
| And here's the result... in 4 color or 2 color! | 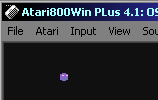 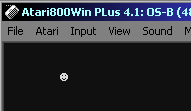 |
Drawing a larger bitmap
| This time we're going to draw a 48x48 sprite... we'll include it from a binary file. | 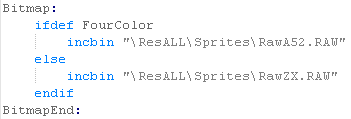 |
| We need to alter our sprite drawing routine with a second inner
loop that will draw all the bytes of a line to screen. Once we've done a line we update the source address by adding Y, and the destination address by adding 40 (one line) We repeat until the sprite is drawn |
 |
| And here's the result! |   |
| You can out put bitmap files in the correct format for this tutorial with AkuSprite editor, it's free and open source (included in the sources.7z) |  |

Starting our program
| Ok, let's start our program! We're going to start our program at $0C00 as before... We now need to do some reads from some memory addresses - it's weird, but reading these addresses turns on these functions... effectively we're turning on the graphics mode |
 |
Drawing an 8x8 sprite
We're going to draw a smiley face on screen.... the format of
screen bytes on the Apple II is weird... the leftmost bit is the
'color palette' and the other 7 are visible pixels.
We'll see what that means onscreen in a moment!
When we want to get our byte wide bitmap onscreen, we first
load it's address into zero-page pair z_hl.
Next we calculate the memory address (in z_de)... GetScreenPos
will do this, using XY as an X,Y pos.
We load in one byte from our source (z_hl) and write it to the
screen (z_de)
We do this 8 times - using Y as an offset for the source data...
to move down a line we add $0400 to the z_de screen address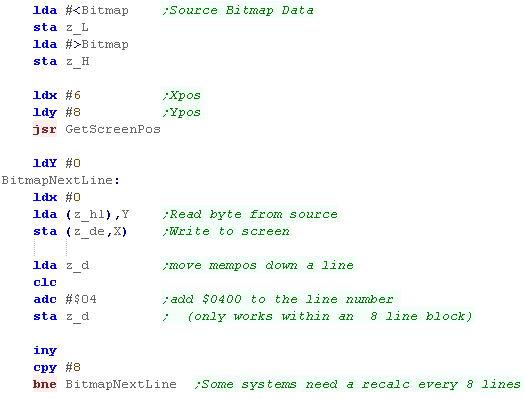
Calculating our screen address is rather annoying on the Apple
II - the screen is split into 3rds... and each line in 8 is
separate... the result is a rather annoying formula:
Yline... AABBBCCC - AA*$0028 BBB*$0080 CCC*$0400
+Xpos
+$4000 (screen base address)
We test the top 2 bits and branch out into sub-code that will do
additions to calculate the final address...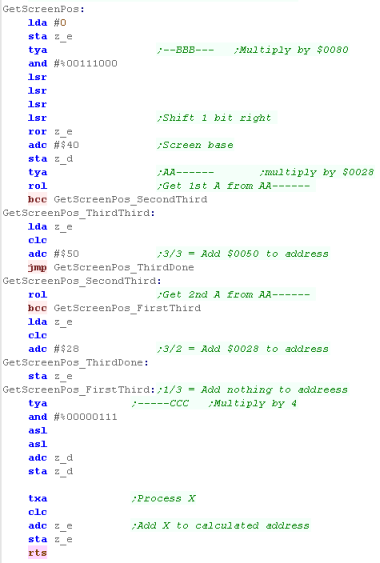
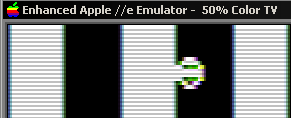
Here's our smiley!... notice the slight color distortion
around the face
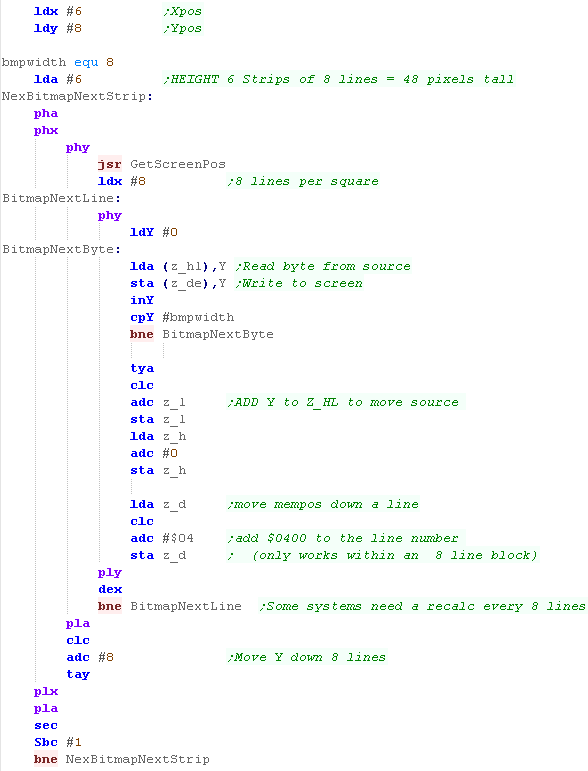
Drawing a larger bitmap
| If we want to draw a larger bitmap, we need to use a more
complex routine... Because the screen is split into so many sections we'll need to use GetScreenPos to recalculate whenever we get outside an 8x8 block... We'll copy all the bytes for each line... then add $0400 to move down a screen line - this will only work for within an 8x8 block.. When we're outside the 8x8 block we need to call GetScreenPos to recalculate things properly again. |
 |
| Here is the result... We've got two versions... a 2 color version, and a 6 color one... note the code is identical... it's the combination of on and of neighboring pixels that make the 'colors' |   |
| You can export basic color sprites with Akusprite Editor - it will attempt to export pixels in the correct layout for the pixels to appear colored onscreen. | 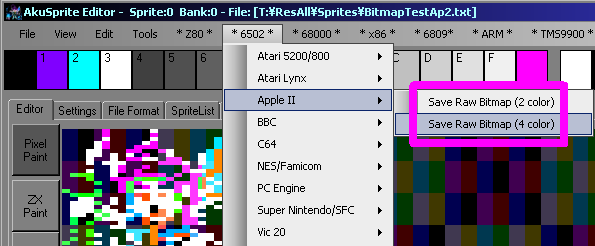 |
| The Apple II colors are pretty weird.. but
thats the way things worked! The colors are an 'artifact' of the
screen display - so even the modern emulators have to 'simulate'
the color distortion of the old screen. |
 |
Starting a Lynx Cartridge
| Our cartridge needs a header This will start our program in ram at address $0200 We need to initialize the screen - setting up the base address of our screen ($C000) We also need to define some colors so we can see the result onscreen. |
 |
Drawing an 8x8 bitmap
| We're going to show a bitmap of a smiley... As each pixel is 16 color - each pixel will be defined by a single nibble. |
 |
| We're going to use a function called "GetScreenPos"... this will
calculate the memory address of the pixel we want to write from an
X,Y co-ordinate: Each line is 80 bytes wide ($50) and our screen starts at $C000 so our formula is: Address = $C000 + (Ypos * $50) + Xpos We effect a multiply by bitshits... $50 in binary is %01010000 ... We will shift the Y bits into each '1' position then add to a running total... then add the base and the Xpos |
 |
| Our Smiley will be shown on the screen. | 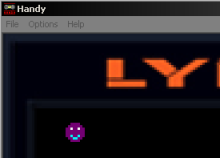 |
Drawing a larger bitmap
| The smiley is fine... but lets try something a bit more
substantial... lets draw our Chibiko character onscreen. We'll include the bitmap data from a file. |
 |
| The routine we wrote before will do the job... we just need to
change the parameters... Each byte holds two pixels - so our 48 pixel image is 24 bytes wide. |
 |
| Our larger sprite will be shown onscreen |
 |
| You can export bitmap data for this example with my Akusprite editor - it's free and open source, and included in the Sources.7z | 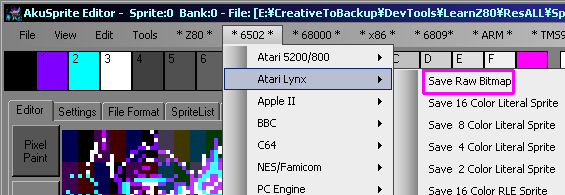 |

Starting a Nes or Famicom Cartridge
| We need a header for our cartridge - the settings shown will work for a simple program. | 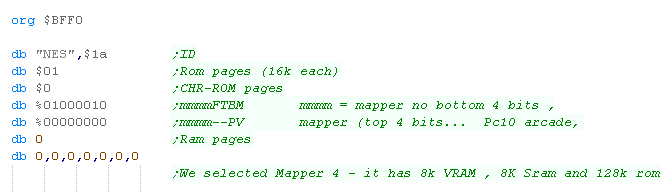 |
| We also need a footer... this has definitions pointing to the start of the program and interrupt handlers | 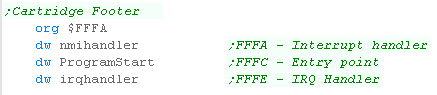 |
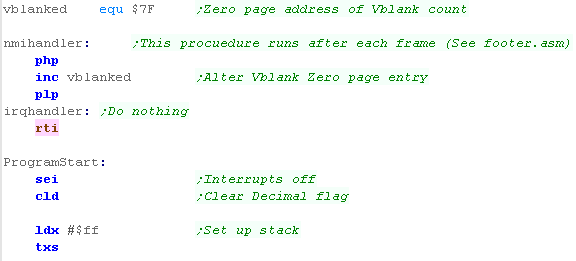
| We're going to need a few bytes in the zero page to store data,
we also need an IRQ handler of some kind (a return in this case) Vblank (The point when the screen is not being drawn) is important, this is the only time we can write to VRAM... so we can detect when this is possible we use zero page entry $7F as a marker.. and alter this when vblank occurs Our program will start by disabling interrupts and turning on the stack. |
 |
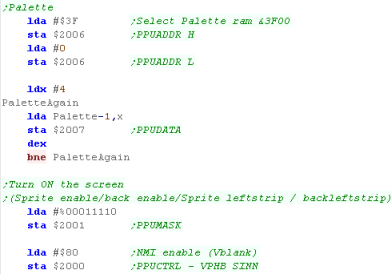
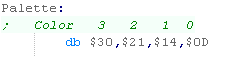
| We need to set up our screen, we'll define the palette and turn
on the screen. To define a palette entry we need to select a VRAM address $3F00+ ... we select the palette entry by writing the address $2006 (in big endian format) We then write the bytes which select our colors. We're ready to start our program. |
  |
Functions to help with the NES video hardware.
| We need some functions to help us with the Nes graphics... First
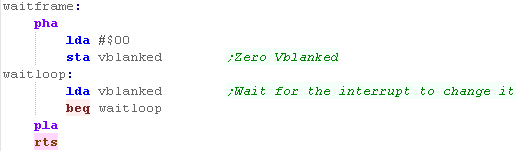
is we need to wait for Vblank before we write to VRAM... Vblank is when the screen is currently not being drawn (at the very top or bottom of the screen) To do this we write 0 to zeropage entry 'Vblanked' (defined by a symbol)... then we wait for it to change... when vblank occurs, the value will be nonzero |
 |
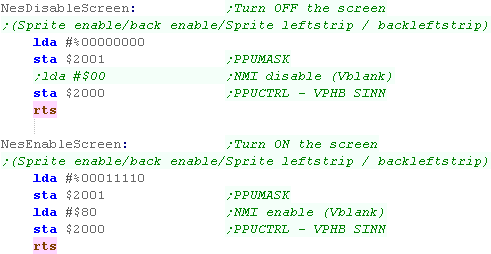
| When we're defining tiles, we can only do so during Vblank, or
when the screen is off... We'll define some functions to turn the screen OFF or ON... this will help if we're defining tiles. |
 |
| We'll use a zero page pair z_de to define a vram destination address... we'll use a 'PrepareVram' function to select the destination address. | 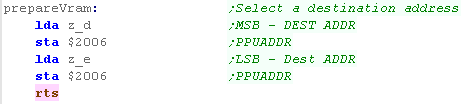 |
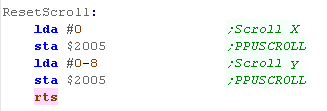
| Whenever we write to vram, the tilemap scroll will change -
messing up our layout (Grr!) We'll create a function to fix the tilemap position. |
 |
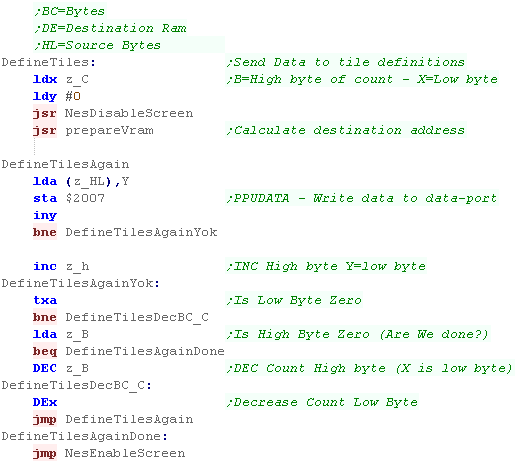
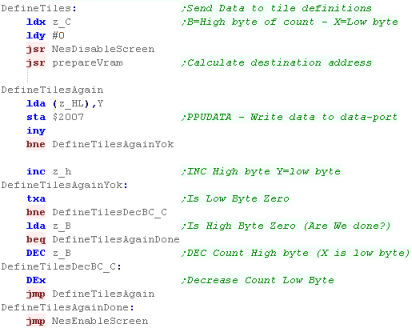
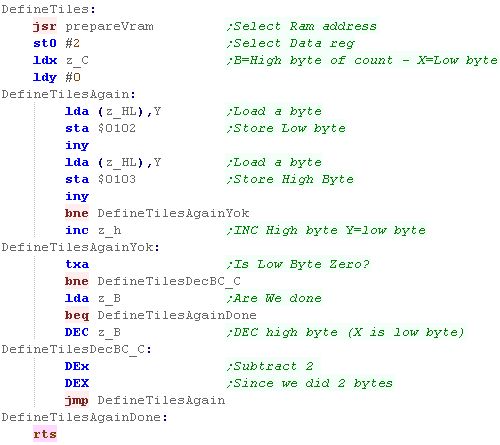
| When it comes to getting our tile data we'll create a 'Define
Tiles' Function.... this will transfer a sequence of bytes from
our cartridge ROM to VRAM. The routine will assume it's being run at the start of the program (not in game) so rather than waiting for VBLANK before writes, it will imply turn off the screen |
 |
Drawing an 8x8 bitmap
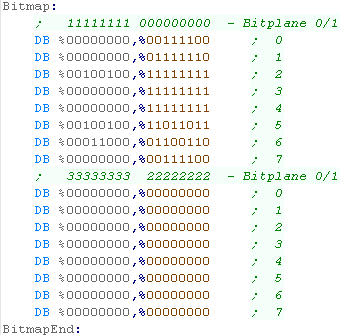
| We're going to define an 8x8 smiley tile! Each pixel on the NES tilemap is 4 colors... so is defined by 2 bits... The NES tilemap is defined in bitplanes, the 8x8 Bit0's are all grouped in 8 consecutive bytes... then all the bit 1's |
 |
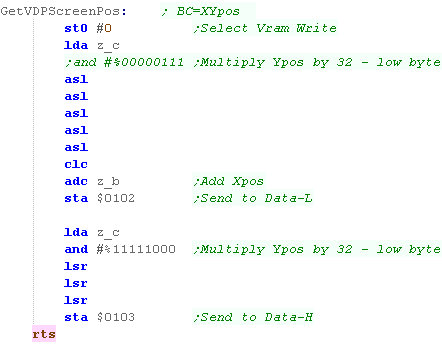
| We need to calculate the VRAM address of the next tile we want
to change... The Tilemap starts at VRAM address $2000, and the tilemap is 32 tiles wide, and each tile is 1 byte in memory, so our formula is: Address= $2000 + (Ypos*32) + Xpos We need to multiply the CursorY by 32... we do this by repeated bitshifts. Before writing we have to wait for Vblank... We write the address bytes to $2006 |
 |
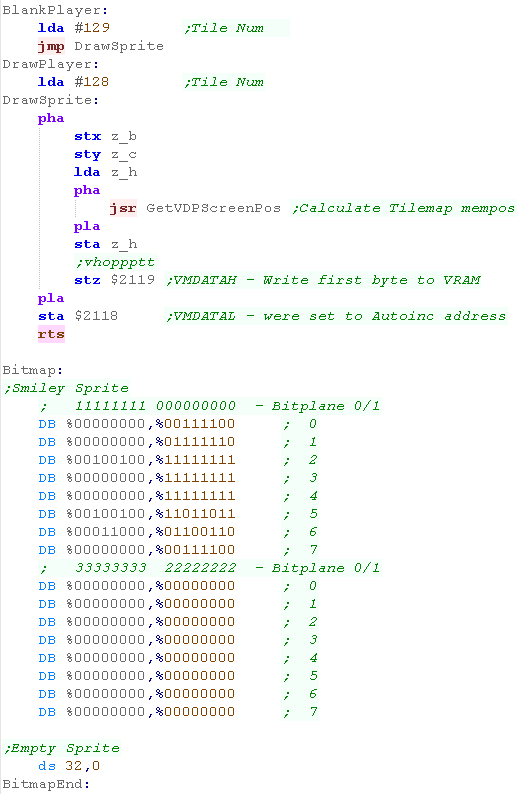
| First we'll need to transfer our tile into VRAM using the
DefineTiles function... this transfers z_bc bytes from ROM address
z_hl to VRAM address z_de Next we set the VRAM location with GetVDPScreenPos - this uses XY position z_b,z_c Finally we actually write our tilenumber into VRAM, we do this by writing 128 to $2007 |
 |
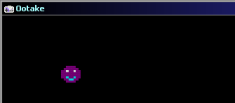
| The 8x8 smiley will be shown to screen. |  |
Drawing a larger sprite
| If we want to draw a bigger sprite, we'll need to split it up
into 8x8 tiles... We'll import a bitmap into our rom with INCBIN |
 |
| We'll need a new command called 'FillAreaWithTiles' This will draw consecutive tile numbers to a grid, and rebuild our sprite. | 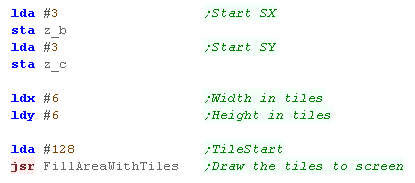 |
| The "Fill Area with Tiles" will do the tile drawing for us - It recalculates the start of a line with GetVDPScreenPos, then writes a line of tiles... This is repeated for each Y line |
 |
| Here is the result! | 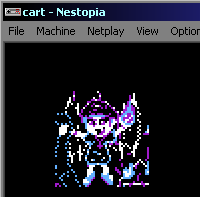 |
| We've only used
the tilemap in this example... if we want to do flexible Sprites
- we would want to use the Nes' hardware sprites ... These can move by pixels, and allow for fast smooth moving objects - but there's a limit to how many can be onscreen. |
|

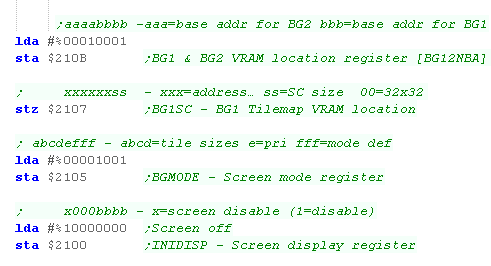
Starting a SNES/SFC Cartridge
| Our cartridge needs to start at address $8000, When our program starts, we'll disable interrupts |  |
| Our cartridge also needs a footer - the one here will work for our purposes. | 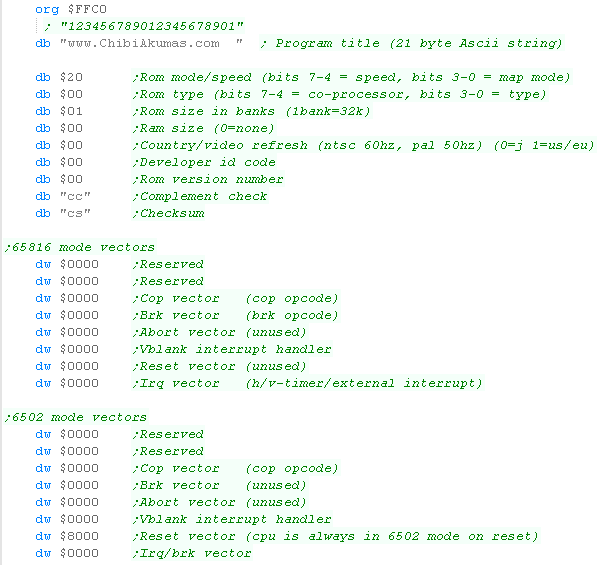 |
| We're going to need to set up our screen... First we need to initialize the tilemap, we need to set the base address in VRAM ($0000) and the tilemap size (32x32) We can only write to VRAM during Vblank while the screen is on, so we turn the screen off during our initialization |
 |
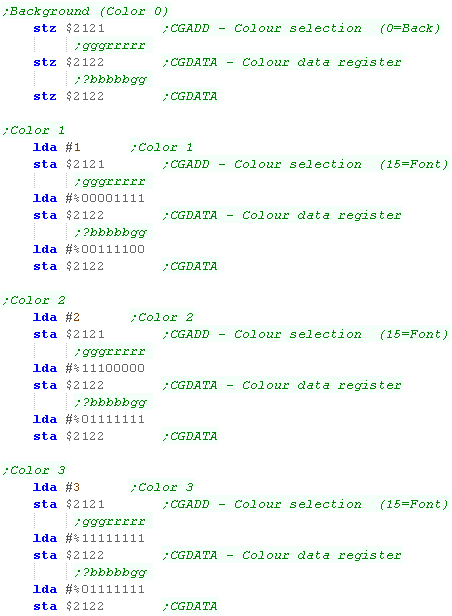
| We need to set the palette next... We're going to set colors 0-3 We select a color by writing to $2121, and RGB bytes to $2122 |
 |
| We need to configure the $2118/9 ports ... we write zero to $2115... we're setting the Vram address to AutoInc on a write to $2118 |  |
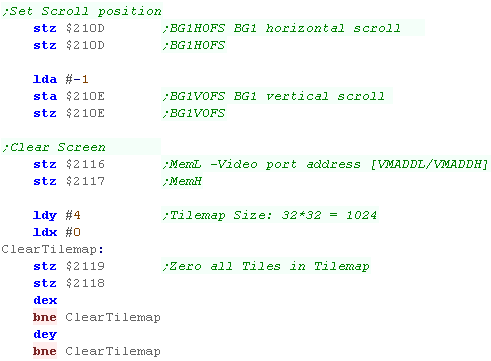
| Right! Our font is ready, but we now need to initialize the Tilemap... we need to reset the scroll position with $210D/E We also need to clear the tilemap... we do this by writing zeros to all the tiles in the tilemap The Tilemap starts at $0000 - and there are 1024 pairs of bytes to zero (32x32 tiles) |
 |
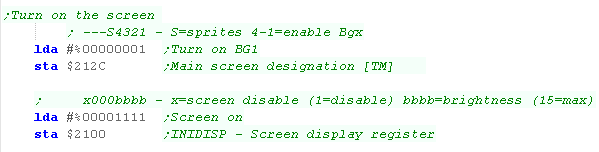
| We're finally done... We now just need to actually turn on the
screen! Phew! that was hard work! |
 |
| We're not defining a font this time...
We're going to define some tile patterns in a moment though -
and we'll use those to draw our character. |
|
Drawing our Smiley
| We're going to draw a smiley to the screen!... we'll define it
as tile patterns in VRAM... The tile is 8x8 and because it's 16 color each pixel is defined by 4 bits.. The image is split into bitplanes, but two bitplanes (0+1) are sent line by line first, then the remaining two (2+3) |
 |
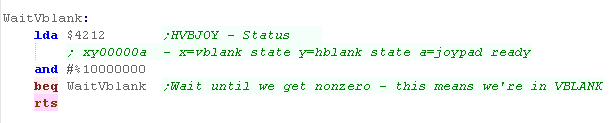
| Now that the screen is enabled, we need to wait for Vblank
before writing to the screen... Vblank is the time during redraw when the screen has finished drawing, and the next frame hasn't started. we can check if the screen is in Vblank by reading $4212 |
 |
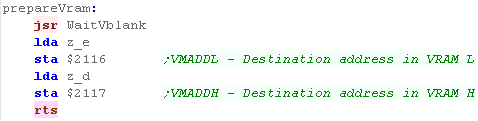
| When we want to select a destination address for VRAM writes, we
do so using ports $2116/7 We're defining z_de as zero page entries for our use. |
 |
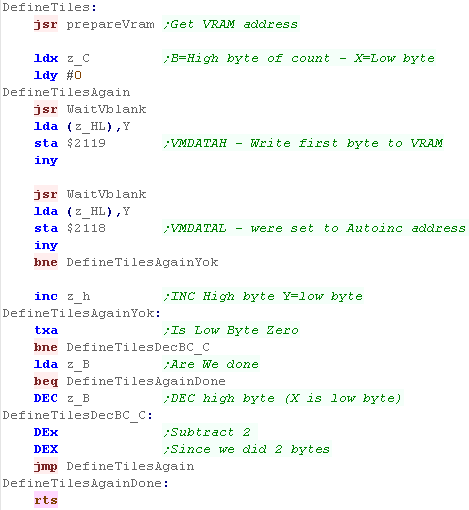
| We're going to need a function to transfer the bytes from ROM to
VRAM.... Because of the way the SNES hardware works,we can only write to VRAM during Vblank we're using zero page entries z_hl as a source, z_bc as a bytecount and z_de as a VRAM destination. |
 |
| We'll use a function called GetVDPScreenPos to calculate tile
positions from a X,Y co-ordinate Our tilemap is 32 tiles wide and starts from memory address $0000 , so our formula is: Address= (Ypos*32) + Xpos We achieve the multiplication by bitshifting. |
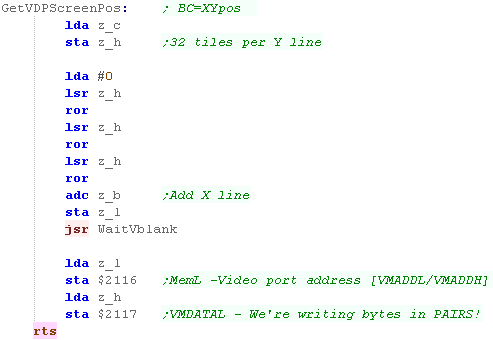 |
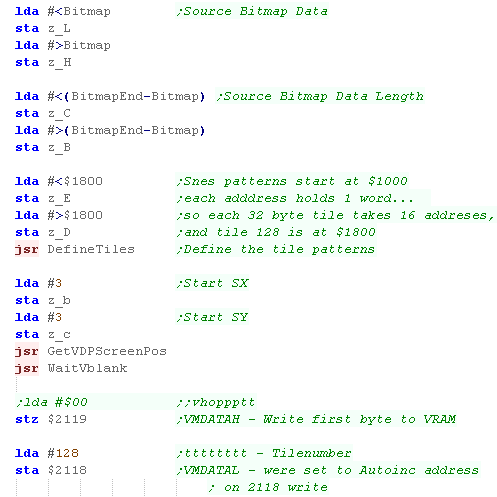
| To draw a tile on screen, first we need to transfer the bitmap
data to VRAM with the 'DefineTiles' Function Once we've done that, we use the Get VDPScreenPos function to select the destination XY address, then we write the tile number (and other settings) to the write port $2119/8 |
 |
| Our smiley will be drawn to the screen! | 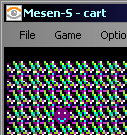 |
The tile has been drawn to the screen,
but there's a lot of corruption - this is because tile 0 has
not been defined - and the Mesen emulator fills the ram with
garbage on bootup.
If we wanted to set the background to black - we need to set
tile 0 to all zeros - Loading our font would have done this.
Drawing a larger bitmap
| This time we're going to draw a 48x48 image of our 'Chibiko'
mascot We'll import a bitmap image from file. |
 |
| If we want to draw a bigger image, we'll need to split our image
into multiple tiles, we'll then need to set all the positions of the
area that makes up the bitmap to the correct patterns. we'll specify a start position XY in (z_b,z_c) - and a Width / Height in in X / Y - finally a tile number to start with in z_D The routine will calculate the start of a line... and write consecutive tile numbers from z_D After each horizontal line,we need to recalculate the memory position |
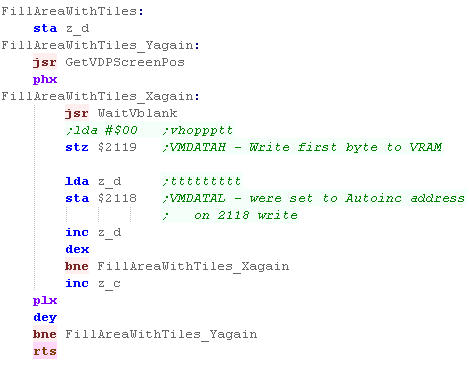 |
| We use the FillAreaWithTiles function to fill the area of the screen with our character. | 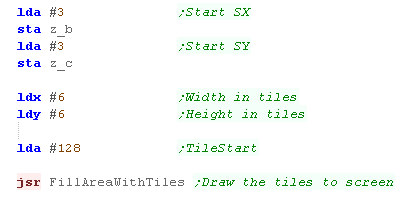 |
| Our character will be drawn to the screen! | 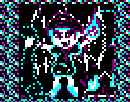 |
| To use this code, you'll need to split a bitmap into tiles - and
those tiles will have to be in the correct format. You can use my AkuSprite editor to do this - it's free and open source, and included in the Sources.7z |
 |

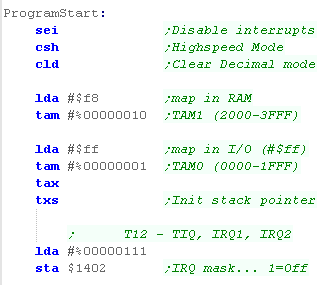
Starting a PC Engine/TurboGrafx-16 Card
| The header is pretty simple... Our program will start at $E000 |
 |
| We also need a footer, it's just a word pointing to the start of our program |  |
| When our program starts, we need to set a lot of things up! First we turn off interrupts, set highspeed mode, and clear the decimal flag. Next we need to 'Page in the RAM and IO banks - this configures parts of the addressable memory, pointing them to underlying hardware.... we do this with a special 6280 command called TAM We also set up the stack pointer... finally we turn the interrupots off with port $1402 |
 |
| We need to set up the Tilemap... we need to select the video
registers with the special command ST0... then set values for
those registers with ST1 and ST2 First we turn the tilemap on... next we set the tilemap size - we set it to 32x32, Finally we reset the position - so that the first tile in the tilemap is the top left corner of the screen. |
 |
| Next we're going to set up the palette... we select a color to change with registers $0402/3 and set the new RGB value with registers $0404/5 |  |
| We're going to clear the screen - we'll do this by setting all
the tiles to tile number 256 We select select the 'Address select' register (0) with ST0... then write the VRAM address to write to $0000 with ST1/2 We then select the 'data port' register (2) with ST0... then write tilenumber 256 with ST1/2 |
 |
| The PC Engine
has lots of special commands... most important for us here are
ST0 , ST1 and ST2... these save fixed values to the graphics
hardware, and are equivalent to STA $0100, STA $0102 and STA
$0103 ST0 Selects a register, and ST1/2 save values to that register... Register 0 is the 'address select' register... Register 2 is Data write - sending data to the address selected with Register 0 It may sound confusing, but don't worry too much if you don't understand it yet - just copy the code here for now. |
|
Drawing an 8x8 Smiley to the screen.
| We're going to draw a smiley to the screen!... we'll define it
as tile patterns in VRAM... The tile is 8x8 and because it's 16 color each pixel is defined by 4 bits.. The image is split into bitplanes, but two bitplanes (0+1) are sent line by line first, then the remaining two (2+3) |
 |
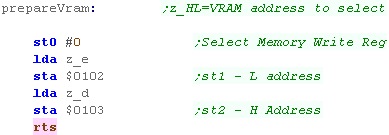
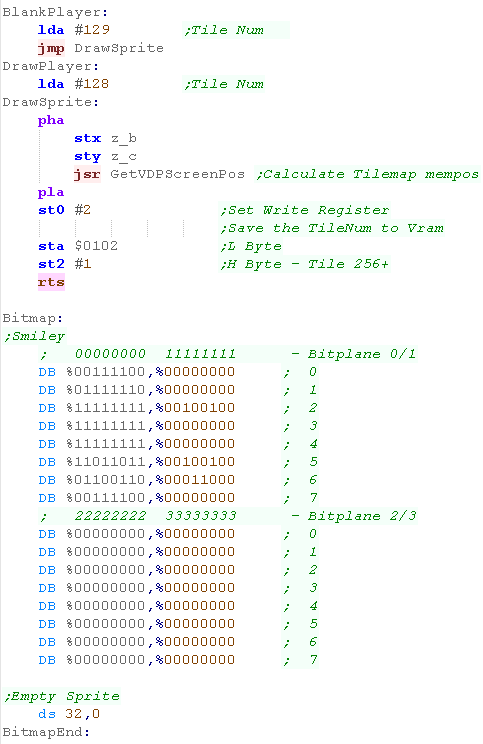
| We're going to define a command called PrepareVram - which will
select a memory address to write to, we'll need this for our
define tiles function... we write the Low address byte to $0102,
and the High address to $0103 when register 0 is selected with ST0 We'll use zero page entries z_de to store the address we want to use. |
 |
| When we want to define tiles -we'll store a source address in
VRAM z_de... a source address in ROM in z_hl, and a byte count in
z_bc We use the PrepareVram function to select an address, then write new bytes to $0102/3 after selecting Reg 0 with ST0 |
 |
| We're going to define a function called GetVDPScreenPos to
select an X,Y Tilemap position in Vram memory As the tilemap is at VRAM address $0000 and each line is 32 tiles wide, our formula is: Address=(Ypos *32) + X We multiply Y by 32 by bishifts, and select the calculated address... |
 |
| We need to transfer the tile pattern data into vram with the define tiles function using the DefineTiles function we wrote. |  |
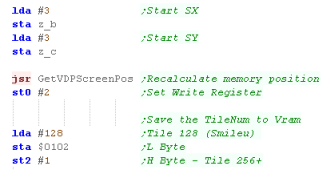
| Next we want to actually set the tilemap to show our tile... we
use GetVDPScreenpos to select a screen tile vram address.. Next we use ST0 to select Register 2 (Data Write) and write 256+128 (384 - the tile of our smiley) using $0102/3 or ST1/2 |
 |
| Our Smiley tile will be shown to screen.. Phew! that was a lot of work! |
 |
Drawing a larger bitmap
| This time we'll try something a bit more substantial... we'll
draw our website mascot 'Chibiko' to the screen... This image is 48x48 pixels, so we'll need to split it into multiple tiles... we'll load the data in with an IncBin command. |
 |
| If we want to draw a bigger image, we'll need to split our image
into multiple tiles, we'll then need to set all the positions of
the area that makes up the bitmap to the correct patterns. we'll specify a start position XY in (z_b,z_c) - and a Width / Height in in X / Y - finally a tile number to start with in z_D The routine will calculate the start of a line... and write consecutive tile numbers from z_D After each horizontal line,we need to recalculate the memory position |
 |
| We use the FillAreaWithTiles function to fill the area of the screen with our character. |  |
| Our Chibiko character will be drawn on the screen. |  |
| To use this code, you'll need to split a bitmap into tiles - and
those tiles will have to be in the correct format. You can use my AkuSprite editor to do this - it's free and open source, and included in the Sources.7z |
 |
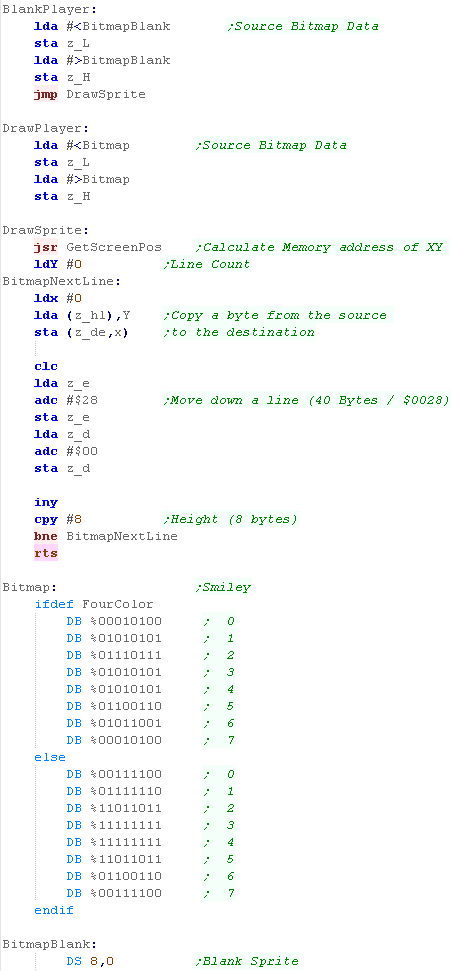
Defining Parameters, and drawing sprites
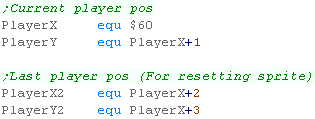
| First we're going to need some zero page bytes to define an X,Y
position. We'll need one pair for the current X,Y position We'll need a second pair for the last position - We'll use them to keep the player onscreen if the player goes out of bounds |
 |
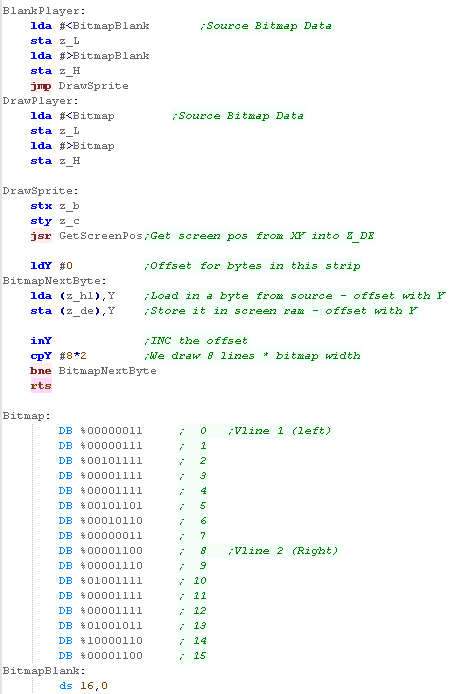
| We're going to use a slightly modified version of the drawing
routine from last time This time there are two versions - one will draw the smiley, the other will draw a blank sprite to clear the last position of the player. |
 |
|
We're
going to move our sprite 8 Y lines at a time - this gets around
the problem of the weird screen layout. If you want to work in 1 pixel Y movements, you'll have to write some better sprite routines! |
Reading the Joystick
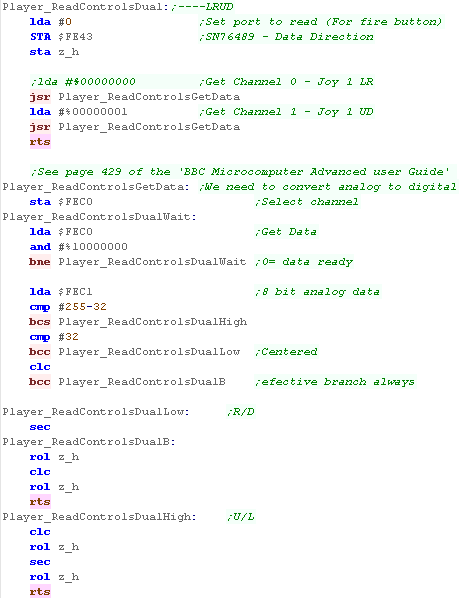
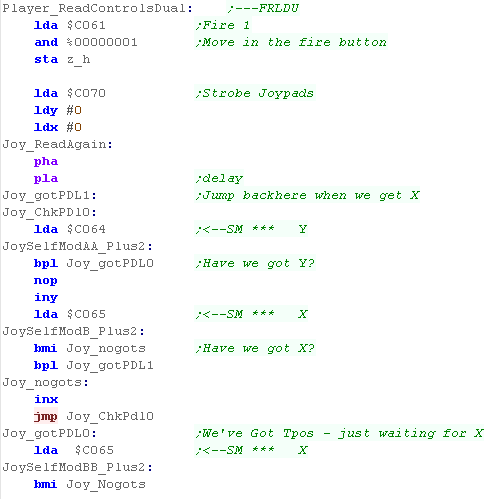
| We're going to read in from
the joystick - the BBC joystick is analog - which is a bit of a
pain. We need to select an axis by writing to $FEC0, then read in from $FEC1 We need to see if the result is outside of the 'dead zone' and set the bits in z_h depending on the result. |
 |
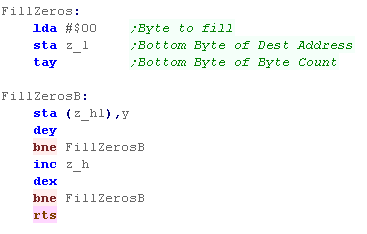
Our test program
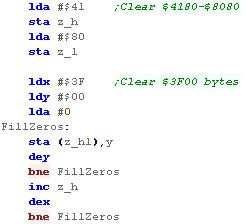
| First we're going to clear our screen... we'll define an address
to clear in z_hl ($4180 - the start of the bitmap screen) we'll define the number of bytes to clear in XY ($3F00) We then use a loop to clear the screen. |
 |
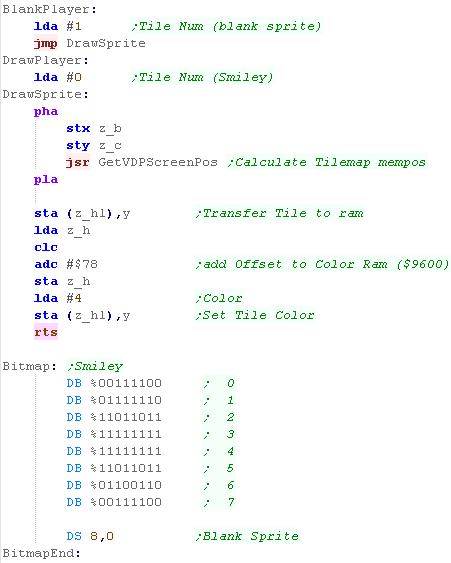
| We're going to define the starting position of our character - z_h will store our joystick buttons - we initialize this to zero - as we need to run the main loop but don't want to cause any keypresses. |  |
| Next comes the joystick reading routine - we skip this the first
run We read in from the joystick into z_H - until a key is pressed we'll wait in an infinite loop... when it is pressed we start our drawing routine... First we back up the last position of the player and clear the old player sprite from the screen. |
 |
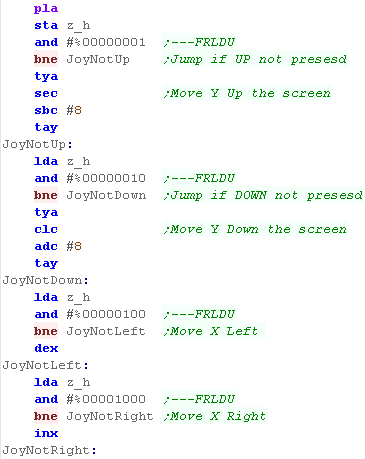
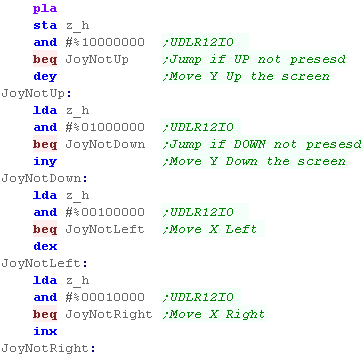
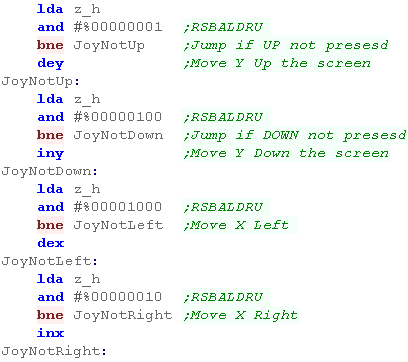
| We test each of the bits in z_h (which was returned from the
joystick routine) In each case, if the bit is 0 then the button isn't down - and we skip over the routine to move the character's X or Y position Because of the screen layout we're going to move vertically in 8 pixel blocks for simplicity |
 |
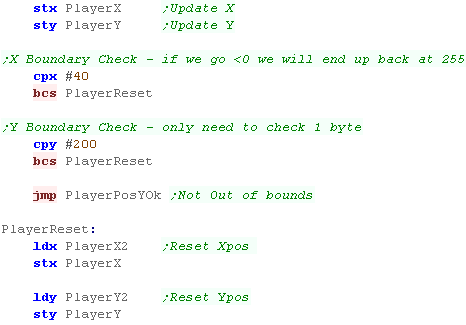
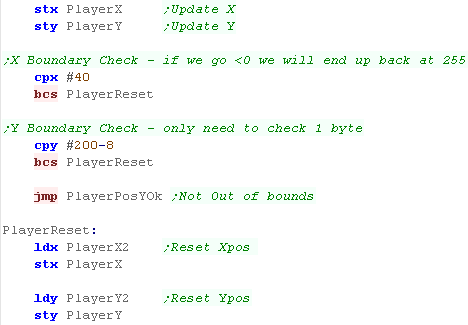
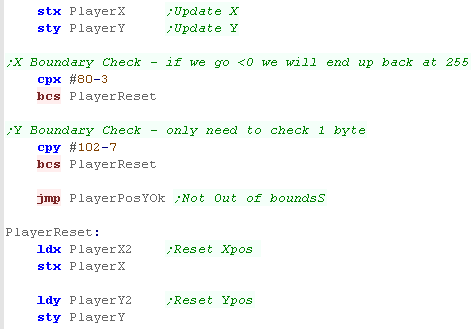
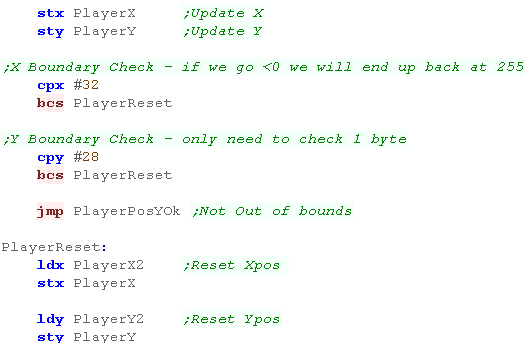
| We save the new XY position. Next we check if the player has gone off the screen... as the top left of the screen is 0,0 if the player goes off the left hand side (<0) they will return at the far right (255) Therefore we only need to check the top boundaries!... we check if the player has gone over the boundaries, if they have we reset the player position from the backup |
 |
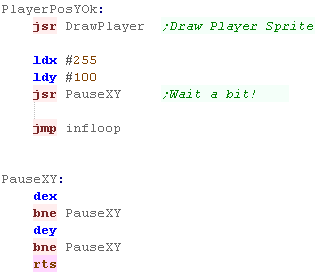
| We're finished, so we draw the player to the screen, and wait a
while! Finally we loop back, and start the procedure again! |
 |
|
We've got a movable sprite
onscreen! You could use this as a basic game. If you want to read two players, or fire buttons you'll need to use better joystick code - see the platform specific series for more details! |
Defining Parameters, and drawing sprites
| First we're going to need some zero page bytes to define an X,Y
position. We'll need one pair for the current X,Y position We'll need a second pair for the last position - We'll use them to keep the player onscreen if the player goes out of bounds |
|
| We're going to use a slightly modified version of the sprite
drawing routine from last time: This time there are two versions - one will draw the smiley, the other will draw a blank sprite to clear the last position of the player. |
 |
Reading the Joystick
| The C64 makes joystick reading super easy! all we need to do is read in from $DC00 / $DC01 for port 1 / 2 | 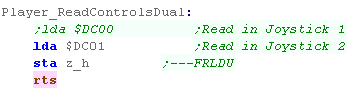 |
Our test program
| First we're going to clear our screen... we'll define an address
to clear in z_hl... We'll define the number of bytes to clear in XY
We then use a loop to clear the screen. We need to fill two screen areas: The bitmap area $2000-$4000 The color attributes $0400-$0800 |
  |
| We're going to define the starting position of our character - z_h will store our joystick buttons - we initialize this to zero - as we need to run the main loop but don't want to cause any keypresses. | |
| Next comes the joystick reading routine - we skip this the first
run We read in from the joystick into z_H - until a key is pressed we'll wait in an infinite loop... when it is pressed we start our drawing routine... First we back up the last position of the player and clear the old player sprite from the screen. |
 |
| We test each of the bits in z_h (which was returned from the
joystick routine) In each case, if the bit is 1 then the button isn't down - and we skip over the routine to move the character's X or Y position Because of the screen layout we're going to move vertically in 8 pixel blocks for simplicity |
 |
| We save the new XY position. Next we check if the player has gone off the screen... as the top left of the screen is 0,0 if the player goes off the left hand side (<0) they will return at the far right (255) Therefore we only need to check the top boundaries!... we check if the player has gone over the boundaries, if they have we reset the player position from the backup |
 |
| We're finished, so we draw the player to the screen, and wait a
while! Finally we loop back, and start the procedure again! |
|
| We've only used
the tilemap in this example... if we want to do flexible Sprites
- we would want to use the Nes' hardware sprites ... These can move by pixels, and allow for fast smooth moving objects - but there's a limit to how many can be onscreen. |
|
Defining Parameters, and drawing sprites
| First we're going to need some zero page bytes to define an X,Y
position. We'll need one pair for the current X,Y position We'll need a second pair for the last position - We'll use them to keep the player onscreen if the player goes out of bounds |
|
| We're defining two character tiles this time - one's a smiley, the
other's just an empty sprite. We're going to use a slightly modified version of the tile setting routine from last time: This time there are two versions - one will draw the smiley, the other will draw a blank sprite to clear the last position of the player. |
 |
Reading the Joystick
| On the Vic 20, we ned to read in from ports $9120 and $911F to get
UDLR and Fire... We'll need to ensure that port B is set to READ by writing to $9122 |
 |
Note: we're cutting corners to save
memory ... we don't need to set port A ($9113) to read, and
we're not switching port B back!
It works ok on our emulator, but you may prefer to do this
too.
Our test program
| First we're going to clear our screen... We'll use a loop to clear
the characters onscreen. We do this by writing Tile 1 (the blank tile) to areas $1E00-$2000 |
 |
| We're going to define the starting position of our character - z_h will store our joystick buttons - we initialize this to zero - as we need to run the main loop but don't want to cause any keypresses. |  |
| Next comes the joystick reading routine - we skip this the first
run We read in from the joystick into z_H - until a key is pressed we'll wait in an infinite loop... when it is pressed we start our drawing routine... First we back up the last position of the player and clear the old player sprite from the screen. |
|
| We test each of the bits in z_h (which was returned from the
joystick routine) In each case, if the bit is 1 then the button isn't down - and we skip over the routine to move the character's X or Y position |
 |
| We save the new XY position. Next we check if the player has gone off the screen... as the top left of the screen is 0,0 if the player goes off the left hand side (<0) they will return at the far right (255) Therefore we only need to check the top boundaries!... we check if the player has gone over the boundaries, if they have we reset the player position from the backup |
 |
| We're finished, so we draw the player to the screen, and wait a
while! Finally we loop back, and start the procedure again! |
|
Defining Parameters, and drawing sprites
| First we're going to need some zero page bytes to define an X,Y
position. We'll need one pair for the current X,Y position We'll need a second pair for the last position - We'll use them to keep the player onscreen if the player goes out of bounds |
|
| We need to define the address of the PIA on the Atari 800 - we'll
use it to get the digital joystick There's no PIA on the 5200 - so we'll use the pokey instead |
 |
| We're going to use a slightly modified version of the bitmap
drawing routine from last time: This time there are two versions - one will draw the smiley, the other will draw a blank sprite to clear the last position of the player. |
 |
Reading the Joystick
| On the Atari 800 , we can read in the UDLR controls of the first
joystick from the PIA The top nibble is joystick 2 - so we ignore this for todays example |
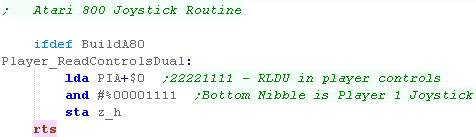 |
| On the 5200 we'll have to read from the analog hardware We read in each axis from the POKEY ($E800/1) We use a deadzone of 128 - and if the axis is outside of that deadzone we set a bit of the resulting joystick value - this converts analog to digital. |
 |
We're only
loading in UDLR directions here of Joystick 1 - if you want to
use Fire, or joystick 2 - see the Platform
Specific series!
Our test program
| First we're going to clear our screen... We'll use a loop to clear
the characters onscreen. We do this by writing Tile 1 (the blank tile) to areas $1E00-$2000 |
|
| We're going to define the starting position of our character - z_h will store our joystick buttons - we initialize this to zero - as we need to run the main loop but don't want to cause any keypresses. | |
| Next comes the joystick reading routine - we skip this the first
run We read in from the joystick into z_H - until a key is pressed we'll wait in an infinite loop... when it is pressed we start our drawing routine... First we back up the last position of the player and clear the old player sprite from the screen. |
 |
| We test each of the bits in z_h (which was returned from the
joystick routine) In each case, if the bit is 1 then the button isn't down - and we skip over the routine to move the character's X or Y position Because of the screen layout we're going to move vertically in 8 pixel blocks for simplicity |
 |
| We save the new XY position. Next we check if the player has gone off the screen... as the top left of the screen is 0,0 if the player goes off the left hand side (<0) they will return at the far right (255) Therefore we only need to check the top boundaries!... we check if the player has gone over the boundaries, if they have we reset the player position from the backup |
 |
| We're finished, so we draw the player to the screen, and wait a
while! Finally we loop back, and start the procedure again! |
|
Defining Parameters, and drawing sprites
| First we're going to need some zero page bytes to define an X,Y
position. We'll need one pair for the current X,Y position We'll need a second pair for the last position - We'll use them to keep the player onscreen if the player goes out of bounds |
|
| We're going to use a slightly modified version of the bitmap
drawing routine from last time: This time there are two versions - one will draw the smiley, the other will draw a blank sprite to clear the last position of the player. |
 |
Reading the Joystick
| Apple Joysticks are annoying! they are analog... we have to strobe the port then read from the X and Y ports, and count up until the top bit changes... this is a 'timer'...using just 1 bit (the top one) it effectively returns an 'analog' value from about 0-100 We're reading in both the X and Y axis at the same time, skipping out of part of the loop when the X or Y part is complete. |
 |
| Once we've read in the analog values, we'll convert them from analog (0-255) to digital (just a single bit 1/0 for Off/On) | 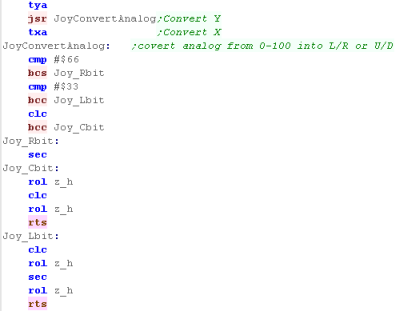 |
|
Reading the
Apple II joystick is a Helluva pain, but the code here does manage
to convert it into something vaguely manageable! Also note, while we typically use an 8x8 smiley - due to the Apple II weirdness, it's 7x8 on this system!... grr! |
Our test program
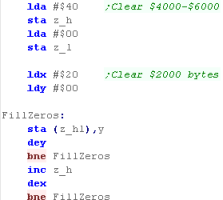
| After our screen is set up (See the bitmap tutorial) we're going
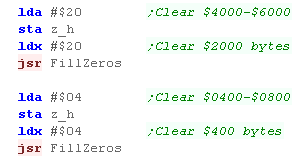
to clear our screen... We'll use a loop to clear the screen. We do this by writing Tile zeros to the screen at addresses $4000-$6000 |
|
| We're going to define the starting position of our character - z_h will store our joystick buttons - we initialize this to 255 - as we need to run the main loop but don't want to cause any keypresses. | 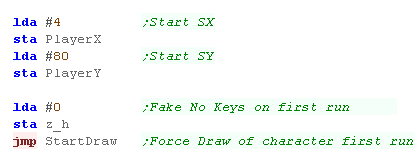 |
| Next comes the joystick reading routine - we skip this the first
run We read in from the joystick into z_H - until a key is pressed we'll wait in an infinite loop... when it is pressed we start our drawing routine... First we back up the last position of the player and clear the old player sprite from the screen. |
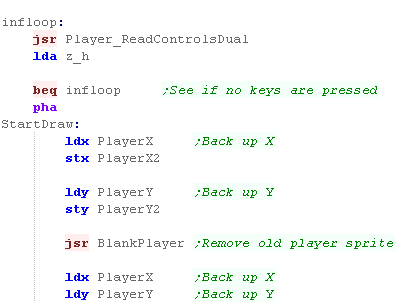 |
| We test each of the bits in z_h (which was returned from the
joystick routine) In each case, if the bit is 0 then the button isn't down - and we skip over the routine to move the character's X or Y position Because of the screen layout we're going to move vertically in 8 pixel blocks for simplicity |
 |
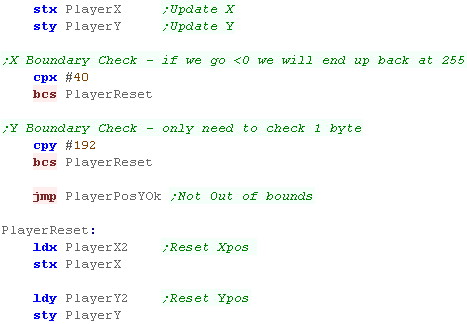
| We save the new XY position. Next we check if the player has gone off the screen... as the top left of the screen is 0,0 if the player goes off the left hand side (<0) they will return at the far right (255) Therefore we only need to check the top boundaries!... we check if the player has gone over the boundaries, if they have we reset the player position from the backup |
 |
| We're finished, so we draw the player to the screen, and wait a
while! Finally we loop back, and start the procedure again! |
|

Lesson
S15 - Joypad Reading on the Atari Lynx
The Lynx makes joypad reading easy for us... we can just read
the keypresses in from port $FCB0
Lets make it happen!


Defining Parameters, and drawing sprites
| First we're going to need some zero page bytes to define an X,Y
position. We'll need one pair for the current X,Y position We'll need a second pair for the last position - We'll use them to keep the player onscreen if the player goes out of bounds |
|
| We're going to use a slightly modified version of the bitmap
routine from last time: This time there are two versions - one will draw the smiley, the other will draw a blank sprite to clear the last position of the player. |
 |
Reading the Joystick
| Reading in the Lynx joypad is super easy! (Yay!) we just read in
from port $FCB0... this returns a byte with each button UDLR12IO
represented by a bit... where 1=ButtonDown and 0=ButtonUp |
 |
Our test program
| We're going to define the starting position of our character - z_h will store our joystick buttons - we initialize this to zero - as we need to run the main loop but don't want to cause any keypresses. | 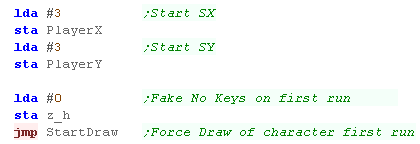 |
| Next comes the joystick reading routine - we skip this the first
run We read in from the joystick into z_H - until a key is pressed we'll wait in an infinite loop... when it is pressed we start our drawing routine... First we back up the last position of the player and clear the old player sprite from the screen. |
 |
| We test each of the bits in z_h (which was returned from the
joystick routine) In each case, if the bit is 0 then the button isn't down - and we skip over the routine to move the character's X or Y position Because of the screen layout we're going to move vertically in 8 pixel blocks for simplicity |
 |
| We save the new XY position. Next we check if the player has gone off the screen... as the top left of the screen is 0,0 if the player goes off the left hand side (<0) they will return at the far right (255) Therefore we only need to check the top boundaries!... we check if the player has gone over the boundaries, if they have we reset the player position from the backup |
 |
| We're finished, so we draw the player to the screen, and wait a
while! Finally we loop back, and start the procedure again! |
 |
|
Hardware sprites on the Lynx are a bit of a pain... but software sprites are pretty easy! And thanks to the Lynx Small screen and speedy CPU, we can make a great game without worrying about the hardware sprites! |
Defining Parameters, and drawing sprites
| First we're going to need some zero page bytes to define an X,Y
position. We'll need one pair for the current X,Y position We'll need a second pair for the last position - We'll use them to keep the player onscreen if the player goes out of bounds |
|
| We're going to use a slightly modified version of the bitmap
routine from last time: This time there are two versions - one will draw the smiley, the other will draw a blank sprite to clear the last position of the player. We're defining tile 128 as our smiley... 129 is 16 zero bytes. |
 |
Reading the Joystick
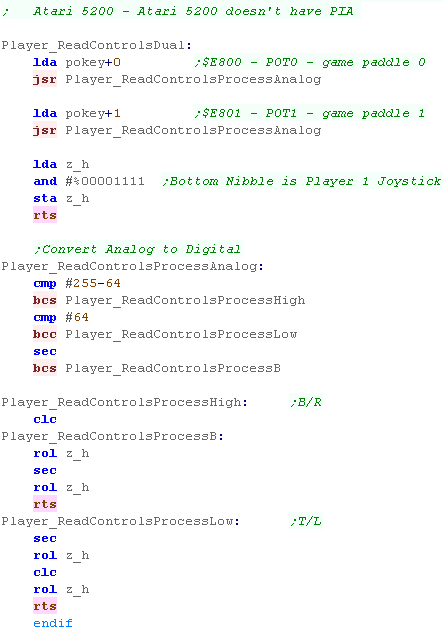
| We need to read in a sequence of 8 bits from port $4016 to get
each direction key... we also need to strobe the port by writing 1
then 0 to the same port... The 8 reads from the port will return the directions: Read 1 - A Read 2 - B Read 3 - Select Read 4 - Start Read 5 - Up Read 6 - Down Read 7 - Left Read 8 - Right |
 |
Reading the NES
joystick is a bit of a pain, but this code will sort it out...
if you want both players pads, check our the full tutorial here
Our test program
| We're going to define the starting position of our character - z_h will store our joystick buttons - we initialize this to zero - as we need to run the main loop but don't want to cause any keypresses. | |
| Next comes the joystick reading routine - we skip this the first
run We read in from the joystick into z_H - until a key is pressed we'll wait in an infinite loop... when it is pressed we start our drawing routine... First we back up the last position of the player and clear the old player sprite from the screen. |
 |
| We test each of the bits in z_h (which was returned from the
joystick routine) In each case, if the bit is 0 then the button isn't down - and we skip over the routine to move the character's X or Y position Because of the screen layout we're going to move vertically in 8 pixel blocks for simplicity |
 |
| We save the new XY position. Next we check if the player has gone off the screen... as the top left of the screen is 0,0 if the player goes off the left hand side (<0) they will return at the far right (255) Therefore we only need to check the top boundaries!... we check if the player has gone over the boundaries, if they have we reset the player position from the backup |
 |
| We're finished, so we draw the player to the screen, and wait a
while! Finally we loop back, and start the procedure again! |
|
Defining Parameters, and drawing sprites
| First we're going to need some zero page bytes to define an X,Y
position. We'll need one pair for the current X,Y position We'll need a second pair for the last position - We'll use them to keep the player onscreen if the player goes out of bounds |
|
| We're going to use a slightly modified version of the bitmap
routine from last time: This time there are two versions - one will draw the smiley, the other will draw a blank sprite to clear the last position of the player. We're defining tile 128 as our smiley... 129 is 32 zero bytes. |
 |
Reading the Joystick
| We need to read in a sequence of 8 bits from port $4016 to get
each direction key... we also need to strobe the port by writing 1
then 0 to the same port... The 8 reads from the port will return the directions: Read 1 - A Read 2 - B Read 3 - Select Read 4 - Start Read 5 - Up Read 6 - Down Read 7 - Left Read 8 - Right |
|
This routine
only loads in the classic NES buttons of Joypad 1, if you want
the full buttons, or the second Joypad, see the details here
Our test program
| We're going to define the starting position of our character - z_h will store our joystick buttons - we initialize this to zero - as we need to run the main loop but don't want to cause any keypresses. | |
| Next comes the joystick reading routine - we skip this the first
run We read in from the joystick into z_H - until a key is pressed we'll wait in an infinite loop... when it is pressed we start our drawing routine... First we back up the last position of the player and clear the old player sprite from the screen. |
|
| We test each of the bits in z_h (which was returned from the
joystick routine) In each case, if the bit is 0 then the button isn't down - and we skip over the routine to move the character's X or Y position Because of the screen layout we're going to move vertically in 8 pixel blocks for simplicity |
|
| We save the new XY position. Next we check if the player has gone off the screen... as the top left of the screen is 0,0 if the player goes off the left hand side (<0) they will return at the far right (255) Therefore we only need to check the top boundaries!... we check if the player has gone over the boundaries, if they have we reset the player position from the backup |
|
| We're finished, so we draw the player to the screen, and wait a
while! Finally we loop back, and start the procedure again! |
|
Defining Parameters, and drawing sprites
| First we're going to need some zero page bytes to define an X,Y
position. We'll need one pair for the current X,Y position We'll need a second pair for the last position - We'll use them to keep the player onscreen if the player goes out of bounds |
|
| We're going to use a slightly modified version of the bitmap
routine from last time: This time there are two versions - one will draw the smiley, the other will draw a blank sprite to clear the last position of the player. We're defining tile 128 as our smiley... 129 is 32 zero bytes. |
 |
We're not going to look at the 'screen
init' routines, as we've already covered them in the simple
series... check that out here.
Reading the Joystick
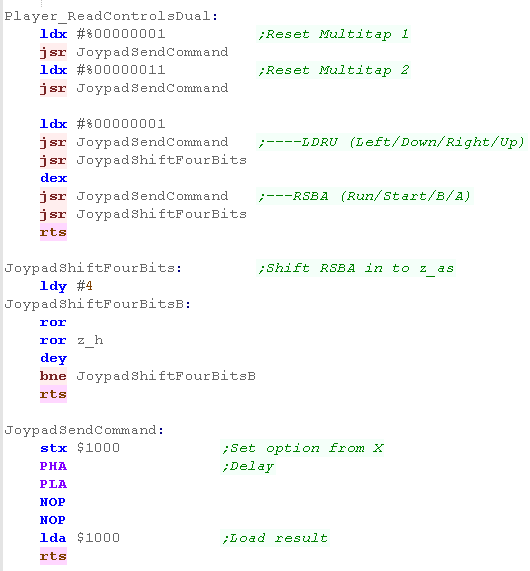
| We need to reset the 'multitap' hardware by sending 1,3 to port
$1000 We then send a 1 - read in 4 bits... and a 0 and read in 4 bits This returns a byte in the format: Run / Start / B / A / Left / Down / Right / Up |
 |
Our test program
| We're going to define the starting position of our character - z_h will store our joystick buttons - we initialize this to zero - as we need to run the main loop but don't want to cause any keypresses. | |
| Next comes the joystick reading routine - we skip this the first
run We read in from the joystick into z_H - until a key is pressed we'll wait in an infinite loop... when it is pressed we start our drawing routine... First we back up the last position of the player and clear the old player sprite from the screen. |
|
| We test each of the bits in z_h (which was returned from the
joystick routine) In each case, if the bit is 0 then the button isn't down - and we skip over the routine to move the character's X or Y position Because of the screen layout we're going to move vertically in 8 pixel blocks for simplicity |
 |
| We save the new XY position. Next we check if the player has gone off the screen... as the top left of the screen is 0,0 if the player goes off the left hand side (<0) they will return at the far right (255) Therefore we only need to check the top boundaries!... we check if the player has gone over the boundaries, if they have we reset the player position from the backup |
|
| We're finished, so we draw the player to the screen, and wait a
while! Finally we loop back, and start the procedure again! |
|
| View Options |
| Default Dark |
| Simple (Hide this menu) |
| Print Mode (white background) |
| Top Menu |
| ***Main Menu*** |
| Youtube channel |
| Patreon |
| Introduction to Assembly (Basics for absolute beginners) |
| Amazon Affiliate Link |
| AkuSprite Editor |
| ChibiTracker |
| Dec/Bin/Hex/Oct/Ascii Table |
| Alt Tech |
| Archive.org |
| Bitchute |
| Odysee |
| Rumble |
| DailyMotion |
| Please note: I wlll upload more content to these alt platforms based on the views they bring in |
| 68000 Content |
| ***68000 Tutorial List*** |
Learn 68000 Assembly  |
| Hello World Series |
| Platform Specific Series |
| Simple Samples |
| Grime 68000 |
| 68000 Downloads |
| 68000 Cheatsheet |
| Sources.7z |
| DevTools kit |
| 68000 Platforms |
| Amiga 500 |
| Atari ST |
| Neo Geo |
| Sega Genesis / Mega Drive |
| Sinclair QL |
| X68000 (Sharp x68k) |
| 8086 Content |
| Learn 8086 Assembly |
| Platform Specific Series |
| Hello World Series |
| Simple Samples |
| 8086 Downloads |
| 8086 Cheatsheet |
| Sources.7z |
| DevTools kit |
| 8086 Platforms |
| Wonderswan |
| MsDos |
| ARM Content |
| Learn ARM Assembly |
| Learn ARM Thumb Assembly |
| Platform Specific Series |
| Hello World |
| Simple Samples |
| ARM Downloads |
| ARM Cheatsheet |
| Sources.7z |
| DevTools kit |
| ARM Platforms |
| Gameboy Advance |
| Nintendo DS |
| Risc Os |
| Risc-V Content |
| Learn Risc-V Assembly |
| Risc-V Downloads |
| Risc-V Cheatsheet |
| Sources.7z |
| DevTools kit |
| MIPS Content |
| Learn Risc-V Assembly |
| Platform Specific Series |
| Hello World |
| Simple Samples |
| MIPS Downloads |
| MIPS Cheatsheet |
| Sources.7z |
| DevTools kit |
| MIPS Platforms |
| Playstation |
| N64 |
| PDP-11 Content |
| Learn PDP-11 Assembly |
| Platform Specific Series |
| Simple Samples |
| PDP-11 Downloads |
| PDP-11 Cheatsheet |
| Sources.7z |
| DevTools kit |
| PDP-11 Platforms |
| PDP-11 |
| UKNC |
| TMS9900 Content |
| Learn TMS9900 Assembly |
| Platform Specific Series |
| Hello World |
| TMS9900 Downloads |
| TMS9900 Cheatsheet |
| Sources.7z |
| DevTools kit |
| TMS9900 Platforms |
| Ti 99 |
| 6809 Content |
| Learn 6809 Assembly |
| Learn 6309 Assembly |
| Platform Specific Series |
| Hello World Series |
| Simple Samples |
| 6809 Downloads |
| 6809/6309 Cheatsheet |
| Sources.7z |
| DevTools kit |
| 6809 Platforms |
| Dragon 32/Tandy Coco |
| Fujitsu FM7 |
| TRS-80 Coco 3 |
| Vectrex |
| 65816 Content |
| Learn 65816 Assembly |
| Hello World |
| Simple Samples |
| 65816 Downloads |
| 65816 Cheatsheet |
| Sources.7z |
| DevTools kit |
| 65816 Platforms |
| SNES |
| eZ80 Content |
| Learn eZ80 Assembly |
| Platform Specific Series |
| eZ80 Downloads |
| eZ80 Cheatsheet |
| Sources.7z |
| DevTools kit |
| eZ80 Platforms |
| Ti84 PCE |
| IBM370 Content |
| Learn IBM370 Assembly |
| Simple Samples |
| IBM370 Downloads |
| IBM370 Cheatsheet |
| Sources.7z |
| DevTools kit |
| Super-H Content |
| Learn SH2 Assembly |
| Hello World Series |
| Simple Samples |
| SH2 Downloads |
| SH2 Cheatsheet |
| Sources.7z |
| DevTools kit |
| SH2 Platforms |
| 32x |
| Saturn |
| PowerPC Content |
| Learn PowerPC Assembly |
| Hello World Series |
| Simple Samples |
| PowerPC Downloads |
| PowerPC Cheatsheet |
| Sources.7z |
| DevTools kit |
| PowerPC Platforms |
| Gamecube |
| Work in Progress |
| ChibiAndroids |
| Misc bits |
| Ruby programming |
Buy my Assembly programming book
on Amazon in Print or Kindle!


Available worldwide!
Search 'ChibiAkumas' on
your local Amazon website!
Click here for more info!


Buy my Assembly programming book
on Amazon in Print or Kindle!
Available worldwide!
Search 'ChibiAkumas' on
your local Amazon website!
Click here for more info!
Buy my Assembly programming book
on Amazon in Print or Kindle!
Available worldwide!
Search 'ChibiAkumas' on
your local Amazon website!
Click here for more info!