

Simple Samples
 |
Warning!
Windows Defender may detect 'NCAT' as a 'threat' and delete it!! Without it the scripts won't be able to send the ASM jobs to the server, so you'll need to restore it if it does. The version provided is the one which came with Hercules, but obviously use it at your own risk. |
| Lesson
S1 - Hello World on the IBM370 Lets get started with the IBM 370 Oh Hercules, we'll write our first JCL to show a hello world message to the screen. |
 |
 Hello.jcl
|
 |
| WThis
example assumes you have a working hercules server, and you
know how to start it up! If you don't look at the devtools page, and download the authors pre-configured server and startup scripts |
 |
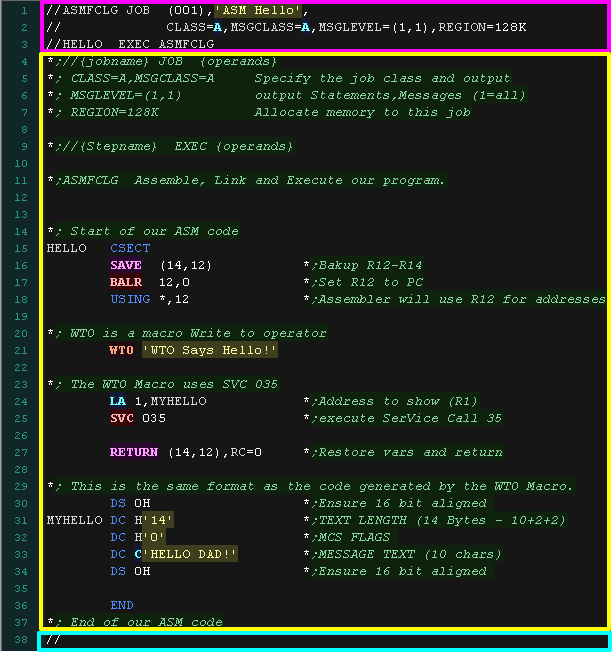
| Here is our hello world example, It shows Two
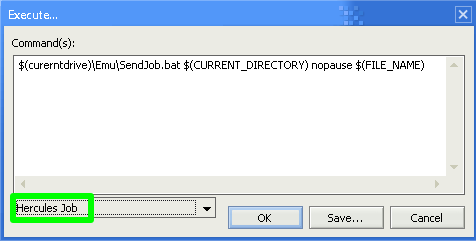
hello messages in two ways! An ASM file cannot be assembled on its own, we need to send a JCL Job file to the server. The Job commands start // Here is the minimal Header and Footer to a JCL which will assemble and run our program. The ASM source code is in the middle of this JOB script These are only ASM tutorials... We will not go into details of JCL in these tutorials To build this JCL file, use the Hercules Job option in my devtool scripts |
  |
| If you use my build scripts, the results of the assembly will
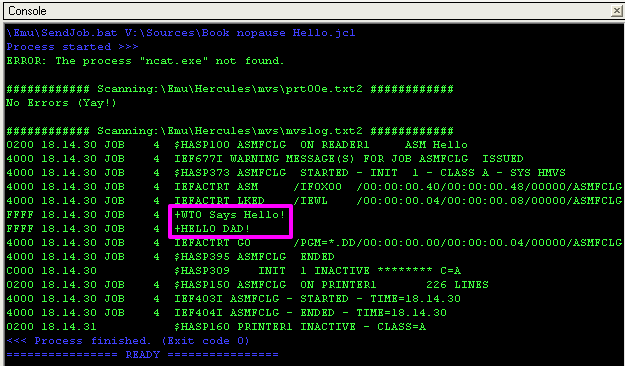
be shown in the console window I've written some tools to scan the PRT00e printer output for possible assembly errors and show them onscreen The result of the execution is shown from mvslog The output is then shown on the screen by the execute script |
 |
| The output will also be shown on the terminal | 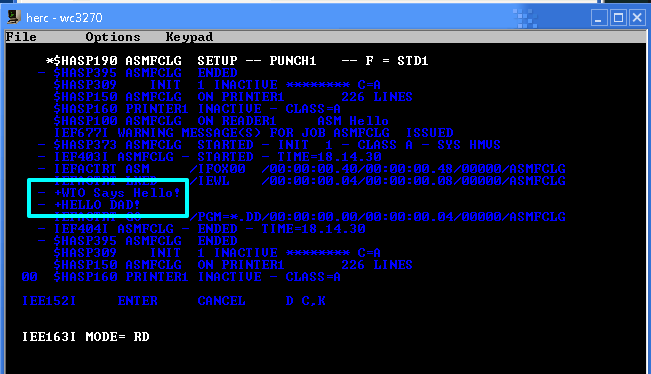 |
| JCL lines start // The first two JOB lines define the Job name, memory and specifications for how it outputs information The next EXEC ine starts the ASMFCLG program to assemble the program the final // line is a 'null line' marking the end of the job (technically We don't actually need this!) |
  |
| Some scripts may include a DD * line, This specifies the following lines as data to be passed to the program, however the hercules assembler does not seem to need this |
 |
| Lines starting
with a * are comments Text after a program line is also a comment |
 |
| The CSECT command and END define the ASM code for the HELLO program. |   |
| At the start of our program we backup all the registers with SAVE We use BALR 12,0 and USING *,12 to set up register R12 for use by the assembler for addressing calculations. At the end of our program we use RETURN to restore the registers and pass control back to the OS |
  |
WTO - Write To Operator
| WTO is a macro we can use to
send text to the user. The simplest form of this macro is shown here. |
 |
| Here is the results |  |
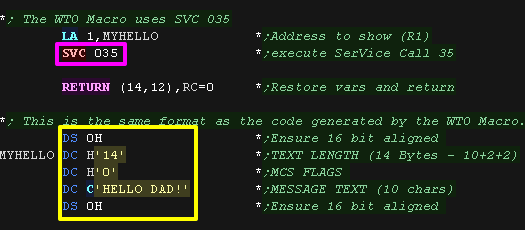
| The WTO macro actually uses SVC 035 It defines a data block containing the settings and string to show! |
 |
| Here are the results |
 |
| We send our job file to the server using NCAT - we TYPE it with
the Pipe operator | to send it. The server is on our machine - localhost 127.0.0.1 on port 3505  |
Using WTO as a buffer
| We want to build up a line for output in stages - sometimes
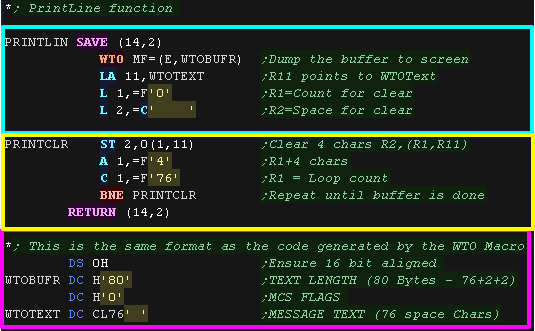
character by character, We define a 76 character 'buffer' called WTOTEXT, We use register R11 as a pointer to the next character in the buffer, and use this to store characters for example, if the low byte of R1 contained a character to store, "STC 1,0(11) A 11,=F'1'" would store the character, and increment R11 to point to the next character. we use the PRINTLIN function to print the buffer, then clear the buffer with the PRINTCLR loop |
 |
Showing a labeled register
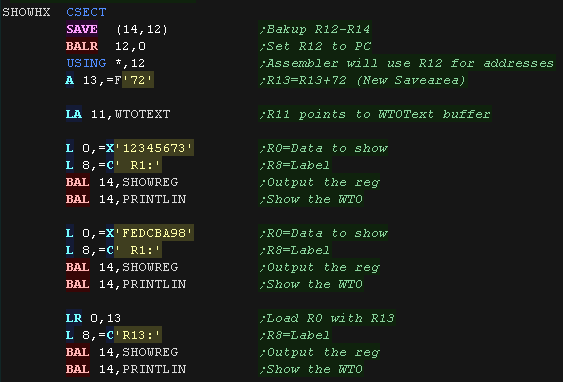
| We're going to create a function called 'SHOWREG' It shows the contents of R0 to the screen as Hexadecimal, with the 4 characters in R8 shown as a 'label' We need to use PRINTLIN to clear the buffer and send it to the screen. |
 |
| Here are the results |
 |
| The SHOWREG function writes the 4
characters in R8 to the WTO buffer pointer R11 We then run the SHOWHEX8 - the 8 refers to 8 nibbles (4 bytes) |
 |
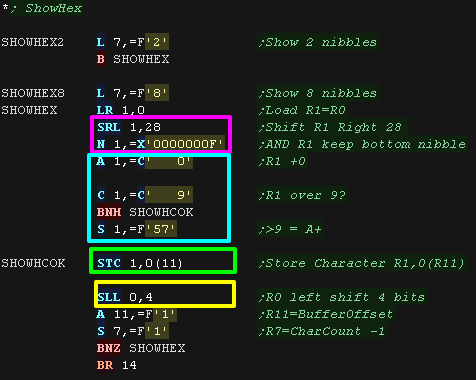
| The ShowHex routine selects the top nibble
of the 32 bit value. We convert the number to a character by adding the character '0', but if the nibble >0 we need to show 'A-F' so we subtract 57 from the character shown. REMEMBER! all the characters are in EBDIC! We write the character into the WTO buffer After each character we shift the value to show 4 bits left, moving the next most significant bit into the 'draw position' |
 |
Dumping memory as Hex and characters
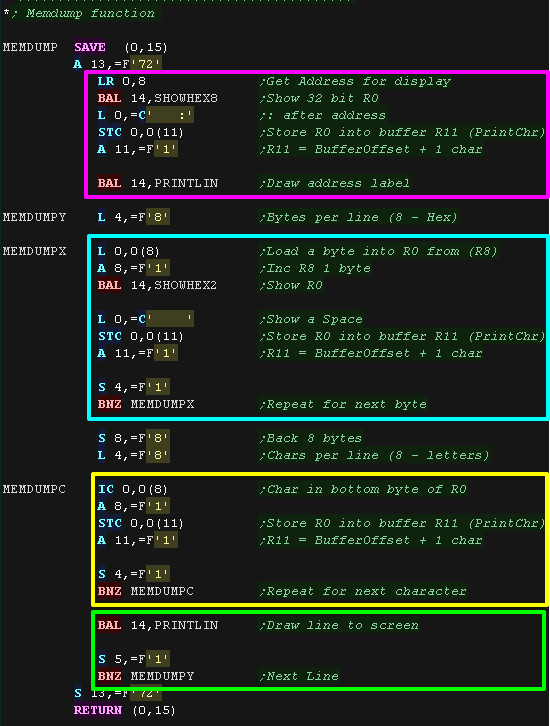
| Our MEMDUMP routine shows R5 lines (8 bytes per line) from address
R8. Here we dump 16 bytes of the code of the 'ShowReg' function |
 |
| Here are the results |
 |
| Our MEMDUMP routine starts by
showing the address in R8 to the screen with the SHOWHEX8 routine
(which shows all 8 nibbles of the 32 bit value) We then show the : to the screen after the address. Next we show 8 bytes to the screen as HEX, each has a space after it, we use SHOWHEX2 as we only show two nibbles. We then show the same data as Characters (EBDIC) Finally we use PRINTLIN to dump the buffer to the operator's screen. We then repeat |
 |
JCL - Job Control Language
| Command | Format | Example | Purpose |
| JOB | //{Jobname} JOB ({Account num}) {operands} {comments} | //ASMFCLG JOB (001),'ASM HELLO
WORLD',
|
Job |
| EXEC | //{Stepname} EXEC {program} {operands} {comments} | //HELLO EXEC ASMFCLG |
Execute |
| DD | //{dd name} DD {operands} {comments} | //ASM.SYSUT1 DD UNIT=SYSDA |
Data Definition |
| PROC | //{name} PROC {operands} {comments} | //DEF PROC STATUS=OLD,LIBRARY=SYSLIB,NUMBER=777777 |
Procedure |
| PEND | //{name} PEND {comments} | // PEND |
Procedure End |
| /* //* |
/* I am a comment | Comment |
JOB:
Class = Time slicing class (A=Default) PRTY = Priority
MSGCLASS = Output class (A-z / 0-9)
MSGLEVEL= (statements,messages) .... 1,1 = output all
Region= Memory to allocate in 1024 byte blocks (eg 128K)
DD:
* = Prompt for input (//ddname DD *)
UNIT = device / group containing data set
Server console / Terminal Notes
Server
Start Server:
C: ipl 150
T: enter
T: r 0,u
T: r 1,format,noreq
to stop errors (in console)
OSTAILOR QUIET
To reply to a message:
r <message number>,<response>
Rexx Files:
regina condcode.rexx prt00e.txt smp4p44
Telnet
Ctrl ]
set localecho
enter
F12 to continue read of messages
shutdown: (in telnet)
$p jes2
z eod
quiesce
quit (in console)
Tape to asci?
hetget -a tape/stage1.het stage1.output 1
| View Options |
| Default Dark |
| Simple (Hide this menu) |
| Print Mode (white background) |
| Top Menu |
| ***Main Menu*** |
| Youtube channel |
| Patreon |
| Introduction to Assembly (Basics for absolute beginners) |
| Amazon Affiliate Link |
| AkuSprite Editor |
| ChibiTracker |
| Dec/Bin/Hex/Oct/Ascii Table |
| Alt Tech |
| Archive.org |
| Bitchute |
| Odysee |
| Rumble |
| DailyMotion |
| Please note: I wlll upload more content to these alt platforms based on the views they bring in |
| 68000 Content |
| ***68000 Tutorial List*** |
| Learn 68000 Assembly |
| Hello World Series |
| Platform Specific Series |
| Simple Samples |
| Grime 68000 |
| 68000 Downloads |
| 68000 Cheatsheet |
| Sources.7z |
| DevTools kit |
| 68000 Platforms |
| Amiga 500 |
| Atari ST |
| Neo Geo |
| Sega Genesis / Mega Drive |
| Sinclair QL |
| X68000 (Sharp x68k) |
| 8086 Content |
| Learn 8086 Assembly |
| Platform Specific Series |
| Hello World Series |
| Simple Samples |
| 8086 Downloads |
| 8086 Cheatsheet |
| Sources.7z |
| DevTools kit |
| 8086 Platforms |
| Wonderswan |
| MsDos |
| ARM Content |
| Learn ARM Assembly |
| Learn ARM Thumb Assembly |
| Platform Specific Series |
| Hello World |
| Simple Samples |
| ARM Downloads |
| ARM Cheatsheet |
| Sources.7z |
| DevTools kit |
| ARM Platforms |
| Gameboy Advance |
| Nintendo DS |
| Risc Os |
| Risc-V Content |
| Learn Risc-V Assembly |
| Risc-V Downloads |
| Risc-V Cheatsheet |
| Sources.7z |
| DevTools kit |
| MIPS Content |
| Learn Risc-V Assembly |
| Platform Specific Series |
| Hello World |
| Simple Samples |
| MIPS Downloads |
| MIPS Cheatsheet |
| Sources.7z |
| DevTools kit |
| MIPS Platforms |
| Playstation |
| N64 |
| PDP-11 Content |
| Learn PDP-11 Assembly |
| Platform Specific Series |
| Simple Samples |
| PDP-11 Downloads |
| PDP-11 Cheatsheet |
| Sources.7z |
| DevTools kit |
| PDP-11 Platforms |
| PDP-11 |
| UKNC |
| TMS9900 Content |
| Learn TMS9900 Assembly |
| Platform Specific Series |
| Hello World |
| TMS9900 Downloads |
| TMS9900 Cheatsheet |
| Sources.7z |
| DevTools kit |
| TMS9900 Platforms |
| Ti 99 |
| 6809 Content |
| Learn 6809 Assembly |
| Learn 6309 Assembly |
| Platform Specific Series |
| Hello World Series |
| Simple Samples |
| 6809 Downloads |
| 6809/6309 Cheatsheet |
| Sources.7z |
| DevTools kit |
| 6809 Platforms |
| Dragon 32/Tandy Coco |
| Fujitsu FM7 |
| TRS-80 Coco 3 |
| Vectrex |
| 65816 Content |
| Learn 65816 Assembly |
| Hello World |
| Simple Samples |
| 65816 Downloads |
| 65816 Cheatsheet |
| Sources.7z |
| DevTools kit |
| 65816 Platforms |
| SNES |
| eZ80 Content |
| Learn eZ80 Assembly |
| Platform Specific Series |
| eZ80 Downloads |
| eZ80 Cheatsheet |
| Sources.7z |
| DevTools kit |
| eZ80 Platforms |
| Ti84 PCE |
| IBM370 Content |
| Learn IBM370 Assembly |
| Simple Samples |
| IBM370 Downloads |
| IBM370 Cheatsheet |
| Sources.7z |
| DevTools kit |
| Super-H Content |
| Learn SH2 Assembly |
| Hello World Series |
| Simple Samples |
| SH2 Downloads |
| SH2 Cheatsheet |
| Sources.7z |
| DevTools kit |
| SH2 Platforms |
| 32x |
| Saturn |
| PowerPC Content |
| Learn PowerPC Assembly |
| Hello World Series |
| Simple Samples |
| PowerPC Downloads |
| PowerPC Cheatsheet |
| Sources.7z |
| DevTools kit |
| PowerPC Platforms |
| Gamecube |
| Work in Progress |
| ChibiAndroids |
| Misc bits |
| Ruby programming |
Buy my Assembly programming book
on Amazon in Print or Kindle!


Available worldwide!
Search 'ChibiAkumas' on
your local Amazon website!
Click here for more info!

Buy my Assembly programming book
on Amazon in Print or Kindle!


Available worldwide!
Search 'ChibiAkumas' on
your local Amazon website!
Click here for more info!


Buy my Assembly programming book
on Amazon in Print or Kindle!


Available worldwide!
Search 'ChibiAkumas' on
your local Amazon website!
Click here for more info!


Buy my Assembly programming book
on Amazon in Print or Kindle!


Available worldwide!
Search 'ChibiAkumas' on
your local Amazon website!
Click here for more info!


Buy my Assembly programming book
on Amazon in Print or Kindle!


Available worldwide!
Search 'ChibiAkumas' on
your local Amazon website!
Click here for more info!


Buy my Assembly programming book
on Amazon in Print or Kindle!


Available worldwide!
Search 'ChibiAkumas' on
your local Amazon website!
Click here for more info!


Buy my Assembly programming book
on Amazon in Print or Kindle!


Available worldwide!
Search 'ChibiAkumas' on
your local Amazon website!
Click here for more info!


Buy my Assembly programming book
on Amazon in Print or Kindle!


Available worldwide!
Search 'ChibiAkumas' on
your local Amazon website!
Click here for more info!


Buy my Assembly programming book
on Amazon in Print or Kindle!


Available worldwide!
Search 'ChibiAkumas' on
your local Amazon website!
Click here for more info!


Buy my Assembly programming book
on Amazon in Print or Kindle!


Available worldwide!
Search 'ChibiAkumas' on
your local Amazon website!
Click here for more info!


Buy my Assembly programming book
on Amazon in Print or Kindle!


Available worldwide!
Search 'ChibiAkumas' on
your local Amazon website!
Click here for more info!


