

Z80 Assembly programming for the Spectrum Next
| The Spectrum Next is a FPGA based
enhanced version of the ZX Spectrum A Kickstarted was completed May 2015 - and many of the backers have their hardware, however at the time of writing it's not possible for the public to buy the machine, Despite this, we can write software for the Spectrum Next using emulation |
 |
 |
 |
|
|
Setting Up Zesarux for Spectrum Next with MMC
| By Default Zesarux will need some setup to emulate the Next...
otherwise you'll get an 'Error initializing SD card!' errror... We need to set up the Boot MMC... to do this, go to the Storage menu and select MMC Select the MMC file, and enable MMC Emulation, and DIVMMC Ports |
 |
| Now go to the Machine menu, and select VTrucco/FB Labs ... then TBBLue |  |
| You'll probably get a black screen with a green border and a LOT
of beeping! Go into Settings and Display... and turn on Real Video Then press enter to start the Next boot. |
 |
Fast booting for developing!
| The NEXT brings the speccy really into the 21st century... in the
sense that it takes a blooming age to boot! Fortunately, if we're just using the graphics hardware, we can disable the firmware, and basically just boot to a 48k speccy rom. In the Settings menu select the hardware menu, and enable TBBlue fast boot mode - Our emulator will boot much faster! |
 |
Now, this is all well and good, but we probably want to start our emulator from a batch script, below is the startup command I use, with a custom config file specified (in the same folder as the emulator), this will load quickly as a Spectrum Next, with the tape file '\%tapefile%' - Just specify a valid spectrum TAP file.. zesarux.exe --machine TBBlue --tape \%tapefile% --configfile .zesaruxrc --tbblue-fast-boot-mode --nosplash --nowelcomemessage --quickexit Want to know how to create a valid TAP file for the Spectrum NEXT? we'll it's exactly the same as the regular spectrum... see my Hello World tutorial Here |
|
Bitmap Hello world in 256 color mode (Layer 2) example!
Lets create a simple(ish) 'Hello World' that uses a bitmap font in 256 color mode.
Download the Sourcecode (ZXN_HelloWorld_WithMonitor.asm)
Want
to learn how to make a TAP? see my Spectrum Hello World Tutorial
Watch
on Youtube
Setting up our screen!
| We're going to use two of the Spectrum Next's special Z80
commands... these cant be compiled by our assembler, so we'll define
macros to compile the bytecode, These commands will set the 256 internal registers of the NEXT quickly - which is what we need to use the 256 color hardware These could also be simulated by an OUT to &243B (with the register number) and then an OUT to &253B (with the value) |
 |
| We're going to start our code at &8000 - but this is not a special requirement of the NEXT... it's just how my loader code works for my spectrum tapes. |  |
| We're going to set a few registers to get our palette set up
&43 selects our palette... and then &40 selects the next
palette entry we're going to change... We then write 1 byte per color to Next Reg &41 to set each color - each takes a single byte in %RRRGGGBB format |
  |
| Ok, we've set up our palette... but lets make sure our Layer 2
screen is set up right... We need to reset the hardware scroll so Byte 0 is the top left of the screen... we do this with Next Registers &16 and &17 We also want to define the Layer 2 (256 color layer) screen area to make it cover the normal screen (0,0)-(255,191)... we do this with 4 consecutive writes to &18 |
 |
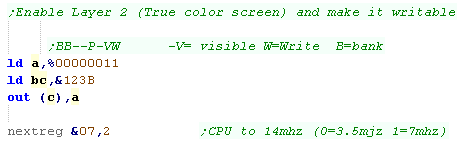
| Ok... So we want to SEE Layer 2... well actually we want to change
it too! We do this by OUTing port &123B... Bit 1 of this port makes the screen visible... Bit 0 allows us to write to it by writing to the usually ROM area at &0000-&3FFF &0000-&3FFF will still read as ROM... but writes will go to the screen... however the screen is 48k, and the &0000-&3FFF area is only 16k... so we need to split the screen into 3 banks... these are selected with Bits 6 and 7 As a bonus, lets turn the CPU to fast mode (14mhz) we do this by writing 2 to Next Register &07 |
 |
Test Pattern!
| Lets fill the top 1/3rd of the screen with consecutive bytes...
this will allow us to see all the colors the SpecNext offers us! We'll loop |
 |
| We can see the result to the screen! | 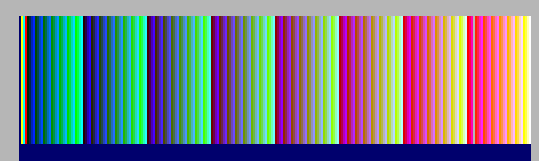 |
Screen locations and Printing A character
| We're going to create a function to return a memory location in HL
based on an X,Y co-ordinate in B,C We'll also page in the correct memory bank in the &0000-&3FFF Because each line is 256 pixels - and each pixel is 1 byte... it's easy to calculate... The low byte of the address is just the Xpos... and the high byte is the Ypos... BUT - we need to deal with the banking... so we take the top 2 bits off the Ypos, and use these as the bank number... We use these two bits with port &123B to page in the correct bank in the &0000-&3FFF range - and return the address in that range in HL |
 |
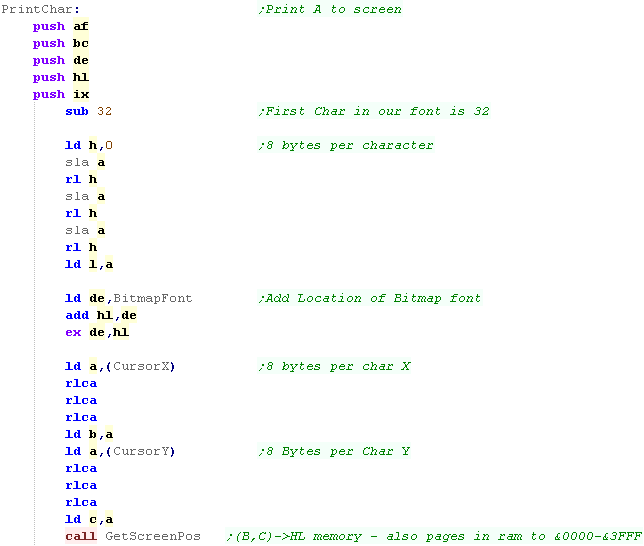
| Lets create a PrintChar command - to show the Accumulator from our
bitmap font! We'll use the 1bpp font we used in the main tutorials... it has no characters below character 32, and uses 8 bytes per character... We subtract 32 from A, and multiply it by 8 to calculate the offset in our font of the character we want... Next we load the X,Y pos of the 'cursor' from address CursorX and CursorY... each character is 8x8 pixels, so we multiply both by 8, and use GetScreenPos to calculate the address the character should be printed. |
 |
| We need to convert our 1bpp font into 8bpp screen bytes... we do
this by reading each byte of our font from DE, Our Screen address is in HL... we back this up with a PUSH HL We shift a bit off the left of the byte, and put it into a screen byte... we repeat this 8 times (with B as a counter)... we've done one line... Now we need to do the next line... we restore the old address with POP HL... as each line is 256 bytes wide... INC H will move us down a line... We now use IXL as a counter for the 8 lines of our font. |
 |
| We've printed the character, but we want to increase CursorX so
the next character will be printed to the right of the last... we also need to check if we've reached the end of the line, and move down a line with the NewLine function |
 |
| The result can be seen! | 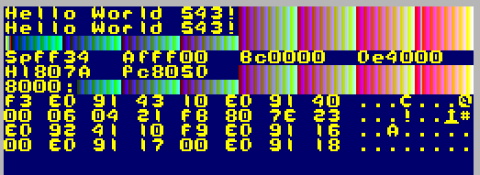 |
Download the Sourcecode (ZXN_HelloWorld_WithMonitor.asm)
Want to learn how to make a TAP? see my Spectrum Hello World Tutorial
Z80 Extended commands and macros
The Spectrum Next CPU isn't just a faster processor, it has special
commands added to it... if our assembler does not support them, we can
emulate these with macros, or use alternate commands.
| Instruction | Function | Macro with Bytecode | Equivalent commands |
| NextReg n,A | Set one of the Spectrum Next exclusive hardware registers from Accumulator | macro nextregA,reg db &ED,&92,\reg endm |
push bc ld bc,&243B push af ld a,\reg out (c),a inc b pop af out (c),a pop bc |
| NextReg n,v | Set one of the Spectrum Next exclusive hardware registers | macro nextreg,reg,val db &ED,&91,\reg,\val endm |
push bc ld bc,&243B push af ld a,\reg out (c),a inc b pop af ld a,\val out (c),a pop bc |
| GetNextReg v | Read a Next reg | (No byte equivalent) | macro GetNextReg,reg push bc ld bc,&243B ld a,\reg out (c),a inc b in a,(c) pop bc endm |
| OutiNB | Out (C),(HL)... inc HL (BC Unchanged) | macro outinb db &ED,&90 endm |
outi inc b |
| Mirror | Swap bits in Accumulator %76543210 -> %01234567 | macro mirror db &ED,&24 endm |
|
| PixelAd | Get pixel Address of (X,Y) co-ordinate (E,D) on standard screen... returned in HL | macro PixelAd db &ED,&94 endm |
|
| PixelDn | Move HL down one pixel line on standard screen | macro PixelDn db &ED,&93 endm |
Spectrum Links
Spectrum Next Wiki
ZESAURX - Spectrum Next Emulator (Called TBBlue)
B. Beginner series - Learn the basics
A. Advanced series - In more detail
M. Multiplatform series - programming methods that work on all systems
| View Options |
| Default Dark |
| Simple (Hide this menu) |
| Print Mode (white background) |
| Top Menu |
| ***Main Menu*** |
| Youtube channel |
| Patreon |
| Introduction to Assembly (Basics for absolute beginners) |
| Amazon Affiliate Link |
| AkuSprite Editor |
| ChibiTracker |
| Dec/Bin/Hex/Oct/Ascii Table |
| Alt Tech |
| Archive.org |
| Bitchute |
| Odysee |
| Rumble |
| DailyMotion |
| Please note: I wlll upload more content to these alt platforms based on the views they bring in |
| 68000 Content |
| ***68000 Tutorial List*** |
Learn 68000 Assembly  |
| Hello World Series |
| Platform Specific Series |
| Simple Samples |
| Grime 68000 |
| 68000 Downloads |
| 68000 Cheatsheet |
| Sources.7z |
| DevTools kit |
| 68000 Platforms |
| Amiga 500 |
| Atari ST |
| Neo Geo |
| Sega Genesis / Mega Drive |
| Sinclair QL |
| X68000 (Sharp x68k) |
| 8086 Content |
| Learn 8086 Assembly |
| Platform Specific Series |
| Hello World Series |
| Simple Samples |
| 8086 Downloads |
| 8086 Cheatsheet |
| Sources.7z |
| DevTools kit |
| 8086 Platforms |
| Wonderswan |
| MsDos |
| ARM Content |
| Learn ARM Assembly |
| Learn ARM Thumb Assembly |
| Platform Specific Series |
| Hello World |
| Simple Samples |
| ARM Downloads |
| ARM Cheatsheet |
| Sources.7z |
| DevTools kit |
| ARM Platforms |
| Gameboy Advance |
| Nintendo DS |
| Risc Os |
| Risc-V Content |
| Learn Risc-V Assembly |
| Risc-V Downloads |
| Risc-V Cheatsheet |
| Sources.7z |
| DevTools kit |
| MIPS Content |
| Learn Risc-V Assembly |
| Platform Specific Series |
| Hello World |
| Simple Samples |
| MIPS Downloads |
| MIPS Cheatsheet |
| Sources.7z |
| DevTools kit |
| MIPS Platforms |
| Playstation |
| N64 |
| PDP-11 Content |
| Learn PDP-11 Assembly |
| Platform Specific Series |
| Simple Samples |
| PDP-11 Downloads |
| PDP-11 Cheatsheet |
| Sources.7z |
| DevTools kit |
| PDP-11 Platforms |
| PDP-11 |
| UKNC |
| TMS9900 Content |
| Learn TMS9900 Assembly |
| Platform Specific Series |
| Hello World |
| TMS9900 Downloads |
| TMS9900 Cheatsheet |
| Sources.7z |
| DevTools kit |
| TMS9900 Platforms |
| Ti 99 |
| 6809 Content |
| Learn 6809 Assembly |
| Learn 6309 Assembly |
| Platform Specific Series |
| Hello World Series |
| Simple Samples |
| 6809 Downloads |
| 6809/6309 Cheatsheet |
| Sources.7z |
| DevTools kit |
| 6809 Platforms |
| Dragon 32/Tandy Coco |
| Fujitsu FM7 |
| TRS-80 Coco 3 |
| Vectrex |
| 65816 Content |
| Learn 65816 Assembly |
| Hello World |
| Simple Samples |
| 65816 Downloads |
| 65816 Cheatsheet |
| Sources.7z |
| DevTools kit |
| 65816 Platforms |
| SNES |
| eZ80 Content |
| Learn eZ80 Assembly |
| Platform Specific Series |
| eZ80 Downloads |
| eZ80 Cheatsheet |
| Sources.7z |
| DevTools kit |
| eZ80 Platforms |
| Ti84 PCE |
| IBM370 Content |
| Learn IBM370 Assembly |
| Simple Samples |
| IBM370 Downloads |
| IBM370 Cheatsheet |
| Sources.7z |
| DevTools kit |
| Super-H Content |
| Learn SH2 Assembly |
| Hello World Series |
| Simple Samples |
| SH2 Downloads |
| SH2 Cheatsheet |
| Sources.7z |
| DevTools kit |
| SH2 Platforms |
| 32x |
| Saturn |
| PowerPC Content |
| Learn PowerPC Assembly |
| Hello World Series |
| Simple Samples |
| PowerPC Downloads |
| PowerPC Cheatsheet |
| Sources.7z |
| DevTools kit |
| PowerPC Platforms |
| Gamecube |
| Work in Progress |
| ChibiAndroids |
| Misc bits |
| Ruby programming |
Buy my Assembly programming book
on Amazon in Print or Kindle!


Available worldwide!
Search 'ChibiAkumas' on
your local Amazon website!
Click here for more info!


Buy my Assembly programming book
on Amazon in Print or Kindle!
Available worldwide!
Search 'ChibiAkumas' on
your local Amazon website!
Click here for more info!
Buy my Assembly programming book
on Amazon in Print or Kindle!
Available worldwide!
Search 'ChibiAkumas' on
your local Amazon website!
Click here for more info!