

Suck
Hunt 3D - Stereoscopic Op Wolf / Duck hunt parody!
Sprite Routines
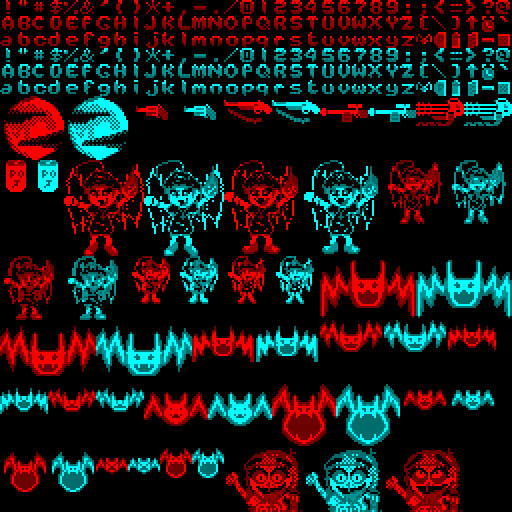
| The sprites for Suck hunt are held in two parts, one is the 'Raw
bitmap' data which is included from a file. The second is a table of the attributes of these sprites - the first is a word address of the sprite in ram (used to draw the sprite), the second is a Width/Height of the sprite in pixels - this is used for collision detection and drawing - though it needs to be coverted to logical units for collision detection and sprite centering or bytes for drawing. |
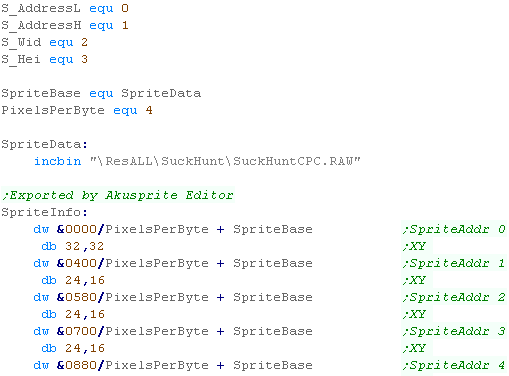 |
| Both of these are saved via Akusprite Editor |
 |
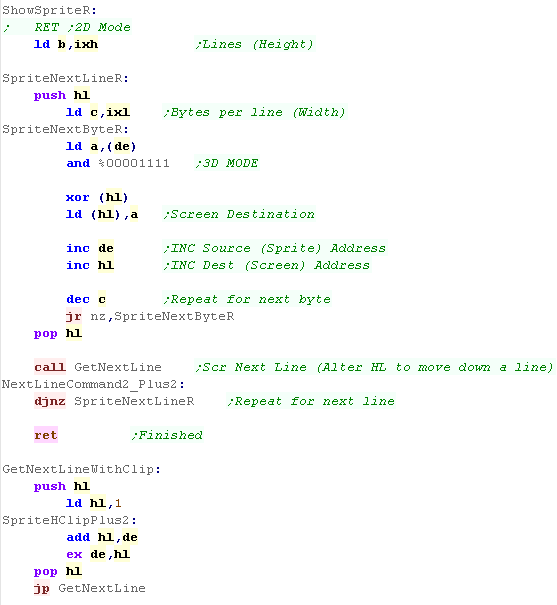
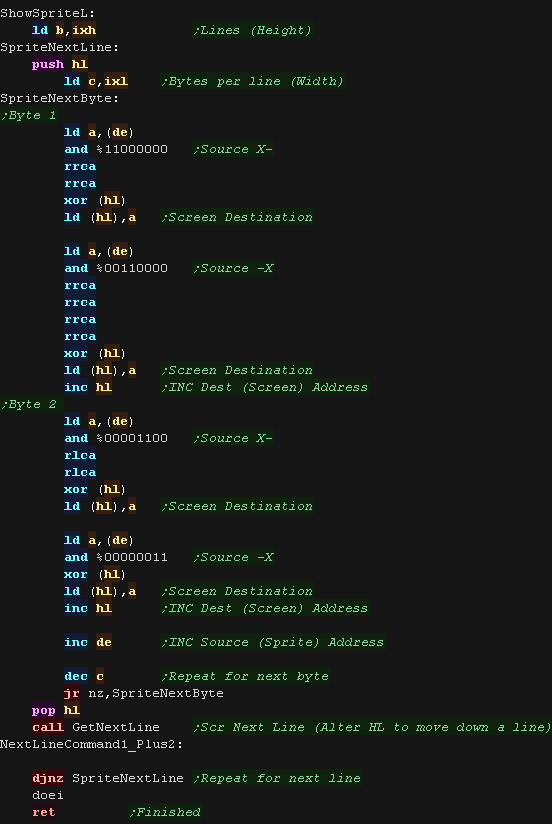
| The sprites are 4 color, but we convert them to 2 color with a
mask with "and %00001111" in 3D mode (This is disabled by
selfmodifying code in 2D mode) We load the sprite data frim DE and We XOR with the current pixels on the screen (HL) The GetNextLine routine is also Self-modified if the sprite needs cropping |
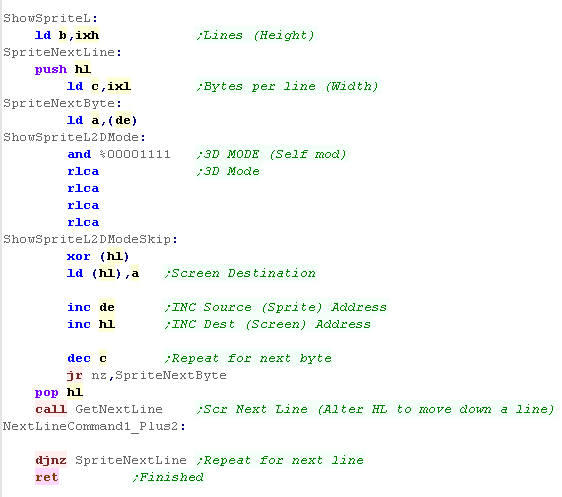 |
| If 3D mode is enabled we draw the 'Right hand eye' sprite (This is
disabled in 2d mode) Note we don't bit-shift the sprite data after the mask as we're using the other colors to create the 3d effect. |
 |
Tilemaps
| The Tilemaps use 8x8 bitmap sprites. These are 4 color, and if
they are 3d, the 3d is precalculated in the bitmap (a single draw,
not created by drawing 2 offset layers) Tiles numbered 0-254 are represented in the tilemap in a single byte ... tile numbers >=255 are represented by a pair of bytes - the first is 255, the second is added (this saves using two bytes for the first 254)... for example: 255,3 will show tile number 258 |
 |
| Our Tilemap routine is used for the title screen and gameover. It uses the 8x8 pixel font routine to show the tiles. |
 |
| The Char routines also use the 3D sprite routines, they modify the
'SprChar' sprite def, setting it's X,Y,Z and data source, then
showing the sprite to the screen. By sharing the 3D sprite routine, the number of modules that need re-writing to port to a new system |
 |
| The intro graphics are fun, but they are only shown quickly when
the game starts. There wasn't enough memory left for these, so to save memory the tiles are 8x4 rather than 8x8 - we show each line twice to fill the space, but we've saved 50% of the memory, and no-one will ever notice(!) On the CPC Suck Hunt is a 464 based 'single load' game, meaning no reloads after the game starts and no memory upgrade needed. As 16k of the 64k is used by the screen (not to mention Disk loading routines and stack) theres a maximum of 48k available to us... SuckHunt uses 42k! The Speech was a last minute addition - as there were still a few bytes to spare! |
 |
| Suck Hunt 3D has a lot of platform specific code,
which meant it was much harder to port to other systems. This is far from ideal, but there is a trade off... a simple game like Yquest could be ported in a day or two... a better quality game like this took 2 weeks or more per platform:-( |
 |
 |
Multiload and
128k games may be clever and impressive, but they are hard to
code, test and plan for, and some people prefer the 464 capable
games anyway. If you're a hobbist, there's no shame in writing a smaller game and saving yourself some stress and time... It's not like a successful hugely complex game will make you big money anyway! |
Music!
| SuckHunt uses ArkosTracker 1 for music. The version is something I
call 'ArkosTracker Lite' - it's been cut down in size, and altered
to work from ROM and on the Gameboy CPU! The music is played by an IM1 Interrupt handler. When the game starts, we patch in a jump to this interrupt hander at address &0038 (RST7) |
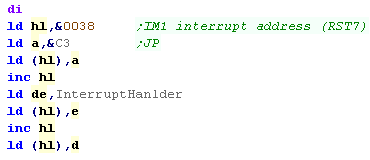 |
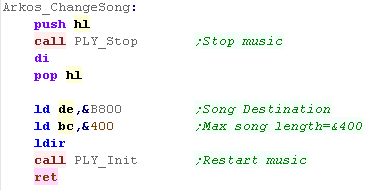
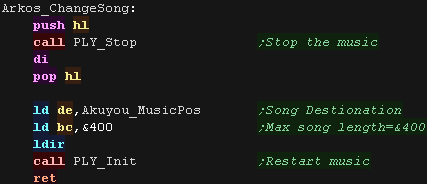
| The cut down tracker I use is hard coded-play from a single
address (&&B800) - we transfer the song we want to play to
this address with a LDIR. |
 |
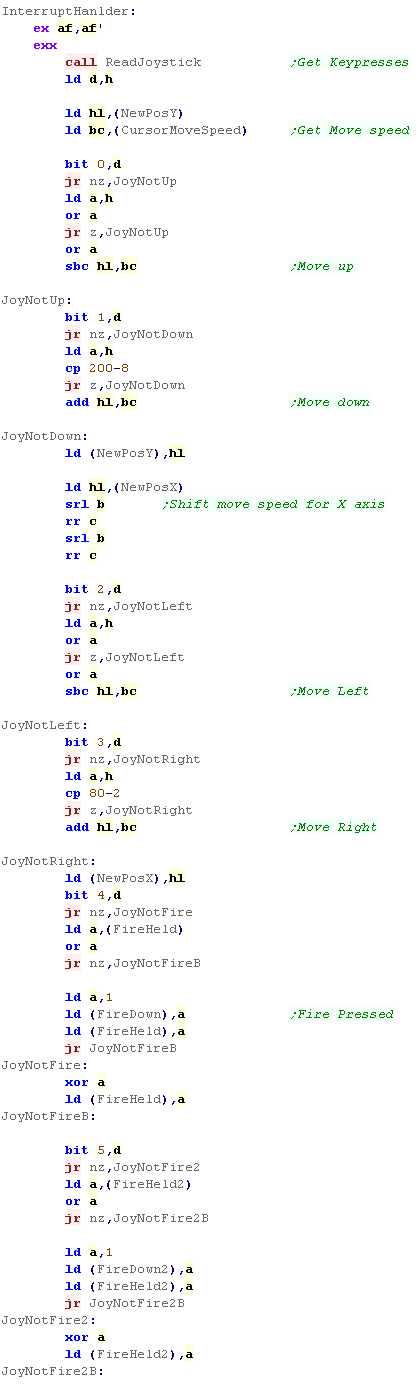
| To allow the cursor to move quickly (important for mouse reading)
we read the joystick and move the cursor during the interrupt
handler (runs 6 times per frame) We don't actually have time to draw the sprite at this time. We read the joystick and test the current position, moving in that direction if we're not already at the edge. |
 |
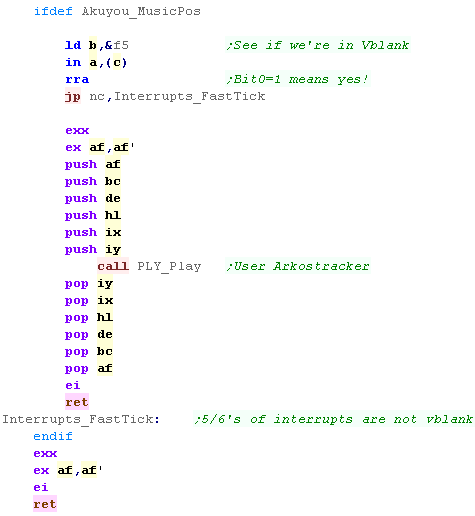
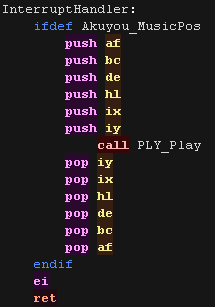
| The CPC interrupts 6 times per frame, but we only want to update
the music during actual Vblank. We test bit 0 of port &xxF5 - if it's 1 then we're in VBLANK so we update the music. we have to back up all the registers before calling Arkostracker - as it changes everything!!! |
 |
 |
Lesson
SH11 - Amstrad CPC code Part 2 - Amazing(?) Intro! Lets take a look at more of the CPC source! |
 |
 See
SuckHunt
folder
|
 |
| We're
not going to cover all of the source code here, just the most
interesting bits! If you want to see all the source in all it's glory(?)... download the source and take a peek... that's what it's there for! Stop expecting us to do everything for you! :-P |
 |
Intro Animations and title screen
| The intro sequence is as series of 4 x 2 frame animations. They appear in different corners, and colors |
 |
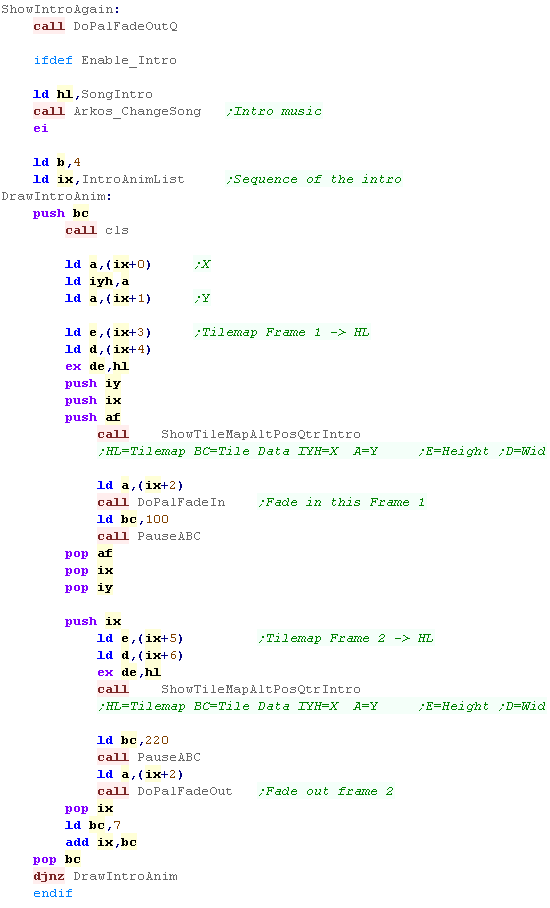
| There is a 'list' of these mini tilemaps used for the intro loop | 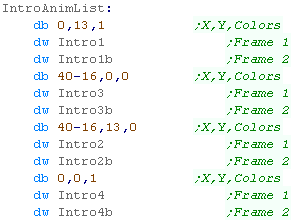 |
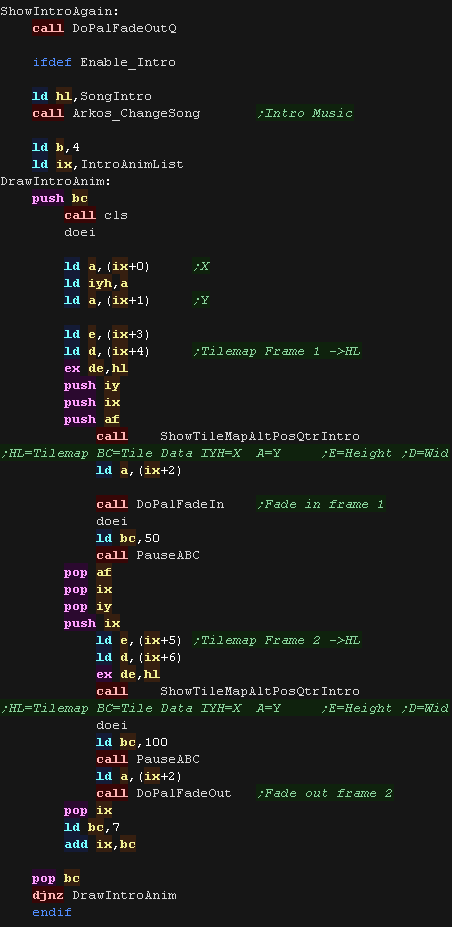
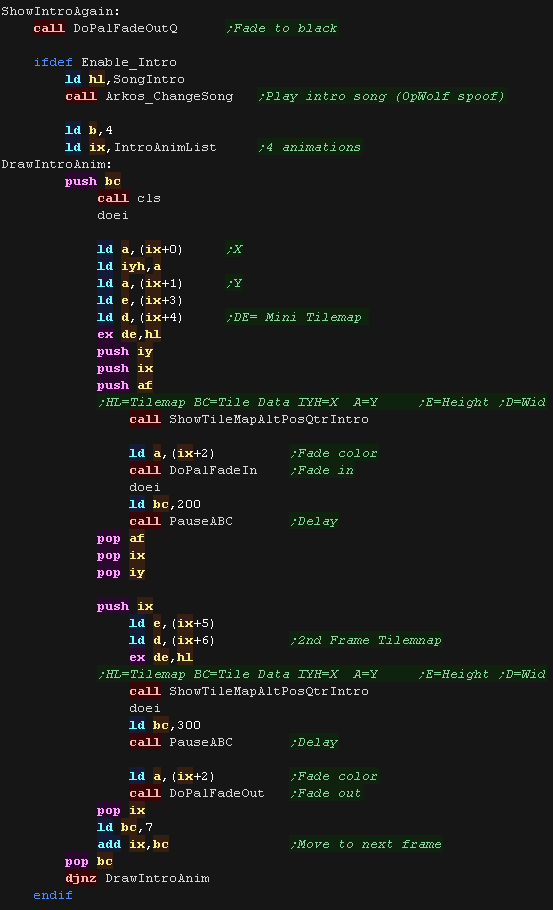
| The Draw routine loops 4 times. The X,Y pos and Color are loaded from the list, and the address of the first frame tilemap. The first frame is shown while the screen is black, then the fade-in occurs. The second frame is then shown and the screen fades out. |
 |
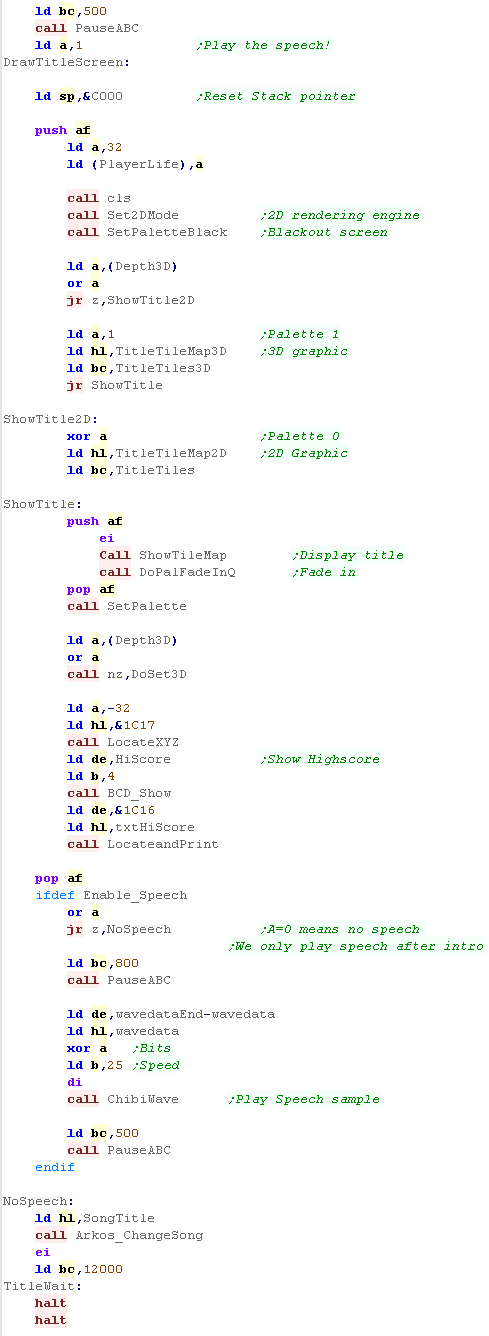
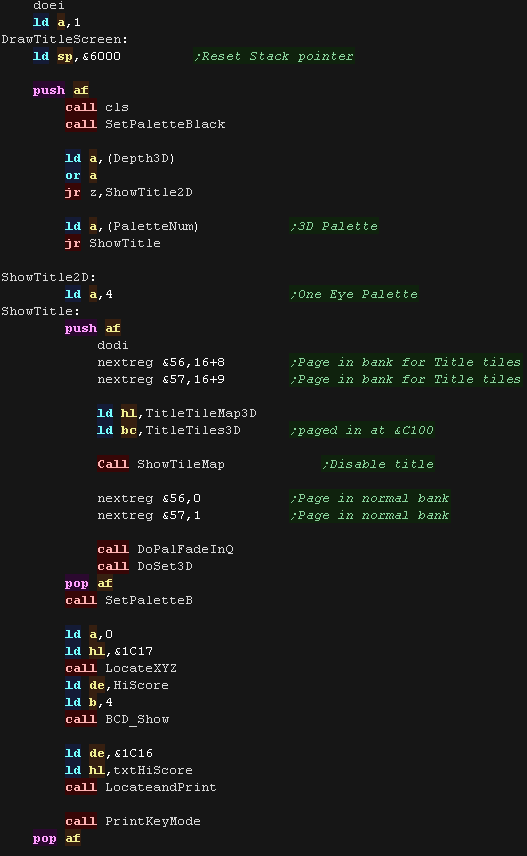
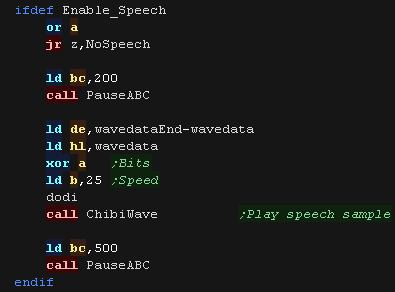
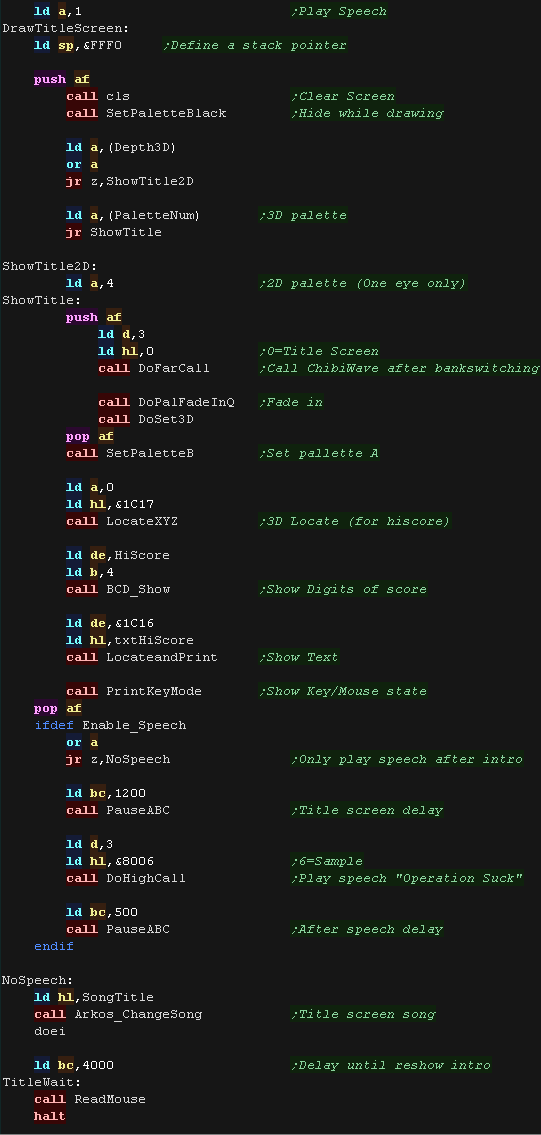
| When the title starts, we show the Title graphic (it's a tilemap,
as this saves memory on the 'reusued parts' The Highscore is also shown. There is a silly 'Operation Suck' speech sample which is played (a parody of OpWolf) - This uses the 'ChibiWave' Driver we covered in a previous lesson! |
 |
Palettes and 3D
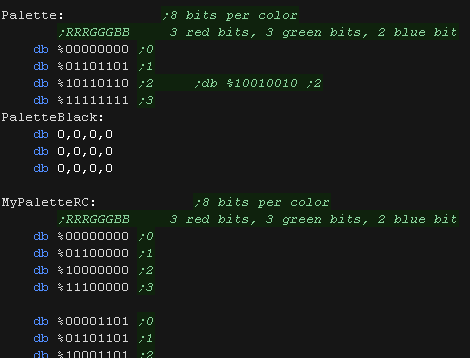
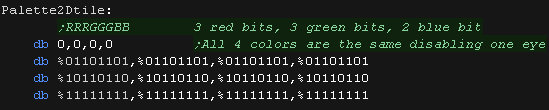
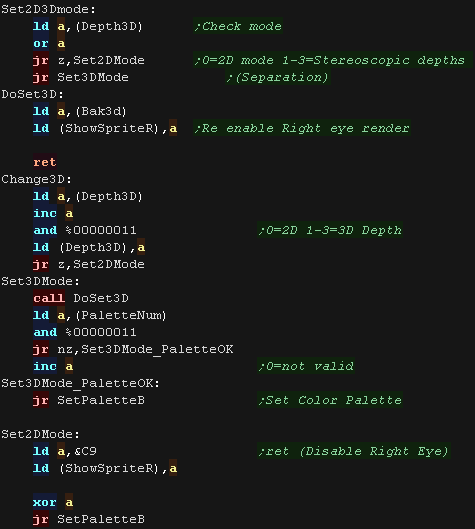
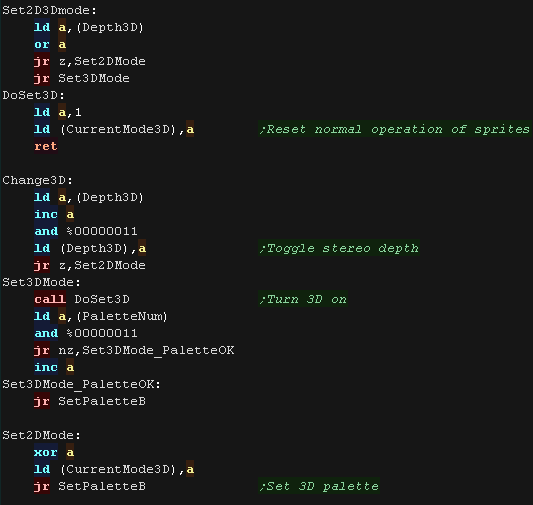
| The game has 4 possible palettes - the first is used in 2D mode, the other 3 are for the 3 different Analgyph glasses we may use. | 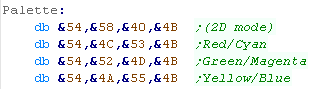 |
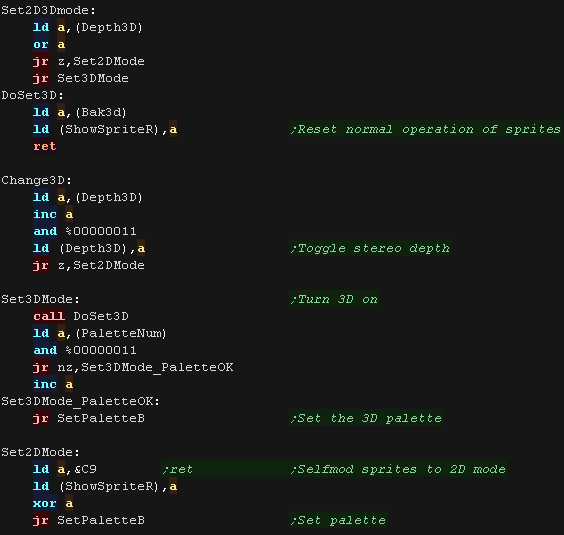
| 3D Depth can be toggled between 4 options: 0 is 0ff, 1-3 are different separations between the two eyes. There are also 4 palettes... 0 is only used by 2D mode, the others are used by 3D mode for the supported 3D glasses 2D mode is enabled by self-modifying code, putting a RET at the start of the Right Eye code (disabling it) and a relative jump in the left eye code, disabling the color mask (keeping all 4 colors) 3D mode is enabled by 'restoring' the original bytes from a backup |
 |
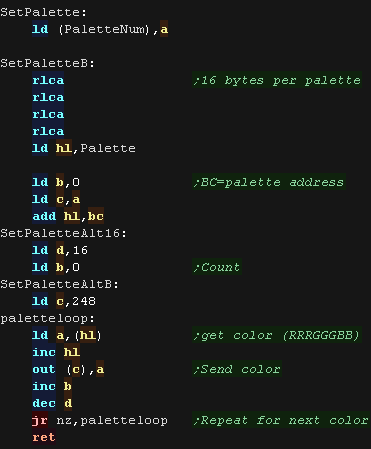
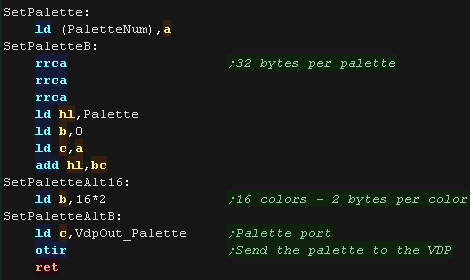
| The SetPalette routine sends the 4 colors to the video hardware. |
 |
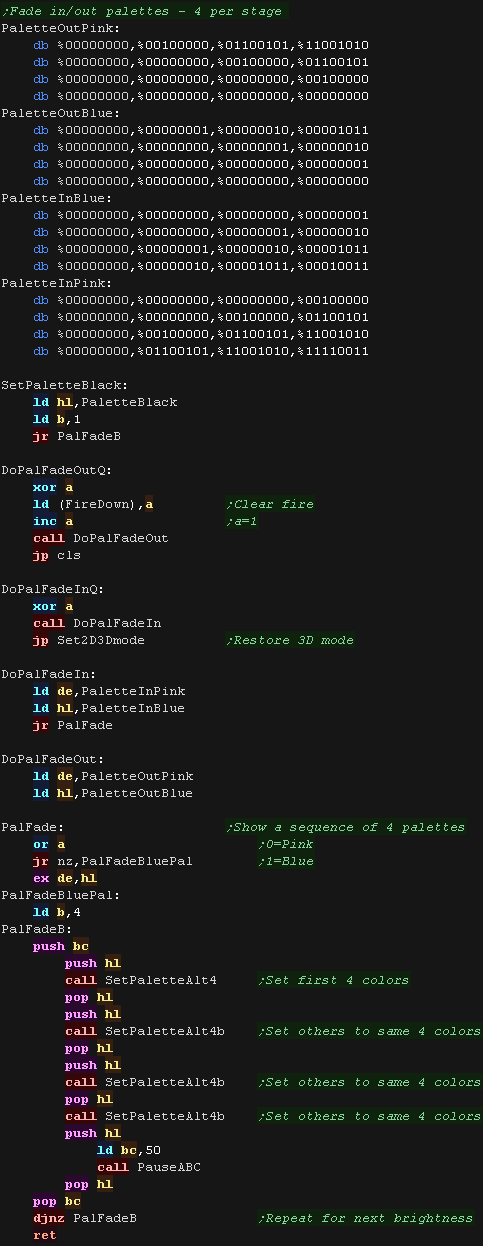
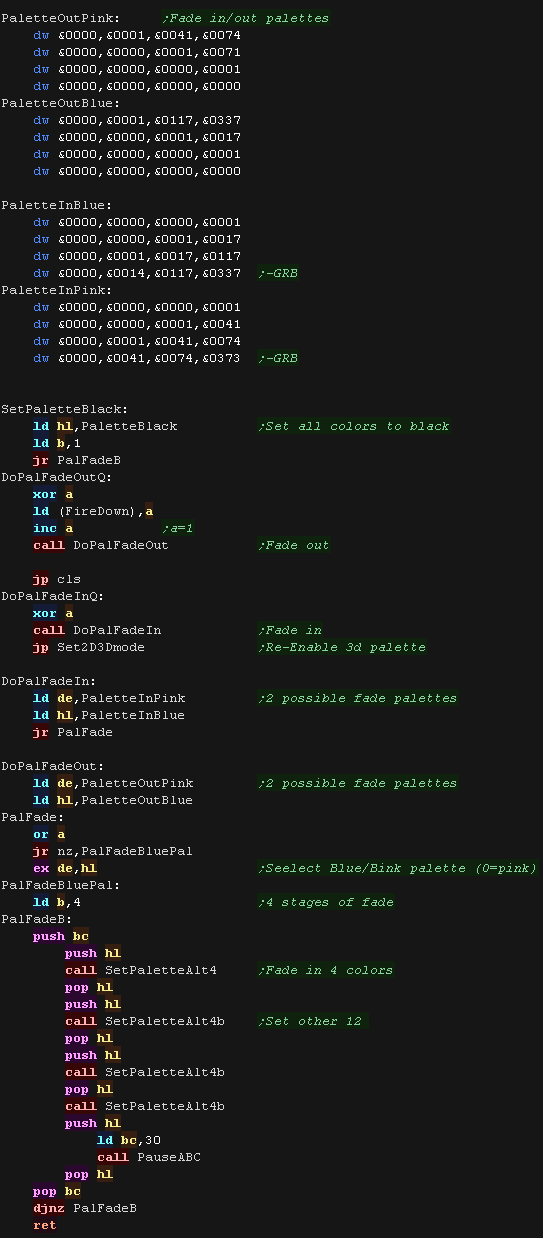
| Our fade routines also use the same 'SetPalette' routines. There are simply 4 palettes for each of the stages of the fade. DoPalFadeIn/Out routines use A as a palette option 0=Pink 1=Blue... these are used by the Intro routines to set the palette. The last stage of DoPalFadeOutQ is to clear the screen after fading to black. The last stage of DoPalFadeInQ is to set the true palette - enabling the 3D effect. |
 |
|
Lesson
SH12 - Amstrad CPC code Part 3 - The Rest! Lets finish off the CPC version of the game - we'll look at the main loop of the game! |
|
See
SuckHunt
folder
|
|
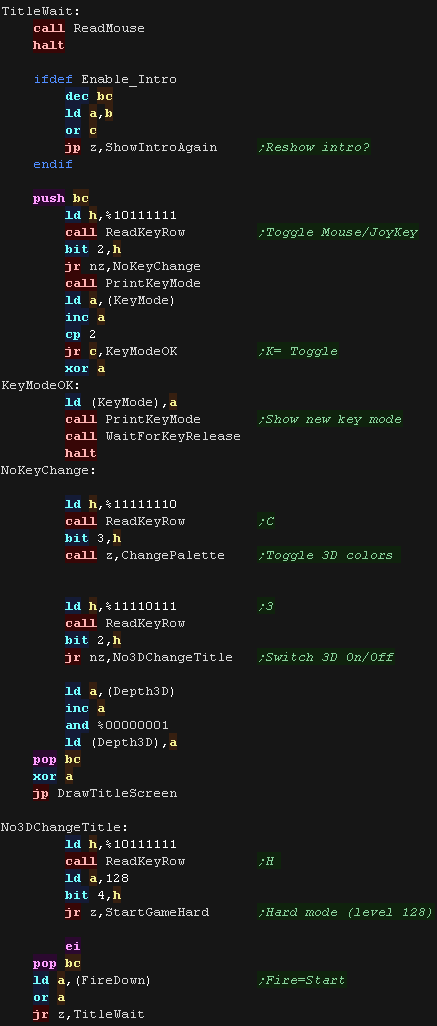
The title screen
| The Title screen is relatively simple, it waits for the player to
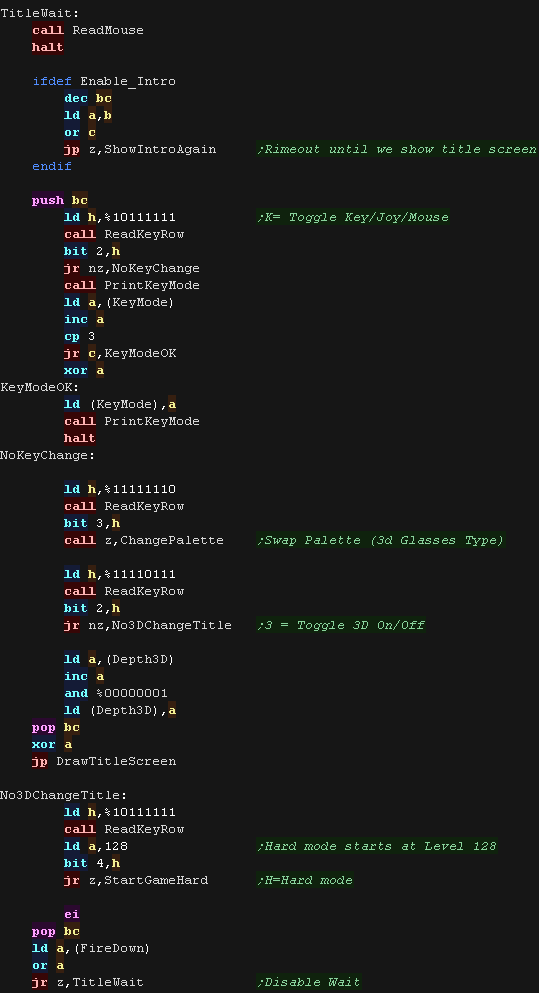
start the game, but it has a few tricky parts! BC is used as a 'timeout' - when it reaches zero the intro shows again. The 'C' key can be used to change the palette, this changes the 3D glasses type '3' can be used to toggle 3D On/Off... as there's a different titlescreen graphic for each, we have to redraw the title screen after making the change. 'H' can be used to start in 'Hard mode' - this sets the first level to number 128 (in the accumulator) When the player presses Fire, the game starts. |
 |
| When the game starts we set the first level number from A We start the main level music, and clear all the game variables to the defaults (NewGameData) |
 |
| The Level starts by setting up the sprites (enemies) and drawing the screen |  |
The main loop
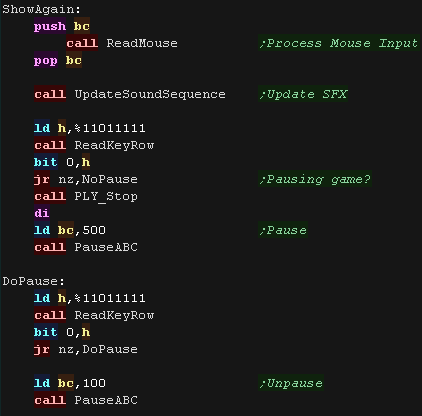
| At the start of the main loop we update the SFX - this updates the
sequence of any sound effect. Next we check the 'P' button and pause the game if it's pressed... there's a short delay, then we check for another 'P' to unpause. |
 |
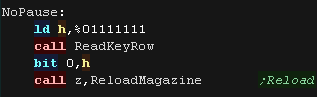
| Next we check the reload key (space) and reload if pressed |
 |
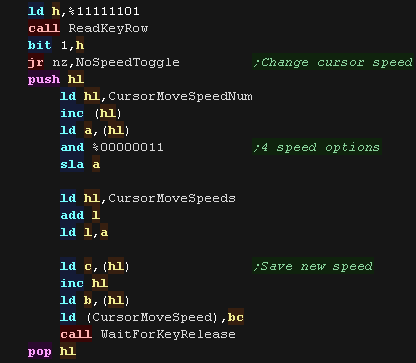
| Next we check the cursor speed key (C) - if it's pressed we toggle
between the 4 speeds. We load in the new speed from the CursorMoveSpeeds array, and store in CursorMoveSpeed - This is used during the interrupt handler |
 |
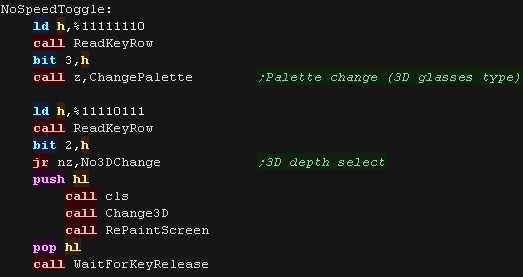
| Next we check the Palette and 3D toggle options. |
 |
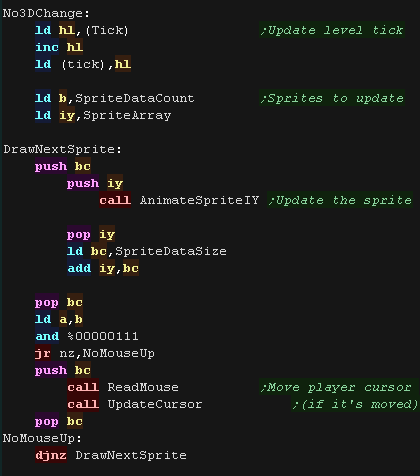
| We update the 'Tick' ... this is used to calculate the updates to
the sprites - as most sprites update every few ticks. We then process each of the sprites, updating their position and Sprite. After each we check the cursor, and update it as needed (to keep the cursor movement smooth) |
 |
| The 'Chibigun' (minigun) is a fully automatic weapon, so fires
every few ticks while fire is held... We check the tick, firestate and current gun to see if the Chibigun is firing. |
 |
| Next we check fire 2, and reload if required |  |
| Finally we update the cursor and repeat. |  |
Double Trouble!
| Suck hunt has more suck than a
single 48k load can handle! To 'Solve' the problem - we load the game in two parts. The game is loaded by a BAS loader, It will load and run multiple files from the same address - we can get these to transfer to the ram addresses we need This bas loader will load up to 4 parts... suck hunt only needs 2. |
 |
| The first part is the Title screen - we transfer this 16K block
into banks 24/25... It just returns to basic when done... basic will load in the next block!... this saves us writing a tape loader! The second part is the actual Game |
 |
|
We can write our
own loader in Assembly, but it's a lot of work... it's much easier
to let basic do the work! It will also be more compatible with weird 'disk/tape' emulators and custom roms that turn up later. |
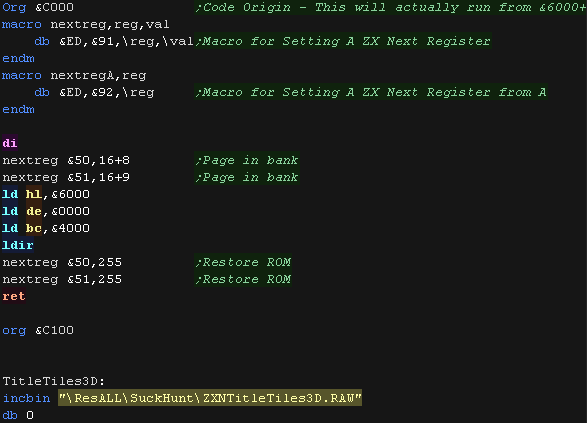
Sprite Routines
| The sprites for Suck hunt are held in two parts, one is the 'Raw
bitmap' data which is included from a file. The second is a table of the attributes of these sprites - the first is a word address of the sprite in ram (used to draw the sprite), the second is a Width/Height of the sprite in pixels - this is used for collision detection and drawing - though it needs to be converted to logical units for collision detection and sprite centering or bytes for drawing. |
 |
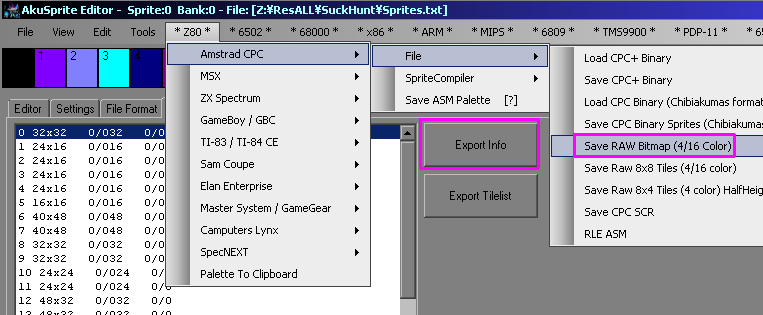
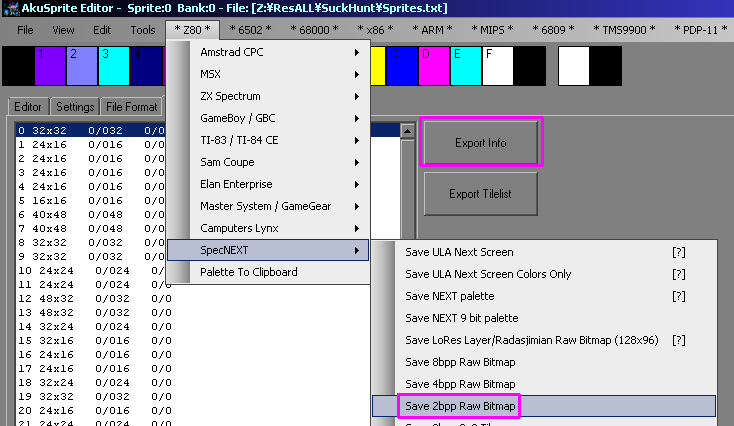
| Both of these are saved via Akusprite Editor |
 |
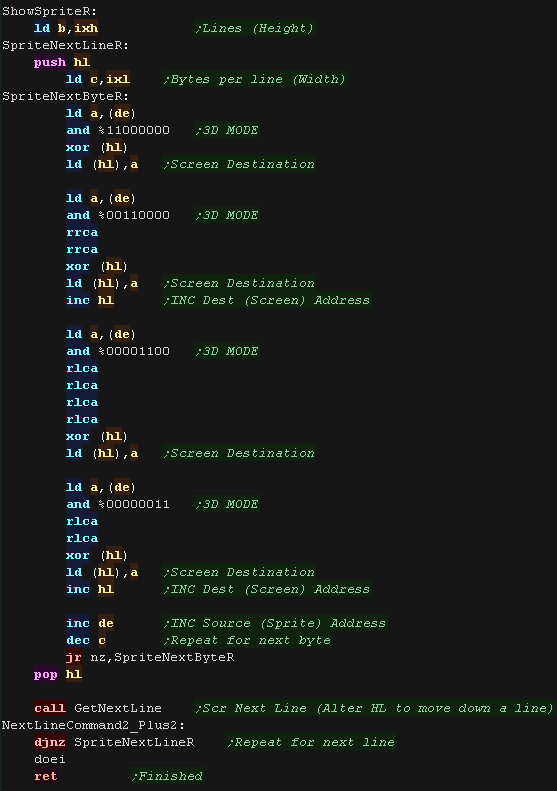
| Suck hunt runs in 256 color 'Layer 2' mode (though it actually
uses only 16 colors). The sprites are actually in 4 colors - so we need to split the 2bpp up, and shift them for the 4 screen bytes they occupy ShowSpriteL draws the first Eye. |
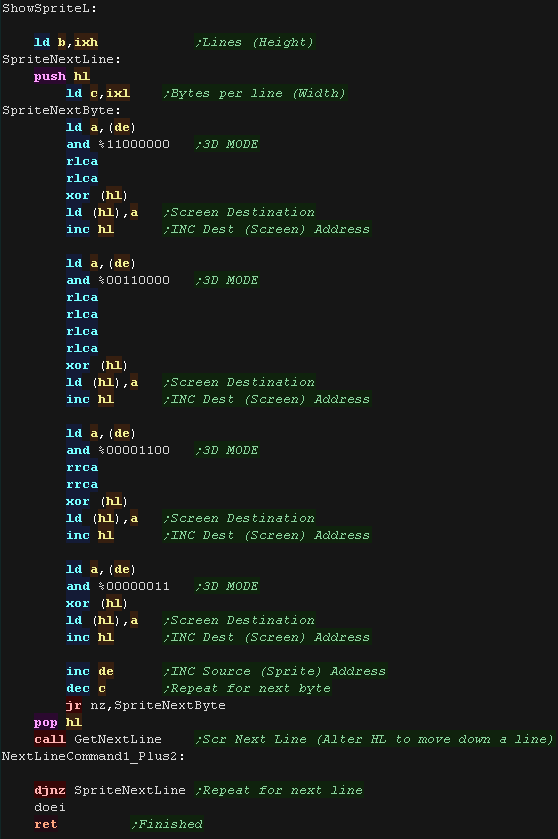 |
| If 3D mode is enabled we draw the 'Right hand eye' sprite (This is
disabled in 2d mode) The bits are shifted to use the other 4 colors, creating the 3D effect |
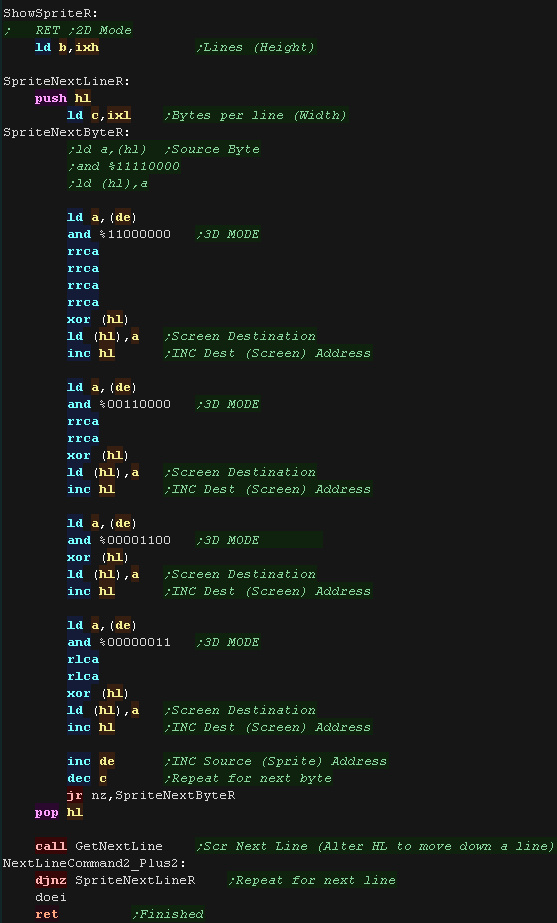 |
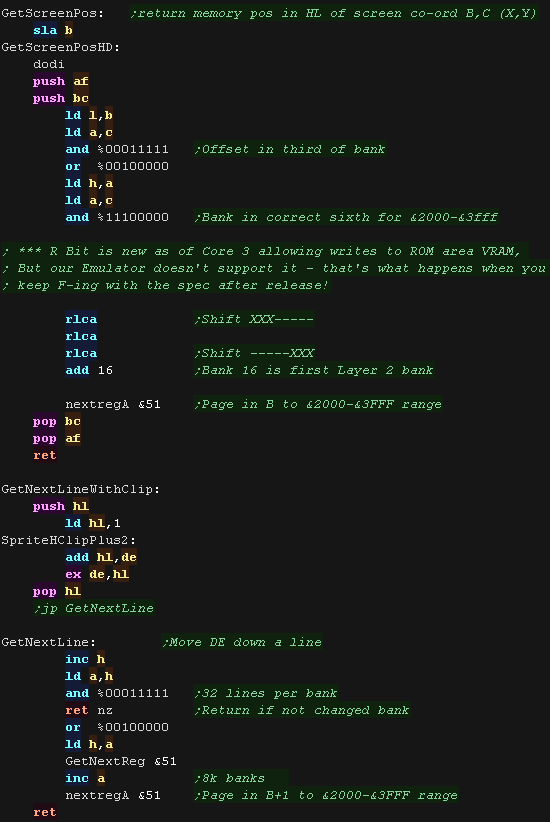
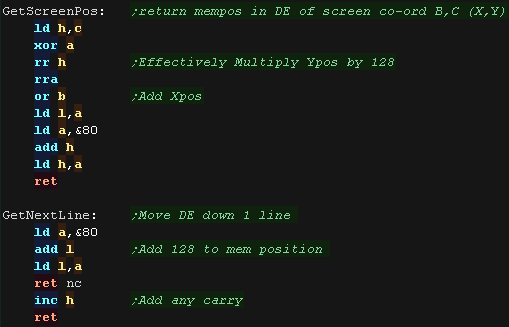
| The Layer 2 screen uses 48k... we page this in, in 6x 8k blocks
into the &2000-&3FFF range... this allows us to keep using
IM1 (which needs write access to &0038 GetNextLine handles paging in the next bank as needed (as we go down below the limit of a bank) GetNextLineWithClip is for partially offscreen sprites - it's enabled by self modifying code. |
 |
Tilemaps
| The Tilemaps use 8x8 bitmap sprites. These are 16 color. In 3D
mode all 16 colors are used. In 2D mode, 12 of the colors are 'hidden' by setting them to the equivalent of the other eye - disabling the second eye. Tiles numbered 0-254 are represented in the tilemap in a single byte ... tile numbers >=255 are represented by a pair of bytes - the first is 255, the second is added (this saves using two bytes for the first 254)... for example: 255,3 will show tile number 258 |
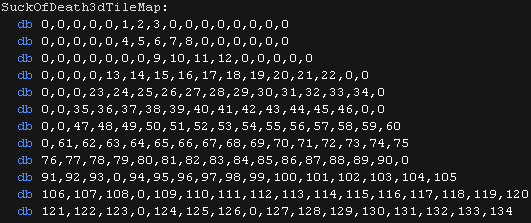 |
| Our Tilemap routine is used for the title screen and gameover. A tile number is loaded from the map, if it's over 255, we switch to the address of the second bank The 8x8 pixel font routine to show the tiles. |
 |
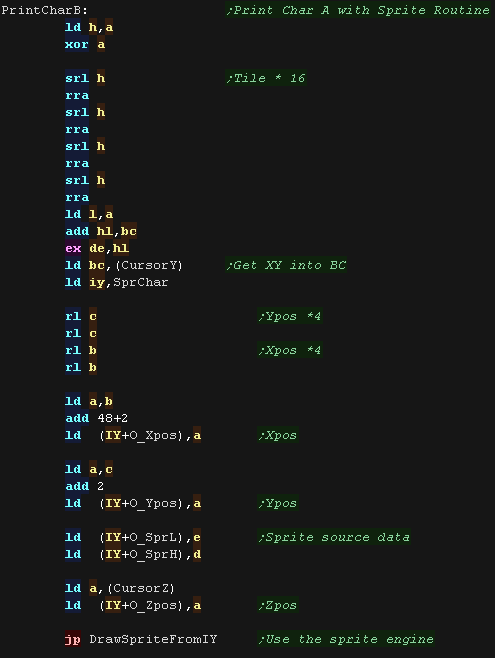
| The Char routines also use the 3D sprite routines, they modify the
'SprChar' sprite def, setting it's X,Y,Z and data source, then
showing the sprite to the screen. By sharing the 3D sprite routine, the number of modules that need re-writing to port to a new system |
 |
| The intro graphics are fun, but they are only shown quickly when
the game starts. There wasn't enough memory left for these, so to save memory the tiles are 8x4 rather than 8x8 - we show each line twice to fill the space, but we've saved 50% of the memory, and no-one will ever notice(!) On the CPC Suck Hunt is a 464 based 'single load' game, meaning no reloads after the game starts and no memory upgrade needed. As 16k of the 64k is used by the screen (not to mention Disk loading routines and stack) theres a maximum of 48k available to us... SuckHunt uses 42k! The Speech was a last minute addition - as there were still a few bytes to spare! |
|
| Suck Hunt 3D has a lot of platform specific code,
which meant it was much harder to port to other systems. This is far from ideal, but there is a trade off... a simple game like Yquest could be ported in a day or two... a better quality game like this took 2 weeks or more per platform:-( |
|
Music!
| SuckHunt uses ArkosTracker 1 for music. The version is something I
call 'ArkosTracker Lite' - it's been cut down in size, and altered
to work from ROM and on the Gameboy CPU! The music is played by an IM1 Interrupt handler. When the game starts, we patch in a jump to this interrupt hander at address &0038 (RST7) |
 |
| The cut down tracker I use is hard coded-play from a single
address (&4000) - we transfer the song we want to play to this
address with a LDIR. |
 |
| We update our music each Vblank - we need to protect all the
registers. |
 |
 |
Lesson
SH14 - Spectrum Next code Part 2 - Amazing(?) Intro! Lets take a look at more of the Spec Next source! |
|
See
SuckHunt
folder
|
|
| We're
not going to cover all of the source code here, just the most
interesting bits! If you want to see all the source in all it's glory(?)... download the source and take a peek... that's what it's there for! Stop expecting us to do everything for you! :-P |
|
Intro Animations and title screen
| The intro sequence is as series of 4 x 2 frame animations. They appear in different corners, and colors. |
|
| There is a 'list' of these mini tilemaps used for the intro loop | 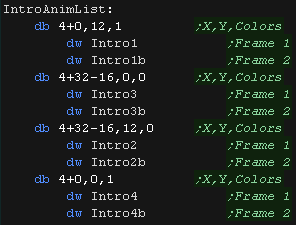 |
| The Draw routine loops 4 times. The X,Y pos and Color are loaded from the list, and the address of the first frame tilemap. The first frame is shown while the screen is black, then the fade-in occurs. The second frame is then shown and the screen fades out. |
 |
| We use the 3D tiltle graphic whether in 2D or 3D mode, we
'disable' one eye in 2D mode, by setting all it's colors to render
the second eye 'hidden' The graphics for the tilemap do not fit within 64k, so we page in the extra data at the &C000-&FFFF range. We page it out again once we've drawn the graphic The Highscore is also shown. |
 |
| After the title graphic There is a silly 'Operation Suck' speech
sample which is played (a parody of OpWolf) - This uses the
'ChibiWave' Driver we covered in a previous lesson! |
 |
Palettes and 3D
| The game has 4 possible palettes - the first is used in 2D mode,
the other 3 are for the 3 different Analgyph glasses we may use. We're using 1 byte per color mode. As each is 16 colors - they're very long, so they're not shown here. |
  |
| 3D Depth can be toggled between 4 options: 0 is 0ff, 1-3 are different separations between the two eyes. 2D mode is enabled by self-modifying code, putting a RET at the start of the Right Eye code (disabling it) 3D mode is enabled by 'restoring' the original bytes from a backup |
 |
| The SetPalette routine sends the 16 colors to the video hardware. Each uses a single byte. |
|
| Our fade routines also use the same 'SetPalette' routines. There are simply 4 colors for each of the stages of the fade. we use the 4 colors *4 times to fill the 16 colors DoPalFadeIn/Out routines use A as a palette option 0=Pink 1=Blue... these are used by the Intro routines to set the palette. The last stage of DoPalFadeOutQ is to clear the screen after fading to black. The last stage of DoPalFadeInQ is to set the true palette - enabling the 3D effect. |
 |
|
Lesson
SH15 - Spectrum Next code Part 3 - Title and Game code Lets take a look at more of the Spec Next source! |
|
See
SuckHunt
folder
|
|
The title screen
| The Title screen is relatively simple, it waits for the player to
start the game, but it has a few tricky parts! BC is used as a 'timeout' - when it reaches zero the intro shows again. The 'K' Key toggles Key control method (Cursor joystick / Kempson / Mouse) The 'C' key can be used to change the palette, this changes the 3D glasses type '3' can be used to toggle 3D On/Off... as there's a different titlescreen graphic for each, we have to redraw the title screen after making the change. 'H' can be used to start in 'Hard mode' - this sets the first level to number 128 (in the accumulator) When the player presses Fire, the game starts. |
 |
| When the game starts we set the first level number from A We start the main level music, and clear all the game variables to the defaults (NewGameData) |
|
| The Level starts by setting up the sprites (enemies) and drawing
the screen |
|
The main loop
| At the start of the main loop we process mouse input. update the SFX - this updates the sequence of any sound effect. Next we check the 'P' button and pause the game if it's pressed... there's a short delay, then we check for another 'P' to unpause. |
 |
| Next we check the reload key (space) and reload if pressed |
 |
| Next we check the cursor speed key (C) - if it's pressed we toggle
between the 4 speeds. We load in the new speed from the CursorMoveSpeeds array, and store in CursorMoveSpeed - This is used during the interrupt handler |
 |
| Next we check the Palette and 3D toggle options. |
 |
| We update the 'Tick' ... this is used to calculate the updates to
the sprites - as most sprites update every few ticks. We then process each of the sprites, updating their position and Sprite. After every few sprites we check the Mouse cursor, and update it as needed (to keep the cursor movement smooth) |
 |
| The 'Chibigun' (minigun) is a fully automatic weapon, so fires
every few ticks while fire is held... We check the tick, firestate and current gun to see if the Chibigun is firing. |
|
| Next we check fire 2, and reload if required | |
| Finally we update the cursor and repeat. | |
| The
Key / Mouse / Joystick are based on those covered in the platform
specific series, Please see the other tutorials if you want more info. |
 |
Sucky Sprites!
| The sprites for Suck hunt are held in two parts, one is the 'Raw
bitmap' data which is included from a file. The second is a table of the attributes of these sprites - the first is a word address of the sprite in ram (used to draw the sprite), the second is a Width/Height of the sprite in pixels - this is used for collision detection and drawing - though it needs to be converted to logical units for collision detection and sprite centering or bytes for drawing. |
|
| Both of these are saved via Akusprite Editor The format is the same as the SpecNext... They are 4 color 2bpp, but are converted to 16 color 4bpp in realtime |
|
| Suck hunt runs in 16 color mode The sprites are actually in 4 colors - so we need to split the 2bpp up, and shift them for the 2 screen bytes they occupy ShowSpriteL draws the first Eye. |
 |
| If 3D mode is enabled we draw the 'Right hand eye' sprite (This is
disabled in 2d mode) The bits are shifted to use the other 4 colors, creating the 3D effect |
 |
| The screen memory is in ram in the &8000-&FFFF range it's
paged in at all times during gameplay GetNextLineWithClip is for partially offscreen sprites - it's enabled by self modifying code. |
 |
Tilemaps
| The Tilemaps use 8x8 bitmap sprites. These are 16 color. In 3D
mode all 16 colors are used. In 2D mode, 12 of the colors are 'hidden' by setting them to the equivalent of the other eye - disabling the second eye. Tiles numbered 0-254 are represented in the tilemap in a single byte ... tile numbers >=255 are represented by a pair of bytes - the first is 255, the second is added (this saves using two bytes for the first 254)... for example: 255,3 will show tile number 258 |
|
| The Char routines also use the 3D sprite routines, they modify the
'SprChar' sprite def, setting it's X,Y,Z and data source, then
showing the sprite to the screen. By sharing the 3D sprite routine, the number of modules that need re-writing to port to a new system |
|
| Suck Hunt 3D has a lot of platform specific code,
which meant it was much harder to port to other systems. This is far from ideal, but there is a trade off... a simple game like Yquest could be ported in a day or two... a better quality game like this took 2 weeks or more per platform:-( |
|
2nd Bank!
| Our program will run from memory address &0100... but we need
to page out the top area of ram for the screen (&8000-&FFFF) We page this in to the &0000-&3FFF range... and we have a 'Jump block' with addresses we can call to use it's functions We have an 'alternative interrupt handler' in this bank, which handles bank switching to keep the music playing. |
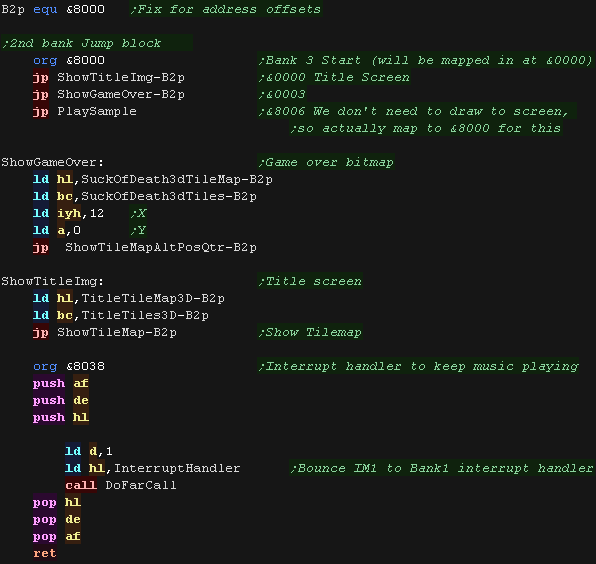 |
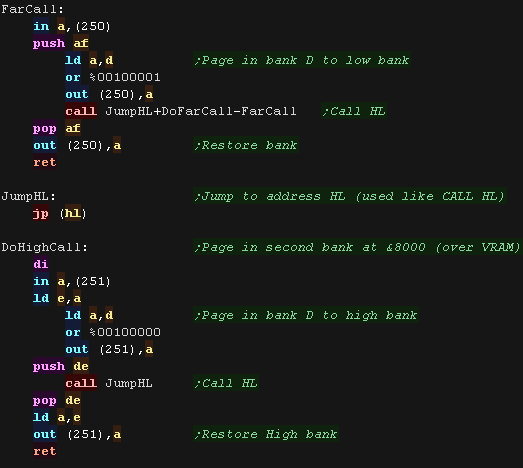
| We have some special functions to handle the bank switching "DoHighCall" pages in the 2nd bank to &8000-FFFF and calls a subroutine "FarCall" is transferred to &E000 - and is used to call subprograms loaded in the second bank at &0000-&7FFF |
 |
| Our Tilemap routine is used for the title screen and gameover. A tile number is loaded from the map, if it's over 255, we switch to the address of the second bank |
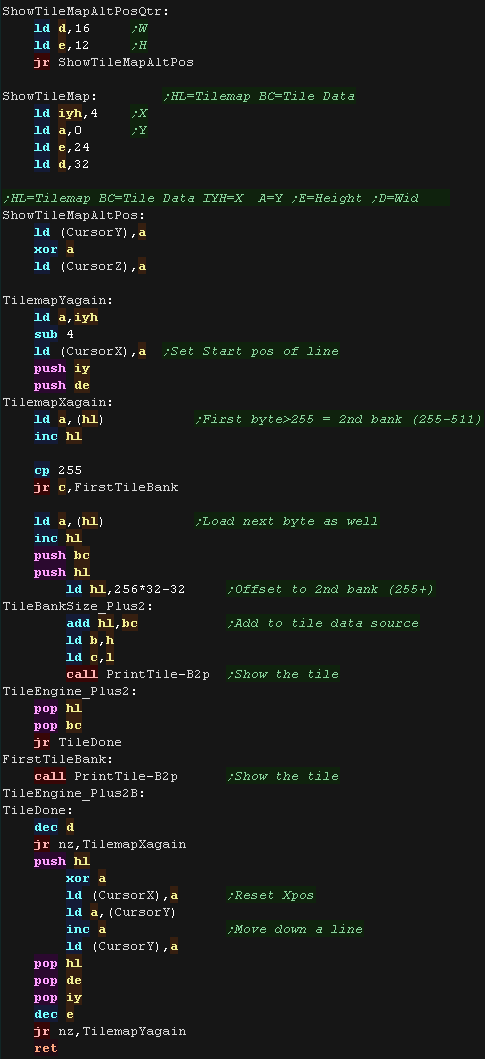 |
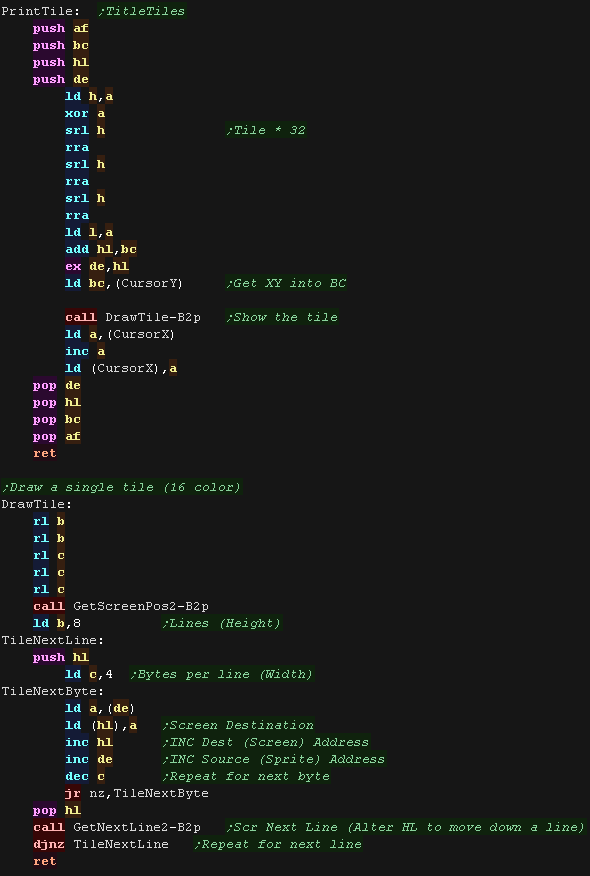
| The PrintTile routine will show the 16 color tiles to the
screen... these are used by the Title screen, and game over. The Intro animation uses half height tiles 8x4 to save memory. |
 |
 |
Lesson
SH17 - Sam Coupe code Part 2 - Tiles and palettes Lets take a look at the Tilemap, Palette and music code of the sam coupe version of the game |
|
See
SuckHunt
folder
|
|
Music!
| SuckHunt uses ArkosTracker 1 for music. The version is something I
call 'ArkosTracker Lite' - it's been cut down in size, and altered
to work from ROM and on the Gameboy CPU! The music is played by an IM1 Interrupt handler. When the game starts, we patch in a jump to this interrupt hander at address &0038 (RST7) |
|
| The cut down tracker I use is hard coded-play from a single
address (&F800 - after the screen RAM) - we transfer the song we
want to play to this address with a LDIR. |
|
| We update our music each Vblank - we need to protect all the
registers. |
|
Intro Animations and title screen
| The intro sequence is as series of 4 x 2 frame animations. They appear in different corners, and colors |
|
| There is a 'list' of these mini tilemaps used for the intro loop | |
| The Draw routine loops 4 times. The X,Y pos and Color are loaded from the list, and the address of the first frame tilemap. The first frame is shown while the screen is black, then the fade-in occurs. The second frame is then shown and the screen fades out. |
 |
| When the title starts, we show the Title graphic (it's a tilemap,
as this saves memory on the 'reusued parts' The Highscore is also shown. There is a silly 'Operation Suck' speech sample which is played (a parody of OpWolf) - This uses the 'ChibiWave' Driver we covered in a previous lesson... this is paged in the second bank |
 |
Palettes and 3D
| The game has 4 possible palettes - the first is used in 2D mode, the other 3 are for the 3 different Analgyph glasses we may use. | 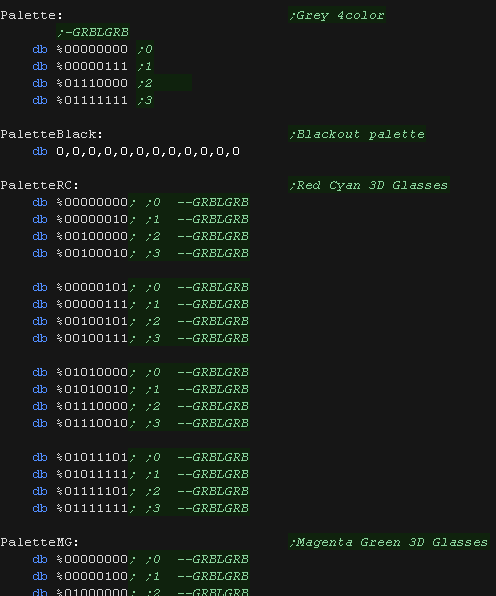 |
| 3D Depth can be toggled between 4 options: 0 is 0ff, 1-3 are different separations between the two eyes. There are also 4 palettes... 0 is only used by 2D mode, the others are used by 3D mode for the supported 3D glasses 2D mode is enabled by self-modifying code, putting a RET at the start of the Right Eye code (disabling it) and a relative jump in the left eye code, disabling the color mask (keeping all 4 colors) 3D mode is enabled by 'restoring' the original bytes from a backup |
 |
| The SetPalette routine sends the 16 colors to the video hardware. |
 |
| Our fade routines also use the same 'SetPalette' routines. There are simply 4 palettes for each of the stages of the fade. DoPalFadeIn/Out routines use A as a palette option 0=Pink 1=Blue... these are used by the Intro routines to set the palette. The last stage of DoPalFadeOutQ is to clear the screen after fading to black. The last stage of DoPalFadeInQ is to set the true palette - enabling the 3D effect. |
 |
|
Lesson
SH18 - Sam Coupe code Part 3 - Title and Game code Lets take a look at more of the Sam Coupe source! |
|
See
SuckHunt
folder
|
|
The title screen
| The Title screen is relatively simple, it waits for the player to
start the game, but it has a few tricky parts! BC is used as a 'timeout' - when it reaches zero the intro shows again. The 'K' Key toggles Key control method (Cursor joystick / Mouse) The 'C' key can be used to change the palette, this changes the 3D glasses type '3' can be used to toggle 3D On/Off... as there's a different titlescreen graphic for each, we have to redraw the title screen after making the change. 'H' can be used to start in 'Hard mode' - this sets the first level to number 128 (in the accumulator) When the player presses Fire, the game starts. |
 |
| When the game starts we set the first level number from A We start the main level music, and clear all the game variables to the defaults (NewGameData) |
|
| The Level starts by setting up the sprites (enemies) and drawing
the screen |
|
The main loop
| At the start of the main loop we process mouse input. update the SFX - this updates the sequence of any sound effect. Next we check the 'P' button and pause the game if it's pressed... there's a short delay, then we check for another 'P' to unpause. |
|
| Next we check the reload key (space) and reload if pressed |
|
| Next we check the cursor speed key (C) - if it's pressed we toggle
between the 4 speeds. We load in the new speed from the CursorMoveSpeeds array, and store in CursorMoveSpeed - This is used during the interrupt handler |
|
| Next we check the Palette and 3D toggle options. |
|
| We update the 'Tick' ... this is used to calculate the updates to
the sprites - as most sprites update every few ticks. We then process each of the sprites, updating their position and Sprite. After every few sprites we check the Mouse cursor, and update it as needed (to keep the cursor movement smooth) |
|
| The 'Chibigun' (minigun) is a fully automatic weapon, so fires
every few ticks while fire is held... We check the tick, firestate and current gun to see if the Chibigun is firing. |
|
| Next we check fire 2, and reload if required | |
| Finally we update the cursor and repeat. | |
|
Unlike the other systems The MSX2 VRAM is
separate from the CPU, we'll have to use VDP commands to draw. This means our code cannot work the same, but to reduce programming time, we'll write 'Conversion code' to make the MSX work as similarly as the other systems as possible. |
Converting sprites to MSX2 memory
| We're going to use the VDP copy commands to quickly draw our
sprites, using XOR to combine the two layers and make the 3d effect. Our sprites in cartridge ROM are 4 color, but we need to convert these to 16 colors. We'll need two versions, one in Red, and one in Cyan... it's the combination of these which make the 3D effect. The sprites are converted in software from RAM, and calculated into a vram grid - the Vram XY pos of the sprite will be stored in a table, and this table will be used to covert the multiplatform code to the MSX2's special VDP functions. |
 |
| The sprites for Suck hunt are held in two parts, one is the 'Raw
bitmap' data which is included from a file. The second is a table of the attributes of these sprites - the first is a word address of the sprite in ram (used to draw the sprite), the second is a Width/Height of the sprite in pixels - this is used for collision detection and drawing - though it needs to be converted to logical units for collision detection and sprite centering or bytes for drawing. |
|
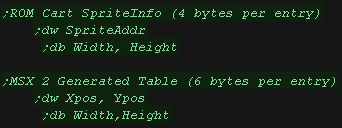
| As well as the SuckHunt SpriteInfo format (4 bytes per sprite),
there is a second table exclusive to the MSX2 This second table is 6 bytes per entry, and contains the X and Y pixel position of the start of the sprite in VRAM, and the width and height of the sprite.... There are 2 entries per sprite... One for the left eye, and one for the right This table does not exist in ROM, it's created during startup by the Suck Hunt Code. |
 |
| There are 3 ways we can transfer data to VRAM. First is to transfer 3D data without a the 'sprite table'... The Font is transferred 'as is'... the drawing does not use the lookup table for its calculations Second is the main 32 sprites... these are the ingame enemies and background and other objects. The third is raw data... This is used for the Cursors (which are 2d) and title/Gameover graphics, which are 3d, but the 3d is 'precalculated' in the 16 color graphics. |
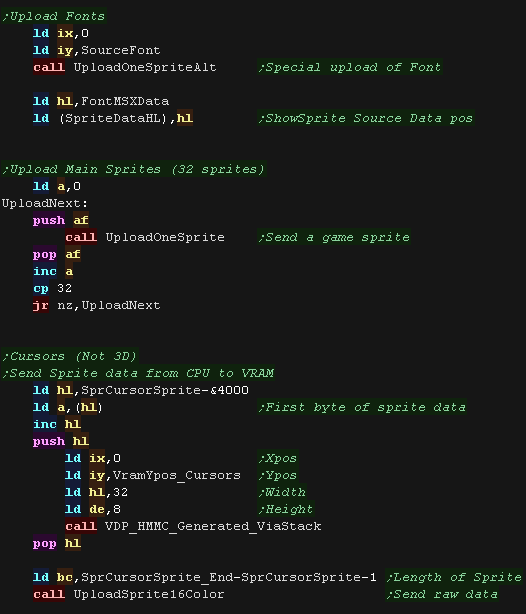 |
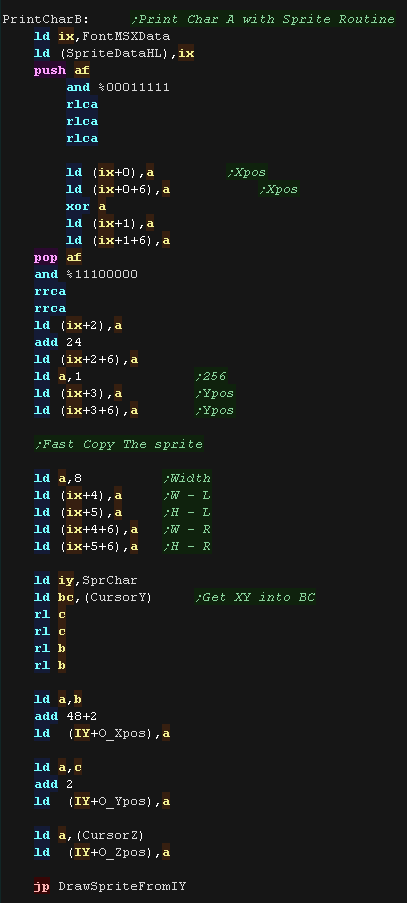
Sprite drawing code
| Both of these are saved via Akusprite Editor The format is the same as the SpecNext... They are 4 color 2bpp, but are converted to 16 color 4bpp in realtime |
|
| Suck hunt runs in 16 color mode The sprites are actually in 4 colors - so we need to split the 2bpp up, and shift them for the 2 screen bytes they occupy ShowSpriteL draws the first Eye. We use LMMM (Logical move).... we need 'Logical' copy for the Xor effect. If 3D mode is enabled we draw the 'Right hand eye' sprite (This is disabled in 2d mode) |
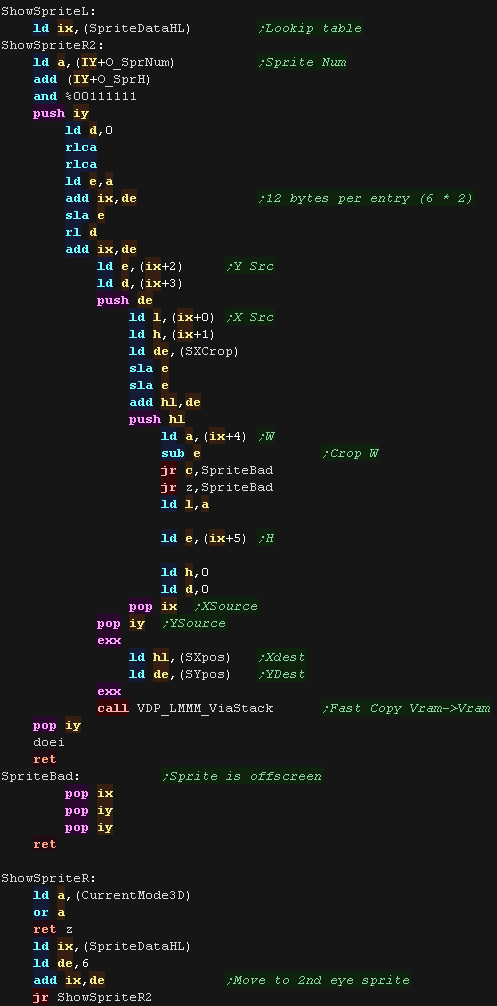 |
| The sprite drawing routines are also used to draw the font. To use the sprite routines, we need the same 12 byte table to draw the character, but there is no table defined. We create a single entry one on the fly, calculated from the character number. |
 |
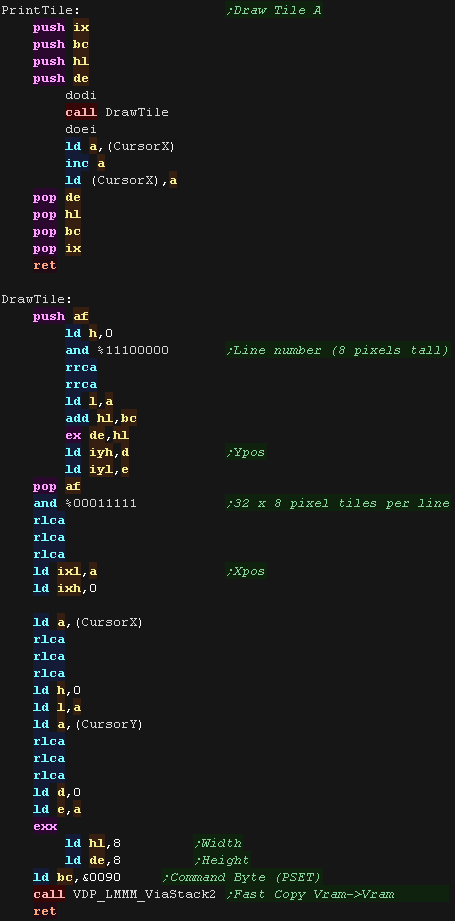
Tilemaps
| The Tilemaps use 8x8 bitmap sprites. These are 16 color. In 3D
mode all 16 colors are used. In 2D mode, 12 of the colors are 'hidden' by setting them to the equivalent of the other eye - disabling the second eye. Tiles numbered 0-254 are represented in the tilemap in a single byte ... tile numbers >=255 are represented by a pair of bytes - the first is 255, the second is added (this saves using two bytes for the first 254)... for example: 255,3 will show tile number 258 |
|
| The Tlemap reading code reads in the tile numbers. The first Tilemap is at Y address BC (at Xpos=0)... If tiles >255 are used, these are 64 Y lines lower than the first tlemap. |
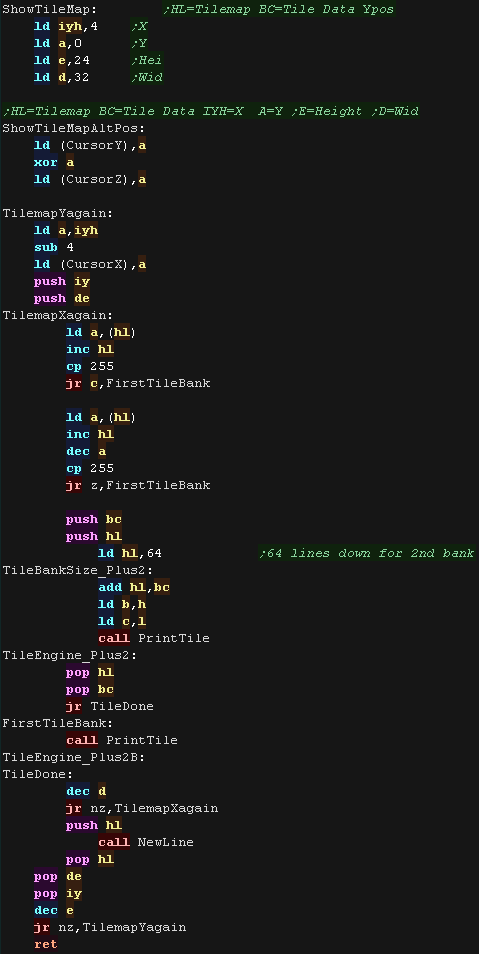 |
| The Tilemap routine calculates the X,Y pos of the tile in VRAM. Each tile is 8x8, so 32 tiles fit on each 256 pixel wide line. We use CursorX,CursorY as the next position to show the tile. We use PSET to transfer the tile to the visible screen. |
 |
| Suck Hunt 3D has a lot of platform specific code,
which meant it was much harder to port to other systems. This is far from ideal, but there is a trade off... a simple game like Yquest could be ported in a day or two... a better quality game like this took 2 weeks or more per platform:-( |
|
 |
Lesson
SH20 - MSX2 code Part 2 - Tiles and palettes Lets take a look at the Tilemap, Palette and music code of the MSX2 version of the game |
|
See
SuckHunt
folder
|
|
Music!
| SuckHunt uses ArkosTracker 1 for music. The version is something I
call 'ArkosTracker Lite' - it's been cut down in size, and altered
to work from ROM and on the Gameboy CPU! The music is played by an IM1 Interrupt handler. The game runs from ROM, and the default configuration is the &0000-&3FFF - but we can 'patch' our own interrupt handler in to memory address &FD9Ah, and this will be executed during the interrupt |
 |
| The cut down tracker I use is hard coded-play from a single
address (&F800 - after the screen RAM) - we transfer the song we
want to play to this address with a LDIR. |
|
| We update our music each Vblank - we need to protect all the
registers. |
 |
Intro Animations and title screen
| The intro sequence is as series of 4 x 2 frame animations. They appear in different corners, and colors |
|
| There is a 'list' of these mini tilemaps used for the intro loop | |
| The Draw routine loops 4 times. The X,Y pos and Color are loaded from the list, and the address of the first frame tilemap. The first frame is shown while the screen is black, then the fade-in occurs. The second frame is then shown and the screen fades out. |
|
| When the title starts, we show the Title graphic (it's a tilemap,
as this saves memory on the 'reusued parts' The Highscore is also shown. There is a silly 'Operation Suck' speech sample which is played (a parody of OpWolf) - This uses the 'ChibiWave' Driver we covered in a previous lesson... this is paged in the second bank |
 |
Palettes and 3D
| The game has 4 possible palettes - the first is used in 2D mode, the other 3 are for the 3 different Analgyph glasses we may use. |  |
| 3D Depth can be toggled between 4 options: 0 is 0ff, 1-3 are different separations between the two eyes. There are also 4 palettes... 0 is only used by 2D mode, the others are used by 3D mode for the supported 3D glasses 2D mode is enabled by setting the CurrentMode3D byte |
 |
| The SetPalette routine sends the 16 colors to the video hardware. |
 |
| Our fade routines also use the same 'SetPalette' routines. There are simply 4 palettes for each of the stages of the fade. DoPalFadeIn/Out routines use A as a palette option 0=Pink 1=Blue... these are used by the Intro routines to set the palette. The last stage of DoPalFadeOutQ is to clear the screen after fading to black. The last stage of DoPalFadeInQ is to set the true palette - enabling the 3D effect. |
 |
| View Options |
| Default Dark |
| Simple (Hide this menu) |
| Print Mode (white background) |
| Top Menu |
| ***Main Menu*** |
| Youtube channel |
| Patreon |
| Introduction to Assembly (Basics for absolute beginners) |
| Amazon Affiliate Link |
| AkuSprite Editor |
| ChibiTracker |
| Dec/Bin/Hex/Oct/Ascii Table |
| Alt Tech |
| Archive.org |
| Bitchute |
| Odysee |
| Rumble |
| DailyMotion |
| Please note: I wlll upload more content to these alt platforms based on the views they bring in |
| 68000 Content |
| ***68000 Tutorial List*** |
Learn 68000 Assembly  |
| Hello World Series |
| Platform Specific Series |
| Simple Samples |
| Grime 68000 |
| 68000 Downloads |
| 68000 Cheatsheet |
| Sources.7z |
| DevTools kit |
| 68000 Platforms |
| Amiga 500 |
| Atari ST |
| Neo Geo |
| Sega Genesis / Mega Drive |
| Sinclair QL |
| X68000 (Sharp x68k) |
| 8086 Content |
| Learn 8086 Assembly |
| Platform Specific Series |
| Hello World Series |
| Simple Samples |
| 8086 Downloads |
| 8086 Cheatsheet |
| Sources.7z |
| DevTools kit |
| 8086 Platforms |
| Wonderswan |
| MsDos |
| ARM Content |
| Learn ARM Assembly |
| Learn ARM Thumb Assembly |
| Platform Specific Series |
| Hello World |
| Simple Samples |
| ARM Downloads |
| ARM Cheatsheet |
| Sources.7z |
| DevTools kit |
| ARM Platforms |
| Gameboy Advance |
| Nintendo DS |
| Risc Os |
| Risc-V Content |
| Learn Risc-V Assembly |
| Risc-V Downloads |
| Risc-V Cheatsheet |
| Sources.7z |
| DevTools kit |
| MIPS Content |
| Learn Risc-V Assembly |
| Platform Specific Series |
| Hello World |
| Simple Samples |
| MIPS Downloads |
| MIPS Cheatsheet |
| Sources.7z |
| DevTools kit |
| MIPS Platforms |
| Playstation |
| N64 |
| PDP-11 Content |
| Learn PDP-11 Assembly |
| Platform Specific Series |
| Simple Samples |
| PDP-11 Downloads |
| PDP-11 Cheatsheet |
| Sources.7z |
| DevTools kit |
| PDP-11 Platforms |
| PDP-11 |
| UKNC |
| TMS9900 Content |
| Learn TMS9900 Assembly |
| Platform Specific Series |
| Hello World |
| TMS9900 Downloads |
| TMS9900 Cheatsheet |
| Sources.7z |
| DevTools kit |
| TMS9900 Platforms |
| Ti 99 |
| 6809 Content |
| Learn 6809 Assembly |
| Learn 6309 Assembly |
| Platform Specific Series |
| Hello World Series |
| Simple Samples |
| 6809 Downloads |
| 6809/6309 Cheatsheet |
| Sources.7z |
| DevTools kit |
| 6809 Platforms |
| Dragon 32/Tandy Coco |
| Fujitsu FM7 |
| TRS-80 Coco 3 |
| Vectrex |
| 65816 Content |
| Learn 65816 Assembly |
| Hello World |
| Simple Samples |
| 65816 Downloads |
| 65816 Cheatsheet |
| Sources.7z |
| DevTools kit |
| 65816 Platforms |
| SNES |
| eZ80 Content |
| Learn eZ80 Assembly |
| Platform Specific Series |
| eZ80 Downloads |
| eZ80 Cheatsheet |
| Sources.7z |
| DevTools kit |
| eZ80 Platforms |
| Ti84 PCE |
| IBM370 Content |
| Learn IBM370 Assembly |
| Simple Samples |
| IBM370 Downloads |
| IBM370 Cheatsheet |
| Sources.7z |
| DevTools kit |
| Super-H Content |
| Learn SH2 Assembly |
| Hello World Series |
| Simple Samples |
| SH2 Downloads |
| SH2 Cheatsheet |
| Sources.7z |
| DevTools kit |
| SH2 Platforms |
| 32x |
| Saturn |
| PowerPC Content |
| Learn PowerPC Assembly |
| Hello World Series |
| Simple Samples |
| PowerPC Downloads |
| PowerPC Cheatsheet |
| Sources.7z |
| DevTools kit |
| PowerPC Platforms |
| Gamecube |
| Work in Progress |
| ChibiAndroids |
| Misc bits |
| Ruby programming |
Buy my Assembly programming book
on Amazon in Print or Kindle!


Available worldwide!
Search 'ChibiAkumas' on
your local Amazon website!
Click here for more info!


Buy my Assembly programming book
on Amazon in Print or Kindle!
Available worldwide!
Search 'ChibiAkumas' on
your local Amazon website!
Click here for more info!
Buy my Assembly programming book
on Amazon in Print or Kindle!
Available worldwide!
Search 'ChibiAkumas' on
your local Amazon website!
Click here for more info!