

Learn Multi platform 6502 Assembly Programming... For Monsters!
Super Simple Series

Logical Units and clipping
| To allow us to crop our sprites, we'll need to move our sprite
around 'logical space' - only a portion of this will be the visible
screen. We'll use this to crop the sprite. |
 |
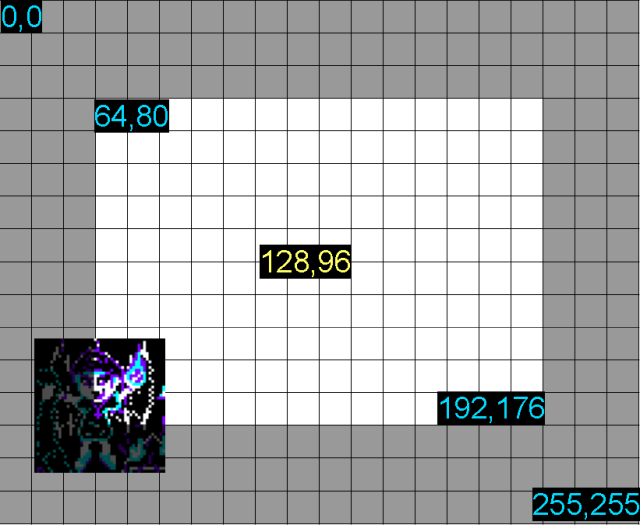
We're designing our code for screens of 256x192 - and we'll use 'Logical Co-ordinates' which define a visible screen of 192x96 (2 pixels per logical unit) The visible logical screen is in the center of the logical space area to allow the sprite to be 'partially offscreen' on any side. |
 |
| We need to crop any offscreen part to
get to the first visible pixel of the sprite. After each line We also need to crop the unused pixels to the next visible pixel |
 |
| We can now move our
sprite in pixels, but our sprites are still 16x16 pixel ' blocks',
we'll need to combine lots of hardware sprites to make our
character (3*3=9 hsprites) |
 |
Our Sprite Routine
| Before we draw our sprite we need to crop it with "DoCrop" Zeropage pair z_bc is the X,Y co-ordinate in logical units Zeropage pair z_hl is the Width,Height in logical units Zeropage pair z_iy is the first tile pattern If there is nothing onscreen, 'DoCrop' will return the Carry set. |
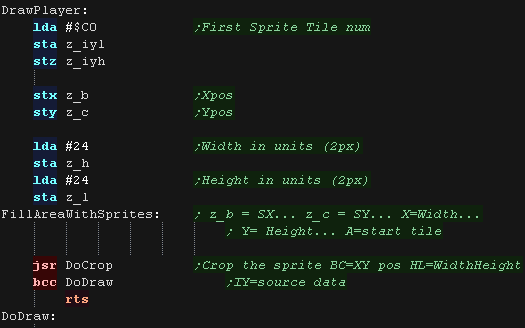 |
| We need to select the VRAM address of our sprite - the sprites are
stored in address $7F00+ Each sprite uses 4 addresses |
 |
| Our sprites are 16x16 pixels, and our screen is 256x239... but
there's a problem! the first visible pixel for the hardware sprites
is (X,Y) co-ordinate (32,64)! We need to use 16 bit co-ordinates for our X and Y position. To allow our sprites to be almost entirely cropped, We also need to have one full sprite completely off the screen We use z_c as our Y-pos, we need to multiply this by 2 and add 48 (64 pixels - the one offscreen 16 pixel sprite) We use z_b as our X-pos and the X register as the sprite offset (we need multiple sprites per line , we need to multiply this by 2 and add 16 (32 pixels - the one offscreen 16 pixel sprite) We need to write the 4 words that define our sprite in the table. The first is the Ypos The second is the Xpos The third is the sprite pattern number The fourth is the attribute (zero) we add two to our source pattern address in z_IYL, and repeat until the line is done. After each sprite, we add 8 to z_c (16 pixels after the doubling) |
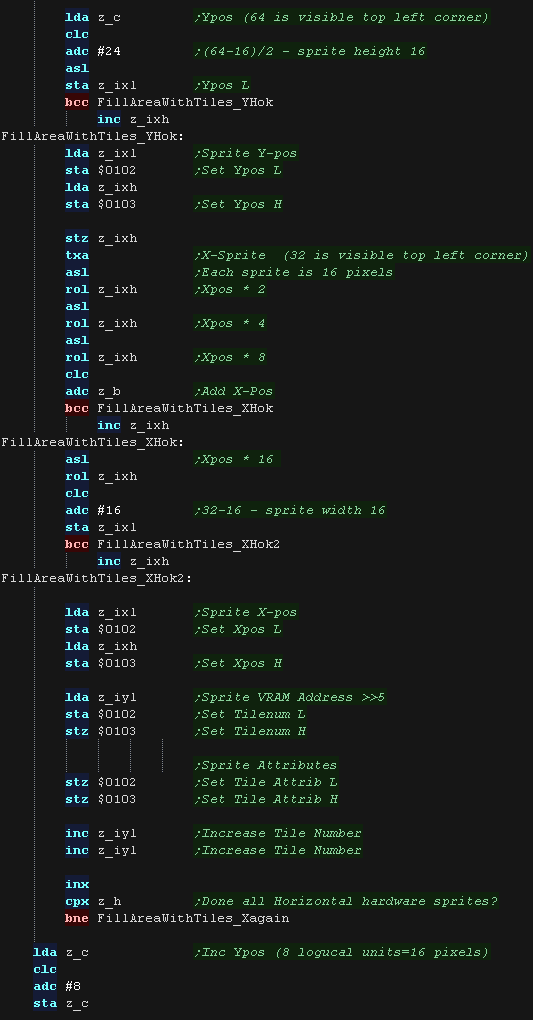 |
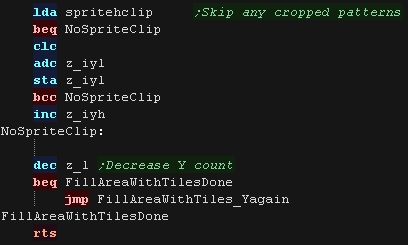
| After we've done a line we may need to remove some patterns to
handle the horizontal cropping, we then repeat until the image is
done. |
 |
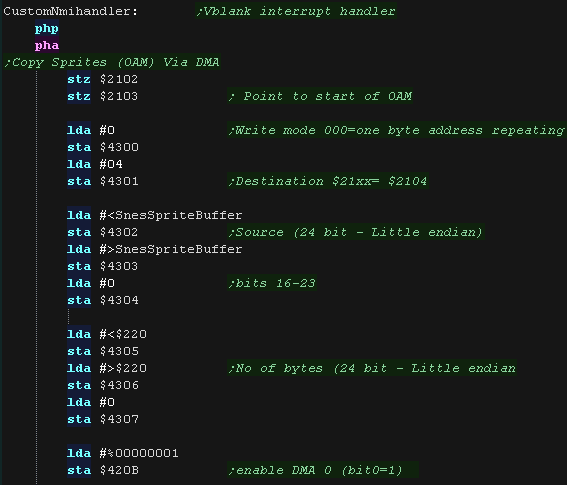
We use the DMA to transfer the sprite cache during NMI... but it has a lot of settings we need to configure to transfer the data! |
 |
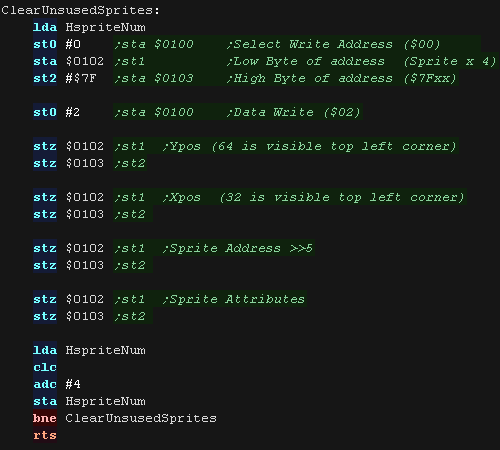
| our Chibiko usually uses 9 sprites, but if it goes partially
offscreen it will use less, We need to zero the unused sprites to clear these. |
 |
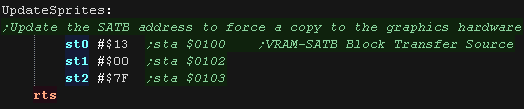
| Transferring our settings isn't enough, we need to send the data
to the SATB sprite attribute table. we use a DMA to do this. |
 |
Logical Cropping
| Our cropping routine will work out the X,Y pos in bytes, and width
and height + any skipped pixels from the source data Zeropage pair z_bc is the X,Y co-ordinate in logical units Zeropage pair z_hl is the Width,Height in logical units Zeropage pair z_iy is the source bitmap address of the sprite data First we zero z_DE - it's used for temp values, and spritehclip which is used for the horizontally skipped bytes after each line |
 |
| Ok... lets crop the top of the sprite... First we remove the ypos of the first visible pixel... if the result is greater than zero, then nothing is off the screen at the top. if the result is less than zero we need to crop... we convert the negative to a positive and compare to the height of our sprite, if the amount to crop is not less than the height then the sprite is completely offscreen. If the top line is partially off the screen we need to convert the ypos so the sprite starts partially offscreen, we do this with EOR #%00000111 |
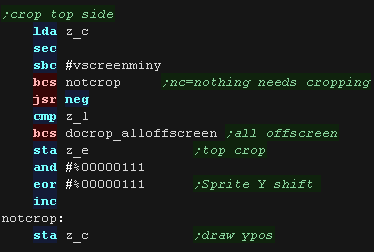 |
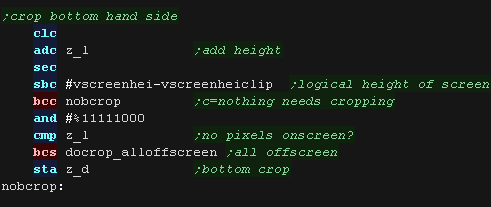
| Next we do the same for the bottom, We add the height to the Ypos, and subtract the height of the logical screen, if it's over the screen height (greater than zero) we need to crop again - the result is the amount to crop We need to convert it to a number of sprites (8 logical units) with AND #%11111000 |
 |
| We've calculated the top and bottom crop... we now use these to calculate the new height of the sprite. | 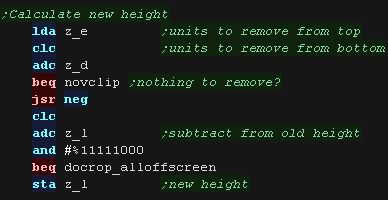 |
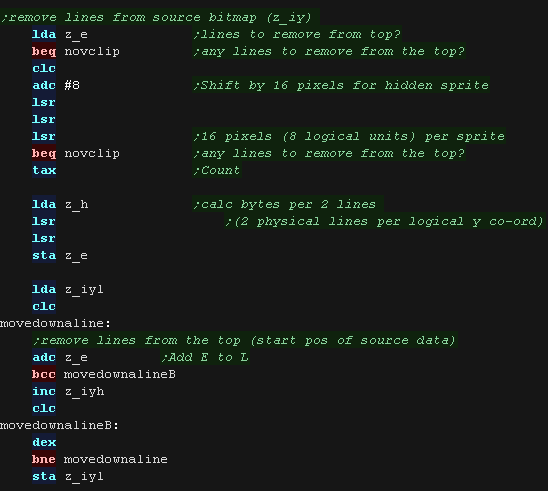
| We then skip over any bytes in the source (z_iy) based on the
number of lines we need to remove from the top. We add 8 to the amount to remove, as we're overstating the size of the screen by 8 logical units to allow for the 'partially offscreen' sprites drawn at the top. |
 |
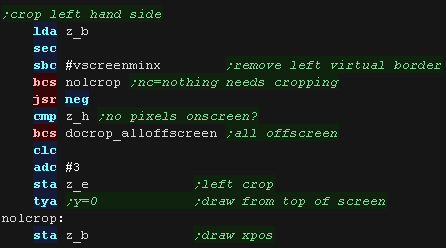
| now we do the same for the X axis First we remove the xpos of the first visible pixel... if the result is greater than zero, then nothing is off the screen at the left. if the result is less than zero we need to crop... we convert the negative to a positive and compare to the width of our sprite, if the amount to crop is not less than the width then the sprite is completely offscreen. Anything else is the number of lines we need to remove from the left, we store this in z_e and adjust the starting draw with an EOR #%00000111 to correct the starting position to adjust for the removed sprites |
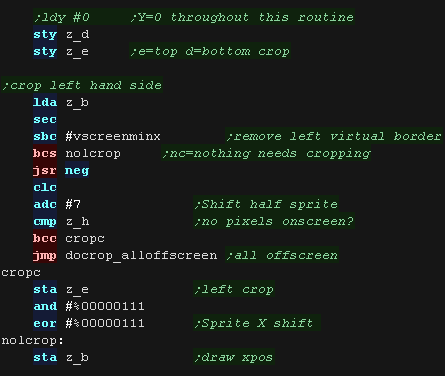 |
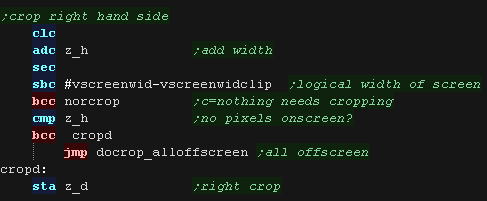
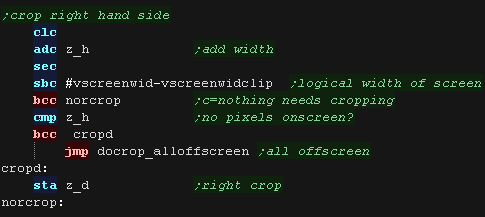
| Next we do the same for the right, We add the width to the Xpos, and subtract the width of the logical screen, if it's over the screen width (greater than zero) we need to crop again - the result is the amount to crop |
 |
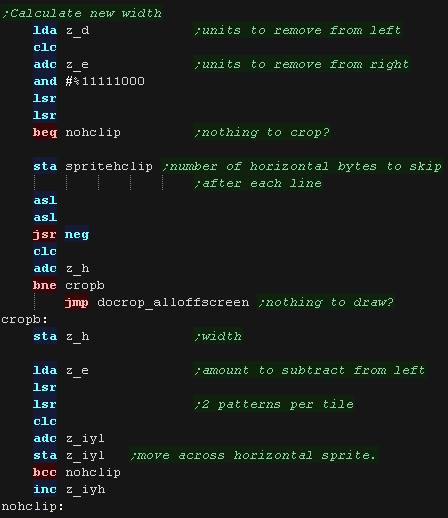
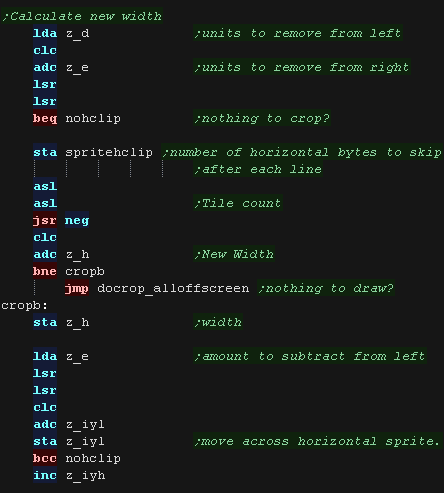
| We've calculated the left and right crop... we now use these to
calculate the new width of the sprite. We then skip over any bytes in the source (z_iy) based on the number of bytes we need to remove from the left. |
 |
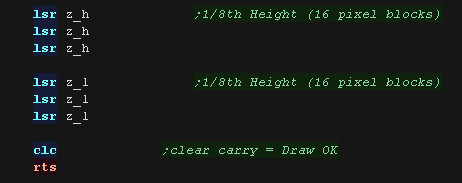
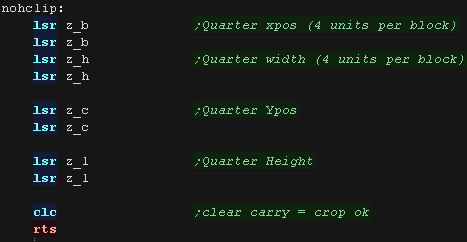
| We've finished cropping our sprite!... but we need to convert our
co-ordinates from logical units to a sprite count -
effectively dividing Width and Height by 8 We leave the X,Y pos in logical units, we convert these later. We clear the carry to tell the calling routine we cropped the sprite successfully (it needs drawing) and return. |
 |
| If the sprite is completely offscreen, there's no point trying to draw, so we set the carry and return |  |
 |
Here we're
using a set of 16x16 sprites, as we wanted to try out our software
clipping code, but the PC Engine can actually define a single
sprite of up to 32x64! We would still need to use multiple sprites to make our 48x48 pixel graphic though! |

|
Lesson
S32 - Char Block clipping on the Commodore PET! Lets alter our previous bitmap drawing routine, and allow it to be clipped so it can be partially offscreen. |
 |
 PET_keys.asm
|
 |
Logical Units and clipping
| To allow us to crop our sprites, we'll need to move our sprite
around 'logical space' - only a portion of this will be the visible
screen. We'll use this to crop the sprite. |
 |
We're designing our code for screens of 256x192 - and we'll use 'Logical Co-ordinates' which define a visible screen of 192x96 (2 pixels per logical unit) The visible logical screen is in the center of the logical space area to allow the sprite to be 'partially offscreen' on any side. |
|
| We need to crop any offscreen part to
get to the first visible pixel of the sprite. After each line We also need to crop the unused pixels to the next visible pixel |
|
| Although each
character block only has 2x2 pixels, we'll treat each as 4x4
logical units to give a large virtual screen of 160x100 like other
systems. Our graphic is 4x4 chars, which is 16x16 logical units |
|
Our Sprite Routine
| Before we draw our sprite we need to crop it with "DoCrop" Zeropage pair z_bc is the X,Y co-ordinate in logical units Zeropage pair z_hl is the Width,Height in logical units Zeropage pair z_iy is the first tile pattern If there is nothing onscreen, 'DoCrop' will return the Carry set. |
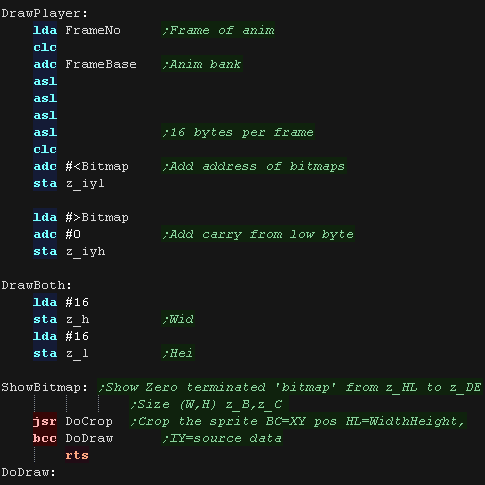 |
GetVDPScreenPos will calculate the VRAM destination into zero page pair z_de We then transfer bytes from z_IY to z_DE to move the VRAM destination down one line we add 40 after each line we update the source bitmap, adding the transferred bytes, and any bytes that need to be skipped at the end of a line |
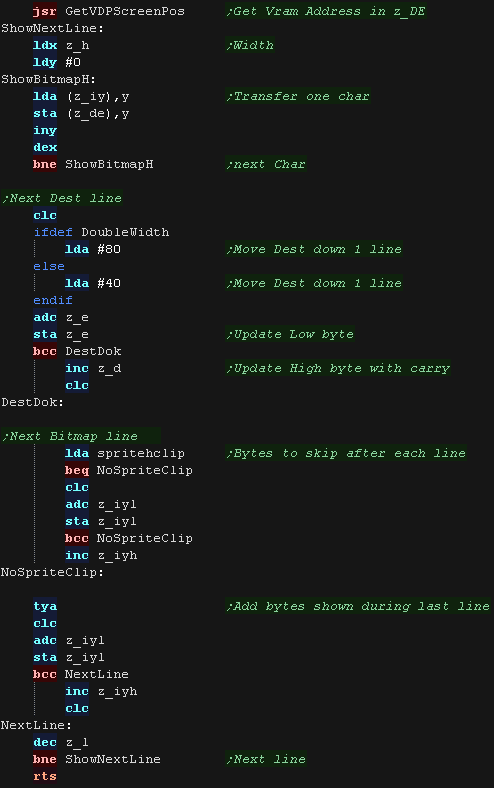 |
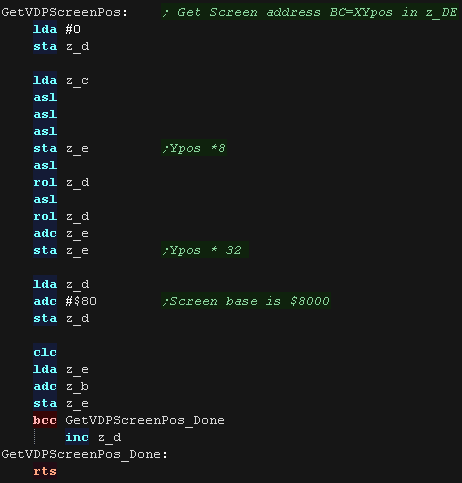
| GetVDPScreenPos will calculate the VRAM destination from X,Y pos
(b,c) The formula is $8000 + Ypos *40 + Xpos Multiplying by 40 is hard!... but multiplying by 32 and 8 is easier, so we do this and add the two results together. |
 |
Logical Cropping
| Our cropping routine will work out the X,Y pos in bytes, and width
and height + any skipped pixels from the source data Zeropage pair z_bc is the X,Y co-ordinate in logical units Zeropage pair z_hl is the Width,Height in logical units Zeropage pair z_iy is the source bitmap address of the sprite data First we zero z_DE - it's used for temp values, and spritehclip which is used for the horizontally skipped bytes after each line |
|
| Ok... lets crop the top of the sprite... First we remove the ypos of the first visible pixel... if the result is greater than zero, then nothing is off the screen at the top. if the result is less than zero we need to crop... we convert the negative to a positive and compare to the height of our sprite, if the amount to crop is not less than the height then the sprite is completely offscreen. We need to mask the count to a whole number of characters, we do this with AND #%11111100 Anything else is the number of lines we need to remove from the top, we store this in z_e and set the new 'draw position' to Ypos (z_c) =0 |
 |
| Next we do the same for the bottom, We add the height to the Ypos, and subtract the height of the logical screen, if it's over the screen height (greater than zero) we need to crop again - the result is the amount to crop |
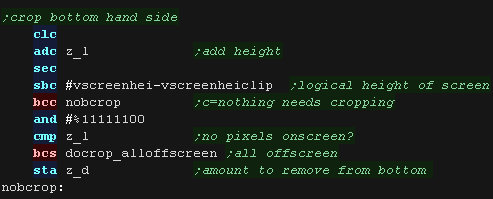 |
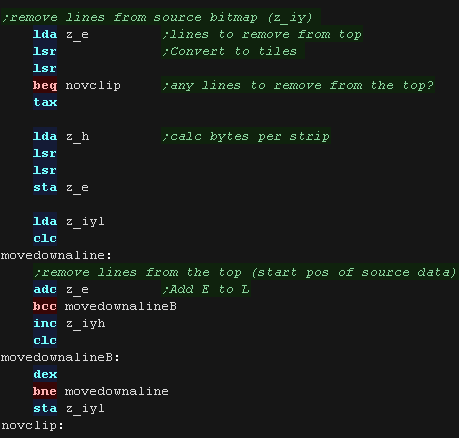
| We've calculated the top and bottom crop... we now use these to calculate the new height of the sprite. | 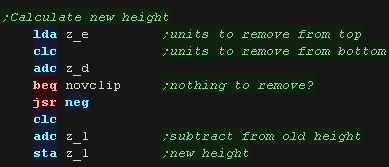 |
| We then skip over any bytes in the source (z_iy) based on the
number of lines we need to remove from the top. |
 |
| now we do the same for the X axis First we remove the xpos of the first visible pixel... if the result is greater than zero, then nothing is off the screen at the left. if the result is less than zero we need to crop... we convert the negative to a positive and compare to the width of our sprite, if the amount to crop is not less than the width then the sprite is completely offscreen. Anything else is the number of lines we need to remove from the left, we store this in z_e and set the new 'draw position' to Xpos (z_c) =0 |
 |
| Next we do the same for the right, We add the width to the Xpos, and subtract the width of the logical screen, if it's over the screen width (greater than zero) we need to crop again - the result is the amount to crop |
 |
| We've calculated the left and right crop... we now use these to
calculate the new width of the sprite. We then skip over any bytes in the source (z_iy) based on the number of bytes we need to remove from the left. |
 |
| We've finished cropping our sprite!... but we need to convert our
co-ordinates from logical units (pairs of pixels) to a tile count -
effectively dividing Xpos,Ypos, Width and Height by 4 We clear the carry to tell the calling routine we cropped the sprite successfully (it needs drawing) and return. |
 |
| If the sprite is completely offscreen, there's no point trying to draw, so we set the carry and return | |

Nes ROMS Format:
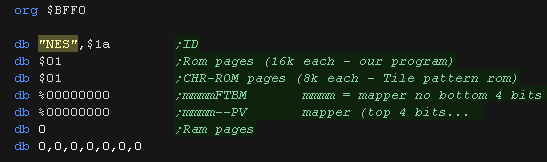
The header of our ROM defines the type of cartridge, it's mapper
| File Position | Bytes | Bits | Meaning | Example |
| &0000 | 4 | Header - do not change! | db "NES",$1a | |
| $0004 | 1 | Program Rom pages (16k each) | db $1 | |
| $0005 | 1 | CHR-Rom Pages (8k each) | db $1 | |
| $0006 | 1 | mmmmFTBM | mmmm =
mapper no bottom 4 bits , Four screen vram layout, Trainer at
&7000 Battery ram at &6000, Mirror (0=horiz, 1=vert) |
db %00000000 |
| $0007 | 1 | mmmm--PV | mmmm= mapper top 4 bits... Pc10 arcade, Vs unisystem | db %00000000 |
| $0008 | 1 | RAM pages (8k each) | db 0 | |
| $0009 | 7 | unused | db 0,0,0,0,0,0,0 |
The example above defines no mapper, one 16k program rom bank, and one 8k CHR-ROM bank (pattern data)
The rest of our rom layout depends on the number of Program and Character rom banks we have
| Bytes | Usage |
| 16 Bytes | Header |
| 512bytes | Trainer (Usually none) |
| 16k * ? | Program ROM Banks (our code) |
| 8K * ? | Character ROM banks (pattern rom) |
Starting our Nes or Famicom Cartridge
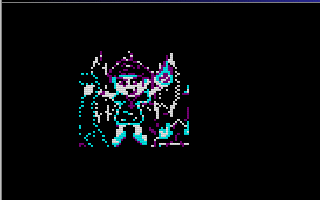
| We're going to draw our mascot Chibiko, and a sample 96 character font. | 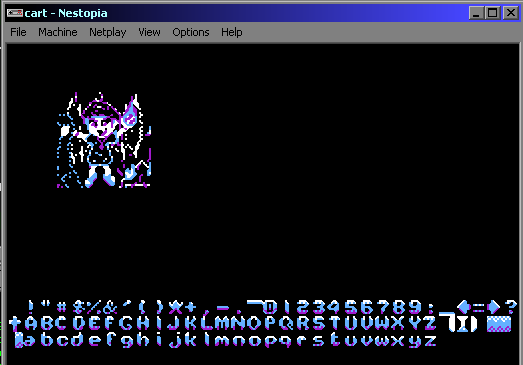 |
| We need a header for our cartridge. We need to define at least one bank of character rom for our pattern data. |
 |
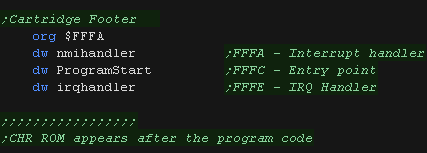
| We also need a footer at $FFFA... this has definitions pointing
to the start of the program and interrupt handlers Immediately after our footer comes our CHR-ROM pattern definitions. |
 |
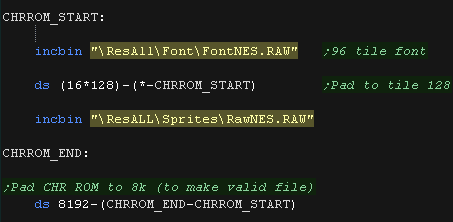
| We're going to use two pattern files, FontNES.RAW and RawNES.RAW
(our mascot bitmap) We need to put some padding between the two, to ensure the mascot bitmap starts at tile 128 (each tile is 16 bytes). We can use * to calculate the current program counter position, and a DS statement to pad empty space with zeros. Finally, we need to ensure the CHR-ROM is 8KB, so again we use a DS statement to fill the remaining space in the 8k block. |
 |
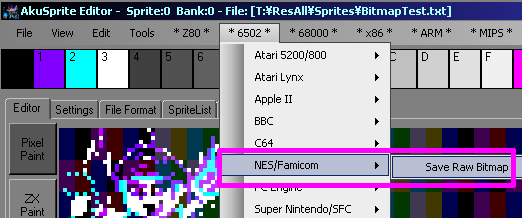
| You can convert a bitmap to the correct binary data with my AkuSprite Editor Its free, open source, and included in the downloads! |
 |
Getting Started!
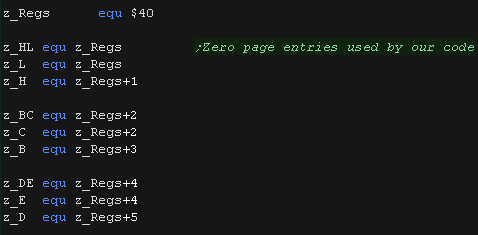
| We're going to need a few bytes in the zero page to store data, we
also need an IRQ handler of some kind (a return in this case) |
 |
| Vblank (The point when the screen is not being drawn) is important, this is the only time we can write to VRAM... so we can detect when this is possible we use zero page entry $7F as a marker.. and alter this when vblank occurs | 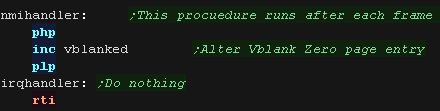 |
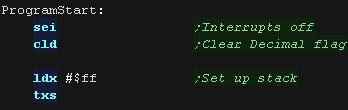
Our program will start by disabling interrupts and turning on the stack. |
 |
| We need to set up our screen, we'll define the palette and turn on
the screen. To define a palette entry we need to select a VRAM address $3F00+ ... we select the palette entry by writing the address $2006 (in big endian format) We then write the bytes which select our colors. We can now turn on our screen, and enable the NMI (vblank) interrupt We're ready to start our program. |
 |
| Our palette is defined later in our code. | 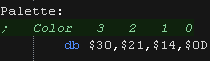 |
Functions to help with the NES video hardware.
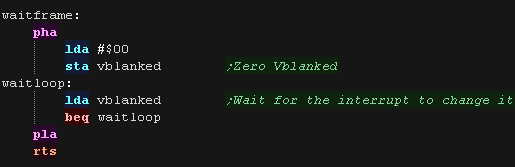
| We need some functions to help us with the Nes graphics... First
is we need to wait for Vblank before we write to VRAM... Vblank is when the screen is currently not being drawn (at the very top or bottom of the screen) To do this we write 0 to zeropage entry 'Vblanked' (defined by a symbol)... then we wait for it to change... when vblank occurs, the value will be nonzero |
 |
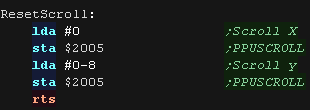
| We'll use a zero page pair z_de to define a vram destination address... we'll use a 'PrepareVram' function to select the destination address. |  |
| Whenever we write to vram, the tilemap scroll will change -
messing up our layout (Grr!) We'll create a function to fix the tilemap position. |
 |
Drawing our mascot!
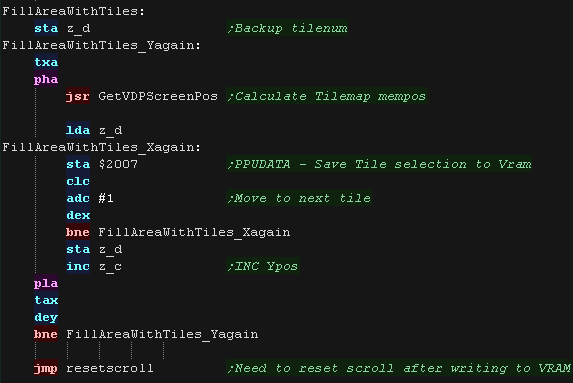
| We'll define a new function... 'FillAreaWithTiles' This will draw consecutive tile numbers to a grid, and rebuild our sprite. We use it twice here, once to show our 48x48 pixel mascot, and once to show of our font! |
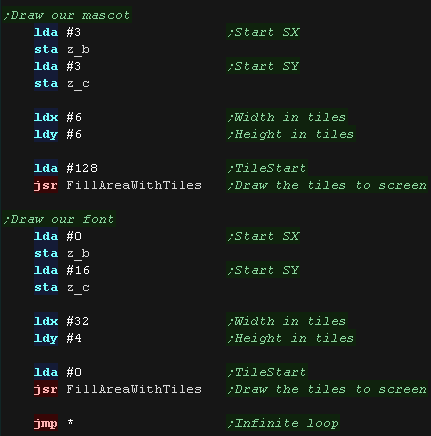 |
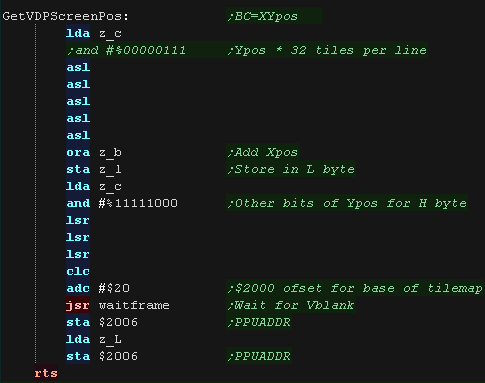
| We need to calculate the VRAM address of the next tile we want
to change... The Tilemap starts at VRAM address $2000, and the tilemap is 32 tiles wide, and each tile is 1 byte in memory, so our formula is: Address= $2000 + (Ypos*32) + Xpos We need to multiply the CursorY by 32... we do this by repeated bitshifts. Before writing we have to wait for Vblank... We write the address bytes to $2006 |
 |
| The "Fill Area with Tiles" will do the tile drawing for us - It recalculates the start of a line with GetVDPScreenPos, then writes a line of tiles... This is repeated for each Y line |
 |
| We've only used
the tilemap in this example... if we want to do flexible Sprites
- we would want to use the Nes' hardware sprites ... These can move by pixels, and allow for fast smooth moving objects - but there's a limit to how many can be onscreen. |
|
| View Options |
| Default Dark |
| Simple (Hide this menu) |
| Print Mode (white background) |
| Top Menu |
| ***Main Menu*** |
| Youtube channel |
| Patreon |
| Introduction to Assembly (Basics for absolute beginners) |
| Amazon Affiliate Link |
| AkuSprite Editor |
| ChibiTracker |
| Dec/Bin/Hex/Oct/Ascii Table |
| Alt Tech |
| Archive.org |
| Bitchute |
| Odysee |
| Rumble |
| DailyMotion |
| Please note: I wlll upload more content to these alt platforms based on the views they bring in |
| 68000 Content |
| ***68000 Tutorial List*** |
Learn 68000 Assembly  |
| Hello World Series |
| Platform Specific Series |
| Simple Samples |
| Grime 68000 |
| 68000 Downloads |
| 68000 Cheatsheet |
| Sources.7z |
| DevTools kit |
| 68000 Platforms |
| Amiga 500 |
| Atari ST |
| Neo Geo |
| Sega Genesis / Mega Drive |
| Sinclair QL |
| X68000 (Sharp x68k) |
| 8086 Content |
| Learn 8086 Assembly |
| Platform Specific Series |
| Hello World Series |
| Simple Samples |
| 8086 Downloads |
| 8086 Cheatsheet |
| Sources.7z |
| DevTools kit |
| 8086 Platforms |
| Wonderswan |
| MsDos |
| ARM Content |
| Learn ARM Assembly |
| Learn ARM Thumb Assembly |
| Platform Specific Series |
| Hello World |
| Simple Samples |
| ARM Downloads |
| ARM Cheatsheet |
| Sources.7z |
| DevTools kit |
| ARM Platforms |
| Gameboy Advance |
| Nintendo DS |
| Risc Os |
| Risc-V Content |
| Learn Risc-V Assembly |
| Risc-V Downloads |
| Risc-V Cheatsheet |
| Sources.7z |
| DevTools kit |
| MIPS Content |
| Learn Risc-V Assembly |
| Platform Specific Series |
| Hello World |
| Simple Samples |
| MIPS Downloads |
| MIPS Cheatsheet |
| Sources.7z |
| DevTools kit |
| MIPS Platforms |
| Playstation |
| N64 |
| PDP-11 Content |
| Learn PDP-11 Assembly |
| Platform Specific Series |
| Simple Samples |
| PDP-11 Downloads |
| PDP-11 Cheatsheet |
| Sources.7z |
| DevTools kit |
| PDP-11 Platforms |
| PDP-11 |
| UKNC |
| TMS9900 Content |
| Learn TMS9900 Assembly |
| Platform Specific Series |
| Hello World |
| TMS9900 Downloads |
| TMS9900 Cheatsheet |
| Sources.7z |
| DevTools kit |
| TMS9900 Platforms |
| Ti 99 |
| 6809 Content |
| Learn 6809 Assembly |
| Learn 6309 Assembly |
| Platform Specific Series |
| Hello World Series |
| Simple Samples |
| 6809 Downloads |
| 6809/6309 Cheatsheet |
| Sources.7z |
| DevTools kit |
| 6809 Platforms |
| Dragon 32/Tandy Coco |
| Fujitsu FM7 |
| TRS-80 Coco 3 |
| Vectrex |
| 65816 Content |
| Learn 65816 Assembly |
| Hello World |
| Simple Samples |
| 65816 Downloads |
| 65816 Cheatsheet |
| Sources.7z |
| DevTools kit |
| 65816 Platforms |
| SNES |
| eZ80 Content |
| Learn eZ80 Assembly |
| Platform Specific Series |
| eZ80 Downloads |
| eZ80 Cheatsheet |
| Sources.7z |
| DevTools kit |
| eZ80 Platforms |
| Ti84 PCE |
| IBM370 Content |
| Learn IBM370 Assembly |
| Simple Samples |
| IBM370 Downloads |
| IBM370 Cheatsheet |
| Sources.7z |
| DevTools kit |
| Super-H Content |
| Learn SH2 Assembly |
| Hello World Series |
| Simple Samples |
| SH2 Downloads |
| SH2 Cheatsheet |
| Sources.7z |
| DevTools kit |
| SH2 Platforms |
| 32x |
| Saturn |
| PowerPC Content |
| Learn PowerPC Assembly |
| Hello World Series |
| Simple Samples |
| PowerPC Downloads |
| PowerPC Cheatsheet |
| Sources.7z |
| DevTools kit |
| PowerPC Platforms |
| Gamecube |
| Work in Progress |
| ChibiAndroids |
| Misc bits |
| Ruby programming |
Buy my Assembly programming book
on Amazon in Print or Kindle!


Available worldwide!
Search 'ChibiAkumas' on
your local Amazon website!
Click here for more info!


Buy my Assembly programming book
on Amazon in Print or Kindle!
Available worldwide!
Search 'ChibiAkumas' on
your local Amazon website!
Click here for more info!
Buy my Assembly programming book
on Amazon in Print or Kindle!
Available worldwide!
Search 'ChibiAkumas' on
your local Amazon website!
Click here for more info!