

Platform Specific Lessons
 |
Lesson
P51 - Multiplatform Software tilemap on the Amiga via BLIT
(Mintile) We've written a minimal multiplatform Tile/Sprite routine in the Mintile series, Now, lets take a look at the platform specific code to quickly draw tiles to the screen on the Amiga using the blitter |
 |
 AMI_MinTileBlit.asm
|
 |
| MinTile is a
multiplatform 'engine' which allows us to define our game code in
a common way, and let the platform specific code handle the
platform specific work!... it was used to write 'ChibiFighter' on
the Z80. For more details on Mintile, see the Mintile series here... |
 |
 |
The blitter isn't really efficient working at
such small sizes, so the speed isn't very good, but this makes a
nice example of using the blitter with bit shifted data. |
Tile Drawing Routines
| Our example shows an onscreen tilemap and two software 'sprites'. Mintile supports scrolling and X-Flip (but not Y-flip) The 'sprites' are actually miniature tile maps, this is to reduce the amount of platform specific code. These are all created via the DoStrip platform specific routine, which we'll look at here. This example writes to the screen in software. |
 |
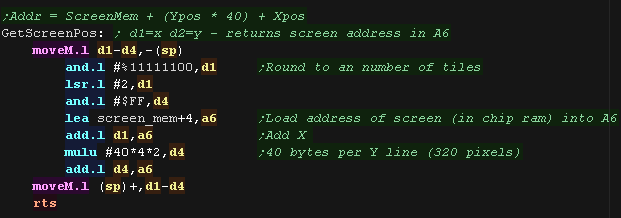
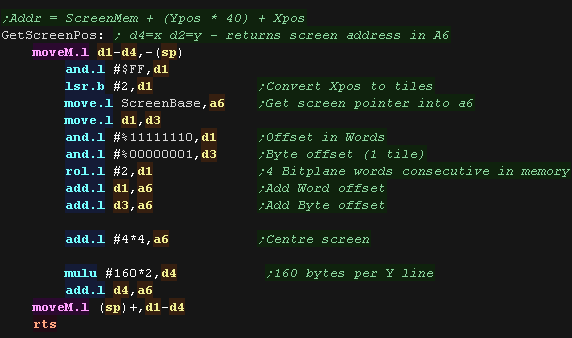
| We have a 'GetScreenPos' function , which calculates the VRAM
destination for the sprite objects. It calculates a VRAM destination in A6, from an X,Y position in D1,D4 Co-ordinates are in 'Logical Units' (Pairs of pixels) - this is to allow for single byte co-ordinates and maintain compatibility with the 8 bit systems Each line of the screen is 40 bytes, but there are 4 bitplanes. This routine calculates the bytepos in A6, but preserves the full xpos in d1 |
 |
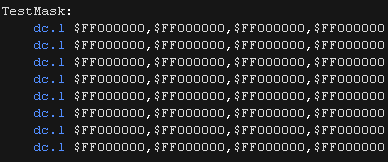
| We need a 1 byte 'mask' for the 4 bitplanes of the 8 lines of our
tile. We'll bitshift this using the destination Xpos as a mask for our tile and the screen. |
 |
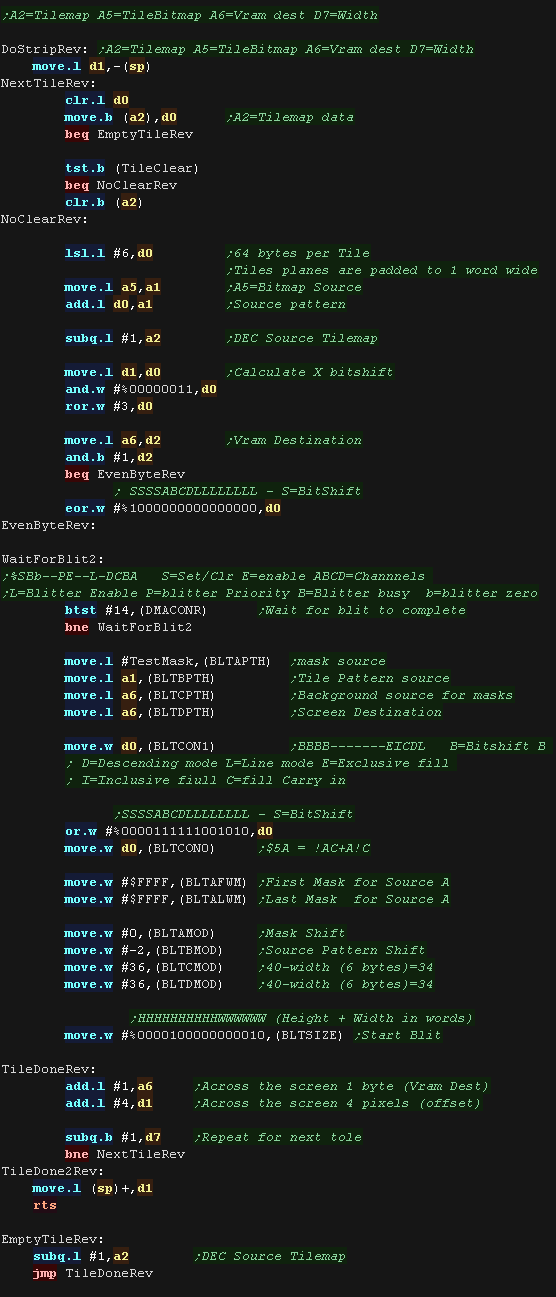
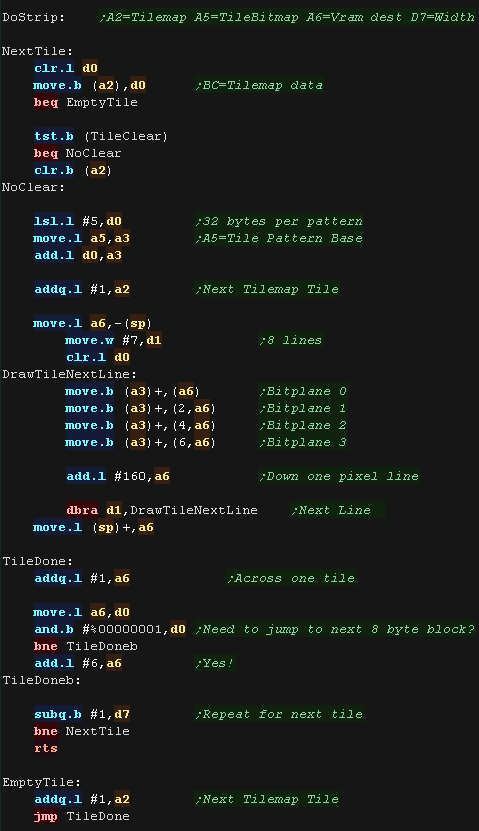
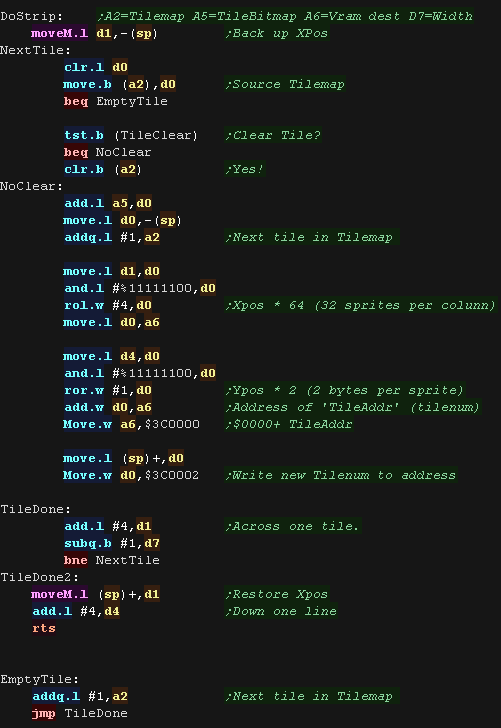
| DoStrip will draw one horizontal strip of tiles. The job is defined by the following registers: A2=Source Tilemap A5=Tile Bitmap Patterns A6=Vram destination D7=Width of strip The tilemap will either be the TileCache (for the background) or a mini tilemap (for sprites) If using the tile cache we zero the tiles after they are drawn. We calculate the address of the source pattern data by multiplying the tile number by 64. Actually the tiles are only 32 bit bytes, but they are 'padded' to 1 word wide, so we can do the bitshifts. |
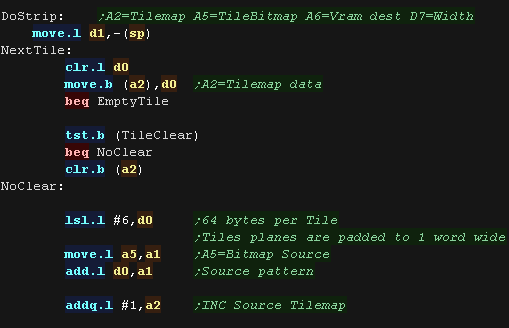 |
| We need to set up the blitter, First we need to work out the
bitshift, to allow per pixel movement. We do this with the bottom two bits of D1, however these need to be shifted to the top 4 bits of BLTCON0/BLTCON1 We use the formula "$5A = !AC+A!C" to do the blitting operation A is the one tile mask, B is the source pattern C is the current screen data, D is the final screen destination. we need to define the "Mods" that shift the sources after each line, to move to the next line. |
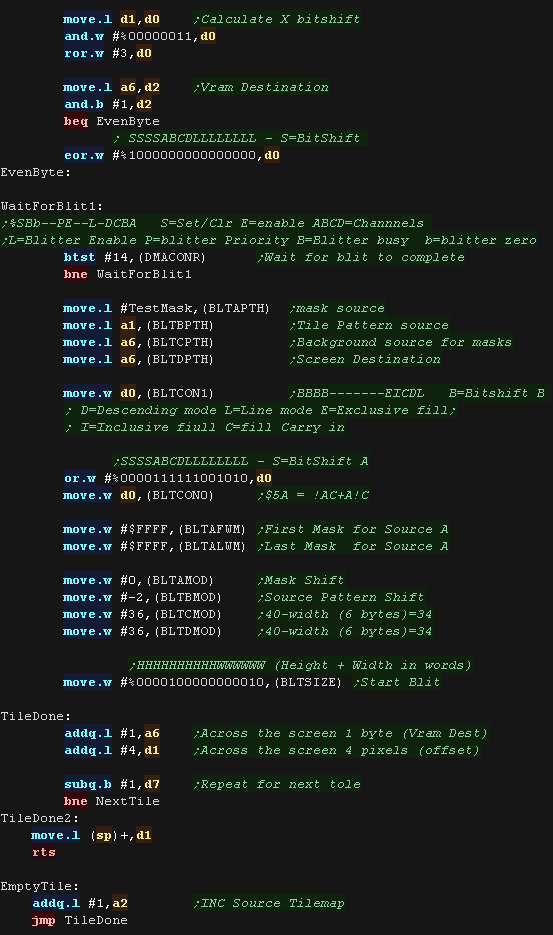 |
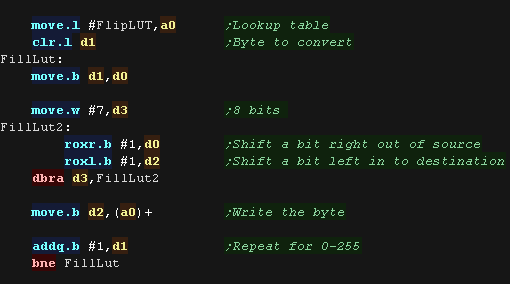
| We need to horizontally flip the bytes in the tiles,
and we'll do this via a 256 byte Lookup Table. For each of the 256 possible bytes, We calculate the opposite position of the 8 pixels of a bitplane |
 |
| The blitter can't do the Xflip job for us, so we'll generate
Xflipped patterns in advance. TestChibikoRev will store the flipped tile data |
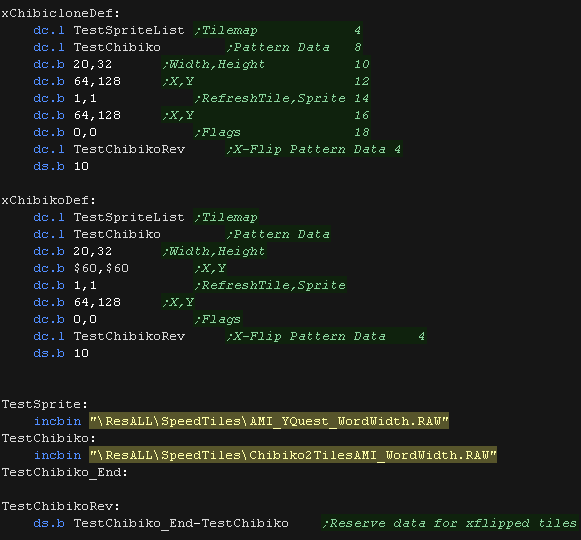 |
| We use our LUT to xflip the source pattern data. | 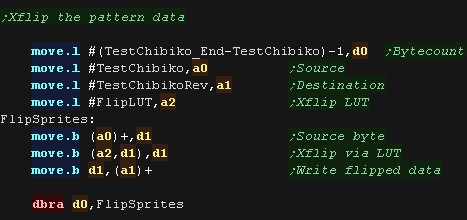 |
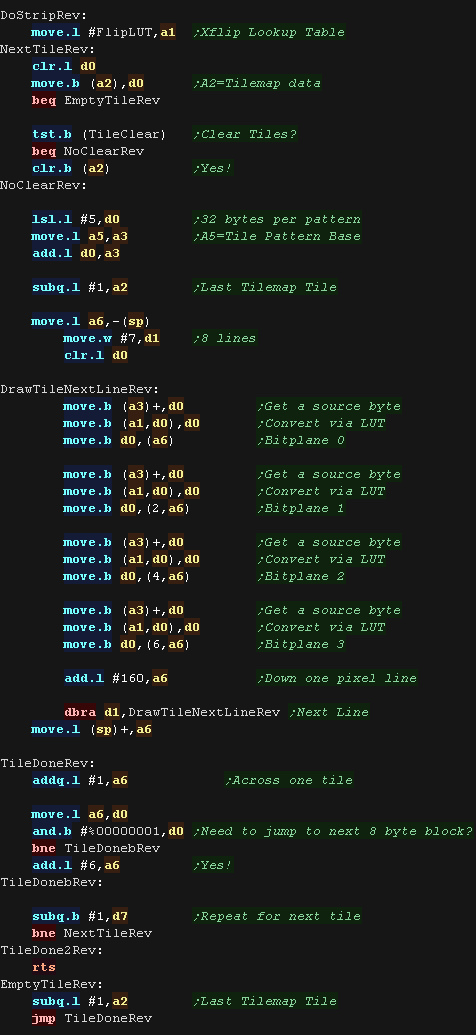
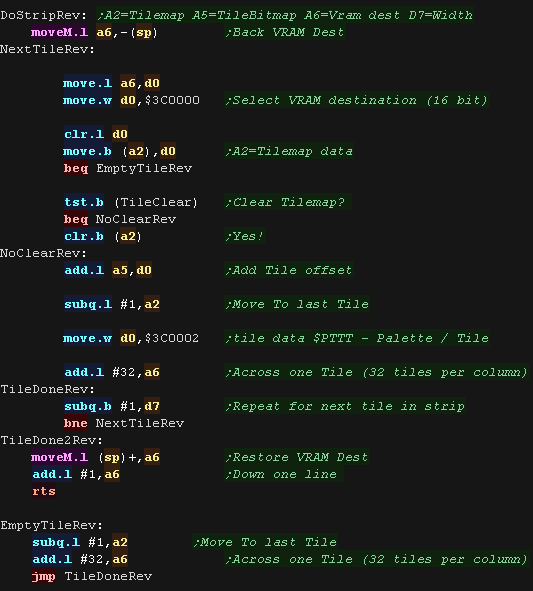
| DoStripRev has essentially the same function, however
we use the X-flipped patterns, and move through the tilemap from
right to left. |
 |
|
Lesson
P52 - Multiplatform Software tilemap on the Atari ST(Mintile) We've written a minimal multiplatform Tile/Sprite routine in the Mintile series, Now, lets take a look at the platform specific code to quickly draw tiles to the screen on the Atari ST |
|
AST_MinTile.asm
|
|
| MinTile is a
multiplatform 'engine' which allows us to define our game code in
a common way, and let the platform specific code handle the
platform specific work!... it was used to write 'ChibiFighter' on
the Z80. For more details on Mintile, see the Mintile series here... |
|
Tile Drawing Routines
| Our example shows an onscreen tilemap and two software 'sprites'. Mintile supports scrolling and X-Flip (but not Y-flip) The 'sprites' are actually miniature tile maps, this is to reduce the amount of platform specific code. These are all created via the DoStrip platform specific routine, which we'll look at here. This example writes to the screen in software. |
 |
| We have a 'GetScreenPos' function , which calculates the VRAM
destination for the sprite objects. It calculates a VRAM destination in A6, from an X,Y position in D1,D4 Co-ordinates are in 'Logical Units' (Pairs of pixels) - this is to allow for single byte co-ordinates and maintain compatibility with the 8 bit systems Each line of the screen is 40 bytes, but there are 4 bitplanes, these are grouped in clusters of 4 words, with one word per bitplane in the format: $0000111122223333 Because of this, we need a 'byte' offset to calculate the position within the word, depending on if our tile is odd or even |
 |
| DoStrip will draw one horizontal strip of tiles. The job is defined by the following registers: A2=Source Tilemap A5=Tile Bitmap Patterns A6=Vram destination D7=Width of strip The tilemap will either be the TileCache (for the background) or a mini tilemap (for sprites) If using the tile cache we zero the tiles after they are drawn. We calculate the address of the source pattern data by multiplying the tile number by 32 There are 4 bitplanes for each tile, spaced 2 bytes apart. After each line we add 160 to move down a line. we repeat 8 times We need to move across a tile, but due to the memory layout, depending on if we're on an even tile, or an odd one we'll need to shift one byte, or 7 After a tile we repeat for all the tiles on the line (the count is in D7) |
 |
| We need to horizontally flip the bytes in the tiles,
and we'll do this via a 256 byte Lookup Table. For each of the 256 possible bytes, We calculate the opposite position of the 8 pixels of a bitplane |
|
| DoStripRev has essentially the same function, however
we flip the pixels via the LUT We load A1 with the address of the lookup table, we then read in a byte into D0, and use the source byte as an offset in the lookup table. Reading from this resulting address gets the X-flipped equivalent byte, which we write to the screen. We write 4 times per line and for all 8 lines |
 |
 |
Lesson
P53 - Multiplatform Software tilemap on the NeoGeo via the FIX
Layer (mintile) We've written a minimal multiplatform Tile/Sprite routine in the Mintile series, Now, lets take a look at the platform specific code to quickly draw tiles to the screen on the NeoGeo using the Fix layer |
|
NEO_MinTile.asm
|
|
| MinTile is a
multiplatform 'engine' which allows us to define our game code in
a common way, and let the platform specific code handle the
platform specific work!... it was used to write 'ChibiFighter' on
the Z80. For more details on Mintile, see the Mintile series here... |
|
|
The FIX layer is really only designed for the
GUI, but it works like a normal 8x8 pixel tile tilemap, so is an
easy way to get graphics to the screen. |
Tile Drawing Routines
| Our example shows an onscreen tilemap and two software 'sprites'. Mintile supports scrolling and X-Flip (but not Y-flip) The 'sprites' are actually miniature tile maps, this is to reduce the amount of platform specific code. These are all created via the DoStrip platform specific routine, which we'll look at here. This example writes to the screen using the Fix layer. |
 |
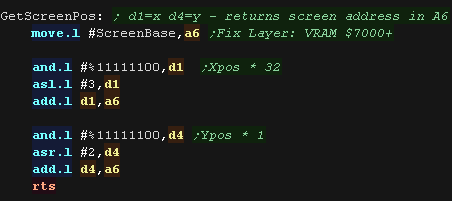
| We have a 'GetScreenPos' function , which calculates the VRAM
destination for the sprite objects. It calculates a VRAM destination in A6, from an X,Y position in D1,D4 Co-ordinates are in 'Logical Units' (Pairs of pixels) - this is to allow for single byte co-ordinates and maintain compatibility with the 8 bit systems The Fixlayer goes down the screen, then across, so we multiply the Xpos by 32, and add the Ypos to the base address of the Fix layer ($7000) |
 |
| DoStrip will draw one horizontal strip of tiles. The job is defined by the following registers: A2=Source Tilemap A5=Tile Bitmap Patterns A6=Vram destination D7=Width of strip The tilemap will either be the TileCache (for the background) or a mini tilemap (for sprites) If using the tile cache we zero the tiles after they are drawn. We add A5 to the tile number - by default this is $1800+768 - to point to the first FIX tile for the background,palette 1 To move across the screen, we add 32 to the destination address (as each column has 32 tiles) we repeat until the line is done. |
 |
| DoStripRev will draw the X-flipped character, but the FIX layer
can't perform the Xflip operation, so we have an alternative set of
Xflipped patterns we use for the job. |
 |
| DoStripRev will use the Xflipped patterns, and walk through the
source A2 tilemap in reverse |
 |
| We need to define the address of the FIX layer data at the appropriate memory address in NeoGeo.xml | 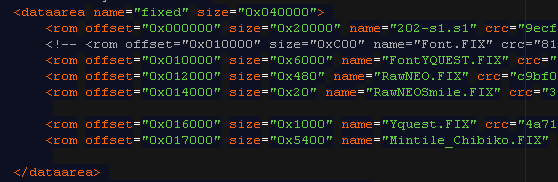 |
|
Lesson
P54 - Multiplatform Software tilemap on the NeoGeo via Hardware
Sprites (MinTile) We've written a minimal multiplatform Tile/Sprite routine in the Mintile series, Now, lets take a look at the platform specific code to quickly draw tiles to the screen on the NeoGeo using Hardware Sprites |
|
NEO_MinTile_Hsprite.asm
|
|
| MinTile is a
multiplatform 'engine' which allows us to define our game code in
a common way, and let the platform specific code handle the
platform specific work!... it was used to write 'ChibiFighter' on
the Z80. For more details on Mintile, see the Mintile series here... |
|
|
The NeoGeo had no tilemap, but it has 'chainable' hardware sprites, that can be combined to form a tilemap. That's what we'll do this time! The sprites are 16x16, but we'll scale them to 50% to simulate an 8x8 tilemap. |
Tile Drawing Routines
| Our example shows an onscreen tilemap and two software 'sprites'. Mintile supports scrolling and X-Flip (but not Y-flip) The 'sprites' are actually miniature tile maps, this is to reduce the amount of platform specific code. These are all created via the DoStrip platform specific routine, which we'll look at here. The sprites are scaled to 50% for the background, so we need to double the size of our tile patterns to get them the right size (which is why they appear small in this example) |
 |
||||||||||||||||||||||||||||||||||||||||||||||||||||||||||||||||||||||||||||||||||||||||||||||||||||||||||||||||||||||||||||||||||||||||||||||||||||||||||
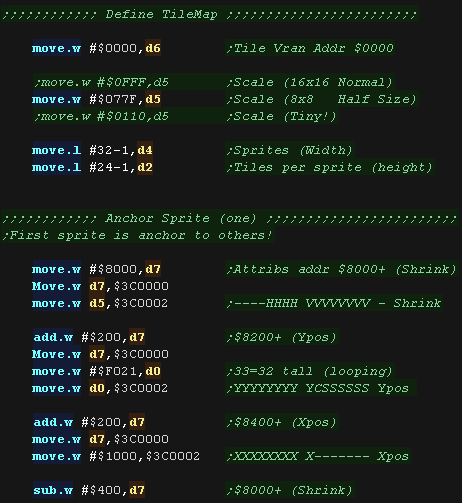
| Before we can use the 'Tilemap' We have to build it out of
sprites! There are a variety of addresses which define each of the sprite.
|
 |
||||||||||||||||||||||||||||||||||||||||||||||||||||||||||||||||||||||||||||||||||||||||||||||||||||||||||||||||||||||||||||||||||||||||||||||||||||||||||
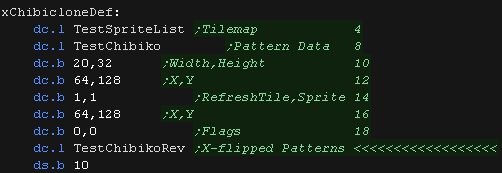
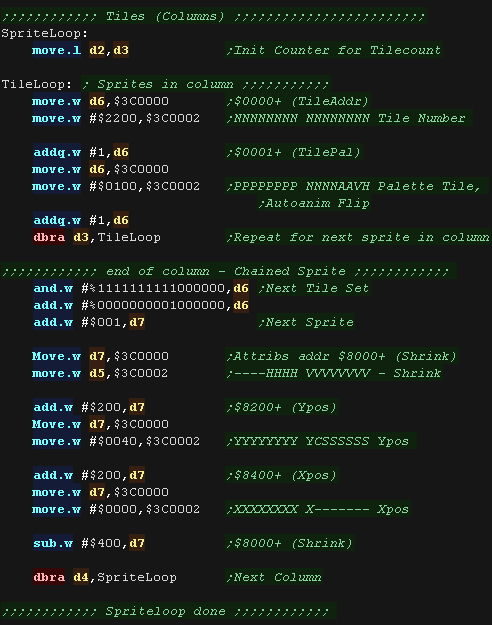
| The first sprite is the 'Anchor' to which all the others acre
connected, We need to set all the sprite parameters for the object. The Sprite is 32 tiles tall, with a scale of $77F (50% - 8x8 pixels) We build all the tiles in the column, all of them point to tile $2200 by default (a blank tile), and palette 1 Our tilemap is 32x24, each sprite draws a full column, so we've used 32 of the available sprites! |
 |
||||||||||||||||||||||||||||||||||||||||||||||||||||||||||||||||||||||||||||||||||||||||||||||||||||||||||||||||||||||||||||||||||||||||||||||||||||||||||
| DoStrip will draw one horizontal strip of tiles. it's
intended for the background tiles. The job is defined by the following registers: A2=Source Tilemap A5=Tile Bitmap Patterns A6=Vram destination D7=Width of strip The tilemap will either be the TileCache (for the background) or a mini tilemap (for sprites) If using the tile cache we zero the tiles after they are drawn. We set the matching sprite tile for our fake tile map to make it visible in the desired position. |
 |
||||||||||||||||||||||||||||||||||||||||||||||||||||||||||||||||||||||||||||||||||||||||||||||||||||||||||||||||||||||||||||||||||||||||||||||||||||||||||
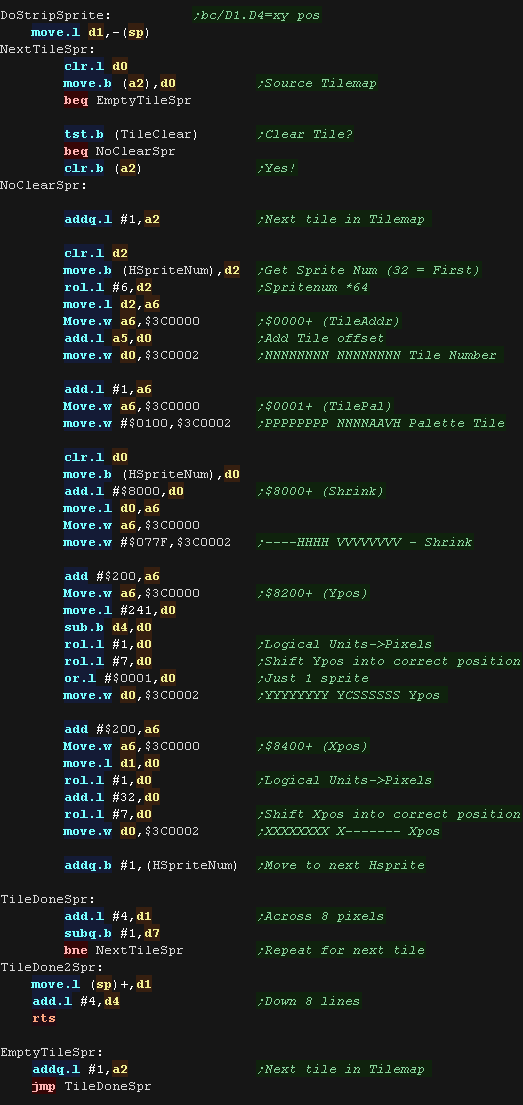
| DoStripSprite will draw one horizontal strip of tiles
for the movable characters The job is defined by the following registers: A2=Source Tilemap A5=Tile Bitmap Patterns D1,D4= X,Y pos D7=Width of strip We use HspriteNum to track the next free sprite number. We position the hardware sprite, and set the tile number (Vram Address $0000+), Palette ($0001+), Scale ($8000+), Xpos ($8200+) and Ypos ($8400+) Due to the way MinTile works, it's not really possible to chain tiles for the vertical height, so we use more hardware sprites for each column. |
 |
||||||||||||||||||||||||||||||||||||||||||||||||||||||||||||||||||||||||||||||||||||||||||||||||||||||||||||||||||||||||||||||||||||||||||||||||||||||||||
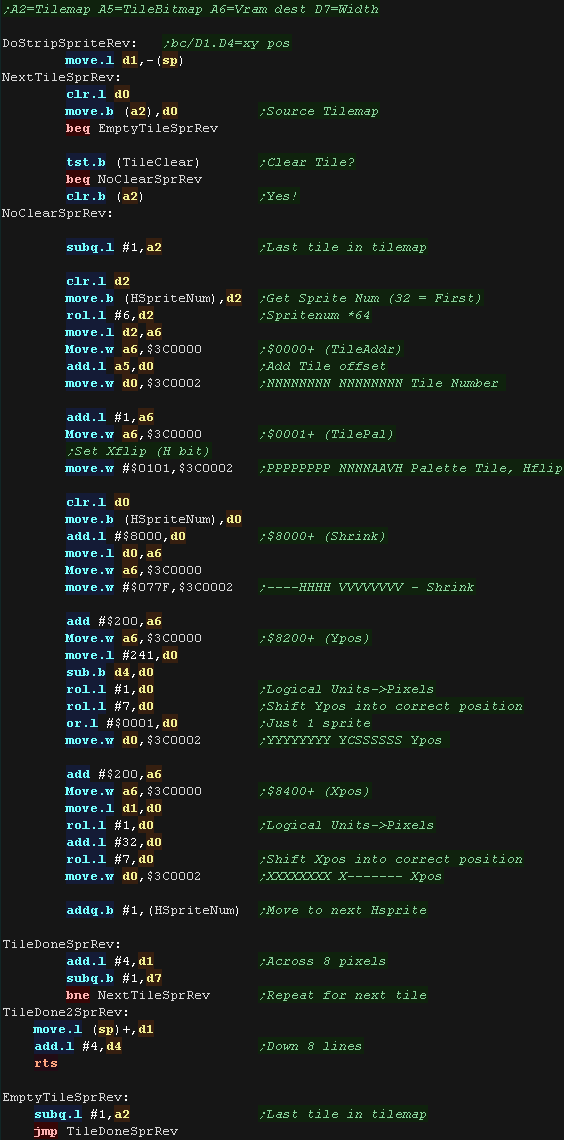
| DoStripRev functions essentially the same, however it
sets the 'H' bit of $0001+ to Xflip the patterns, and moves through
the tilemap from right to left. |
 |
||||||||||||||||||||||||||||||||||||||||||||||||||||||||||||||||||||||||||||||||||||||||||||||||||||||||||||||||||||||||||||||||||||||||||||||||||||||||||
| We need to define the address of the Sprite pattern data at the appropriate memory address in NeoGeo.xml | 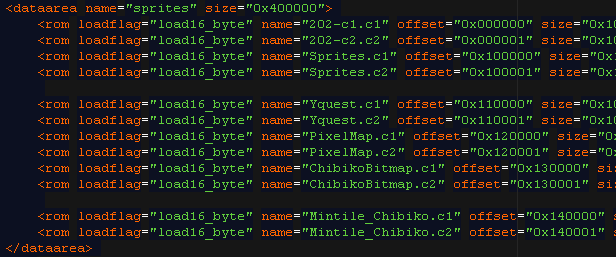 |
||||||||||||||||||||||||||||||||||||||||||||||||||||||||||||||||||||||||||||||||||||||||||||||||||||||||||||||||||||||||||||||||||||||||||||||||||||||||||

The Interrupt Handler - Vblanks
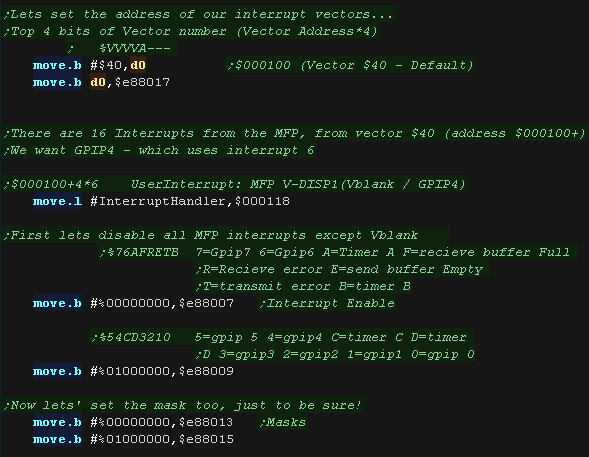
| We're going to use VBlank to control the speed of our music. Vblank and many other interrupts are generated by the MFT. The interrupts can be enabled with $E88007/9, however they are also 'masked' with $E88013/5 (a bit 1 in both enables an interrupt!) Interrupt 6 - Gpip4 is the Vblank (referred to as V-Disp) is controlled by bit 7 of $E88009 and $E88015 - This causes an execution of vector $46 at address $000118 We need to load the address of our interrupt handler to $000118 We don't need to, but actually we can change this address!... The default vector base for the interrupts is vector $40 at address $000100 - this can be changed with the top 4 bits of $e88017 |
 |
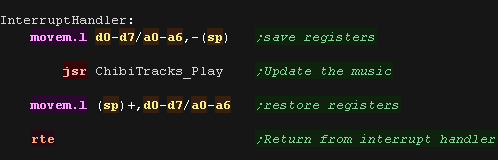
| We need to protect all our register, as ChibiTracks will use
them. We return from our interrupt handler with RTE |
 |
ChibiTracks
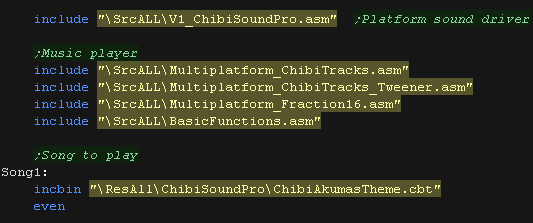
| To use ChibiTracks, we need to include the modules of the
music player, We also need the platform specific "Chibisound Pro" sound driver. We also need to have a ChibiTracks music file to play. |
 |
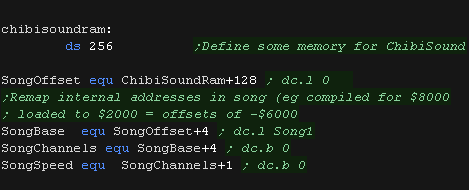
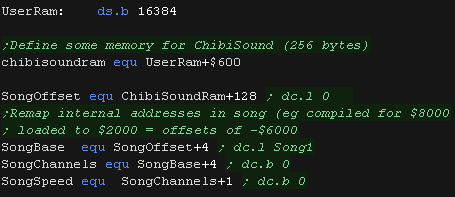
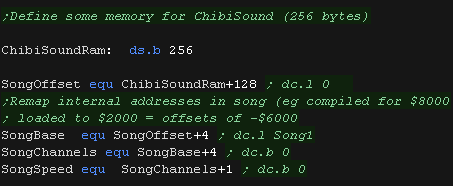
| We need to allocate up to 256 bytes of memory for
ChibiSoundPro, and ChibiTracks player. We define pointers to the ChibiTracks variables within this ram. |
 |
| Before we play anything we need to init the ChibiSoundPro
Driver. To start our song, we set SongBase to point to the music file we want to play, and call StartSong - we do this any time we want the music to change If we want to change the speed, we can load a new value into SongSpeed at any time. |
 |
| All that's left is to execute the PLAY routine to update the playing music. | |

The Interrupt Handler - Vblanks
| The Vblank (Vsync) interrupt will cause an execution of the
IRQ6 vector at $00000078 First we need to put the address of our interrupt handler at this address. We still need to do a bit more though!... |
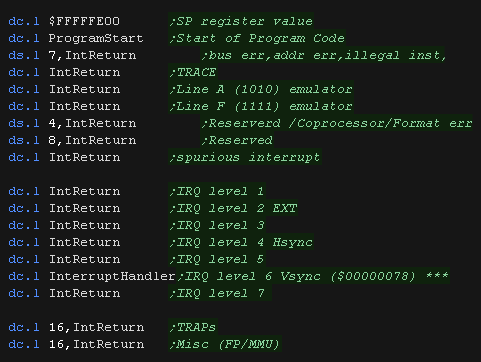 |
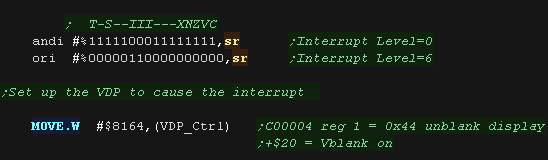
| Next we need to set the interrupt level in the SR register. This is controlled by bits 8-10. We need to set a value of 6 or lower, to allow our interrupt to occur. Next we need to set bit 5 of VDP register 1 to one, this will enable Vblank on the video hardware |
 |
| We need to protect all our register, as ChibiTracks will use
them. We return from our interrupt handler with RTE |
|
ChibiTracks
| To use ChibiTracks, we need to include the modules of the
music player, We also need the platform specific "Chibisound Pro" sound driver. We also need to have a ChibiTracks music file to play. |
|
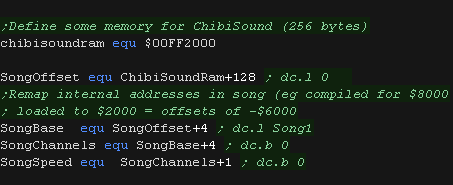
| We need to allocate up to 256 bytes of memory for
ChibiSoundPro, and ChibiTracks player. We define pointers to the ChibiTracks variables within this ram. |
 |
| Before we play anything we need to init the ChibiSoundPro
Driver. To start our song, we set SongBase to point to the music file we want to play, and call StartSong - we do this any time we want the music to change If we want to change the speed, we can load a new value into SongSpeed at any time. |
|
| All that's left is to execute the PLAY routine to update the playing music. | |
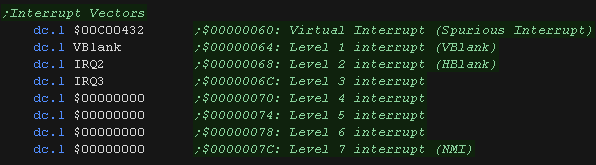
The Interrupt Handler - Vblanks
| The Vblank (Vsync) interrupt will cause an execution of the
IRQ0 vector at $00000064 First we need to put the address of our interrupt handler at this address. |
 |
| Next we need to set the interrupt level in the SR register. This is controlled by bits 8-10. We need to set a value of 0, to allow our interrupt to occur, this will also enable the other interrupts. |
 |
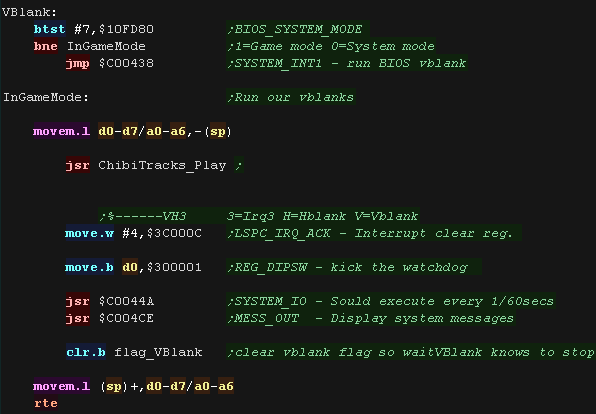
| Our interrupt handler needs to check if our game is running,
we do this with bit 7 of $10FD80 - A value of 1 means our game
is running, otherwise we run the system interrupt handler at
$10FD80 Next we need to do some system tasks, we clear the interrupt with bit 2 of $3C000C. We kick the watchdog at $3C000C - this tells the system we haven't crashed (otherwise it auto reboots) We run to system routines to do various jobs, $C0044A handles IO, $C004CE shows any system messages. We can now worry about updating our music! We need to protect all our register, as ChibiTracks will use them. We return from our interrupt handler with RTE |
 |
ChibiTracks
| To use ChibiTracks, we need to include the modules of the
music player, We also need the platform specific "Chibisound Pro" sound driver. We also need to have a ChibiTracks music file to play. |
|
| We need to allocate up to 256 bytes of memory for
ChibiSoundPro, and ChibiTracks player. We define pointers to the ChibiTracks variables within this ram. |
|
| Before we play anything we need to init the ChibiSoundPro
Driver. To start our song, we set SongBase to point to the music file we want to play, and call StartSong - we do this any time we want the music to change If we want to change the speed, we can load a new value into SongSpeed at any time. |
|
| All that's left is to execute the PLAY routine to update the playing music. | |

|
We're going
to 'Play nice' with the OS for a change! The OS will do most of the VBlank work for us, we'll just tag onto it's job list, and update our music once a frame. |
The Interrupt Handler - Vblanks
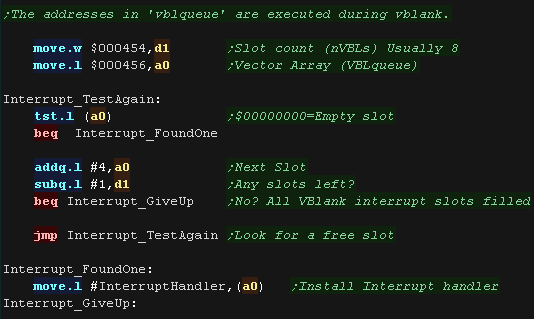
| The system executes a series of interrupt handlers during
Vblank, These are defined in a list, with the lists
pointer at address $000456. The length of the list is at
address $000454 (8 by default) We want to register the address of interrupt handler in this list, so we need to look for a zero entry ($00000000) if we can find one we put our interrupt handler in it's slot. |
 |
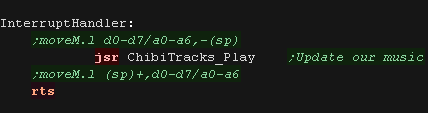
| ChibiTracks uses all our registers, but the OS is protecting
them for us. We return from our interrupt handler with RTS, the other defined Vblanks interrupt handlers will (or did) execute. |
 |
ChibiTracks
| To use ChibiTracks, we need to include the modules of the
music player, We also need the platform specific "Chibisound Pro" sound driver. We also need to have a ChibiTracks music file to play. |
|
| We need to allocate up to 256 bytes of memory for
ChibiSoundPro, and ChibiTracks player. We define pointers to the ChibiTracks variables within this ram. |
 |
| Before we play anything we need to init the ChibiSoundPro
Driver. To start our song, we set SongBase to point to the music file we want to play, and call StartSong - we do this any time we want the music to change If we want to change the speed, we can load a new value into SongSpeed at any time. |
|
| All that's left is to execute the PLAY routine to update the playing music. | |
|
We're going
to 'Play nice' with the OS for a change! The OS will do most of the VBlank work for us, we'll just tag onto it's job list, and update our music once a frame. |
The Interrupt Handler - Vblanks
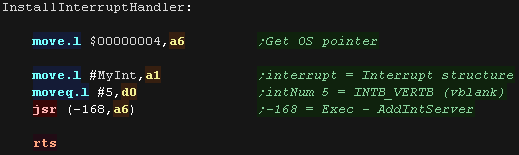
| We need to get the operating system to define the interrupt,
we load a pointer to the OS into A6 from address $4 We need to define a structure with the information about the interrupt, we load it into A1 We select the interrupt type with D0, we want interrupt 5 (VERTB - vblank) we now execute function 'Exec - AddIntServer' at address -168 |
 |
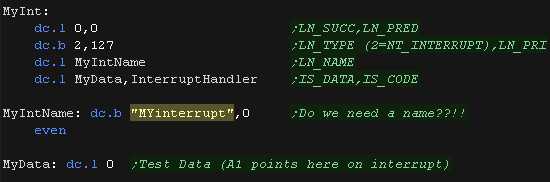
| Here is the structure that defines the interrupt in A1. The
first few bytes should be left unchanged. LN_NAME points to a zero terminated string giving the interrupt a name - it can be anything really. IS_DATA can point to a data structure for the interrupts parameters, it's address is loaded into A1. This will be handy if you're using multiple instances of the same interrupt handler, but we don't really need it. IS_CODE points to the actual subroutine which will be executed. |
 |
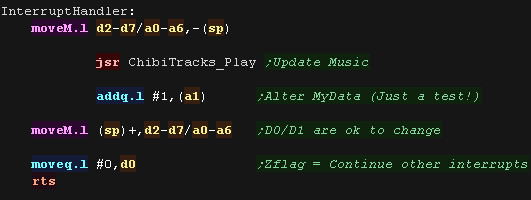
| ChibiTracks uses all our registers, the calling routine will
deal with D0 and D1 for us though, so we don't Push and Pop
those. A0 must retain the value $DFF000 for Vblank interrupts - We're backing up all Address registers so that is fine! We've added a little test of IS_DATA, by adding 1 to A1 (MyData) To tell the OS to pass control to other interrupts we set the Zero flag and return with RTS |
 |
ChibiTracks
| To use ChibiTracks, we need to include the modules of the
music player, We also need the platform specific "Chibisound Pro" sound driver. We also need to have a ChibiTracks music file to play. |
|
| We need to allocate up to 256 bytes of memory for
ChibiSoundPro, and ChibiTracks player. We define pointers to the ChibiTracks variables within this ram. |
 |
| Before we play anything we need to init the ChibiSoundPro
Driver. To start our song, we set SongBase to point to the music file we want to play, and call StartSong - we do this any time we want the music to change If we want to change the speed, we can load a new value into SongSpeed at any time. |
|
| All that's left is to execute the PLAY routine to update the playing music. | |

The Interrupt Handler - Vblanks
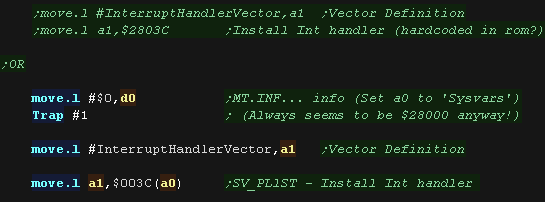
| We're going to take over the vblank interrupt handler of the
operating system! The OS passes control to the interrupt list at address +$3C in the SysVars - Usually at address $2803C We can check the actual address of SysVars by executing Trap #1 function #0 (MT_INF)... this returns the base of SysVars in A0 We load the address of our InterruptList into +$3C (not the interrupt itself) |
 |
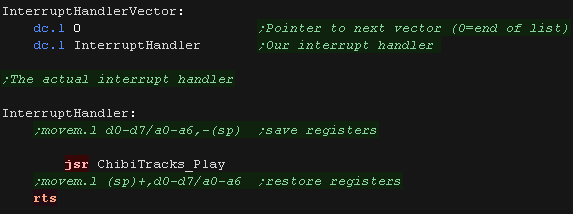
| The Structure of the interrupt list is a linked list which
takes 2 Longs. The 1st long points to the next list, or $00000000 if this is the end of the list. the 2nd long points to the address of our interrupt handler. We use the interrupt to play our music, and return with RTS. The OS is preserving all the registers for us, so we don't PUSH or POP any. |
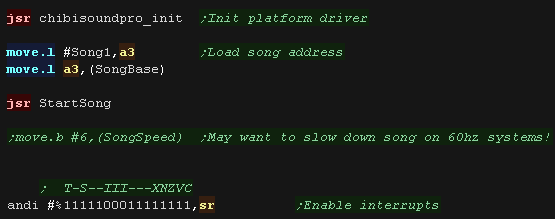
 |
Finally we need to set the interrupt level to 0 in the SR register to start interrupts. |
 |
ChibiTracks
| To use ChibiTracks, we need to include the modules of the
music player, We also need the platform specific "Chibisound Pro" sound driver. We also need to have a ChibiTracks music file to play. |
|
| We need to allocate up to 256 bytes of memory for
ChibiSoundPro, and ChibiTracks player. We define pointers to the ChibiTracks variables within this ram. |
 |
| Before we play anything we need to init the ChibiSoundPro
Driver. To start our song, we set SongBase to point to the music file we want to play, and call StartSong - we do this any time we want the music to change If we want to change the speed, we can load a new value into SongSpeed at any time. |
|
| All that's left is to execute the PLAY routine to update the playing music. | |
| View Options |
| Default Dark |
| Simple (Hide this menu) |
| Print Mode (white background) |
| Top Menu |
| ***Main Menu*** |
| Youtube channel |
| Patreon |
| Introduction to Assembly (Basics for absolute beginners) |
| Amazon Affiliate Link |
| AkuSprite Editor |
| ChibiTracker |
| Dec/Bin/Hex/Oct/Ascii Table |
| Alt Tech |
| Archive.org |
| Bitchute |
| Odysee |
| Rumble |
| DailyMotion |
| Please note: I wlll upload more content to these alt platforms based on the views they bring in |
| 68000 Content |
| ***68000 Tutorial List*** |
Learn 68000 Assembly  |
| Hello World Series |
| Platform Specific Series |
| Simple Samples |
| Grime 68000 |
| 68000 Downloads |
| 68000 Cheatsheet |
| Sources.7z |
| DevTools kit |
| 68000 Platforms |
| Amiga 500 |
| Atari ST |
| Neo Geo |
| Sega Genesis / Mega Drive |
| Sinclair QL |
| X68000 (Sharp x68k) |
| 8086 Content |
| Learn 8086 Assembly |
| Platform Specific Series |
| Hello World Series |
| Simple Samples |
| 8086 Downloads |
| 8086 Cheatsheet |
| Sources.7z |
| DevTools kit |
| 8086 Platforms |
| Wonderswan |
| MsDos |
| ARM Content |
| Learn ARM Assembly |
| Learn ARM Thumb Assembly |
| Platform Specific Series |
| Hello World |
| Simple Samples |
| ARM Downloads |
| ARM Cheatsheet |
| Sources.7z |
| DevTools kit |
| ARM Platforms |
| Gameboy Advance |
| Nintendo DS |
| Risc Os |
| Risc-V Content |
| Learn Risc-V Assembly |
| Risc-V Downloads |
| Risc-V Cheatsheet |
| Sources.7z |
| DevTools kit |
| MIPS Content |
| Learn Risc-V Assembly |
| Platform Specific Series |
| Hello World |
| Simple Samples |
| MIPS Downloads |
| MIPS Cheatsheet |
| Sources.7z |
| DevTools kit |
| MIPS Platforms |
| Playstation |
| N64 |
| PDP-11 Content |
| Learn PDP-11 Assembly |
| Platform Specific Series |
| Simple Samples |
| PDP-11 Downloads |
| PDP-11 Cheatsheet |
| Sources.7z |
| DevTools kit |
| PDP-11 Platforms |
| PDP-11 |
| UKNC |
| TMS9900 Content |
| Learn TMS9900 Assembly |
| Platform Specific Series |
| Hello World |
| TMS9900 Downloads |
| TMS9900 Cheatsheet |
| Sources.7z |
| DevTools kit |
| TMS9900 Platforms |
| Ti 99 |
| 6809 Content |
| Learn 6809 Assembly |
| Learn 6309 Assembly |
| Platform Specific Series |
| Hello World Series |
| Simple Samples |
| 6809 Downloads |
| 6809/6309 Cheatsheet |
| Sources.7z |
| DevTools kit |
| 6809 Platforms |
| Dragon 32/Tandy Coco |
| Fujitsu FM7 |
| TRS-80 Coco 3 |
| Vectrex |
| 65816 Content |
| Learn 65816 Assembly |
| Hello World |
| Simple Samples |
| 65816 Downloads |
| 65816 Cheatsheet |
| Sources.7z |
| DevTools kit |
| 65816 Platforms |
| SNES |
| eZ80 Content |
| Learn eZ80 Assembly |
| Platform Specific Series |
| eZ80 Downloads |
| eZ80 Cheatsheet |
| Sources.7z |
| DevTools kit |
| eZ80 Platforms |
| Ti84 PCE |
| IBM370 Content |
| Learn IBM370 Assembly |
| Simple Samples |
| IBM370 Downloads |
| IBM370 Cheatsheet |
| Sources.7z |
| DevTools kit |
| Super-H Content |
| Learn SH2 Assembly |
| Hello World Series |
| Simple Samples |
| SH2 Downloads |
| SH2 Cheatsheet |
| Sources.7z |
| DevTools kit |
| SH2 Platforms |
| 32x |
| Saturn |
| PowerPC Content |
| Learn PowerPC Assembly |
| Hello World Series |
| Simple Samples |
| PowerPC Downloads |
| PowerPC Cheatsheet |
| Sources.7z |
| DevTools kit |
| PowerPC Platforms |
| Gamecube |
| Work in Progress |
| ChibiAndroids |
| Misc bits |
| Ruby programming |
Buy my Assembly programming book
on Amazon in Print or Kindle!


Available worldwide!
Search 'ChibiAkumas' on
your local Amazon website!
Click here for more info!


Buy my Assembly programming book
on Amazon in Print or Kindle!
Available worldwide!
Search 'ChibiAkumas' on
your local Amazon website!
Click here for more info!
Buy my Assembly programming book
on Amazon in Print or Kindle!
Available worldwide!
Search 'ChibiAkumas' on
your local Amazon website!
Click here for more info!