

Simple sample code on a variety of
Z80 machines
Continuing from the 'hello world' series, we're going to create some super
basic examples to get you started! Each will be a single ASM file (where
possible) and we'll look at the basics you'll need to make a game with as
little code as possible, Lets make a start!
Drawing a bitmap
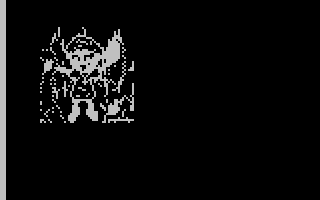
| We're going to learn how to transfer a bitmap of our 'Chibiko'
mascot to the screen. The bitmap is 48x48... but the data will be 24x24, as each character block is 2x2 pixels. |
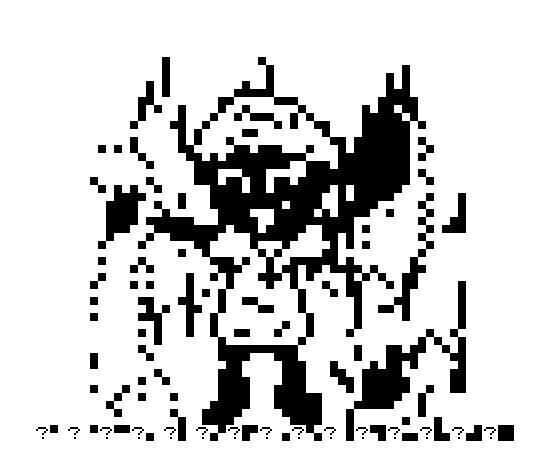 |
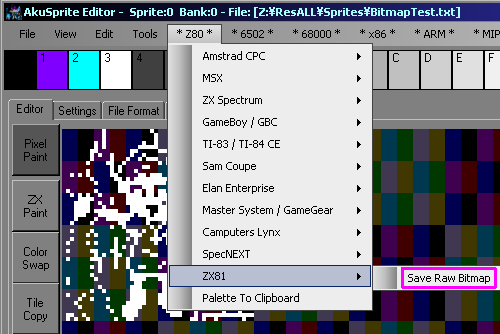
| The image is exported with AkuSprite
Editor, it's free and open source |
 |
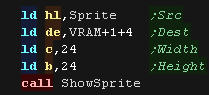
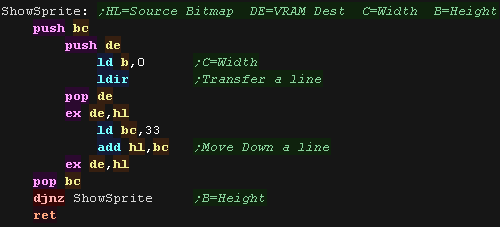
| We can transfer our sprite to VRAM with a sequence of LDIR
commands. We need to add 33 to our memory pos to move down a line, as each line is 32 chars+1 NewLine char |
  |
Reading the keyboard
| This time we're going to use a 8x8 pixel image (4x4 char blocks) We'll move a little character around the screen. |
 |
||||||||||||||||||||||||||||||||||||||||||||||||||||||||||||
| We can read in a row of the keyboard by setting BC to the correct value and using IN A,(C)... the resulting byte will contain a 0 if the key is pressed, 1 if it is not. |
|
||||||||||||||||||||||||||||||||||||||||||||||||||||||||||||
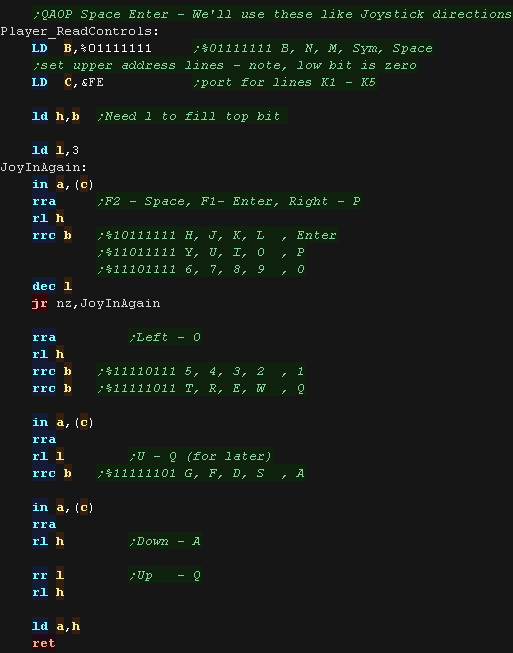
| As the ZX81 doesn't support a joystick, we'll use QAOP Enter and
Space as directions and fire buttons, we can use these for simple
games. We start by loading %01111111 into B, and read in, we repeatedly rotate B, shifting the bits of the buttons we want into H, which contains the eventual result. |
 |
||||||||||||||||||||||||||||||||||||||||||||||||||||||||||||
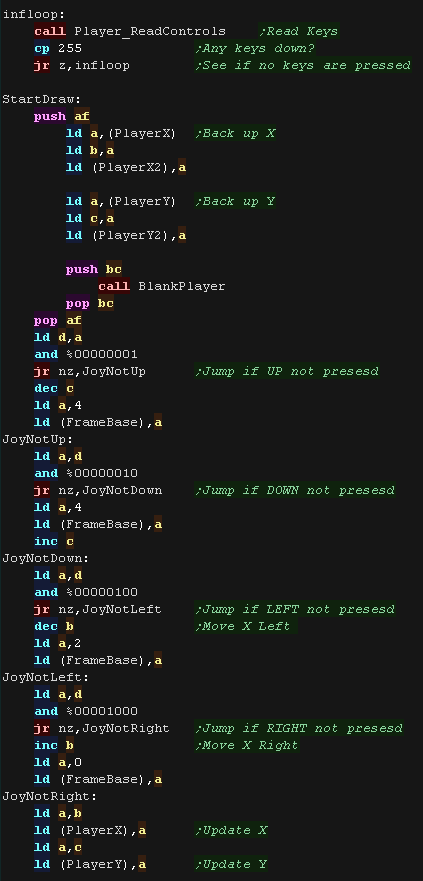
| When it comes to our main loop we'll wait until a key is pressed. When one is, we'll test each of our directions, and move our sprite in that direction. We also change FrameBase... this selects one of the pairs of sprites for the animation, We use Sprite 4,5 as Up/Down We use Sprite 0,1 as Right We use Sprite 2,3 as Left. |
 |
||||||||||||||||||||||||||||||||||||||||||||||||||||||||||||
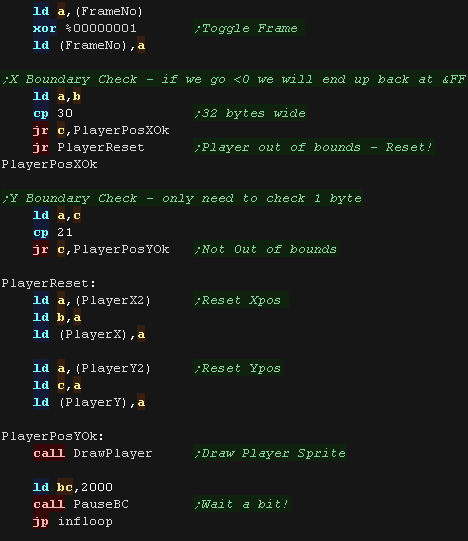
| We next toggle the framenumber (FrameNo) We then check our X and Y position, and reset if the object has gone off the screen. We then draw the sprite to the screen. |
 |
||||||||||||||||||||||||||||||||||||||||||||||||||||||||||||
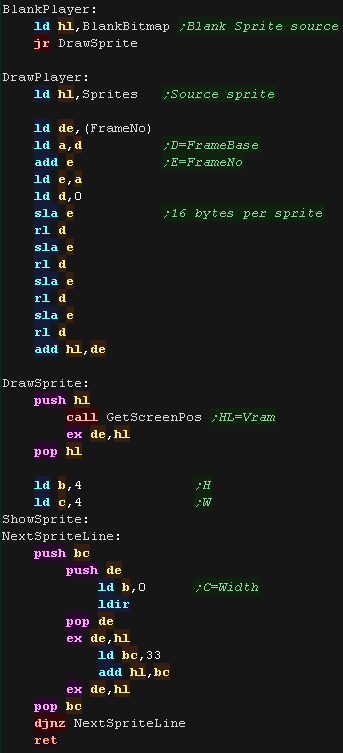
| Lets draw our sprite! We load in FrameNo and FrameBase and add them together. As each 8x8 pixel (4x4 char) image is 16 bytes, we multiply this by 16 via bitshifts, and add it to the 'Sprites' base. We've now calculated the source bitmap address. We then draw our sprite to the screen! We use 'GetScreenPos' to calculate the VRAM address from the (B,C) X,Y pos |
 |
||||||||||||||||||||||||||||||||||||||||||||||||||||||||||||
| To calculate the VRAM destination we use the following formula Destination ram = VRAM+1+ XPOS + (YPOS*33) We skip the first byte of VRAM as this is a newline byte. We effect multiplication of Ypos*33 by adding the Ypos*1, then bitshifting YPOS to calculate YPOS*32 and adding again. |
 |
||||||||||||||||||||||||||||||||||||||||||||||||||||||||||||
| We've
learned how to draw an image to the screen, and read the keyboard. We should have all we need to start writing a simple game on the ZX81... so get programming! What's your excuse not to? |
 |
Logical Units and clipping
| To allow us to crop our sprites, we'll need to move our sprite
around 'logical space' - only a portion of this will be the visible
screen. We'll use this to crop the sprite. |
 |
We're designing our code for screens of 256x192 - and we'll use 'Logical Co-ordinates' which define a visible screen of 192x96 (2 pixels per logical unit) The visible logical screen is in the center of the logical space area to allow the sprite to be 'partially offscreen' on any side. |
 |
| We need to crop any offscreen part to
get to the first visible pixel of the sprite. After each line We also need to crop the unused pixels to the next visible pixel |
 |
Logical Cropping
| Our cropping routine will work out the X,Y pos in bytes, and width
and height + any skipped pixels from the source data registers B,C is the X,Y co-ordinate in logical units registers H,L is the Width,Height in logical units register IY is the address of the source bitmap data. First we zero Dm,E - they are used for temp values |
 |
| Ok... lets crop the top of the sprite... First we remove the ypos of the first visible pixel from the draw ypos (C)... if the result is greater than zero, then nothing is off the screen at the top. if the result is less than zero we need to crop... we convert the negative to a positive and compare to the height of our sprite (L), if the amount to crop is not less than the height then the sprite is completely offscreen. Anything else is the number of lines we need to remove from the top, we store this in E and set the new 'draw position' to Ypos (C) =0 |
 |
| Next we do the same for the bottom, We add the height to the Ypos, and subtract the height of the logical screen, if it's over the screen height (greater than zero) we need to crop again - the result is the amount to crop |
 |
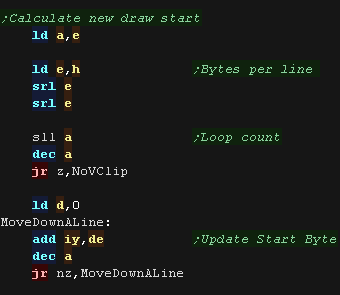
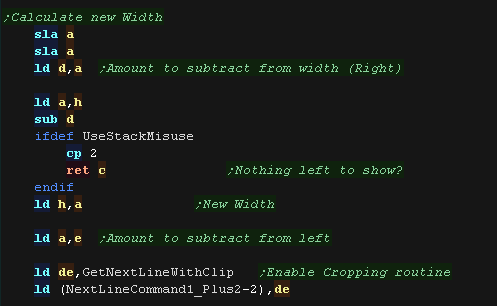
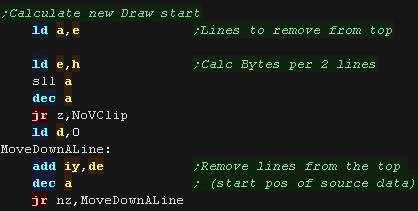
| We've calculated the top (E) and bottom (D) crop... we now use these to calculate the new height of the sprite (L). | 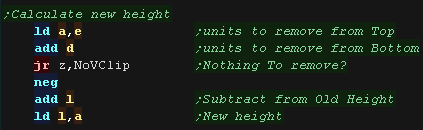 |
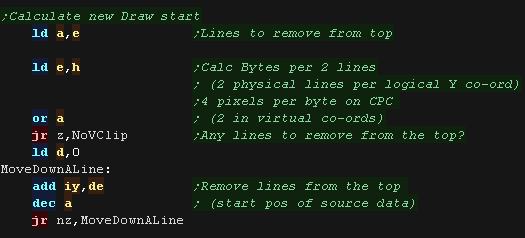
| We then skip over any bytes in the source (IY) based on the number
of lines of tiles we need to remove from the top. |
 |
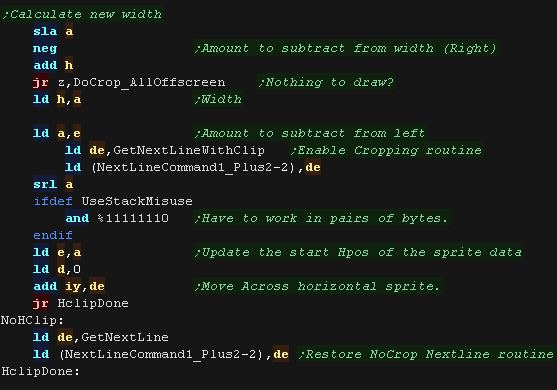
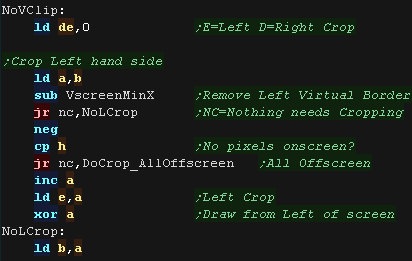
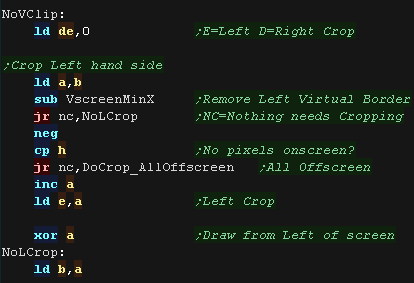
| now we do the same for the X axis First we remove the xpos of the first visible pixel from the draw Xpos (B) ... if the result is greater than zero, then nothing is off the screen at the left. if the result is less than zero we need to crop... we convert the negative to a positive and compare to the width of our sprite (H), if the amount to crop is not less than the width then the sprite is completely offscreen. Anything else is the number of lines we need to remove from the left, we store this in D5 and set the new 'draw position' to Xpos (B) =0 If we're using 'Stack Misuse' we have to work in 16 bit words. |
 |
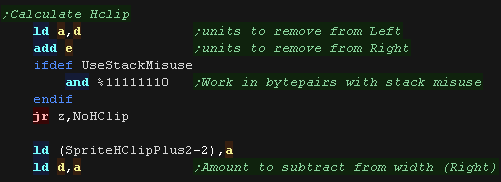
| Next we do the same for the right, We add the width (H) to the Xpos, and subtract the width of the logical screen, if it's over the screen width (greater than zero) we need to crop again - the result is the amount to crop from the right (D) |
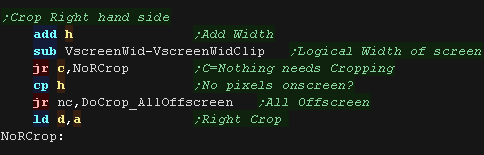 |
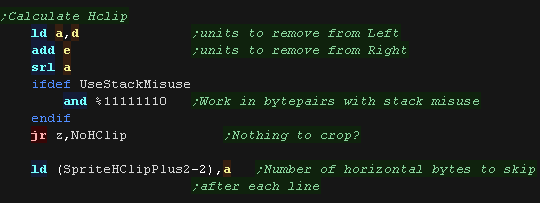
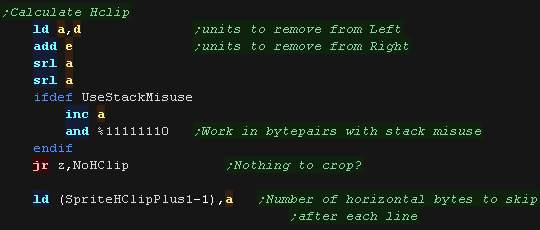
| We've calculated the left and right crop... We use these
to calculate the bytes to skip after each line of our sprite
(SpriteHClip) If this is zero, there's no horizontal crop |
 |
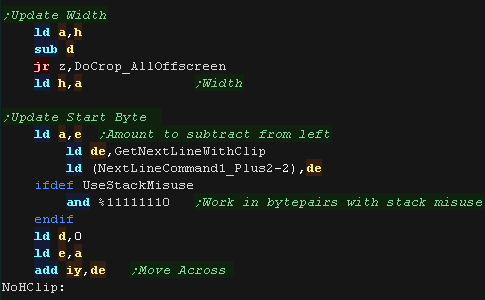
| We need to crop, so we calculate the new with in H, We also need to turn on the slower cropping routine via self modifying code |
 |
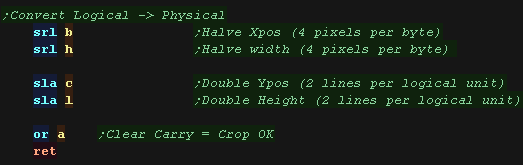
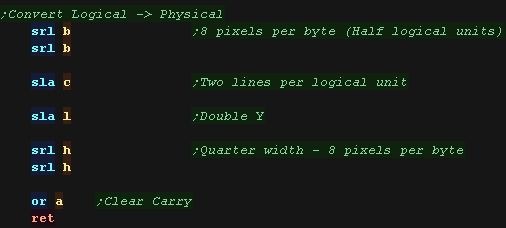
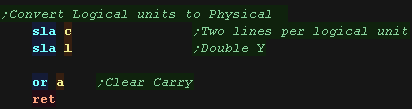
| We need to convert out Xpos and Width to a number of bytes, and
our Ypos and height to a number of lines. We clear the carry to tell the calling routine we cropped the sprite successfully (it needs drawing) and return. |
 |
| If the sprite is completely offscreen, there's no point trying to draw, so we set the carry and return |  |
Logical Units and clipping
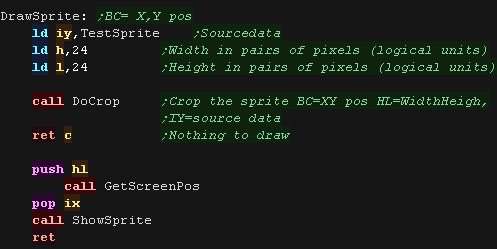
| When we want to draw our sprite, we first run the DoCrop routine
to calculate the required cropping. If there's anything to draw, we then calculate the VRAM destination with GetScreenPos, and run the ShowSprite routine |
 |
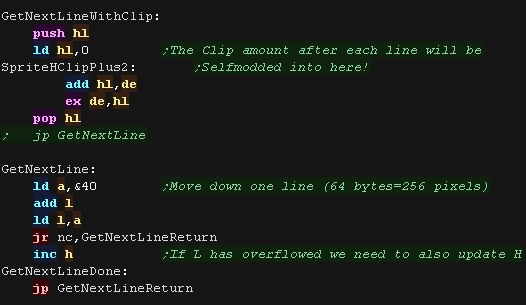
| The showsprite routine trasnfers bytes from the source (now in DE)
to VRAM in HL after each line GetNextLine moves the HL destination down one pixel line. This routine is switched via self modifying code if the sprite is cropped. |
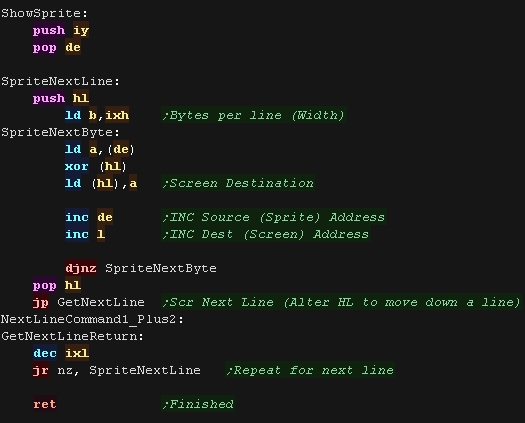 |
GetNextLine will correctly update HL to correctly handle the CPC screen layout and move down a single pixel line. If the sprite is cropped, we need to use the GetNextLineWithClip to remove the un-needed source bitmap bytes. |
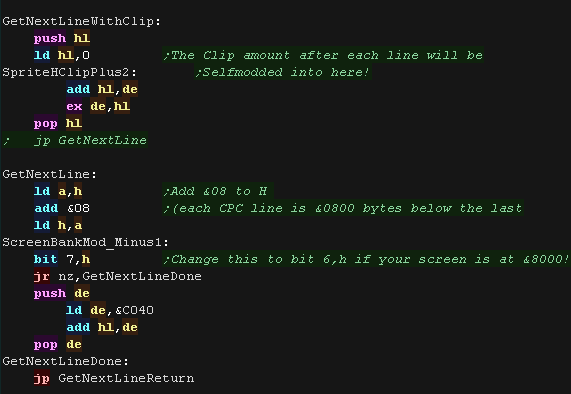 |
| This time we've looked at the cropping, and basic
sprite drawing code. Next time we'll look at the 'Double buffering' and 'Stack misuse' that allow for no flicker and faster sprite drawing. |
 |
 |
Lesson
S23 - Sprite clipping on the Amstrad CPC (Part 2/2) - Stack misuse Lets look at the rest of the sprite clipping code, and the use of 'Stack Misuse' to speed up writing! |
 |
 CPC_Bitmap_Clipping.asm CPC_Bitmap_Clipping.asm |
 |
| Stack misuse is a trick where we use the PUSH
or POP commands to quickly read or write data, by pointing the SP
register to the start of data we want to read, or end of data we
want to write, we can use these commands to quickly transfer data. BUT because the SP register is not pointing to a normal stack, we probably can't use CALLS or interrupts. |
 |
Double Buffering
| We're going to use two buffers. One will shown to the viewer while
the other is being drawn, we'll then swap the two in hardware and
repeat. One will be at &C000, the other at &4000 We need to change CRTC register 12 to set the screen base, by flipping bit 7 we can alternate between the two screen bases, we then use self modifying code to adjust the condition of the 'GetNextLine' function to work correctly with the new base. We also patch the new screen base (&C0 or &40) into the GetScreenPos function |
 |
Clearing the screen
| We'll use stack misuse to clear the screen - this means we need to
calculate the address of the byte after the end of the screen, as
each 2 byte write will be done by a PUSH command. When we want to clear the screen we set DE to the two bytes to fill the screen with, and calculate the END of the VRAM range in HL - we do this by reading in the current screen base byte, and adding &40 |
 |
| We're going to fill the full 16k screen bank with the bytes in DE. To reduce the number of loops, we do 32 'PUSH DE' commands, writing 64 bytes... using lots of repeated commands to reduce loops is called 'Unwrapping loops'... As loop conditions take time, the fewer we use, the faster the fill will be. First we back up the true stack pointer in IY. We move the end of the destination range from HL into the stack pointer... each PUSH DE decreases the stack pointer by two, so we are working in reverse. As we're misusing the stack, we stop interrupts with DI, and restore the true stack pointer in IY |
 |
Drawing the sprite
| Because we need to recalculate the screen destination after each
line, it won't help much to use the stack for writing, instead we'll
use it to read the bitmap data with POP commands. We back up the stack pointer with self modifying code, and move the image source data address from IY to SP. We then POP two bytes of data from the source image, and write them to the screen. Once the sprite is finished, we restore the stack pointer address. |
 |
| Our "get next line" routine also needs to be changed. If we need to clip the sprite, we need to update the stack pointer to skip over the source bytes that are not needed. We then need to move down the destination address in HL - if the screen buffer address changes the Bit test and JR condition also need to change... this is done by self modifying code. |
 |
| Here is the result... Note: because we are working in words, when we get close to the screen, one 4 pixel byte will disappear on alternating positions. It may be more appropriate to use the sprite misuse code for entirely onscreen sprites, and a slower regular routine for clipped sprites. |
 |
Logical Units and clipping
| To allow us to crop our sprites, we'll need to move our sprite
around 'logical space' - only a portion of this will be the visible
screen. We'll use this to crop the sprite. |
 |
We're designing our code for screens of 256x192 - and we'll use 'Logical Co-ordinates' which define a visible screen of 192x96 (2 pixels per logical unit) The visible logical screen is in the center of the logical space area to allow the sprite to be 'partially offscreen' on any side. |
|
| We need to crop any offscreen part to
get to the first visible pixel of the sprite. After each line We also need to crop the unused pixels to the next visible pixel |
|
Logical Cropping
| Our cropping routine will work out the X,Y pos in bytes, and width
and height + any skipped pixels from the source data registers B,C is the X,Y co-ordinate in logical units registers H,L is the Width,Height in logical units register IY is the address of the source bitmap data. First we set up the default getnextline routine (used for uncropped sprites) next we zero D,E - they are used for temp values |
 |
| Ok... lets crop the top of the sprite... First we remove the ypos of the first visible pixel from the draw ypos (C)... if the result is greater than zero, then nothing is off the screen at the top. if the result is less than zero we need to crop... we convert the negative to a positive and compare to the height of our sprite (L), if the amount to crop is not less than the height then the sprite is completely offscreen. Anything else is the number of lines we need to remove from the top, we store this in E and set the new 'draw position' to Ypos (C) =0 |
|
| Next we do the same for the bottom, We add the height to the Ypos, and subtract the height of the logical screen, if it's over the screen height (greater than zero) we need to crop again - the result is the amount to crop |
|
| We've calculated the top (E) and bottom (D) crop... we now use these to calculate the new height of the sprite (L). | |
| We then skip over any bytes in the source (IY) based on the number
of lines of tiles we need to remove from the top. |
 |
| now we do the same for the X axis First we remove the xpos of the first visible pixel from the draw Xpos (B) ... if the result is greater than zero, then nothing is off the screen at the left. if the result is less than zero we need to crop... we convert the negative to a positive and compare to the width of our sprite (H), if the amount to crop is not less than the width then the sprite is completely offscreen. Anything else is the number of lines we need to remove from the left, we store this in D5 and set the new 'draw position' to Xpos (B) =0 |
 |
| Next we do the same for the right, We add the width (H) to the Xpos, and subtract the width of the logical screen, if it's over the screen width (greater than zero) we need to crop again - the result is the amount to crop from the right (D) |
|
| We've calculated the left and right crop... We use these
to calculate the bytes to skip after each line of our sprite
(SpriteHClip) If this is zero, there's no horizontal crop We need to round to a pair of bytes if using stack misuse |
 |
| We need to crop, so we calculate the new with in H, We also need to turn on the slower cropping routine via self modifying code |
 |
| We need to alter the start byte to compensate for any left hand clipping | 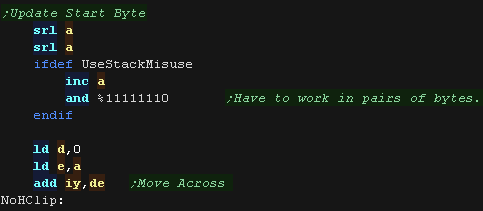 |
| We need to convert out Xpos and Width to a number of bytes, and
our Ypos and height to a number of lines. We clear the carry to tell the calling routine we cropped the sprite successfully (it needs drawing) and return. |
 |
| If the sprite is completely offscreen, there's no point trying to draw, so we set the carry and return | |
Logical Units and clipping
| When we want to draw our sprite, we first run the DoCrop routine
to calculate the required cropping. If there's anything to draw, we then calculate the VRAM destination with GetScreenPos, and run the ShowSprite routine |
 |
| The showsprite routine transfers bytes from the source (now in DE)
to VRAM in HL after each line GetNextLine moves the HL destination down one pixel line. This routine is switched via self modifying code if the sprite is cropped. |
 |
GetNextLine will correctly update HL to correctly handle the spectrum screen layout and move down a single pixel line. If the sprite is cropped, we need to use the GetNextLineWithClip to remove the un-needed source bitmap bytes. |
 |
|
We've only looked at the basic cropping and
sprite drawing routines here. Next time we'll take a peek at the use of stack misuse to speed up reading and writing, and the double buffering code. |
Next time we'll look at the 'Double buffering' and 'Stack misuse' that allow for no flicker and faster sprite drawing. |
|
 |
Lesson
S25 - Sprite clipping on the ZX Spectrum (Part 2/2) - Stack misuse Lets look at the rest of the sprite clipping code, and the use of 'Stack Misuse' to speed up writing! |
|
ZXS_Bitmap_Clipping.asm |
|
| Stack misuse is a trick where we use the PUSH
or POP commands to quickly read or write data, by pointing the SP
register to the start of data we want to read, or end of data we
want to write, we can use these commands to quickly transfer data. BUT because the SP register is not pointing to a normal stack, we probably can't use CALLS or interrupts. |
|
Double Buffering
| We're going to use two buffers. One will shown to the viewer while
the other is being drawn, we'll then swap the two in hardware and
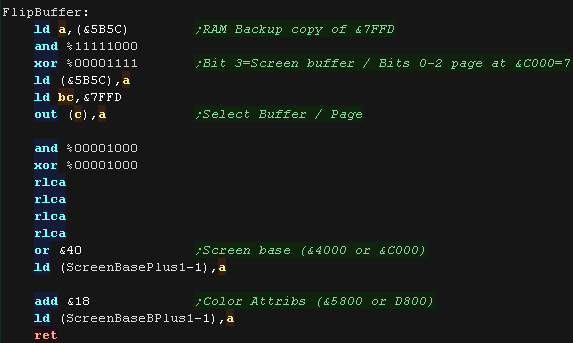
repeat. On the spectrum 128 and +3 we can use hardware buffering via bit 3 of port &7FFD. This allows us to toggle between between bank 5 and bank 7 being the visible screen buffer. Bits 0-2 also select the page banked into range. The current setting of port &7FFD is backed up at memory address &5B5C. We use this to toggle the pages, and set page 7 to the &C000 range This gives us two screen buffers, One will be at &C000, the other at &4000 We also patch the new screen base (&C0 or &40) into the GetScreenPos function, along with the color attribute addresses |
 |
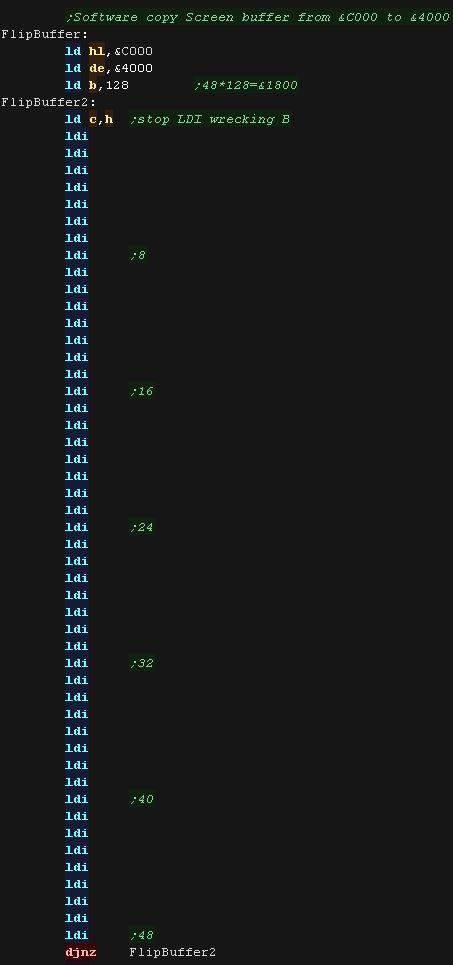
| On the 48k systems we can't use hardware page flipping, so our
only option is to do a memory copy of our buffer from &C000 to
&4000 We could use Stack misuse, but it won't really offer any benefit over an unwrapped loop of LDI commands, so we'll do that instead! LDI decreases BC after each command, but we need B to be unchanged as it's our loop counter, so we rig C to have a high value so B will not change. |
 |
 |
You may well
wonder why we've used so many LDIs!.. this is known as 'unwrapping
a loop'. Checking the condition and looping back wastes time, so by having lots of repeated commands and few loops, we make our code faster! (at the cost of some memory) |
Clearing the screen
| We'll use stack misuse to clear the screen - this means we need to
calculate the address of the byte after the end of the screen, as
each 2 byte write will be done by a PUSH command. When we want to clear the screen we set DE to the two bytes to fill the screen with, and calculate the END of the VRAM range in HL. We use this first to clear the bitmap screen, and also to set the color attributes. |
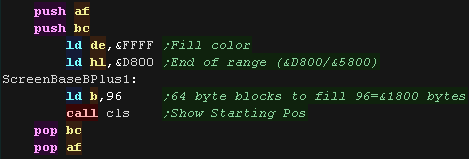 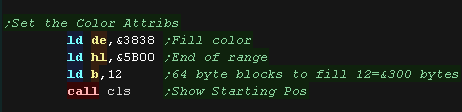 |
| We're going to fill the full 16k screen bank with the bytes in DE. To reduce the number of loops, we do 32 'PUSH DE' commands, writing 64 bytes... using lots of repeated commands to reduce loops is called 'Unwrapping loops'... As loop conditions take time, the fewer we use, the faster the fill will be. First we back up the true stack pointer in IY. We move the end of the destination range from HL into the stack pointer... each PUSH DE decreases the stack pointer by two, so we are working in reverse. As we're misusing the stack, we stop interrupts with DI, and restore the true stack pointer in IY |
|
Drawing the sprite
| Because we need to recalculate the screen destination after each
line, it won't help much to use the stack for writing, instead we'll
use it to read the bitmap data with POP commands. We back up the stack pointer with self modifying code, and move the image source data address from IY to SP. We then POP two bytes of data from the source image, and write them to the screen. Once the sprite is finished, we restore the stack pointer address. |
|
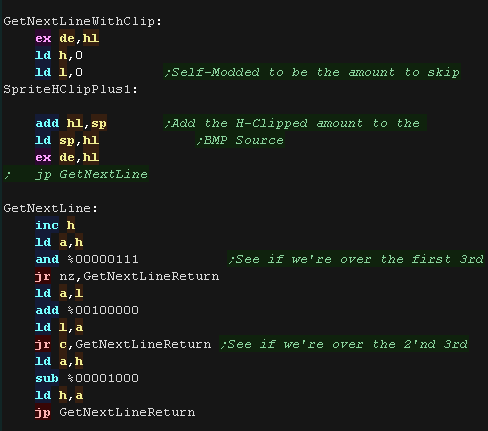
| Our "get next line" routine also needs to be changed. If we need to clip the sprite, we need to update the stack pointer to skip over the source bytes that are not needed. We then have the routine to handle the change of the HL VRAM destination - this will work fine whether the screen buffer is at address &4000 or &C000 |
 |
| Here is the result... Note: because we are working in words, when we get close to the screen, our movement will become limited to 16 pixel blocks. It may be more appropriate to use the sprite misuse code for entirely onscreen sprites, and a slower regular routine for clipped sprites. |
 |

Logical Units and clipping
| To allow us to crop our sprites, we'll need to move our sprite
around 'logical space' - only a portion of this will be the visible
screen. We'll use this to crop the sprite. |
 |
We're designing our code for screens of 256x192 - and we'll use 'Logical Co-ordinates' which define a visible screen of 192x96 (2 pixels per logical unit) The visible logical screen is in the center of the logical space area to allow the sprite to be 'partially offscreen' on any side. |
|
| We need to crop any offscreen part to
get to the first visible pixel of the sprite. After each line We also need to crop the unused pixels to the next visible pixel |
|
|
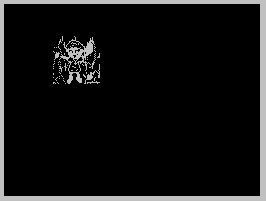
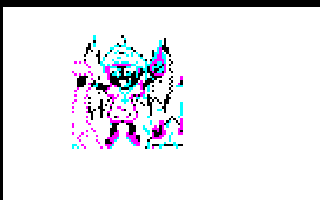
Chibiko may look a rather odd color today,
but don't worry, she's not been out in the sun too long! The sprite routine uses XOR, so it's being inverted as we've set the background to color 4... We did this so we can see the background screen area. |
Logical Cropping
| Our cropping routine will work out the X,Y pos in bytes, and width
and height + any skipped pixels from the source data registers B,C is the X,Y co-ordinate in logical units registers H,L is the Width,Height in logical units register IY is the address of the source bitmap data. First we zero Dm,E - they are used for temp values |
|
| Ok... lets crop the top of the sprite... First we remove the ypos of the first visible pixel from the draw ypos (C)... if the result is greater than zero, then nothing is off the screen at the top. if the result is less than zero we need to crop... we convert the negative to a positive and compare to the height of our sprite (L), if the amount to crop is not less than the height then the sprite is completely offscreen. Anything else is the number of lines we need to remove from the top, we store this in E and set the new 'draw position' to Ypos (C) =0 |
|
| Next we do the same for the bottom, We add the height to the Ypos, and subtract the height of the logical screen, if it's over the screen height (greater than zero) we need to crop again - the result is the amount to crop |
|
| We've calculated the top (E) and bottom (D) crop... we now use these to calculate the new height of the sprite (L). | |
| We then skip over any bytes in the source (IY) based on the number
of lines of tiles we need to remove from the top. |
|
| now we do the same for the X axis First we remove the xpos of the first visible pixel from the draw Xpos (B) ... if the result is greater than zero, then nothing is off the screen at the left. if the result is less than zero we need to crop... we convert the negative to a positive and compare to the width of our sprite (H), if the amount to crop is not less than the width then the sprite is completely offscreen. Anything else is the number of lines we need to remove from the left, we store this in D5 and set the new 'draw position' to Xpos (B) =0 If we're using 'Stack Misuse' we have to work in 16 bit words. |
|
| Next we do the same for the right, We add the width (H) to the Xpos, and subtract the width of the logical screen, if it's over the screen width (greater than zero) we need to crop again - the result is the amount to crop from the right (D) |
|
| We've calculated the left and right crop... We use these
to calculate the bytes to skip after each line of our sprite
(SpriteHClip) If this is zero, there's no horizontal crop |
|
| We need to crop, so we calculate the new with in H, We also need to turn on the slower cropping routine via self modifying code |
|
| We need to convert out Xpos and Width to a number of bytes, and
our Ypos and height to a number of lines. We clear the carry to tell the calling routine we cropped the sprite successfully (it needs drawing) and return. |
|
| If the sprite is completely offscreen, there's no point trying to draw, so we set the carry and return | |
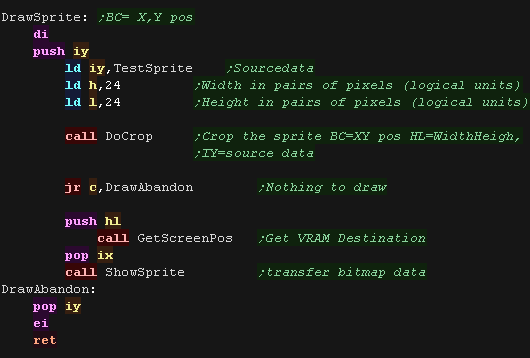
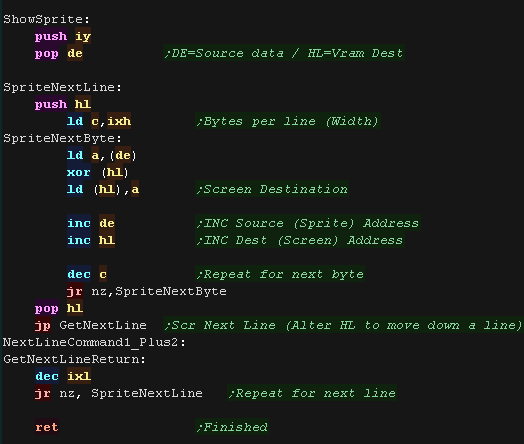
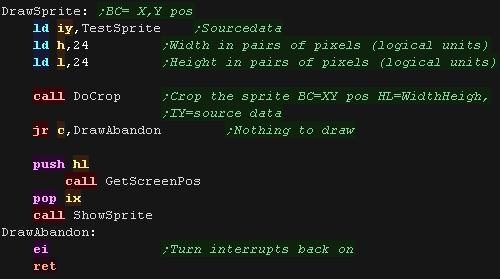
Sprite Drawing
| When we want to draw our sprite, we first run the DoCrop routine
to calculate the required cropping. If there's anything to draw, we then calculate the VRAM destination with GetScreenPos, and run the ShowSprite routine |
|
| The showsprite routine trasnfers bytes from the source (now in DE)
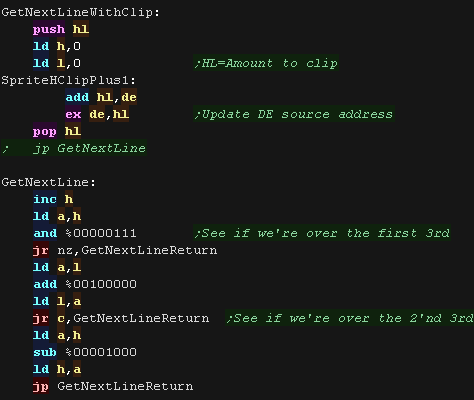
to VRAM in HL after each line GetNextLine moves the HL destination down one pixel line. This routine is switched via self modifying code if the sprite is cropped. |
|
GetNextLine will correctly update HL to correctly handle the CPC screen layout and move down a single pixel line. If the sprite is cropped, we need to use the GetNextLineWithClip to remove the un-needed source bitmap bytes. |
 |
| This time we've looked at the cropping, and basic
sprite drawing code. Next time we'll look at the 'Double buffering' and 'Stack misuse' that allow for no flicker and faster sprite drawing. |
|
| Stack misuse is a trick where we use the PUSH
or POP commands to quickly read or write data, by pointing the SP
register to the start of data we want to read, or end of data we
want to write, we can use these commands to quickly transfer data. BUT because the SP register is not pointing to a normal stack, we probably can't use CALLS or interrupts. |
|
Double Buffering
| We're going to use two buffers. One will shown to the viewer while
the other is being drawn, we'll then swap the two in hardware and
repeat. Our screen buffer is always at memory address &C000, we swap the paged ram banks that are available to the z80 (for drawing the next buffer), and visible to the viewer. We need to request 2 16k ram banks during INIT so we have enough memory for the two 12k banks |
 |
| We use port &B3 to select the bank at memory address
&C000. We need to page in the bank we're writing to this time. Every other frame we need to swap the two buffers! we use 'ActiveBuffer' to do this. To actually change the visible screen we patch in the new screen base into the LPT, this is always in the memory range &FF00+ of Buffer 1 |
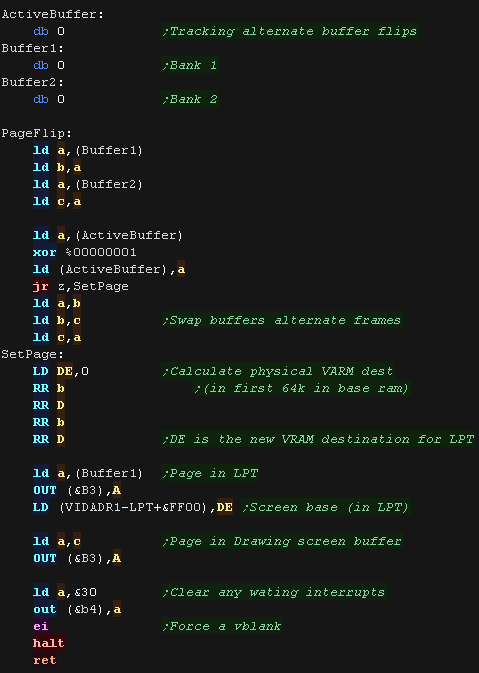 |
Clearing the screen
| We'll use stack misuse to clear the screen - this means we need to
calculate the address of the byte after the end of the screen, as
each 2 byte write will be done by a PUSH command. When we want to clear the screen we set DE to the two bytes to fill the screen with, and specify the EN of the range to fill - &F000 |
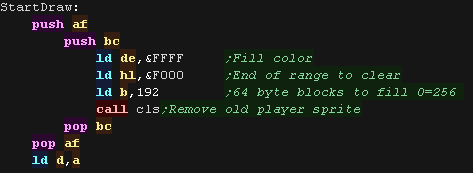 |
| We're going to fill the full 16k screen bank with the bytes in DE. To reduce the number of loops, we do 32 'PUSH DE' commands, writing 64 bytes... using lots of repeated commands to reduce loops is called 'Unwrapping loops'... As loop conditions take time, the fewer we use, the faster the fill will be. First we back up the true stack pointer in IY. We move the end of the destination range from HL into the stack pointer... each PUSH DE decreases the stack pointer by two, so we are working in reverse. As we're misusing the stack, we stop interrupts with DI, and restore the true stack pointer in IY |
|
Drawing the sprite
| Because we need to recalculate the screen destination after each
line, it won't help much to use the stack for writing, instead we'll
use it to read the bitmap data with POP commands. We back up the stack pointer with self modifying code, and move the image source data address from IY to SP. We then POP two bytes of data from the source image, and write them to the screen. Once the sprite is finished, we restore the stack pointer address. |
|
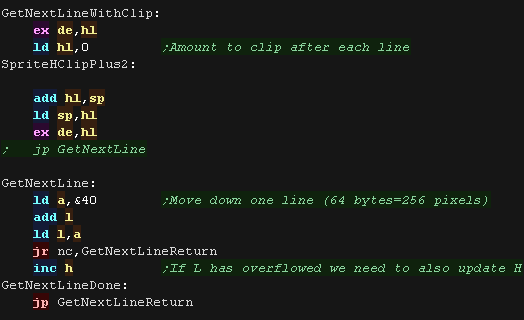
| Our "get next line" routine also needs to be changed. If we need to clip the sprite, we need to update the stack pointer to skip over the source bytes that are not needed. We then need to move down the destination address in HL - if the screen buffer address changes the Bit test and JR condition also need to change... this is done by self modifying code. |
 |
Logical Units and clipping
| To allow us to crop our sprites, we'll need to move our sprite
around 'logical space' - only a portion of this will be the visible
screen. We'll use this to crop the sprite. |
 |
We're designing our code for screens of 256x192 - and we'll use 'Logical Co-ordinates' which define a visible screen of 192x96 (2 pixels per logical unit) The visible logical screen is in the center of the logical space area to allow the sprite to be 'partially offscreen' on any side. |
|
| We need to crop any offscreen part to
get to the first visible pixel of the sprite. After each line We also need to crop the unused pixels to the next visible pixel |
|
|
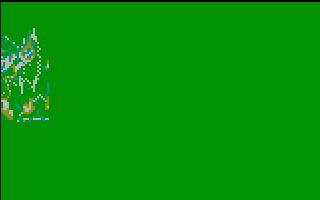
Chibiko may look a rather odd color today,
but don't worry, she's not been out in the sun too long! The sprite routine uses XOR, so it's being inverted as we've set the background to color 4... We did this so we can see the background screen area. |
Logical Cropping
| Our cropping routine will work out the X,Y pos in bytes, and width
and height + any skipped pixels from the source data registers B,C is the X,Y co-ordinate in logical units registers H,L is the Width,Height in logical units register IY is the address of the source bitmap data. First we zero Dm,E - they are used for temp values |
|
| Ok... lets crop the top of the sprite... First we remove the ypos of the first visible pixel from the draw ypos (C)... if the result is greater than zero, then nothing is off the screen at the top. if the result is less than zero we need to crop... we convert the negative to a positive and compare to the height of our sprite (L), if the amount to crop is not less than the height then the sprite is completely offscreen. Anything else is the number of lines we need to remove from the top, we store this in E and set the new 'draw position' to Ypos (C) =0 |
|
| Next we do the same for the bottom, We add the height to the Ypos, and subtract the height of the logical screen, if it's over the screen height (greater than zero) we need to crop again - the result is the amount to crop |
|
| We've calculated the top (E) and bottom (D) crop... we now use these to calculate the new height of the sprite (L). | |
| We then skip over any bytes in the source (IY) based on the number
of lines of tiles we need to remove from the top. |
 |
| now we do the same for the X axis First we remove the xpos of the first visible pixel from the draw Xpos (B) ... if the result is greater than zero, then nothing is off the screen at the left. if the result is less than zero we need to crop... we convert the negative to a positive and compare to the width of our sprite (H), if the amount to crop is not less than the width then the sprite is completely offscreen. Anything else is the number of lines we need to remove from the left, we store this in D5 and set the new 'draw position' to Xpos (B) =0 ***** |
 |
| Next we do the same for the right, We add the width (H) to the Xpos, and subtract the width of the logical screen, if it's over the screen width (greater than zero) we need to crop again - the result is the amount to crop from the right (D) |
|
| We've calculated the left and right crop... We use these
to calculate the bytes to skip after each line of our sprite
(SpriteHClip) If this is zero, there's no horizontal crop We have to adjust the Hclip if we're using Stack misuse |
 |
| We need to crop, so we calculate the new with in H, and update the
First source byte in IY if required We also need to turn on the slower cropping routine via self modifying code |
 |
| We need to convert out Xpos and Width to a number of bytes, and
our Ypos and height to a number of lines. We clear the carry to tell the calling routine we cropped the sprite successfully (it needs drawing) and return. |
 |
| If the sprite is completely offscreen, there's no point trying to draw, so we set the carry and return | |
Sprite Drawing
| When we want to draw our sprite, we first run the DoCrop routine
to calculate the required cropping. If there's anything to draw, we then calculate the VRAM destination with GetScreenPos, and run the ShowSprite routine |
 |
| The showsprite routine trasnfers bytes from the source (now in DE)
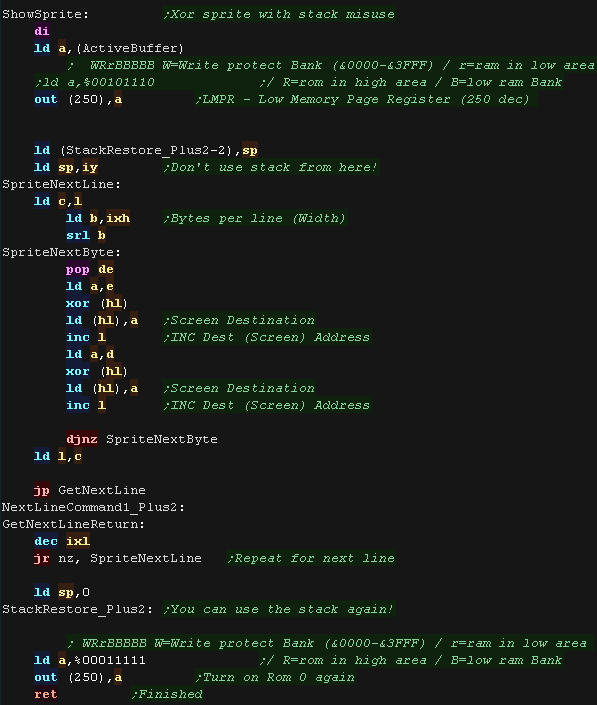
to VRAM in HL after each line GetNextLine moves the HL destination down one pixel line. We're using the ROM to read in keys, but we need to page in the VRAM - we do this via port 250 This routine is switched via self modifying code if the sprite is cropped. |
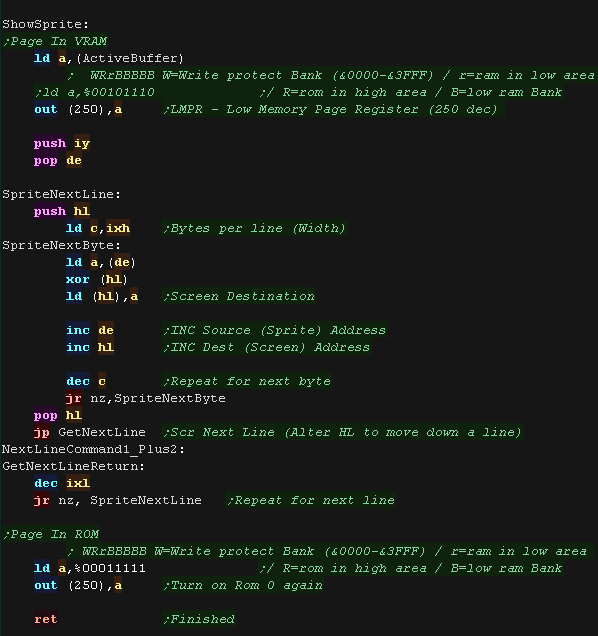 |
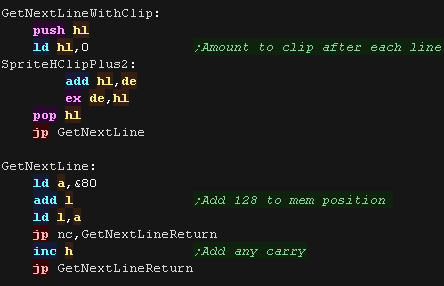
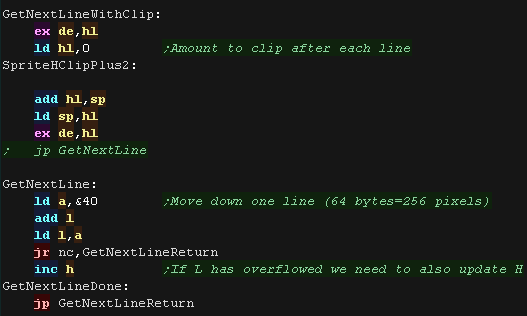
GetNextLine will correctly update HL to correctly handle the CPC screen layout and move down a single pixel line. If the sprite is cropped, we need to use the GetNextLineWithClip to remove the un-needed source bitmap bytes. |
 |
| This time we've looked at the cropping, and basic
sprite drawing code. Next time we'll look at the 'Double buffering' and 'Stack misuse' that allow for no flicker and faster sprite drawing. |
|
 |
Lesson
S29 - Sprite clipping on the Sam Coupe (Part
2/2) - Stack misuse Lets look at the rest of the sprite clipping code, and the use of 'Stack Misuse' to speed up writing! |
|
SAM_Bitmap_Clipping.asm |
|
| Stack misuse is a trick where we use the PUSH
or POP commands to quickly read or write data, by pointing the SP
register to the start of data we want to read, or end of data we
want to write, we can use these commands to quickly transfer data. BUT because the SP register is not pointing to a normal stack, we probably can't use CALLS or interrupts. |
|
Double Buffering
| We use Port &250 to select the memory bank in range
&0000-&8000. We use Port &252 to select the visible bank. We use banks 12+13 for buffer one and 14+15 for buffer two - each bank is 16k, and we need 24k total for the screen. |
|
Clearing the screen
| We'll use stack misuse to clear the screen - this means we need to
calculate the address of the byte after the end of the screen, as
each 2 byte write will be done by a PUSH command. When we want to clear the screen we set DE to the two bytes to fill the screen with, and specify the EN of the range to fill - &F000 |
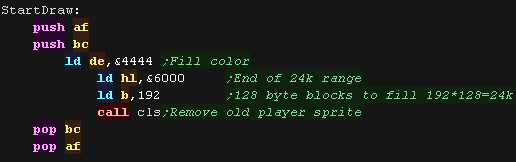 |
| We're going to fill the full 24k screen bank with the bytes in DE. We need to page in the memory bank before the procedure To reduce the number of loops, we do 64 'PUSH DE' commands, writing 128 bytes... using lots of repeated commands to reduce loops is called 'Unwrapping loops'... As loop conditions take time, the fewer we use, the faster the fill will be. First we back up the true stack pointer in IY. We move the end of the destination range from HL into the stack pointer... each PUSH DE decreases the stack pointer by two, so we are working in reverse. As we're misusing the stack, we stop interrupts with DI, and restore the true stack pointer in IY |
 |
Drawing the sprite
| Because we need to recalculate the screen destination after each
line, it won't help much to use the stack for writing, instead we'll
use it to read the bitmap data with POP commands. We back up the stack pointer with self modifying code, and move the image source data address from IY to SP. We then POP two bytes of data from the source image, and write them to the screen. Once the sprite is finished, we restore the stack pointer address. |
 |
| Our "get next line" routine also needs to be changed. If we need to clip the sprite, we need to update the stack pointer to skip over the source bytes that are not needed. We then need to move down the destination address in HL - if the screen buffer address changes the Bit test and JR condition also need to change... this is done by self modifying code. |
 |
| View Options |
| Default Dark |
| Simple (Hide this menu) |
| Print Mode (white background) |
| Top Menu |
| ***Main Menu*** |
| Youtube channel |
| Patreon |
| Introduction to Assembly (Basics for absolute beginners) |
| Amazon Affiliate Link |
| AkuSprite Editor |
| ChibiTracker |
| Dec/Bin/Hex/Oct/Ascii Table |
| Alt Tech |
| Archive.org |
| Bitchute |
| Odysee |
| Rumble |
| DailyMotion |
| Please note: I wlll upload more content to these alt platforms based on the views they bring in |
| 68000 Content |
| ***68000 Tutorial List*** |
Learn 68000 Assembly  |
| Hello World Series |
| Platform Specific Series |
| Simple Samples |
| Grime 68000 |
| 68000 Downloads |
| 68000 Cheatsheet |
| Sources.7z |
| DevTools kit |
| 68000 Platforms |
| Amiga 500 |
| Atari ST |
| Neo Geo |
| Sega Genesis / Mega Drive |
| Sinclair QL |
| X68000 (Sharp x68k) |
| 8086 Content |
| Learn 8086 Assembly |
| Platform Specific Series |
| Hello World Series |
| Simple Samples |
| 8086 Downloads |
| 8086 Cheatsheet |
| Sources.7z |
| DevTools kit |
| 8086 Platforms |
| Wonderswan |
| MsDos |
| ARM Content |
| Learn ARM Assembly |
| Learn ARM Thumb Assembly |
| Platform Specific Series |
| Hello World |
| Simple Samples |
| ARM Downloads |
| ARM Cheatsheet |
| Sources.7z |
| DevTools kit |
| ARM Platforms |
| Gameboy Advance |
| Nintendo DS |
| Risc Os |
| Risc-V Content |
| Learn Risc-V Assembly |
| Risc-V Downloads |
| Risc-V Cheatsheet |
| Sources.7z |
| DevTools kit |
| MIPS Content |
| Learn Risc-V Assembly |
| Platform Specific Series |
| Hello World |
| Simple Samples |
| MIPS Downloads |
| MIPS Cheatsheet |
| Sources.7z |
| DevTools kit |
| MIPS Platforms |
| Playstation |
| N64 |
| PDP-11 Content |
| Learn PDP-11 Assembly |
| Platform Specific Series |
| Simple Samples |
| PDP-11 Downloads |
| PDP-11 Cheatsheet |
| Sources.7z |
| DevTools kit |
| PDP-11 Platforms |
| PDP-11 |
| UKNC |
| TMS9900 Content |
| Learn TMS9900 Assembly |
| Platform Specific Series |
| Hello World |
| TMS9900 Downloads |
| TMS9900 Cheatsheet |
| Sources.7z |
| DevTools kit |
| TMS9900 Platforms |
| Ti 99 |
| 6809 Content |
| Learn 6809 Assembly |
| Learn 6309 Assembly |
| Platform Specific Series |
| Hello World Series |
| Simple Samples |
| 6809 Downloads |
| 6809/6309 Cheatsheet |
| Sources.7z |
| DevTools kit |
| 6809 Platforms |
| Dragon 32/Tandy Coco |
| Fujitsu FM7 |
| TRS-80 Coco 3 |
| Vectrex |
| 65816 Content |
| Learn 65816 Assembly |
| Hello World |
| Simple Samples |
| 65816 Downloads |
| 65816 Cheatsheet |
| Sources.7z |
| DevTools kit |
| 65816 Platforms |
| SNES |
| eZ80 Content |
| Learn eZ80 Assembly |
| Platform Specific Series |
| eZ80 Downloads |
| eZ80 Cheatsheet |
| Sources.7z |
| DevTools kit |
| eZ80 Platforms |
| Ti84 PCE |
| IBM370 Content |
| Learn IBM370 Assembly |
| Simple Samples |
| IBM370 Downloads |
| IBM370 Cheatsheet |
| Sources.7z |
| DevTools kit |
| Super-H Content |
| Learn SH2 Assembly |
| Hello World Series |
| Simple Samples |
| SH2 Downloads |
| SH2 Cheatsheet |
| Sources.7z |
| DevTools kit |
| SH2 Platforms |
| 32x |
| Saturn |
| PowerPC Content |
| Learn PowerPC Assembly |
| Hello World Series |
| Simple Samples |
| PowerPC Downloads |
| PowerPC Cheatsheet |
| Sources.7z |
| DevTools kit |
| PowerPC Platforms |
| Gamecube |
| Work in Progress |
| ChibiAndroids |
| Misc bits |
| Ruby programming |
Buy my Assembly programming book
on Amazon in Print or Kindle!


Available worldwide!
Search 'ChibiAkumas' on
your local Amazon website!
Click here for more info!


Buy my Assembly programming book
on Amazon in Print or Kindle!
Available worldwide!
Search 'ChibiAkumas' on
your local Amazon website!
Click here for more info!
Buy my Assembly programming book
on Amazon in Print or Kindle!
Available worldwide!
Search 'ChibiAkumas' on
your local Amazon website!
Click here for more info!