

Simple Hello World Example on the
6809
Introduction to the Hello World Series...
In this series we'll be looking at the basics of coding,compiling and running

 |
Lesson
H1 - Hello World on the Dragon / Tandy CoCo Lets take a look at the Dragon - We'll make Hello world work on a cartridge, and run it on an emulator |
 |
 DGN_HelloWorld_Advanced.asm
|
 |
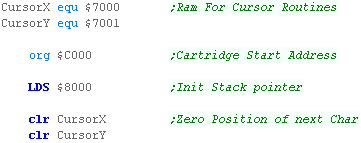
| We're going to start a cartridge... Our Cartridge runs from address $C000 - $FFFF (16 k) We define two bytes of Ram as being the X,Y position of the cursor, At the start of the cartridge we need to set a usable stack pointer ($8000) We also zero the printing cursor position |
 |
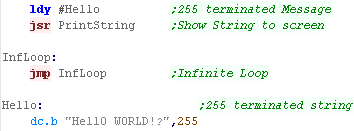
| We're going to print a 255 terminated string to the screen.. Note, the string contains a lower case character (The dragon can't do them, but we'll fix it) |
 |
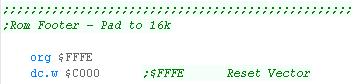
| Our cartridge needs to be 'padded' to 16k - so we put a couple of
bytes at the end... Note, the 'Reset' address doesn't actually seem to get used on the running machine. (it's overridden by system defaults) |
 |
| Here is the result! | 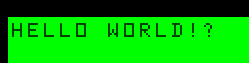 |
 |
Tje Dragon
starts in text mode, so we don't need to do any complex screen set
up... Of course the Dragon has graphics modes too, but we'll look at them another time! |
Printing a character to the screen
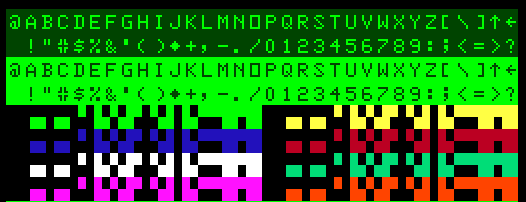
| The Dragon screen uses 1 byte per character Screen memory starts at $0400, and the screen is 32 bytes wide, so the formula for a screen character is: Address= $0400 + (Ypos * 32) + Xpos But the character map is a little odd!... it has no lowercase characters, instead having inverted characters... we'll have to work around that |
 |
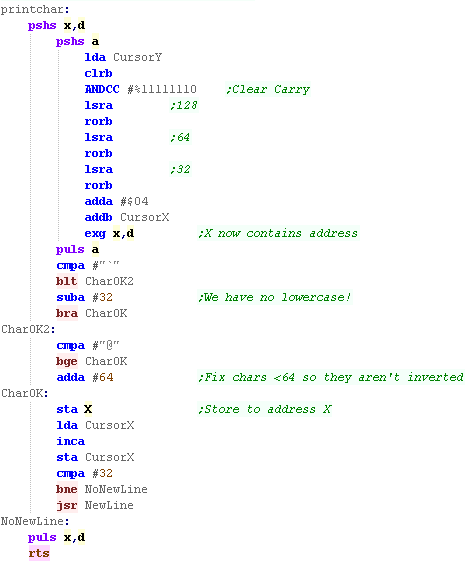
| When we want to print a character to screen, we need to calculate
the memory address of the 'cursor'... We multiply Y by 32 by repeated bit shifts. Once we've worked out the memory address, we need to 'Fix' the ASCII character, converting it to the Dragon charset. If a character is lower case, we need to subtract 32 converting it to the uppercase equivalent if the character is a symbol (! to ] etc) we need to add 64 - otherwise these will appear 'inverted' Finally, we move the cursor along, and if we've reached the end of a line, we perform a newline command |
 |
| Newline just zeros the Xpos, and increases the Ypos | 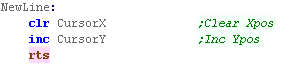 |
Using our PrintChar to print a string
| We're going to write a simple string printing routine, it prints a
255 terminated string. All we do is read in bytes from Y until we get to a 255, at which point we return... we print all other characters with our PrintChar routine |
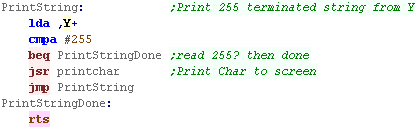 |
| This will show 'Hello World' to the screen | |
Building the ROM
| We build our rom with Macro
AS (ASW) Here is the script I use... We specify the source asm (%BuildFile% in my batch file) We specify our CPU type as 6809 We specify to output a listing file - this is handy for debugging. We tell the assembler to define a symbol 'BuildDGN' (Some of my multiplatform programs use this) We output a Build file prog.bld - but this needs converting before we can use it as a rom!  Once the build completes - we need to convert it to a binary  We can then start the ROM cartridge with our emulator Xroar:  |
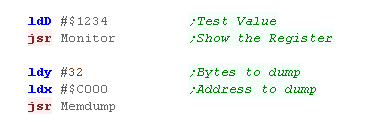
| As an added bonus we can include the 'Monitor Tools' we developed
in the multiplatform series. These allow us to show the registers or parts of the Ram for testing and debugging purposes |
 |
| This gives us 2 commands... Monitor shows all the registers, RamDump will show Y bytes from address X to the screen |
 |
| We can see the result onscreen. | 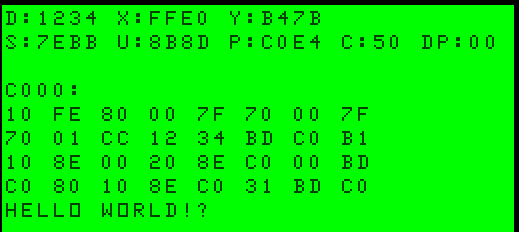 |
 |
We've got some basic screen routines, a
memory dump and register dump... we can use these as 'building
blocks' for making and testing something better. |

Beginning a 2B0 binary file
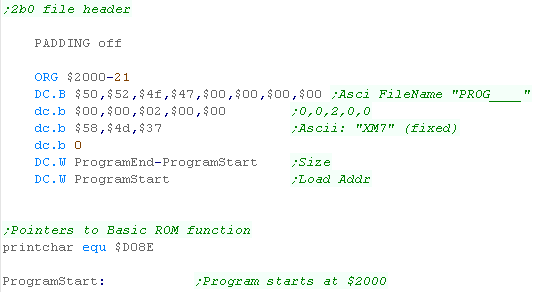
| First we define 'Padding Off' - this stops the assembler adding
zero bytes to our code to align to 16 bit boundaries. We need to put a header on our file... the file starts at address $2000 - but our 21 byte header precedes that. The header defines the header pf the program, the size of the program, and the address to load the program in memory. We calculate the size from the ProgramEnd and ProgramStart labels. We're also defining the symbol 'PrintChar' which points to the Basic print routine. |
 |
| As well as our header, we need a footer after our program. | 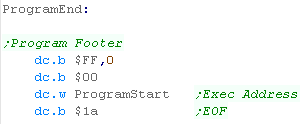 |
 |
Here we're using
a basic call to draw characters, but later we'll learn more about
the graphics hardware... Actually the FM7 has TWO processors... the MAIN one for our program, and the SUB one which handles graphics. The main 6809 that runs our program CANNOT access graphics ram! |
Using PrintChar to print a string
| We're going to write a simple string printing routine, it prints a
255 terminated string. All we do is read in bytes from Y until we get to a 255, at which point we return... we print all other characters with the PrintChar routine |
|
| If we want to start a new line, we just print CHAR 13 followed by CHAR 10 | 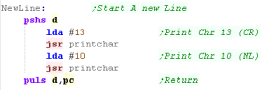 |
| We use this function to print our message to the screen | 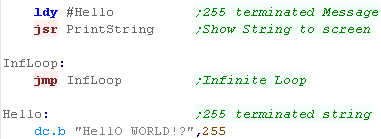 |
| This will show 'Hello World' to the screen | 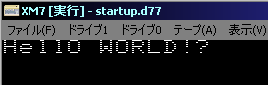 |
Building the Disk
| We build our file with Macro
AS (ASW) Here is the script I use... We specify the source asm (%BuildFile% in my batch file) We specify our CPU type as 6809 We specify to output a listing file - this is handy for debugging. We tell the assembler to define a symbol 'BuildFM7' (Some of my multiplatform programs use this) We output a Build file prog.bld - but this needs converting before we can use it as a binary.  Once the build completes - we need to convert it to a binary  We need to put the file on a disk... we have a pre-formatted blank disk with a 'startup program'... We use FMWrite from the 'Ftools' package to put our 2B0 file on the disk:  We can then start the ROM cartridge with our emulator XM7:  |
Startup basic file
| We've used a pre-configured startup disk, this contains a basic
program which will load our binary, and run the address $2000 This disk is used as the basis for our built program. |
 |
| If you decide to load your program at a different
address you'll need to change this basic file.. for some reason the 'EXEC' address in the 2B0 doesn't seem to help much! |
 |
| As an added bonus we can include the 'Monitor Tools' we developed
in the multiplatform series. These allow us to show the registers or parts of the Ram for testing and debugging purposes |
|
| This gives us 2 commands... Monitor shows all the registers, RamDump will show Y bytes from address X to the screen |
|
| We can see the result onscreen. | 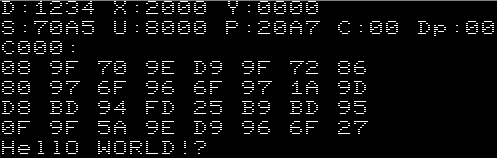 |

Beginning a Cartridge
| We're going to start a cartridge... Our Cartridge runs from
address $0000... We turn Padding off - this stops the assembler adding 0 bytes where we don't want them. The cartridge needs a header, with some fixed bytes, and title and music for the boot screen The Vectrex uses two direct pages... $C8 points the DP to RAM... $D0 points to hardware registers, which is needed for some |
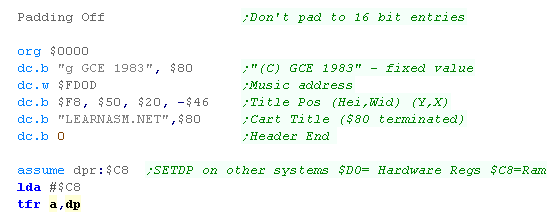 |
| The title we specify will be shown on the boot splash screen | 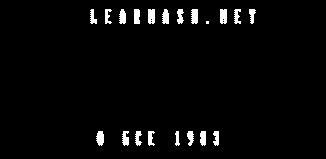 |
|
The emulator
provided with these tutorials is configured to use a modified ROM
The Author of these tutorials modified the rom to skip the splash screens - this allows the game to start immediately, and saves time when debugging. |
Printing a character to the screen
| The vectrex draws in lines not pixels, but the firmware provides a limited font we can use via it's firmware functions. | 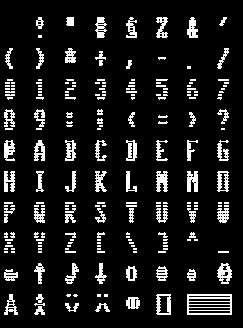 |
| First we need to define the size of the text we'll use... this is
defined by two bytes at $C82A We'll use $FC38 - a small font, but we could also use $F848 for large text. |
 |
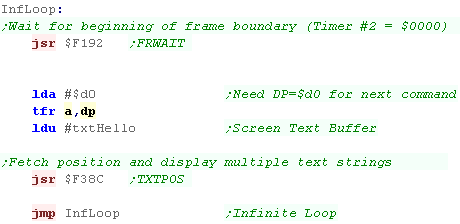
| We're going to use function $F38C (TXTPOS) to draw to the
screen... this can draw multiple strings in one go. Before we draw to the screen we'll call $F192 (FRWAIT) - this wait's for a new screeen redraw. Then we use $F38C - but this needs the DP to point to the hardware registers at $D0 We have to draw the screen every frame, otherwise it will instantly disappear from the screen |
 |
| The hello string needs to start with a Y,X drawing location. Each line must end $80, and the last string must end $00 |
 |
| The message is shown on screen |  |
Building the ROM
| We build our rom with Macro
AS (ASW) Here is the script I use... We specify the source asm (%BuildFile% in my batch file) We specify our CPU type as 6809 We specify to output a listing file - this is handy for debugging. We tell the assembler to define a symbol 'BuildDGN' (Some of my multiplatform programs use this) We output a Build file prog.bld - but this needs converting before we can use it as a rom!  Once the build completes - we need to convert it to a binary  We can then start the ROM cartridge with our emulator vecxgl... we specify a custom Bios Rom (myrom.dat) - this rom has been modified to skip the startup splash screen... we also specify a screen size of 1000  |
Simulating a raster screen
| We can use the multiline printing routine to simulate a screen
similar to our other systems. We'll define some bytes for this: TextRam is the text string which makes up all the text 'onscreen' The current Y pos (in screen co-ords) this is needed for defining each screen line's position. The Datapos is a pointer to the byte of TextRam the next char needs to be inserted |
 |
| We define a Newline and CLS functions. We need to make sure the text string ends with $80,$0 Each new line needs to contain an Y and X position... Y is taken from the TextDataY, X is always -128 |
 |
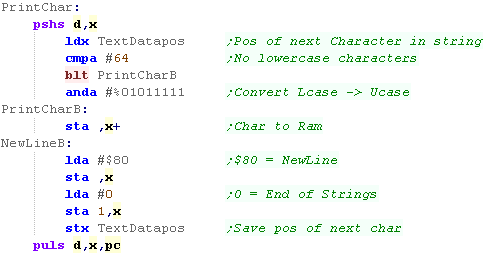
| The PrintChar routine adds another character to the end of the
string, Because the Vectrex has no lowercase characters we check for these, and convert them to uppercase. |
 |
| We still need to draw the screen during our main loop, however we'll provide a single function to do this - drawing the TextRam buffer to the screen, and waiting for Vblank | 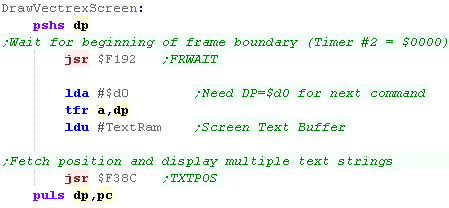 |
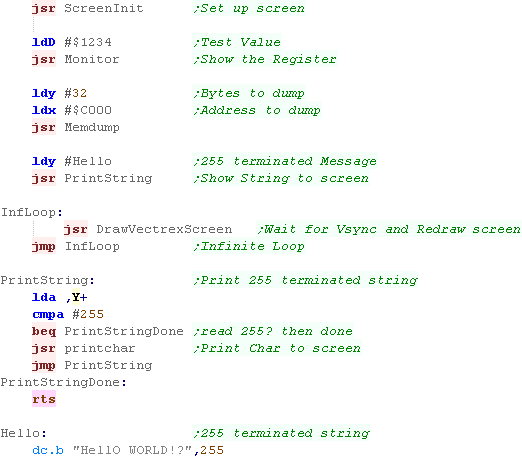
Monitor Tools
| As an added bonus we can include the 'Monitor Tools' we developed
in the multiplatform series. These allow us to show the registers or parts of the Ram for testing and debugging purposes |
|
| This gives us 2 commands... Monitor shows all the registers, RamDump will show Y bytes from address X to the screen |
 |
| We can see the result onscreen. | 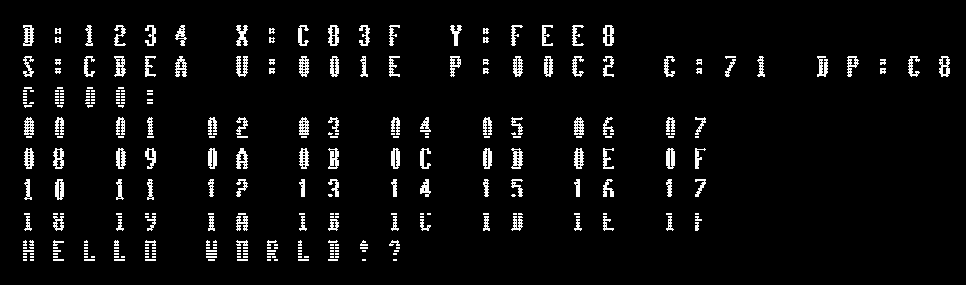 |
| Of course the
Vectrex isn't really designed for raster fonts... it's designed
for VECTORS! We'll learn how to draw vectors another time! |
 |
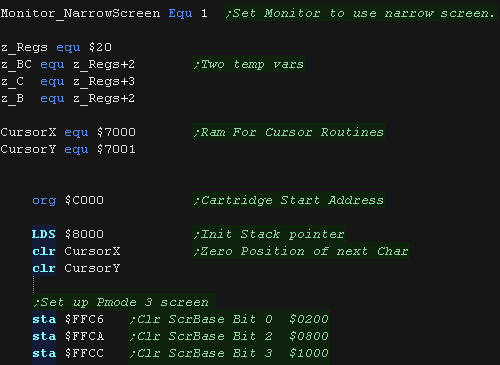
| We're going to start a cartridge... Our Cartridge runs from address $C000 - $FFFF (16 k) We define two bytes of Ram as being the X,Y position of the cursor, We also define two bytes of temporary zero page storage (z_b and z_c) At the start of the cartridge we need to set a usable stack pointer ($8000) We also zero the printing cursor position |
 |
| We're going to print a 255 terminated string to the screen.. | 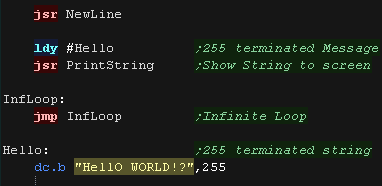 |
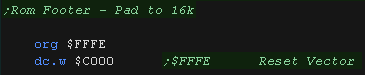
| Our cartridge needs to be 'padded' to 16k - so we put a couple of
bytes at the end... Note, the 'Reset' address doesn't actually seem to get used on the running machine. (it's overridden by system defaults) |
 |
| Here is the result! |  |
|
Tje Dragon
starts in text mode, so we don't need to do any complex screen set
up... Of course the Dragon has graphics modes too, but we'll look at them another time! |
Printing a character to the screen
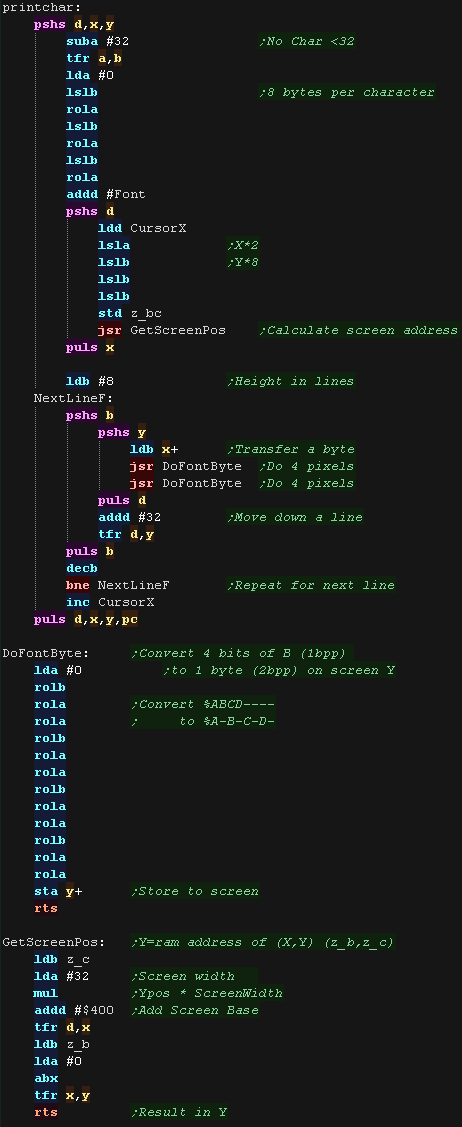
| We're using our own bitmap font... it's 2 color (1bpp) but we're going to 'convert' it for the 4 color screen. |  |
| We include the font as binary data in our file. |  |
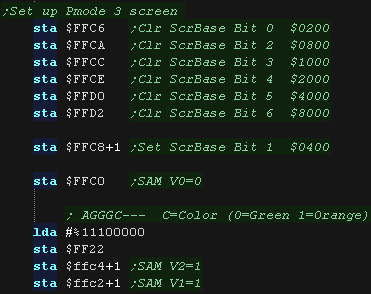
| We're using Pmode 3 screen This gives a 128x192 screen with 4 colors. |
 |
| When we want to print a character to screen, we need to calculate
the memory address of the 'cursor'... We multiply Y by 32 by repeated bit shifts. Once we've worked out the memory address, we need to 'Fix' the ASCII character, converting it to the Dragon charset. If a character is lower case, we need to subtract 32 converting it to the uppercase equivalent if the character is a symbol (! to ] etc) we need to add 64 - otherwise these will appear 'inverted' Finally, we move the cursor along, and if we've reached the end of a line, we perform a newline command |
 |
| Newline just zeros the Xpos, and increases the Ypos | 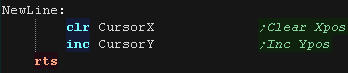 |
Using our PrintChar to print a string
| We're going to write a simple string printing routine, it prints a
255 terminated string. All we do is read in bytes from Y until we get to a 255, at which point we return... we print all other characters with our PrintChar routine |
 |
| This will show 'Hello World' to the screen | |
Building the ROM
| We build our rom with Macro
AS (ASW) Here is the script I use... We specify the source asm (%BuildFile% in my batch file) We specify our CPU type as 6809 We specify to output a listing file - this is handy for debugging. We tell the assembler to define a symbol 'BuildDGN' (Some of my multiplatform programs use this) We output a Build file prog.bld - but this needs converting before we can use it as a rom! Once the build completes - we need to convert it to a binary We can then start the ROM cartridge with our emulator Xroar: |
| As an added bonus we can include the 'Monitor Tools' we developed
in the multiplatform series. These allow us to show the registers or parts of the Ram for testing and debugging purposes |
 |
| This gives us 2 commands... Monitor shows all the registers, RamDump will show Y bytes from address X to the screen |
 |
| We can see the result onscreen. | 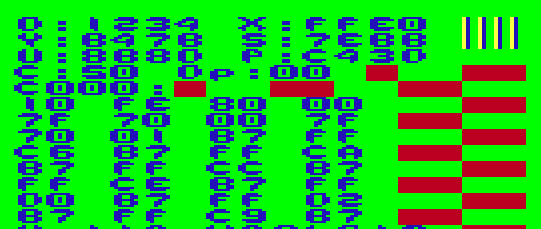 |
|
We've got some basic screen routines, a
memory dump and register dump... we can use these as 'building
blocks' for making and testing something better. |
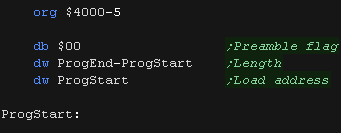
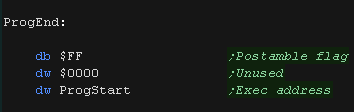
The BIN file format
| The Dandy COCO disk system uses binary files for program code. These have a 5 byte header before the data, and a 5 byte footer. The header contains a $00 byte, the length of the data itself (without header/footer) and the Load address the data should be loaded to in ram The footer contains a $FF byte, an unused word ($0000) and the Execution address we want to run, which in this case is the start of our program. |
  |
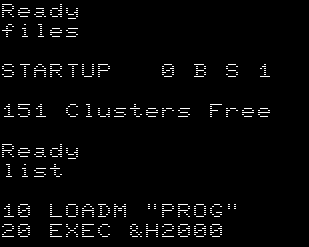
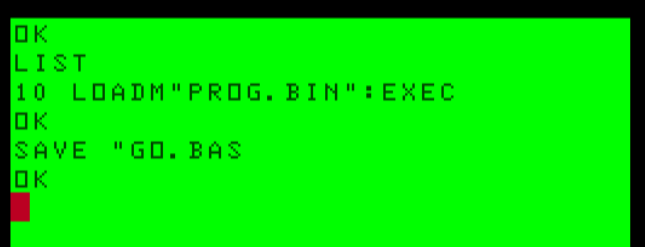
| Our emulator can load the BIN file directly, but we can create a
basic loader we use 'LOADM "PROG.BIN" to load our program 'PROG' in memory, then EXEC to run it. We save this - in this case as 'GO.BAS' |
 |
| We're going to print a 255 terminated string to the screen.. | |
| Our cartridge needs to be 'padded' to 16k - so we put a couple of
bytes at the end... Note, the 'Reset' address doesn't actually seem to get used on the running machine. (it's overridden by system defaults) |
|
| Here is the result! Hello world is shown in the top corner - though we didn't clear the screen! |
 |
|
Note: This
example is for the COCO only je Dragon uses a different BIN and Disk format, and we won't be covering it here! |
| You'll need
appropriate ROM files for the disk system so the emulator will
work. For legal reasons we cannot provide them here.... soz! |
|
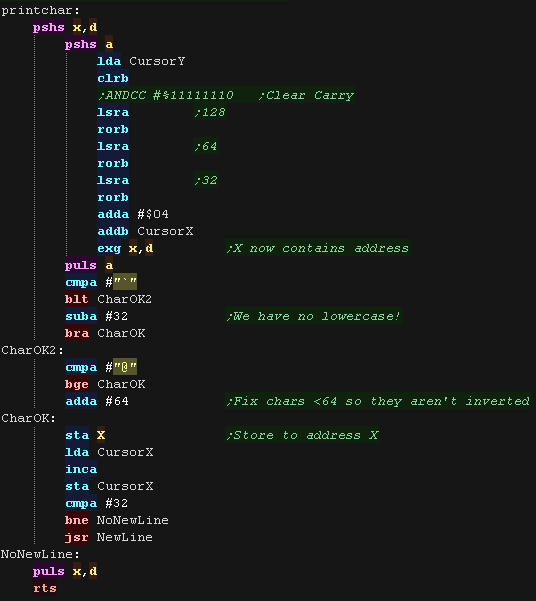
Printing a character to the screen
| The Dragon screen uses 1 byte per character Screen memory starts at $0400, and the screen is 32 bytes wide, so the formula for a screen character is: Address= $0400 + (Ypos * 32) + Xpos But the character map is a little odd!... it has no lowercase characters, instead having inverted characters... we'll have to work around that |
|
| When we want to print a character to screen, we need to calculate
the memory address of the 'cursor'... We multiply Y by 32 by repeated bit shifts. Once we've worked out the memory address, we need to 'Fix' the ASCII character, converting it to the Dragon charset. If a character is lower case, we need to subtract 32 converting it to the uppercase equivalent if the character is a symbol (! to ] etc) we need to add 64 - otherwise these will appear 'inverted' Finally, we move the cursor along, and if we've reached the end of a line, we perform a newline command |
 |
| Newline just zeros the Xpos, and increases the Ypos | |
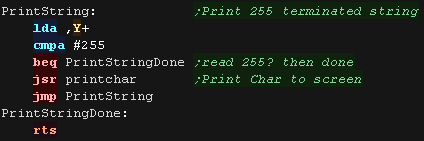
Using our PrintChar to print a string
| We're going to write a simple string printing routine, it prints a
255 terminated string. All we do is read in bytes from Y until we get to a 255, at which point we return... we print all other characters with our PrintChar routine |
|
| This will show 'Hello World' to the screen | |
Building the BIN
| We build our BIN with Macro
AS (ASW) Here is the script I use... We specify the source asm (%BuildFile% in my batch file) We specify our CPU type as 6809 We specify to output a listing file - this is handy for debugging. We tell the assembler to define a symbol 'BuildDGN' (Some of my multiplatform programs use this) We output a Build file prog.bld - but this needs converting before we can use it as a rom! Once the build completes - we need to convert it to a binary  We can then start the BIN directly with our emulator Xroar, we're also specifying we want to emulate a COCO  |
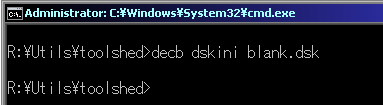
| We uses the 'ToolShed'
tools to work with disks DECB works with disk images We can create a blank disk with "decb dskini blank.dsk" |
 |
| We'll start from a copy of our blank disk each time... if we save
our "GO.BAS" to this master image, we will be able to start our
program quickly each time We use DECB COPY to transfer our BIN file to the disk image |
 |
| We can load our disk image on start up with XROAR |
 |
Monitor Tools
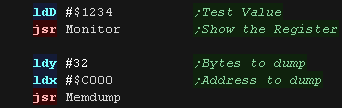
| As an added bonus we can include the 'Monitor Tools' we developed
in the multiplatform series. These allow us to show the registers or parts of the Ram for testing and debugging purposes |
|
| This gives us 2 commands... Monitor shows all the registers, RamDump will show Y bytes from address X to the screen |
|
| We can see the result onscreen. | 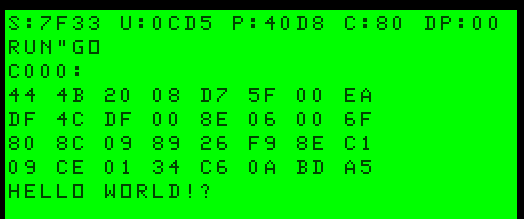 |
|
We've got some basic screen routines, a
memory dump and register dump... we can use these as 'building
blocks' for making and testing something better. |
| View Options |
| Default Dark |
| Simple (Hide this menu) |
| Print Mode (white background) |
| Top Menu |
| ***Main Menu*** |
| Youtube channel |
| Patreon |
| Introduction to Assembly (Basics for absolute beginners) |
| Amazon Affiliate Link |
| AkuSprite Editor |
| ChibiTracker |
| Dec/Bin/Hex/Oct/Ascii Table |
| Alt Tech |
| Archive.org |
| Bitchute |
| Odysee |
| Rumble |
| DailyMotion |
| Please note: I wlll upload more content to these alt platforms based on the views they bring in |
| 68000 Content |
| ***68000 Tutorial List*** |
Learn 68000 Assembly  |
| Hello World Series |
| Platform Specific Series |
| Simple Samples |
| Grime 68000 |
| 68000 Downloads |
| 68000 Cheatsheet |
| Sources.7z |
| DevTools kit |
| 68000 Platforms |
| Amiga 500 |
| Atari ST |
| Neo Geo |
| Sega Genesis / Mega Drive |
| Sinclair QL |
| X68000 (Sharp x68k) |
| 8086 Content |
| Learn 8086 Assembly |
| Platform Specific Series |
| Hello World Series |
| Simple Samples |
| 8086 Downloads |
| 8086 Cheatsheet |
| Sources.7z |
| DevTools kit |
| 8086 Platforms |
| Wonderswan |
| MsDos |
| ARM Content |
| Learn ARM Assembly |
| Learn ARM Thumb Assembly |
| Platform Specific Series |
| Hello World |
| Simple Samples |
| ARM Downloads |
| ARM Cheatsheet |
| Sources.7z |
| DevTools kit |
| ARM Platforms |
| Gameboy Advance |
| Nintendo DS |
| Risc Os |
| Risc-V Content |
| Learn Risc-V Assembly |
| Risc-V Downloads |
| Risc-V Cheatsheet |
| Sources.7z |
| DevTools kit |
| MIPS Content |
| Learn Risc-V Assembly |
| Platform Specific Series |
| Hello World |
| Simple Samples |
| MIPS Downloads |
| MIPS Cheatsheet |
| Sources.7z |
| DevTools kit |
| MIPS Platforms |
| Playstation |
| N64 |
| PDP-11 Content |
| Learn PDP-11 Assembly |
| Platform Specific Series |
| Simple Samples |
| PDP-11 Downloads |
| PDP-11 Cheatsheet |
| Sources.7z |
| DevTools kit |
| PDP-11 Platforms |
| PDP-11 |
| UKNC |
| TMS9900 Content |
| Learn TMS9900 Assembly |
| Platform Specific Series |
| Hello World |
| TMS9900 Downloads |
| TMS9900 Cheatsheet |
| Sources.7z |
| DevTools kit |
| TMS9900 Platforms |
| Ti 99 |
| 6809 Content |
| Learn 6809 Assembly |
| Learn 6309 Assembly |
| Platform Specific Series |
| Hello World Series |
| Simple Samples |
| 6809 Downloads |
| 6809/6309 Cheatsheet |
| Sources.7z |
| DevTools kit |
| 6809 Platforms |
| Dragon 32/Tandy Coco |
| Fujitsu FM7 |
| TRS-80 Coco 3 |
| Vectrex |
| 65816 Content |
| Learn 65816 Assembly |
| Hello World |
| Simple Samples |
| 65816 Downloads |
| 65816 Cheatsheet |
| Sources.7z |
| DevTools kit |
| 65816 Platforms |
| SNES |
| eZ80 Content |
| Learn eZ80 Assembly |
| Platform Specific Series |
| eZ80 Downloads |
| eZ80 Cheatsheet |
| Sources.7z |
| DevTools kit |
| eZ80 Platforms |
| Ti84 PCE |
| IBM370 Content |
| Learn IBM370 Assembly |
| Simple Samples |
| IBM370 Downloads |
| IBM370 Cheatsheet |
| Sources.7z |
| DevTools kit |
| Super-H Content |
| Learn SH2 Assembly |
| Hello World Series |
| Simple Samples |
| SH2 Downloads |
| SH2 Cheatsheet |
| Sources.7z |
| DevTools kit |
| SH2 Platforms |
| 32x |
| Saturn |
| PowerPC Content |
| Learn PowerPC Assembly |
| Hello World Series |
| Simple Samples |
| PowerPC Downloads |
| PowerPC Cheatsheet |
| Sources.7z |
| DevTools kit |
| PowerPC Platforms |
| Gamecube |
| Work in Progress |
| ChibiAndroids |
| Misc bits |
| Ruby programming |
Buy my Assembly programming book
on Amazon in Print or Kindle!


Available worldwide!
Search 'ChibiAkumas' on
your local Amazon website!
Click here for more info!


Buy my Assembly programming book
on Amazon in Print or Kindle!
Available worldwide!
Search 'ChibiAkumas' on
your local Amazon website!
Click here for more info!
Buy my Assembly programming book
on Amazon in Print or Kindle!
Available worldwide!
Search 'ChibiAkumas' on
your local Amazon website!
Click here for more info!