

Simple Hello World Example on a
variety of Z80 machines
<- Back to the Main
Contents & Basic Z80 Assembly Lessons
Introduction to the Hello World Series...
We've covered a lot of complex stuff in these tutorials, but I think it's time to take a new approach, and offer the absolute basics for people who just want to get started!
In this series, we're going to go over every system covered in these tutorials, and create a 'One File Hello World'... that is a Single ASM file, which can show a 'Hello World' message one one system with NO INCLUDES
Contrary to my usual method, we WILL use the
firmware in this series - as the goal is to get 'Hello World' on screen as
simply as possible!
For each system we'll define a PrintChar to
print a single character, we'll extend this to a whole line with a common
PrintString, and we'll also create a NewLine command to start a new line -
this should allow you to start building your own simple programs!
As an added bonus, there will be an extra
'chunk' which will allow the Monitor and Memdump to work... this will need
an include, but the logic is simple... if you can get data from the CPU
and Memory to screen, then you can start testing and building up your own
code.
Once we've got the working ASM file - we'll
then go into the technicalities of how to get the program running on an
emulator... in other words, how to build a Disk/Tape/Cart image, load it
into an emulator.... and where needed, load it in basic!
if you're using my Devkit you won't need
this, but if you're not, or want to tweak it for your own needs, then this
will tell you all you need.
Essentially this series will give you the
simplest, shortest path to running your own mini program on the machine of
your choice!
Enough chit-chat... lets start saying HELLO
to the 8 bits!

 |
Lesson
H1 - Hello World on the CPC As always, the CPC is my first 'Go to' system for development, and we'll be using Winape again, for it's superb built in Assembler! We'll use the firmware to do the work of drawing text to the screen, and we'll create our own PrintString function! |
 |
 See
SimpleHelloWorld folder
|
 |
 |
Beginning a CPC program
| Load up WinApe , Select Show Assembler from the Assembler menu | 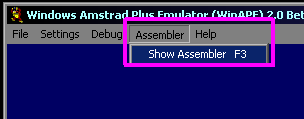 |
| We need to define a start for our program in memory... BASIC and
the firmware need the first chunk, so memory address &1200 is
a good starting point to start your program at &1200 add the command ORG &1200 |
 |
Showing Characters and Newlines
| To Print a Character, we're going to use firmware call &BBFA... calling this will print the Accumulator to the screen. |  |
| By using PrintChar with character 13 then character 10, we can start a new line | 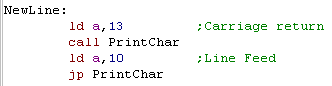 |
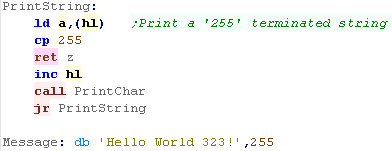
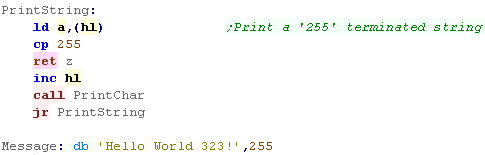
| We're going to use this Printchar routine in our Printstring
function This function will be common to every platform |
 |
| To use this function, we just point HL to the message, and Call PrintString | 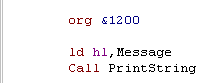 |
Running the Program
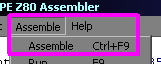
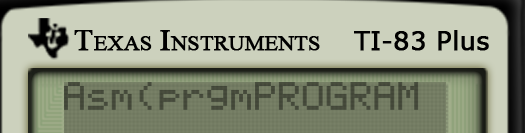
| Select Assemble from the Assemble Menu |
 |
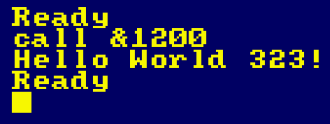
| In the emulator type Call &1200 and press enter | 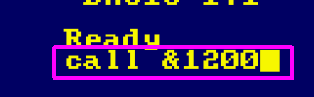 |
| The message will be shown onscreen |
 |
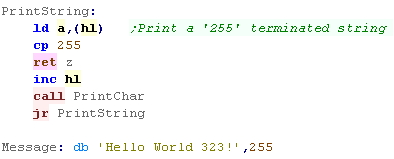
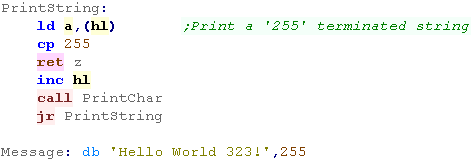
The Complete code
| PrintChar equ
&BB5A org &1200 ld hl,Message ;Address of string Call PrintString ;Show String to screen ret ;Finished Hello World PrintString: ld a,(hl) ;Print a '255' terminated string cp 255 ret z inc hl call PrintChar jr PrintString Message: db 'Hello World 323!',255 NewLine: ld a,13 ;Carriage return call PrintChar ld a,10 ;Line Feed jp PrintChar |
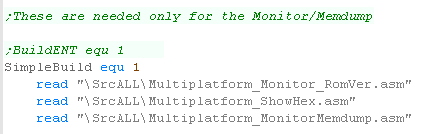
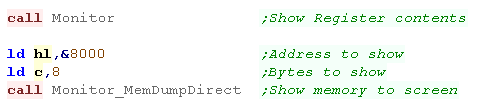
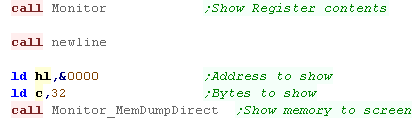
With a Monitor
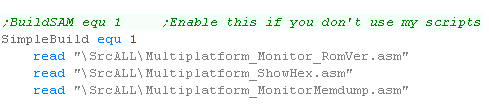
| We also have Montior Tools we can add... These have been covered previously in the Multiplatform tutorials... |
 |
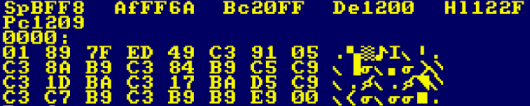
| With the Monitor, we can dump the
contents of the Main Registers... We can also dump areas of memory. |
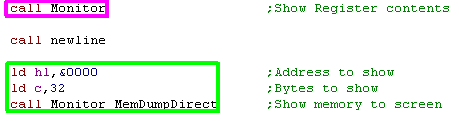 |
| If we can see the registers and memory, we can use this to debug
code we're working on, and work out what's happening... Of course, on Winape we actually have a better option in the built in debugger (Press F7!) |
 |
Building a Disk or Tape
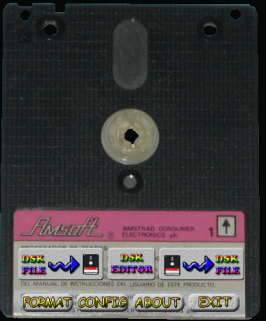
| DISK: The easiest way to run our program is compiling with WinApe, but if you want to use a different Assembler or emulator, we need to create an image! Creating a disk image can be performed with CPCDiskXP.exe To add an executable to a disk image, we need to add an AmsDos Header... |
 |
| As we'll need to run our program often, it's best
to do this from the command line (there's a batch file to do
this in my DevTools) Here's an example usage:  We've specified the Run Address the Source file (Binary program we compiled) and a Destination Disk image |
|
| When it comes to loading a program in basic from Disk or Tape
there are three stages 1. Allocate memory with the MEMORY command 2. Load the Binary program to the address in our ORG statement 3. Call the address of the ORG statement |
 |
| Tape: If you want to build a tape I use 2cdt This is a command line tool that builds a tape image, here's an example usage: By default 2CDT adds a file to an image, the first line starts a New Image with the -n switch We specify the Name of the file as it appears on the tape with -R Next we specify the source file name and path Finally we specify the destination tape image name If nessasary we can specify the type of file, in this example we specified one file as a 'Pure Data Block' (rather than a turbo loading data block) Note: The go.bas has to be already in CPC format (not a text file)... create a basic file on the CPC, and export it from the disk image with CPCDiskXP The program can be loaded on the CPC in the same way as the Disk image |
 |
| Cartridge: The Easiest way to create a cartridge is with NoCart , this tool converts a disk image into a CPC+ Cartridge. It's a command line tool, and the command is as follows: We specify a Source Disk image - this is the disk with the program we want to make into a cartridge A Destination cartridge to create Finally, a basic run command which will start the program |
 |
Advanced Cartridge: Nocart works by using an Amsdos firmware emulator to run the disk image... if we want to use the full capabilities of the CPC+, then we probably want a more advanced solution... BuildCPR Will convert a binary rom to a cartrige - but you'll have to know how to do everything yourself with no default firmware, so it's not something for beginners... BuildCPR is released as source, but there is a compiled version in \Utils\buildcpr in my DevTools kit I used a modified version of the OS source file PATCHDOS.asm from BuildCPR, which loads the first 32k of ROM from the cartridge into RAM, and then executes it - effectively the same as my Disk code above. (This is available in my DevTools - \Utils\buildcpr folder) This needs to be compiled with PASMO to a ROM file |
 |
Next we need to merge the ROM We need to merge the roms with our program binary into a temp file Then we convert the temp file into a destination CPR Cartridge ... |
|
 |
Creating a 'Real' Cartridge allows you to
use ROM banking to gain access to large amounts of data
allowing you to have a machine with 64k ram and 512k rom - if
you convert disk images, you've effectively got a 464+ with a
disk system. 'Real' cartridges are better, but they're more work, especially if you're planning to release for non plus CPC's as well. |

Beginning a program
| We're going to compile our program with the VASM
assembler, and test with the FUSE
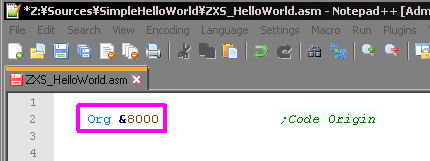
emulator... I tend to use Notepad++ for my editor - you can get a pre-configured package in my DevTools download When we start our program, the first command should be an ORG &8000 statement... this defines that our program will be loaded in memory address &8000 (32768) |
 |
Showing Characters and Newlines
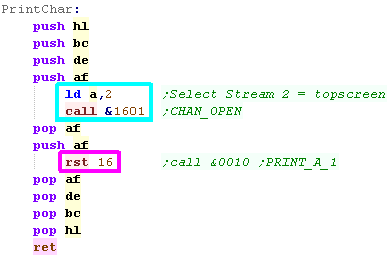
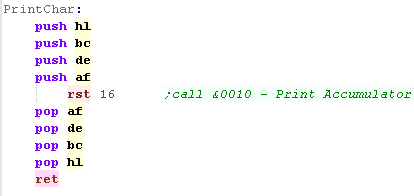
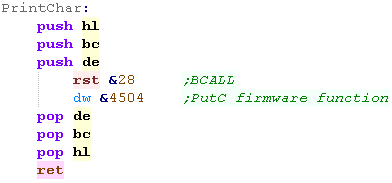
| We need a 'PrintChar' function that will print the Accumulator
as a character to the screen, To do this we need to Open a channel to the screen, we do this by loading A with 2, then CALLing &1601 Now our channel is open,to Print the Character we just use RST 16 (sometimes called RST 2)... this is the same as CALL &0010 Note we have to do a lot of PUSH and POPs to ensure that none of our registers are changed during the PrintChar function |
 |
| We're going to use this Printchar routine in our Printstring
function This function will be common to every platform |
|
| To use this function, we just point HL to the message, and Call PrintString | 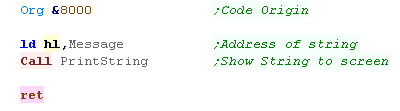 |
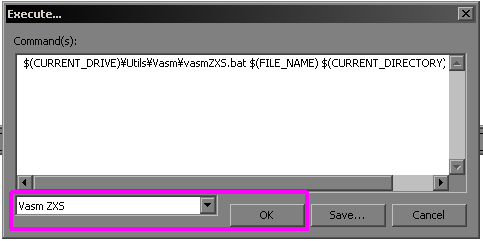
Compiling and running the program
| If your using my Devtools and Notepad++, press F6 and select VASM ZXS If you're not using my Devtools then read on - it's going to be tricky! |
 |
(You don't need this if you're using my
Devtools!)
| We're compiling with Oldstyle
VASM... The build script I use is shown to the right. There are a few parameters you may want to change... The Source file is specified - this version is called by a batch file, so it's shown as %1 here, The Destination file - we write to Program.Bin here.... we're outputting to binary here (specified by -Fbin) Some Symbols are defined - you won't need these for the Hello World example, but my other files use them.  Note: This is just a binary, we need to get it into a tape or Disk to run it. |
|
| *** Creating a Tape Image *** First we're going to convert our file to a TAP... we're going to use BinTap to do this (note the version in my download package is a newer build) We Specify a source Binary, a destination TAP, a filename (for the file in the TAP) and the origin (though we can override the origin in our loader) |
 |
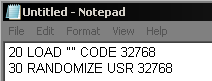
| We want to add a loader to our tape, the loader is shown too
the right, it has two lines. The first line loads the next file to memory address 32768 (&8000 - the same address as our ORG statement) the next line is a 'Randomize' statement, but it's actually a trick to 'Call &8000' - the USR statement defines a user function... this will run our program We can just create the basic program in notepad, and convert it using MkTap (I didn't write it, but I can't find a link to the original) We're specifying: A Source file to read from (in text format) A destination TAP file A Spectrum filename for the file (inside the TAP) We're also specifying a line number for the program to start (10) |
  |
| We've now got a program TAPe and a loader TAPe... we need to
combine them using the windows COPY command - specifying /B for
binary copy We specify the source files, separater by +... order is important We specify the destination file for the complete TAP |
 |
| We can specify the tape file on the Fuse emulator command line to load it automatically |  |
| *** Creating a DSK (Spectrum +3) Image *** The Spectrum +3 uses the same Disk file format as the Amstrad CPC, but we need a different kind of header for the files, I've created a tool called PlusThreeHeader that can add the correct file header First we use PlusThreeHeader to convert our Sourcefile into a Destination file valid for the Speccy (We need to give it a .C extension) Next we use CPCDiskXP to add the Destination file to a Disk image. |
 |
When we want to start Fuse, we can
specify a Source Disk image that we want
to load, we also need to specify that we're using a +3
machine... we can even load a Memory
Snapshot at the same time, to get the machine ready to
load our program! |
|
| To actually start the program, once again we need a basic
loader.. Once it's typed in, we could save a memory Snapshot, and load it on the command line to allow us to start our program quickly |
 |
| If we want our disk to start automatically with the Loader, we just need to save a file called "DISK" and specify the line number to start the program (10) |  |
| *** Creating a TRD image *** TRD (Betadisk) is supported by many SD card disk emulators like the DIVMMC ENJOY and is the only real option for disks on non +3 systems... unfortunately it's a major pain! You can download an empty TRD image here... You can get a detailed (translated) TRD manual here... an English manual is also here |
|
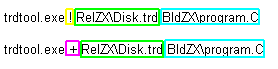
| To add files to a disk image we use TrdTool TRDTool cannot overwrite files... first we try to delete the file we want to add from the disk image (in case it already exists on the disk) Then we add the file we want to add to the disk image The file MUST end in .C |
 |
| When loading Fuse, we probably want to emulate 128k
Machine, and we need to enable Betadisk We need to specify our TRD Image we made You may also want to have a memory snapshot loaded up, with your program about to start! |
 |
| When sending a command to TRDOS, we first have to start with "Randomize USR 15619 : REM :"... what
follows will be the actual command TRDOS
executes You'll probably want to save a memory snapshot to save you typing this lot again! You can start the TRDOS command line with Randomize USR 15616... * Note: Some very old versions of TRDOS did not use 15619/15616 - they used alternate numbers |
 |
| If you save a file called 'boot' it will autostart where possible (48k and DIVMMC only?) |  |
 |
You may want
to develop for the ZX spectrum or MSX, but you should
startwith the CPC and WINAPE! Winape has a built in Assembler and Debugger that are second to none! In the early days you will make a lot of mistakes, and having the compiler ,emulator and debugger in one place will save you a lot of time and problems!You can even develop MSX and SPECTRUM code with it - the MSX and Spectrum versions of ChibiAkumas are compiled in winape too!.... If youdont't use widows, Winape works OK with WINE! |
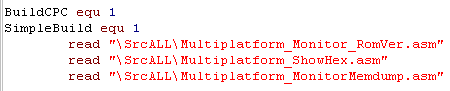
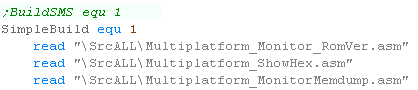
Monitor tools
| in the Multiplatform
series, we created some tools for debugging programs, we can use these with this hello world example by including a few extra files. |
 |
| This gives us two tools, a Monitor,
which will dump the CPU registers to screen. and a MemDump, which will output a number of bytes of memory to screen |
 |
| We can use these tools to see the state of the CPU and Memory,
and this allows us to test and debug our code. |
 |
 |
It's
worth bearing in mind that TRD is bigger than DSK... a
single TRD can take 720k of data, but a DSK is only 180k... During development of ChibiAkumas, the game was developed on TRD, before compression was applied to make the game run on DSK. |

Making a MSX Cartridge
| We're going to compile our program with the VASM
assembler, and OpenMSX for
emulation First we need to create a header... the header is 10 bytes... the header starts at &4000 in MSX memory (but byte 0 in the Binary output of the assembler) The first two bytes are always AB... the next two bytes point to the first line of code in ram (so probably &400A - 10 bytes in) The next 8 bytes are all &00 - as they are unused for our purposes |
 |
Showing Characters and Newlines
| The first thing we need to do is set up our screen, we need to
CALL &006F to select screen mode... Then we need to write 32 to &F3B0 to tell the firmware the width of the screen we're using. |
 |
| If we want to show a character to the screen, we can just use firmware function &00A2 - this will print the accumulator to the screen. |  |
| If we want to start a new line, we can just print Character
13, then Character 10 to the screen. |
 |
| We're going to use this Printchar routine in our Printstring
function This function will be common to every platform |
 |
| To use this function, we just point HL to the message, and Call PrintString |  |
| The code will show our message to the screen |  |
Finishing a MSX Cartridge
| After our program has run, we can't return to basic, as we didn't use it... instead we can just halt the processor |  |
| OpenMSX won't really like it if our cartridge size isn't a
multiple of 8k... We can pad our cartridge to 32k with VASM with an ORG &C000 statement. |
 |
We need to use VASM to compile the source into a
binary file... here is a sample command line... We need to specify a source file We need a destination for the cartridge In this example we're also defining some Symbols - you'll only need these for the Montor test. |
|
All we need to do next is load the cartridge... we specify the Cartridge file on the command line... You can use MSX Catapult if you prefer though! |
|
Making a DISK image file
We need to add a small header to our
binary file to make it valid for the operating system - it
contains a calculated checksum, so it's easier to use a tool to
make it for us, I've created a command line tool called MSXheader
which will do this for us We specify a Source file to read A Destination file to save the result, and a Load address... this is the place in memory the MSX OS will load the file by default |
|
We don't even need to create a real
disk image, OpenMSX can use a folder as a disk... so putting a
file in the specified folder will allow the MSX to use it, but
if we want to create a disk image (which we will for
redistribution) we can use the free tool BFI...
We need to collect all the files for the disk into a folder,
then convert the folder to a disk image We can specify a source folder with the files, A Disk Image to create, I found some machines had trouble booting from the image, so I added a new bootsector to replace the default boot sector with an MSX bootsector, which seemed to solve the problem |
|
We can start OpenMSX from the command
line with the finished disk image We specify a source disk image, We also specify a machine type, I tend to use the MSX2+ Sony XDJ as a good testing machine for disk software |
|
| We need to load our program into memory (the load address is
in the file header) We then need to define USR0 to point to the address we want to call, and execute the program with a USR0(0) call To make the disk boot automatically save this to the disk as AUTOEXEC.BAS |
  |
Monitor tools
| in the Multiplatform
series, we created some tools for debugging programs, we can use these with this hello world example by including a few extra files. |
 |
| This gives us two tools, a Monitor,
which will dump the CPU registers to screen. and a MemDump, which will output a number of bytes of memory to screen |
|
| We can use these tools to see the state of the CPU and Memory, and this allows us to test and debug our code. | 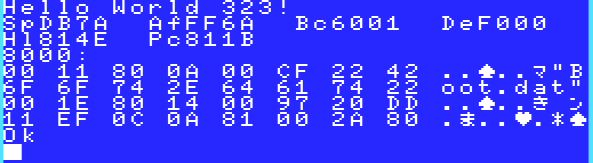 |

Beginning our program
| To Start our program, we just need to define an origin of &8000 |  |
| At the end of our program, we can just use RET to return to the
OS, but that will clear the screen, For testing we may want to use DI HALT to stop the processor instead. |
 |
Printing to the screen
| If we want to print a character in A to the screen, just like on
the speccy, we just use RST 16 This will print our character to the screen |
 |
| When we need to create a newline, we just print CHR 13 to the screen. | 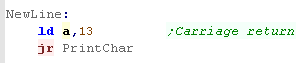 |
| We use PrintChar to print a 255 terminated string | 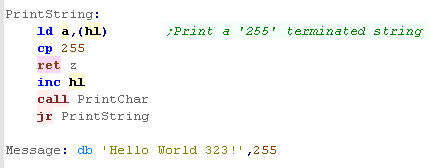 |
| By loading HL with the string address, we can show our string to the screen. |  |
 |
Compiling our program
We're going to use VASM to assemble the program to a binary
file. We're going to specify the Source Asm file, The Destination Binary, We're also going to define some symbols, these are only needed for the monitor tools Finally we'll output a listing file - this is optional but will help if we have any unexpected problems |
The Monitor Tools
| In the Multiplatform
series, we created some tools for debugging programs, we can use these with this hello world example by including a few extra files. |
 |
| This gives us two tools, a Monitor,
which will dump the CPU registers to screen. and a MemDump, which will output a number of bytes of memory to screen |
|
| We can use these tools to see the state of the CPU and Memory, and this allows us to test and debug our code. | 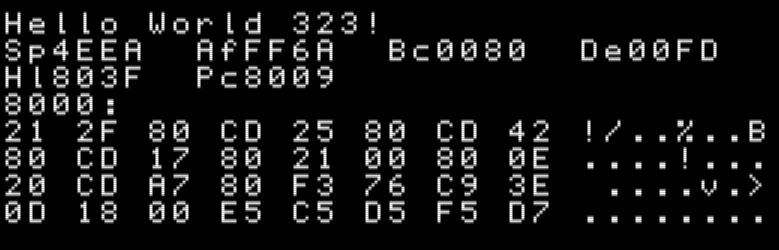 |
Creating a disk
To create a disk for the Sam Coupe I
use "DiskMan" (the SimCoupe .DSK Manipulator by Andrew Collier)
You can get the original Here,
But I use a modified version - I added the ability to load in a list of
changes from a text file - my version is in the Devtools
download (Source included)
We can use my version to automate the
creation of a disk image.
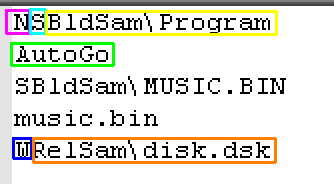
| If you're using my program, we can call it with a script on the command line |  |
| The text in the script are sent as keypresses to the program
(including Enter keys)... In this example we do 3 kinds of command N = Create a new disk image S = Save a file to the image (Specifying Source file, and Destination name) W = Write the complete disk to our computer as a disk image If we save our program with the name AutoGo , the SAM will load it automatically for us! |
 |
| We can start SimCoupe with our disk image by specifying the disk image on the command line |  |
| If
you don't want to use the modified DiskMan, you can use the same
keypresses on the regular version, Alternatively there are disk editors that use a User Interface - the trouble is, while these programs work, they aren't efficient for developing, where you may be running your program dozens of times when fixing a problem |
 |
Loading a program
| We can see the contents of our disk with the DIR command. |  |
| If we've created an AutoGo file, then it will run
automatically... we can load to a different address in the same
way as the spectrum, We need to specify the load address as well. |
 |
| If we want to call a program in memory, we use the USR command to call an address - we need to send the output to somewhere, so we use the RANDOMIZE command for this.... We can also use CALL &8000 |  |

Beginning our program
| First we need to define the header for our program... Our program code will start at &100, but we need a 16 byte header, so we start our header at &0F0 We need to put the length of the file in the header 2 bytes in. |
 |
| Our file start will need to define a new Stack Pointer - we'll define the SP to point just before our program at &100 - this will give around 128 bytes of stack data |  |
| We need to initialize a text
screen, first we need to open a stream to the device 'VIDEO:'....
we do this as stream 10. All calls to the OS use RST 48 (called RST 6 on some operating systems)... the byte following the RST is the command number Next we need to do some extra commands with a command call 'Special Function'... this init's the screen and turns it on |
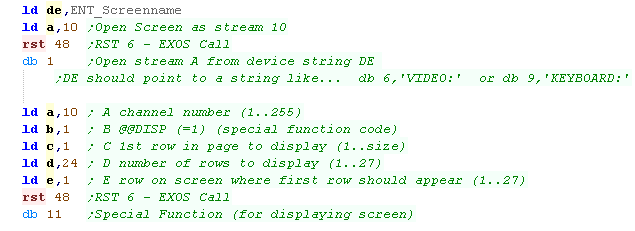  |
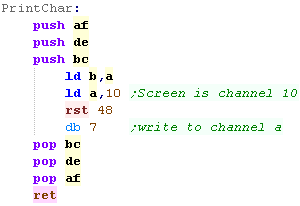
Showing Characters and Newlines
| When we want to print a character to the screen, we need to use
the channel we opened to the screen before (Channel 10) We load B with the character we want to show (from A) - and call the EXOS call (RST 48) and use command 7 to send the character to the stream. |
 |
| We can effect a newline by printing Character 13 then Character 10 | 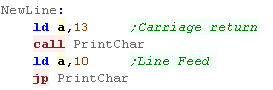 |
| We can repeatedly print characters from a HL pointer, until we
get to a chr 255. We can call this function after pointing HL to a text string, to print that string to the screen. |
  |
| The result will be shown to the screen. |  |
Ending our program
| After our program has finished, we'll stop the processor so we
can see the result. |

|
| After the last byte of our program, we need to define the FileEnd
so we can calculate the length of the file. |

|
Running the program from FileIO
| If we have FileIO set up (Learn more here)
we can just use a folder on our hard drive to run the program
from... In this case we need to specify File: as the source drive, and our program name |
 |
Running the program from disk image
| If we we want to create a DSK image, for a real machine (or if
we haven't got FileIO set up) we can just convert a folder with
the program into a disk image with the free tool BFI...
We need to specify two things... The Source folder, and the Destination disk image |
 |
| We can start our program with a RUN command... Alternatively, if we save our program with the name START, we can load it automatically by pressing F1 |
  |
If we want to save time, we can configure EP128emu
on the command line, I specify a config file with the correct emulator settings, and also a memory Snapshot to save time typing the run command |
|
 |
Setting up
FileIO is a bit of a pain, but the load time on the emulator is
faster than from Disk Image, so it's worth it... The same goes for using snapshot save states, they can help reduce the load time - and saving a second or two every run really ads up when you're developing a game! |
Compiling our program
We're going to use VASM to assemble the program to a binary
file. We're going to specify the Source Asm file, The Destination Binary, We're also going to define some symbols, these are only needed for the monitor tools Finally we'll output a listing file - this is optional but will help if we have any unexpected problems |
The Monitor Tools
| In the Multiplatform
series, we created some tools for debugging programs, we can use these with this hello world example by including a few extra files. |
 |
| This gives us two tools, a Monitor,
which will dump the CPU registers to screen. and a MemDump, which will output a number of bytes of memory to screen |
|
| We can use these tools to see the state of the CPU and Memory, and this allows us to test and debug our code. | 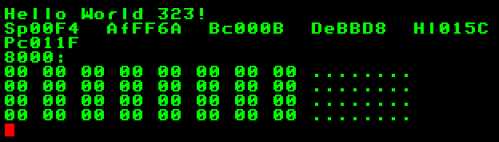 |

Beginning a program
| A good starting point for our program is the address &6500,
basic and the stack uses areas before this. Next we're going to do something a little odd, when the program loads, the Lynx will be making quite a noise! to stop this we need to write zero to %10000100 |
 |
Printing a character to the screen
| Printing a character to the screen is easy, all we do is use RST 8 (called RST 1 on some assemblers)... this will print the character in the accumulator | 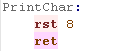 |
| If we want to start a new line, we can just print a character |  |
| We're going to extend that printchar command into a printstring, All we do is repeatedly read in from HL, sending each character to Printchar, until we get to a character 255. |
 |
| The "Hello World" message will be shown! |  |
The Monitor Tools
| In the Multiplatform
series, we created some tools for debugging programs, we can use these with this hello world example by including a few extra files. |
|
| This gives us two tools, a Monitor,
which will dump the CPU registers to screen. and a MemDump, which will output a number of bytes of memory to screen |
|
| We can use these tools to see the state of the CPU and Memory, and this allows us to test and debug our code. |  |
Lynx TAP file format
As the LYNX has no cartridges, our best way of getting data from our assembler to the Lynx is to make a TAP file...
Creating a valid TAP file requires some byte calculations, but is not too hard... here is the format of the TAP file
|
 |
Compiling our program, and Creating a
TAP file
| First, We need to compile our program into a
binary, we use VASM in these tutorials, but you can use another
assembler if you prefer. We run VASM on the command line  We need to specify a source file, We need to specify a destination binary For my Monitor tools, we need to define some symbols finally, we can output a listing, which can be used for debugging |
|
| OK, we've made our binary, but there's a problem! - we need to
add a header and footer to our file, and unfortunately they're
quite complex! The header needs the file size adding to it, that's not too bad, and we could make it with VASM, but the footer needs a checksum which we must calculate, To create the header, I use a sample header file, and attach it to the binary made in the last stage, then I patch in the size, and add the checksums. |
 |
| We're going to use a tool I wrote called BinaryTools
- this tool can do various useful things for building ROM
images! First we make a second copy of the program, this is so we can use one as a source to calculate checksums, and the other as the destination for those checksums. Now we calculate the checksums, and append them to the end of the program binary Next we insert the new length of the binary into the template header. Now we append the Execute position (the ORG we used in our code) to the end of the file (with the high byte (&65) repeated), we also insert it into the header. Our last stage is to use the Copy command in binary mode (/b) to merge the header and the program binary into a usable tape file! Phew! we've made a usable TAP! |
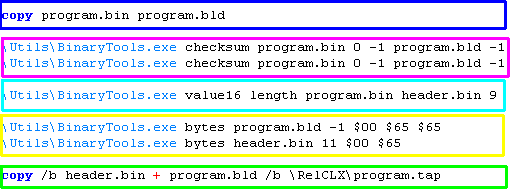
|
| We can automatically start our TAP with Jynx, by specifying
the TAP on the command line! The tape will load itself without us typing a single command! |

|
|
The Firmware of the Lynx is pretty slow,
even when drawing text, it may be better to use our own font
and draw things ourselves (like in the main tutorials), but of
course that will use up memory! You'll have to decide what your priorities are, and write your code accordingly! |

Beginning a program
| To start our program, we need our code to start at &9D95,
but we need a 2 byte header with the bytes &BB,&6D To allow for the header, we specify our code origin &9D93 |
 |
| When we finish our program, we just use a RET command to return to the OS |  |
Printing a character to the screen
| We have to use firmware calls
for everything which use RST &28 (also called RST 5 on some
assemblers)... there are two bytes after the RST call, these
define the OS function we want to use... In this case we want to use 'PutC' (Put Character) using the code &4504 - this prints the Accumulator to the screen as a character. |
 |
| We're also going to define a newline command, we use the same RST &28, but this time we use &452E NewLine function. | 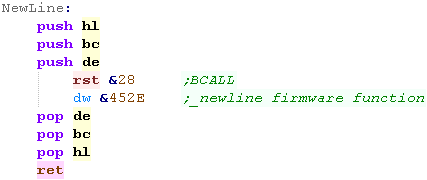 |
| Because we now have the ability to print a character, we can
extend this into a function to print whole strings. Our code prints a string that is ended with a 255, we just pass the string address in HL |
  |
| This can be used to show a test string to the screen | 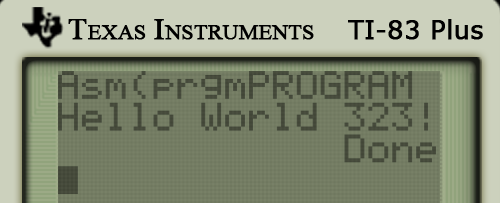 |
The Monitor Tools
| As a bonus, we can include the Monitor functions we wrote in the
multiplatform series, These allow us to show the Z80 registers, or parts of the system memory for debugging purposes |
 |
| This adds 2 new functions... Monitor shows all the registers... Monitor_MemDumpDirect shows part of the memory... it shows C bytes from address HL |
 |
| Due to the small screen, the Monitor isn't very useful, but it's always there if you need it! |  |
|
The Limited
screen space means these monitor tools aren't a lot of use - for
more practical purposes, it's probably better to print the one
register you're interested in on screen when you're debugging See the main tutorial series for details on how to do Locate commands to re-position the print cursor! |
Creating a valid executable file
In these tutorials we use VASM to
compile, we need to specify various parameters. First, We need to specify a Source file, Next we specify a Destination - this is a binary, but we'll need to convert it to an 8xp later We also specify some symbols - these are only needed for the assembler. Finally we specify a Listing file - this is for debugging and contains output which may help us if we have trouble. We're also specifying to ignore case sensitivity, and check for labels that look like commands |
|
| We can't use the program yet, we need to convert it with
bin28xp, this will add the header required for the calculator to
run the program. The program takes a source file, and outputs a matching 8xp, we should be able to use this with our emulator |
 |
if we're using WabbitEmu, we can start
our emulator with the new program via the command line. In this example we're specifying the complete 8xp to execute We're also specifying a memory save state on the command line as well, this prepares the calculator to launch the program. |
|
| To start a program, we need to specify the program name to the
command ASM... In this example, I've saved a memory snapshot so I don't have to type the command name |
 |
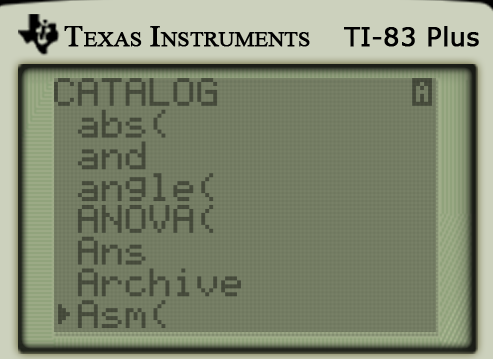
| Without the snapshot we need to load the program ourself! First we need to use the 'Catalog' function button Then we need to select the ASM( function |
 |
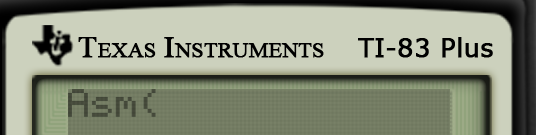
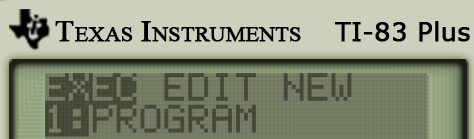
| Unfortunately this just starts the function to run the code, we
still need to specify the program, Select the PRGM button, and choose the program from the list, This will prepare your program to run, just select the enter button to run it! |
   |
| Loading
a program on the TI is a pain, so you definitely want to use a
save state to save time loading the program. If you want to run your program on a real machine, you'll need a USB cable - unfortunately they're horridly overpriced - so it's probably best to just stick to the emulator |
|


|
The example
today will build for the Sega Mastersystem by default... but with
a few tweaks we can compile for the GameGear... To do this just define the symbol 'BuildSGG' (with 'BuildSGG equ 1') - this will compile the Gamegear version (with alternate palette, tile offset, screen size and rom footer) |
Beginning a program
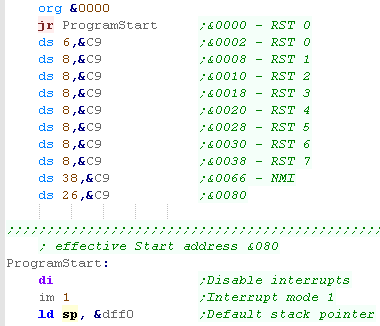
| Our rom starts from address &0000 - and the first 128 bytes or
so are RST's and interrupt handlers - we'll fill these all with
RET's (&C9) effectively turning off interrupts. RST 0 at &0000 will be the first byte executed by the system, so we need to put a jump at this point to jump to our actual program code.. As soon as our program starts, we'll turn off interrupts, and set the stack pointer up to a valid RAM address |
 |
||||||||||||||||||||||||||||||
| As well as the header - we should create a footer to our rom...
though depending on our emulator setup (if we don't specify a
firmware rom), this may not actually be needed. Though rom files can be up to 512k, this footer always at &7FF0... it contains a few bytes, most of which we can just leave the same as here. There is a 2 byte checksum - this is only actually checked by the Export SMS - so we can ignore this if we run on a Japanese SMS or a game gear... We'll learn how to create a valid checksum in a moment. Depending on our planned region and rom size, we may need to set the last byte to the correct value for our cartridge... the top nibble is region, the bottom is size the options are shown below:
Also Note: Although SMS/GG is specified in the header, it's actually the filename used by fusion to decide what system to use for the rom... a SMS file extension is the Master system and GG is the gamegear |
 |
| Only
the International SMS checks the Checksum, and while the later
GameGears check the header for the ''TMR SEGA" string, all other
systems check nothing at all! If you run the FUSION emulator without a bios Rom, then you can test your game on SMS or GG just fine with no header at all! |
|
Initializing the screen
| We need to turn on the screen and set it up, to do this we're
going to write default values to the VDP control port We're going to define symbols for the VDP Control port (&BF) and VDP data port (&BE) To transfer the data to the VDP we'll use OTIR. OTIR repeatedly OUTs bytes from HL to port C... and the byte count will be in B The code to the right will set up a valid screen. |
   |
| Ok, so the screen will be working, but we won't be able to see
anything - as all the colors will be black! We need to set up a valid palette!... we're going to use OTIR to send the palette data to the VDP data port, but first we need to select the destination address in VRAM (&C000 is the start of the palette)... we do this with a function called 'PrepareVram' Next we out the bytes of the palette to the Vdp Data port (&BE) Note: we're sending 32 bytes of data on the GameGear - but only 16 on the Master System... that's because the GameGear has a better palette range than the SMS! |
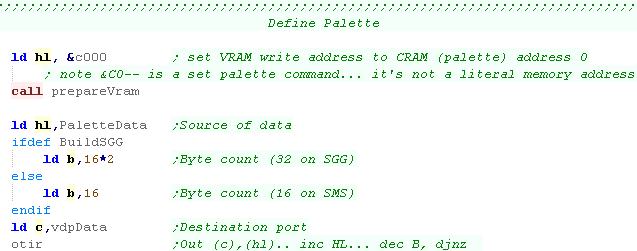  |
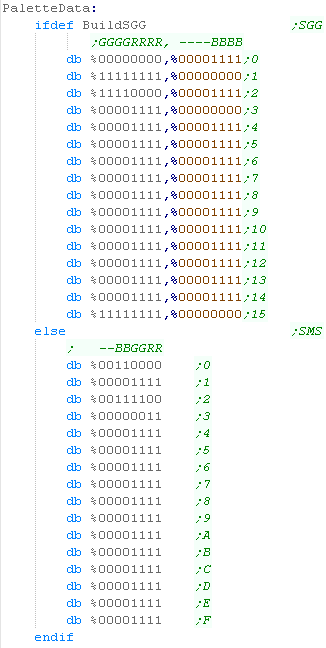
| The palette is the biggest difference between the SMS and GG...
both have 16 colors for the tiles (background), but the SMS uses one
byte per color (2 bit per channel), but the GameGear has 2 bytes per
color (4 bits per channel) We use a symbol (BuildSGG) if it's defined, we'll use the GameGear palette, otherwise we'll use the MasterSystem one. |
 |
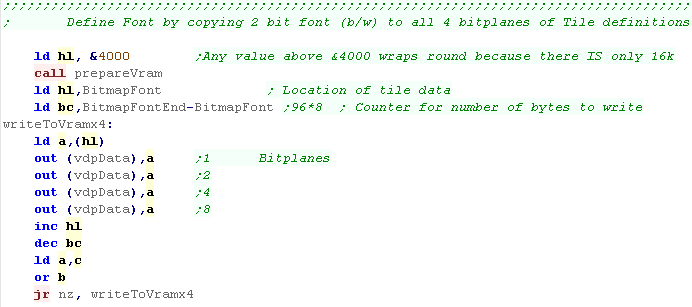
| We're going define tiles 0-96 as our font (0 will be space) We're importing a font file called 'Font96.FNT'... this uses 8x8 characters (SMS/GG tiles are also 8x8) The font file is black and white (1 bit per pixel)... but the SMS/GG uses 4 bitplanes (4 bits per pixel)... We write the same byte 4 times, setting each bitplane to the same value, efffectively setting the text to color 15 If we wanted to set the font color to 1, we could load a with zero after the first 'out (vdpData),a', effectively setting bitplanes 2,3,4 to zero. |
  |
| We have a font, but we need to actually handle the 'cursor'
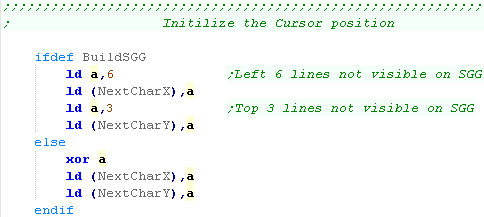
position. Each time we show a character, we need to work out the position to show it, but we then need to update the position so we know where the next one should be shown to the screen. For this purpose we'll use two bytes of Ram at (&C000/1) for an X and Y position... But because the gamegear screen is smaller than the master system, the top left visible tile is not (0,0), but is actually (6,3)... we need to define the correct start position depending on the system |
 |
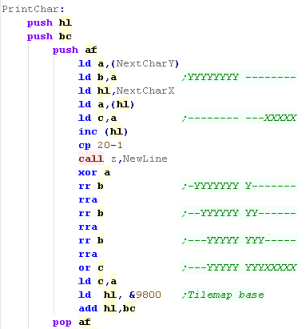
Printing a character to the screen
| Ok, we need to print a character to the screen, but it's a little
tricky. The 'Tilemap' starts at VRAM address &3800... each tile is 2 bytes, and the tilemap is 32 tiles wide... therefore our formula is: Tile VramAddress=&3800 + (Ypos * 64)+ (Xpos *2) We achieve this calculation via a series of bitshifts... once we've found the Vram address, and selected it with the 'PrepareVram' function, we just need to OUT 2 bytes to the VdpData port, |
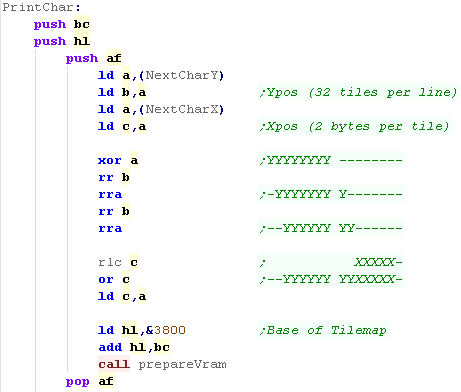 |
| Our font starts with Space (Character 32), so we subtract 32 from
the Ascii character to get the tile number... the second byte we
write is always zero in this case (it's used for palette options
flipping tiles and a few other things) |
 |
| Once we've shown the character, we need to update the cursor, we
increase 'NextCharX' and see if we're at the end of the screen The screen is 32 tiles wide on the SMS, and just 20 on the GG... If we're at the end of the screen, we call the NewLine function to move down a line |
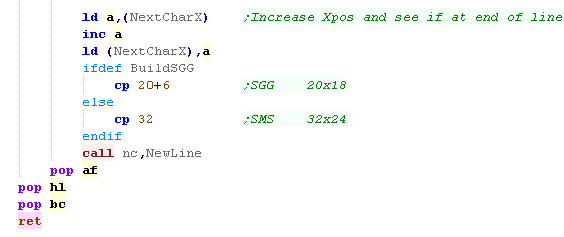 |
| The newline command increases the Y position, and resets the X position to the left of the screen. | 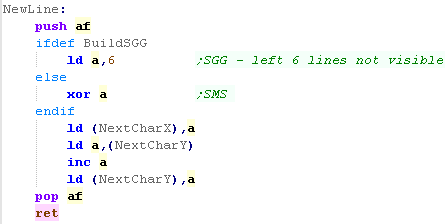 |
Using our PrintChar to print a string
| We're going to write a simple string printing routine, it prints a
255 terminated string. All we do is read in bytes from HL until we get to a 255, at which point we return... we print all other characters with our PrintChar routine |
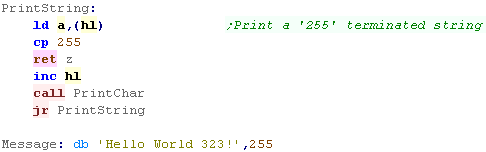 |
| To print the string, just load HL with the address of the string, and call the function |  |
| This will show 'Hello World' to the screen |  |
Patching the CRC into the Rom footer
| We wrote a footer at &7FF0 before, but we didn't put a valid
checksum, which will mean the game won't boot on some SMS To fix this, we need to calculate a 16 bit 'Checksum' and write it to bytes &7FFA/B - we achieve this by adding each byte from &0000-&7FEF (even if the rom is larger than 32k)... The Checksum is 16 bit, this means if the calculation goes over 65535 (&FFFF) it rolls back to 0 I've written a tool called 'BinaryTools' which can create a valid checksum, it's included in the Devtools pack... the command to create the CRC is shown below:  |
Monitor Tools
| As an added bonus we can include the 'Monitor Tools' we developed
in the multiplatform series. These allow us to show the registers or parts of the Ram for testing and debugging purposes |
 |
| This gives us 2 commands... Monitor shows all the registers, MemDumpDirect will show C bytes from address HL to the screen |
 |
| We can see the result onscreen. | 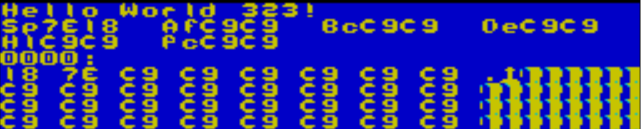 |
|
This example code is pretty long, but we've
got the screen set up correctly, and now we can see the registers
and Ram, so we can do more from here! the "PrepareVram" function can be used to do sprites and things as well, so you should have a great starting point to make something better. |


|
As far as
todays code goes, the regular Game Boy and GBC are virtually the
same, so the code we're making today will compile on GB or GBC -
we just need to define a symbol BuildGBC for the Gameboy Color! The Batch files provided in the DevTools will do this automatically! |
Beginning a program
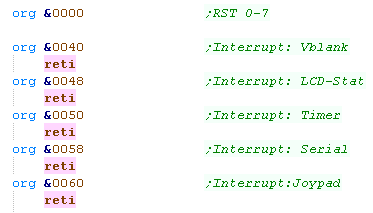
| We need to start our rom cartridge, the first 64 bytes are used by
the Z80 RST's - the gameboy does not need these, not even RST7 -
which does not handle the interrupt handler on the gameboy. In fact, the Gameboy Interrupts are handled by addreses &0040, &0048, &0050, &0058, &0060 - we need to make sure these interrupts won't do anything, so we just put a RETI at each |
 |
| Execution of our cartridge will start at address &0100, but we need to put the cartridge header at &0104 - so we only have room for a jump here | 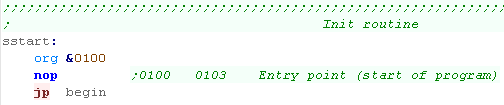 |
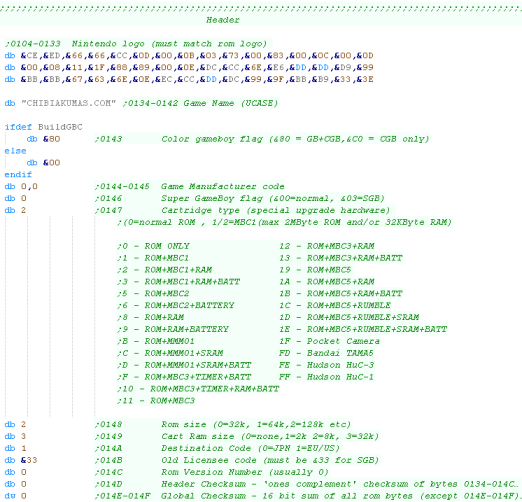
| Next we need the rom header - this is very important for a real
gameboy - as if the header Checksum, or Nintendo Logo are not
correct the game won't boot. We'll learn how to calculate that checksum later. |
 |
| Our actual code will start at the 'begin' label | 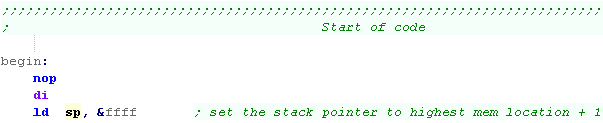 |
| We're
going to have to do quite a bit of set up to get the system
working, we need to define our font, and palette so we can see
anything on screen... The gameboy is a great little system, but if you're just starting out with Z80, then a system like the Amstrad CPC is easier to get started with thanks to it's firmware. |
|
Initializing the screen
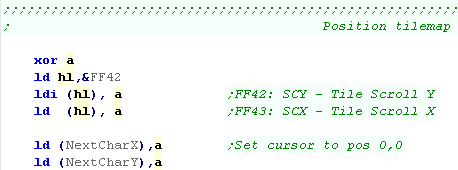
| We're going to start by setting up the position of our screen...
we're going to reset the 'tilemap' - moving it to position (0,0) We're also going to define two defined memory addresses NextCharacterX and Y - these will remember the position of the next character to draw - these will be in Gameboy Ram at &C000/1 |
 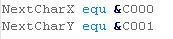 |
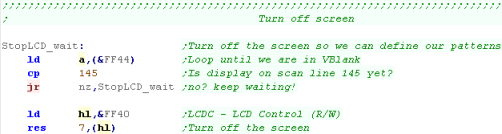
| Next we need to turn off the screen so we can set things up... We have to wait until the screen is in Vblank... to do this we check address &FF44 - which will return the screen line - when the screen line is 156, we're in Vblank.... To turn off the screen we reset bit 7 of &FF40 |
 |
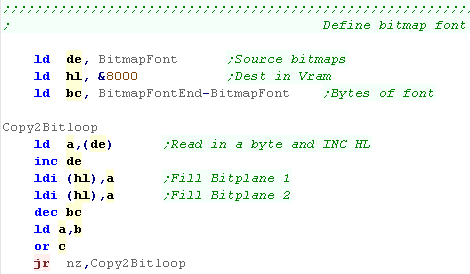
| Now our screen is off ,we need to define our font... We're going to put this in tiles 0-95 - our font has 96 characters (from 32-128... first character is space, containing all standard visible Ascii characters) Our bitmap font is a black and white 8x8 font (8 bytes per character)... we're going to load from the label 'BitmapFont' into address &8000 - the start of the patterns in video ram Now, we read in each byte - but we write it twice... the Gameboy uses 2 bits per pixel - meaning 2 bitplanes, so we 'double up' the font data, writing it twice... This effectively means the font is Color 3 in the palette... We repeat for all the bytes of the font. |
  |
| The next stage is to set the palette... this depends on if we're
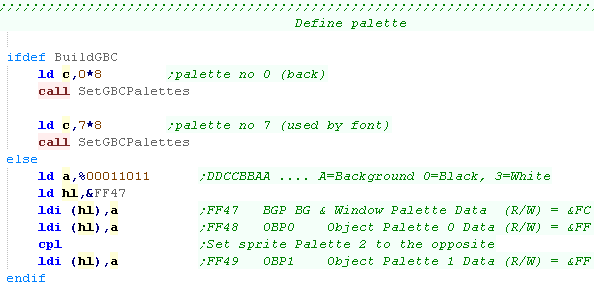
using a Gameboy Color, or classic. On the Black and white GB: on a black and white gameboy, we define the background with address &FF47... sprites are defined by &FF48/9... each uses 2 bits per color, 00=White and 11=black On the Color GB: On color systems we have 8 palettes (0-7)... we're defining a function called 'SetGBCPalettes'... we're using palette 0 for the background, and palette 7 for the font... each palette has 4 colors - 2 bytes per color, so we multiply the palette number by 8. |
 |
| On the Color GB: The native format of the GBC palettes is 16 bit in the format -BBBBBGG GGGRRRRR We read in bytes from our palette definiton (the end of the definition is defined by a bytepair of 255,255) Next we write the palette number we want to change to &FF68 (from C), after that we write the Low byte (from E) to &FF69 We increment C, and write the second palette number we want to change to &FF68 (from C), and write the High byte (from D) to &FF69 we Inc C again, and repeat to do the same for the following palette entry. |
 |
| Ok, our font and palette are ready, so now we can turn the screen
back on! We're ready to write our program! |
 |
Printing a character to the screen
| When we want to print a character to the screen, we need to
calculate the position in the Tilemap we want to draw the character, Although the screen is 20 tiles wide, The tilemap is 32 tiles wide... it starts at memory address &9800 Our formula is: Tile Address= &9800 + (ypos*32) + xpos We calculate this by reading in our Y-Pos, multiplying it by 32 (via bitshifts) and adding the X-Pos... then we add the &9800 base... The tile address for the character is now in HL |
 |
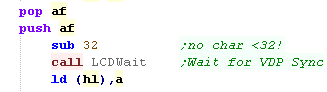
| Before we write to Vram, we need to wait... we'll use a function
called 'LCDWait' to do this... we'll take a look at this in a
moment! As our font starts at character 32, we subtact 32 from the accumulator, the write A to the address in HL to set the tile visible at the location we calculated. On the Black and white GB, we're done! |
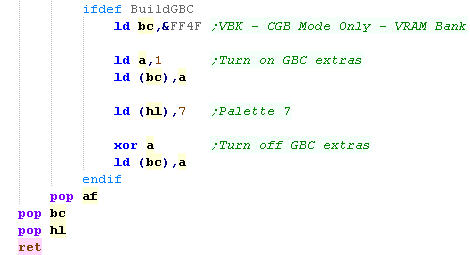
 |
| On the Color GB: We need to select the palette... we're going to use GBC palette 7... The palette entry for our tile is at the same address (in HL)... BUT we need to switch in the extra GBC ram... to do this we write a 1 to address &FF47... This turns the GBC ram on... we write our palette number 7 to HL... Finally we turn off the GBC ram, by writing a 0 |
 |
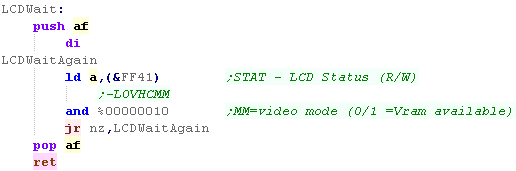
| When we want to wait for Vram to be ready, we need to check the
'Mode' bits of &FF41... in bits 0-1 If the 'Mode' is 0 or 1 - we can Write, if it's 2 or 3 we need to wait, so we can check this by waiting for bit 1 to be zero. |
 |
| When we want to start a newline, we just Zero NextCharX, and increase NextCharY... we need to do this when Xpos reaches 20 (the width of the screen) |  |
Using our PrintChar to print a string
| We can build up our PrintChar routine into a PrintString routine, Our string is 255 terminated. |  |
| We load HL with the string address, and Call PrintString |  |
| The Text will be shown to screen |   |
|
Compiling our
rom is easy, we just need to compile to a binary file... because
we've included the header in our source as-is... we can just load
it straight away in Visual boy Advance! If we're using the BGB emulator, we need to fix the CRC first, lets learn how! |
Patching the CRC into the Rom
| To make our ROM work with the BGB emulator , we need to ensure the
checksum is OK, we can fix it with RGBFIX
-v will tell the software to fix the rom checksum -p 0 will pad the rom with zeros. |
 |
Monitor Tools
| We can include the Monitor tools we wrote in the Multiplatform
series. These will help us develop our programs |
 |
| If we want to see the state of the registers, we can just call the
Monitor function... We can also dump parts of the memory, just load HL with an address, and C with a bytecount, and call Montior_MemDumpDirect |
 |
| The Results can be seen here. | 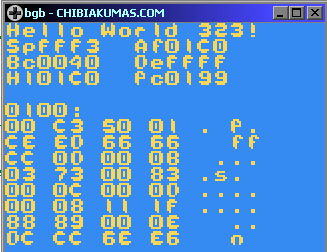 |

Beginning a program
| We're going to create a "P" file... this is the binary data which
would be contained by a tape... we'll load it into our emulator to
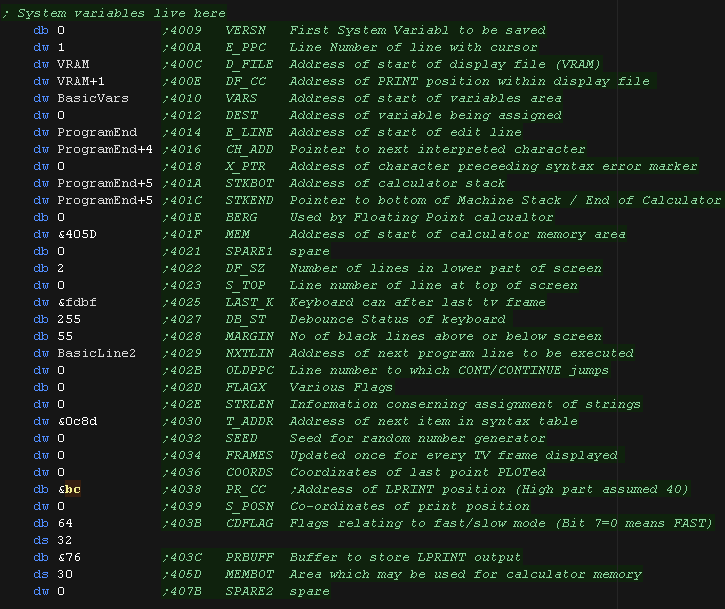
run our tests. The start of our program needs a 116 byte header - this contains a variety of variables and pointers required for the system to run. |
 |
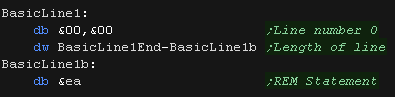
| The start of our program is a 'REM statement'... This is to
'Contain' our ASM program!... Our binary will all be part of one huge line of our program which will follow this. |
 |
Ending a program
| At the end of our ASM program
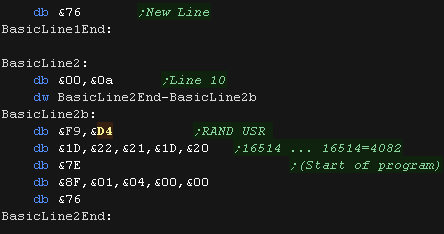
we need a second basic line. This is an "RAND USR 16514" ... this executes address 16514 (&4082) - the first line of our ASM program! |
 |
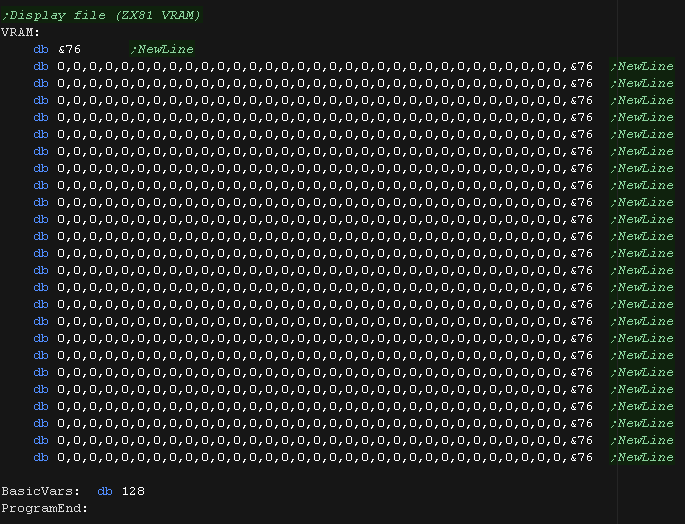
| We've created our program... but we need to do two other things...
Firstly we need to allocate some 'VRAM' for the screen display (with appropriate new lines)... we'll start it all as space characters. We also need to allocate an address for 'Basic VARS'... we'll allocate 128 bytes at the end of our program. |
 |
Hello World!
| We use 'byte 255' terminated
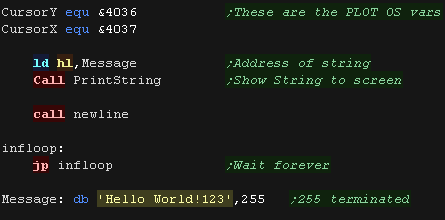
strings in all our tutorials. We'll load the address of our string into HL, and show it to the screen with PrintString. We need two bytes for our 'Cursor' pos so we know where to put the next character... we use the 'COORDS' bytes in the OS vars for this purpose. |
 |
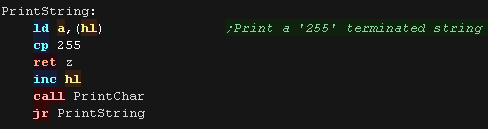
| Our PrintString routine just relies on our 'PrintChar' function to
do all the work! |
 |
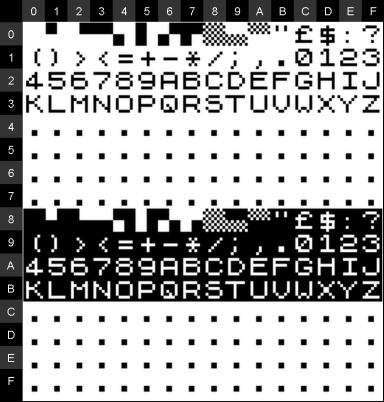
| The ZX81 does NOT use ASCII... we'll convert our ascii to the
character set used by the ZX81. |
|
| First we check if we're drawing a space... if it is, we need to
use Char 0. We now see if we've been passed a number, these are in a different place in the ZX81, so we add 7 Next we see if we've been passed lower case - the ZX81 can't do this - we convert to uppercase ASCII by subtracting 32 Next we convert A-Z by subtracting 27. Any Character over 64 is going to be a problem!... we'll convert these to '.' Once we know our character we calculate the screen destination VRAM with 'GetScreenPos' and write the byte of our character. We move our Xpos, nad if we're at Char 32 we start a new line. |
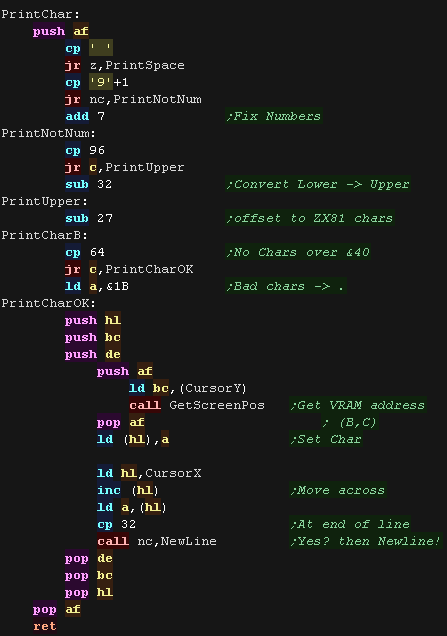 |
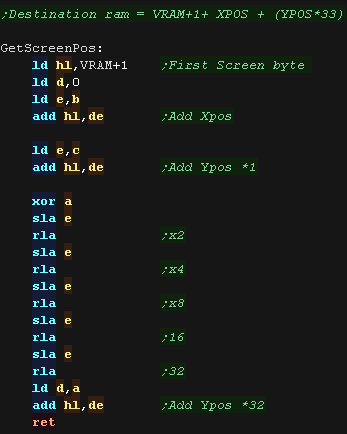
| To calculate the VRAM destination we use the following formula Destination ram = VRAM+1+ XPOS + (YPOS*33) We skip the first byte of VRAM as this is a newline byte. We effect multiplication of Ypos*33 by adding the Ypos*1, then bitshifting YPOS to calculate YPOS*32 and adding again. |
 |
| We also create a newline command, which will move us down a Yline and Zero the Xpos | 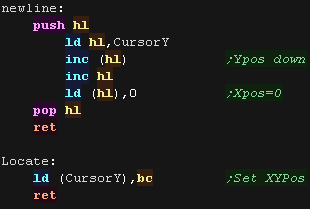 |
| Note: This PRINTCHAR function doesn't provide for
brackets, punctuation etc)ess super-fast! If you need support for more characters, you could upgrade it to cope, but memory is so limited on the ZX81, it seemed better to 'do without' in this case. |
|
Building our program
Here's the command I use to build a valid TAPE.P from the ASM
source. %BuildFile% ... This is where your sourcefile goes - for example HELLO.ASM (%BuildFile% is used by my batch file) -chklabels ... This tells VASM to check for labels that look like commands... for example if we forget to indent a RET command it will be mistaken for a label! -nocase ... This turns off case sensitivity -Dvasm=1 -DBuildZX8=1 ... These are some predefined symbols (like EQU statements)... you don't need these for this example, but others will! -Fbin ... This tells VASM to output a BIN file. -o "\RelZX8\tape.p" ... This is the destination file - we'll get our emulator to run it. -L \BldZX8\Listing.txt ... This is a debugging listing file, you don't need it, but it may help you. |
Running our program
| We can get Zesarux to start our program automatically with the command shown. |  |
| Here is the result! |
 |
Monitor Tools
| As an added bonus we can include the 'Monitor Tools' we developed
in the multiplatform series. These allow us to show the registers or parts of the Ram for testing and debugging purposes |
 |
| This gives us 2 commands... Monitor shows all the registers, MemDumpDirect will show C bytes from address HL to the screen |
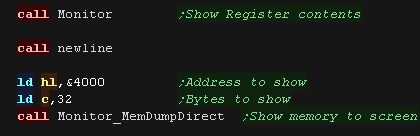 |
| We can see the result onscreen. | 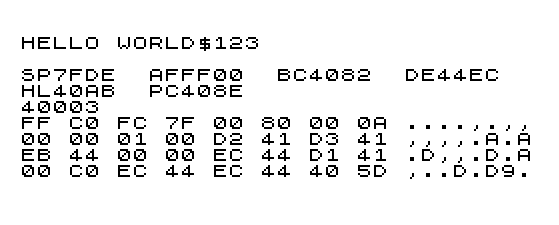 |
|
The memdump
address header of "4000:" has been incorrectly shown as "40003". That's because the colon ":" is not properly drawn by the PrintChar function! |
|
MAXAM isn't
included in the Devtools package, but you can get it from the
fantastic CPCWiki
website! Fortunately WINAPE's assembler is pretty much identical to MAXAM, so basic programs will assemble fine without changes! |
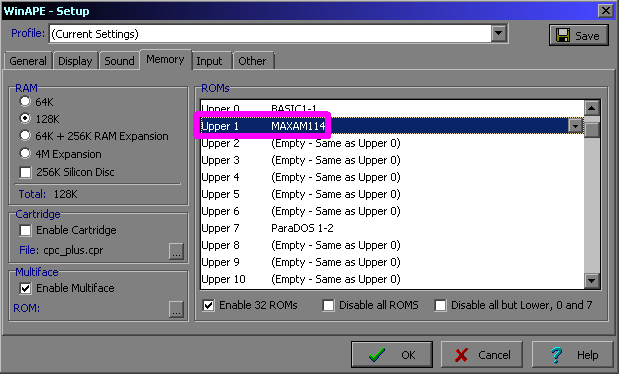
Option 1!... Maxam 1.14 ROM
| Lets try out the MAXAM rom version! We need to change the Memory settings of the CPC, and plug the MAXAM rom into one of the slots. |
 |
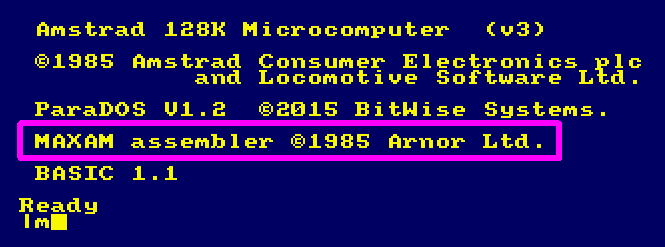
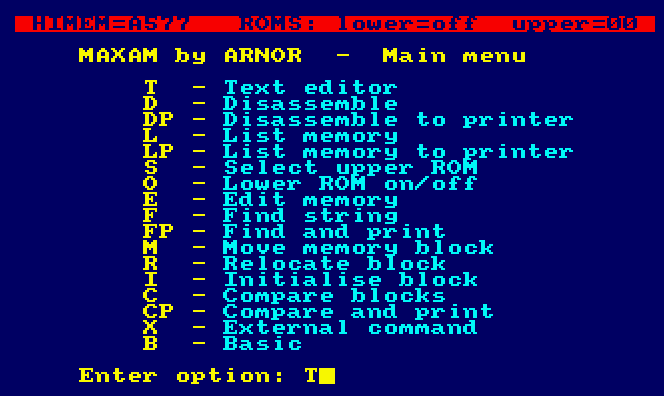
| When we reboot our emulator the ROM will initialize. We can now use the '|M' (Bar M) command to start maxam... You can also type |maxam if you really like typing! |
 |
| We can write a program in Amstrad Basic but We'll type in the program in with the Text Editor this time! (We'll use basic next time!) Select T - Text Editor, then E - Edit text |
 |
| Lets Type in our program... ...or use Winape AutoType if we're getting tired fingers ! It's not Cheating *** IT'S NOT! *** |
 |
| We need to assemble our program, Press ESC to go back to the previous menu, then select A - Assemble text |
 |
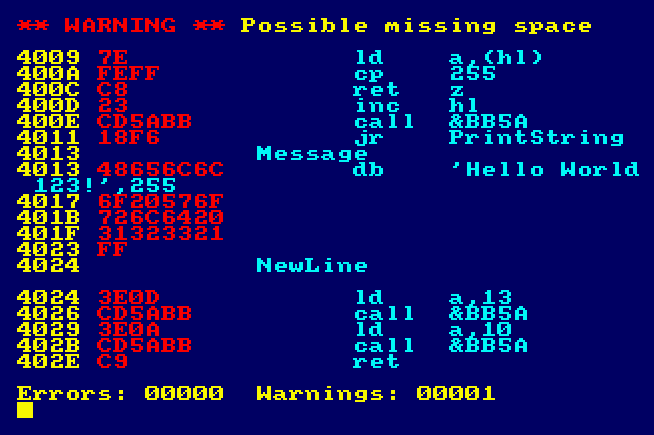
| We will get a warning about a possible space missing in our
PrintString label, but the program will compile fine! |
 |
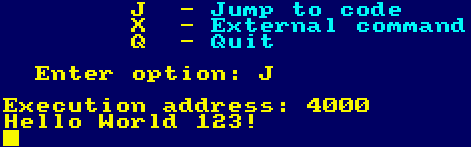
| We need to run our program, so this time select J-Jump
to code. Our program started with ORG &4000, so specify address 4000. Our program will run! |
 |
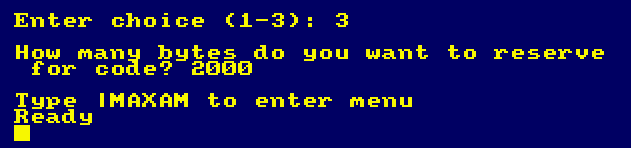
Option 2!... Maxam Disk
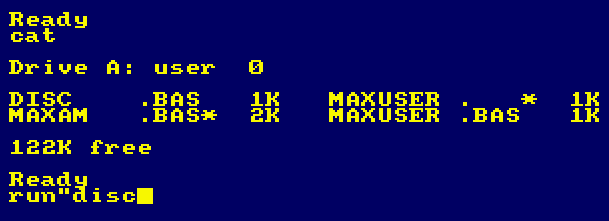
| That was far too easy, so this time lets use the DISK version....
because we enjoy pain! Insert the disk image, and type Run"disc |
 |
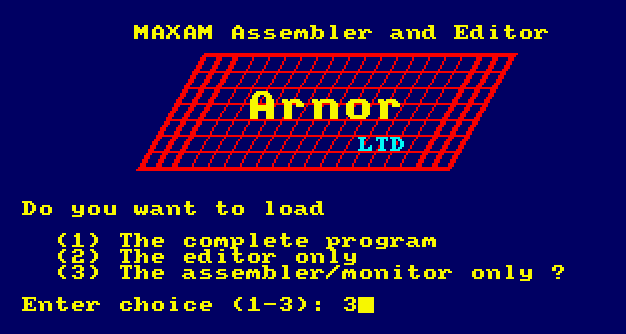
| If we select 1 we'll get all the functionality of the ROM version,
but lets save some memory and loading time with just the assembler. Select option 3 |
 |
| we'll be asked how many bytes to reserve for our code, we'll
allocate 2000. we could now use |m as before (Though option 3 didn't load the text editor), but this time we'll do it all with basic! |
 |
| We can just type our assembly code in basic. The first line before our ASM code should be the |assemble command, all our code should start with a REM statement ' (Apostrophe) The |assemble command will build our program, so we can just use RUN to build it! |
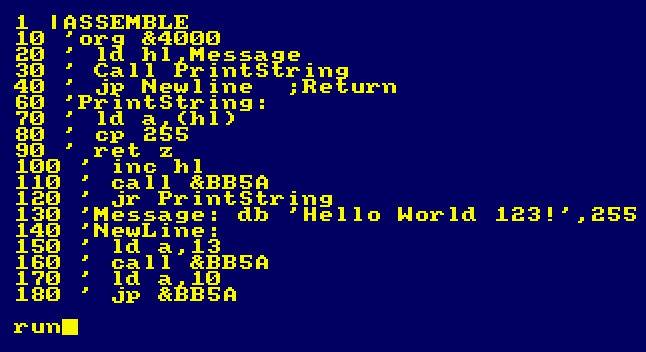 |
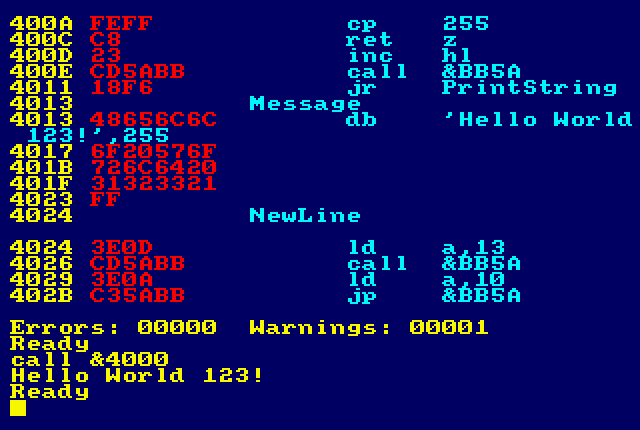
| Our program will assemble like before. We can use CALL &4000 to run it. |
 |
| With
MAXAM 1.5 the devs got lazy and couldn't be bothered to create a
text editor (or something like that!)... fortunately their text
editor has build functions added, so we'll use that! We can still compile from basic too! Lets have a go! |
|
Option 3!... Maxam 1.5+ Protext ROM
| This time we'll need two roms MAXAM15 and PROTEXT |
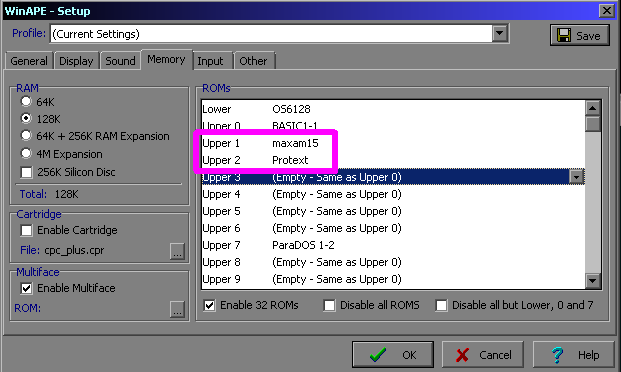 |
| We can compile from basic, or use |m But this time let's write our program in protext with |p |
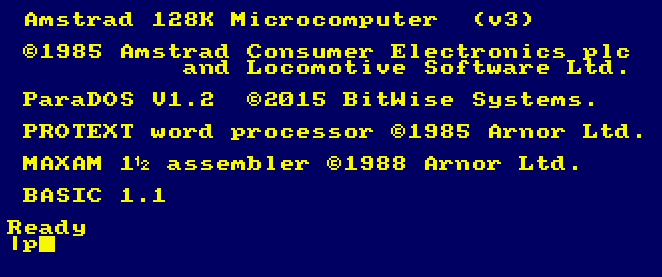 |
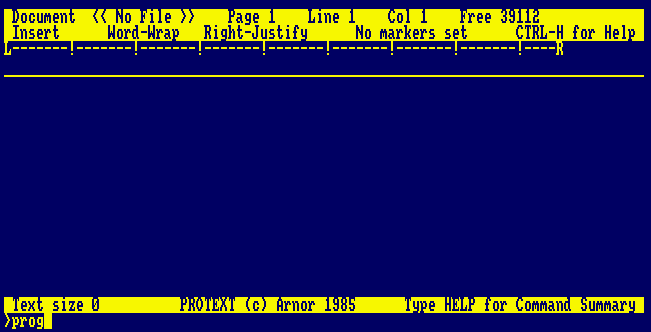
| Lets switch to program mode, This mode is plaintext only Type in PROG at the prompt and hit enter. |
 |
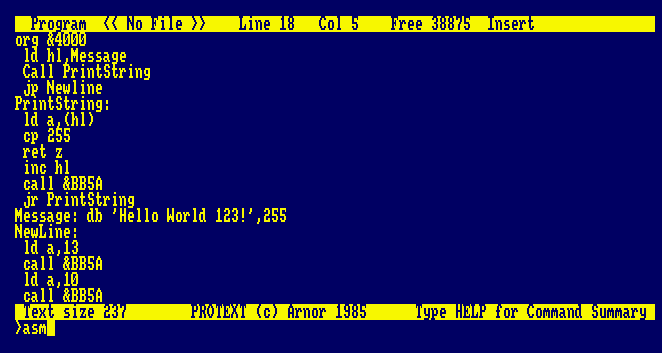
| Type your program in then press ESC to
get back to the prompt Type in ASM to build our program |
 |
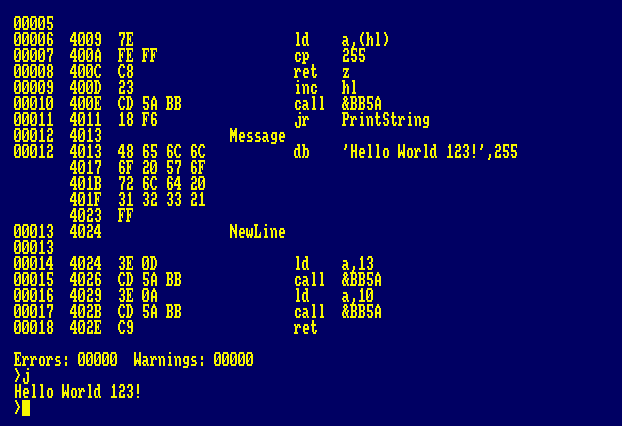
| Once our program compiles we can use J
to execute it directly from protext. (J= Jump) Our program will run! |
 |
|
We've only scratched the teensiest weeniest
little bit of the capabilities of MAXAM and PROTEXT, for the full
features, please see the manuals! Or, you know, just use VASM in windows, and make your life easier, it's up to you! |
| View Options |
| Default Dark |
| Simple (Hide this menu) |
| Print Mode (white background) |
| Top Menu |
| ***Main Menu*** |
| Youtube channel |
| Patreon |
| Introduction to Assembly (Basics for absolute beginners) |
| Amazon Affiliate Link |
| AkuSprite Editor |
| ChibiTracker |
| Dec/Bin/Hex/Oct/Ascii Table |
| Alt Tech |
| Archive.org |
| Bitchute |
| Odysee |
| Rumble |
| DailyMotion |
| Please note: I wlll upload more content to these alt platforms based on the views they bring in |
| 68000 Content |
| ***68000 Tutorial List*** |
Learn 68000 Assembly  |
| Hello World Series |
| Platform Specific Series |
| Simple Samples |
| Grime 68000 |
| 68000 Downloads |
| 68000 Cheatsheet |
| Sources.7z |
| DevTools kit |
| 68000 Platforms |
| Amiga 500 |
| Atari ST |
| Neo Geo |
| Sega Genesis / Mega Drive |
| Sinclair QL |
| X68000 (Sharp x68k) |
| 8086 Content |
| Learn 8086 Assembly |
| Platform Specific Series |
| Hello World Series |
| Simple Samples |
| 8086 Downloads |
| 8086 Cheatsheet |
| Sources.7z |
| DevTools kit |
| 8086 Platforms |
| Wonderswan |
| MsDos |
| ARM Content |
| Learn ARM Assembly |
| Learn ARM Thumb Assembly |
| Platform Specific Series |
| Hello World |
| Simple Samples |
| ARM Downloads |
| ARM Cheatsheet |
| Sources.7z |
| DevTools kit |
| ARM Platforms |
| Gameboy Advance |
| Nintendo DS |
| Risc Os |
| Risc-V Content |
| Learn Risc-V Assembly |
| Risc-V Downloads |
| Risc-V Cheatsheet |
| Sources.7z |
| DevTools kit |
| MIPS Content |
| Learn Risc-V Assembly |
| Platform Specific Series |
| Hello World |
| Simple Samples |
| MIPS Downloads |
| MIPS Cheatsheet |
| Sources.7z |
| DevTools kit |
| MIPS Platforms |
| Playstation |
| N64 |
| PDP-11 Content |
| Learn PDP-11 Assembly |
| Platform Specific Series |
| Simple Samples |
| PDP-11 Downloads |
| PDP-11 Cheatsheet |
| Sources.7z |
| DevTools kit |
| PDP-11 Platforms |
| PDP-11 |
| UKNC |
| TMS9900 Content |
| Learn TMS9900 Assembly |
| Platform Specific Series |
| Hello World |
| TMS9900 Downloads |
| TMS9900 Cheatsheet |
| Sources.7z |
| DevTools kit |
| TMS9900 Platforms |
| Ti 99 |
| 6809 Content |
| Learn 6809 Assembly |
| Learn 6309 Assembly |
| Platform Specific Series |
| Hello World Series |
| Simple Samples |
| 6809 Downloads |
| 6809/6309 Cheatsheet |
| Sources.7z |
| DevTools kit |
| 6809 Platforms |
| Dragon 32/Tandy Coco |
| Fujitsu FM7 |
| TRS-80 Coco 3 |
| Vectrex |
| 65816 Content |
| Learn 65816 Assembly |
| Hello World |
| Simple Samples |
| 65816 Downloads |
| 65816 Cheatsheet |
| Sources.7z |
| DevTools kit |
| 65816 Platforms |
| SNES |
| eZ80 Content |
| Learn eZ80 Assembly |
| Platform Specific Series |
| eZ80 Downloads |
| eZ80 Cheatsheet |
| Sources.7z |
| DevTools kit |
| eZ80 Platforms |
| Ti84 PCE |
| IBM370 Content |
| Learn IBM370 Assembly |
| Simple Samples |
| IBM370 Downloads |
| IBM370 Cheatsheet |
| Sources.7z |
| DevTools kit |
| Super-H Content |
| Learn SH2 Assembly |
| Hello World Series |
| Simple Samples |
| SH2 Downloads |
| SH2 Cheatsheet |
| Sources.7z |
| DevTools kit |
| SH2 Platforms |
| 32x |
| Saturn |
| PowerPC Content |
| Learn PowerPC Assembly |
| Hello World Series |
| Simple Samples |
| PowerPC Downloads |
| PowerPC Cheatsheet |
| Sources.7z |
| DevTools kit |
| PowerPC Platforms |
| Gamecube |
| Work in Progress |
| ChibiAndroids |
| Misc bits |
| Ruby programming |
Buy my Assembly programming book
on Amazon in Print or Kindle!


Available worldwide!
Search 'ChibiAkumas' on
your local Amazon website!
Click here for more info!


Buy my Assembly programming book
on Amazon in Print or Kindle!
Available worldwide!
Search 'ChibiAkumas' on
your local Amazon website!
Click here for more info!
Buy my Assembly programming book
on Amazon in Print or Kindle!
Available worldwide!
Search 'ChibiAkumas' on
your local Amazon website!
Click here for more info!