

Learn Multi platform 6502 Assembly Programming... For Monsters!
Hello World Series


Showing A 'Hello World' Message
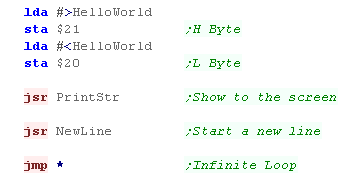
| Starting our program, we're going to define the Origin at $3000 We're also going to define two symbols from the firmware to do tasks for use: $FFE3 will print a character in A to the screen $FFE7 will start a new line. |
 |
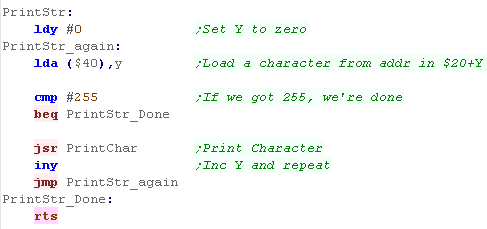
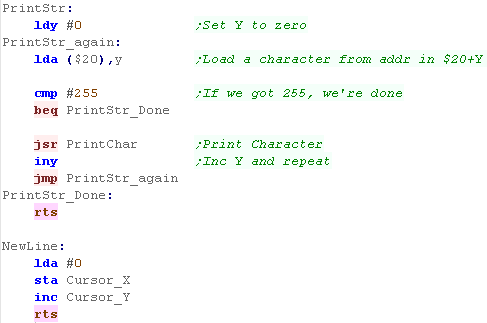
| We're going to 'extend' this to make a PrintString routine... We'll use Zeropage pair $20/1 to store an address which will point to a string in memory... We use Y as an offset to the start address, and We'll print characters to the screen, until we get a character 255... |
 |
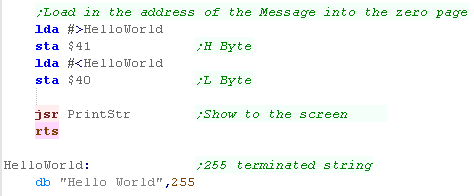
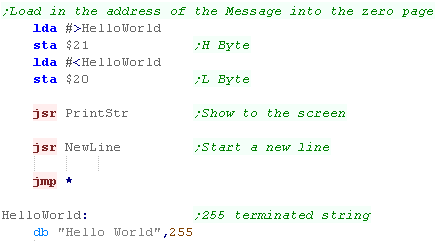
| We need to load the High and Low bytes of our address into the $20/1 zero page entries to define the address of our string, and then call our PrintString function - this will show our string to the screen. |  |
| Our Hello World message will be shown to screen. |  |
 |
Getting Hello World to the
screen isn't much, but it's a vital step! Once we can get a program
running, we can develop it into something much better. In our Bitmap Series, we went directly to the graphics hardware and used our own font, but We've used the firmware in this example for speed. |
Running our Program
We need to compile our program using
VASM... we need to specify some command switches We need to specify a ASM file to build We need to specify an output file, and that we need it to be Binary... We're specifying some Symbols we want defined on the command line... you probably don't need these We're also outputting a listing file ... this is for debugging. We're also disabling Case sensitivity, and telling VASM to check our labels don't look like commands (Usually because we've missed a tab!) |
|
| Once we've built our binary, we need to get it into a disk to run
on the bbc, we use BBCIM
to do this First we add our $.Boot file to the disk (the name is important!) Next we set the disk to autoboot. |
|
| We can use the command line to start the disk image with BeebEm |

|
Debugging Tools
| It's relatively easy to add support for my 'Monitor Tools' ... these will allow you to see the state of the processor or memory easily. |   |
We can use the Monitor to see the processor registers, or specify a memory address, and a number of lines to show. |
 |
| We will see the result to screen. |  |

|
Lesson
H2 - Hello World on the C64 Lets learn how to show a Hello World message on the C64... we'll learn how to build our example as a PRG and an CRT Cartridge |
 |
 C64_HelloWorld.asm
|
|
 |
Showing Hello World to the screen
| We're going to create a PRG file... these need a header to start
the program - we'll never need to change this provided we don't want
to change the start address, Ours starts at $0810 |
 |
| We're going to use the firmware function $FFD2 to print characters
(known as ChrOut) Unfortunately this function does not use normal ASCII! and it doesn't have lower case letters... we'll need to do some converting to fix this! |
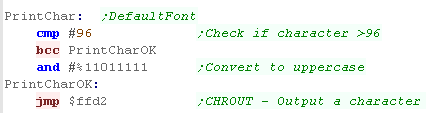 |
| We're going to 'extend' this to make a PrintString routine... We'll use Zeropage pair $20/1 to store an address which will point to a string in memory... We use Y as an offset to the start address, and We'll print characters to the screen, until we get a character 255... |
|
| We need to load the High and Low bytes of our address into the $20/1 zero page entries to define the address of our string, and then call our PrintString function - this will show our string to the screen. | |
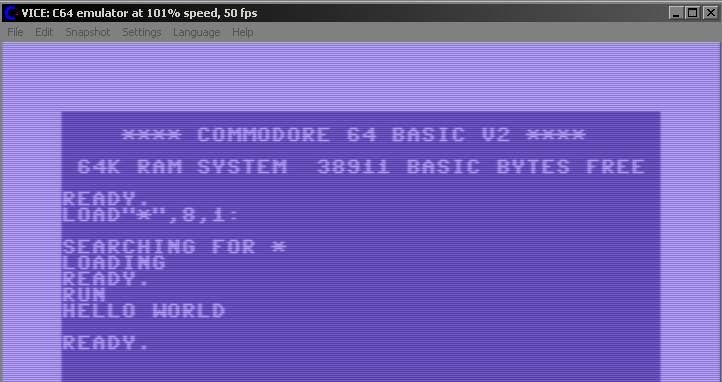
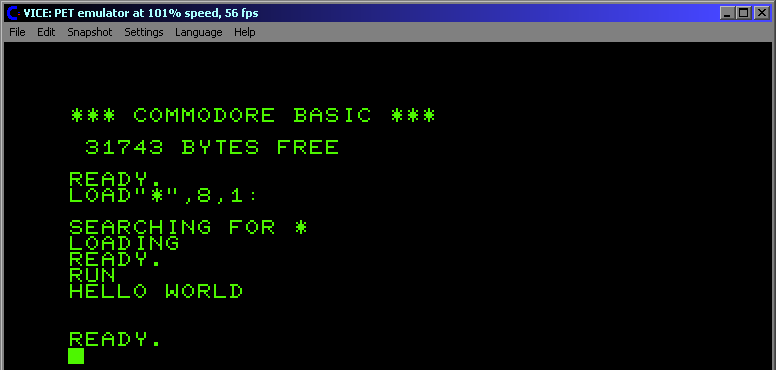
| Our Hello World message will be shown to screen |
|
Upper and Lower case fonts
| The C64 has an alternate font, which while not ASCII allows for
upper and lower case. To enable it we just write character $0E (14) to the screen |
 |
| We need a different PrintChar routine for the new font. | 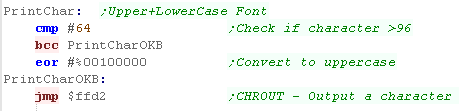 |
| We can now print Upper and Lower Case! | 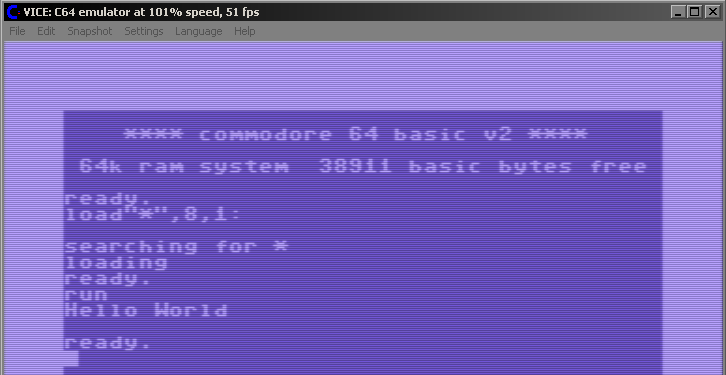 |
Building a PRG file with Vasm
I use VASM to compile the ASM file into a
usable PRG We have to specify a Source ASM file. We need to tell VASM we want to create a BINary that's a PRG file We need to specify the Destination file name We include some symbols (some of my code uses these - you won't need them) We're specifying an output Listing file We're also disabling case sensitivity, and telling VASM to check our labels don't look like commands (in case we forgot a tab on one of our commands) |
|
| We can start the VICE emulator with the PRG from the command line |  |
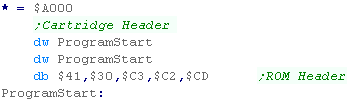
Converting to a cartridge
| We can convert our PRG to a cartridge instead - we need to replace
the PRG header with a cartridge one, The header shown should work OK |
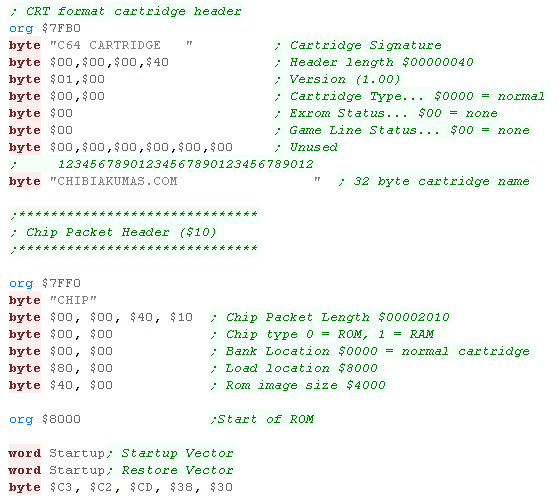 |
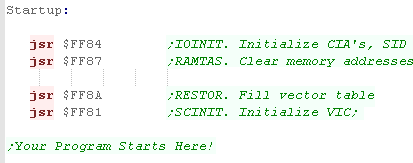
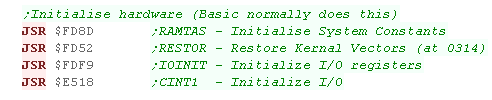
| Our ROM will effectively bypass basic, so we need to do the tasks
BASIC was previously doing, the calls shown will do this We can then just include our program as usual |
 |
We still use VASM to assemble, we just
remove the switch -CBM-PRG, and change the output file to a CRT We need to pad our cartridge to 16k, My BinaryTools program can do this:  We also Change our VICE command line:  |
|
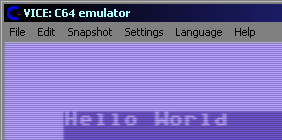
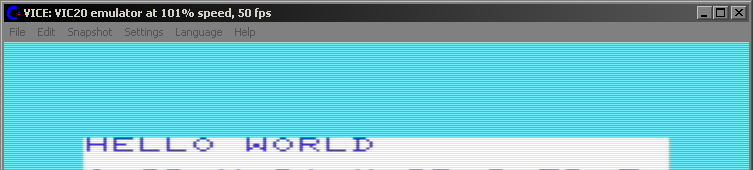
| "Look MA! no basic!" We've run our program straight from a cartridge! |
 |
| Running from a
cartridge may make things easier, as our program will no longer be
running from low memory (0-$3FFF).. This area is used by the screen hardware,so it's 'premium' storage space! |
 |
Debugging Tools
| It's relatively easy to add support for my 'Monitor Tools' ... these will allow you to see the state of the processor or memory easily. |   |
| We can use the Monitor to see the processor registers, or specify a memory address, and a number of lines to show. | |
| We will see the result to screen. |  |

Showing Hello World to the screen
| We're going to create a PRG file... these need a header to start
the program - we'll never need to change this provided we don't want
to change the start address, Ours starts at $100A |
 |
| We're going to use the firmware function $FFD2 to print characters
(known as ChrOut) Unfortunately this function does not use normal ASCII! and it doesn't have lower case letters... we'll need to do some converting to fix this! |
|
| We're going to 'extend' this to make a PrintString routine... We'll use Zeropage pair $20/1 to store an address which will point to a string in memory... We use Y as an offset to the start address, and We'll print characters to the screen, until we get a character 255... |
|
| We need to load the High and Low bytes of our address into the $20/1 zero page entries to define the address of our string, and then call our PrintString function - this will show our string to the screen. | |
| Our Hello World message will be shown to screen |
 |
Building a PRG file with Vasm
I use VASM to compile the ASM file into a
usable PRG We have to specify a Source ASM file. We need to tell VASM we want to create a BINary that's a PRG file We need to specify the Destination file name We include some symbols (some of my code uses these - you won't need them) We're specifying an output Listing file We're also disabling case sensitivity, and telling VASM to check our labels don't look like commands (in case we forgot a tab on one of our commands) |
|
| We can start the VICE emulator with the PRG from the command line |  |
Converting to a cartridge
| We can convert our PRG to a cartridge instead - we need to replace
the PRG header with a cartridge one, The header shown should work OK |
 |
| Our ROM will effectively bypass basic, so we need to do the tasks
BASIC was previously doing, the calls shown will do this We can then just include our program as usual |
 |
We still use VASM to assemble, we just
remove the switch -CBM-PRG, and change the output file to a CRT We need to pad our cartridge to 8k, My BinaryTools program can do this:  We also Change our VICE command line: |
|
| "Look MA! no basic!" We've run our program straight from a cartridge! |
 |
| The VIC has very
little RAM, so using cartridges will make things a lot easier, and
is something you'll almost certainly want to do, unless your
program is very small and simple. Grime 6502 was too big for a PRG, and that was tiny! |
 |
Debugging Tools
| It's relatively easy to add support for my 'Monitor Tools' ... these will allow you to see the state of the processor or memory easily. | |
| We can use the Monitor to see the processor registers, or specify a memory address, and a number of lines to show. | |
| We will see the result to screen. | 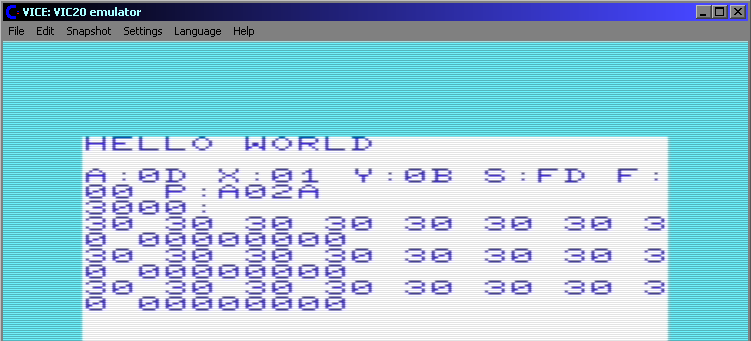 |

Setting up the Cartridge and initializing the screen.
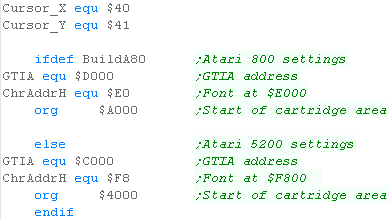
| We're going to need some defined symbols. The GTIA is at a different memory address on the 5200 and 8000 - it handles some of the graphics functions. The Font's Character address is also different. Finally the Cartridge starts at a different memory address. We also need two zero page entries for the X and Y cursor positions. |
 |
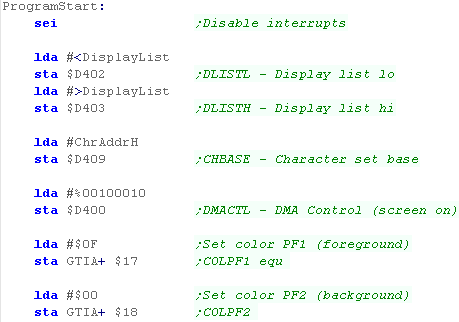
| We need to set up the screen... The graphics display is defined by a 'display list' (it defines the screen settings of each line of the screen)... we need to point to this display list, and set $D402/3 to the 16 bit address (labeled 'DisplayList' in our code) We need to set the 'Character Base' - this is the address of the Font in Ram/Rom Now we need to enable the screen... we do this by seting bits 1 and 5 of $D400 Finally we set the colors of the background and foreground - these are done by the GTIA (the address is different on the 800/5200) |
 |
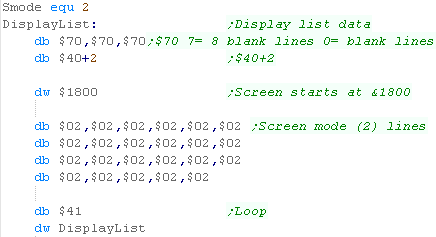
| The Display List needs to be a fairly fixed format... we're
defining all the lines as screen mode 2. You won't want to change any of this unless you're trying to do something clever - so you should probably leave it alone! |
 |
| Finally we need a footer for the cartridge... it has to be at $BFFD, the first byte should be $FF... next is the address of the start of code to execute. |  |
Showing Hello World to the screen
| If we want to print a character to the screen, we need to set a
byte of the screen memory to the character number. To calculate the memory address to change for a XY position, we need to use the formula below: Address = ScreenBase + (Ypos * ScreenWidth) + Xpos Address = $1800 + (Ypos * 40) + Xpos To effect the multiplication, we do bitshifting... to 'Multiply' by 40, we bitshift to get Y*8, then to Y*32 - and add the two together! We calculate the memory address of the next character location |
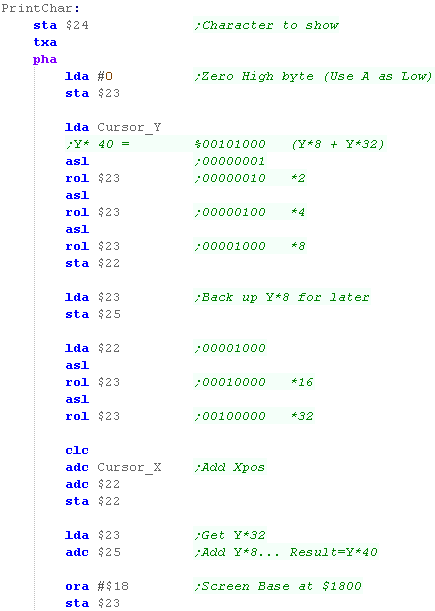 |
| We now know know the position to change (in zero page entry $22/3) Unfortunately the font is not ASCII - it has no lowercase letters - we can convert the se by subtracting 32 ($20) from the character number when the character is over 96 After writing our character onscreen, we Increment our X position, and check if we're at the end of the line. |
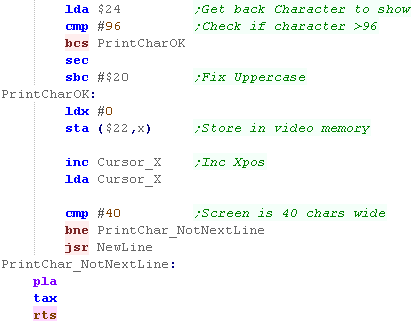 |
| We can extend this function into a 'PrintString routine' We print consecutive characters to the screen, until we get a character 255. |
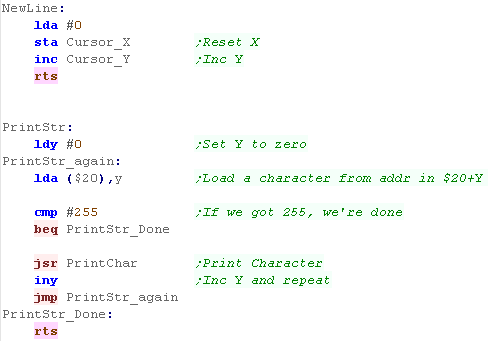 |
| To print a string We load it's address into zero page entries $20/1, before calling 'PrintStr' | 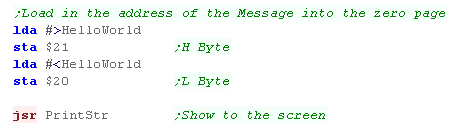 |
| The code can work on the Atari 800 or 5200 - we just need to define symbol 'BuildA80' for the Atari 800 | 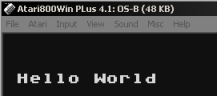 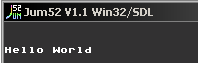 |
Building and running our cartridge
I compile the code with VASM in a batch
file. We have to specify a Source ASM file. We need to tell VASM we want to create a BINary that's a PRG file We need to specify the Destination file name We include some symbols (You'll need BuildA80 if you're building for Atari 800) We're specifying an output Listing file We're also disabling case sensitivity, and telling VASM to check our labels don't look like commands (in case we forgot a tab on one of our commands) |
|
| We can start the cartridge with the emulator of our choice. |   |
Debugging Tools
| It's relatively easy to add support for my 'Monitor Tools' ... these will allow you to see the state of the processor or memory easily. | |
| We can use the Monitor to see the processor registers, or specify a memory address, and a number of lines to show. | |
| We will see the result to screen. | 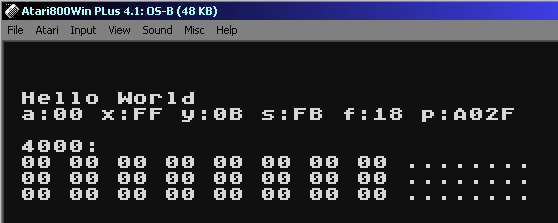 |
 |
The 5200 and
800 are almost the same system - the only reason they don't work
the same is so people couldn't buy console games for the home
computer - the whole decision was a big evil scheme by the accountants ! What can I say... Whoever came up with the idea of moving the GTIA, they deserve a slow painful death!! |

Showing Hello World on the Apple II
| Ok, let's start our program! We're going to start our program at $0C00, and we're going to define a symbol which we'll use as the newline command... We'll need that new line straight away as the program will start with the cursor still on the line that ran the program, for clarity we'll start a new line. |
 |
| We're going to be using a pair of firmware functions to help us in
this episode... We'll use $FC62 to start a new line. We'll use $FDF0 to draw a character... unfortunately, the Apple II fonts are a little weird, but we'll fix them by adding 128 to the character number, which will solve the problem! |
 |
| We'll Extend this PrintChar routine into a PrintString routine. We use CHR 255 terminated strings in this tutorial. |
 |
| We use this NewLine Function to show our hello world message to
the screen. Once we've shown our message, we're done... so we just return to basic with a RET command! |
 |
| Our text will be shown to the screen. | 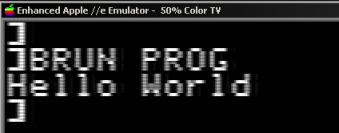 |
Building our program onto a Disk on the Apple II
I build my files with VASM via a batch
file. We have to specify a Source ASM file. We need to tell VASM we want to create a BINary file We need to specify the Destination file name We include some symbols We're specifying an output Listing file We're also disabling case sensitivity, and telling VASM to check our labels don't look like commands (in case we forgot a tab on one of our commands) The Apple II has a 65c02 CPU - to enable the extra features we use the -c02 switch |
|
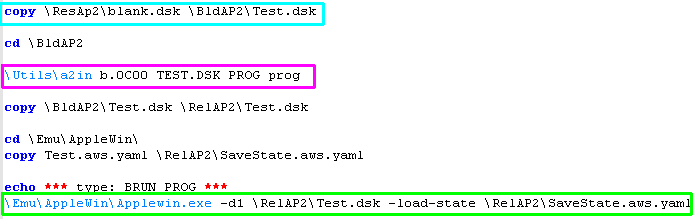
| We're going to start with a template blank disk,
we'll add our file to it To add the file to our disk, We use the A2In function of A2Tools Finally we'll start our AppleWin emulator with the Disk image - we'll also use a save state to speed things up (so we don't need to type the BRUN command) |
 |
Debugging Tools
| We can use the Debugging tools that were build in the Multiplatform series, we just need to include a few files and settings. | 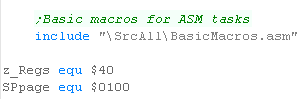 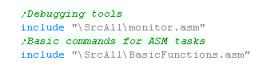 |
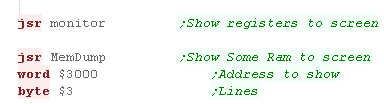
| We can use our 'Monitor' function to show the registers, We can use the MemDump function to show an area of memory. |
 |
| We'll see the register contents, and the memory area we chose. |  |
| We've got some text to the screen without too
much difficulty, We've covered bitmap fonts in the Platform
specific series... Next time in the Simple series, we'll learn how
to get bitmaps to the screen. |
 |

Starting a Lynx Cartridge
| Our cartridge needs a header This will start our program in ram at address $0200 |
 |
| We're going to need some zero page values for our work. We'll define these using symbols |
 |
| When we write to the 'Suzy' graphics chip , we MUST write low
bytes first. We're going to set the address in RAM to show as the screen with $FD94/5 - we're setting this to $C000 |
 |
| We need to set up some colors! We'll set the background (Color 0) to blue... we'll Color 15 to Yellow (used by our font) The palette is defined by addresses $FDA0+ - each color definition uses two bytes |
 |
| We're now ready to start our program! |
Drawing a character to the screen
| We're going to use a bitmap font to print characters to the
screen... each character in our font is 8 bytes of black and white
pixels... we'll need to convert this 1bpp to 4bpp font |
 |
| We need a "PrintCharacter" routine... Our font starts from Character 32, so we need to subtract 32 from the character we want to print... Next we need to calculate the address in the font of the character.. As each character has 8 bytes of data, we multiply the Character number by 8... we do this with 3 bitshifts, then we add the address of our font... z_HL now contains the address of the bitmap data of the character we want |
 |
| We now need to calculate the address of the screen position for
the character we want to draw - our screen is 80 bytes wide ($50)
and our characters are 8 lines tall, so our formula is: Address=$C000 + ($280*CursorY) + CursorX We don't have a multiply command in 65c02, so we achieve this by two bit shifting operations. We then add the Xpos and the screen base ($C0) |
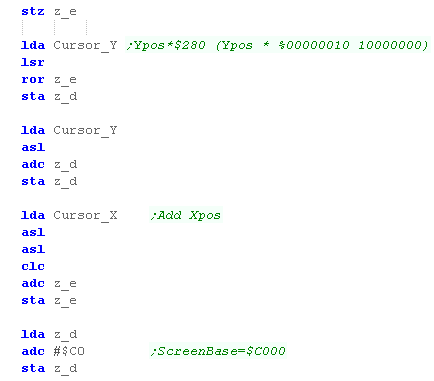 |
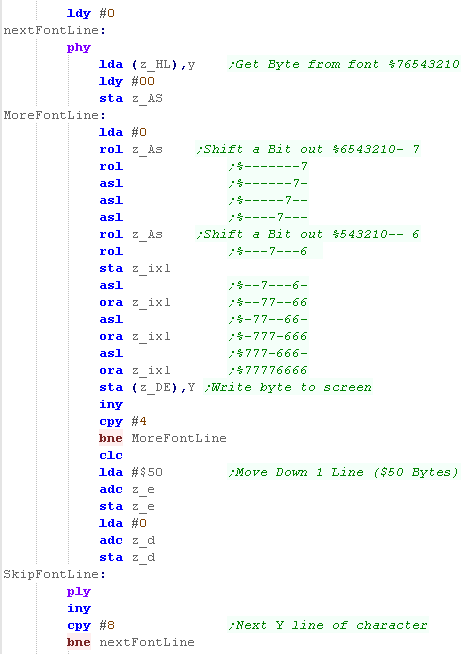
| We're going to read in a line from our font... In our font, each bit is a pixel... but in screen ram, each pixel is represented by a nibble of the byte... We want our font to use color 15, to achieve this we shift two bits out of the font, and copy these bits to fill all 4 bits of the nibble. We repeat this 4 times, to fill all 8 pixels of the font, we then repeat for all 8 lines |
 |
Printing a string to screen
| We're going to use our PrintChar function in a printstring routine, this will print characters until it reaches a CHR 255 | 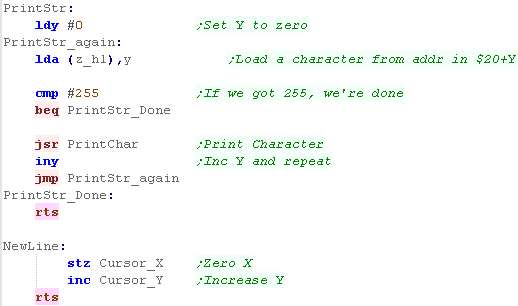 |
| We can load z_HL with the address of a string to show it to the screen |  |
| The Hello World will be shown to the screen. | 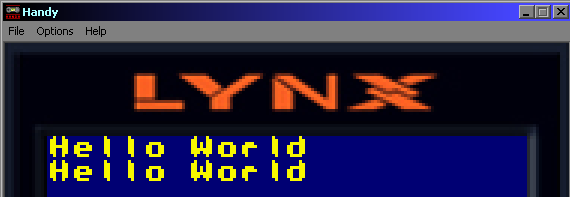 |
Building an unencrypted cartridge
I build my files with VASM via a batch
file. We have to specify a Source ASM file. We need to tell VASM we want to create a BINary file We need to specify the Destination file name We include some symbols We're specifying an output Listing file We're also disabling case sensitivity, and telling VASM to check our labels don't look like commands (in case we forgot a tab on one of our commands) The Lynx has a 65c02 CPU - to enable the extra features we use the -c02 switch |
|
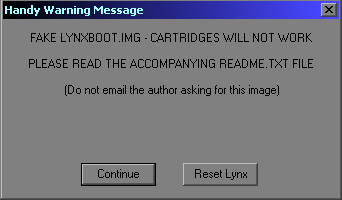
| We can load the Handy emulator with this file just fine, though
handy will give a warning because we don't have a rom image (we can
just ignore it!) |
  |
|
Real Atari Lynx cartridges
need to be encrypted, but we would need a proper OS ROM to run them
(Which cannot legally be distributed!) For our purposes these unencrypted .O files will work just fine! |
Debugging Tools
| We can include the 'Monitor tools' we looked at in the multiplatform series, these can help us develop on a new system. |  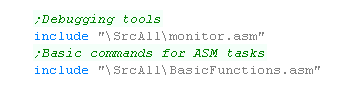 |
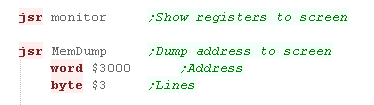
| We can use the Monitor to show the contents of the CPU registers, We can use the Memdump to output lines of ram to the screen. |
 |
| The register contents, and the memory address specified will be shown with these commands. | 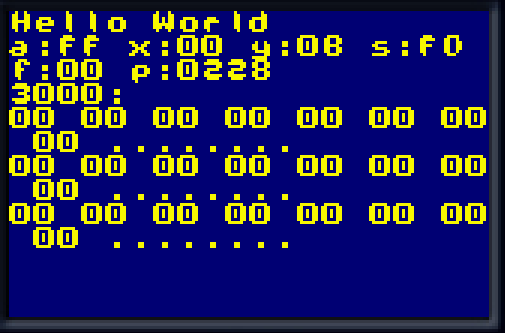 |

Starting a Nes or Famicom Cartridge
| We need a header for our cartridge - the settings shown will work for a simple program. | 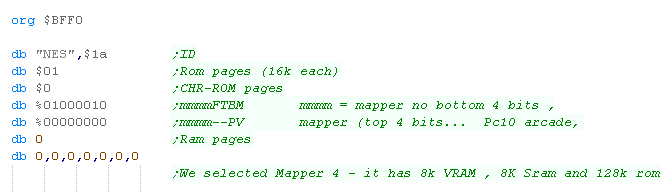 |
| We also need a footer... this has definitions pointing to the start of the program and interrupt handlers | 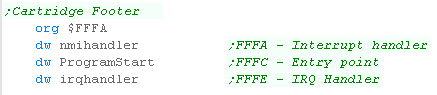 |
| We're going to need a few bytes in the zero page to store data, we
also need an IRQ handler of some kind (a return in this case) Vblank (The point when the screen is not being drawn) is important, this is the only time we can write to VRAM... so we can detect when this is possible we use zero page entry $7F as a marker.. and alter this when vblank occurs |
 |
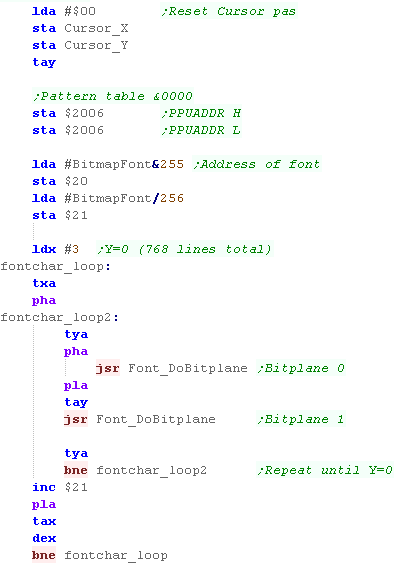
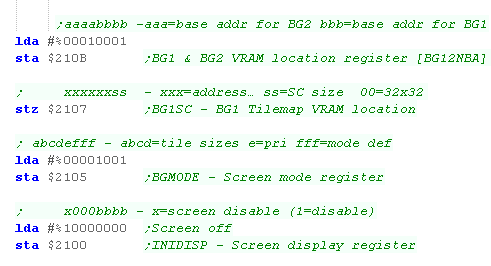
| We're ready to start our program!... First we need to set up the
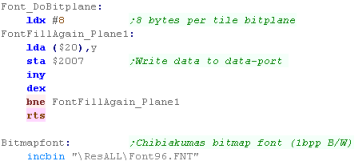
font... We need to define the tiles that will make up each character... These are written to the 'Pattern Table' at VRAM address $0000 Each tile uses 2 bitplanes (4 color)... The 8 line of Bitplane 0 of the tile come first... then the 8 lines of Bitplane 1 to convert our black and white font to 4 colors we need to write the same 8 bytes of data to both bitplanes This will set our font to color 3 in the palette Note... at this stage the screen is not on, so we don't need to worry about VBlank at this time |
  |
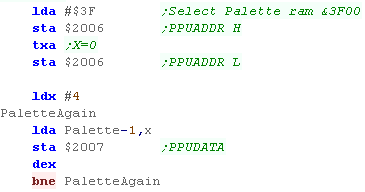
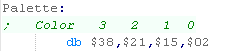
| Now we've got a font, we need to set up our palette... The palette is in VRAM Addresses $3F00 onwards... each palette of 4 colors uses 4 bytes. We load in the four bytes of the palette in from our palette definition... we use X as an offset in the palette, so the colors are read in backwards We define the background as Blue, and Color 3 as Yellow |
  |
| We're finally done! we need to turn on the layers, and enable the Vblank | 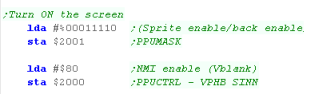 |
Waiting for Vblank
| Now the screen is on, we need to wait for Vblank before we write
to VRAM... To do this we write 0 to zeropage entry 'Vblanked' (defined by a symbol)... then we wait for it to change... when vblank occurs, the value will be nonzero |
 |
Getting A Character to the screen
| We're going to print a character to the screen... Because our font has no characters below 32 we need to subtract 32 from the character number. |  |
| We need to calculate the VRAM address of the next tile we want to
change... The Tilemap starts at VRAM address $2000, and the tilemap is 32 tiles wide, and each tile is 1 byte in memory, so our formula is: Address= $2000 + (Ypos*32) + Xpos We need to multiply the CursorY by 32... we do this by repeated bitshifts. |
 |
| Now that the screen is on, Before we write to vram, we need to
wait until vblank with our 'WaitFrame' function. Then we select our calculated Vram Address with port $2006 - finally, we write the actual tile number (Character) to Vram with port $2007 Any write to VRAM will mess up the scrolling of the tilemap... so we need to reset it with port $2005 |
 |
| The Screen is 32 tiles wide, once we're at the end of the screen, we need to do a newline to start the next line. | 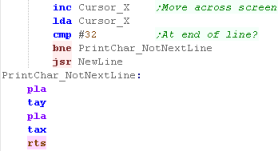 |
Printing a string to screen
| We're going to extend our PrintChar command to print strings...
Our strings will be char 255 terminated. We also need a NewLine command, this needs to Zero the Cursor_X and increase Cursor_Y |
 |
| We need to load the address of the string into Zeropage entries
$20/1... we then call our Printstring routine to show it to the
screen Once we're done, we use a JMP * to halt the processor. |
 |
| Our Hello World message will be shown to screen | 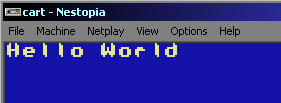 |
| Because we're
waiting for VBlank each write, the text will be rather slow, It's enough for this beginner series, but we need a buffer for real games... we covered this in the Platform Specific series |
|
Building our NES cartridge
I build my files with VASM via a batch
file. We have to specify a Source ASM file. We need to tell VASM we want to create a BINary file We need to specify the Destination file name We include some symbols We're specifying an output Listing file We're also disabling case sensitivity, and telling VASM to check our labels don't look like commands (in case we forgot a tab on one of our commands) |
|
| Once we've compiled our cartridge, we can load it with our emulator. |  |
Debugging Tools
| We can include the 'Monitor tools' we looked at in the multiplatform series, these can help us develop on a new system. |  |
| We can use the Monitor to show the contents of the CPU registers, We can use the Memdump to output lines of ram to the screen. |
|
| The register contents, and the memory address specified will be shown with these commands. | 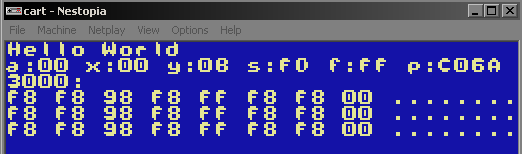 |

Starting a SNES/SFC Cartridge
| Our cartridge needs to start at address $8000, When our program
starts, we'll disable interrupts We also need to define some symbols - we'll need two zeropage bytes for the current cursor position |
 |
| Our cartridge also needs a footer - the one here will work for our purposes. | 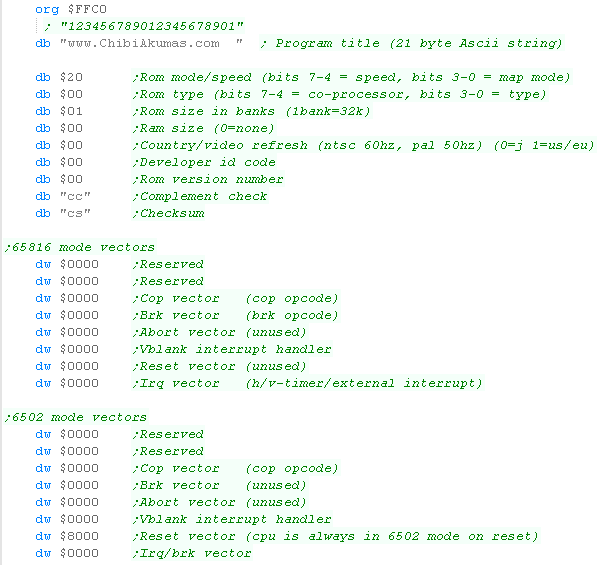 |
| We're going to need to set up our screen... First we need to initialize the tilemap, we need to set the base address in VRAM ($0000) and the tilemap size (32x32) We can only write to VRAM during Vblank while the screen is on, so we turn the screen off during our initialization |
 |
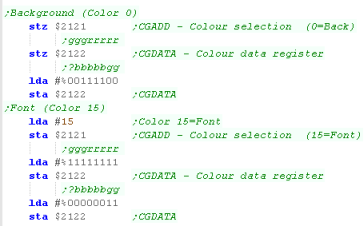
| We need to set the palette next... we only need two colors for
this test... the background (Color 0 - blue) and the font (color 15
- yellow) We select a color by writing to $2121, and RGB bytes to $2122 |
 |
| We need to configure the $2118/9 ports ... we write zero to $2115... we're setting the Vram address to AutoInc on a write to $2118 |  |
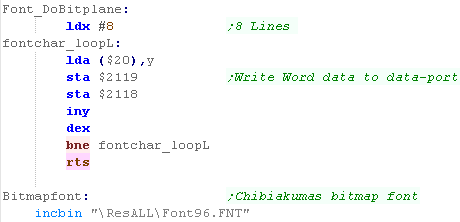
| We now need to load in our font... The SNES font uses 4 bitplanes
for each 8 pixel wide line of the tile... The 8 lines of bitplanes
0+1 come first... then the 8 lines of lines 2+3 come next. We set the address to write to with ports $2116/7 - The Tile patterns are at address $1000 we read in from our 1bpp font, and write each byte 4 times... because bitplanes (0,1) and (2,3) are split, we write the 8 lines once... reset Y and do the same again! |
  |
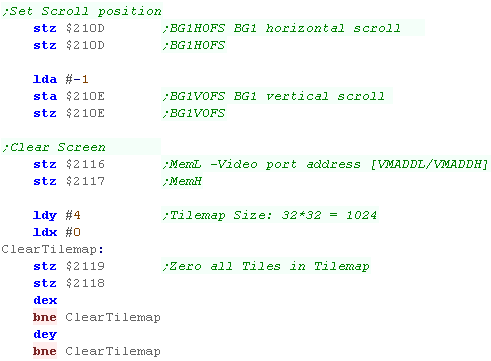
| Right! Our font is ready, but we now need to initialize the Tilemap... we need to reset the scroll position with $210D/E We also need to clear the tilemap... we do this by writing zeros to all the tiles in the tilemap The Tilemap starts at $0000 - and there are 1024 pairs of bytes to zero (32x32 tiles) |
 |
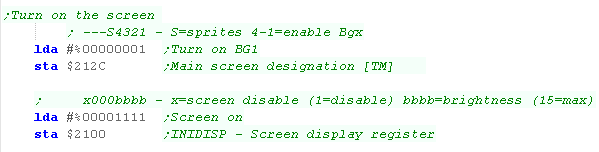
| We're finally done... We now just need to actually turn on the
screen! Phew! that was hard work! |
 |
| We may be able to skip the clear screen part
on some emulators, but emulators like Mesen-S will fill the ram
with random data on power-up to force us to do things properly!...
how cheeky! |
|
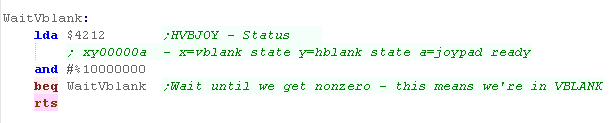
Waiting for Vblank
| Now that the screen is enabled, we need to wait for Vblank before
writing to the screen... Vblank is the time during redraw when the screen has finished drawing, and the next frame hasn't started. we can check if the screen is in Vblank by reading $4212 |
 |
Getting A Character to the screen
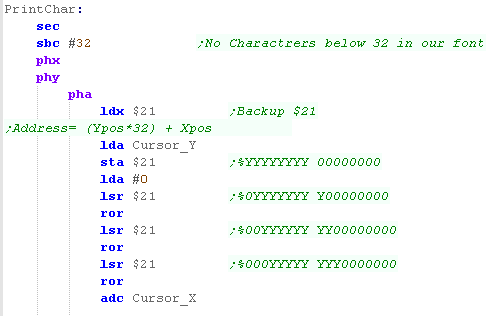
| We want to print the character
in A to the screen... Our font doesn't have a character below 32... so we subtract 32 from the character number. We now need to calculate the address of the tile we want to change... our tilemap is 32 tiles wide and starts from memory address $0000 , so our formula is: ;Address= (Ypos*32) + Xpos We achieve the multiplication by bitshifting. |
 |
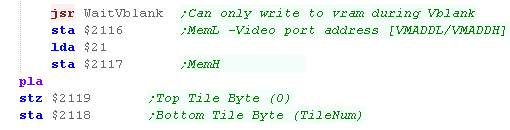
| We need to wait for Vblank before doing any VRAM writing... we use
the function we wrote before. Now we select the address we want to write to using ports $2116/7... Then we write the two bytes for that address with ports $2119/8 note... we must write them in this order - as the address will autoinc when we write to #2118) |
 |
| We now need to increase our X position, then we check if we're at the end of the line... we need to move down a line if we've reached character 32 (the right hand of the screen) |  |
Printing a string to screen
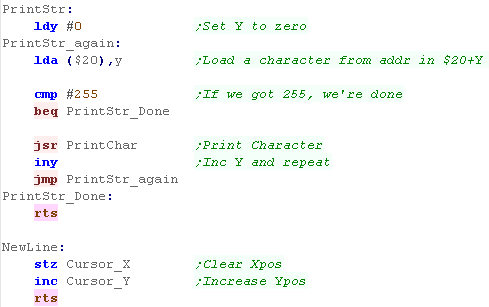
| We're going to extend our PrintChar command to print strings...
Our strings will be char 255 terminated. We also need a NewLine command, this needs to Zero the Cursor_X and increase Cursor_Y |
 |
| We need to load the address of the string into Zeropage entries
$20/1... we then call our Printstring routine to show it to the
screen Once we're done, we use a JMP * to halt the processor. |
 |
| Our Hello World message will be shown to screen |  |
Building a SNES / Super Famicom Cartridge
I build my files with VASM via a batch
file. We have to specify a Source ASM file. We need to tell VASM we want to create a BINary file We need to specify the Destination file name We include some symbols We're specifying an output Listing file We're also disabling case sensitivity, and telling VASM to check our labels don't look like commands (in case we forgot a tab on one of our commands) The SNES has a 65c02 CPU - to enable the extra features we use the -c02 switch |
|
| Once we've compiled our cartridge, we can load it with our emulator. |  |
Debugging Tools
| We can include the 'Monitor tools' we looked at in the multiplatform series, these can help us develop on a new system. | 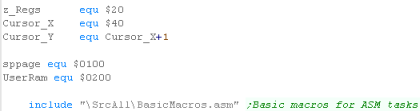 |
| We can use the Monitor to show the contents of the CPU registers, We can use the Memdump to output lines of ram to the screen. |
|
| The register contents, and the memory address specified will be shown with these commands. | 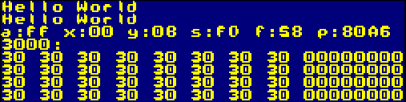 |

Starting a PC Engine/TurboGrafx-16 Card
| Our program will start at $E000 We'll also define some symbols we'll need for our cursor position |
 |
| We also need a footer, it's just a word pointing to the start of our program |  |
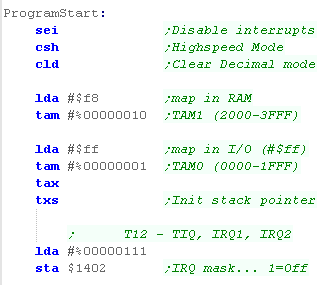
| When our program starts, we need to set a lot of things up! First we turn off interrupts, set highspeed mode, and clear the decimal flag. Next we need to 'Page in the RAM and IO banks - this configures parts of the addressable memory, pointing them to underlying hardware.... we do this with a special 6280 command called TAM We also set up the stack pointer... finally we turn the interrupots off with port $1402 |
 |
| We need to set up the Tilemap... we need to select the video
registers with the special command ST0... then set values for those
registers with ST1 and ST2 First we turn the tilemap on... next we set the tilemap size - we set it to 32x32, Finally we reset the position - so that the first tile in the tilemap is the top left corner of the screen. |
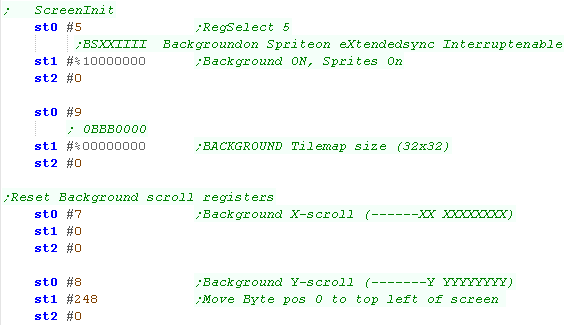 |
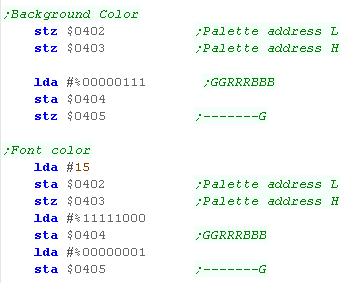
| Next we're going to set up the palette... we select a color to
change with registers $0402/3 and set the new RGB value with
registers $0404/5 The background is Color 0 - we set it to blue... the foreground is Color 15 - we set it to yellow |
 |
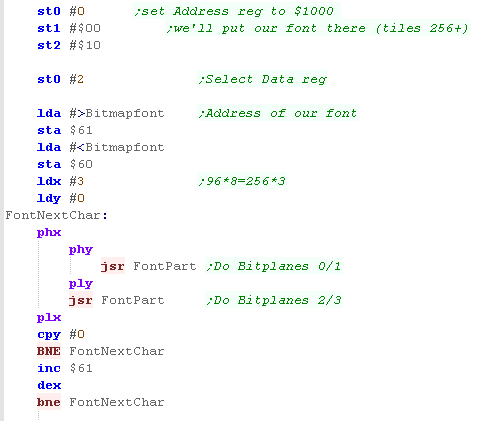
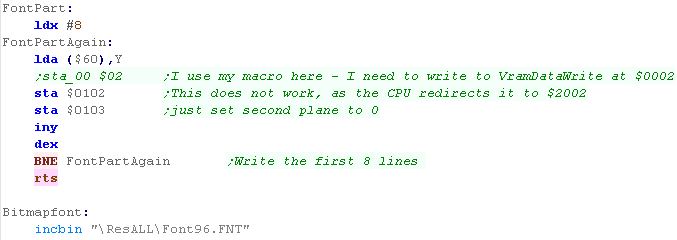
| We need to copy our font into tile ram... We're going to use tiles 256+ - which appears at Vram Address $1000 onwards... we need to set ST0 to #0 to tell the hardware we want to change the address - then write $1000 to ST1/2... finally we set ST0 to #2 to select that we're going to send data. Our font is 1bpp, but the PC engine uses 4 bitplanes - split into two halves - we need to send the 8 lines bitplanes 0/1 first, then the 8 lines of Bitplanes 1/2 As our font is 1bpp - we send the same data for all 4. When we want to send data in A - we use $0102 and $0103 - these are the equivalent of ST 1/2 when our value is in the accumulator |
  |
| We now need to clear our tilemap, and set all the starting tiles
to zero... We select the address for the destination of our tilemap with Graphics Reg 0 - we select address $0000 We need to write 1024 tiles to fill our 32x32 tilemap - we need to write |
 |
| The PC Engine
has lots of special commands... most important for us here are ST0
, ST1 and ST2... these save fixed values to the graphics hardware,
and are equivalent to STA $0100, STA $0102 and STA $0103 ST0 Selects a register, and ST1/2 save values to that register... Register 0 is the 'address select' register... Register 2 is Data write - sending data to the address selected with Register 0 It may sound confusing, but don't worry too much if you don't understand it yet - just copy the code here for now. |
|
Getting A Character to the screen
| We're going to print a character to the screen! We need to work out the next cursor position... as the tilemap is at VRAM address $0000 and each line is 32 tiles wide, our formula is: Address=(Ypos *32) + X We multiply Y by 32 by bishifts, and select the calculated address... We need to subtract 32 from our character number, as our font has no characters below 32 then write the tilenumber. |
 |
| Once we've drawn our letter, we increase Cursor X, and check if we've got to the end of a line - if we have, we use our NewLine function to start the next line |  |
Printing a string to screen
| We're going to extend our PrintChar command to print strings...
Our strings will be char 255 terminated. We also need a NewLine command, this needs to Zero the Cursor_X and increase Cursor_Y |
 |
| We need to load the address of the string into Zeropage entries
$20/1... we then call our Printstring routine to show it to the
screen Once we're done, we use a JMP * to halt the processor. |
 |
| Our Hello World message will be shown to screen | 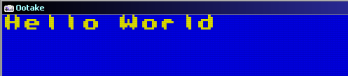 |
Building a PC Engine/TurboGrafx-16 Card
I build my files with VASM via a batch
file. We have to specify a Source ASM file. We need to tell VASM we want to create a BINary file We need to specify the Destination file name We include some symbols We're specifying an output Listing file We're also disabling case sensitivity, and telling VASM to check our labels don't look like commands (in case we forgot a tab on one of our commands) We need to be able to use the 6280 exclusive opcodes - to enable the extra features we use the -6280 switch |
|
| Once we've compiled our cartridge, we can load it with our emulator. |  |
Debugging Tools
| We can include the 'Monitor tools' we looked at in the multiplatform series, these can help us develop on a new system. |  |
| We can use the Monitor to show the contents of the CPU registers, We can use the Memdump to output lines of ram to the screen. |
|
| The register contents, and the memory address specified will be shown with these commands. | 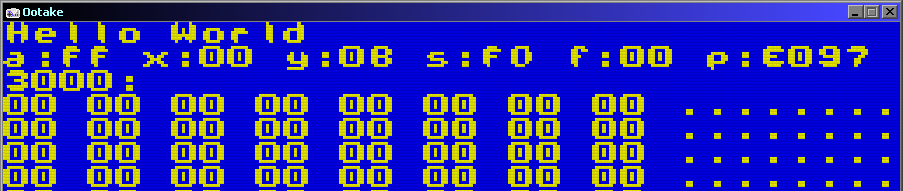 |

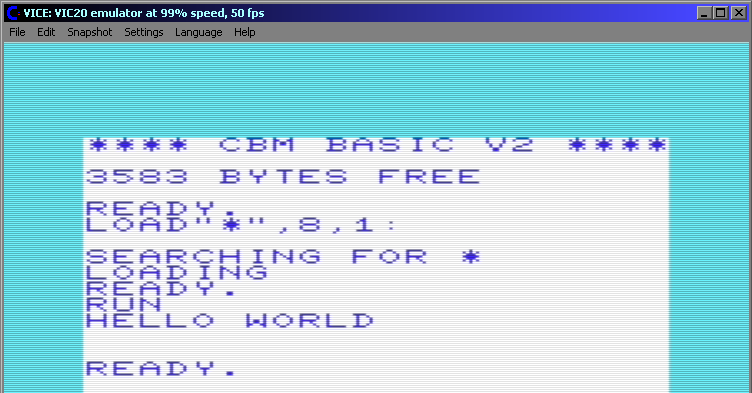
Showing Hello World to the screen
| We're going to create a PRG file... these need a header to start
the program - we'll never need to change this provided we don't want
to change the start address, Ours starts at $100A |
 |
| We're going to use the firmware function $FFD2 to print characters
(known as ChrOut) Unfortunately this function does not use normal ASCII... and it doesn't have lower case letters... we'll need to do some converting to fix this! |
|
| We're going to 'extend' this to make a PrintString routine... We'll use Zeropage pair $20/1 to store an address which will point to a string in memory... We use Y as an offset to the start address, and We'll print characters to the screen, until we get a character 255... |
|
| We need to load the High and Low bytes of our address into the $20/1 zero page entries to define the address of our string, and then call our PrintString function - this will show our string to the screen. | |
| Our Hello World message will be shown to screen |
 |
Building a PRG file with Vasm
I use VASM to compile the ASM file into a
usable PRG We have to specify a Source ASM file. We need to tell VASM we want to create a BINary that's a PRG file We need to specify the Destination file name We include some symbols (some of my code uses these - you won't need them) We're specifying an output Listing file We're also disabling case sensitivity, and telling VASM to check our labels don't look like commands (in case we forgot a tab on one of our commands) |
|
| We can start the VICE emulator with the PRG from the command line |  |
Debugging Tools
| It's relatively easy to add support for my 'Monitor Tools' ... these will allow you to see the state of the processor or memory easily. | |
| We can use the Monitor to see the processor registers, or specify a memory address, and a number of lines to show. | |
| We will see the result to screen. | 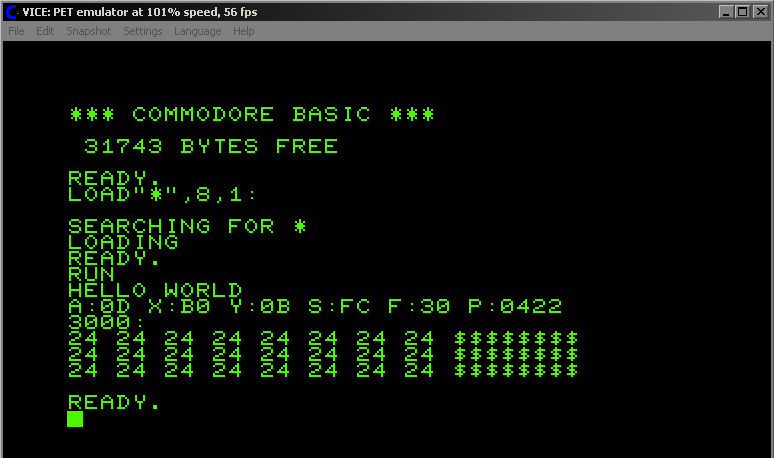 |
|
Unlike most
BASICs, BBC BASIC is CASE SENSITIVE, so you need to put all the
commands in CAPS! Surprisingly it seems the assembler is NOT!... but we'll put the commands in CAPS there too! |
The Basic wrapper
| Before we do anything, lets change our screen mode! The default mode will work OK, but some of the characters will show differently, so lets switch to MODE 0, so [ ] and a few others show right! |
 |
| Lets look at a simple wrapper for a minimal ASM program (A RTS
Statement!) :REM - A basic REM comment statement \ - an Assembly comment (; also works) [ ] - Start and end of the ASM block DIM MC% 100 - This Defines a block of 101 bytes from free memory and calls it MC% FOR opt%=0 TO 3 STEP 3 - This runs two passes of our assembly file, once with option 0, and once with option 3 P%=MC% - This sets the program counter (P%) for the start of the pass OPT opt% - This is an assembler directive, and tells the assembler what OPTions to use for the pass |
 |
| We can type all of that in if we really want, but we can just copy paste it from notepad, and let the emulator do all the work! |  |
| To assemble our program we just use RUN We can start our program with CALL MC% , or by calling the address we assembled to (CALL 6681) |
 |
Showing Hello World to the screen
| We're going to convert our previous hello world example to BBC
BASIC format. The main changes are: Hexadecimal needs to be specified with & prefix Labels need to be prefixed with . (full stop) DIV used to get the top byte of and address MOD used to get the bottom byte of an address Bytes and Strings need to be defined with EQU |
 |
| We're going to use the firmware function &FFE3
to print characters (known as OSASCI) We'll also use &FFE7 to start a new line (known as OSNEWL) We're going to 'extend' this to make a PrintString routine... We'll use Zeropage pair $70/1 to store an address which will point to a string in memory... We use Y as an offset to the start address, and We'll print characters to the screen, until we get a character 255... |
 |
| We need to load the High and Low bytes of our address into the
$20/1 zero page entries to define the address of our string, and
then call our PrintString function - this will show our string to
the screen. We get the high part with DIV 256, and the low part with MOD 256 (Remainder of division) |
 |
| We need to define our string! We define a string with EQUS, and a byte with EQUB |
 |
| We start our program with CALL
MC% Our Hello World message will be shown to screen |
 |

|
Lesson
H12 - 'Hello Chibiko' on the Atari 2600 (Nearly hello world!) Lets take a look at the Apple 2600. We'll use the Playfield background to show a full screen 40x48 bitmap. |
|
A26_HelloChibiko.asm
|
|
|
The Apple 2600
doesn't really have a font or characters, we have to draw our
screen image using the playfiled in 2 strips of 20 pixels. We COULD use this to show hello world, but it will be more useful to show an amazing full screen image of our choosing... ME! |
About the playfield
| The Playfield data is controlled by 3 registers for a total of 20
bits. The top 4 bits of $0D (PF0 - Right to left) are first, then $0E (PF1 - Left to right), finally $0F (PF2 - Right to left) The bits of PF1 are in the opposite order to PF0 and PF2 The 3 Registers are repeated on the right hand side of the screen, but we mirror them instead, by setting bit 0 of $0A (CTRLPF) These will just repeat down the screen, unless we change them at the exact time the raster beam is drawing that line of the screen! |
Normal: Mirrored:  Here we set PF0 PF1 PF2 to |%00110000 %10111001 %01011111 |
| Its tricky, but if If we time
things right and change the 3 registers mid screen, we can
effectively give ourselves a 40 pixel screen... just enough to draw
our Chibiko mascot. We also change the playfield forground color... Reg $08 - COLUPF We could change the bacground color with reg $09 COLUBK. Both take a color in the format %CCCCLLLL - where C is the color and L is the luminescence. |
 |
| If we set bit 1 of the Playfield control register ($0A CTRLPF) we
can set the playfield to use the colors for Player 0 and 1 on the
left and right. We set these with registers $06 (COLUP0) and $07 (COLUP1) |
 |
The screen!
The graphics registers on the Atari 2600 don't change themselves, so we
need to time our code correctly for each line of the screen, we also need
to send the signals to the screen for Vblank and Vsync.
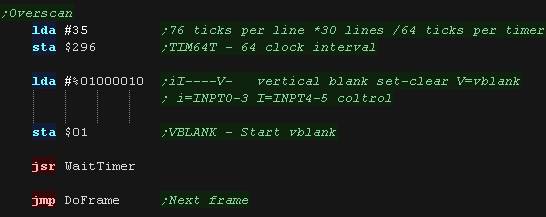
Overscan is the offscreen area we can't draw to.
We need to draw the screen line by line. Each line takes 76 cpu ticks.
We can get the hardware to pause the CPU until a line ends by writing any value to $02 (WSYNC) - We'll probably want to do this during the drawn screen
Alternatively we can set the timer with $296 (TIM64T) and wait until bit 7 of $285 (INSTAT) becomes 1 - We'll do this during Vblank/overscan so we can worry about our game logic without counting lines.
Alternatively if we're super hard core, we can look up all the instruction times of the CPU and ensure our code takes 76 ticks!
Bit 1 of $00 (VSYNC) defines the start/end of
vsync
Bit 1 of $01 (VBLANK) defines the start/end of vblank
We don't need to do anything for overscan, except calculate the time it
takes.
Showing our Chibiko!
| At the end of our cartridge ($FFFC) we need to define a footer,
which has the reset jump to the start of our program. Our program starts at $F000 |
  |
| First we'll set up our playfield with register $0A (CTRLPF) Bit 0 defines if the screen is mirrored or not. Bit 1 turns on 'Score mode', which uses the player colors for the Left/Right of the screen. |
 |
| Here is our bitmap data. Each half of the screen uses 3 bytes for PF0 PF1 and PF2, and one color byte. This means each line is 4 bytes. We don't need to use both color bytes if we don't want! |
  |
| At the start of our frame, we need to begin VSYNC. We then need to wait 3 lines with WSYNC by writing anything to $02 after Vsync, we'll do Vblank, this lasts about 43 TIM64T interrupts, so we'll set the timer and do the tasks for our game/program! |
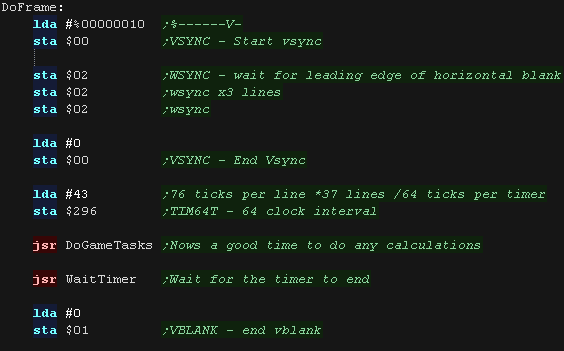 |
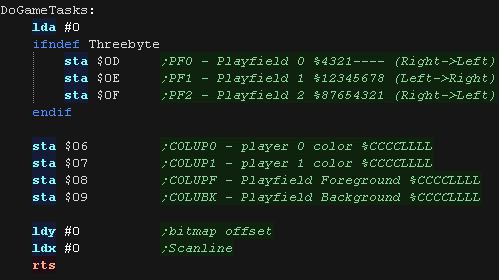
| Before the draw of the screen, we want to reset everything so
nothing draws onscreen before we're ready. We clear all the drawing registers, and set all the colors to black. |
 |
| We use 'WaitTimer' to pause until the TIM64T count reaches zero, we then execute a WSYNC so we're exactly timed to a line. | 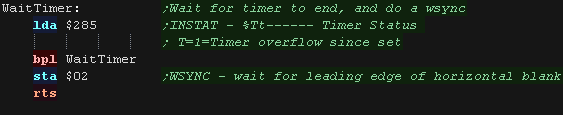 |
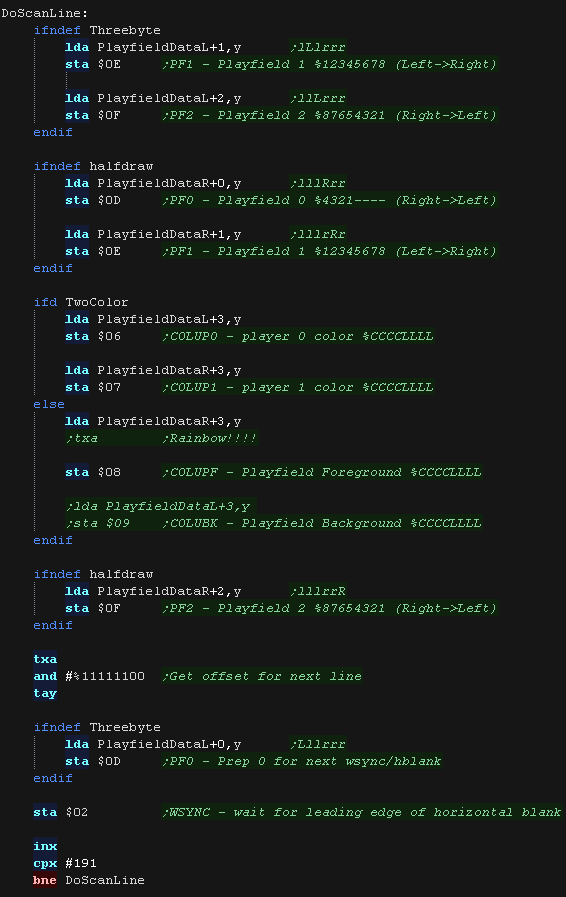
| For each line of the screen we need to do the various tasks to
update the screen. Here we're setting PF0, PF1 and PF2 and maybe some colors. We use Y to count the lines, and X as an offset to the bitmap data. PF0 on the left is drawn almost immediately after WSYNC, and we need to ensure the right hand part is updated after the left hand part has drawn, for this reason the order of update is: PF1l pf2l PF0r PF1r colors PF2r PF0l |
 |
| After the screen, we need to wait for the overscan part... this
would be another great time to do some game tasks! We're done, so we repeat for the next frame! |
 |
| View Options |
| Default Dark |
| Simple (Hide this menu) |
| Print Mode (white background) |
| Top Menu |
| ***Main Menu*** |
| Youtube channel |
| Patreon |
| Introduction to Assembly (Basics for absolute beginners) |
| Amazon Affiliate Link |
| AkuSprite Editor |
| ChibiTracker |
| Dec/Bin/Hex/Oct/Ascii Table |
| Alt Tech |
| Archive.org |
| Bitchute |
| Odysee |
| Rumble |
| DailyMotion |
| Please note: I wlll upload more content to these alt platforms based on the views they bring in |
| 68000 Content |
| ***68000 Tutorial List*** |
Learn 68000 Assembly  |
| Hello World Series |
| Platform Specific Series |
| Simple Samples |
| Grime 68000 |
| 68000 Downloads |
| 68000 Cheatsheet |
| Sources.7z |
| DevTools kit |
| 68000 Platforms |
| Amiga 500 |
| Atari ST |
| Neo Geo |
| Sega Genesis / Mega Drive |
| Sinclair QL |
| X68000 (Sharp x68k) |
| 8086 Content |
| Learn 8086 Assembly |
| Platform Specific Series |
| Hello World Series |
| Simple Samples |
| 8086 Downloads |
| 8086 Cheatsheet |
| Sources.7z |
| DevTools kit |
| 8086 Platforms |
| Wonderswan |
| MsDos |
| ARM Content |
| Learn ARM Assembly |
| Learn ARM Thumb Assembly |
| Platform Specific Series |
| Hello World |
| Simple Samples |
| ARM Downloads |
| ARM Cheatsheet |
| Sources.7z |
| DevTools kit |
| ARM Platforms |
| Gameboy Advance |
| Nintendo DS |
| Risc Os |
| Risc-V Content |
| Learn Risc-V Assembly |
| Risc-V Downloads |
| Risc-V Cheatsheet |
| Sources.7z |
| DevTools kit |
| MIPS Content |
| Learn Risc-V Assembly |
| Platform Specific Series |
| Hello World |
| Simple Samples |
| MIPS Downloads |
| MIPS Cheatsheet |
| Sources.7z |
| DevTools kit |
| MIPS Platforms |
| Playstation |
| N64 |
| PDP-11 Content |
| Learn PDP-11 Assembly |
| Platform Specific Series |
| Simple Samples |
| PDP-11 Downloads |
| PDP-11 Cheatsheet |
| Sources.7z |
| DevTools kit |
| PDP-11 Platforms |
| PDP-11 |
| UKNC |
| TMS9900 Content |
| Learn TMS9900 Assembly |
| Platform Specific Series |
| Hello World |
| TMS9900 Downloads |
| TMS9900 Cheatsheet |
| Sources.7z |
| DevTools kit |
| TMS9900 Platforms |
| Ti 99 |
| 6809 Content |
| Learn 6809 Assembly |
| Learn 6309 Assembly |
| Platform Specific Series |
| Hello World Series |
| Simple Samples |
| 6809 Downloads |
| 6809/6309 Cheatsheet |
| Sources.7z |
| DevTools kit |
| 6809 Platforms |
| Dragon 32/Tandy Coco |
| Fujitsu FM7 |
| TRS-80 Coco 3 |
| Vectrex |
| 65816 Content |
| Learn 65816 Assembly |
| Hello World |
| Simple Samples |
| 65816 Downloads |
| 65816 Cheatsheet |
| Sources.7z |
| DevTools kit |
| 65816 Platforms |
| SNES |
| eZ80 Content |
| Learn eZ80 Assembly |
| Platform Specific Series |
| eZ80 Downloads |
| eZ80 Cheatsheet |
| Sources.7z |
| DevTools kit |
| eZ80 Platforms |
| Ti84 PCE |
| IBM370 Content |
| Learn IBM370 Assembly |
| Simple Samples |
| IBM370 Downloads |
| IBM370 Cheatsheet |
| Sources.7z |
| DevTools kit |
| Super-H Content |
| Learn SH2 Assembly |
| Hello World Series |
| Simple Samples |
| SH2 Downloads |
| SH2 Cheatsheet |
| Sources.7z |
| DevTools kit |
| SH2 Platforms |
| 32x |
| Saturn |
| PowerPC Content |
| Learn PowerPC Assembly |
| Hello World Series |
| Simple Samples |
| PowerPC Downloads |
| PowerPC Cheatsheet |
| Sources.7z |
| DevTools kit |
| PowerPC Platforms |
| Gamecube |
| Work in Progress |
| ChibiAndroids |
| Misc bits |
| Ruby programming |
Buy my Assembly programming book
on Amazon in Print or Kindle!


Available worldwide!
Search 'ChibiAkumas' on
your local Amazon website!
Click here for more info!


Buy my Assembly programming book
on Amazon in Print or Kindle!
Available worldwide!
Search 'ChibiAkumas' on
your local Amazon website!
Click here for more info!
Buy my Assembly programming book
on Amazon in Print or Kindle!
Available worldwide!
Search 'ChibiAkumas' on
your local Amazon website!
Click here for more info!