

MultiPlatform Lessons
RLE - Run Length Encoding
| Run Length encoding works when consecutive bytes are the same -
suppose we want to compress the string "111100000223335" (15
characters) We could do this by storing a letter - and a count for that letter. this would result in a string '1105223351' (10 characters)...we've saved a few characters! We'd also want a way of storing bytes that are not the same (we'll call it linear data)... lets look at the real algorithm |
111100000223335 1x4 0x5 2x2 3x3 5x1 1405223351 |
| Our actual format is more advanced, well a bit! We'll have a 'header byte' - If the whole byte is zero - then we're reached the end of the compressed sequence If the top bit is 1, the next sequence is RLE compressed... the remaining bits are a bytecount (1-127) If the top bit is 0, the next sequence is LINEAR uncompressed data... the remaining bits are a bytecount (1-127) |
Compressed data: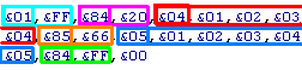 Uncompressed Data:  |
| If you want to RLE compress a file in this format, you can use AkuSprite Editor, the FileProcessor option will compress in RLE format | 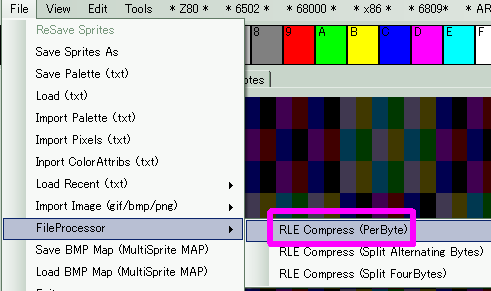 |
 |
The RLE
compression alrorithm here certainly isn't the best! it was
shamelessly At the request of a patreon, the author of these tutorials did a disassembly of the routines here ... This tutorial is based on what was learned! |
Z80 Decompressor
| When we want to decompress data, we need to specify a source in HL... and a destination in DE | 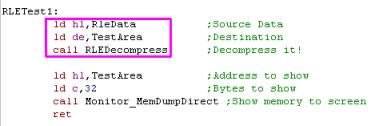 |
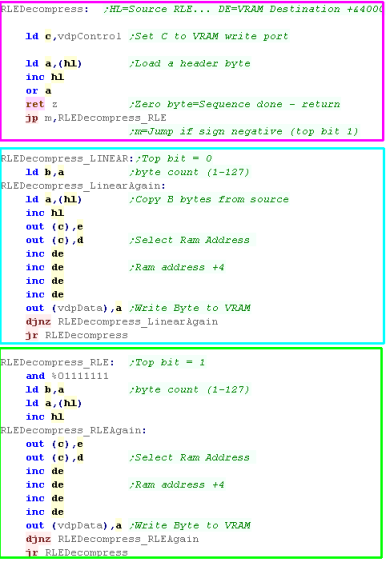
| The RLE decompressor is split into 3 parts... the Header
byte processor detects if the next block is Linear, Rle, or if
the stream had ended... We use JP M, This is 'Jump if Minus' - effectively this tests the top bit of the registers, which is what we need to detect the RLE block The Linear section handles uncompressed data. The RLE section handles the compressed data |
 |
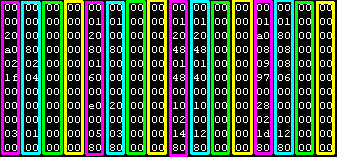
| Of course we'll need our Compressed RLE data, and some storage space for the destination after it's decompressed. | 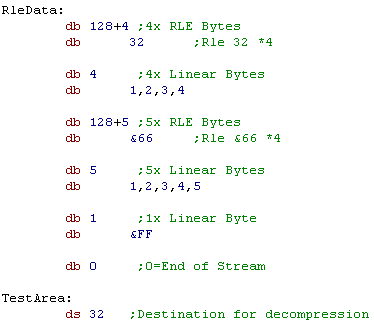 |
| Here is the decompressed data. |  |
| Of course we can compress anything!... here's a simple CPC screen! This screen is 16k... but compressed it's just 2.7k! Of course that's only because it's so basic, but you get the point! |
 |
| Some
Data will RLE compress well - others will end up bigger than they
started! You need to pick what data to compress, and what to leave alone, if possible, design your graphics to be simple if you need to RLE compress them in this way |
 |
SMS Bitmap data - splitting bitplanes for better RLE
| Lets use our RLE compressor to compress the bitmap data of the
Chibiko mascot we used in a previous example... Unfortunately, the raw format of the file is 'problematic' |
 |
| Looking ad the data, it looks a bit complicated, and maybe like it won't compress so well (We would save just 3 bytes)... but we need to think of what the data represents - and use our decompressor accordingly! |  |
| Our graphics is 16 color - and is split into 4 bitplanes... Bitplane
0, Bitplane 1,Bitplane 2,Bitplane 3 Because Chibiko is only 4 color, bitplanes 3 and 4 are totally unused... If we split up our file, and store each bitplane in a separate RLE we'll get far more efficiency. Splitting the file in this way reduces the file size by over 50%! |
 |
| We can create 4 files split in this way with the 'Split Four Bytes' option in Akusprite Editor |  |
Filling One Bitplane of the SMS with RLE
| Again The RLE decompressor is split into 3 parts... the Header
byte processor detects if the next block is Linear, Rle, or if
the stream had ended... We use JP M, This is 'Jump if Minus' - effectively this tests the top bit of the registers, which is what we need to detect the RLE block The Linear section handles uncompressed data. The RLE section handles the compressed data Note that we're OUTing the decompressed data to the vdp, and first we're selecting the VRAM address in DE ... DE must contain VRAM address +&4000 (&40000 denotes WRITE)... We add 4 to DE each time, so we're sending the decompressed data to just one bitplane |
 |
| We need to include all 4 bitplane files in our source code. | 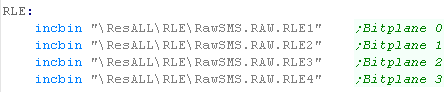 |
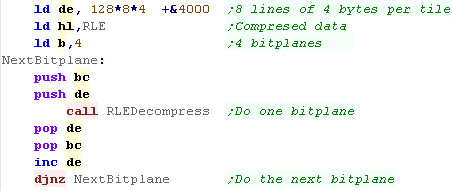
| When we want to stream the data to the 4 bitplanes, we load the
starting VRAM address in DE, and the RLE data in HL We repeat, backing up the destination address before each loop, and INCing the Vram address for each consecutive bitplane HL will point to the start of the next bank of RLE data after each execution, so we don't need to change it between bitplanes. |
 |
| The image will look the same, but it took less memory! | |
 |
We've not saved
much memory, but it's only an example of how you can use RLE
compression, and change the way you're writing (OUTing) data to
VRAM to optimize the data you're sending. If you're doing a small game it's not going to be a problem, but if you're making a bigger game, you may need to keep things as small as possible. |
Passing parameters to Subroutines
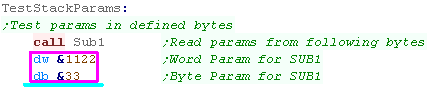
| If we want to save program code and we want to pass parameters to
a function, rather than loading them into registers, we can store
them in the code after the sub with DB and DW statements... We can read these in from within our sub, and modify the return address to skip over the parameters so code execution resumes after the parameters |
 |
| To get the address of the parameters, we transfer the top of the
stack into IX... We then use IX to read in the parameters. Finally we alter IX to skip the parameters, adding enough bytes to jump over the parameters, and put the new return address back on the stack |
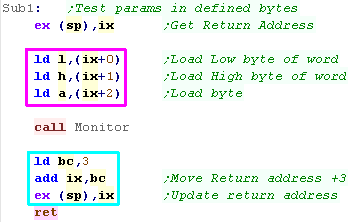 |
| A and HL have been loaded in by the sub |  |
| Another way of passing parameters to a function is to push parameters on to the stack... this is handy if we need the registers for other purposes. | 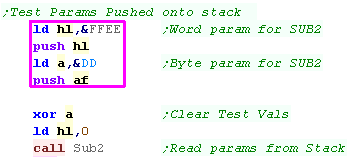 |
| We get the stack pointer into IX and use it to read
in the parameters. Once we've taken the parameters, We need to move the return address to the top of the stack with the parameters removed |
 |
| Here are the results. |  |
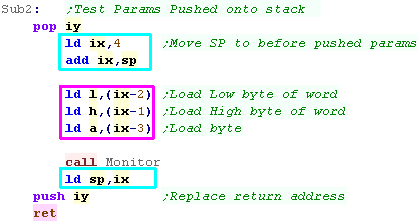
Returning parameters on the stack
| Of course, we can reverse the procedure, taking the return
address off the stack, putting some
parameters on the stack, then putting the return
address back on the stack We can then read the parameters back after the sub finishes |
 |
| Here are the results |  |
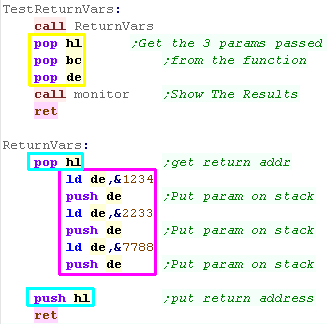
Allocating Temp Ram on the stack
| If we need a small amount of temporary ram for our subroutine,
rather than having a permanently allocated bank, it may make more
sense to allocate it on the stack, and set IX or IY to this
allocated data. In this example, we've allocated six bytes... when we're done, we reset the stack pointer |
 |
| The data will be on the stack... above the return address... so make sure you fix the stack before returning! |  |
 |
Allocating a
few bytes of temp ram with a label will of course be much easier,
but what about if you're subroutine will need to be nested?...
you'd need to allocate those bytes for each iteration of the
function By using the stack, once the function completes, all the bytes are freed - just make sure your stack isn't too small - or something may get overwritten! |
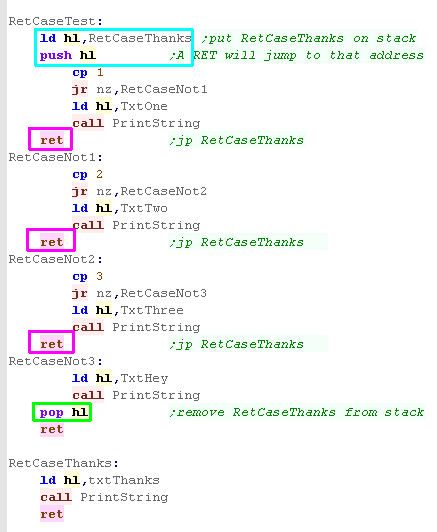
Return as a Jump!
| Lets take a look at a simple test program... This program has a large number of branches, all of which end up with a JumP to CaseThanks a JP command takes 3 bytes each... and if space is super tight this may be a problem if there are a lot of them... but a RET command is just one byte |
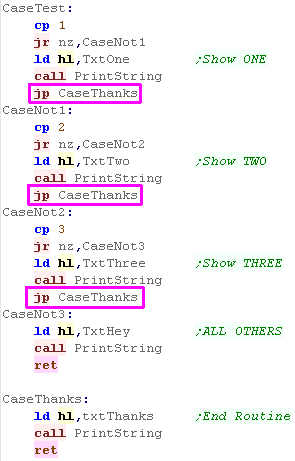 |
| If we push an address onto the stack - then
any RETurn command will effectively jump to
that address - if there are a lot of Jumps we can save a few
bytes... If there are some cases we don't want that jump to occur we can just POP the return address off the stack. |
 |
| This is just a
simple example of what you can do with the stack and RETurn... you
can of course do much more... like simulating a JMP (BC)
command - jump to a numbered entry in a vector table, or
whatever you can figure out the code for! Of course, these are all advanced 'tricky' things, so don't worry about them if you're starting out. |
 |
Jump with RST (Like making our own command!)
| It's not really related to the
stack... but if we're looking for ways to save a byte or too, don't
forget RST! There are 8 RST's, which effetively call to low addresses... on the CPC RST6 is reserved for the user to use... that means we can do with it what we want,without harming the firmware. RST6 (RST &30) is a 1 byte command... and in this case we're setting it to JP RstTest... As RST is a call, this means RST6 is equivalent to CALL RstTest Our 'RstTest' function does the same as our earlier example - taking a word from the following bytes as a string to show to the screen... Effectively we've made our RST6 into a 'PrintString' command.. it prints the following word- and this saves 3 bytes compared to 'LD HL,STRING / CALL RstTest' |
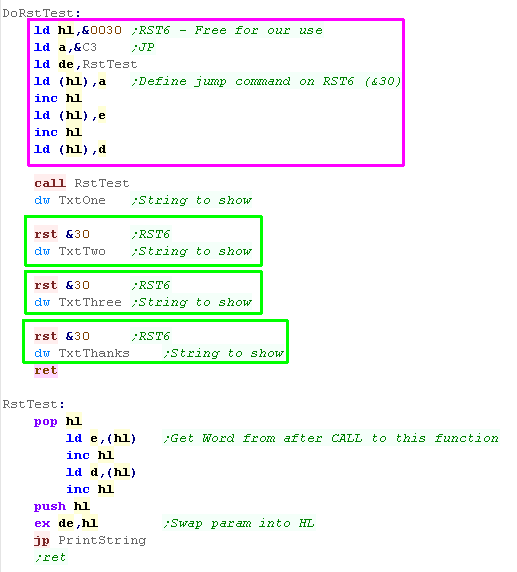 |
| Here is the result |  |
Stack Misuse (For fast Read/Write)
| We've covered it before - but
lets look again at Stack Misuse... this is where we use the stack
for bulk reading or writing... We just point the stack pointer to the bottom of the area we want to read, or top of the area we want to write, and PUSH or POP away. Of course we can't use the stack for anything else when we're doing this, so no CALLs! We need to restore the stack pointer once we're done so we can CALL again! This example copies the screen, scrolling the screen up 8 lines |
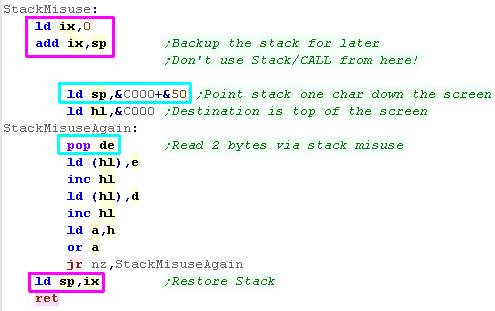 |
| The routine will cause a vertical scroll of 8 lines when we run
it! We used the stack to copy the whole screen quickly |
  |
| If
you're misusing the stac kin this way, you'll probably want to
disable interrupts first!. Because interrupts are effectively CALLs, and calls use the stack, they may draw corruption to your screen, and make quite a mess! If your super clever you may be able to work around this - but it's very tough so it's best to disable interrupts and make your life easy! |
|
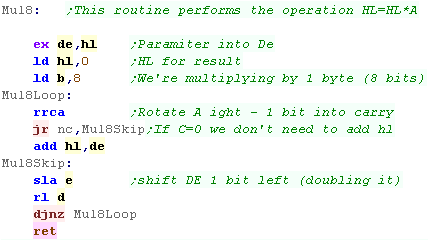
Multiplication
| Lets look at
Multiplication!.... If we want to multiply 102 by 10 by hand, we would multiply 10 by each of the digits in 102 (or the other way round!) We can do the same in assembly...however instead we'll work in bits - bit-shifting the value we want to multiply, and adding the amount we want to multiply by each time. |
 |
| This function will effectively set HL = HL*A Through each iteration of the program, we rotate the bits in A to the right... causing one bit from the right to be copied into the Carry If the bit is 1, we add DE to HL Whether it was or not, we double DE - setting it to the correct value to add for the next bit. |
 |
| Here we can see what happens to the registers... on the right is
the bits in A and the Carry (C) When the Carry reaches 1 - we add the current value of DE (1020) to HL... this effectively multiplies the value that WAS in HL at the start of the function into by the bit position (now it's shifted into the Carry) |
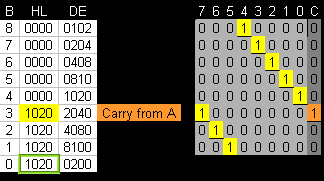 |
| We multiplied &10 by &0102... the result was &1020 |  |
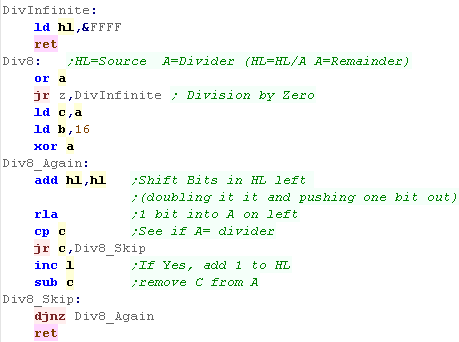
Division
| Lets Divide 1023 by 10 When we do division by hand, we need to work out how many times we can take 10 from each digit - starting from the left moving to the right - any remaining value is the remainder. Of course, we'll have to do things in bits when it comes to our ASM version. |
 |
| In our example we'll perform HL=HL/A... where HL=1023 and A=10 We actually work sort-of backwards with the division - rather than moving A right through the bits of HL, we'll move HL left (by adding HL to itself - doubling it). We'll move HL LEFT - popping the leftmost (top) bit into A... with each shift we'll also double A - when A is greater than, or equal to the amount we wanted to divide by (10) we subtract that amount - and add 1 to HL That '1' that was shifted into HL will continue shifting with HL - until we've rotated HL round a full 16 bit 'loop'... At the end HL will have been divided by the value (10)... and A will now contain any remainder! |
 |
| Here's the registers... and a bit representation of HL on the
right. We move the bits left in HL (Blue highlighted bits) -and when a bit gets pushed out, we move it into A (Yellow Highlighted) A also shifts left each iteration, and once this exceeds the divisor we add 1 to to HL (shown Yellow) We repeat this loop 16 times - HL ends up containing the whole number part... and A is the remainder. |
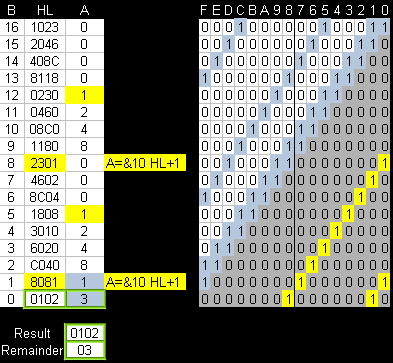 |
| We divided HL by A The result is in HL... the remainder is in A |
 |
| This is just
two examples of a dividing a 16 bit number by an 8 bit one - if
you need more, check out Grauw's
site Which has many other z80
algorithms for multiplication and division with great
documentation! |
|
SpeedTile
| SpeedTile is a software tilemap... it uses 2 frame buffers to
facilitate software scrolling, and works at 256x192 on most systems. It breaks up images into 8x8 tiles, and has optimized drawing routines which are designed to work 'around' the screen co-ordinate difficulties of each system. The tile code has the potential to use multiple drawing engines for flexibility - Normal (PSET tiles) Fill (solid colors for fast tiles) Zero Transparent (byte zero not drawn) and Transparent (Tile completely unused) Tilemaps can be any size, and small 'tilemaps' can be used as sprites - as the code allows tile reuse (compression) and flood fill for solid color tiles (speed) and flexibility (small areas transparent only when needed) using the tile code for sprites can be extremely efficient. |
 |
 |
Software
scrolling means we'll use two screen buffers, and redraw the
entire screen every frame - this is slower than Hardware
scrolling, but it's much easier and is less platform specific. Many systems cannot hardware scroll (SAM/Speccy) and systems like the CPC have limited ability - plus Hardware scroll is difficult, as memory addresses change every time the screen moves, and if a lot of stuff moves onscreen, it could even end up slower than soft scroll as we'd end up redrawing everything anyway. And beware! If you're struggling to understand the software scroll tutorial here... you'll really find hardware scroll too hard! |
| There are 3 kinds of tilemap
we need to consider. The Visible tilemap.... What we see onscreen The Logical tilemap... this is a set of pointers to the data used to draw the screen - it's slightly bigger than the screen to allow for scrolling The Supertile map... this is the 'compressed' levelmap... it's many time bigger than the screen. The logical tilemap is pretty simple... each 8x8 tile is represented by 1 word in the format: %AAAAAAAA AAAAAATF Where A is the address of the bitmap data in ram for the 8x8 tile (with the bottom 2 bits as 00)... eg &FF84 F=1 denotes a filled tile that uses 2 bytes to fill the entire tile (Faster)... eg &FF84+1 F=1 and T=1 denotes a transparent tile ... eg &FF84+3 A=00000000 + F=1 denotes an empty tile - the tile is not drawn - skipping this 8x8 block... eg &0+1 We use symbols to simplify defining these. The Tilemap is rotated 90 degrees clockwise... so the XY co-ordinates of data in the Logical tilemap go DOWN then ACROSS...eg DW [Y0 X0],[Y1 X0],[Y 2X0] DW [Y0 X1],[Y1 X1],[Y2 X1] DW [Y0 X2],[Y1 X2],[Y2 X2] This is because the drawing order of the screen goes down then across. |
  |
| Because
speed is paramount the logical tilemap code is platform
specific,however they're all pretty similar. We'll take a look at the CPC version here, but the SAM and Speccy version are pretty similar, it's just 'newline calculations' differ |
|
Drawing the Logical Tilemap
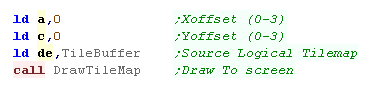
| We need to draw the tilemap... we set DE to the first byte of the
logical tilemap to draw. A/C are the XY offset (in 1/4 tiles)... to move a full tile we need to alter the DE offset. |
 |
| The CPC can only move the tilemap in 4 pixel chunks... *** We need to calculate the base VRAM address of the top-left corner of the tilemap - we use IX to calculate the start address in VRAM to draw. |
 |
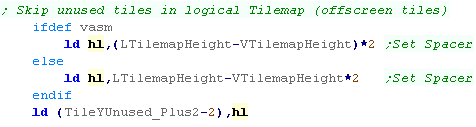
| Our Logical tilemap will usually be taller than our visible
screen... Our Screen is 24 tiles tall - but what if our Logical
tilemap is 32 tiles tall??? After drawing each vertical strip to screen, there will be 8 tiles unused... we'll need to skip over them... we calculate the amount to skip here for later. |
 |
| We set IYH and IYL for the end of the tilemap sizes. This is consistent for the tilemap... but will be different when we use the tilemap code for sprite drawing. |
 |
|
*** NOTE: The 4
pixel vertical shift is actually handled by an alternate version
of this module "CPC_V1_SpeedTile_ShiftedTile.asm"... this is
because the routine is optimized for 8x8 blocks, and the
optimizations are different for an effective 4 pixel vertical
offset... using extra ram for a second version makes more sense
than trying to write a single version that works for both
positions and lose speed we don't have. |
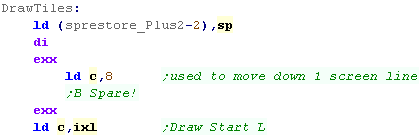
Starting The Tile Draw
| We use the Stack for fast reading during the main loop, so we back
up the stack pointer at the start. shadow C is used for fast calculations on the CPC to move down a line (add 8 to Vram H) Note we're using shadow registers to allow less use of ram to store paramters |
 |
| At the start of a line, we reset the screen memory position to draw the next vertical strip | 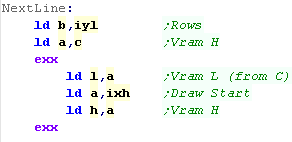 |
| We need to draw a tile... we load in the address of the bitmap
data for the tile from HL we check the bottom bit of the address... if it's 1 this is not a 'normal' tile - it's either Filled or Transparent |
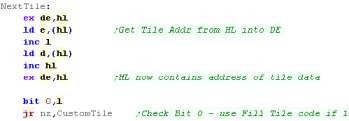 |
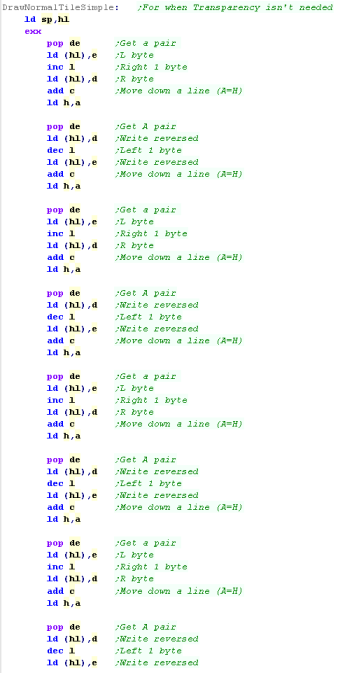
Drawing a bitmap tile
| we're drawing a normal tile. We set the stack pointer to the start of the Tile bitmap data and POP a pair of bytes from the data (one lines worth on the CPC) We write the first byte to the screen and move right (INC L) then we write the second byte. we then move down a line ... we add 8 (from C) to the accumulator (Which contains H) - we then update H We then repeat the process... this time we write the bytes in reverse to save unnecessary moves. We repeat this for all 8 lines of the tile. |
 |
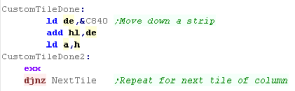
Finishing the tile
| When a tile is complete we need to fix up HL... HL will now point
one tile below the last one - ready for the next tile. We check B and repeat until the strip is done. |
 |
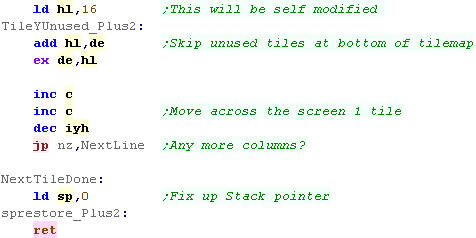
| Once a strip is done, we skip any unused tiles (The tilemap will
usually be taller than the visible screen) We need to move 8 pixels to the right... we INC C twice... moving across the screen two bytes (8 pixels) and repeat to do the next vertical strip When there are no strips left, we restore SP and return. |
 |
The Solid tile
| The Solid tile is basically the same, however alternating lines
are filled with just 1 byte - this gives the tile a filled color
(with checkerboard pattern color) Because there's just one bytepair read It's faster than than the regular draw |
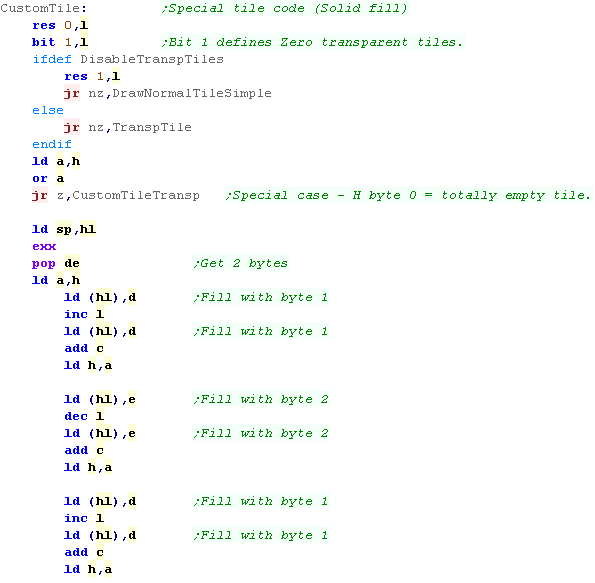 |
The Empty tile
| Empty tiles have no drawn pixels - we just change HL to move down to the next tile. | 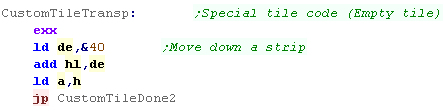 |
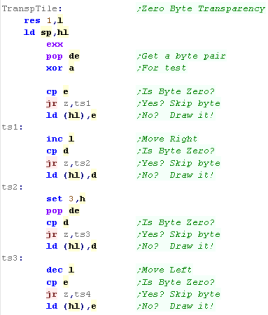
Transparent tiles (Zero Byte)
| The 'Transparent' tile version is for sprite drawing. It's basically the same as the regular tile routine, but before each draw we test the byte, if it's zero, we don't put it onscreen. this is used for the sprite drawing routines we'll look at in a later episode. |
 |
Supertile definitions and SuperTile Map
| The SuperTile map uses 1 byte per supertile defining the tile
number The tilemap is organized horizontally, so each byte has the position: db [X0 Y0],[X1 Y0],[X2 Y0] db [X0 Y1],[X1 Y1],[X2 Y1] db [X0 Y2],[X1 Y2],[X2 Y2] |
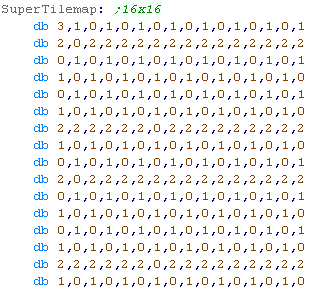 |
| Each Supertile defines a 4x4 square of tiles, so it's definition is 16 tiles / 32 bytes in total | 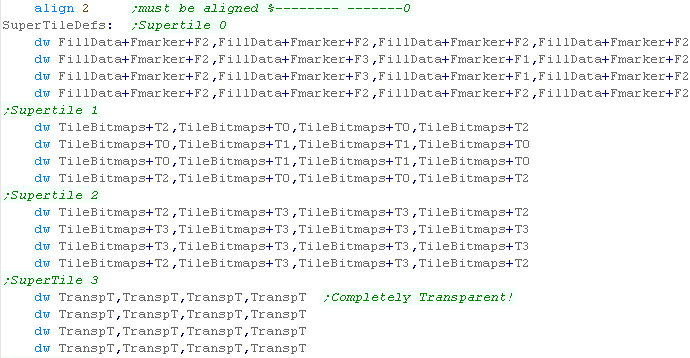 |
Using the SuperTileMap code
| We're going to update the Visible/Logical tilemap based on a
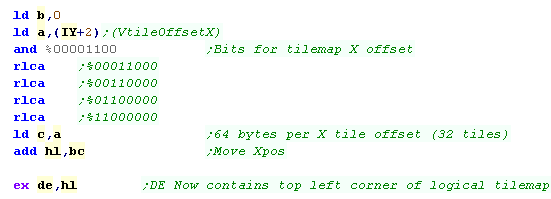
'World position' This uses a 16 bit X and Y co-ordinate whic splits into 3 parts.... %-------- SSSSOOHQ The Top byte -------- is unused (our world is only 16 supertiles wide) The SSSS bits are the position in the SuperTilemap for the top corner of the Logical Tilemap OO is the tile offset of the Logical tilemap in whole tiles HQ is the offset of the tile in Half/Quarter tiles (2 pixel blocks)... The SAM can use quarter shifts... the CPC can only do half shifts... the SPECCY can only do full block shifts |
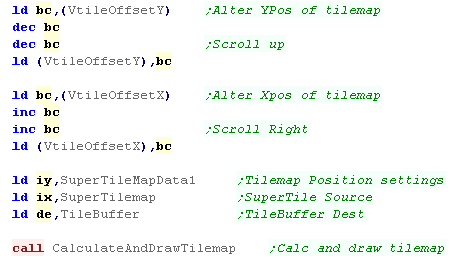
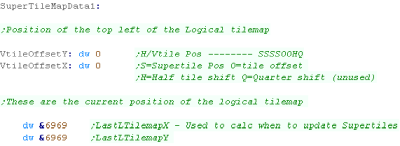 |
| We have a single routine 'CalculateAndDrawTilemap' which will
update the Logical tilemap as required, and draw a full screen
tilemap. IY needs to point to the variables defining the current position, and last calculated position |
 |
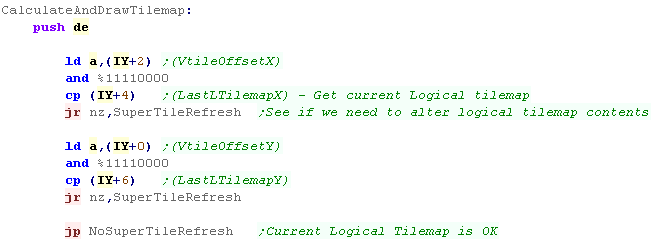
Filling the Logical Tilemap from the Supertile Map
| The Logical tilemap is 4 tiles (1 supertile) larger than the
visible tilemap on all sides, this means we can scroll up to 4 tiles
in any direction before updating the logical tilemap. First we check the current position within the Supertilemap... if the position of the currently calculated logical tilemap has not changed we don't need to do anything. If it HAS , we need to refill the Logical tilemap from the super tile map |
 |
| We need to convert the XY position within the supertile map into a
byte position within the supertile map. The sample tile map is 16 tiles wide... so the offset address is: SuperTileMap+(Ypos*16)+(Xpos) |
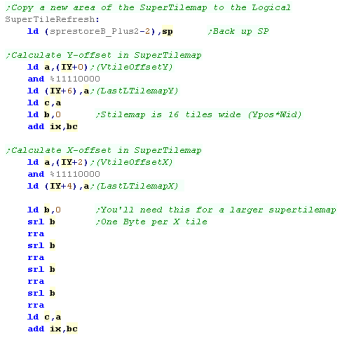 |
| We're going to transfer supertiles into the logical tilemap... we
load in a supertile from IX... and get the supertile definition from
"SuperTileDefs" Each supertile is 4x4 tiles - 2 bytes each (32 bytes) |
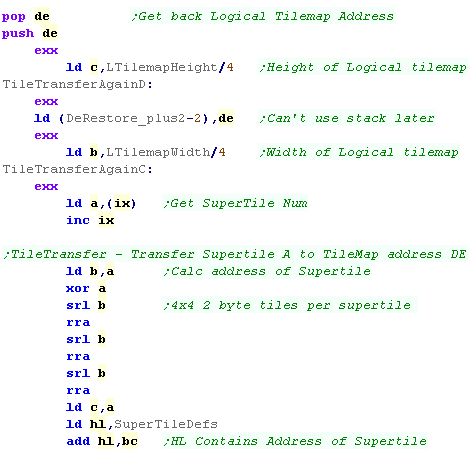 |
| We need to transfer all all 16 bytes of each of the 4 lines of the
supertile definition into the tilemap. We read data from the supertile definition by POPing it out we repeat for all 4 lines |
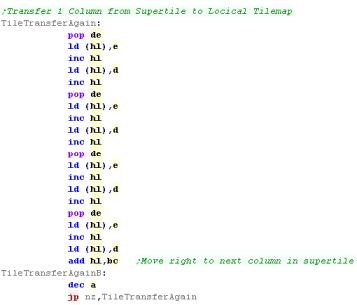 |
| We repeat moving along the logical tilemap | 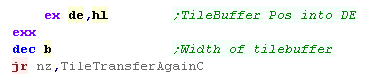 |
| We've done one 4 tile tall row of the Logical tilemap, we need to move down a row and repeat. | 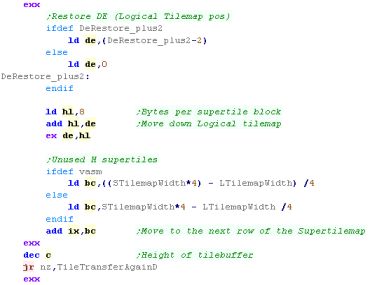 |
| Once the Logical tilemap fill is complete we restore the stack pointer |  |
|
You'll notice in
some parts of the code there are two versions - one that uses self
modifying code, and the other that uses symbols for other memory
addresses. Self-Modifying is faster, but doesn't work if we're working from ROM - we want both options so we can best server RAM systems like the CPC, and ROM systems like the SMS |
Calculating the Logical Tilemap area to draw.
| We need to calculate the 'whole tile' offset of the logical
tilemap (Defined by bits 2,3 of our XY tilemap pos) Each Tile contains two bytes, so to move down 1 tile, we multiply the offset by two We add this to the address of the start of the logical tilemap |
 |
| Because the tiles are organized vertically in the logical tilemap,
To move across one tile, we need to add the height of the tilemap
(32) * the number of bytes per tile (2) So we multiply the Xpos by 64, and add this to the address of the start of the logical tilemap |
 |
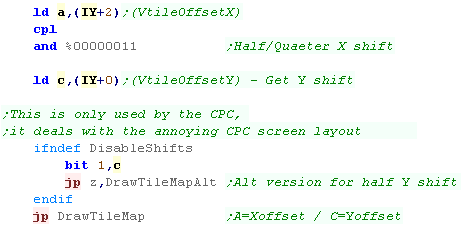
| We get the X 'Quarter tile' offset into A... and the Y offset into
C (for systems that can use it) Due to the screen layout on systems like the Amstrad CPC it's not easy to vertically shift the screen - to work around this, we have an alternative draw routine to do a 4 pixel vertical offset. |
 |
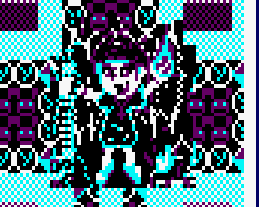
Drawing a sprite
| Here's a 'Chibiko' sprite drawn with the Sprite/Tile engine...
because the graphics is being done by the tile code, we have all the
Tile options - Transparency, 8x8 fill areas and the possibility to
'reuse' 8x8 tiles without increasing the size of the memory
footprint. The sprite can be any size, but it must be a multiple of 8x8 (of course part can be transparent. |
 |
|
| The DrawSprite routine is called to show the sprite to screen... We pass a pointer to the 'Sprite Tilemap' in DE... a set of pointers in the same format as the logical tilemap - one word per 8x8 tile. We pass the X,Y pos in B,C We specify the Width,Height (in Tiles) in H,L This example automatically makes the Chibiko character move towards the bottom right of the screen. |
 |
|
The Sprite needs to be defined in the same format as
the 'Logical Tilemap'... a grid of pointers to the tile data |
||
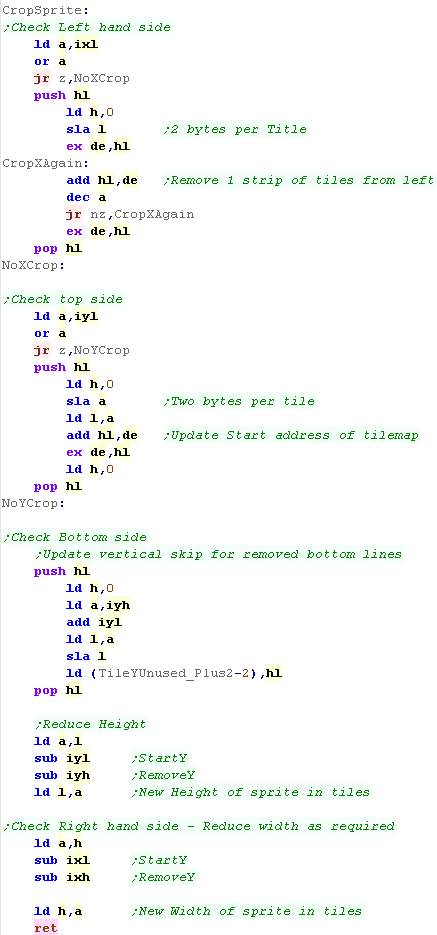
Drawing a sprite - Cropping Check
| The X,Y pos is NOT specified
in tiles - the co-ordinates are specified in pairs of pixels
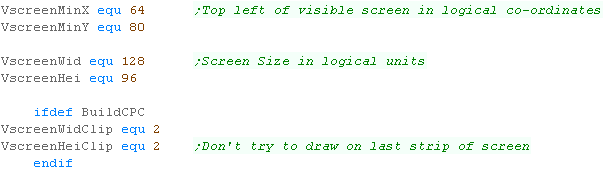
'quarter tiles'... therefore our screen is 128x96 in logical units So we can have clipping 0,0 is NOT the top left visible pixel of the screen - there is an 'offscreen' area around the visible screen... the first visible unit is 64,80 and the last is 192,176 |
 |
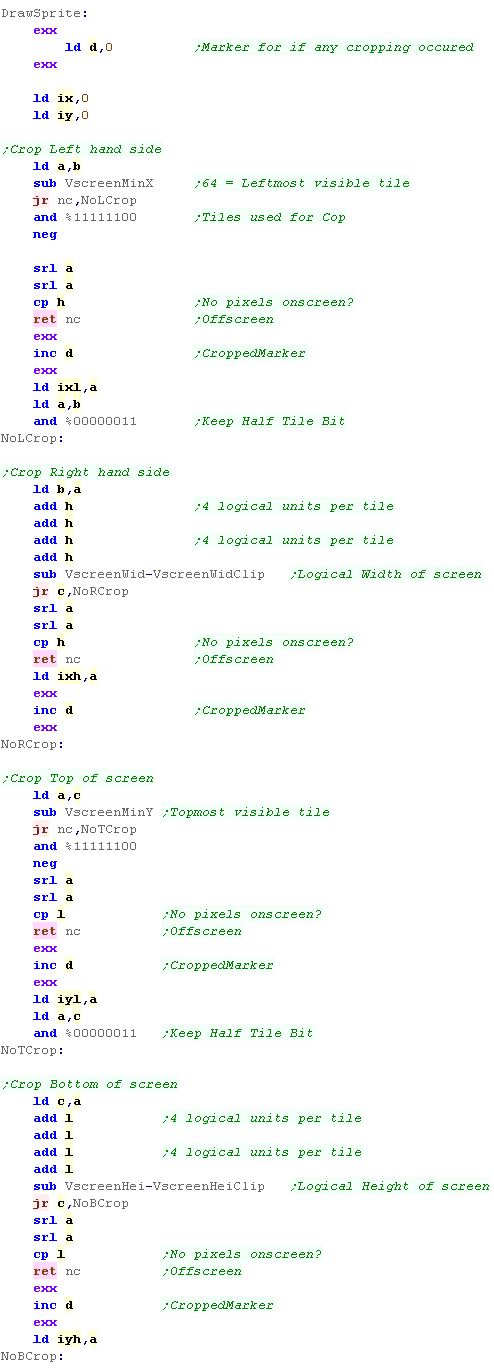
| We need to look at the position of our sprite, and see if it needs
any of its sides cropping Sprite clipping takes time, so we'll use a marker (Shadow reg D) to note if anything needs doing... IX/IY registers will store the amount of cropping needed. IXL - is the pixels to remove from Left IYL - is the pixels to remove From Top IXH - is the pixels to remove From Right IYH - is the pixels to remove from Bottom We can only crop full tiles ... there is a 1/2 or 3/4 tile border around the tilemap so this is not noticeable! For each direction we check if any tiles need to be cropped, and store the number of tiles to remove - we'll calculate how to do this later. If the result of the 'crop' is no tiles are onscreen then we return without drawing anything. |
 |
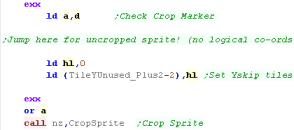
| We check the Shadow D register, and run the crop routine if
required. We also set the 'Y unused tiles' to zero - this will need changing later if cropping occurs. |
 |
Drawing a sprite - Cropping
| Because the Logical Tilemap uses 2 bytes per tile and goes down
the tilemap, to crop the left we have to remove an entire column of
tiles (2 * L) To crop a row from the top, we move down the tilemap by 2 bytes per tile... but we then need to skip those (in TileY unused) To crop a row from the bottom, we reduce L... but we then need to skip those (in TileY unused) To crop the right hand side, we just decrease H |
 |
Hardware Sprite Support
| If we're on a system like the SMS we could use hardware sprites to draw the graphic - provided we've not yet used all the hardware sprites this frame... we check and branch to a special 'Hardware sprite' routine if possible | 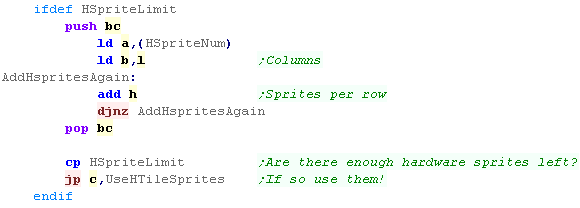 |
Drawing the sprite
| We need to calculate the VRAM address of the first tile to draw. This is Platform specific, there is a version for each system. |
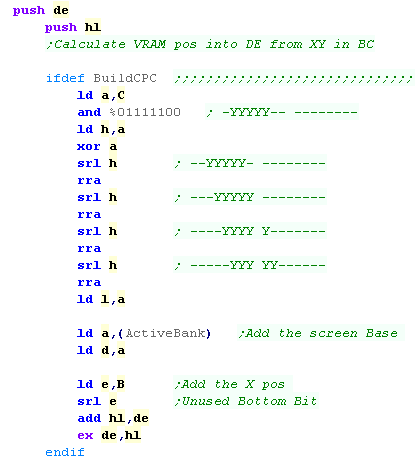 |
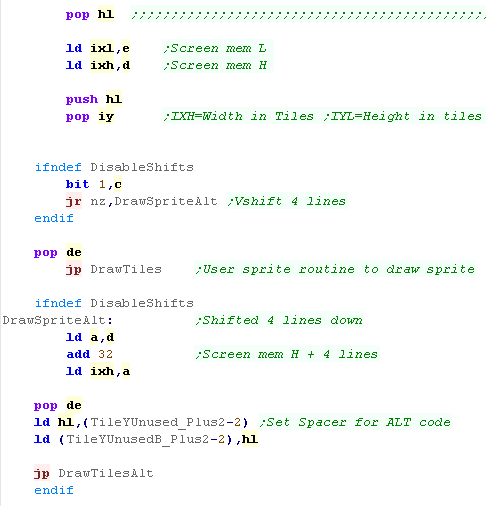
| We've calculated the area to draw, and the address to draw to. We run DrawTiles to do the job... There's also an 'alternate' version for the CPC - which needs a special version to draw with a vertical 4 pixel offset (due to screen ram layout) |
 |
| Using the
Tilemap code for sprites works surprisingly well!... Firstly
there's only one piece of code to port to new systems, and
splitting a sprite up into 8x8 blocks gives us opportunities for
saving speed and space... by making only small areas transparent -
reusing repeating parts, and solid filling blocks where possible. It's win freaking win! |
|
|
Generally The
author of these tutorials does not recommend Disassembly on the
basis that if you can't write something yourself from scratch, you
probably won't be able to understand it in disassembled source! This was an exception though, as while the author knows very little about speech synthesis, he did know Z80 and CPC wave playback! |
| Warning! This
software has been distributed as 'Speech' (C) 1986 Superior
software (On Amstrad Action Covertape AA103) and the exact same
program was distributed as The
Speaker by Xavier GROSSETETE 1991 While it has been redistributed, and the final version here has been heavily rewritten, The author of these tutorials cannot claim ownership of the code, as it is a derivative of the fore mentioned work. As far as the author of these tutorials is concerned You are welcome to use his code, however please do so at your own risk, as he is not sure of the copyright implications of the rewrite. |
|
Getting started with disassembly
| First of all we need to identify what we're going to disassemble
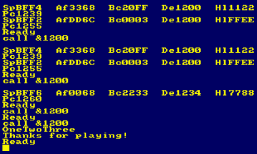
(and check it actually works) Here we can see our test program - conveniently in basic! We already know a few things! 1. Our program code is loaded to &8690 2. There is some kind of INIT routine at &98FE 3. There is another INIT routine at &9907 - which took the parameter 7 4. The String we want to say is passed to the routine at &998B Taking a look at SAY.BIN we also learn our entire program is 8302 bytes. If we change the value 7 on line 40, we will learn this is the 'pitch/playback speed' of the speech. We've already learned lots of useful things,without even touching a disassembler! |
 |
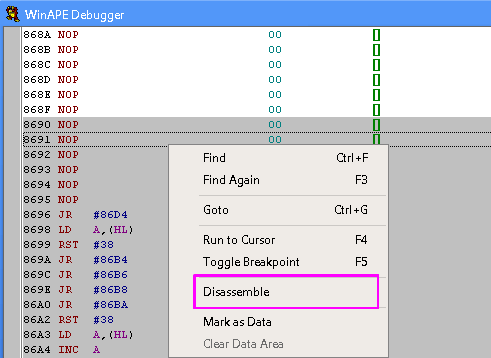
| If we open the winape debugger, the Disassembler is available on
the right click menu! |
 |
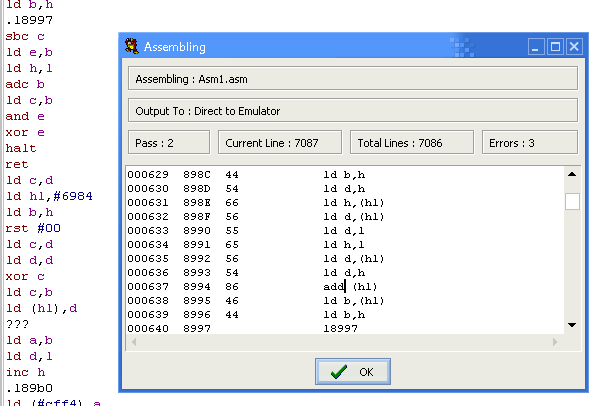
| Winape has disassembled the bytes into their equivalent source. Referenced addresses by the code have been given labels with the format .l{address} But there's a problem! Some lines appear as ??? and this won't re-assemble! Why? Well, those lines must be BYTE DATA, that has no equivalent OP code! We'll need to fix these before we disassemble. |
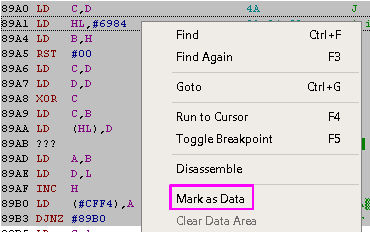
 |
| We will need to mark the problem areas as 'Data' This will cause them to disassemble to DB statements rather than ASM source. It may take a few attempts to get things right. If we mark too little as data, we will end up with an ASM source which won't assemble, or has nonsense commands which may confuse us! If we mark too much as data, we may find part of the functional code has been stored as a DB statement - that's not so bad though, as once we realize it (we'll see a JP or CALL to an address in that data block) we can disassemble just that part of the source and 'Patch it into' our dissasembly |
 |
Detecting Data!
If the two are 'mixed' We'll want to try to work out what is data, and what is source! Here are a few things to keep an eye out for!
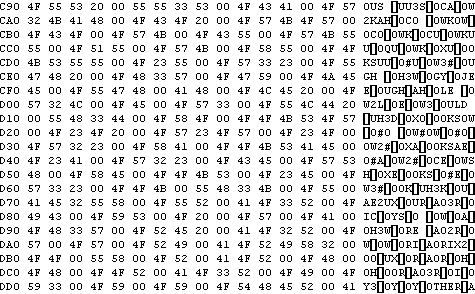
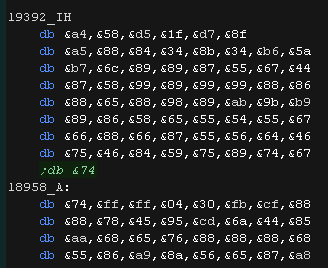
| This is very obviously data! We can see parts of words in it! But there's something else we can learn from this... it looks like parts of words, but they look kind of weird... 'OH3W' isn't a 'word' but maybe it's the phonetic pronunciation of one?... It looks like this is a table of data used to convert the speech we want to say into phonetics! This is something I would expect to see in a speech synthesizer. As well as the fact this area is data, we've now learned it's purpose, and if we see references to these addresses in the disassembled code we'll know they are doing some kind of phonetic conversion. |
 |
| Here is another block of very obvious data! We have lots of repetitions of the same values over and over again! It's very unlikely these are code - we can check that with the disassembly view to be sure. These 'Could' be bitmap data, but our program doesn't draw anything so it's not that! It does play sound samples though - so they could be some kind of wave data? (Spoiler... they are!) |
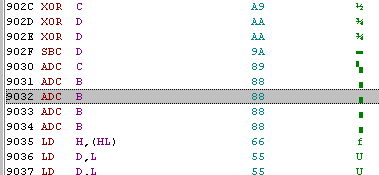
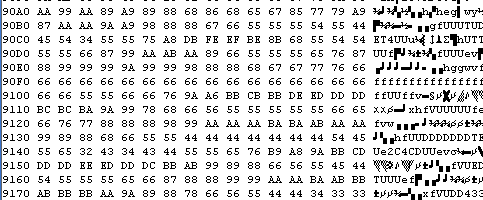 |
| Here is the disassembled code! we see "ADC B ADC B" - this is plausable, as adding a value twice to the accumulator could be a crude multiplication. But we also see "XOR D XOR D" ... The second XOR would undo the first, so it's not likely this is code! We also see "LD D,L LD D,L"... again, why would anyone do this, the second command has no effect! It seems almost certain this is data! |
 |
| We asked the program to say "I am a fish" We now see that converted to uppercase around area &9B00 We also see it's been converted phonetically around area &8710 We've learned some more useful things! 1. These areas contain data 2. The program has a 'preprosesssor routine that converts case' 3. The program stores the phonetically converted string in memory before speaking it |
  |
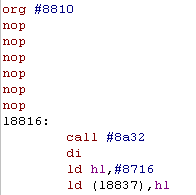
| Oh no! Our disassembly contains a call to an area we marked as
data! We know this because we're calling to a # address (# means hex like &) If we'd specified this address as code there would be a label and we'd see "call L8A32" We will need to 'redisassemble' that part of the code, and paste the disassembly of that part into our work in progress ASM file. |
 |
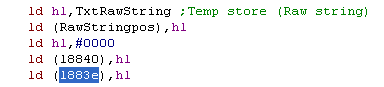
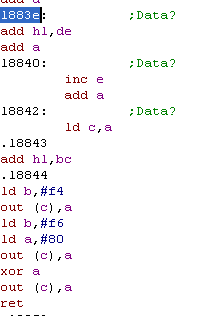
| Here we've found a command that writes &0000 to address l883e We thought that was ASM code, but maybe it's data? Writing &0000 certainly says data, but It could be tricky though... as our program may use Self Modifying code! (Spoiler: it does not) For now I've marked it as "Data?" as I'm not sure. Looking just a few lines down I see LD B,&F4 with an OUT, followed by LD B,&F6 and a OUT. We may think this is just 'data mis-interpreted as code' but I know it is not!... how do I know? because I recognize it as the command sequence used to set an AY sound register on the CPC.... We NEED to know what our code is likely to do if we are going to disassemble it's source. |
  |
Disassembly
| Once we have a disassembly we can reassemble and execute we need
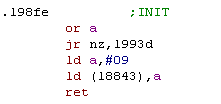
to start going through the code. We already know the INIT routine is at &98FE, so lets go label that up! Hmm... it writes the value 9 to L8843... no idea yet what that means - we'll worry about it later! |
 |
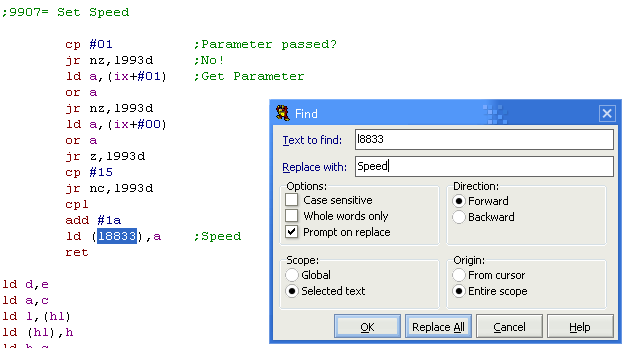
| We're pretty sure that address &9907 sets the speed of
playback. so lets label up that routine. I know the CPC uses IX to point to the parameter passed on a Call, and there's some 'checking and conversion' going on, but the final value is stored to L1883 - so that seems to be the 'Speed setting' Once we're sure (if we see it again later used for this purpose we should do a search and replace and give it a proper name! |
 |
| Once we know for certain what an address is we should use Search
and Replace to replace the L1234 type label with something
meaningful. I've used the string "RawStringPos' for one label, as I can see the words I typed in the memdump at this address, so I'm certain what it does! |
|
| Ok, lets look at the speech routine. We need to go through each line and try to work out what we think it does. We know we're processing text, so we need to lookup any written and compared values in an ASCII table to see how they relate to the character set. |
 |
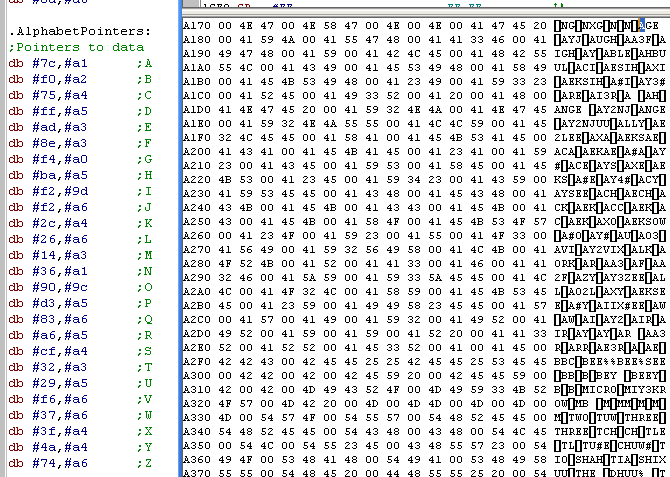
| Here we see a common trick! We've subtracted 'A' from the value in the accumulator, doubled it, and added it to an address (I've already labeled it as 'AlphabetPointers')... We then load two bytes from that address! What's this do? We'll it's clear to me simply because I've written the same kind of code many times before. This is loading an address from a table of pointers - the first entry in the table is the pointer for the letter 'A'. |
 |
| We can confirm this! Here is the labelled up table, and the memory!... we've seen it before, it's the Phonetic table we saw before! Each entry A-Z in the pointer table points to the first conversion starting with that letter. |
 |
| Here's an interesting one! I've already worked out ConvAddr is used to point to an entry in the Phonetic table used to perform a conversion. This code uses CPIR twice!... This isn't a command I've ever really used, but checking my documentation, it will scan from HL up to BC bytes until it finds A BC is set to &0000 - so it will scan up to 65536 bytes over both CPIRs XOR A is a quick way of setting A=0, so both CPIRs will search for 0. So this routine will update HL, looking for two concecutive 0 bytes. Looking at the phonetic table, each entry is separated by a 0, and it now seems that maybe the first is a 'before conversion' string, and the second is an 'after conversion' string.... So it seems this routine skips Before-After pair in the conversion table. |
 |
| That's
all we're looking at for disassembly! What you want more?.... MORE??? Sadly there really isn't much point, If you can't decipher the code by looking at it, then however 'part disassembled' examples like this you're shown won't help much. You're best bet is to practice writing little examples yourself, and looking at documented disassmblies... We'll look at the fully finished disassembly in a later lesson. |
|
|
There are two
kinds of optimization... optimizing for Size, or for Speed.
Usually we can only have one, as we can make our code faster by
using unwrapped loops and more specialized code, or smaller by
using more subroutines and reusing code where we can. |
| It
may be worth doing light optimization as we go along, but heavy
optimization is probably best done at the end of our project.
Optimization is likely to make our code harder to read, and
there's always the risk of bugs creeping in. Also it's not going to be possible to identify all the best optimizations to make before we know everything the code will finally contain. |
|
Easy Wins!
Here are some simple optimizations that it's always good to look out for, and can be made with little or no drawbacks! They don't really make the code much harder to read, and they are 'self contained' so it won't matter if our code changes later on!
| Before | After | |
| Always look out for JPs!... if the destination is nearby we can
change these to JRs and save a byte. |
 |
 |
| Here's two that didn't actually appear in todays source code, but
it's always good to look out for! LD A,0 is a two byte command - XOR A also sets A=0, but does so in a single byte. CP 0 is a two byte command setting the Zero flag if A=0, but OR A does the same thing in a single byte |
LD A,0 CP 0 |
XOR A OR A |
| Here is a common one we see in this code. Here we have a CALL, followed by a RET We can replace these with a JP (or JR) - This will save a byte of code, and result in a faster program, as calls use the stack, but jumps do not! |
 |
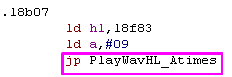  |
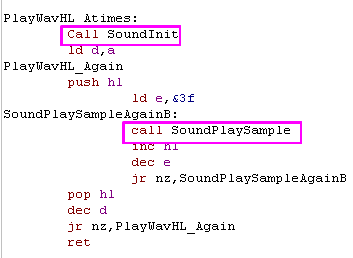
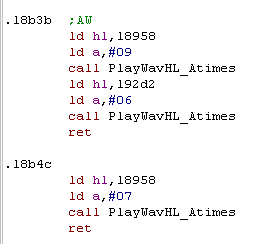
| This code calls "PlayWavHL_Atimes" as a sub... then returns! This wastes time and a byte, as "JP PlayWavHL_Atimes" would be smaller and faster, but in fact "PlayWavHL_Atimes" is right next to this code! Lets just remove the call altogether, and let execution 'Flow into' PlayWavHL_Atimes. |
 |
 |
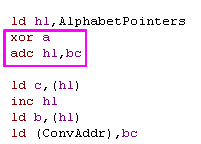
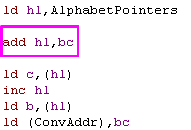
| Here's a strange one! It's common to see XOR A, SBC HL,BC ... This is because the Z80 has a 16 bit subtract with carry, but no 16 bit subtract. Here we see the same format, but with ADC... it's not clear why ADC is being used instead of ADD, so we'll replace the command, and save the 1 byte XOR. |
 |
 |
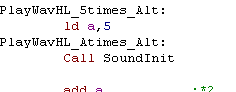
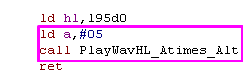
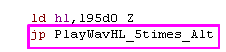
| There are several locations that call "PlayWavHL_Atimes_Alt" after
loading A with 5 Lets create a routine that sets A=5 before running PlayWavHL_Atimes_Alt. We can the Call or jump to this routine, and save all those extra two byte "LD A,5" commands! |
 |
 |
| Here we're loading A with 13 (&0D) then transferring it to
(HL) But HL (and HL alone) can do this in one command, saving a byte. |
 |
 |
| Here we've done the same!... by using HL instead of BC, we can
load the space into (HL) without an extra command |
 |
 |
 |
When optimizing your code, Test often!... and
backup too!!! You may think your changes have had no effect, but maybe you made a typo, or maybe a value in an apparently unused register causes a problem later in the code. |
Somewhat Harder Wins!
Some changes are worth doing at the end, but may not make sense if we
change our code later on.
For Example: Suppose we have a block of code that's used twice, we could
split out that code into a Subroutine, but what if we replace one of those
peices of code. Now that sub makes no sense, as a subroutine that's only
called in one place does not save any code.
| Before | After | |
| The code had a subroutine to detect if HL was at the end of a
string (called AtEndOfString in my disassembly) However this sub was only called once!... as there was no benefit to it being a sub, we've merged it into the original code to save space and speed. |
 |
 |
| Here we load HL with &0000, then D with 0. We've checked our code, and E is unused... so Lets use DE for both jobs! |
 |
 |
| Here we have two pieces of code that do almost the same thing! the C register is spare in this code, so lets set that to 1 or 2, so we can use the same block of code for both jobs. |
 |
 |
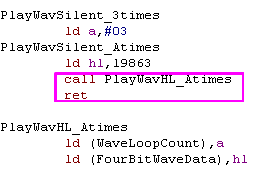
| There are two wave playing routines. "PlayWavHL_Atimes" and
"PlayWavHL_Atimes_Alt' The Alt version changes the pitch, but 80% of the code is the same. Lets break that code out into subroutines that are shared by both versions. This will also help us port the code to other systems! |
 |
  |
| Many parts of this code end with "ld
(HLSwitchToggle),a pop af ret" This is a 5 byte sequence... A JR would only be 2 bytes, so lets 'share' this sequence between all these routines. |
 |
 |
| The Soundinit routine used to store the address and speed in
memory. With a bit of stack use, we don't need these memory variables, and can just store them in HL and A... saving variable ram and a few bytes of code |
 |
 |
| After taking a look at the code, It's clear that the sample
playing routines always play 63 bytes. Once all the WAV samples have been labeled up there is some 'Extra Data' that is never used! It does nothing so lets get rid of it! In fact, if we're really sneaky, we can organize the samples, and remove the odd byte, as if the last byte or two of one sample, are the same as the next, they can 'share' those bytes! |
 |
 |
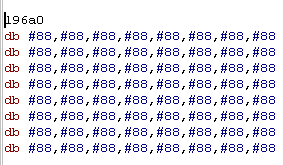
| There are two WAV samples that are just a single byte repeated 63
times! This an OUTRAGEOUS waste of 126 bytes - and cannot be tolerated! |
 |
 |
| BUG ALERT! If the character in the source string is a Space or number a special phonetic conversion is used. It would be expected the code would load the address of the conversion table, however it actually loads a pointer to the address of the conversion table... which is never de-referenced. There is also a 'limiter' on the conversion attempts (INC D) - a maximum of 255 bytes, but this makes no sense, as the last conversion is a 'catch all' which just keeps the original character. I suspect this 'catch all' was to work around the bug. We've fixed the bug, and removed the limiter. |
   |
  |
| Other optimizations not shown here! 1. There was a block of space in the middle of the code - this has been removed. 2. The Uppercase version of the string, and phonetic version were stored at two different fixed addressees. The phonetic one is now stored immediately after the converted one, using ram more efficiently. 3. There were 3 prep routines: Get String Length, Convert to Uppercase,Get Last Char.... these have been merged into a single routine. |
Win hard 2 - win harder!
| Before | After | |
| It's time for the hardest of optimization wins! The sample playing code decides which sample, or samples to play based on the characters in the phonetic string. Sadly in the un-optimized code this is a massive set of 'CP JP' Combos, followed by a series of calls We could easilly save a few bytes by changing a few JPs to JRs and CALL+RETs to JPs... and maybe making a "PlayWavHL_6times" sub which sets A to 6 before calling PlayWavHL_Atimes But there's a more extreme and powerful solution! Lets create a table of conditions and actions, and a 'Sequence player'... kind of like a virtual machine, which will perform the compare, and perform one of various actions depending on the matched character.... The format for the comarison table is: 1. A comparison byte 2. An action byte (the delay value for A, and player to use, or defining the address as a jump/sequence) 3. An address (A jump, Sequence or single sample) The sequences also use a similar command byte. and an address to a wave sample. The code is long, but gives a significant saving in space! |
  |
   |
The results:
Original example 8302 bytes...
Optimized version 6453 bytes... a 22% reduction
With no reduction in functionality!
| As
a modern hobbyist it may seem easy to be critical of the
'inefficiency' of the original code, but it's important to
remember two things. 1. We have much better tools now, we can assemble and test in seconds with modern emulators. On a real machine if a change caused a crash, the time taken to assemble test reset and reload could be ten minutes! 2. Projects are always built to requirements, If a commercial project's goal was to be completed by monday so it could be sold for $15 a copy in a magazine ad, the ONLY priority is it works well by monday, not how big or 'well written' it is... If the code works already, and spending more time on it will earn no more money, then it doesn't make sense to do so! |
 |
| Lesson
M19 - speech synthesizer! (Part 3/4) Lets take a look at the source for the speech synth. This time we'll look at the phonetic conversion routines. |
 |
 Speech_Final.asm
|
 |
Globals
| We need some bytes of ram for various parameters, We also need enough 'temp space' around 2x the length of the string we want to say at 'TxtRawString' One is the 'cleaned string' - uppercase with a few char tweaks. The other is the 'phonetic string' which is used to play the sound samples |
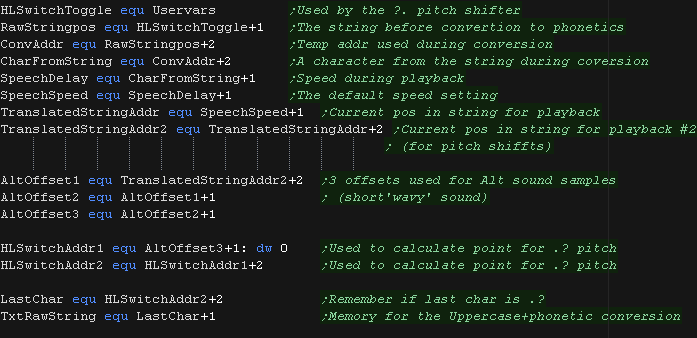 |
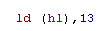
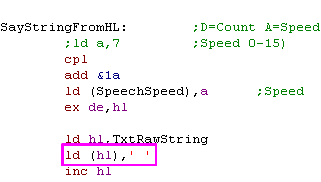
| When we want to speak, we use SayStringFromHL We load A with the speed We load HL with the zero terminated string we want to say. |
 |
The pre-converter
| First we convert the speed in A into something we can use. it's used as a 'delay' so needs to be in the correct range for the sample playback code |
 |
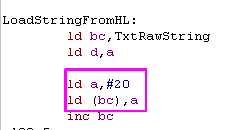
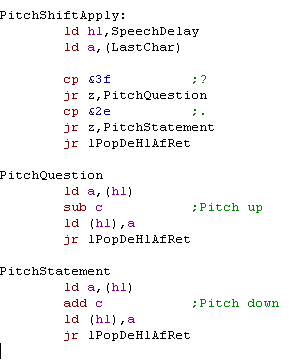
| We're going to copy the passed string into 'TxtRawString' This first scan copies the string to our temp area, it also ensures the string starts with as 'space' and ends with a chr 13 We record the 'LastChar' - we tweak the pitch of sentences ending ? or . |
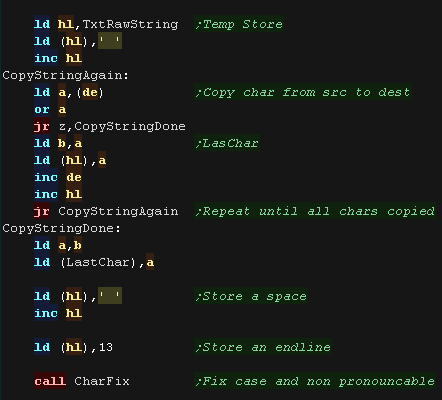 |
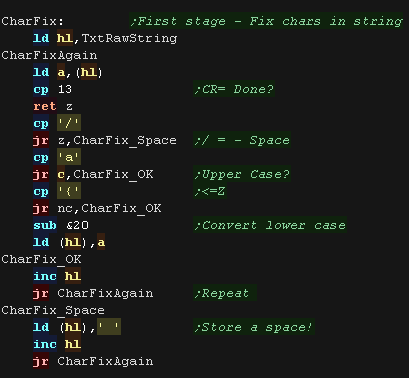
| We need to clean up the string. We remove / - this has a special meaning to the phonetic converter. we convert lower case to upper case. |
 |
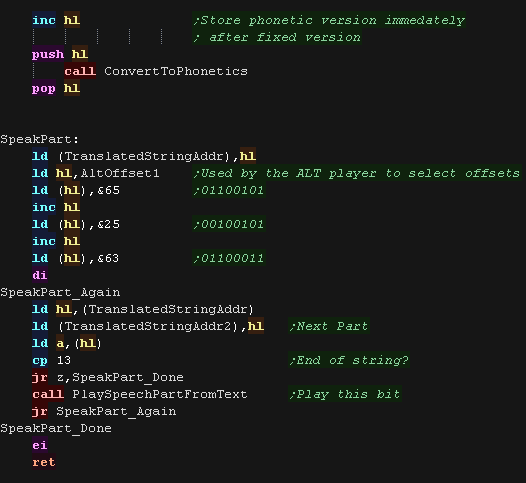
| Next we convert the string to phonetics that our wave player can
play 'SpeakPart' Plays all the samples to form the speech |
 |
The phonetic converter
| We need to convert our string
from: I AM A CPC, YOU ARE A WORM.YOU WILL BOW TO MY Z80 SUPERIORITY. into phonetics like: IY4 AEM AE SEE PEE SEE, YUW AA3R AE WER3M.YUW WIHL BOW TUX3 MIY ZAYD AY3T IY SUX2PEE3RIHAORIYTEE. |
|
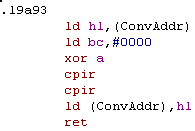
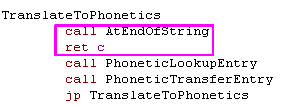
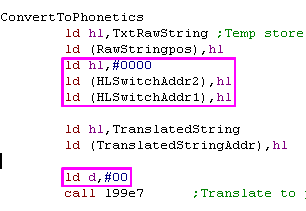
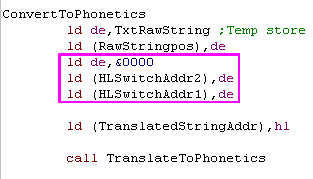
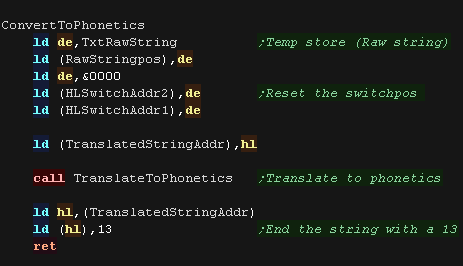
| We init some of our vars , and run TranslateToPhonetics This converts the string We then tag on a CHR 13 to the end of the string. |
 |
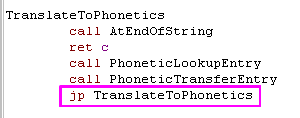
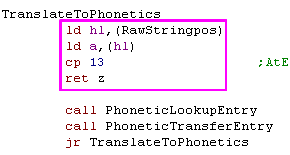
| TranslateToPhonetics repeats until it comes across a CHR 13 |
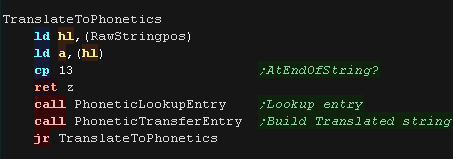 |
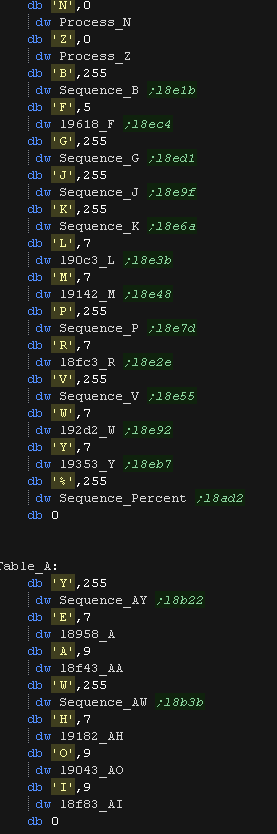
| We're going to try to find a conversion. We have a lookup table (LUT) by letter to point to the entries in the phonetic conversion table Entries are in pairs, separated by zeros. |
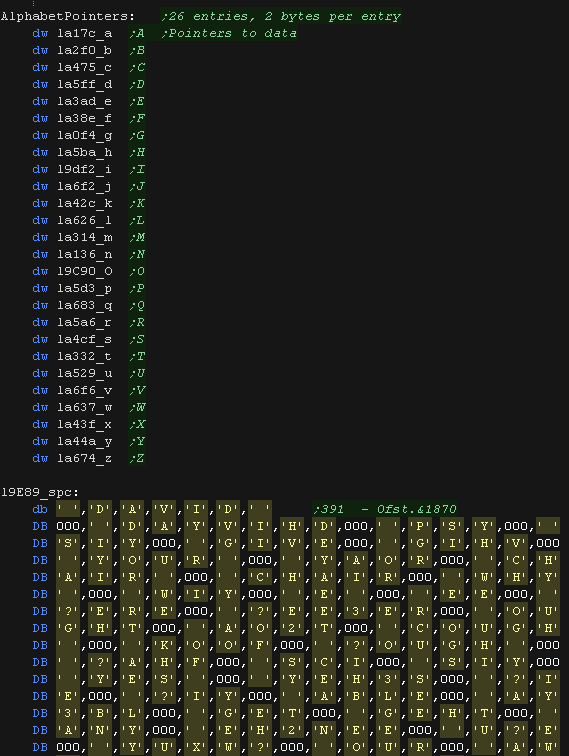 |
| We load in a symbol from our string, if it's a letter we convert it from A-Z into an offset 0-25. We multiply it by two and load the address we want to start scanning for a phonetic match. |
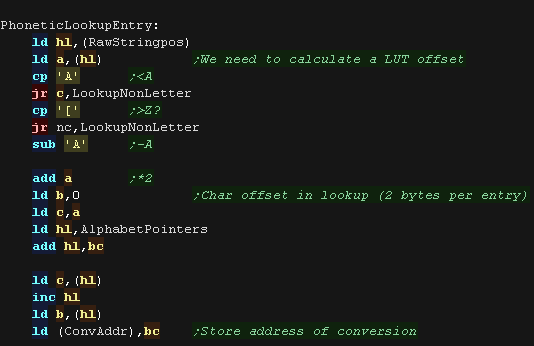 |
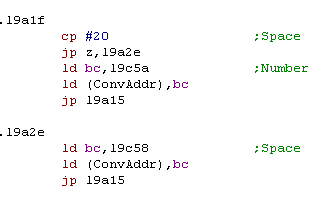
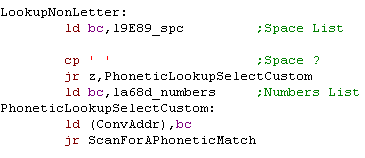
| We have two special sections of the table if we find a space (for whole words) or a number |  |
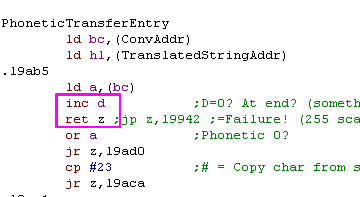
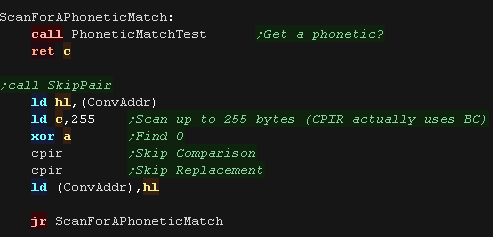
| PhoneticMatchTest will see if the next entry is ok, it
returns C if the match is right NC if it's no good We skip over a no good match by using CPIR twice, this skips 2 zero bytes ahead. |
 |
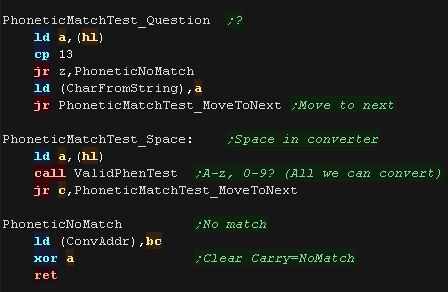
| We read in the next character in the conversion. If we get a space we test the source string if we get a ? we use char from the source string we repeat through the characters of the string |
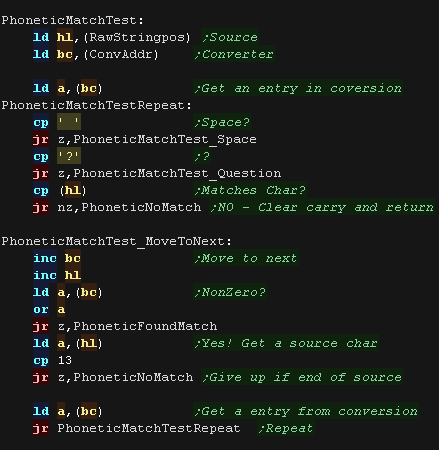 |
| Here are the handlers for '?' and ' ' If no match is found we point BC to the next entry in the lookup to consider |
 |
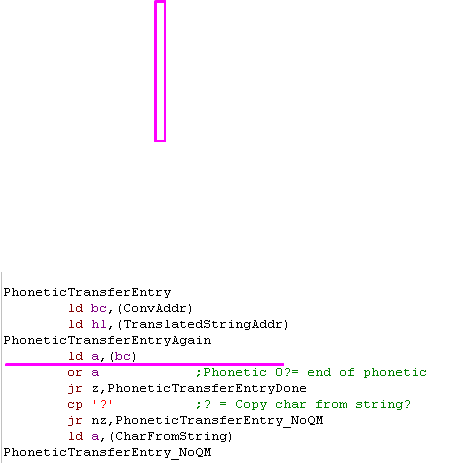
| If we've found a valid match, we update BC and HL to point to the
part of the string we want to phonetically transfer |
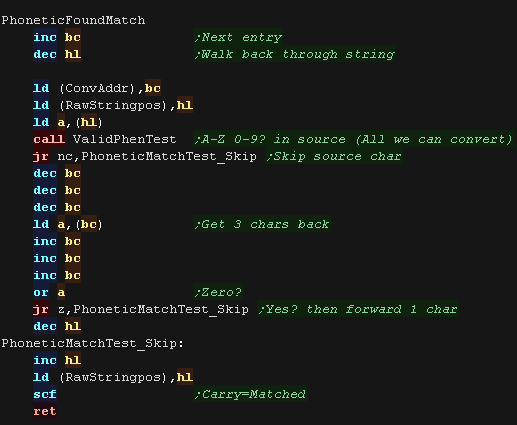 |
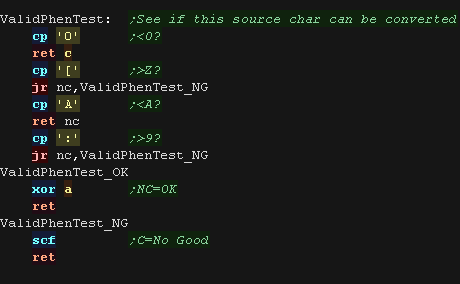
| ValidPhenTest will thest the character in the source string, and
see if it's a valid for phonetic conversion C= no good NC=ok |
 |
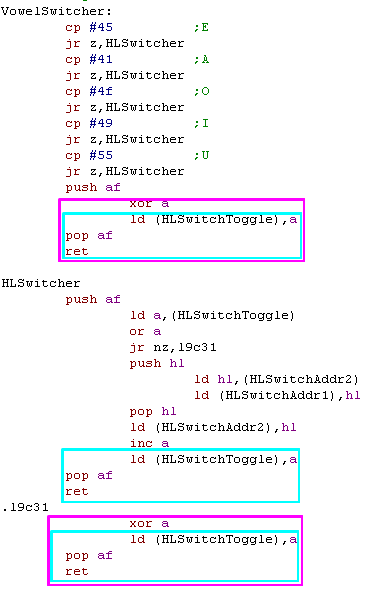
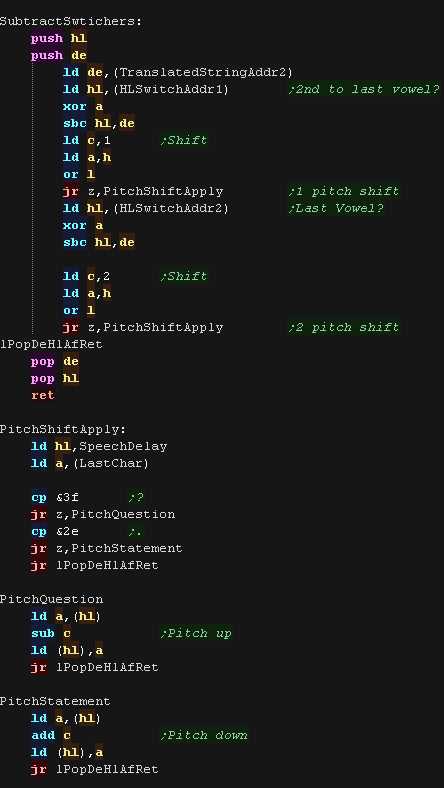
| If we've found a good conversion, we transfer the converted string ? is a special case, it copies the character 'as is' from the sourcestring Vowels are processed specially - we need to track the last two for the pitch change of a string ending ? or . |
 |
| VowelSwitcher Checks if the letter is a vowel, if it is it keeps track of the last two addresses of vowels, so when the speech is playing back the pitch can be changed if required | 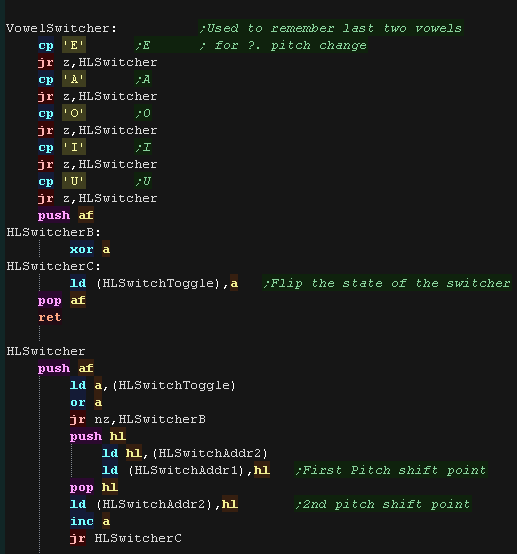 |
| Lesson
M20 - speech synthesizer: Sample playback! (Part 4/4) Lets take a look at the source for the speech synth. This time we'll look at the Sample selection and playback routines. |
|
Speech_Final.asm
|
|
Our source data
| We have already converted our text into a
'phonetic representation' in memory, as shown below: IY4 AEM AE SEE PEE SEE, YUW AA3R AE WER3M.YUW WIHL BOW TUX3 MIY ZAYD AY3T IY SUX2PEE3RIHAORIYTEE. |
|
| The speech needs to be made up of 'wave samples' These are 4 bit per sample uncompressed PCM samples which make the sounds which will build up the speech |
 |
Platform specific playback
| Most of the code is multiplatform, however there are some small
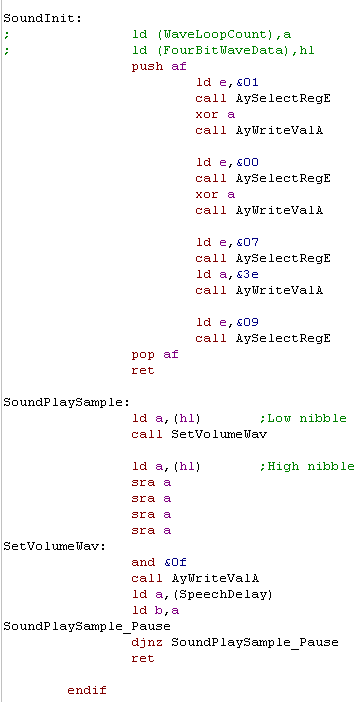
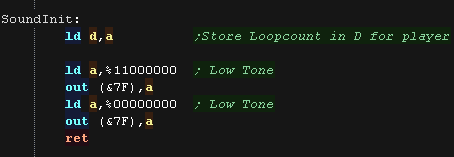
platform specific parts to handle the specific hardware We have an INIT routine to set up the hardware to be able to play the samples. On the SMS we set the tone pitch to LOW We also have to transfer A to D - this is the loopcount for the sample used by the player. |
 |
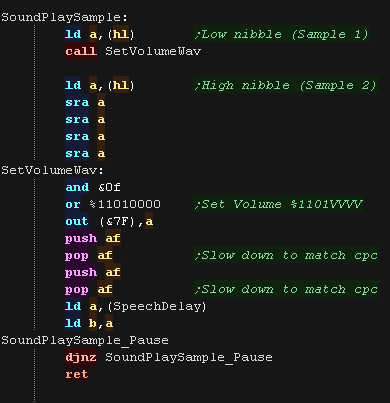
| SoundPlaySample will play a single byte (2 samples) The first sample is in the high nibble, the second sample is in the low nibble. These are effectively the volume we need to set to play the sample. on the SMS we send these to port &74 after setting the top 4 bits to %1101 - this selects the 'volume setting' |
 |
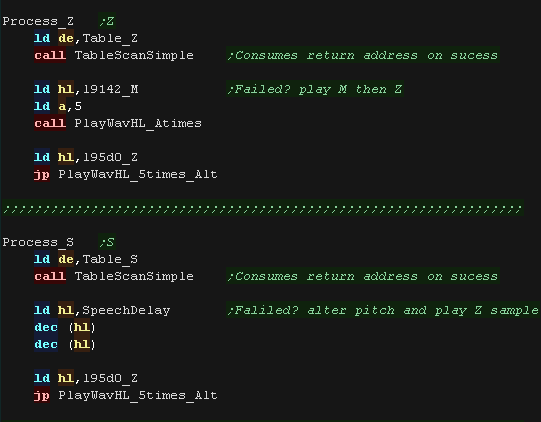
| SpeakPart Will repeatedly 'speak' the text in the phonetic string, until a newline is found | 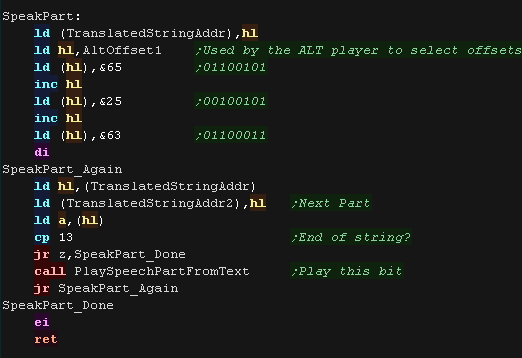 |
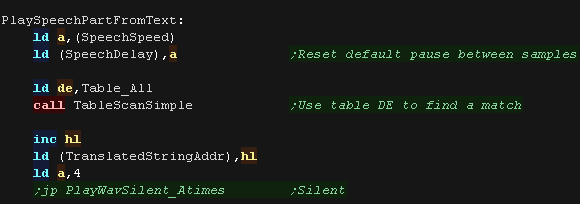
| We're going to try to find a sample to play for the next letter in
the string, we use 'TableScanSimple' to do this. If we can't find a sample we'll give up and play the generic 'silent sample' |
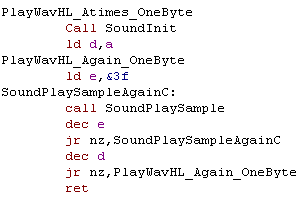
 |
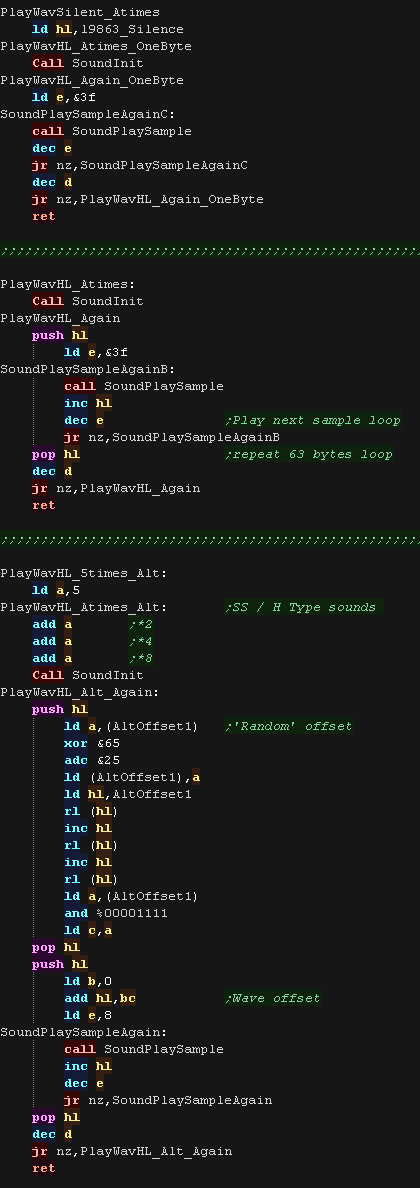
| We have 3 possible sample routines. PlayWavHL_Atimes_OneByte uses just one byte at address HL - it's used for TTTT and silent sounds PlayWavHL_Atimes is the 'normal' routine, it plays 63 bytes of samples from HL PlayWavHL_Atimes is a bit odd, it uses part of a sample with a 'random offset' it makes, it makes a kind of 'distorted' sound and is used for a few sounds like 'SH' |
 |
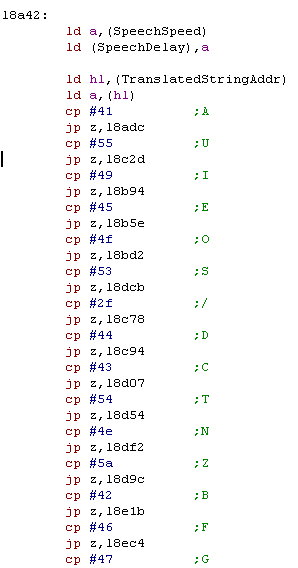
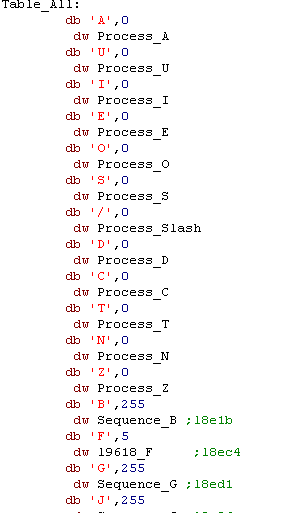
The comparison table
| Originally the code contained a huge case statement of CP and JR Z
statements. This wasted a lot of code memory, so has been replaced
with a loop and a matrix of characters and actions. Each entry is 2 bytes and 1 word. The First byte is the Letter Comparison, if this matches the other 3 bytes are used. The 2nd byte is the Repeat count , or command The 3rd/4th bytes are a 16 bit address The table ends with a 0 letter comparison byte. There are 2 types of command 0 performs a branch to the address in bytes 3/4 255 plays a 'sequence' at the address in bytes 3,4 Any other command byte is a loop count 1-15 uses the normal sample player +16 uses the 'Alt sample playback. |
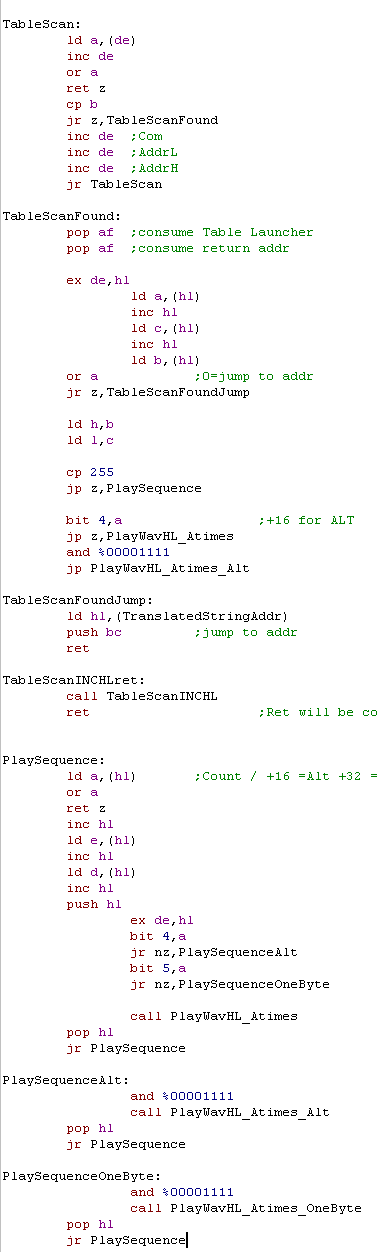
 |
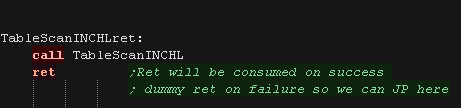
| The tablescan routine performs the comparison to B if no match is found it will return to the caller - if a match IS found it does NOT. if a match is found we won't return, we also consume the return address of the sub which called us (as it's job is done). We play the sample if the delay/command is not 0 or 255 if it's 255 we play a Sequence at the address parameter if it's 0 we do a jump to the address parameter |
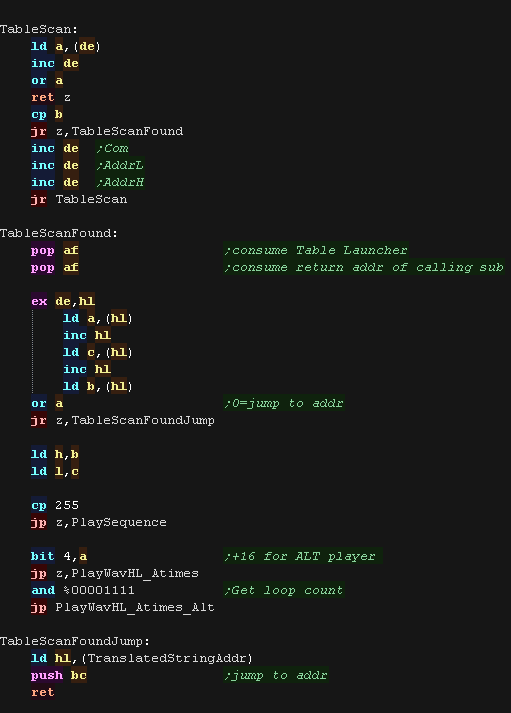 |
| To make the TableScan easy to use we have some 'helper subs' We also have 'ProcessDigitDelays' - When a number is found in the string it alters the playback pitch by -4 to +5 |
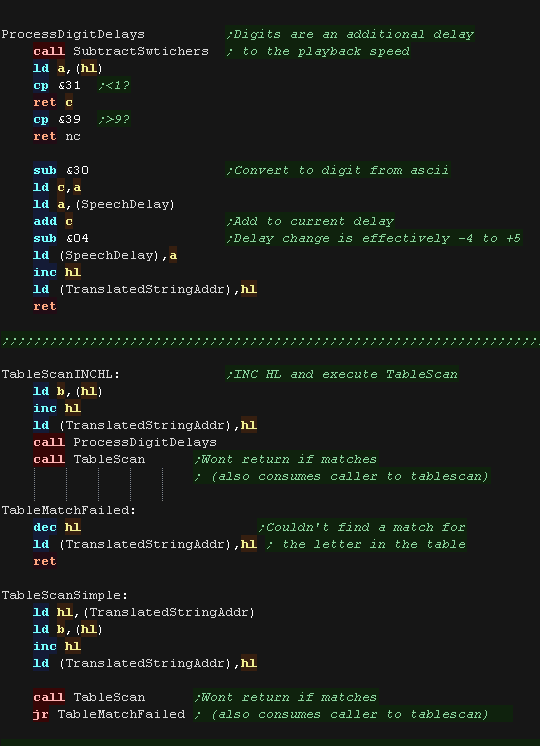  |
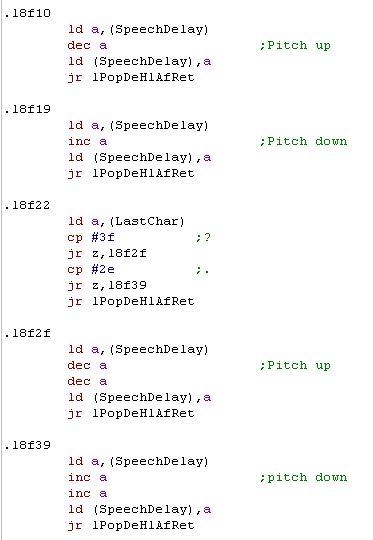
| ProcessDigitDelays also executes SubtractSwtichers This checks if the current character is one of the last two vowels. if the last character is a ? or . we change the pitch of these vowels. We detect if we're at one of these chars by subtacting the address of the vowel from the current address, if the result is zero, we'lre on the vowel... we do this twice. |
 |
| We use the Tablescan routine to select samples based on the next
character. The scan will return if nothing was found, meaning we can perform 'default actions' |
 |
|
Remember, this
lesson is based on Disassembled code, not something the author
wrote themselves. It's questionable if PlayWavHL_Atimes is worth using, but it's here simply because that's how the original program worked! Optimizations and changes have been made, but only to reduce size, not where it would reduce the function of the program. |
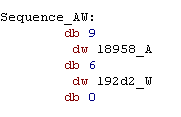
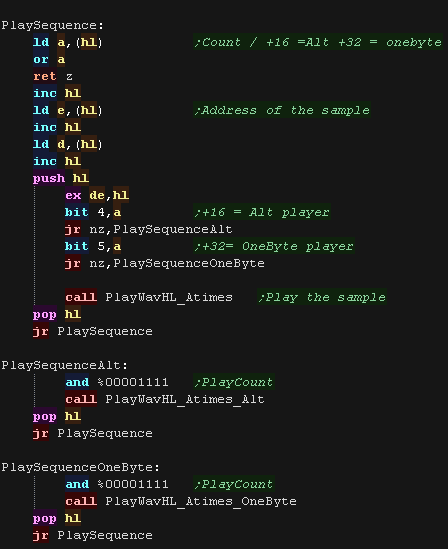
Sequence player
| Many times we need to play a
combination of sounds to make the sound of a phonetic. To reduce the number of Calls and Loads, we define a sequence table. The First byte is the 'Loop Count' (0=end of sequence) 1-15 uses the normal sample player +16 uses the 'Alt sample playback. +32 use the 'onebyte playback' The 2nd and 3rd bytes are the address of the sound sample. |
 |
| The PlaySequence routine works through the table, calling the
correct play routine for each sample |
 |
| View Options |
| Default Dark |
| Simple (Hide this menu) |
| Print Mode (white background) |
| Top Menu |
| ***Main Menu*** |
| Youtube channel |
| Patreon |
| Introduction to Assembly (Basics for absolute beginners) |
| Amazon Affiliate Link |
| AkuSprite Editor |
| ChibiTracker |
| Dec/Bin/Hex/Oct/Ascii Table |
| Alt Tech |
| Archive.org |
| Bitchute |
| Odysee |
| Rumble |
| DailyMotion |
| Please note: I wlll upload more content to these alt platforms based on the views they bring in |
| 68000 Content |
| ***68000 Tutorial List*** |
Learn 68000 Assembly  |
| Hello World Series |
| Platform Specific Series |
| Simple Samples |
| Grime 68000 |
| 68000 Downloads |
| 68000 Cheatsheet |
| Sources.7z |
| DevTools kit |
| 68000 Platforms |
| Amiga 500 |
| Atari ST |
| Neo Geo |
| Sega Genesis / Mega Drive |
| Sinclair QL |
| X68000 (Sharp x68k) |
| 8086 Content |
| Learn 8086 Assembly |
| Platform Specific Series |
| Hello World Series |
| Simple Samples |
| 8086 Downloads |
| 8086 Cheatsheet |
| Sources.7z |
| DevTools kit |
| 8086 Platforms |
| Wonderswan |
| MsDos |
| ARM Content |
| Learn ARM Assembly |
| Learn ARM Thumb Assembly |
| Platform Specific Series |
| Hello World |
| Simple Samples |
| ARM Downloads |
| ARM Cheatsheet |
| Sources.7z |
| DevTools kit |
| ARM Platforms |
| Gameboy Advance |
| Nintendo DS |
| Risc Os |
| Risc-V Content |
| Learn Risc-V Assembly |
| Risc-V Downloads |
| Risc-V Cheatsheet |
| Sources.7z |
| DevTools kit |
| MIPS Content |
| Learn Risc-V Assembly |
| Platform Specific Series |
| Hello World |
| Simple Samples |
| MIPS Downloads |
| MIPS Cheatsheet |
| Sources.7z |
| DevTools kit |
| MIPS Platforms |
| Playstation |
| N64 |
| PDP-11 Content |
| Learn PDP-11 Assembly |
| Platform Specific Series |
| Simple Samples |
| PDP-11 Downloads |
| PDP-11 Cheatsheet |
| Sources.7z |
| DevTools kit |
| PDP-11 Platforms |
| PDP-11 |
| UKNC |
| TMS9900 Content |
| Learn TMS9900 Assembly |
| Platform Specific Series |
| Hello World |
| TMS9900 Downloads |
| TMS9900 Cheatsheet |
| Sources.7z |
| DevTools kit |
| TMS9900 Platforms |
| Ti 99 |
| 6809 Content |
| Learn 6809 Assembly |
| Learn 6309 Assembly |
| Platform Specific Series |
| Hello World Series |
| Simple Samples |
| 6809 Downloads |
| 6809/6309 Cheatsheet |
| Sources.7z |
| DevTools kit |
| 6809 Platforms |
| Dragon 32/Tandy Coco |
| Fujitsu FM7 |
| TRS-80 Coco 3 |
| Vectrex |
| 65816 Content |
| Learn 65816 Assembly |
| Hello World |
| Simple Samples |
| 65816 Downloads |
| 65816 Cheatsheet |
| Sources.7z |
| DevTools kit |
| 65816 Platforms |
| SNES |
| eZ80 Content |
| Learn eZ80 Assembly |
| Platform Specific Series |
| eZ80 Downloads |
| eZ80 Cheatsheet |
| Sources.7z |
| DevTools kit |
| eZ80 Platforms |
| Ti84 PCE |
| IBM370 Content |
| Learn IBM370 Assembly |
| Simple Samples |
| IBM370 Downloads |
| IBM370 Cheatsheet |
| Sources.7z |
| DevTools kit |
| Super-H Content |
| Learn SH2 Assembly |
| Hello World Series |
| Simple Samples |
| SH2 Downloads |
| SH2 Cheatsheet |
| Sources.7z |
| DevTools kit |
| SH2 Platforms |
| 32x |
| Saturn |
| PowerPC Content |
| Learn PowerPC Assembly |
| Hello World Series |
| Simple Samples |
| PowerPC Downloads |
| PowerPC Cheatsheet |
| Sources.7z |
| DevTools kit |
| PowerPC Platforms |
| Gamecube |
| Work in Progress |
| ChibiAndroids |
| Misc bits |
| Ruby programming |
Buy my Assembly programming book
on Amazon in Print or Kindle!


Available worldwide!
Search 'ChibiAkumas' on
your local Amazon website!
Click here for more info!


Buy my Assembly programming book
on Amazon in Print or Kindle!
Available worldwide!
Search 'ChibiAkumas' on
your local Amazon website!
Click here for more info!
Buy my Assembly programming book
on Amazon in Print or Kindle!
Available worldwide!
Search 'ChibiAkumas' on
your local Amazon website!
Click here for more info!
Buy my Assembly programming book
on Amazon in Print or Kindle!
Available worldwide!
Search 'ChibiAkumas' on
your local Amazon website!
Click here for more info!
Buy my Assembly programming book
on Amazon in Print or Kindle!
Available worldwide!
Search 'ChibiAkumas' on
your local Amazon website!
Click here for more info!
Buy my Assembly programming book
on Amazon in Print or Kindle!
Available worldwide!
Search 'ChibiAkumas' on
your local Amazon website!
Click here for more info!
Buy my Assembly programming book
on Amazon in Print or Kindle!
Available worldwide!
Search 'ChibiAkumas' on
your local Amazon website!
Click here for more info!
Buy my Assembly programming book
on Amazon in Print or Kindle!
Available worldwide!
Search 'ChibiAkumas' on
your local Amazon website!
Click here for more info!
Buy my Assembly programming book
on Amazon in Print or Kindle!
Available worldwide!
Search 'ChibiAkumas' on
your local Amazon website!
Click here for more info!
Buy my Assembly programming book
on Amazon in Print or Kindle!
Available worldwide!
Search 'ChibiAkumas' on
your local Amazon website!
Click here for more info!
Buy my Assembly programming book
on Amazon in Print or Kindle!
Available worldwide!
Search 'ChibiAkumas' on
your local Amazon website!
Click here for more info!