

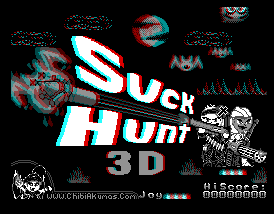
Suck
Hunt 3D - Stereoscopic Op Wolf / Duck hunt parody!
Introduction to the SH Series...
| Suck Hunt is a little fun game I created in 2020. I had been
doing some experiments with 3D
and
the SMS Lightgun.
|
 |
| The Game supports multiple 'colors' of 3D glasses, and the depth
of the 3D effect can be changed, it can even be turned off for
boring people! It is controlled with Mouse/Lightgun where available or Joypad During development the game got a bit out of hand, and scrolling, multiple enemies and weapons were added, so a parody 'Operation wolf' introduction was added! (Including speech sample!) The game has 4 weapons, you can reload by shooting offscreen with the lightgun, shooting the HUD, or using fire 2/space... Reloading a full weapon switches to the next weapon.  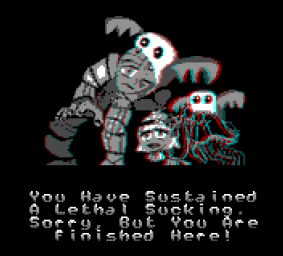 |
  |
| Merchandise available! You can buy a 'suck hunt' T-shirt or mug from my Teespring store if you want to support my content! Get the game! You can download the game from the website here! |
 |
Constants and Data definitions
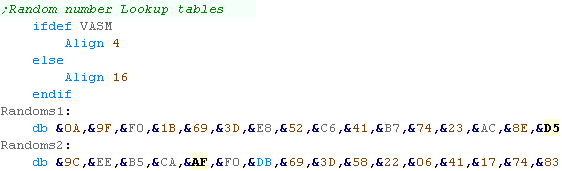
| SuckHunt uses the same Random number
generator as Yquest and Photon. It uses two lookup tables. |
 |
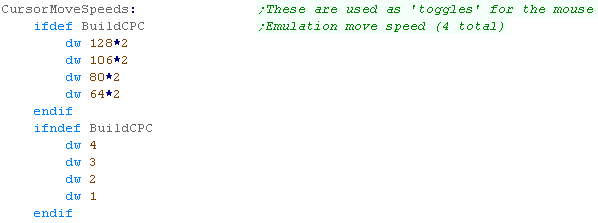
| There are options for Cursor move speeds -
these are for when the game is controlled by a joypad rather than
mouse. There are 4 - each is 2 bytes, and the values need to correspond to the mouse routine of the platform. |
 |
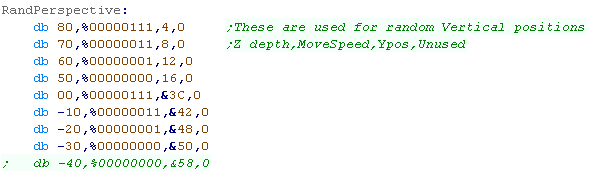
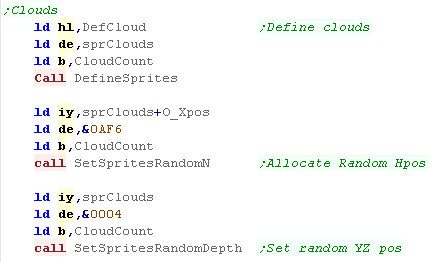
| Some objects like clouds and grass will need a random
'depth'... The 3d Depth, Move speed and Vertical position
need to all match to make the parallax effect work. We have a lookup table to do this. |
 |
| SuckHunt uses ArkosTracker 1 for its music... but Chibisound for
its SFX... I extended Chibisound with a new 'Sound Sequence' routine... which automatically plays a set of timed sounds. |
 |
| The game has 4 guns, and the player can switch between them at
will! We need two variables per gun.. total bullets available (in magazine) and total loaded bullets (in gun) |
 |
| The 4 guns have various properties that
define them. These are defined in a fixed array. |
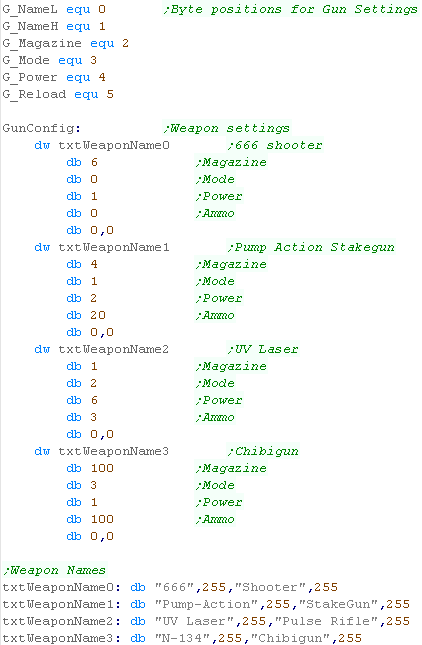 |
| We need some text strings for screen
elements, We also need the 'game over' text... which is a parody of the 'Operation Wolf' end sequence! |
 |
| Like my other games, SuckHunt uses Binary Coded Decimal for it's scores... when we want to add a value, we need to point to a matching BCD sequence with the amount to add. |  |
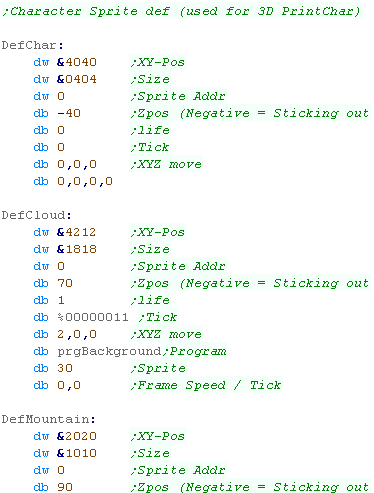
| Objects in the game are enemies, clouds and
any other drawn sprite. Each object is define by 16 bytes, that define it's 3d position (Z affects the 'size' and 3d depth), movement, bitmap source, life, movement speed and more. even the font is an object... though just one 'object' which is re-programmed for each character. '3D Sprites' have 3 different scales (Large, Medium and Small) - each has 2 frames of animation... this is used for the bats in the game which get closer to the screen. |
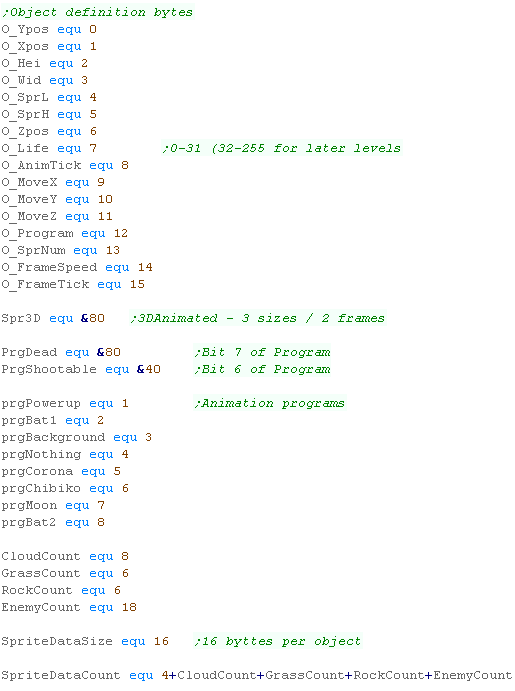 |
| The object state is held in RAM, but there are template object definitions in the data area here. Some of the settings are configured during LevelInit, as things like speed and life are relative to the current level. |
 |
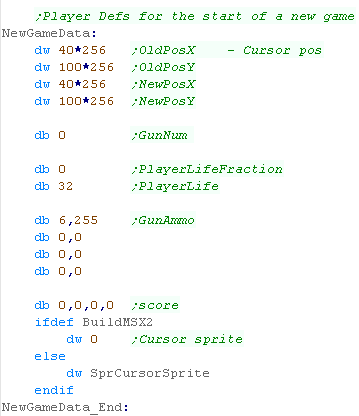
| The objects are reset every level, but there is also a 'Game
data' block which handles the player settings like Ammo and
Score. This is initialized from the template shown. |
 |
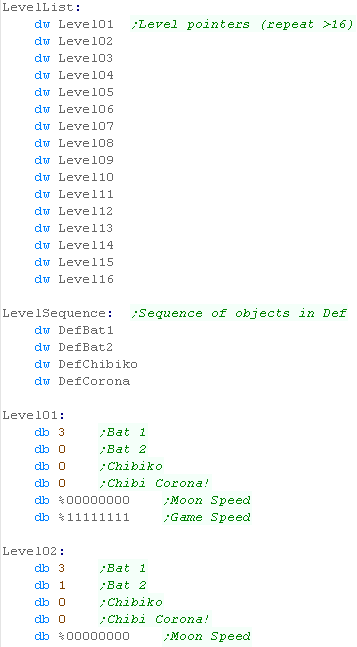
| The game has 256 levels, but only 16 are
'defined'... The rest are procedurally generated by upping the
speed and life of the first 16 Each of the levels defines the quantity of each of the 4 enemy types. The 'Moon Speed' is effectively the level length - as the nightends when the moon crosses the sky. The 'Game Speed' is how fast the enemies move |
 |
Ram Definitions
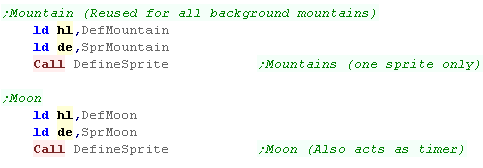
| The Game needs 16 bytes per sprite object definition. We need one object per cloud,grass enemy and also one for the moon, powerup etc. Note there is only one sprite for the mountains, as they don't actually animate! |
 |
| There are a variety of other vars: Bak3d is used to back up some self modifying code when the stereoscopic engine is turned off HiScore is the BCD high score CursorY, CursorX and CursorZ are the 3d position for the next character RandomSeed is the seed for the random number generator FireHeld is used to register keypresses for the machine gun (continuous fire) FireDown is used to detect a click - used for fire FireHeld2 handles the second fire FireDown2 is used to detect a Fire2/Rightclick - used for reload GameSpeed is the movement speed of the game Tick is used to calculate frequency of object movement - it just increases in a loop PaletteNum The colors of the 3D glasses Depth3D is the stereoscopic separation LevelNum is the level number (night number) ScreenEdgeSpawnPos is the position objects appear (either far left or right depending on scroll direction) CursorMoveSpeed is the movement speed as a 16 bit number CursorMoveSpeedNum is the number of the selected move speed (0-3) SoundSequence is the address of the current playing sound sequence SoundTimeout is the time remaining of the current Chibisound byte SoundPriority is the priority of the current sound - lower priority sounds will be ignored OldPosX, OldPosY are the last drawn cursor pos NewPosX,NewPosY are the current cursor pos GunNum is the selected gun number (0-3) PlayerLifeFraction is the partial life units used (0-255) PlayerLife is the visible life units (0-32) GunAmmo is an array of the ammo for each gun, (2 bytes per gun) Score is the BCD current score CrosshairSprite is the current sprite graphic for the cursor - it changes depending on the selected gun. |
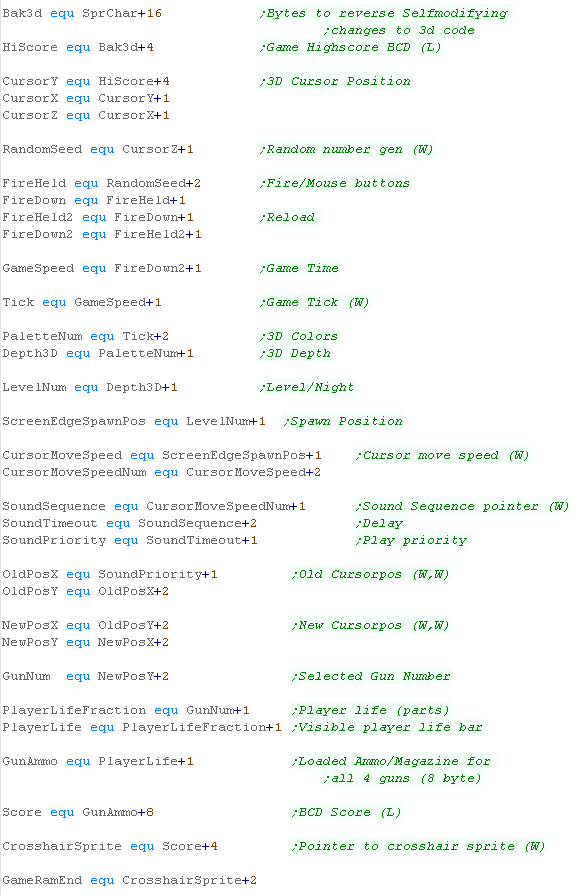 |
 |
Note:
All these addresses are relative to the base address
'UserRam'... this is so the RAM data can be located where
ever free ram exists on the target platform. So the game can work on ROM machines, this is the only writable data, The is no self modifying code or altered data within the other areas of code. |
Random Number Generation
| Suck hunt uses the same random number generator as Yquest, It
produces repeatable 16 bit random numbers
from a 16 bit seed. To assist in this it uses two 16 byte Lookup tables. |
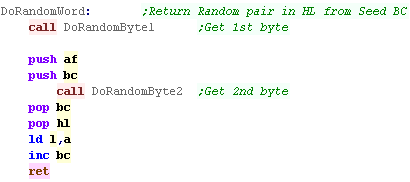 |
| The First byte is generated by using the two byte seeds, with rotations and Xors | 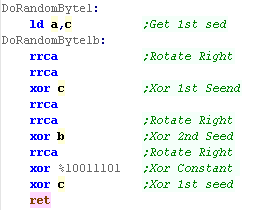 |
| The second byte is produced by using the lookup tables, and the result of the first generator. | 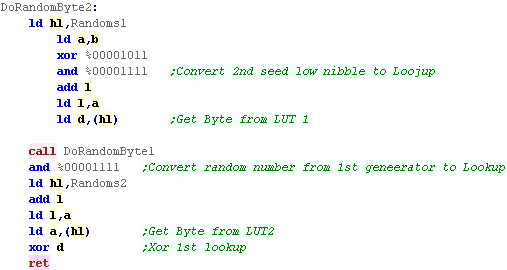 |
| Y quest only uses single byte random numbers, so we use a simple 1 byte generator DoRandom, which autoincs it's seed. |  |
 |
Of course, a
one byte generator could have been used, However this 16 bit one had already had extensive testing while developing Yquest to ensure it produced good random numbers. |
Using Random numbers
| Sometimes we need a value between a high and low range... DoRangedRandom will do this for us. | 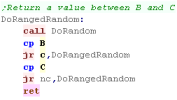 |
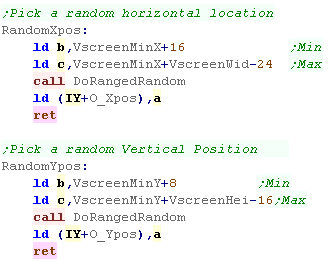
| We use this to produce new random 'positions' on the horizontal
and vertical axis... this is used for initializing background
objects, and spawning new enemies A pointer to the object we want to reposition will be in IY |
 |
Showing the score
| The score is shown in the corner of the screen. There's a "Score:"
title above it. |
 |
This drawing is done in two stages... the actual score is stored in Packed Binary Coded Decimal... 4 bytes give 8 digits. |
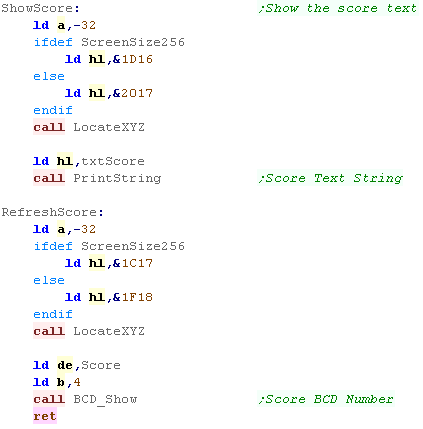 |
| We also have 'Apply Score'... This adds score to the players current score. | 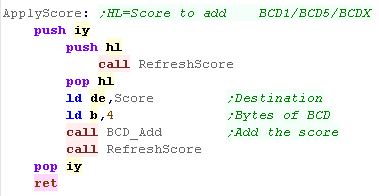 |
Range Checking
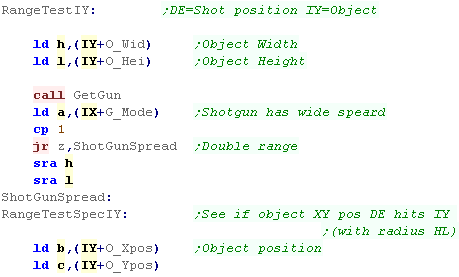
| We will need to check whether the player has 'shot' an enemy. To
do this we compare the shot position to the location of object
pointed to by IY. Weapon 1 is a 'Shot gun' this has twice the range of the other weapons |
 |
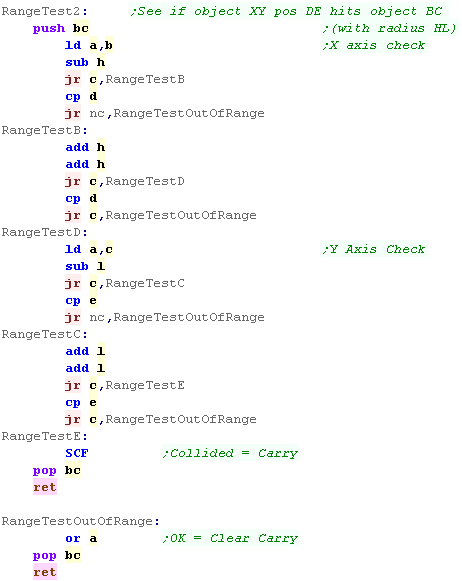
| Once we've got the position of the shot and the player, we compare
the two and see if they are within our specified range. We set the Carry if the two collided and clear it if they didn't |
 |
| Lesson
SH3 - Gun Routines Suck hunt has 4 guns, each of which has it's own ammo level. Lets take a look at the code which handles them. |
 |
 See
SuckHunt
folder
|
 |
Showing the gun details
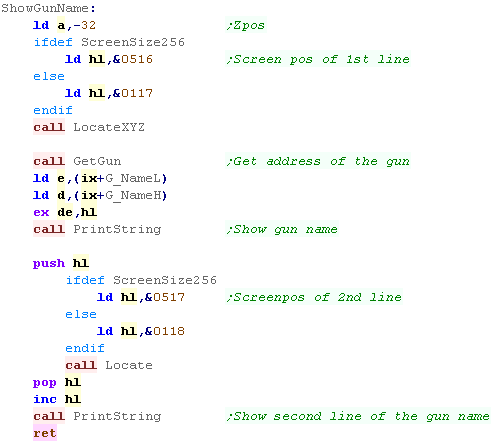
| The Gun name is shown at the bottom left of the screen, the icon for the gun and the bullets loaded / remaining are in the middle | |
| We need to show the text of the gun name. The name is shown in two parts on two lines of the bottom left. We select the location of the first line, specifying a 3D X,Y,Z position We then use 'GetGun' to get the IX address of the currently selected gun - we use this to get the address of the first line of text. We then show the two lines to the screen. |
 |
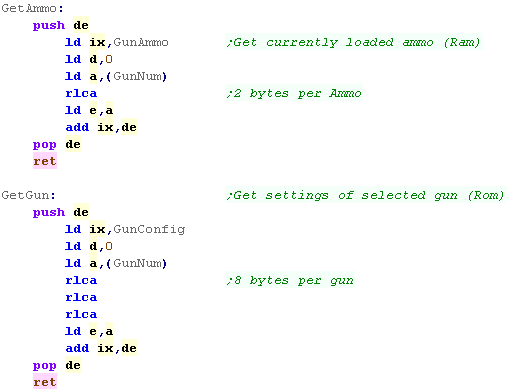
| We have 2 functions to get the details of the current gun. GetGun gets the fixed attributes of the weapon, the name, sprite and ammo details GetAmmo gets the current players ammo levels, how much ammo is loaded into the gun, and how much the player has in total. |
 |
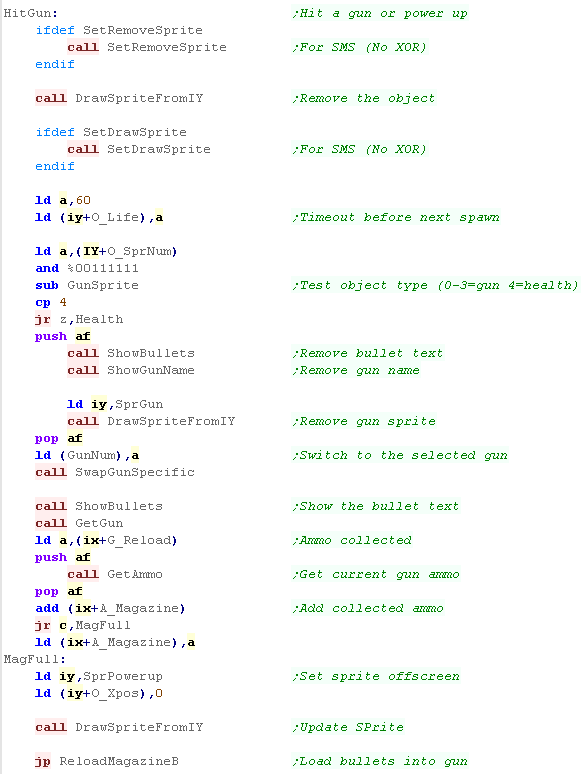
| Lets reload the gun! First we 'show' the current bullets - as our graphics routines are XOR, this effectively removes the current bullet count. Next we need to check how many bullets can be loaded in the gun - Reloading a full gun switches weapon. Ok - the gun isn't full, but we need to check if we should load a full clip - or just part of one. We calculate the number of bullets, add them to the gun, and update the visible bullets. |
 |
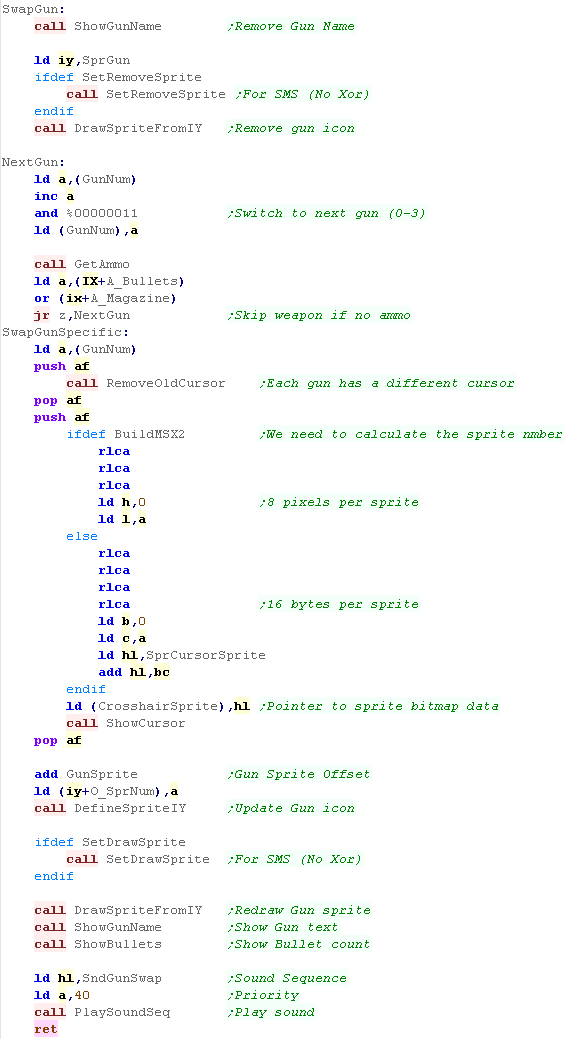
| The user wants to swap the gun, First we use our XOR to remove the old text and icon for the gun. Next we switch to the next possible gun - only guns which have ammo can be selected. Each gun uses a different cursor sprite, we need to select it. We then draw the new Gun sprite, and ammo status. |
 |
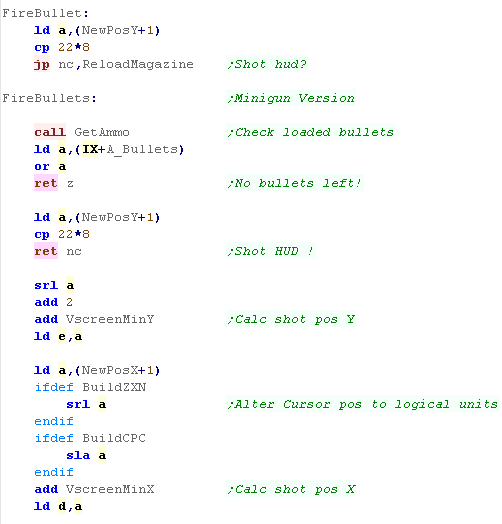
Firing the gun!... Pow!
| The Player wants to shoot! We check if the payer has no bullets left, and return Z if they dont. Next we check where the player shot, if they shot the HUD, then we need to reload - we return C if they don't. Our next stage is to adjust the cursor position into logical game units. |
 |
| Ok, the player can shoot, so we down the bullets. We now check each object in the game, and run "TestSpriteIY" for all the ones that are alive and shootable. |
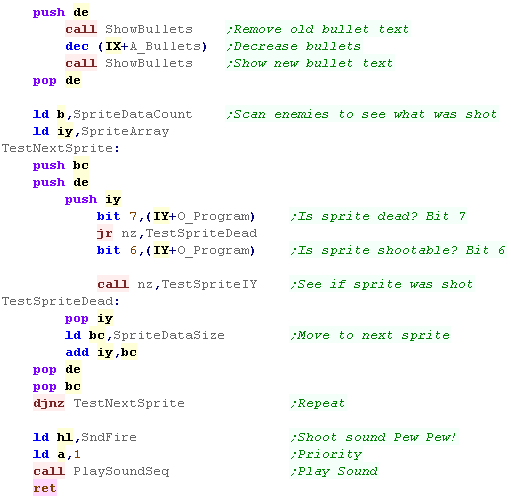 |
| We use 'RangeTestIY' to see if the player shot an object. We now check the object program and run the object hit code. |
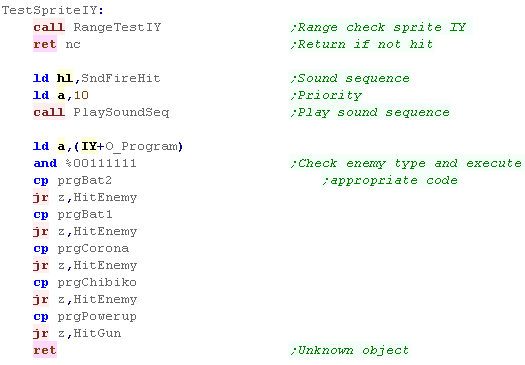 |
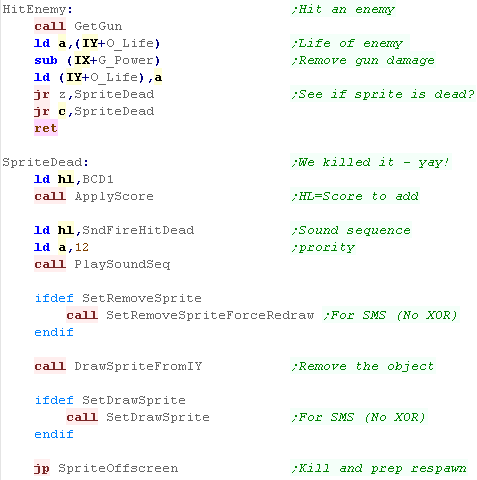
| The player has hit an enemy... we reduce the life of the enemy by
the gun power. If the enemy is dead, we run the 'SpriteDead' code The sprite dead code gives the player some score, removes the sprite from screen, and runs the 'SpriteOffscreen' routine, which re-initializes the sprite for respawn in the future. |
 |
| If the player shot a gun, we add the ammo to the gun, and set it
as the currently selected gun. The 'gun' could also be a 'health' powerup (the same object handles both) |
 |
| The health power up adds 8 to the current life bar, assuming the life bar isn't already full. | 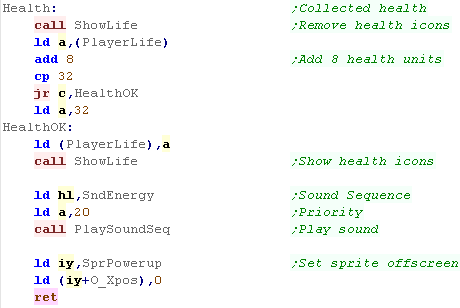 |
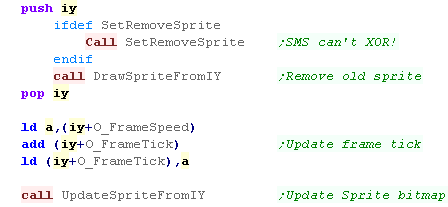
| You'll notice that there's
special code for the SMS called 'SetRemoveSprite' and
'SetDrawSprite'. This is because the SMS cannot do XOR, so we need to set the sprite routines to 'blank out' the old sprites. |
|
| Lesson
SH4 - More Graphics routines Lets take a look at more parts of the multiplatform suck hunt code! |
|
See
SuckHunt
folder
|
|
The Life bar
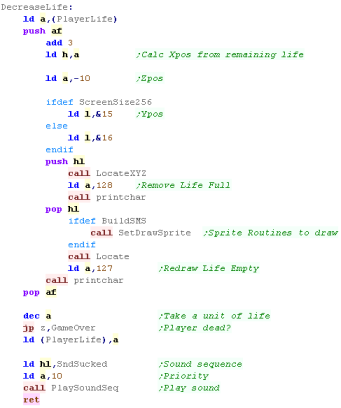
| Our "Decrease life" routine will update the
display, removing one unit of life. First we calculate the screenpos of the last unit of life, and draw the "Full life" sprite - as it's an XOR routine this removes one block. Next we redraw the "empty life" sprite in the same position. We now remove 1 from the players life, jumping to the gameover routine if the player is dead. If the player is still alive, we make the 'hurt' sound |
 |
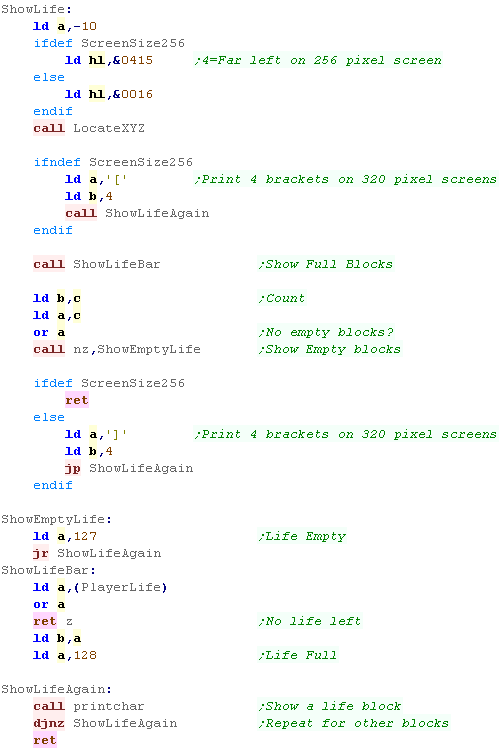
| The "Show Life" routine will show the complete life bar, on
systems with a 320 pixel wide screen, the 32 block life bar has 4
[[[[]]]] brackets on each side. Strips of blocks are drawn with the "ShowLifeAgain" routine, this is used first to draw left brackets, then the full blocks, then the empty blocks, and finally the right brackets, |
 |
The Bullet Count
| The bullet count is shown in the centre. There are two lines. The top line is the text label. The bottom line shows "Loaded / Total" bullets onscreen. |
 |
Draw Cursor
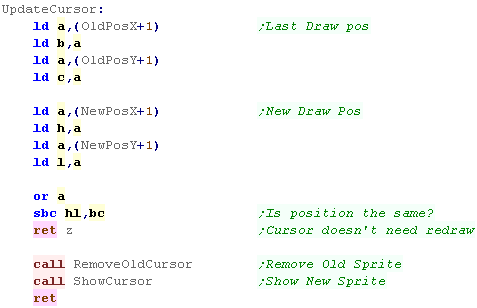
| The drawcursor routine will check the current and last cursor
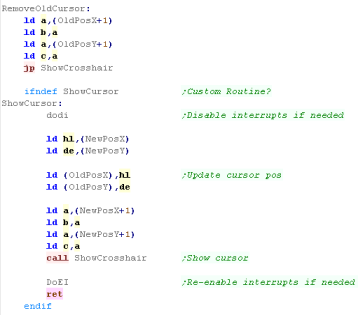
position to see if the cursor has moved, If it hasn't we return. If the cursor has moved, we first use 'RemoveOldCursor' to take the sprite off the screen, then draw the new cursor position |
 |
| If the cursor has moved, we first update the old position value. Next we take the top byte of the 16 bit xy address and use 'ShowCrosshair' to do the drawing - this is a platform specific module. Note: Some platforms override this ShowCursor routine in entirety. |
 |
Repaint Screen
| After a clear screen or level start, we need to repaint the whole
screen. The "Repaint screen" function does this, calling all the routines that are needed to draw an entire screen. |
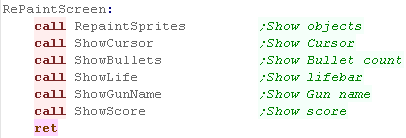 |
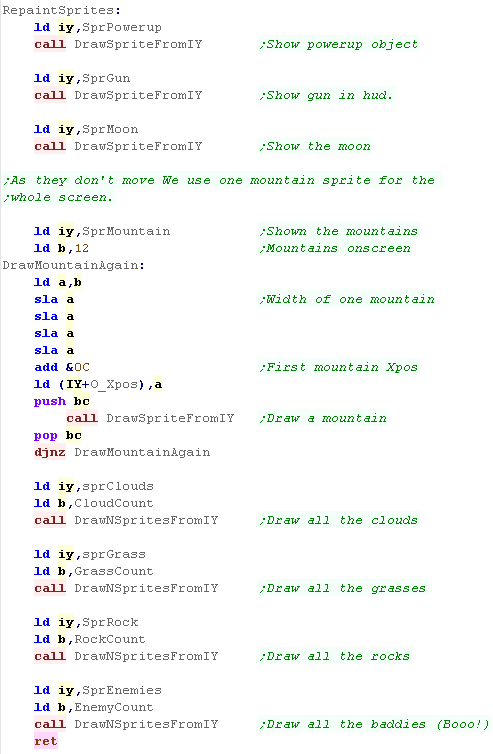
| For each type of sprite, we use a generic DrawSprite(S) routine,
which will show one or more sprites to screen. The special case is the mountains... there are 12 mountains onscreen, but as they never move, we use a single sprite object to draw all of them, moving it after each. |
 |
Sprite Cropping
| Our game uses 'Virtual screen co-ordinates'... these are effectively half the pixel resolution of the screen... so the CPC has a visible 'virtual screen' of 160x96 (320x192 pixels) - there is an 'offscreen area' of 48 logical units on the left and right of the virtual screen. This is to allow a sprite can be partially onscreen. | 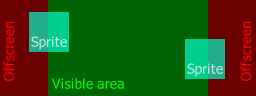 |
To calculate the settings for the crop we use the DoCrop function. This takes an X,Y position in B/C, and a Width,Height in IXL/IXH First we Subtract the 'Start' of the visible screen (Xpos 48 in logical units)... if the sprite is partially offscreen we store the amounts that we need to remove from the Left and Right in IYH/IYL |
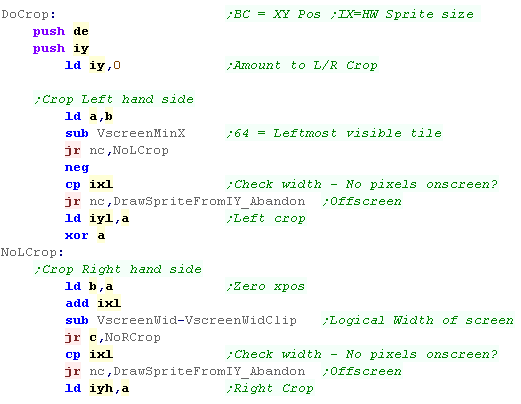 |
| Once we've calculated the crop amounts we need to apply them. "SpriteHClipPlus2" is the amount of bytes to skip from each line during the draw. All sprites are 2bpp (4 pixels per byte) so we use "SRL A" to halve the logical units. We need to turn on this cropping routine with "GetNextLineWithClip" We also need to update the Width, removing any units removed from the left or right of the screen. We also update DE - which contains the starting address of the sprite data of the sprite we want to show. |
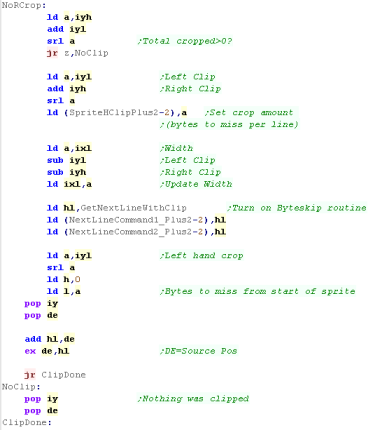 |
| We now need to convert the 'Logical Units' into the co-ordinates
our platform specific routines will need. Once we're doing we clear the carry flag - this reports there is data to draw. If the entire sprite was offscreen we set the carry - to tell the calling routine to give up drawing the sprite. |
 |
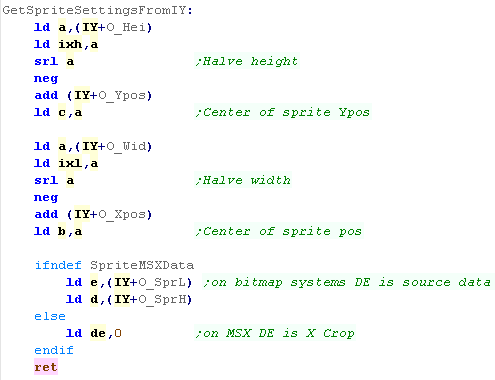
Sprite Settings
| We use IY as a pointer to the sprite we're working with GetSpriteSettingsFromIY will read in the settings of the sprite, and process them for sprite drawing |
 |
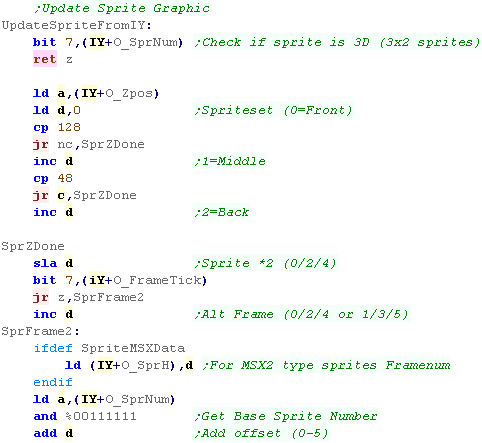
| UpdateSpriteFromIY will update the
sprite animation frame and scale. A 3D sprite has 2 frames of animation at 3 different sizes (Large1/Large2/Mid1/Mid2/Small1/Small2) This routine uses DefineSpriteIY to update the bitmap source |
 |
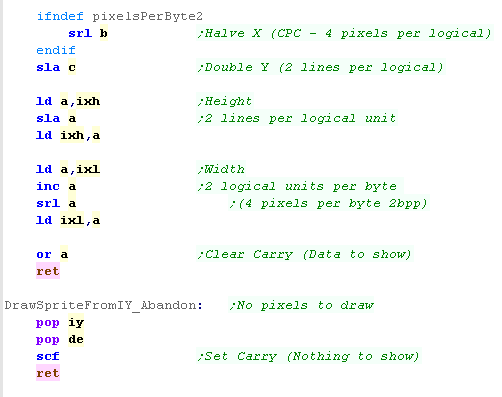
| DefineSpriteIY will read in the data source and sprite size from
SpriteInfo. The Width and Height are in pixel units in SpriteInfo, so we halve them into logical units. |
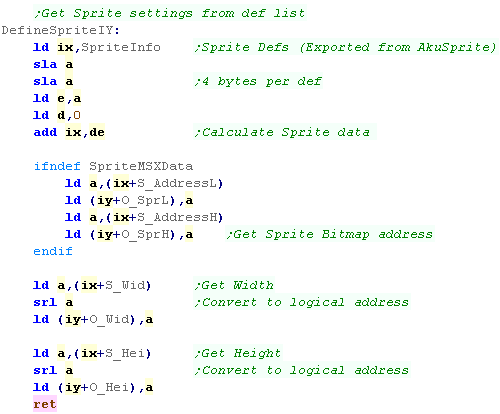 |
| SpriteInfo is a bank of data which contains the pixel sizes and addresses of the sprites | 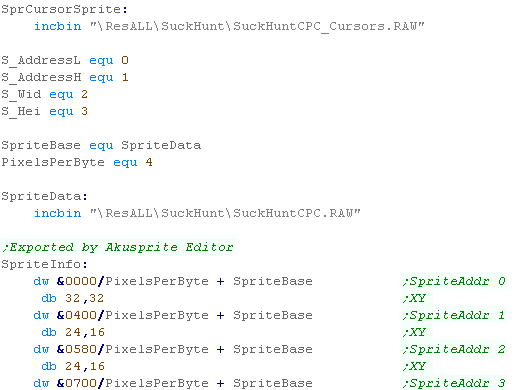 |
| SpriteInfo is exported straight out of AkuSprite Editor! |  |
Sprite Initialization
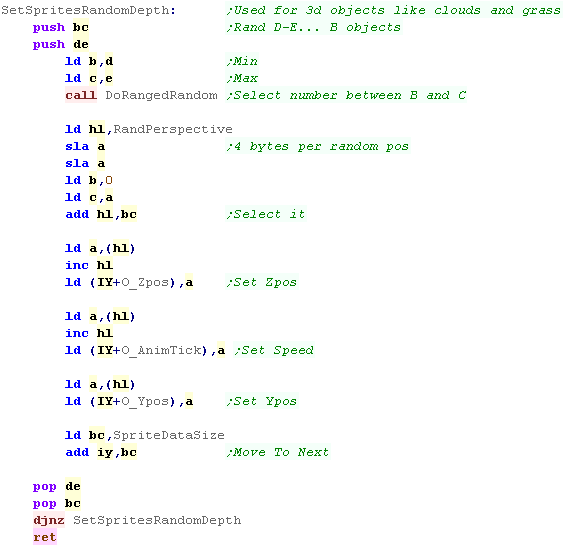
| Sprites like clouds and Rocks need 3 matched elements to give them
'parallax depth' - a Ypos, a move speed and a 3D Zpos. We probably want these to be synced , or a rock in the background could move faster than a rock in the foreground! We use the 'RandPerspective' lookup to match all these values |
 |
| Sprites like Vampire bats will need a random X and Y pos, we have a function to do this! | 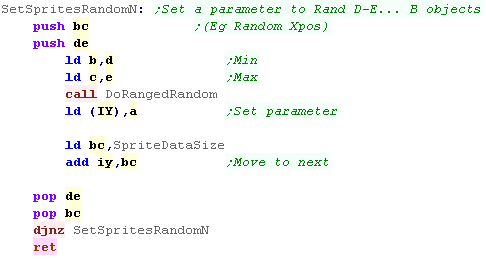 |
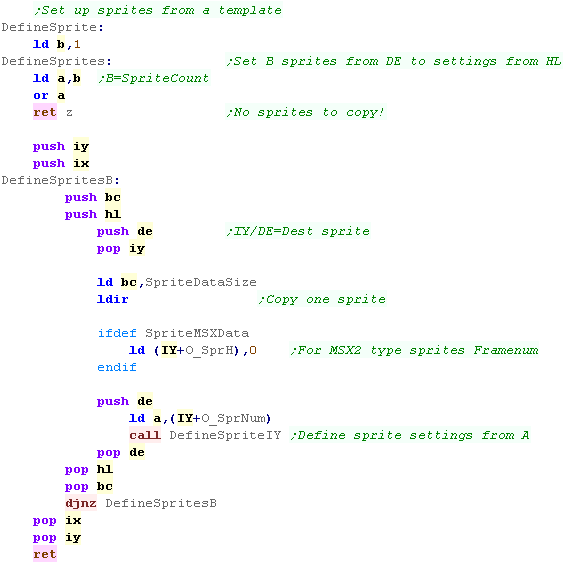
| Although some settings will be random, we'll want most of our
settings to match a 'template' We have a function to do this. We point DE to the RAM data for the sprite... HL to the template, and B is the sprite count - so we can define lots of rocks or clouds in one go. |
 |
Drawing a sprite
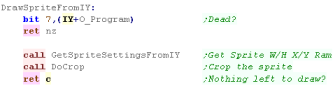
| DrawSpriteFromIY will show a
sprite object pointed to by IY. First we check bit 7, if it is 1 the sprite object is 'dead' and should not be shown. Next we get the size and position of the sprite with GetSpriteSettingsFromIY, and perform the cropping. If the carry is set we return, as the sprite is entirely offscreen! |
 |
| Ok we need to show the sprite!... To make the 3d image, we draw the 2 images. |  |
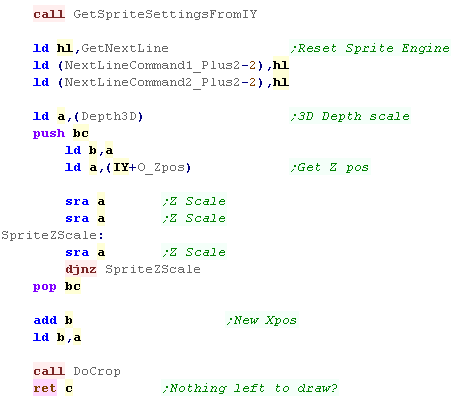
| First we calculate the VRAM address and draw the left image with
ShowSpriteL... the Left eye (Red) This is 'Platform specific' - there's a different version for each system (We'll look at them in a later episode) |
 |
| We need to shift the horizontal position for the Right hand
sprite.... this is how we create the 3D effect. We load the Zpos, and halve it a few times (the smaller the offset, the less the 3d effect) we add this zpos to the Xpos, and this is the new horizontal position to draw the Right eye (Cyan) We run our cropping routine with the new position |
 |
| We show the right hand sprite, then reset the sprite routine for next time. | 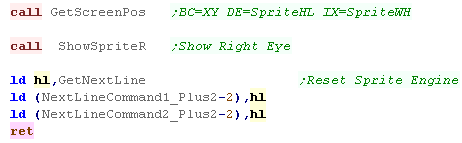 |
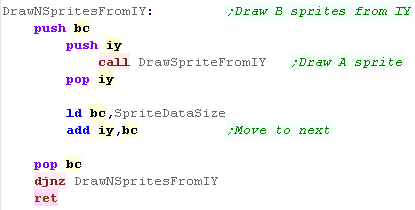
| There will be times we need to show multiple sprites, for example
all the clouds. DrawNSpritesFromIY will do this, showing B sprites starting from IY |
 |
Character routines
| Suck hunt uses the platform specific sprite routines to draw
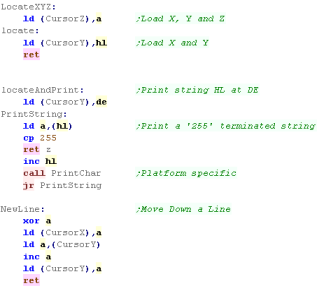
characters, so the font is also 3D, with X,Y and Z Our printing routines use char 255 termination, and we have different versions of the functions for Location on 2 aixs, 3 axis, and to locate and print in a single command to save time. |
 |
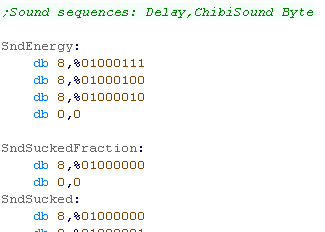
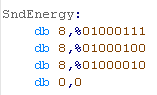
Sound Sequences
| Suck hunt uses 'ChibiSound' for SFX, this allows single byte
commands which make simple beeps and noises. Suck hunt uses an extended version, which allows a 'sequence' to be played... the first byte in each line is a time (number of ticks until next sound) the second byte is the 'SFX' command for Chibisound A time of 0 represent the end of the sequence |
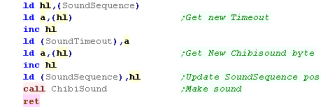
 |
| When we update the sound we first check the current 'Time'... if the last sound still needs to play, we just return. | 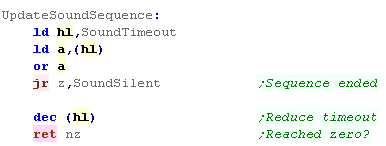 |
| We need to load in the next SFX for Chibisound to play. We update our position in the sound sequence, and load in the new 'Sound Timeout' (the time the sound will play) and the next SFX for chibisound to play. |
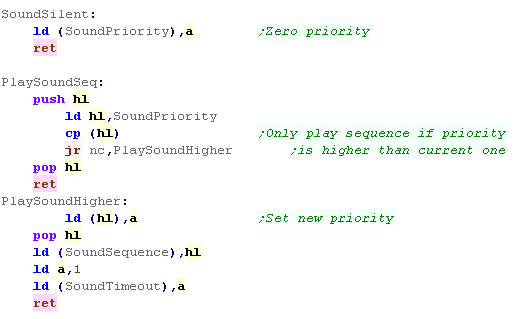
 |
| When we want to play a sound sequence, we pass the address of the
sequence in HL, but also a priority in A If the priority of the new sequence is lower than the current playing sequence, the new one is ignored. This is so 'Bullet sounds' do not stop 'Power up sounds' from being missed. |
 |
| Lesson
SH7 - Sprite Animation When each sprite movement tick occurs, we need to update the sprite according to it's 'rules' This defines each enemy as unique |
|
See
SuckHunt
folder
|
|
Moving the sprite
| We don't update the sprite every game tick, first we check the
tick according to the game speed, and only proceed on relevant
ticks. Next we check how fast this sprite should animate, some sprites animate faster than others. Finally we check if this sprite is alive, we don't want to update dead sprites. |
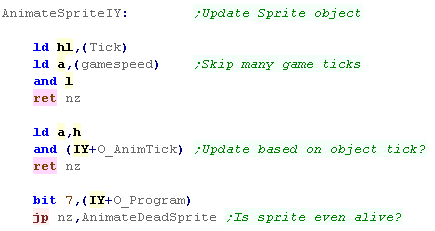 |
| We're going to update the sprite, so first we remove the old
sprite from the screen. Next we update the 'Frame tick' of the sprite, and re-calculate the new sprite to show with 'Update Sprite From IY' |
 |
| The next part of the code depends on the enemy type. |  |
| The 'Chibiko' boss is one of the most complex The 'Chibiko' Enemy moves in a 3d zigzag, when it gets to the edge of the screen the movement direction flips (Including foreground and background) |
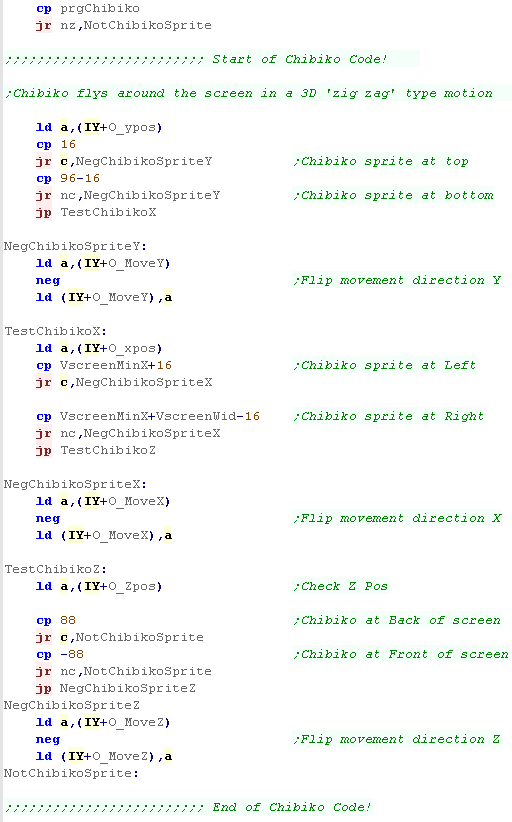 |
| Next we update the Xpos - if the sprite has gone off the side of the screen we mark it as 'dead' (Typically background objects) | 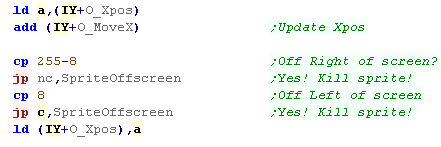 |
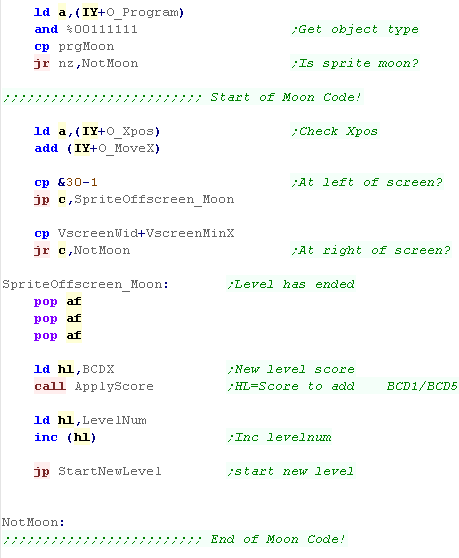
| The moon has a special purpose!... it's effectively the level
timer, when it reaches the edge of the screen the level has ended. The moon moves in different directions each level, so we have to check both edges of the screen. |
 |
| Next we update the Y and Z position | 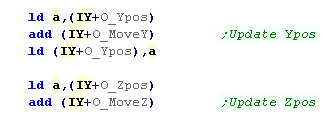 |
| We check the Z position, If the Sprite is in the foreground we may
need to hurt the player The rate the sprite will hurt the player depends on the level (difficulty) the routine used to hurt the player depends on the sprite, anything other than the 4 enemy types does not hurt! |
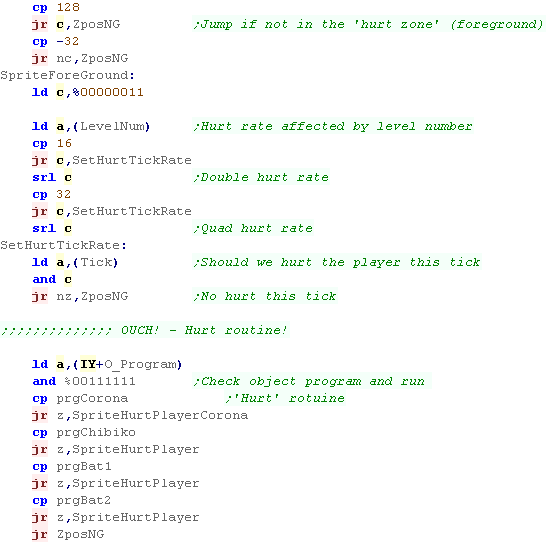 |
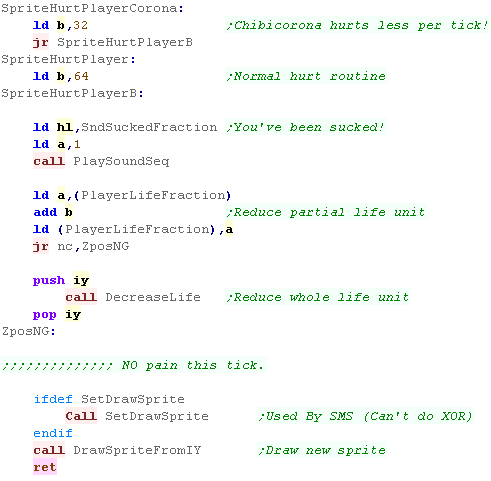
| Most enemies hurt by 64 units (1/4 of a life bar block) The chibicorona enemy hurts less, but it's always in the foreground. Once we've finished processing, we draw the new sprite. |
 |
Sprites offscreen
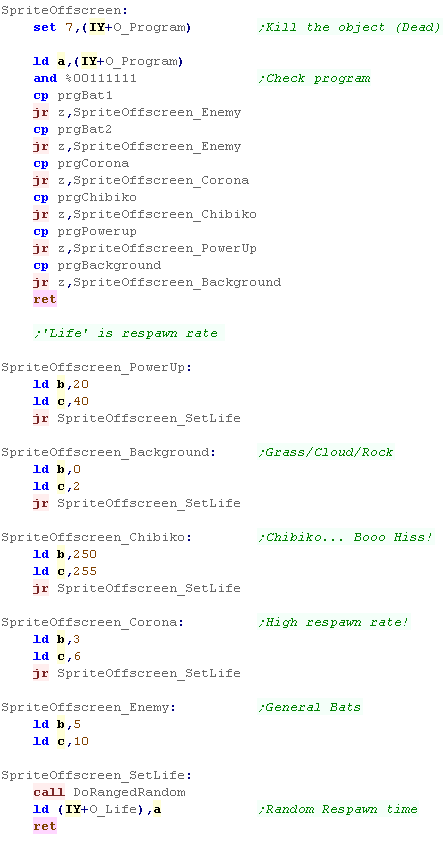
| When a sprite goes offscreen it's marked as 'Dead' We'll want to respawn it later - the time before it's respawned depends on the enemy type... in the case of a dead object the 'Life' is the time until it respawns |
 |
Dead Sprites
| When a sprite is dead (When bit 7 of it's 'program' is 1), it's
'Life' count actually marks the ticks remaining until it respawns. Each tick the 'Life' is reduced - when it reaches zero, the code which respawns that object is executed. |
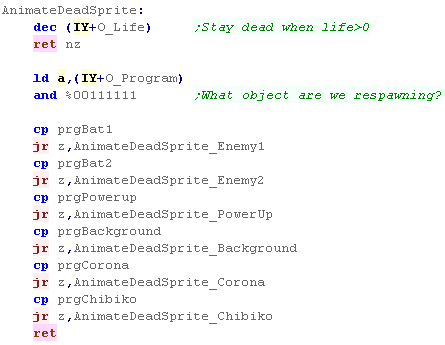 |
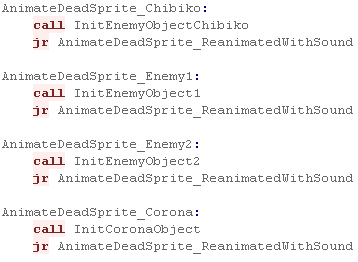
| The enemy objects all have their own 'init' subroutine... we'll
see them in a moment. The 'AnimateDeadSprite_ReanimatedWithSound' function brings the object back to life (clearing bit 7 of the program) and making a beep! |
 |
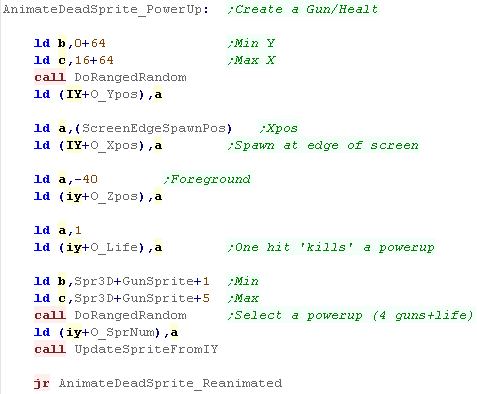
| Power up objects (the 4 guns and the life can) have special rules! They always appear in the foreground, near the bottom of the screen, and they always appear at the 'edge' of the screen, Either far left, or far right (depending on the level) They have a 'life' of 1 - this means one shot 'collects' the power up. |
 |
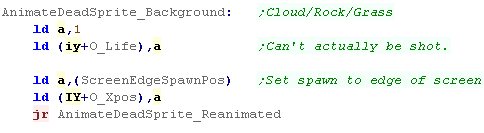
| Background objects can't actually be shot, but they need a
non-zero life. They don't actually change their Y or Z position, they just appear in the same position on the opposite edge of the screen they left! |
 |
| Re-animating an object will usually end with making a 'beep' to announce the return of the enemy, and finally clearing bit 7 of the program - to set it as 'alive' | 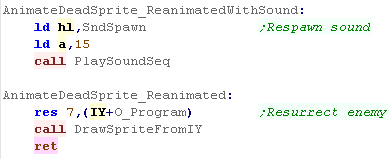 |
| Chibicorona's always appear at the very top or bottom of the game
window in the foreground, though they appear at any horizontal
position. They only take one hit, but come back very quickly  To set the Y position, a random number is picked, and the Ypos and Sprite are set, depending if its greater than, or less than 128 |
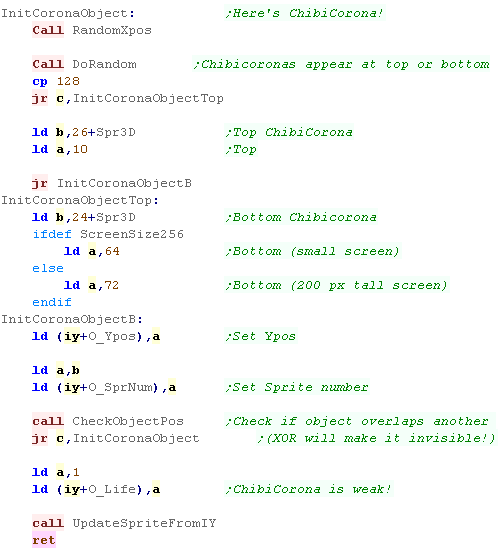 |
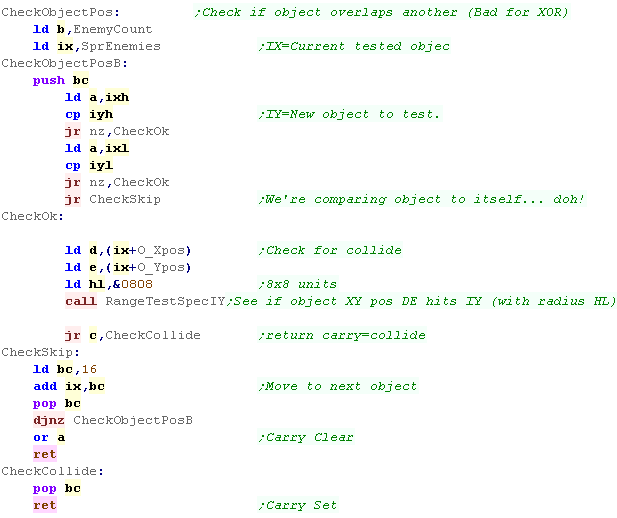
| Before we position an object, we can use 'CheckObjectPos' This stops two objects having the same X,Y position - Because we're using XOR, two enemies in the exact same position will be invisible - especially a problem for ChibiCoronas who do not move! |
 |
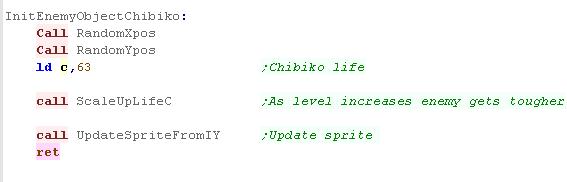
| Chibiko is the 'boss'... she has a lot of life, but is otherwise
just another bat enemy. The 'ScaleUpLifeC' will increase the amount of life the enemy has, depending on the current level  |
 |
The two basic bat enemies are the same, the only difference is
their amount of life. |
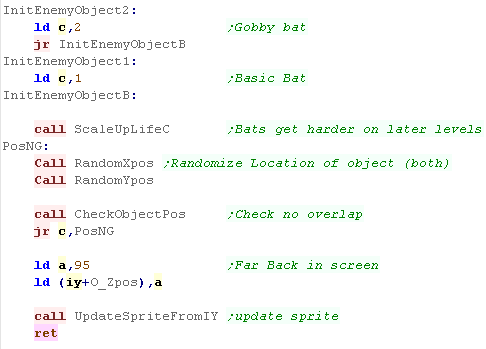 |
| Here's the life scaling routine. it increases the life depending on the top 4 bits of the level (there are only 16 defined levels that repeat indefinitely) | 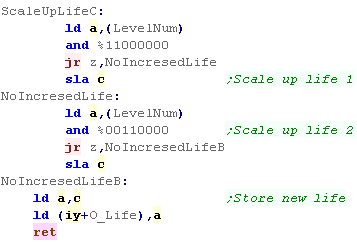 |
Game Over
| The Game over screen is a little tricky!... essentially it's a
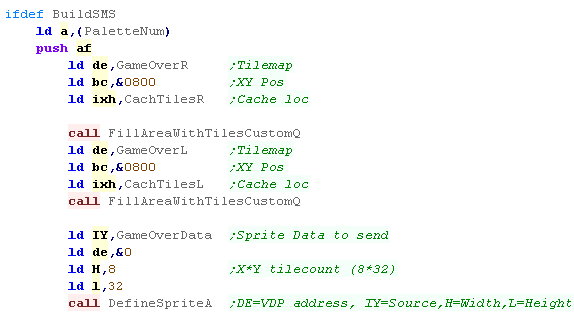
tilemap graphic (saves memory over a raw bitmap) with some text. The trouble is, it has to work in 2D and 3D modes! In 16 color mode the 3D version is used for both, in 2D mode we just palette switch 'Hiding' 12 of the colors... in 4 color mode we have two version of the graphic, one 3D and one 2D On the SMS we use shutterglasses and we actually use two tilemaps - one for each stereoscopic eye |
|
| First we make the gameover sound and fade out the screen | 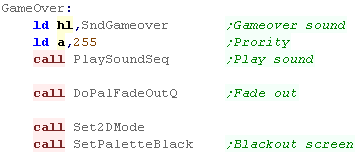 |
| on the SMS we need to draw the two tilemaps to the screen (CacheR
and CacheL are the right and left tilemap buffers) |
 |
| The CPC has different tilemaps for 2D and 3D. The 3D effect is precalculated in the Tilemap patterns, so we draw this in 2D mode. |
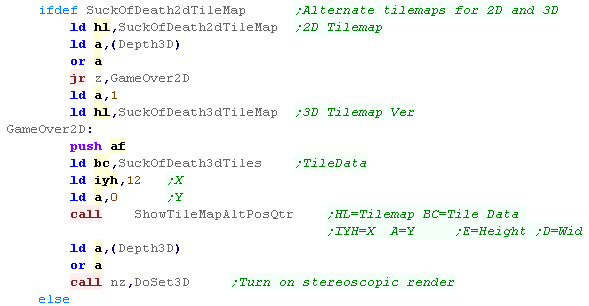 |
| When we're using the 3D Tilemap for both systems, all we change is
the palette - we use palette 4 in 2D mode, this sets all 16 of the
colors to 4 shades of Grey - disabling the 3D effect. the SAM coupe version has the data in an alternative bank... The MSX2 version needs an alternative Ypos for the tilemap data. |
 |
| We've drawn our graphic, now we draw our text messages | 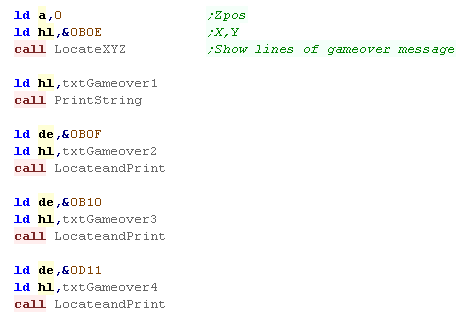 |
| Next we check the highscore. If we've got a higher score this time we update the highscore and show a message. These are the same routines as Yquest and Grime used We pop a value out of the stack - this is the correct palette to use after the fade in |
 |
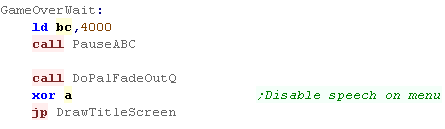
| We delay a while on the gameover screen and fade out. We then restart the game at the title screen... setting A=0 stops the 'Operation Suck' speech sample! |
 |
Level Definition (Recap)
| The game has 256 levels, but only 16 are
'defined'... The rest are procedurally generated by upping the speed
and life of the first 16 Each of the levels defines the quantity of each of the 4 enemy types. The 'Moon Speed' is effectively the level length - as the nightends when the moon crosses the sky. The 'Game Speed' is how fast the enemies move. |
|
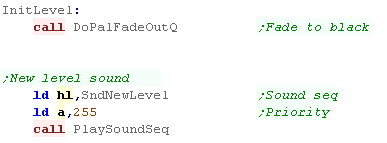
Level Init
| At the start of a new level we first fade out, and play the 'new
level sound' |
 |
| We clear the sprites data to zero - this ensures the ram data
starts from a constant position irrespective of anything left over. |
 |
| We first define the 'powerup' object - this is the collectable
onscreen item, it can be a health bonus, or one of 4 guns (which is
decided on respawn) |
 |
| We initialize the Gun - this is not the powerup, but the icon in
the HUD. We use DefineSpriteIY to recalculate the size and address of the sprite based on the selected gun. |
 |
| We set up the mountain object - this is used to draw the
background mountains, one sprite is used for all the mountains. The moon is the level time - it will need some more setup later. |
 |
| We define the cloud sprites. These all have a random Xpos... and a random Y/Z pos, but all only appear at the top of the screen. |
 |
| We do the same for rocks and grass, but these are at the bottom of the screen. | 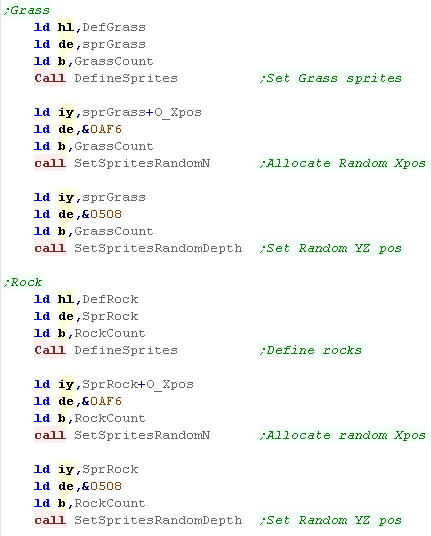 |
| We have a bank of definitions for the 16 levels. We load an address from the "level list". This is the pointer to the 6 byte definition which defines the basic enemy counts, and level speed |
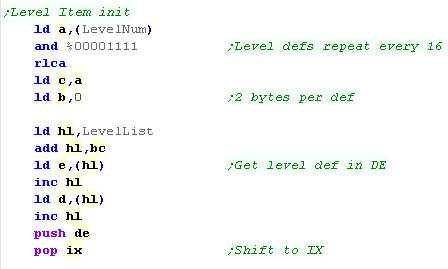 |
| We load the definition of each of the 4 enemies, and create the specified number of that enemy using DefineSprites (B can also equal zero) |  |
| The game has 256 levels, but we've only defined 16... to 'make up'
the difference, there are some routines which automatically add
extra 'bonus' enemies in later levels, based on the top 4 bits of
the level number. This makes the game play in 'waves' of 16 levels, getting harder and harder up to level 15, before easing up, but with a few extra low level enemies at the start of the next wave. |
 |
| We need to set the game speed... there are two elements to this 'Game Speed' is how fast the level updates (enemy speed), lower numbers update the game more often so the play is faster 'Moon Speed' is how fast the moon moves across the screen, when the moon leaves the screen the level ends, so the slower the moon, the longer the level. Again, these are altered automatically for later levels, making enemies faster and levels longer. |
 |
| We've defined all our enemies, but we want them to enter the level
at different times, To do this we give them all different spawn times... defined by the object 'life' |
 |
| Half the levels scroll left, the other half scroll right... this
alternates every level. Every other level we 'flip' the defined move direction and start moon pos. We also define "ScreenEdgeSpawnPos" this is the far edge of the screen, and is used for spawning powerups. |
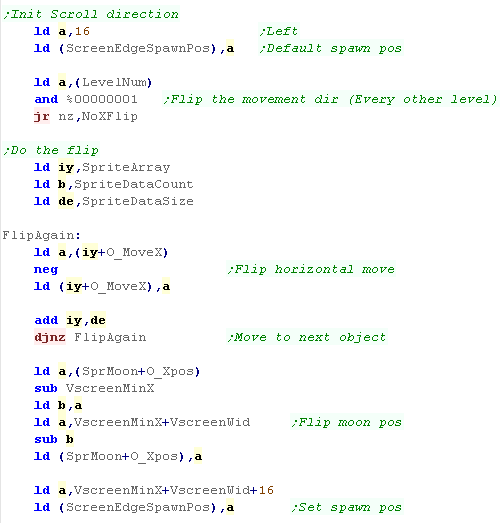 |
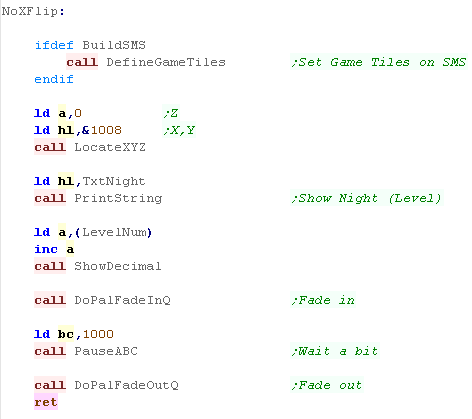
| Phew! We're done... On the SMS we need to define the level tile patterns. We show the 'Level number' (Night), and pause and return. |
 |
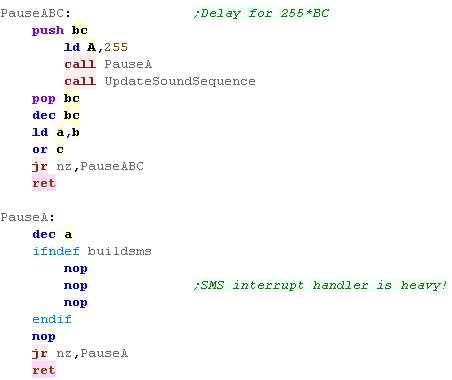
Pause
| As a bonus(!) we have a crude pause routine. It delays a bit, while updating the SFX. Actual sound playing is handled by the interrupt handler. |
 |
| View Options |
| Default Dark |
| Simple (Hide this menu) |
| Print Mode (white background) |
| Top Menu |
| ***Main Menu*** |
| Youtube channel |
| Patreon |
| Introduction to Assembly (Basics for absolute beginners) |
| Amazon Affiliate Link |
| AkuSprite Editor |
| ChibiTracker |
| Dec/Bin/Hex/Oct/Ascii Table |
| Alt Tech |
| Archive.org |
| Bitchute |
| Odysee |
| Rumble |
| DailyMotion |
| Please note: I wlll upload more content to these alt platforms based on the views they bring in |
| 68000 Content |
| ***68000 Tutorial List*** |
Learn 68000 Assembly  |
| Hello World Series |
| Platform Specific Series |
| Simple Samples |
| Grime 68000 |
| 68000 Downloads |
| 68000 Cheatsheet |
| Sources.7z |
| DevTools kit |
| 68000 Platforms |
| Amiga 500 |
| Atari ST |
| Neo Geo |
| Sega Genesis / Mega Drive |
| Sinclair QL |
| X68000 (Sharp x68k) |
| 8086 Content |
| Learn 8086 Assembly |
| Platform Specific Series |
| Hello World Series |
| Simple Samples |
| 8086 Downloads |
| 8086 Cheatsheet |
| Sources.7z |
| DevTools kit |
| 8086 Platforms |
| Wonderswan |
| MsDos |
| ARM Content |
| Learn ARM Assembly |
| Learn ARM Thumb Assembly |
| Platform Specific Series |
| Hello World |
| Simple Samples |
| ARM Downloads |
| ARM Cheatsheet |
| Sources.7z |
| DevTools kit |
| ARM Platforms |
| Gameboy Advance |
| Nintendo DS |
| Risc Os |
| Risc-V Content |
| Learn Risc-V Assembly |
| Risc-V Downloads |
| Risc-V Cheatsheet |
| Sources.7z |
| DevTools kit |
| MIPS Content |
| Learn Risc-V Assembly |
| Platform Specific Series |
| Hello World |
| Simple Samples |
| MIPS Downloads |
| MIPS Cheatsheet |
| Sources.7z |
| DevTools kit |
| MIPS Platforms |
| Playstation |
| N64 |
| PDP-11 Content |
| Learn PDP-11 Assembly |
| Platform Specific Series |
| Simple Samples |
| PDP-11 Downloads |
| PDP-11 Cheatsheet |
| Sources.7z |
| DevTools kit |
| PDP-11 Platforms |
| PDP-11 |
| UKNC |
| TMS9900 Content |
| Learn TMS9900 Assembly |
| Platform Specific Series |
| Hello World |
| TMS9900 Downloads |
| TMS9900 Cheatsheet |
| Sources.7z |
| DevTools kit |
| TMS9900 Platforms |
| Ti 99 |
| 6809 Content |
| Learn 6809 Assembly |
| Learn 6309 Assembly |
| Platform Specific Series |
| Hello World Series |
| Simple Samples |
| 6809 Downloads |
| 6809/6309 Cheatsheet |
| Sources.7z |
| DevTools kit |
| 6809 Platforms |
| Dragon 32/Tandy Coco |
| Fujitsu FM7 |
| TRS-80 Coco 3 |
| Vectrex |
| 65816 Content |
| Learn 65816 Assembly |
| Hello World |
| Simple Samples |
| 65816 Downloads |
| 65816 Cheatsheet |
| Sources.7z |
| DevTools kit |
| 65816 Platforms |
| SNES |
| eZ80 Content |
| Learn eZ80 Assembly |
| Platform Specific Series |
| eZ80 Downloads |
| eZ80 Cheatsheet |
| Sources.7z |
| DevTools kit |
| eZ80 Platforms |
| Ti84 PCE |
| IBM370 Content |
| Learn IBM370 Assembly |
| Simple Samples |
| IBM370 Downloads |
| IBM370 Cheatsheet |
| Sources.7z |
| DevTools kit |
| Super-H Content |
| Learn SH2 Assembly |
| Hello World Series |
| Simple Samples |
| SH2 Downloads |
| SH2 Cheatsheet |
| Sources.7z |
| DevTools kit |
| SH2 Platforms |
| 32x |
| Saturn |
| PowerPC Content |
| Learn PowerPC Assembly |
| Hello World Series |
| Simple Samples |
| PowerPC Downloads |
| PowerPC Cheatsheet |
| Sources.7z |
| DevTools kit |
| PowerPC Platforms |
| Gamecube |
| Work in Progress |
| ChibiAndroids |
| Misc bits |
| Ruby programming |
Buy my Assembly programming book
on Amazon in Print or Kindle!


Available worldwide!
Search 'ChibiAkumas' on
your local Amazon website!
Click here for more info!


Buy my Assembly programming book
on Amazon in Print or Kindle!
Available worldwide!
Search 'ChibiAkumas' on
your local Amazon website!
Click here for more info!
Buy my Assembly programming book
on Amazon in Print or Kindle!
Available worldwide!
Search 'ChibiAkumas' on
your local Amazon website!
Click here for more info!