

Learn Multi
platform Z80 Assembly Programming... With
Vampires!
Platform Specific Lessons
Platform Specific Lessons
<- Back to the Main
Contents & Basic Z80 Assembly Lessons
Platform Specific Series - Lets learn how the hardware of the systems work, so we can get it to do what we want... Covers Amsrad CPC,MSX,ZX Spectrum, TI-83,Enterprise 128/64 and Sam Coupe!
Platform Specific Series - Lets learn how the hardware of the systems work, so we can get it to do what we want... Covers Amsrad CPC,MSX,ZX Spectrum, TI-83,Enterprise 128/64 and Sam Coupe!
 |
Lesson
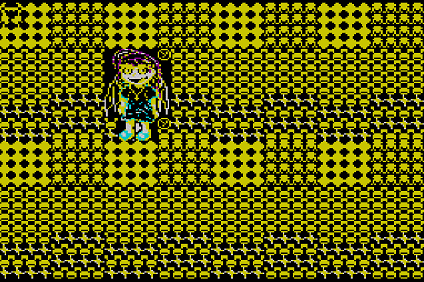
P80 - Multiplatform Software tilemap on the MSX2 (Mintile) We've written a minimal multiplatform Tile/Sprite routine in the Mintile series, and we looked at the MSX1 screen before Now, lets take a look at the platform specific code to quickly draw tiles to the screen on the 16 color MSX2 |
 |
 MSX2_MinTile.asm
|
 |
| MinTile is a
multiplatform 'engine' which allows us to define our game code in
a common way, and let the platform specific code handle the
platform specific work!... it was used to write 'ChibiFighter' on
the Z80. For more details on Mintile, see the Mintile series here... |
 |
Tile Pattern Routines
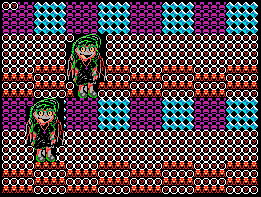
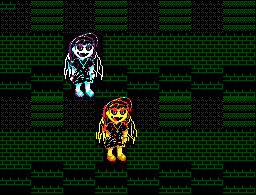
| Our example shows an onscreen tilemap and two software 'sprites'. Mintile supports scrolling and X-Flip (but not Y-flip) The 'sprites' are actually miniature tile maps, this is to reduce the amount of platform specific code. These are all created via the DoStrip platform specific routine, which we'll look at here |
 |
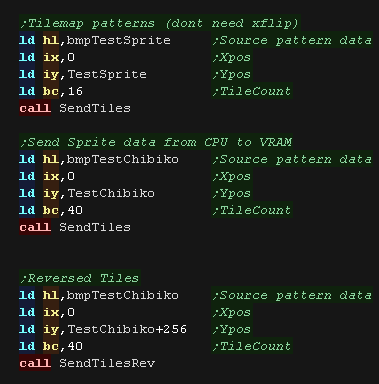
| We need to transfer the patterns to the VDP. We write these to the
offscreen area in lines 256+ We do this twice, once normally, and once X-flipped! |
Line 256: Line 512:  |
| We need to send our pattern data to the VDP. We send the tilemap patterns only once. We send the sprite data twice, once normally, and once X-flipped |
 |
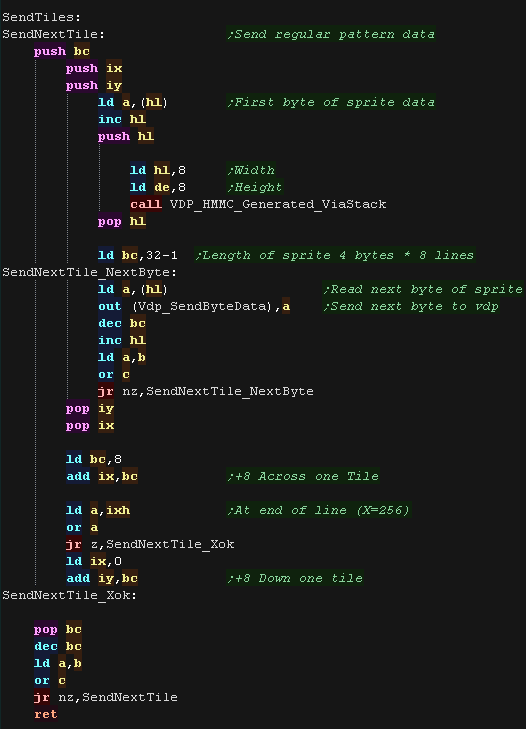
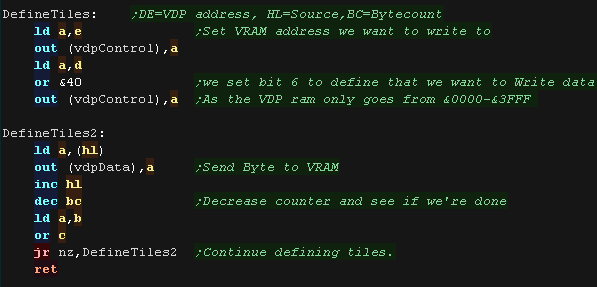
| The send tile routine sends each 8x8 tile to the VDP. We use a HMMC command to do this - this sends bitmap data from the CPU to an area of VRAM in the VDP There are 32 tiles on a single 256 pixel line, we move across 8 pixels after each tile, and down 8 pixels once we get to the end of the line. |
 |
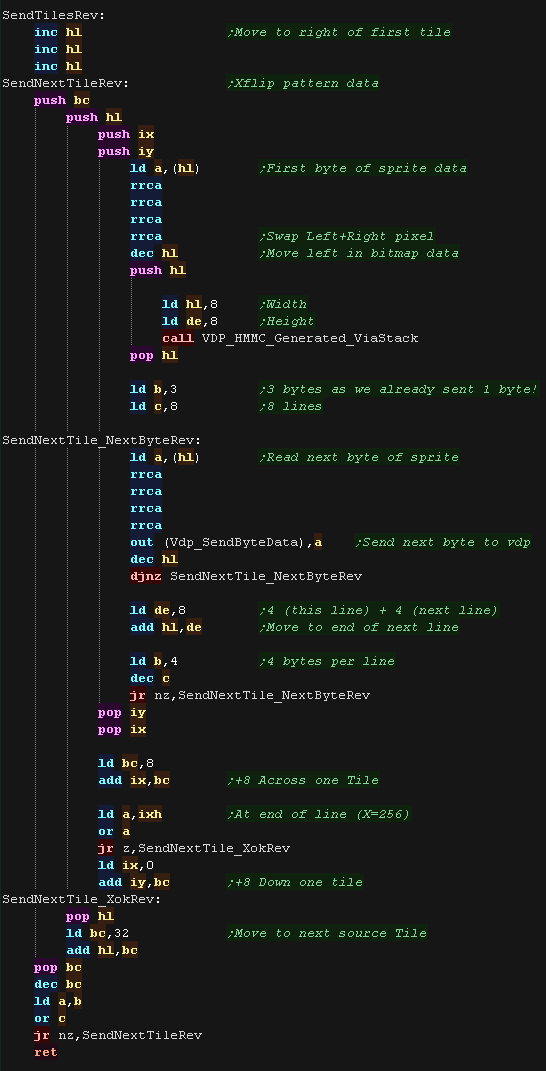
| The reverse tile function takes the same parameters and source
bitmap pattern data, however it moves from right to left through the 4 bytes, and uses 4x RRCA commands to flip the two pixels in each byte, effectively Xflipping it. |
 |
Strip Drawing
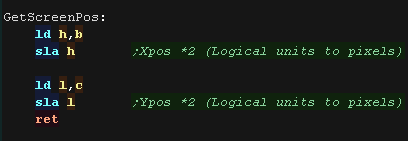
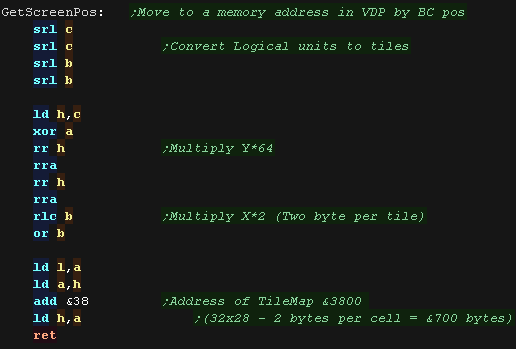
| On most systems GetScreenPos calculates a HL vram destination, but
on the MSX2 it works differently, simply converting the XY
co-ordinates in BC (pairs of pixels) to a pixel location in HL This is used to calculate the destination for sprite drawing |
 |
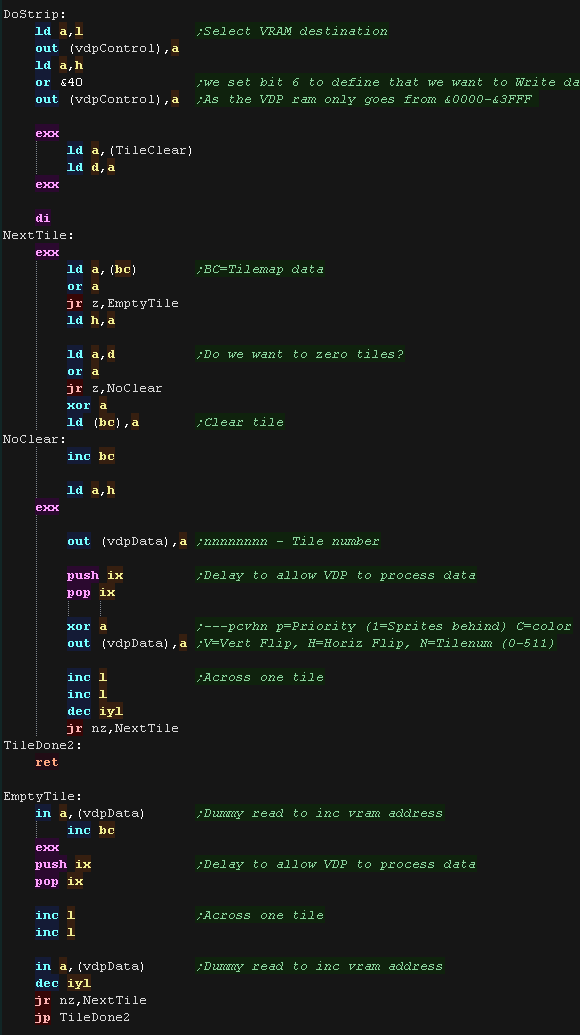
| DoStrip will draw one horizontal strip of tiles. The job is defined by the following registers HL = VRAM Dest BC' = Tilemap DE' = Pattern data IYL = TileMap Width The tilemap will either be the TileCache (for the background) or a mini tilemap (for sprites) If using the tile cache we zero the tiles after they are drawn there are 32 tiles per screen line in the pattern data area, so we use %00011111 to calculate the X position, and %11100000 to calculate the Y position |
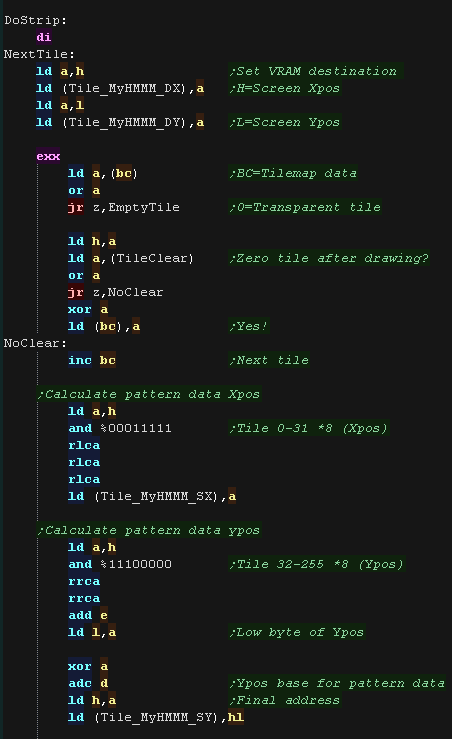 |
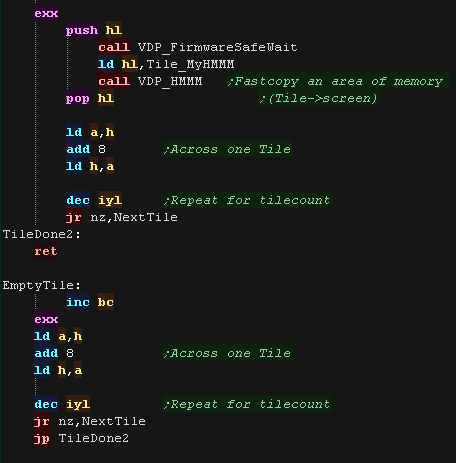
| We use HMMM to quickly transfer tiles. After each tile is sent we repeat for the rest of the horizontal strip. |
 |
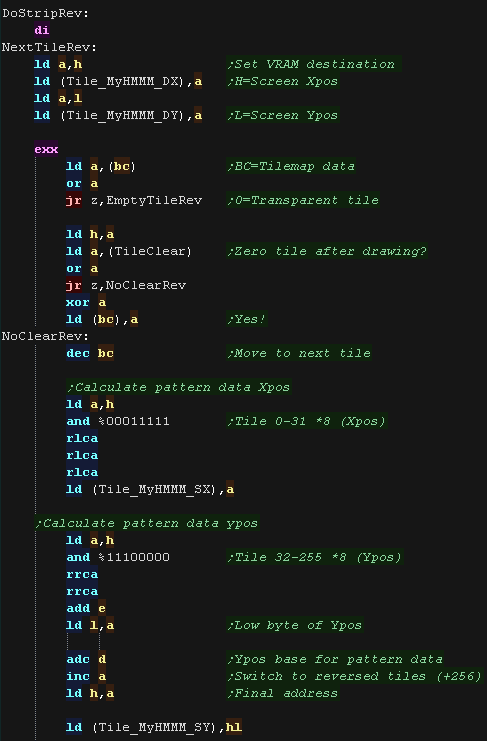
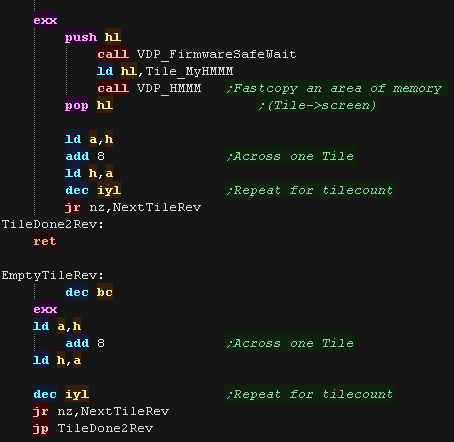
| DoStripRev has essentially the same function, however we add 256 to the source Y position to select the X flipped pattern set |
  |
| Note that
Mintile makes extensive use of the shadow registers HL' BC' and
DE' (but not AF') This means you'll need to keep interrupts disabled (as the firmware uses them!), or write your own interrupt handler.... We'll write our own interrupt handler later on when we add music to this example. |
 |
 |
Lesson
P81 - Multiplatform Software tilemap on the Sam Coupe (16 color -
Mintile) We've written a minimal multiplatform Tile/Sprite routine in the Mintile series, Now, lets take a look at the platform specific code to quickly draw tiles to the screen on the Sam Coupe |
|
SAM_MinTile_0000.asm
|
|
| MinTile is a
multiplatform 'engine' which allows us to define our game code in
a common way, and let the platform specific code handle the
platform specific work!... it was used to write 'ChibiFighter' on
the Z80. For more details on Mintile, see the Mintile series here... |
|
Tile Drawing Routines
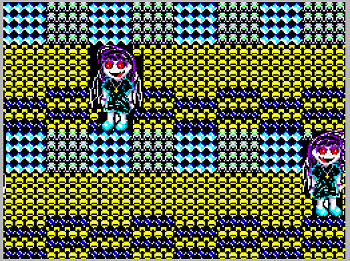
| Our example shows an onscreen tilemap and two software 'sprites'. Mintile supports scrolling and X-Flip (but not Y-flip) The 'sprites' are actually miniature tile maps, this is to reduce the amount of platform specific code. These are all created via the DoStrip platform specific routine, which we'll look at here The screen is configured to a 256x192 size, to maintain a compatible screen size on all systems |
 |
| The MinTile shared routine provides calculation and tilemap
planning, however we need to do the actual job of 'Drawing' in the
platform code. The code can horizontally flip tiles, In 16 color mode on the Sam Coupe we use a 256 byte lookup table, to 'pre-calculate the flipping of the 2 pixels in a byte |
 |
| The LUT needs to be byte aligned, so &8100 or &2E00 would be fine, but &2E01 would not! | 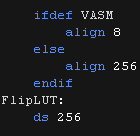 |
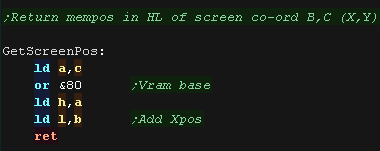
| We have a 'GetScreenPos' function , which calculates the VRAM
destination for the sprite objects. Our BC co-ordinates are in 'logical units' (2 pixels/lines per logical unit) |
 |
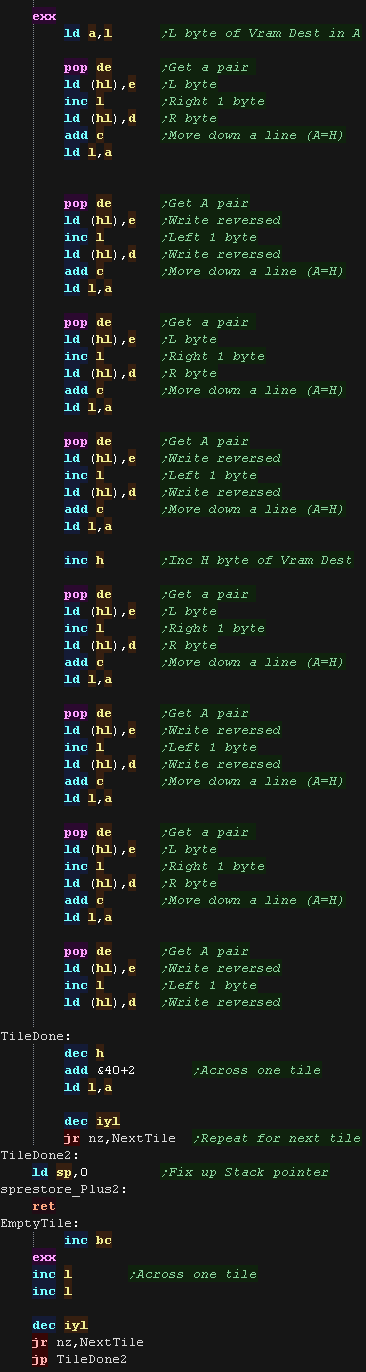
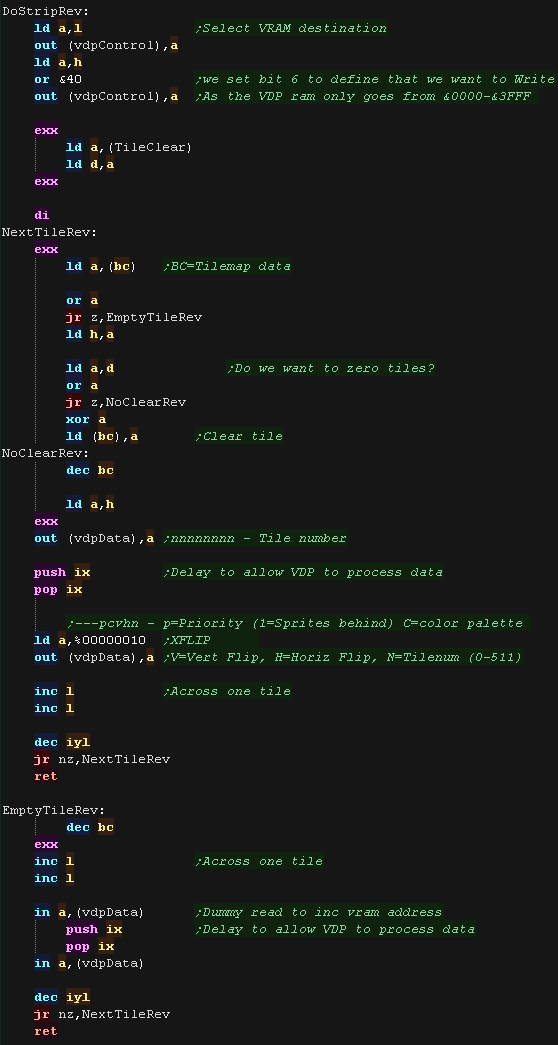
| DoStrip will draw one horizontal strip of tiles. The job is defined by the following registers HL = VRAM Dest BC' = Tilemap DE' = Pattern data IYL = TileMap Width The tilemap will either be the TileCache (for the background) or a mini tilemap (for sprites) If using the tile cache we zero the tiles after they are drawn We multiply the tile number by 32 to get the offset to the pattern data. we use stack misuse to speed up loading the pattern data We also 'Precalculate' the two possible L bytes of the HL vram addresses in BC, which we'll use next. |
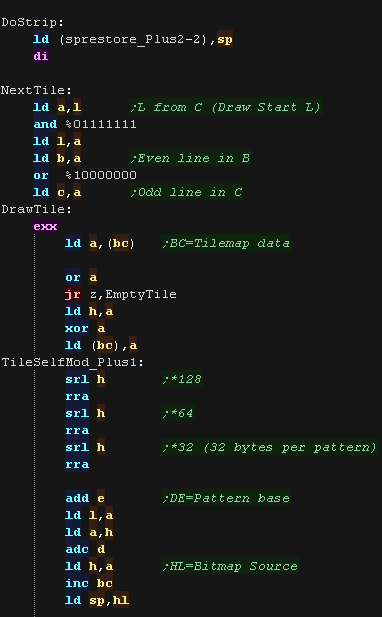 |
After each line, we need to move down a line. Odd lines are on addresses like &8080, &8180, &8280 etc Even lines are on addresses like &8000, &8100, &8200 etc We need to 'toggle' the L byte between two values, so we pre-calculated these in B and C so we can quickly flip between the two L bytes, we also INC the H byte as needed we use POP commands to read pattern data, and transfer it to the screen for all 8 lines |
 |
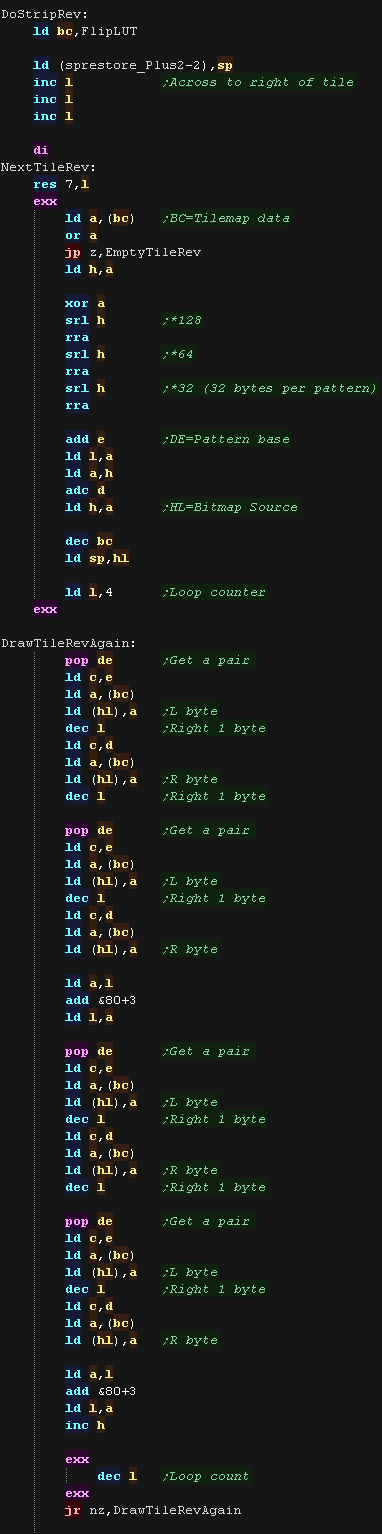
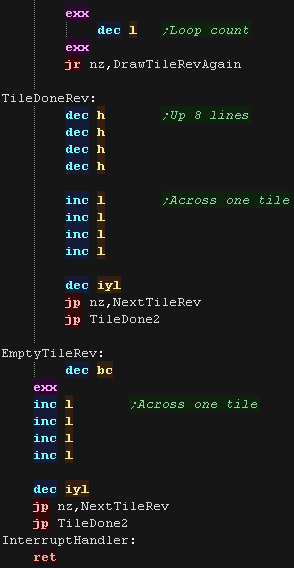
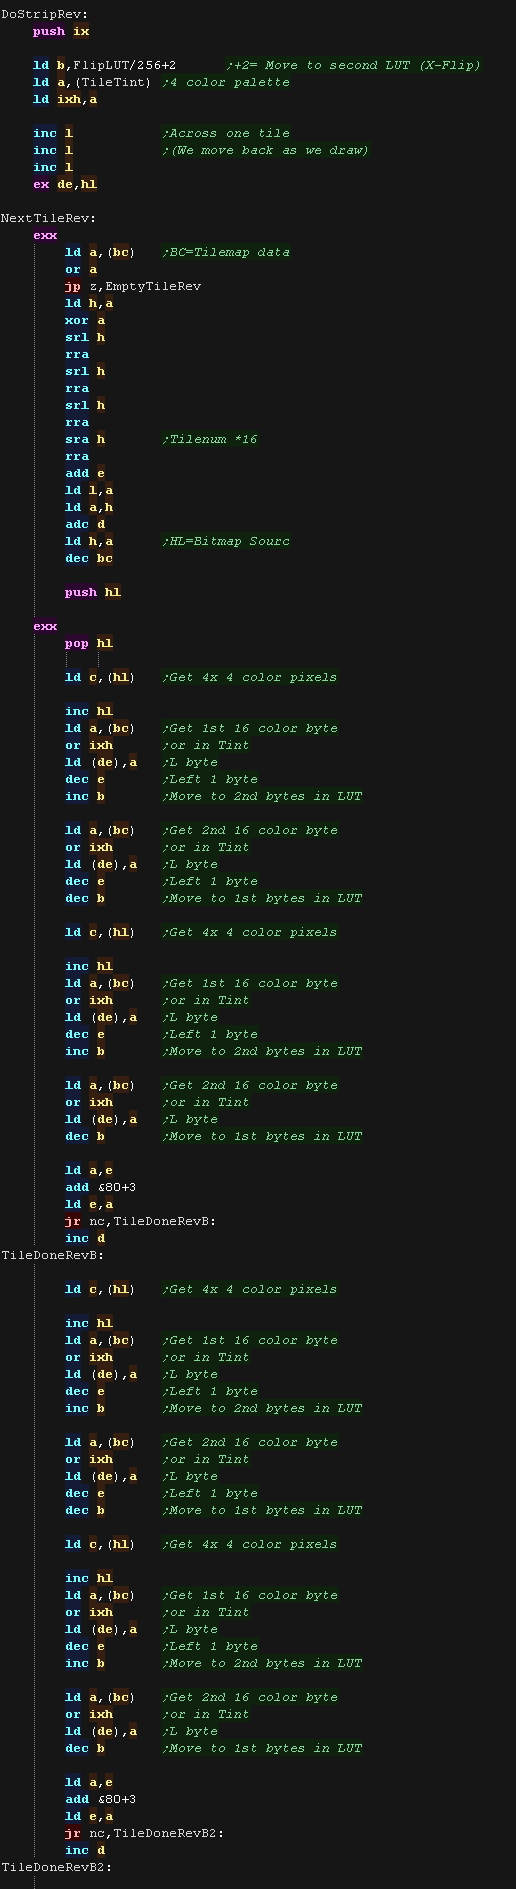
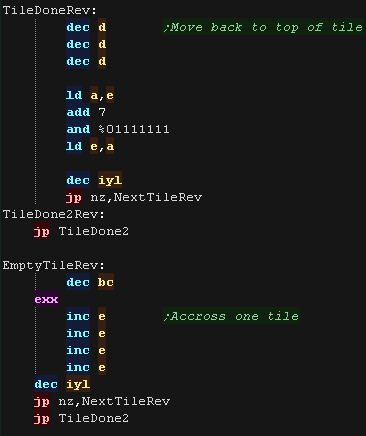
| DoStripRev has essentially the same function, however
it horizontally flips the pattern data via the lookup table. We're using BC to point to our lookup table, which means we don't have enough registers free to do the same 'trick' swapping B and C with L as before, so we calculate these manually. As this code is quite a bit longer, we actually use a loop this time, in L |
  |
| Note that
Mintile makes extensive use of the shadow registers HL' BC' and
DE' (but not AF') This means you'll need to keep interrupts disabled (as the firmware uses them!), or write your own interrupt handler.... We'll write our own interrupt handler later on when we add music to this example. |
|
| MinTile is a
multiplatform 'engine' which allows us to define our game code in
a common way, and let the platform specific code handle the
platform specific work!... it was used to write 'ChibiFighter' on
the Z80. For more details on Mintile, see the Mintile series here... |
|
Tile Drawing Routines
| Our example shows an onscreen tilemap and two software 'sprites'. Mintile supports scrolling and X-Flip (but not Y-flip) The 'sprites' are actually miniature tile maps, this is to reduce the amount of platform specific code. These are all created via the DoStrip platform specific routine, which we'll look at here The screen is configured to a 256x192 size, to maintain a compatible screen size on all systems |
 |
| The MinTile shared routine provides calculation and
tilemap planning, however we need to do the actual job of 'Drawing'
in the platform code. The code can horizontally flip tiles, and we use a LUT to flip the bytes, BUT calculating the 4 color pattern bytes to 16 color screen bytes is slow, so we actually preconvert the unflipped data too! Each 4 color byte of pattern data becomes two 16 color screen bytes. |
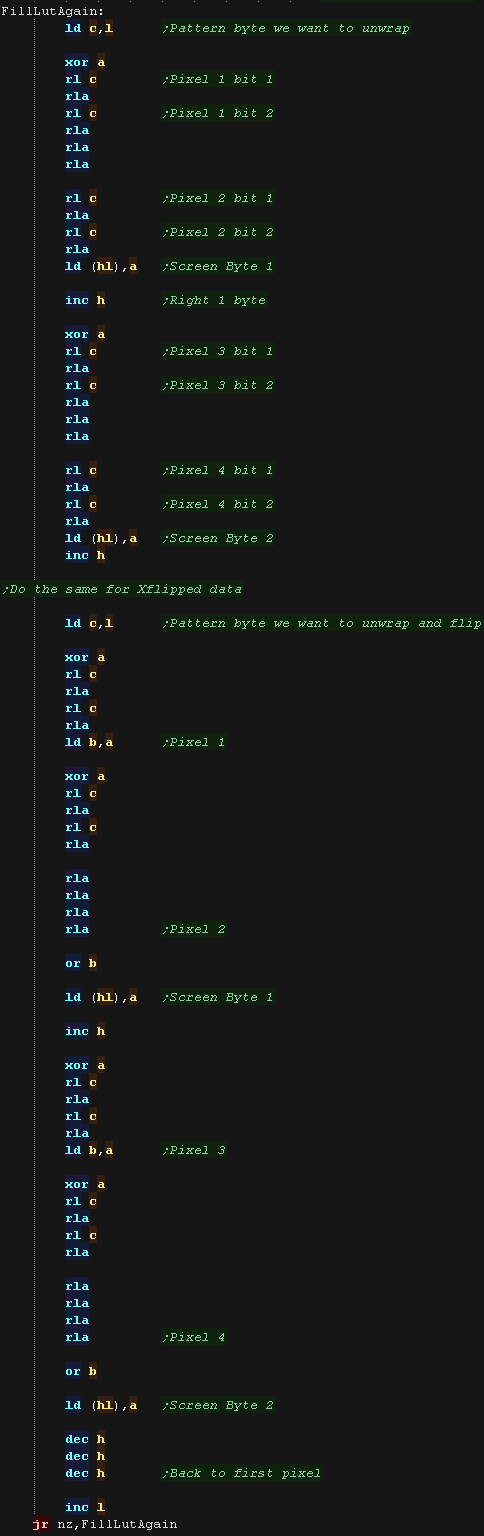 |
| The LUT needs to be byte aligned, so &8100 or &2E00 would
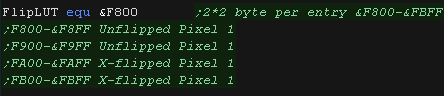
be fine, but &2E01 would not! There are two Luts (Normal and X-Flipped) and each LUT use a total of 512 bytes |
 |
| We have a 'GetScreenPos' function , which calculates the VRAM
destination for the sprite objects. Our BC co-ordinates are in 'logical units' (2 pixels/lines per logical unit) |
|
| DoStrip will draw one horizontal strip of tiles. The job is defined by the following registers HL = VRAM Dest BC' = Tilemap DE' = Pattern data IYL = TileMap Width The tilemap will either be the TileCache (for the background) or a mini tilemap (for sprites) If using the tile cache we zero the tiles after they are drawn As our patterns are now 16 color, We multiply the tile number by 16 to get the offset to the pattern data. We also 'Precalculate' the two possible L bytes of the HL vram addresses in BC, which we'll use next. This time we DONT use stack misuse - this allows us to keep interrupts enabled (for playing music!) |
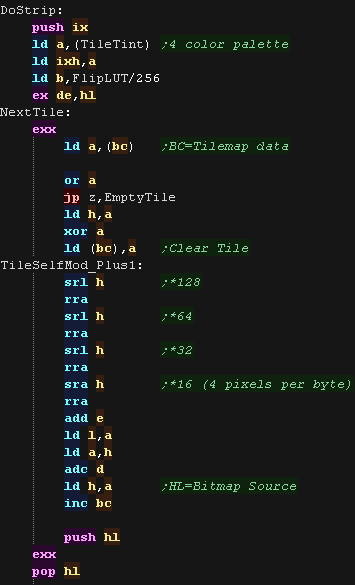 |
We use BC for our lookup table. We load C with the 4 color pattern byte we want to covert. We then load in from (BC) - this is the 1st converted byte We then INC B and load in from (BC) - this is the 2nd converted byte After each line, we need to move down a line. Odd lines are on addresses like &8080, &8180, &8280 etc Even lines are on addresses like &8000, &8100, &8200 etc |
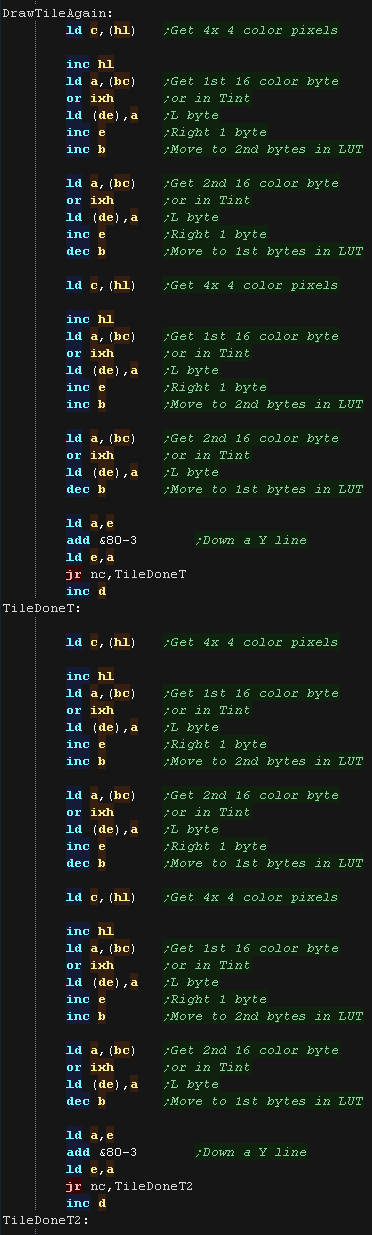 ... 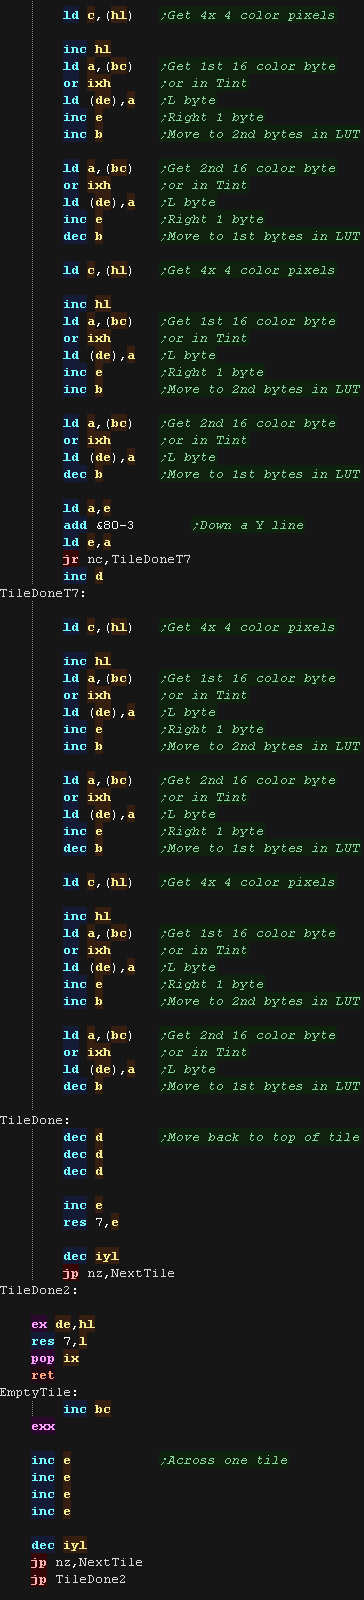 |
| As we're already using a LUT, DoStripRev is almost
identical, we just use the second 512 bytes of the LUT for our
conversion |
 ...  |
| Note that
Mintile makes extensive use of the shadow registers HL' BC' and
DE' (but not AF') This means you'll need to keep interrupts disabled (as the firmware uses them!), or write your own interrupt handler.... We'll write our own interrupt handler later on when we add music to this example. |
|
 |
Lesson
P83 - Multiplatform Software tilemap on the Spectrum Next We've written a minimal multiplatform Tile/Sprite routine in the Mintile series, Now, lets take a look at the platform specific code to quickly draw tiles to the screen on the Spectrum Next |
|
ZXN_MinTile.asm
|
|
| MinTile is a
multiplatform 'engine' which allows us to define our game code in
a common way, and let the platform specific code handle the
platform specific work!... it was used to write 'ChibiFighter' on
the Z80. For more details on Mintile, see the Mintile series here... |
|
Tile Drawing Routines
| Our example shows an onscreen tilemap and two software 'sprites'. Mintile supports scrolling and X-Flip (but not Y-flip) The 'sprites' are actually miniature tile maps, this is to reduce the amount of platform specific code. These are all created via the DoStrip platform specific routine, which we'll look at here The screen is configured to a 256x192 size, to maintain a compatible screen size on all systems |
 |
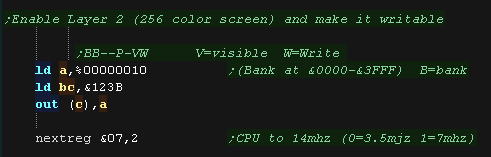
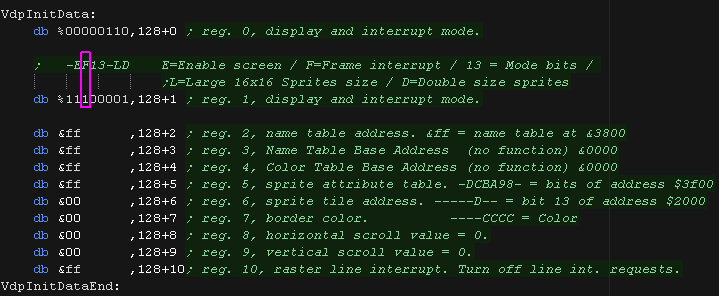
| We're using 256 color mode on the ZX Next We page in the VRAM to the area &2000-&3FFF, this leaves the address &0038 free for interrupt mode 1 |
 |
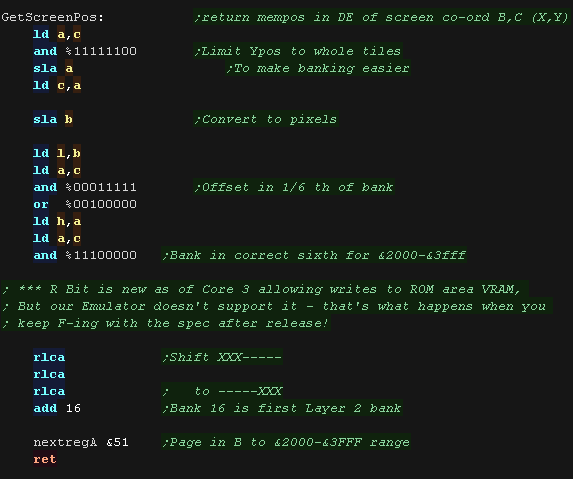
| We have a 'GetScreenPos' function , which calculates the VRAM
destination for the sprite objects. Our BC co-ordinates are in 'logical units' (2 pixels/lines per logical unit) This pages in the bank of the appropriate 1/6th of the screen for the tile we want to draw via NextReg &51 |
|
| DoStrip will draw one horizontal strip of tiles. The job is defined by the following registers HL = VRAM Dest BC' = Tilemap DE' = Pattern data IYL = TileMap Width The tilemap will either be the TileCache (for the background) or a mini tilemap (for sprites) If using the tile cache we zero the tiles after they are drawn As each tile is 8x8 and 256 colors per pixel, We multiply the tile number by 64 to get the offset to the pattern data. We use stack misuse to speed up loading the pattern data |
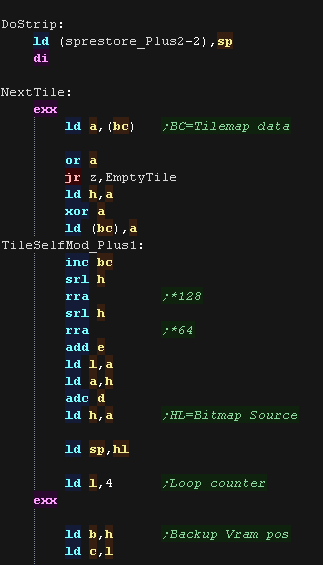 |
| We back up HL in BC We pop two bytes (2 pixels) and write them to the screen, we move across the screen by INCing L After each line we reset L from C and inc H we do two lines in a batch and use shadow register L' as a loop counter |
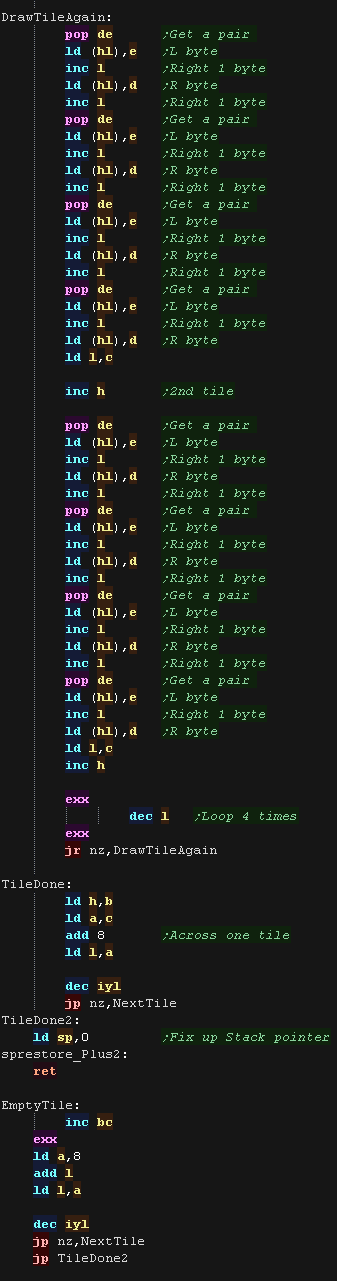 |
| DoStripRev has essentially the same function, We read the data in the same way, however we move left across the screen instead of right. |
 |
| Note that
Mintile makes extensive use of the shadow registers HL' BC' and
DE' (but not AF') This means you'll need to keep interrupts disabled (as the firmware uses them!), or write your own interrupt handler.... We'll write our own interrupt handler later on when we add music to this example. |
|
 |
Lesson
P84 - Multiplatform Software tilemap on the Gameboy Color
(Mintile) We've written a minimal multiplatform Tile/Sprite routine in the Mintile series, and we looked at other systems before Now, lets take a look at the platform specific code to quickly draw tiles to the screen on the Gameboy Color |
|
GBC_MinTile.asm
|
|
| MinTile is a
multiplatform 'engine' which allows us to define our game code in
a common way, and let the platform specific code handle the
platform specific work!... it was used to write 'ChibiFighter' on
the Z80. For more details on Mintile, see the Mintile series here... |
|
 |
Mintile uses the
Gameboy Color's extra functions for the Xflipped tiles. For this reason it won't work on the Gameboy Classic. |
Tile Pattern Routines
| Our example shows an onscreen tilemap and two software 'sprites'. Mintile supports scrolling and X-Flip (but not Y-flip) The 'sprites' are actually miniature tile maps, this is to reduce the amount of platform specific code. These are all created via the DoStrip platform specific routine, which we'll look at here |
 |
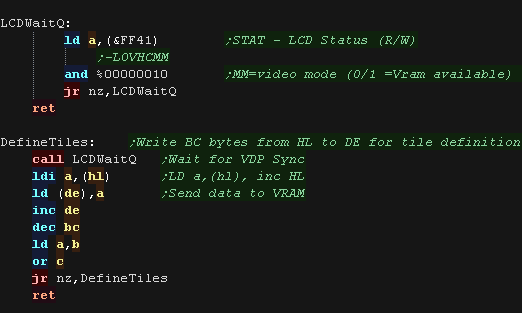
| We need to transfer the patterns to the VRAM, we use 'DefineTiles' to do this | 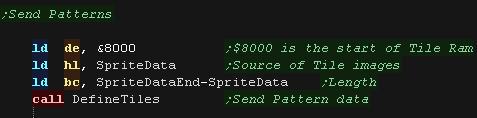 |
| We send the tiles once, unflipped. The Xflip effect is performed by the Gameboy Colors extra functions. If we wanted to do this on the gameboy classic we'd have to transfer the data twice. |
 |
Strip Drawing
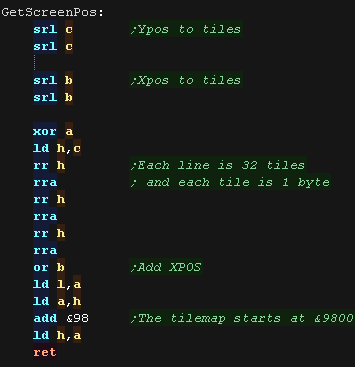
| We don't actually use hardware sprites in this example, we draw
the chibiko character to the tilemap. 'GetScreenPos' converts the co-ordinate in 'Logical units' (pairs of pixels) to screen tiles |
 |
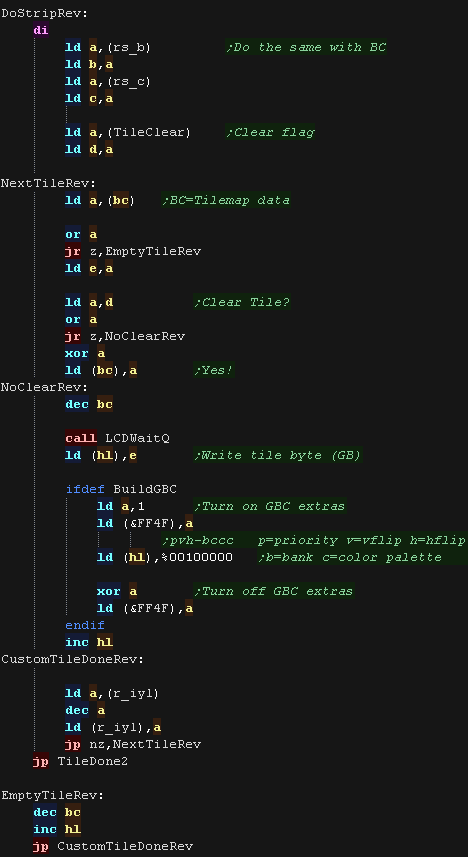
| DoStrip will draw one horizontal strip of tiles. The job is defined by the following registers HL = VRAM Dest BC' = Tilemap (rs_b and rs_c simulate z80 shadow registers) IYL = TileMap Width (r_iyl simulates the z80 IYL register) The tilemap will either be the TileCache (for the background) or a mini tilemap (for sprites) If using the tile cache we zero the tiles after they are drawn We transfer the tile number to the Tilemap, setting the GBC palette after each tile. |
 |
| DoStripRev has essentially the same function, however we set the H-flip flag in the GBC tile settings to Xflip the tiles |
 |
  |
Lesson
P85 - Multiplatform Software tilemap on the SMS/SGG (Mintile) We've written a minimal multiplatform Tile/Sprite routine in the Mintile series, and we looked at other systems before Now, lets take a look at the platform specific code to quickly draw tiles to the screen on the Sega Master System or GameGear |
|
SMS_MinTile.asm
|
|
| MinTile is a
multiplatform 'engine' which allows us to define our game code in
a common way, and let the platform specific code handle the
platform specific work!... it was used to write 'ChibiFighter' on
the Z80. For more details on Mintile, see the Mintile series here... |
|
Tile Pattern Routines
| Our example shows an onscreen tilemap and two software 'sprites'. Mintile supports scrolling and X-Flip (but not Y-flip) The 'sprites' are actually miniature tile maps, this is to reduce the amount of platform specific code. These are all created via the DoStrip platform specific routine, which we'll look at here |
 |
| We need to transfer the patterns to the VRAM, we use 'DefineTiles' to do this | 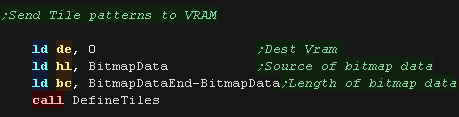 |
| We send the tiles once, unflipped. The Xflip effect is performed by using the SMS tilemap capability |
 |
Strip Drawing
| We don't actually use hardware sprites in this example, we draw
the chibiko character to the tilemap. 'GetScreenPos' converts the co-ordinate in 'Logical units' (pairs of pixels) to screen tiles |
 |
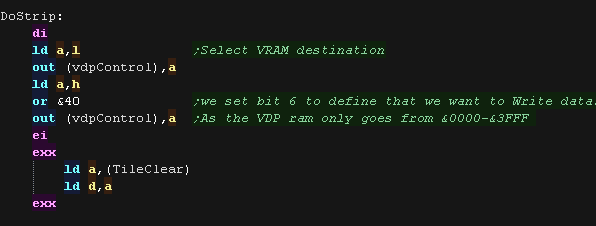
| DoStrip will draw one horizontal strip of tiles. The job is defined by the following registers HL = VRAM Dest BC' = Tilemap (rs_b and rs_c simulate z80 shadow registers) IYL = TileMap Width (r_iyl simulates the z80 IYL register) The tilemap will either be the TileCache (for the background) or a mini tilemap (for sprites) If using the tile cache we zero the tiles after they are drawn We transfer the tile number to the Tilemap, We need to wait a while between writes, so we Push and POP IX to slow things down If we have an empty tile, we can increment the VRAM destination with two dummy reads |
 |
| DoStripRev has essentially the same function, however we set the H-flip flag in the to Xflip the tiles |
 |
|
Lesson
P86 - Interrupt Driven Music on the SMS/GG (ChibiTracks) Let's write an interrupt handler for the SMS/GameGear, and use it to play music with ChibiTracks! |
|
SMS_MinTile_WithSound.asm
|
|
The Interrupt Handler
| The video hardware can cause a VBLANK interrupt once per frame,
but for this to happen we need to set bit 5 of VDP Register 1 to
one. Otherwise no interrupts will occur and we won't get any sound! |
 |
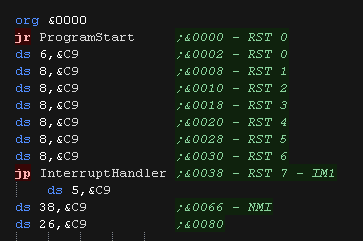
| Next we need to create a pointer to our interrupt handler at
address &0038. We do this via a jump in the header of our cartridge. Interrupt Mode 1 (IM1) calls this address when the interrupt occurs |
 |
| We should ensure IM1 is set, and enable interrupts to get things
started. |
 |
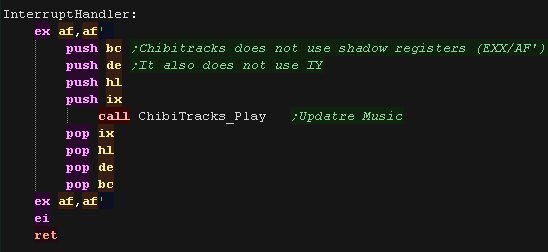
| We need to poll the status register during our interrupt handler
to clear the interrupt we do this via "in a,(vdpControl)" If we don't do this, the interrupt will immediately occur again, and our music will play super fast, while the game will lock up. |
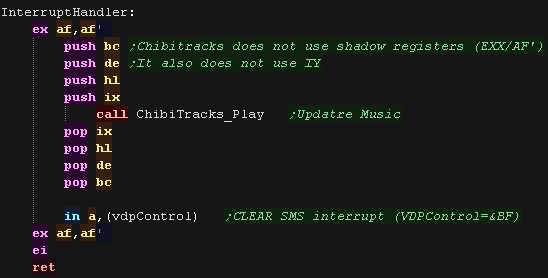 |
| Reading in from the control port will mess up our address
selection, if an interrupt occurs in between writing the H and L
part of the address, to ensure this doesn't happen we disable
interrupts at that time. If an interrupt DOES occur, it will wait until interrupts are enabled again. |
 |
ChibiTracks
| To use ChibiTracks, we need to include the modules of the music
player, We also need the platform specific "Chibisound Pro" sound driver. |
 |
| We need to have a ChiBiTracks music file to play. |
 |
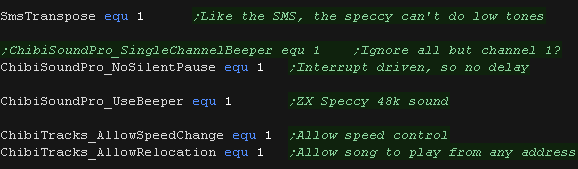
| We have two options 'Allow Speed change' allows us to change the
speed of our song. This is useful to keep the song playing the
same speed on 50hz and 60hz screens. NOTE: Whether this will work
effectively depends on if the speed was pre-multiplied on export
(faster playback, but stops this function working) AllowRelocation allows the binary to be loaded at any memory address, not just the one 'compiled' into the binary at export time - while disabling this will save a little speed/memory it's recommended you keep this enabled! |
 |
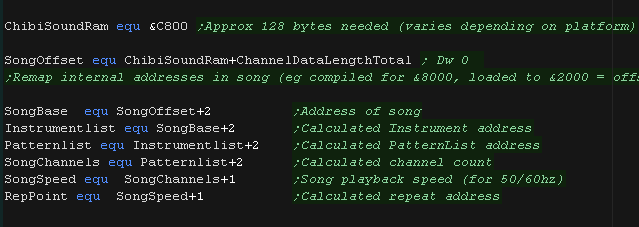
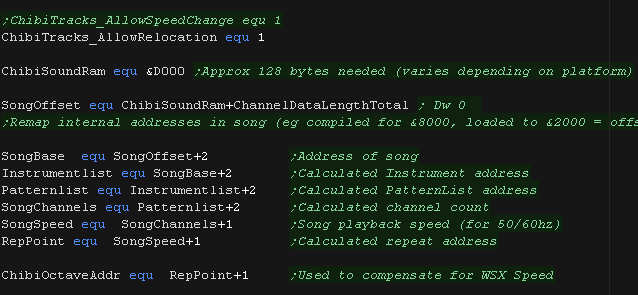
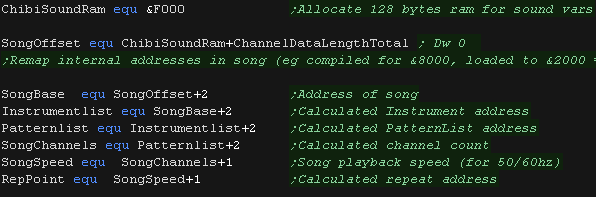
| We need to allocate up to 128 bytes of memory for ChibiSoundPro,
and ChibiTracks player. We define pointers to the ChibiTracks variables within this ram. |
 |
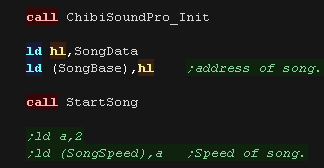
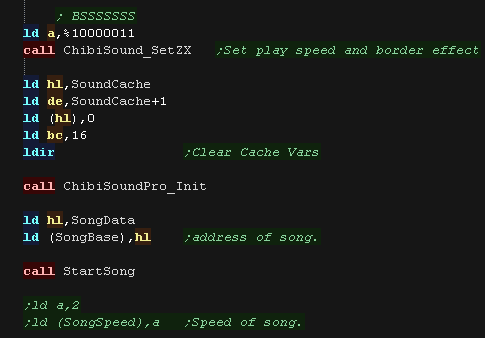
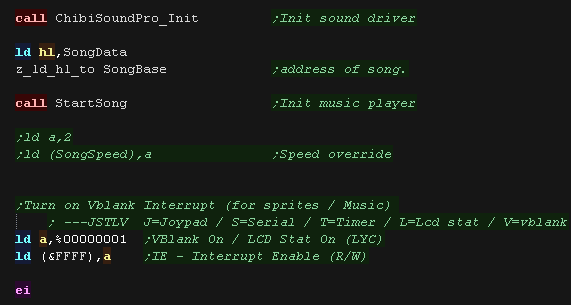
| Before we play anything we need to init the ChibiSoundPro
Driver. To start our song, we set SongBase to point to the music file we want to play, and call StartSong - we do this any time we want the music to change |
 |
| All that's left is to execute the PLAY routine to update the
playing music. ChibiTracks uses AF,BC,DE,HL and IX... it does not use IY or shadow registers. |
|

 |
How we
write our interrupt handler depends if we're running from
RAM or ROM. Here We'll assume we're running from a ROM cartridge, as it's the harder method. The technique is almost identical for a RAM based interrupt handler though. |
The Interrupt Handler
| The video hardware can cause a VBLANK interrupt once per
frame, but for this to happen we need to set bit 5 of VDP
Register 1 to one. Otherwise no interrupts will occur and we won't get any sound! |
 |
| IM1 causes a call to address &0038 on interrupt, If we're working on a system with 64k ram, we can page in RAM and put a JP at that address. Otherwise if we're running from cartridge we have to 'Chain onto' the firmware interrupt handler, we do this by writing a jump at address &FD9Ah |
 |
| We should ensure IM1 is set, and enable interrupts to get
things started. |
|
| Our interrupt handler updates the music. Note: As we're chaining onto the firmware routine, enabling interrupts and clearing the interrupt by reading the VDP status is done for us - we need to do this ourselves if we're writing our own complete interrupt handler |
 |
| Reading in from the control port will mess up our address
selection, if an interrupt occurs in between writing the H and
L part of the address, to ensure this doesn't happen we
disable interrupts at that time. We also use stack misuse during our draw routines, which will not go well, so we keep interrupts disabled. As the joystick connects to the AY port, There are also problems if interrupts occur during Joystick reading It's safest to disable interrupts for any code that may cause problems, the interrupts will wait if they occur while DI is in operation |
 |
ChibiTracks
| To use ChibiTracks, we need to include the modules of the
music player, We also need the platform specific "Chibisound Pro" sound driver. |
|
| We need to have a ChiBiTracks music file to play. |
|
| We have two options 'Allow Speed change' allows us to change
the speed of our song. This is useful to keep the song playing
the same speed on 50hz and 60hz screens. NOTE: Whether this
will work effectively depends on if the speed was
pre-multiplied on export (faster playback, but stops this
function working) AllowRelocation allows the binary to be loaded at any memory address, not just the one 'compiled' into the binary at export time - while disabling this will save a little speed/memory it's recommended you keep this enabled! |
|
| We need to allocate up to 128 bytes of memory for
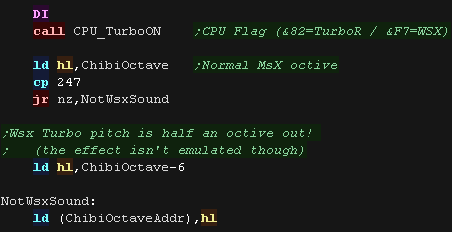
ChibiSoundPro, and ChibiTracks player. We define pointers to the ChibiTracks variables within this ram. "ChibiOctaveAddr" is exclusive to the MSX - The WSX turbo mode plays at a different pitch, and we use this to tweak the octave table to compensate. |
 |
| Before we play anything we need to init the ChibiSoundPro
Driver. To start our song, we set SongBase to point to the music file we want to play, and call StartSong - we do this any time we want the music to change |
|
| All that's left is to execute the PLAY routine to update the
playing music. ChibiTracks uses AF,BC,DE,HL and IX... it does not use IY or shadow registers. |
|
Turbo Mode
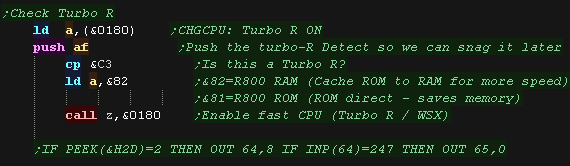
| To detect a turbo R, we read from address &0180, if this
address contains &C3, then we are running on a turbo R Calling address &0180 in the firmware will set Turbo mode depending on the Accumulator, a value of &82 will turn on the fast CPU |
 |
| The WSX has no turbo mode, but has a 6mhz mode which is a little
faster To detect it we load from address &002D, if this address contains 2, then we're running on a panasonic machine. Next we write 8 to port &40, and read back the device id, if it contains 247 then we're on a WSX. We tun on turbo mode by OUTing 0 to port &41 |
 |
| We turn the Turbo Mode on at the start of our program (it does
nothing on a basic msx) The WSX sound pitches are different in turbo to the normal hardware, we shift the pitch table of ChibiOctave if we turned WSX 6mhz mode on. NOTE: The 6mhz pitch shift may not be emulated by your emulator. |
 |

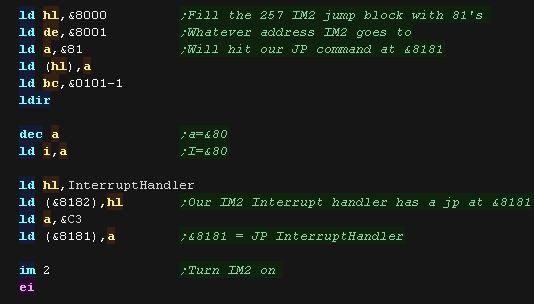
Interrupt Mode 2
In this mode an address is formed by
taking the top byte from the R register, and the bottom byte from the
interrupting device.
A 16 bit word is read from that address, and that address is called.
We can't effectively predict what the bottom byte will be, so we need to define a block of 257 bytes which all point to the same address.
The common solution is to fill memory addresses $8000-$8101 with the value $81. The effect of this is that all interrupts will call to $8181, and it's at that address we put the code for (or jump to) our actual interrupt handler.
This is not very convenient, and IM 1 is far more useful. But on systems like the Spectrum, where low memory (Address &0038) is ROM, then this is the best solution for us.
The Interrupt Handler
| Here we are reserving a block of 400 bytes at &8000 We'll use this to define the 257 byte address block for the IM2 handler, and the jump to the handler itself. Because we're at address &8000, the byte in register I will need to be &80 |
 |
| We use a LDIR to fill the 257 bytes with &8181 We load I with &80 - as our IM2 block starts at &80xx We as our IM2 block contains &8181, we put a jump at address &8181 to our actual interrupt handler. The area &8102-&817F is actually free for use (eg ram vars/stack) |
 |
| Our interrupt handler updates the music. Chibitracks uses HL,BC,DE IX and AF only |
 |
ChibiTracks
| To use ChibiTracks, we need to include the modules of the
music player, We also need the platform specific "Chibisound Pro" sound driver. |
|
| We need to have a ChiBiTracks music file to play. |
|
| We have two options 'Allow Speed change' allows us to change
the speed of our song. This is useful to keep the song playing
the same speed on 50hz and 60hz screens. NOTE: Whether this
will work effectively depends on if the speed was
pre-multiplied on export (faster playback, but stops this
function working) AllowRelocation allows the binary to be loaded at any memory address, not just the one 'compiled' into the binary at export time - while disabling this will save a little speed/memory it's recommended you keep this enabled! UseBeeper enables the beeper version (rather than the AY one for 128k) NoSilentPause disables the delay for silent ticks - our speed is controlled by the interrupt handler, so we don't need this SingleChannelBeeper will ignore all but channel 1 in the song, disabling this means the loudest of the 3 channels will be selected for the beeper to play |
 |
| We need to allocate up to 128 bytes of memory for
ChibiSoundPro, and ChibiTracks player. We define pointers to the ChibiTracks variables within this ram. |
 |
| The spectrum beeper needs cpu time to make a sound - we set
the speed with SetZX, we need to set short beeps (3) so that
the interrupt handler doesn't take too much time and slow down
our game. We clear the 'sound cache' used by the speccy ChibiSoundPro Driver - this is used to record what each channel should be playing, so the one that the beeper plays can be decided. Before we play anything we need to init the ChibiSoundPro Driver. To start our song, we set SongBase to point to the music file we want to play, and call StartSong - we do this any time we want the music to change |
 |
| All that's left is to execute the PLAY routine to update the
playing music. ChibiTracks uses AF,BC,DE,HL and IX... it does not use IY or shadow registers. |
|
 |
Lesson
P89 - Interrupt Driven Music on the Gameboy / GBC Let's write an interrupt handler for the Gameboy, and use it to play music with ChibiTracks! |
|
GBC_MinTile_WithSound.asm
|
|
|
The
gameboy processor isn't a Z80,but it's based on the 8080. It doesn't use IM1 for interrupts, but has a similar address that's called during vblank (&0040) - we'll update our music during that interrupt. |
The Interrupt Handler
| We need to put a jump to our interrupt handler on the VBLANK
interrupt - this is at address &0040 We do this at the start of our ROM cartridge. |
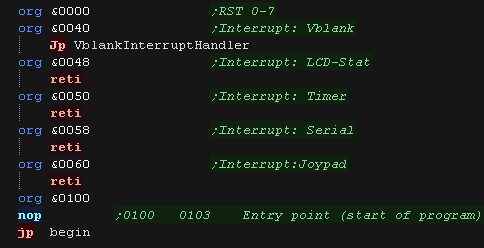 |
| Our interrupt handler jump is in place, but we need to get
the hardware to generate the interrupt , we do this with bit 0
of address &FFFF |
 |
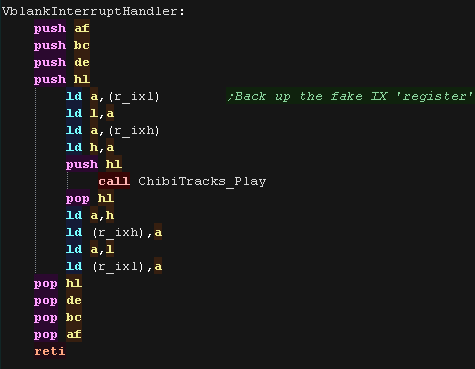
| Our interrupt handler updates the music. ChibiTracks uses all the registers, it also uses the 'fake' IX registers held in memory - we back these up as the rest of our program uses them too. We return with a RETI command |
 |
ChibiTracks
| To use ChibiTracks, we need to include the modules of the
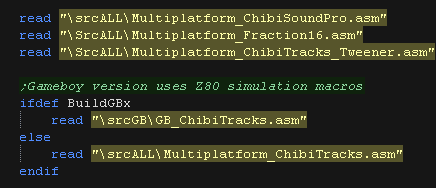
music player. We also need the platform specific "Chibisound Pro" sound driver. ChibiTracks uses a variety of Z80 commands which do not exist on the GB, but we can simulate these with the "\SrcALL\CPU_Compatability.asm" macros |
 |
| We need to have a ChiBiTracks music file to play. |
|
| We have two options 'Allow Speed change' allows us to change
the speed of our song. This is useful to keep the song playing
the same speed on 50hz and 60hz screens. NOTE: Whether this
will work effectively depends on if the speed was
pre-multiplied on export (faster playback, but stops this
function working) AllowRelocation allows the binary to be loaded at any memory address, not just the one 'compiled' into the binary at export time - while disabling this will save a little speed/memory it's recommended you keep this enabled! |
|
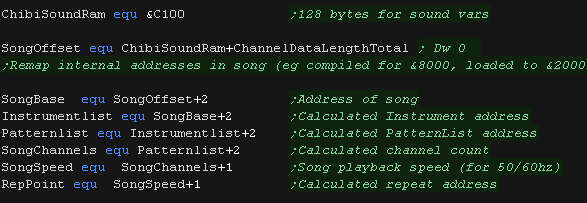
| We need to allocate up to 128 bytes of memory for
ChibiSoundPro, and ChibiTracks player. We define pointers to the ChibiTracks variables within this ram. |
 |
| Before we play anything we need to init the ChibiSoundPro
Driver. To start our song, we set SongBase to point to the music file we want to play, and call StartSong - we do this any time we want the music to change |
 |
| All that's left is to execute the PLAY routine to update the
playing music. ChibiTracks uses AF,BC,DE,HL and IX... On the gameboy, Z80 registers that do not exist are simulated with bytes in memory (r_ixl and r_ixh) |
|
| View Options |
| Default Dark |
| Simple (Hide this menu) |
| Print Mode (white background) |
| Top Menu |
| ***Main Menu*** |
| Youtube channel |
| Patreon |
| Introduction to Assembly (Basics for absolute beginners) |
| Amazon Affiliate Link |
| AkuSprite Editor |
| ChibiTracker |
| Dec/Bin/Hex/Oct/Ascii Table |
| Alt Tech |
| Archive.org |
| Bitchute |
| Odysee |
| Rumble |
| DailyMotion |
| Please note: I wlll upload more content to these alt platforms based on the views they bring in |
| 68000 Content |
| ***68000 Tutorial List*** |
Learn 68000 Assembly  |
| Hello World Series |
| Platform Specific Series |
| Simple Samples |
| Grime 68000 |
| 68000 Downloads |
| 68000 Cheatsheet |
| Sources.7z |
| DevTools kit |
| 68000 Platforms |
| Amiga 500 |
| Atari ST |
| Neo Geo |
| Sega Genesis / Mega Drive |
| Sinclair QL |
| X68000 (Sharp x68k) |
| 8086 Content |
| Learn 8086 Assembly |
| Platform Specific Series |
| Hello World Series |
| Simple Samples |
| 8086 Downloads |
| 8086 Cheatsheet |
| Sources.7z |
| DevTools kit |
| 8086 Platforms |
| Wonderswan |
| MsDos |
| ARM Content |
| Learn ARM Assembly |
| Learn ARM Thumb Assembly |
| Platform Specific Series |
| Hello World |
| Simple Samples |
| ARM Downloads |
| ARM Cheatsheet |
| Sources.7z |
| DevTools kit |
| ARM Platforms |
| Gameboy Advance |
| Nintendo DS |
| Risc Os |
| Risc-V Content |
| Learn Risc-V Assembly |
| Risc-V Downloads |
| Risc-V Cheatsheet |
| Sources.7z |
| DevTools kit |
| MIPS Content |
| Learn Risc-V Assembly |
| Platform Specific Series |
| Hello World |
| Simple Samples |
| MIPS Downloads |
| MIPS Cheatsheet |
| Sources.7z |
| DevTools kit |
| MIPS Platforms |
| Playstation |
| N64 |
| PDP-11 Content |
| Learn PDP-11 Assembly |
| Platform Specific Series |
| Simple Samples |
| PDP-11 Downloads |
| PDP-11 Cheatsheet |
| Sources.7z |
| DevTools kit |
| PDP-11 Platforms |
| PDP-11 |
| UKNC |
| TMS9900 Content |
| Learn TMS9900 Assembly |
| Platform Specific Series |
| Hello World |
| TMS9900 Downloads |
| TMS9900 Cheatsheet |
| Sources.7z |
| DevTools kit |
| TMS9900 Platforms |
| Ti 99 |
| 6809 Content |
| Learn 6809 Assembly |
| Learn 6309 Assembly |
| Platform Specific Series |
| Hello World Series |
| Simple Samples |
| 6809 Downloads |
| 6809/6309 Cheatsheet |
| Sources.7z |
| DevTools kit |
| 6809 Platforms |
| Dragon 32/Tandy Coco |
| Fujitsu FM7 |
| TRS-80 Coco 3 |
| Vectrex |
| 65816 Content |
| Learn 65816 Assembly |
| Hello World |
| Simple Samples |
| 65816 Downloads |
| 65816 Cheatsheet |
| Sources.7z |
| DevTools kit |
| 65816 Platforms |
| SNES |
| eZ80 Content |
| Learn eZ80 Assembly |
| Platform Specific Series |
| eZ80 Downloads |
| eZ80 Cheatsheet |
| Sources.7z |
| DevTools kit |
| eZ80 Platforms |
| Ti84 PCE |
| IBM370 Content |
| Learn IBM370 Assembly |
| Simple Samples |
| IBM370 Downloads |
| IBM370 Cheatsheet |
| Sources.7z |
| DevTools kit |
| Super-H Content |
| Learn SH2 Assembly |
| Hello World Series |
| Simple Samples |
| SH2 Downloads |
| SH2 Cheatsheet |
| Sources.7z |
| DevTools kit |
| SH2 Platforms |
| 32x |
| Saturn |
| PowerPC Content |
| Learn PowerPC Assembly |
| Hello World Series |
| Simple Samples |
| PowerPC Downloads |
| PowerPC Cheatsheet |
| Sources.7z |
| DevTools kit |
| PowerPC Platforms |
| Gamecube |
| Work in Progress |
| ChibiAndroids |
| Misc bits |
| Ruby programming |
Buy my Assembly programming book
on Amazon in Print or Kindle!


Available worldwide!
Search 'ChibiAkumas' on
your local Amazon website!
Click here for more info!


Buy my Assembly programming book
on Amazon in Print or Kindle!
Available worldwide!
Search 'ChibiAkumas' on
your local Amazon website!
Click here for more info!
Buy my Assembly programming book
on Amazon in Print or Kindle!
Available worldwide!
Search 'ChibiAkumas' on
your local Amazon website!
Click here for more info!