

Learn Multi
platform Z80 Assembly Programming... With
Vampires!
Platform Specific Lessons
Platform Specific Lessons
<- Back to the Main
Contents & Basic Z80 Assembly Lessons
Platform Specific Series - Lets learn how the hardware of the systems work, so we can get it to do what we want... Covers Amsrad CPC,MSX,ZX Spectrum, TI-83,Enterprise 128/64 and Sam Coupe!
Platform Specific Series - Lets learn how the hardware of the systems work, so we can get it to do what we want... Covers Amsrad CPC,MSX,ZX Spectrum, TI-83,Enterprise 128/64 and Sam Coupe!


Why IM2?
The SAM coupe can use IM1, as we can page
in ram to the &0038 address, but there's an issue!
The screen ram takes a whopping 24K, two thirds of one of the pagable banks. If we want to page in pattern graphics into the low bank (&0000-&7FFF), to draw to the screen in the high bank (&8000-&FFFF)
Where will our interrupt handler be?
The screen ram takes a whopping 24K, two thirds of one of the pagable banks. If we want to page in pattern graphics into the low bank (&0000-&7FFF), to draw to the screen in the high bank (&8000-&FFFF)
Where will our interrupt handler be?
We could disable interrupts, while we
copy graphics, but missed interrupts on the SAM never occur, so our
music would slow down.
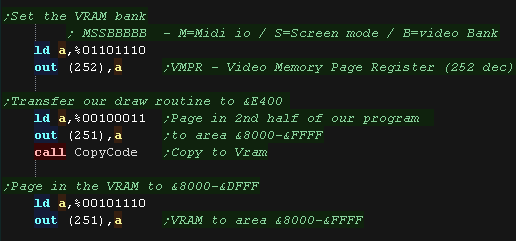
The solution we'll use it to set up an
IM2 block at the &E000-&E200 range (Vram uses
&8000-&DFFF). Our interrupt handler will page the music back
in (and out) to the &0000-&7FFF range
We'll then copy our drawing routines to
&E400 - This allows the drawing routines to page in more bitmap
patterns into the &0000-&7FFF range to copy to Vram.
Interrupt Mode 2
In this mode an address is formed by
taking the top byte from the R register, and the bottom byte from the
interrupting device.
A 16 bit word is read from that address, and that address is called.
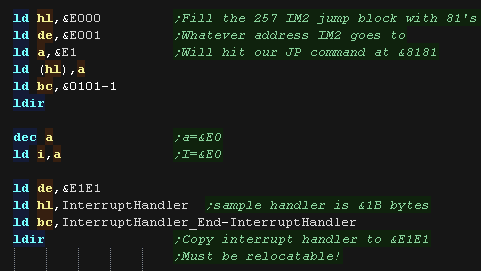
We can't effectively predict what the bottom byte will be, so we need to define a block of 257 bytes which all point to the same address.
The common solution is to fill memory addresses $8000-$8101 with the value $81. The effect of this is that all interrupts will call to $8181, and it's at that address we put the code for (or jump to) our actual interrupt handler.
This is not very convenient, and IM 1 is far more useful. But on systems like the Spectrum, where low memory (Address &0038) is ROM, then this is the best solution for us.
A 16 bit word is read from that address, and that address is called.
We can't effectively predict what the bottom byte will be, so we need to define a block of 257 bytes which all point to the same address.
The common solution is to fill memory addresses $8000-$8101 with the value $81. The effect of this is that all interrupts will call to $8181, and it's at that address we put the code for (or jump to) our actual interrupt handler.
This is not very convenient, and IM 1 is far more useful. But on systems like the Spectrum, where low memory (Address &0038) is ROM, then this is the best solution for us.
The Interrupt Handler
| We use a LDIR to fill the 257 bytes with &E1E1 We load I with &E0 - as our IM2 block starts at &E0xx We as our IM2 block contains &E1E1, we copy our interrupt handler to address &E1E1. The area &E102-&E1E0 is actually free for use (eg ram vars/stack) |
 |
| The interrupt handler must be relocatable, meaning we can
use JR, but not JP or CALL (the Call to ChibiTracks_PLAY is fine, as the paging operation moves this to the right address) port 250 controls the low bank, we remember the current setting, then page in the music bank (%00100001) so we can play it Our interrupt handler updates the music. Chibitracks uses HL,BC,DE IX and AF only |
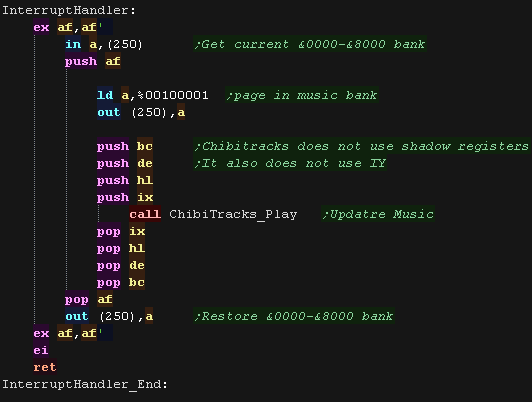 |
| We need to switch on IM2 and enable interrupts |  |
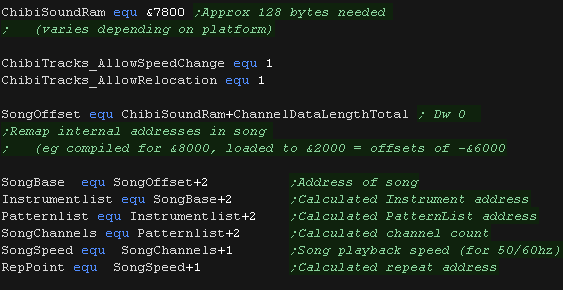
ChibiTracks
| To use ChibiTracks, we need to include the modules of the
music player, We also need the platform specific "Chibisound Pro" sound driver. |
 |
| We need to have a ChiBiTracks music file to play. |
 |
| We have two options 'Allow Speed change' allows us to change
the speed of our song. This is useful to keep the song playing
the same speed on 50hz and 60hz screens. NOTE: Whether this
will work effectively depends on if the speed was
pre-multiplied on export (faster playback, but stops this
function working) AllowRelocation allows the binary to be loaded at any memory address, not just the one 'compiled' into the binary at export time - while disabling this will save a little speed/memory it's recommended you keep this enabled! We need to allocate up to 128 bytes of memory for ChibiSoundPro, and ChibiTracks player. We define pointers to the ChibiTracks variables within this ram. |
 |
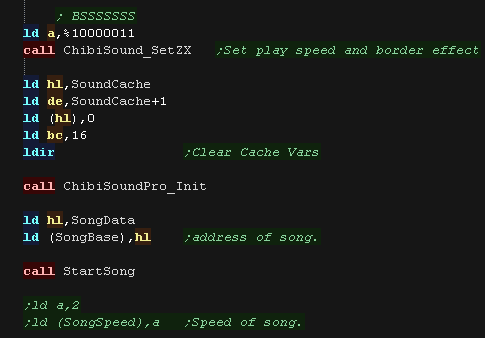
| Before we play anything we need to init the ChibiSoundPro
Driver. To start our song, we set SongBase to point to the music file we want to play, and call StartSong - we do this any time we want the music to change |
 |
| All that's left is to execute the PLAY routine to update the
playing music. ChibiTracks uses AF,BC,DE,HL and IX... it does not use IY or shadow registers. |
|
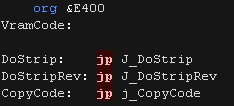
Relocating the graphics routines
| We're going to use the &8000+ range for VRAM in bank 15/16,
but we want to copy our drawing routines to &E400 in this
bank. We page in bank 3 - which will contain the second 32k of our program, and run 'CopyCode' which will transfer the drawing routine. |
 |
| To make working with this 'relocated code' easier, we've put a
jump block at the start of the bank. |
 |
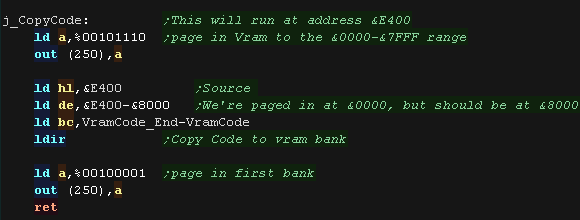
| Our copy code pages in the VRAM bank to the &0000-&7FFF
range - this is the wrong range, but our running code is at
&8000-&FFFF! We transfer all our drawing routines to the same addresses in the VRAM bank. We can now run our graphics routines in the graphics bank! |
 |
 |
The drawing
code in this example doesn't ACTUALLY bankswitch, the example is
so simple it doesn't need to, but the potential is there, as
we've coded our example in a way to allow the bottom bank
&0000-&7FFF to be switched during drawing. |

MaxTile Definitions
| Maxtile is optimized to work as efficiently as possible with the
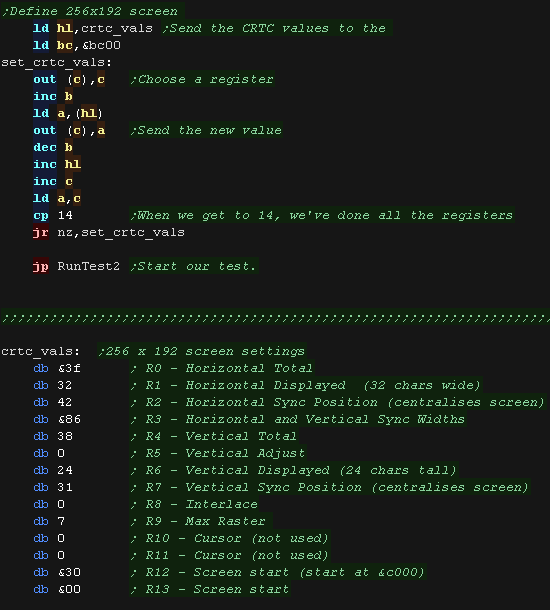
VRAM layout. the CPC version is designed to work with a 256x192 screen, as this gives the best compatibility with other systems. It also means the VRAM movement commands can only update the L part of the HL address, which increases speed a little too. We send a sequence of values to the CRTC chip to set up the screen layout. The 256x192 screen is 12k, but the CPC 'spreads' it over 16k, leaving some 512 byte blocks spare... we'll use some of these for our work data! Free areas: ;&C600-&C7FF ;&200 *8 = &1000 free ;&CE00-&CFFF ;&D600-&D7FF ;&DE00-&DFFF ;&E600-&E7FF ;&EE00-&EFFF ;&F600-&F7FF ;&FE00-&FFFF |
 |
| We use some of this spare memory for the 3 draw caches (each 256
bytes) we also use 256 bytes for the 'Xflip lookup table' The screen is 256x192, which is 128x96 in logical units. As usual on the CPC the VRAM base of the screen is &C000. Our drawing routine uses Stack misuse, so we have to disable interrupts, but we can turn them on between draws, so we set DOEI to turn interrupts on. |
 |
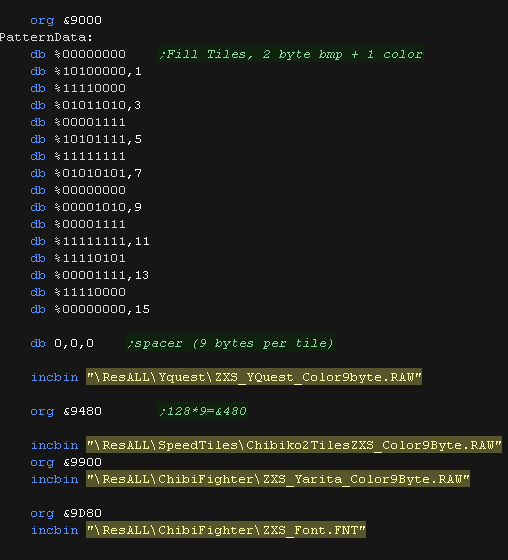
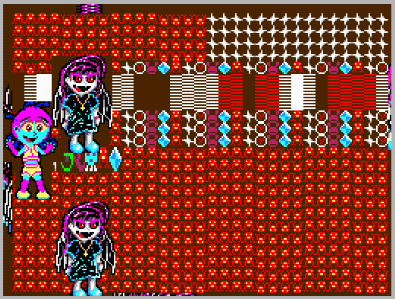
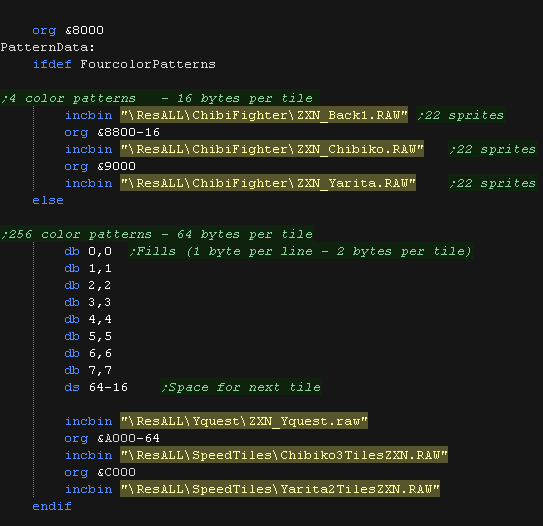
| Here is the Tile pattern data The CPC Tile Drawing routines use 4 color 8x8 tiles, So each tile uses 16 bytes. 'Fill tiles' are a special case, they fill a tile with 2 bytes (saving time and memory) |
 |
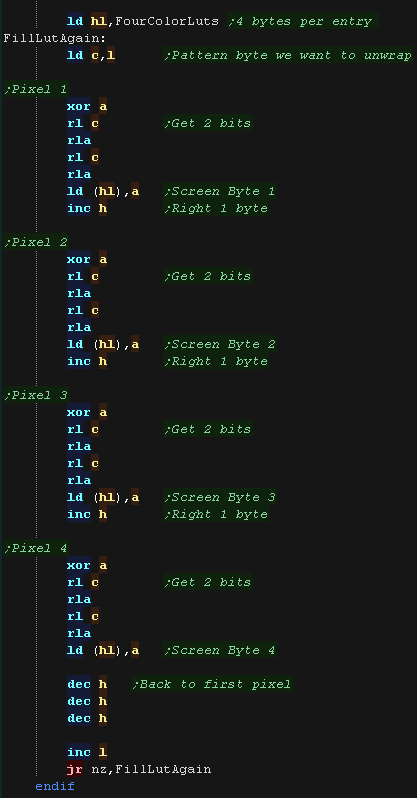
| Amstrad CPC Mode 1 has 4 pixels in each byte, with 2 bits
defining each pixel color. We'll calculate an Xflip LUT It would be too slow to shift these in realtime, so we 'precaclulate' the flipped equivalent of each of the 256 possible source bytes. This saves memory compared to storing alternative patterns. Yflip does not require a lookup table, we instead move UP VRAM instead of DOWN as we draw the pattern! |
 |
| When we want to draw a sprite object to the screen, we need to calculate the VRAM destination. MaxTile uses X,Y co-ordinates in 'Logical Units' (Pairs of pixels) - this is passed in BC, and the Vram destination is returned in HL Due to the CPC screen layout, it's hard to move down 4 pixels. Making out drawing routines support this would cause them to be much slower... so instead we have a second set of routines, all of which are optimized for a 4 Pixel Y shift! if this is enabled, we can allow the Half shift, otherwise we round our Y move to full tiles. The screen base is &C000 Looking at Y line (in C) - we need to take each set of bits, and work with them separately: YYYYYYYY Y line number (0-200) -----YYY (0-7) - this part needs to be multiplied by &0800 and added to the total YYYYY--- (0-31) - This part needs to be multiplied by 64 (&40) The Xpos (in B) in bytes is added as an offset. |
 |
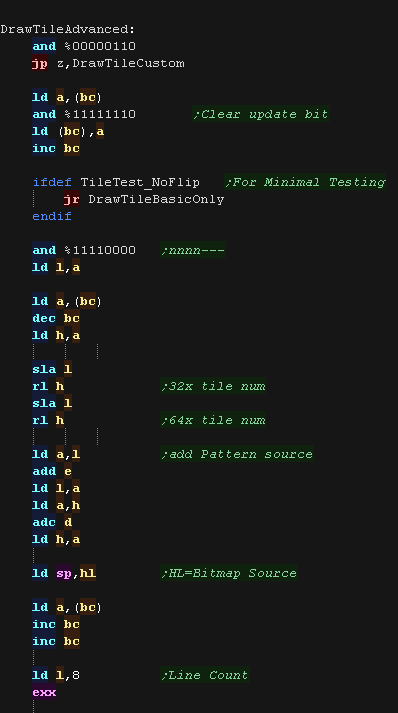
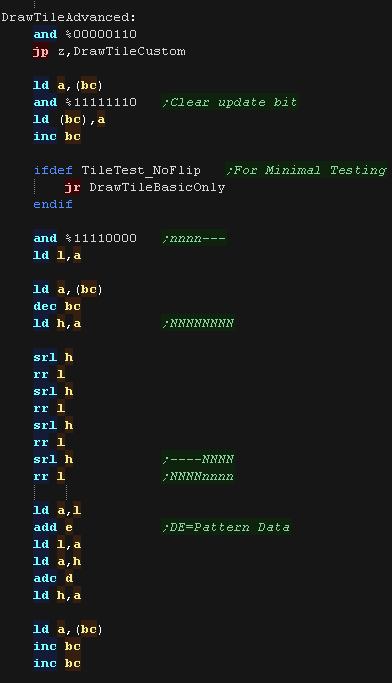
Tile Drawing!
| The DrawTile Routine is called by the shared code, This shared
code will backup and restore the stack pointer and load the first
byte of the 16 bit tile number into A The low bit is shifted out (the update bit)... we need to reset it to 0 anyway! The following registers are loaded: BC=Tilemap DE=Tile Bitmap Pattern data HL'=VRAM Destination |
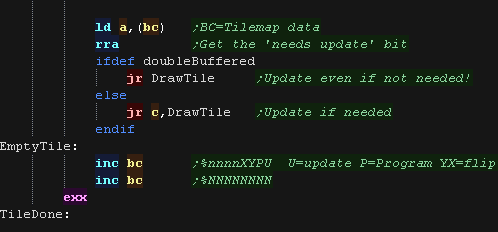 |
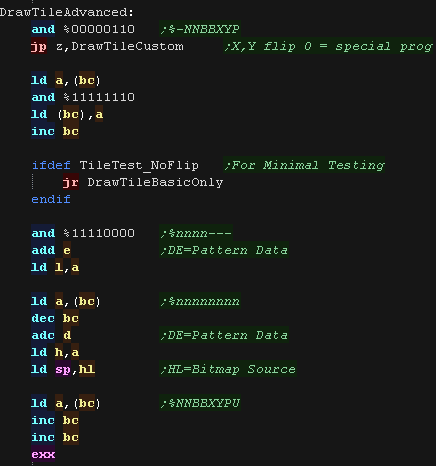
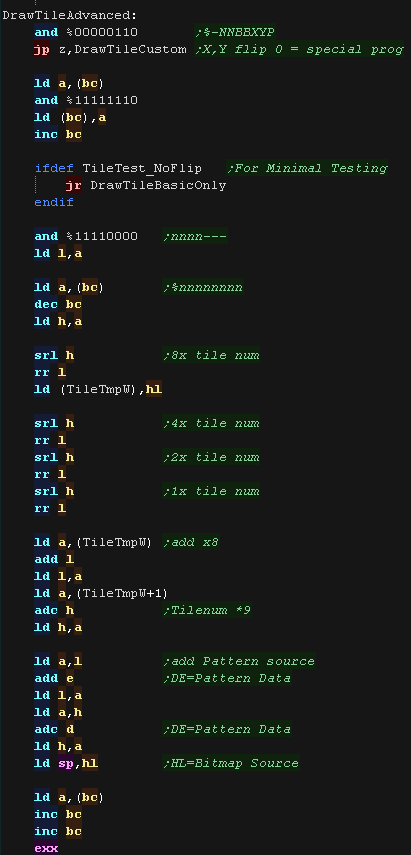
| To optimize things, the tile drawing works as a 'binary tree',
deciding the kind of tile drawing routine to use The Platform specific draw routine DrawTile starts by ckecking Bit 1 (now Bit 0) This is the 'Program' flag - If this is 0, then this is the simplest unflipped tile, otherwise we switch to the advanced routine. If we're drawing a basic tile, we shift a 0 back into A, and write it back, that clears the Update flag, as we will draw the tile now. |
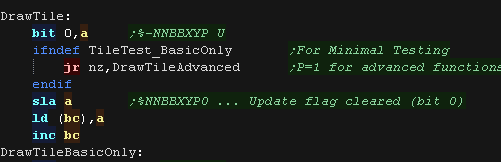 |
| We're going to draw a basic unflipped
tile We need to load the second byte of the tilenumber, and add it to DE (the pattern data) This gives us the source address - which we shift into SP, as we'll use stack misuse and POP the source bitmap data off the stack! |
 |
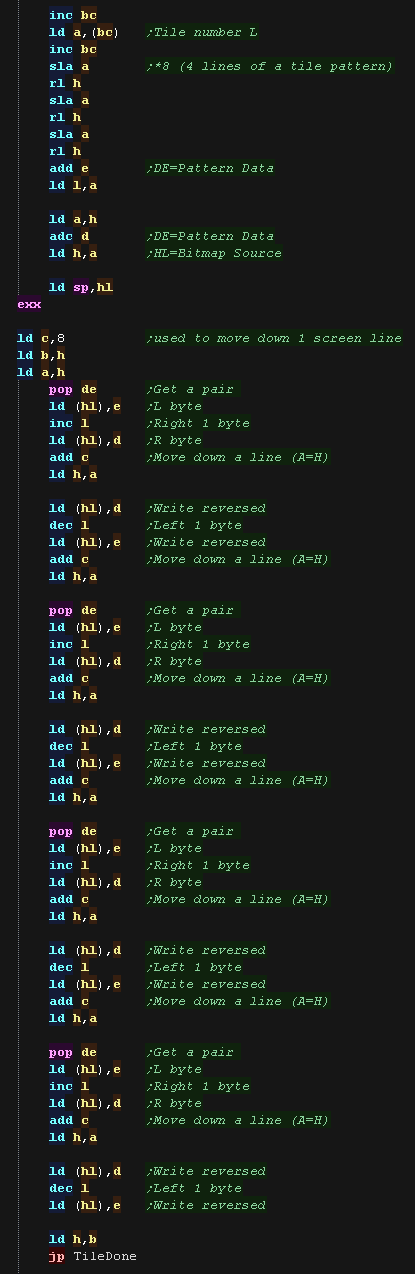
| We now use a huge 'unwrapped loop to move each line
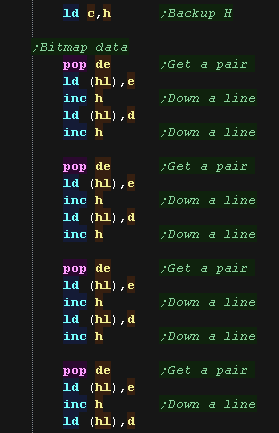
of our source pattern to the screen. HL is the VRAM destination. We back up the top byte of the HL destination in B, and also hold it in A We pop a pair of bytes out the pattern source and write them to the HL destination in a Zig zag pattern... INC L for the first line, DEC L for the second We move down a line by adding 8 (in C) to A, then shiftin A back to H we reset the HL pair (from B) after the tile and return. Note: the XY bits of the pattern number are unused in this case (They define flip mode if the Program bit was set)... These could be used for a 'Tile Tint' (for 4 color patterns on 16 color systems) or a bank number (for bankswitching huge tile sets) |
 |
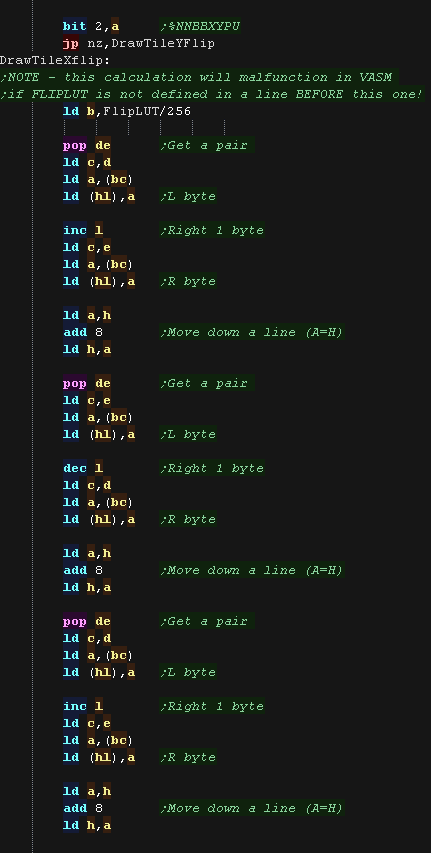
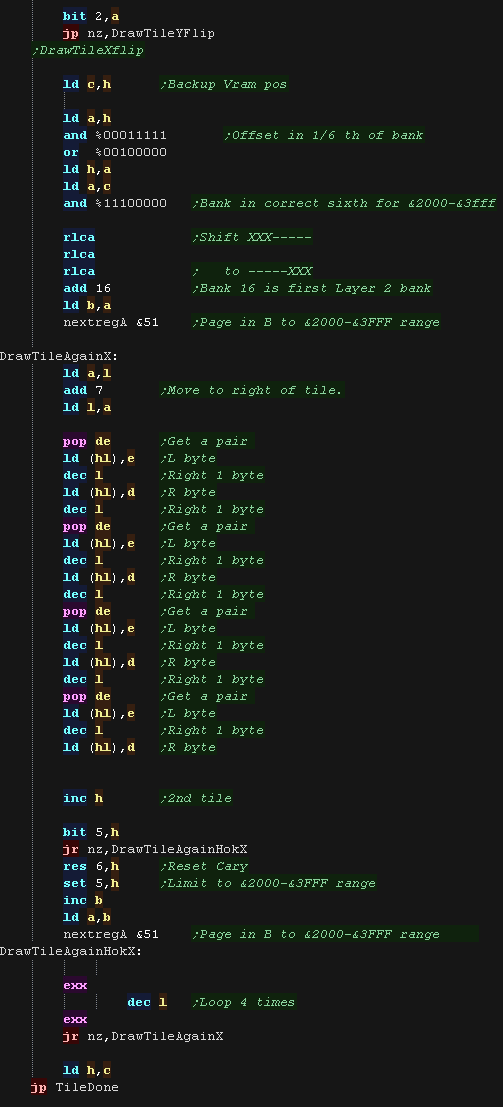
| If the Program bit was 1, then either we need to flip, or run
some 'custom code' Next we check the XY bits, if both are 0 this is not a flip (Transparent, Filled, Double etc) If either bit (or both) is 1, then this is some kind of flip, so we calculate the pattern source address, and move it into the stack pointer. |
 |
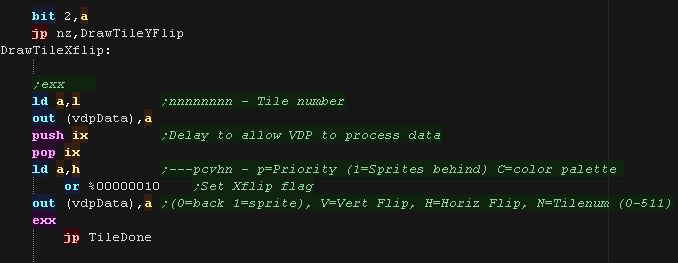
| If the Y flip bit is 0 we must be X flipping! We Pop each source pattern byte off the stack, then Xflip it via the Lookup table (in BC) The code is basically the same as the unflipped one, but Unfortunately, as we're using BC for the LUT and A for converting bytes, the code is a bit less efficient moving down the screen. |
 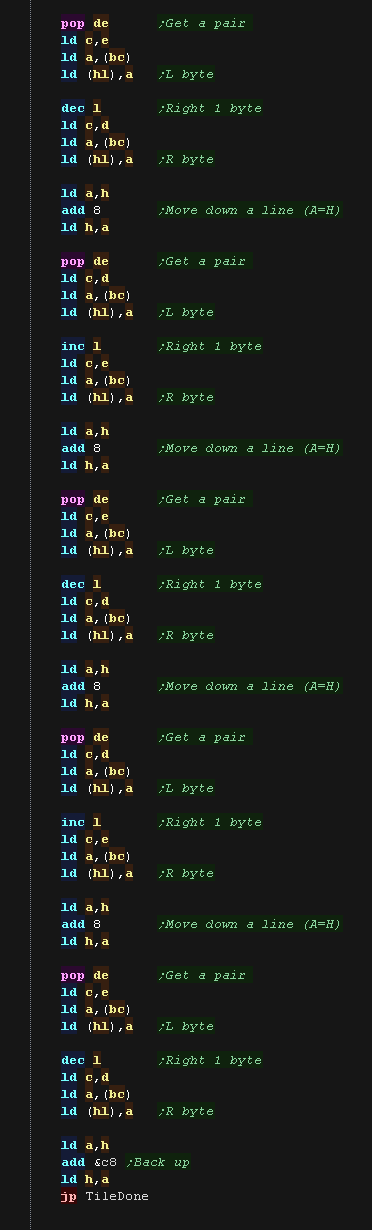 |
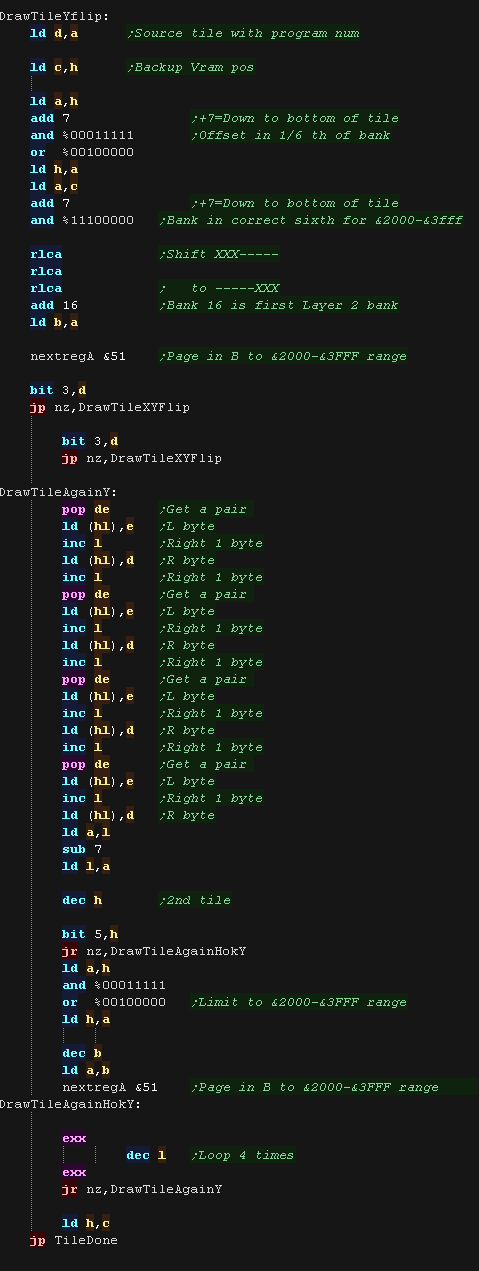
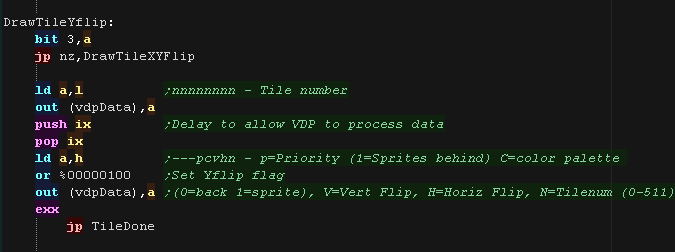
| If the Y flip bit was set we now check if the X
flip bit is also set. If it's not we're just Yflipping! To flip vertically we load the source pattern data normally, but we write it from the bottom of the tile upwards. |
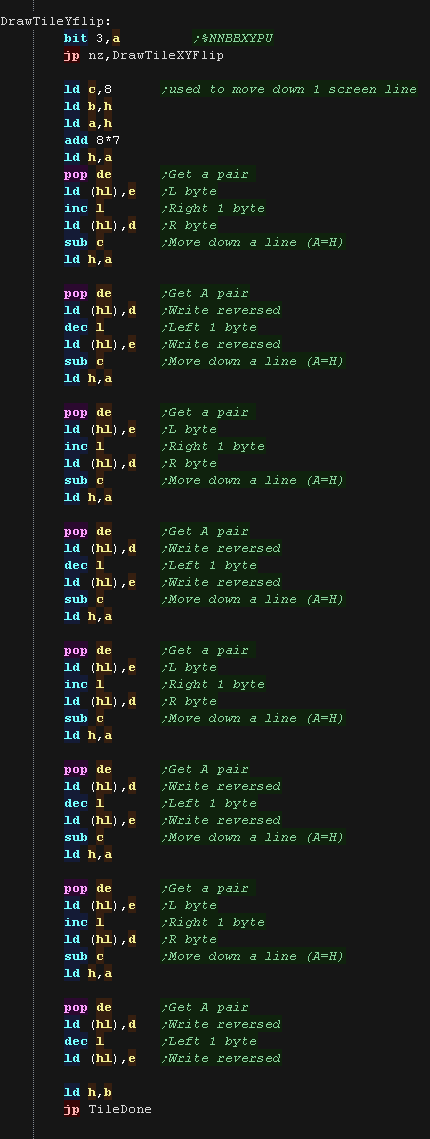 |
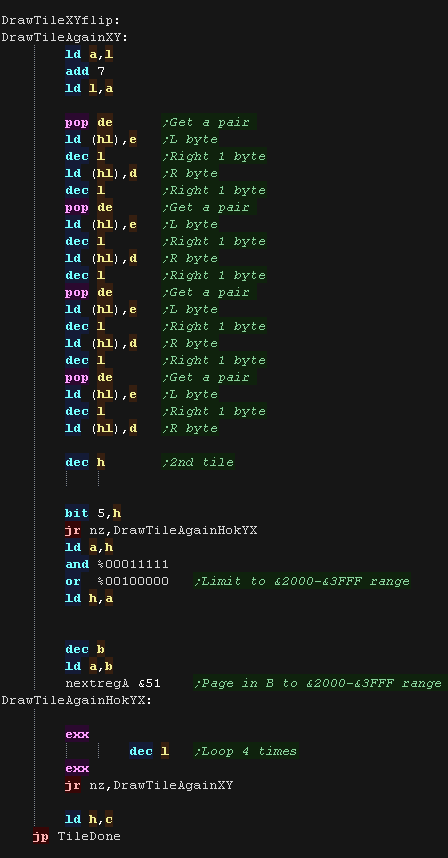
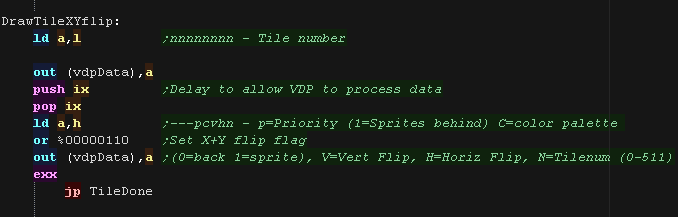
| if the X bit was set as well as Y we need to XY flip. We do this with a combination of both 'tricks' We use the LUT to X flip, and draw to the screen Bottom to Top to Y flip! |
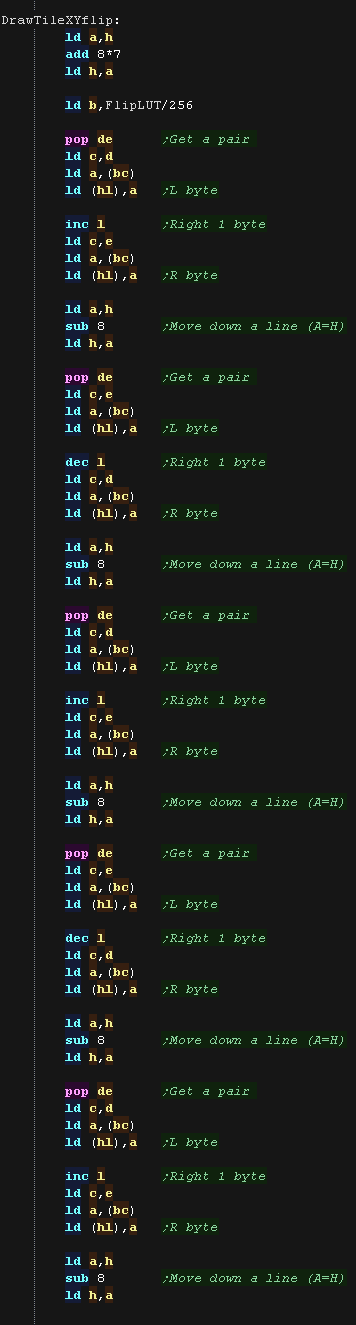 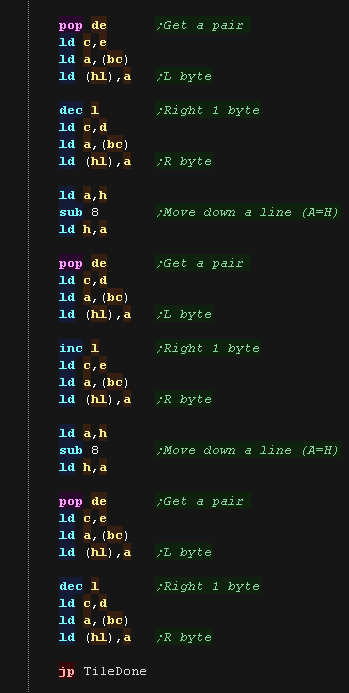 |
MaxTile Custom Draw Types
| Bits 1,2,3... XYP=%001 defines a custom program When a custom program is being used Bits 4,5 define the program type (rather than part of the low tile number) %00=Filled Tile %01=Double height tile %10=unused %11=Transparent tile/empty tile The remaining two bits 6,7 act as the High part of the tile number %------NN nnnnnnnn |
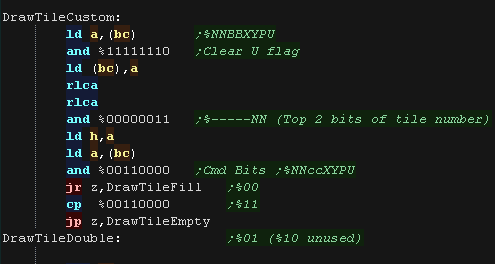 |
| A double height
tile uses only 4 lines of a pattern, so we multiply the pattern
number by 8 We then draw each line of the pattern twice to the screen. |
 |
| The fill tile is
the simplest! We use 2 bytes from the pattern data, and fill each line with one of the two We use E for one line, then D for one line - this allows us to make a nice 'checkerboard' patterned fill, or alternate lines in different colors. As so little data is read, This routine is the fastest, so should be used for as much as possible of our tilemap! |
 |
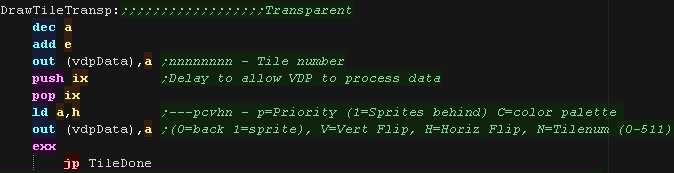
| The final type is the Transparent
tile. if the Tilenumber=255 then this tile is completely transparent, and no data will be drawn |
 |
| Our transparency is a crude '0 byte' transparency. Basically, any byte equal to 0 is not drawn to the screen, others are drawn normally. We compare to the transparent 0 (in C, moved to A) and skip over the draw command if the bytes match. In fact, if we switch C we can define another byte to be transparent (Chibiakumas used a 'rainbow byte' with color 3210 or 0123 as transparent in some cases). More impressive transparency can be achieved via a LUT and a combination of AND/OR, however this simple transparency is fast, and tends to give a nice 'cartoon' effect with black outlines to characters |
  |
Half tile Y shift
| Due to the VRAM layout it's not efficient to make our drawing
routines 'flexible' with Y position. The routines above can only
draw tiles aligned to an 8x8 grid. We do however have alternative versions, which are shifted Y+4 pixels! If we detect a Y offset, the draw tilemap routine switches to the alternative code. |
 |
| The alternative dostrip routine switches to the alternative tile
draw routine, apart from that it works in the same way as before |
 |
| The drawing routines are similar to the unshifted ones, however
more complex line calculations have to be done on the 4th line to
compensate for crossing the 'aligned tile' boundary |
 |
|
So long as we
align our tiles to an 8x8 boundary we can use almost all the
same code as before! Due to the screen layout, If we allowed half tile movements our code would become much more complex and much slower, so we won't do that for now!!! |
Overscan!
| The lines of the screen are split into two 'halves', these fill
the two 16k banks at &8000-&BFFF and &C000-&FFFF Lines 0-127 start at memory address base &8200 Lines 128-271 start at memory address base &C000 The formulas we need to use to move around memory are a bit more complex for Overscan which will make 'half tile' moves almost impossible, at least implausible for a example of this scope. With a 256 pixel, 64 byte wide screen we only needed to update L as we moved across the screen. But now, because our screen is 96 bytes wide, we will need to update H and L, at least when we move a full tile, the odd (mid tile) moves we can still just update L Moving down a line is the same as before, we add &0800 to HL, but moving over the 8 line boundary (down a tile) is more complex, as we have to cope with the 'jump' between the two banks (over address &B7FF we have to jump to &C000) |
 |
||
| A 384x272 @ 4 color screen should be about 25k, but it actually
covers 31k (&8200-&FEC0) The reason for this 'Discrepancy' is that there are gaps which are not used by the pixel data, which we can use for our work data - which may be important when half our 64k ram is used by the screen!!! Because the second bank has more screen lines (144), the &C000-&FFFF area has smaller unused areas. |
|
Upgrading for Overscan
| We need to use an alternative set of CRTC settings to define our larger screen, and strange memory layout! |  |
| The settings we're using for overscan result in a
screen 'split' into two banks Lines 0-127 start at memory address base &8200 Lines 128-271 start at memory address base &C000 Similar to before, the top 5 bits of our Ypos (Ytile) is multiplied by 96 (&0), and the bottom 3 bits (Yoffset) are multiplied by &0800 We also add our Xpos in bytes (Xbyte Our ScreenPos formula is: VRAM = Base+ Ytile*96 + Yoffset*&0800 + Xbyte Because our screen is over 256 lines tall, we keep the Y position in logical units rather than lines during this calculation |
 |
| Provided we're aligned to an 8x8 boundary, our
existing Drawtile code will work unchanged! |
 |
| When we move across a tile we need to inc only L for the first
byte (The middle of the tile) but HL for the second When our screen was 256 pixels and 64 bytes wide we only needed to worry about L But now our overscan screen is 96 bytes wide, we need to ensure both H and L are updated when we move 8 pixels, as both may need updating. |
 |
| To move down a 1 pixel Y-line we add &0800 as before, but
when we want to move down a single line things are more tricky! Generally speaking we add 96 &0060 |
 |

MaxTile Definitions
| Maxtile is optimized to work as efficiently as possible with
the VRAM layout. the Enterprise version is designed to work with a 256x192 screen, as this gives the best compatibility with other systems. It also means the VRAM movement commands can only update the L part of the HL address, which increases speed a little too. We define the screen size with the line parameter table. |
 |
| The screen is 256x192, which is 128x96 in logical units. The VRAM base of the screen is &C000. We use some of this spare memory for the 3 draw caches (each 256 bytes) we also use 256 bytes for the 'Xflip lookup table' We define these in the unused memory of the &C000-&FFFF bank Our drawing routine uses Stack misuse, so we have to disable interrupts, but we can turn them on between draws, so we set DOEI to turn interrupts on. |
|
| Here is the Tile pattern data The Enterprise Tile Drawing routines use 4 color 8x8 tiles, So each tile uses 16 bytes. 'Fill tiles' are a special case, they fill a tile with 2 bytes (saving time and memory) |
|
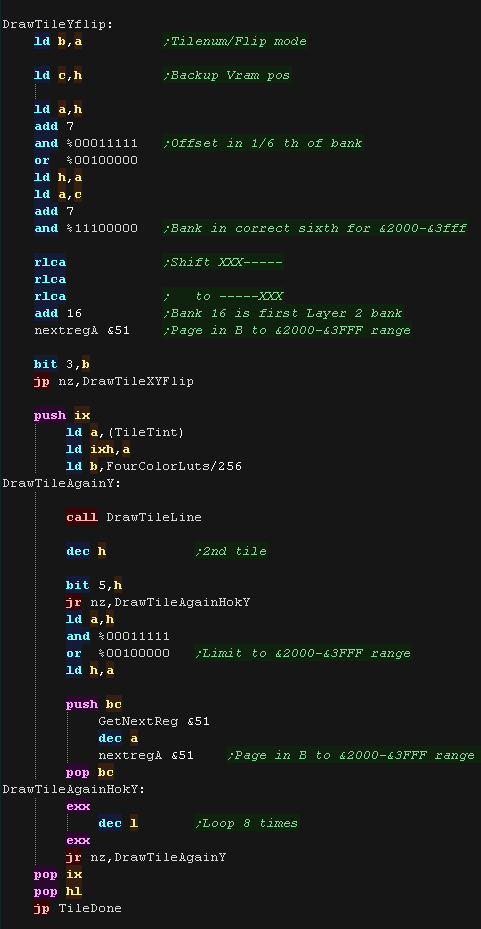
| The Enterprise is the same layout as Amstrad CPC Mode 1 has 4
pixels in each byte, with 2 bits defining each pixel color. We'll calculate an Xflip LUT It would be too slow to shift these in realtime, so we 'precaclulate' the flipped equivalent of each of the 256 possible source bytes. This saves memory compared to storing alternative patterns. Yflip does not require a lookup table, we instead move UP VRAM instead of DOWN as we draw the pattern! |
|
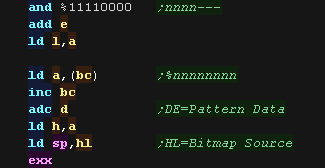
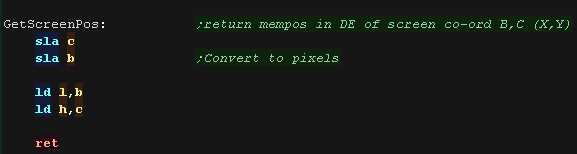
| When we want to draw a sprite object to the screen, we need to
calculate the VRAM destination. MaxTile uses X,Y co-ordinates in 'Logical Units' (Pairs of pixels) - this is passed in BC, and the Vram destination is returned in HL While the layout of pixels in a byte is the same as the CPC, the screen layout is much simpler!, Thanks to the LPT table we defined The Enterprise memory layout is very simple! Our VRAM destination is: VRAM= &C000 + (YlineInPixels *64) + XposInBytes |
 |
Tile Drawing!
| The DrawTile Routine is called by the shared code, This shared
code will backup and restore the stack pointer and load the
first byte of the 16 bit tile number into A The low bit is shifted out (the update bit)... we need to reset it to 0 anyway! The following registers are loaded: BC=Tilemap DE=Tile Bitmap Pattern data HL'=VRAM Destination |
|
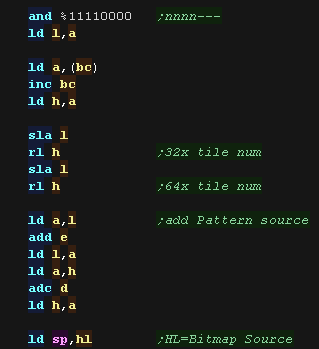
| To optimize things, the tile drawing works as a 'binary tree',
deciding the kind of tile drawing routine to use The Platform specific draw routine DrawTile starts by ckecking Bit 1 (now Bit 0) This is the 'Program' flag - If this is 0, then this is the simplest unflipped tile, otherwise we switch to the advanced routine. If we're drawing a basic tile, we shift a 0 back into A, and write it back, that clears the Update flag, as we will draw the tile now. |
|
| We're going to draw a basic unflipped
tile We need to load the second byte of the tilenumber, and add it to DE (the pattern data) This gives us the source address - which we shift into SP, as we'll use stack misuse and POP the source bitmap data off the stack! |
|
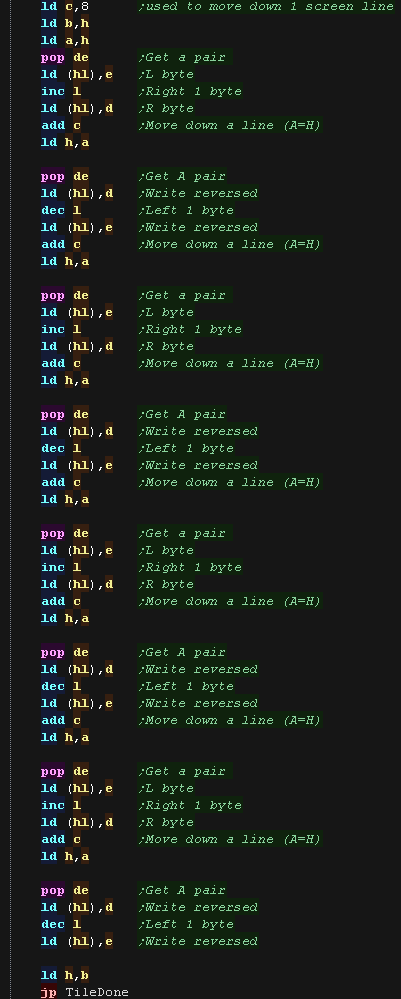
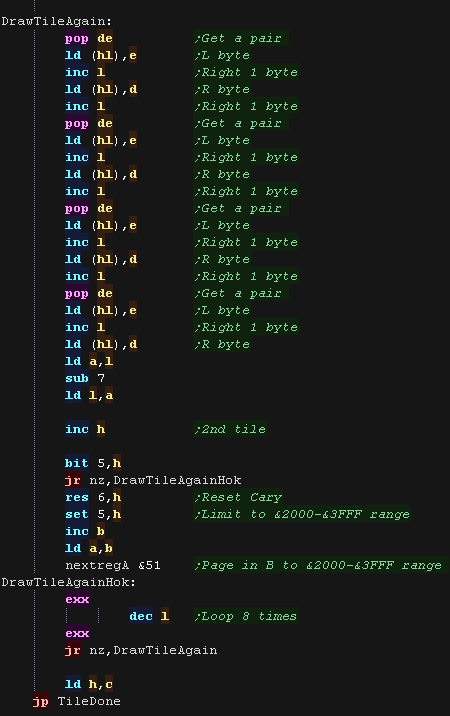
| We now use a huge 'unwrapped loop to move each
line of our source pattern to the screen. HL is the VRAM destination. We back up the top byte of the HL destination in B, and also hold it in A We pop a pair of bytes out the pattern source and write them to the HL destination in a Zig zag pattern... INC L for the first line, DEC L for the second We move down a line by adding 64 (&40) (in C) to A, then copying A back to L This works for the first 4 lines, but as 64*4=256, after that we need to increment the H part we reset the HL pair (from B) after the tile and return. Note: the XY bits of the pattern number are unused in this case (They define flip mode if the Program bit was set)... These could be used for a 'Tile Tint' (for 4 color patterns on 16 color systems) or a bank number (for bankswitching huge tile sets) |
 |
| If the Program bit was 1, then either we need to flip, or run
some 'custom code' Next we check the XY bits, if both are 0 this is not a flip (Transparent, Filled, Double etc) If either bit (or both) is 1, then this is some kind of flip, so we calculate the pattern source address, and move it into the stack pointer. |
|
| If the Y flip bit is 0 we must be X flipping! We Pop each source pattern byte off the stack, then Xflip it via the Lookup table (in BC) The code is basically the same as the unflipped one, but Unfortunately, as we're using BC for the LUT and A for converting bytes, the code is a bit less efficient moving down the screen. |
  |
| If the Y flip bit was set we now check if the X
flip bit is also set. If it's not we're just Yflipping! To flip vertically we load the source pattern data normally, but we write it from the bottom of the tile upwards. We INC H, and subtract 64 from the L part, this moves us to the last line of the tile |
 |
| if the X bit was set as well as Y we need to XY
flip. We do this with a combination of both 'tricks' We use the LUT to X flip, and draw to the screen Bottom to Top to Y flip! |
  |
MaxTile Custom Draw Types
| Bits 1,2,3... XYP=%001 defines a custom program When a custom program is being used Bits 4,5 define the program type (rather than part of the low tile number) %00=Filled Tile %01=Double height tile %10=unused %11=Transparent tile/empty tile The remaining two bits 6,7 act as the High part of the tile number %------NN nnnnnnnn |
|
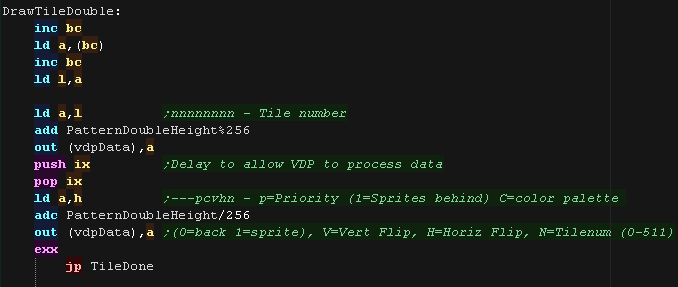
| A double height
tile uses only 4 lines of a pattern, so we multiply the pattern
number by 8 We then draw each line of the pattern twice to the screen. |
 |
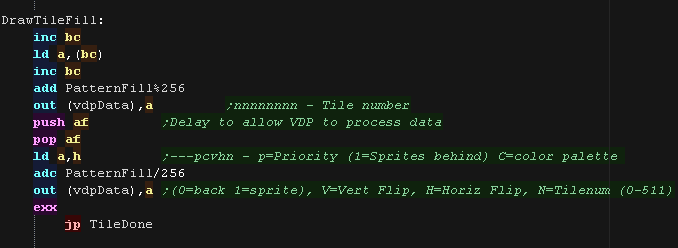
| The fill tile
is the simplest! We use 2 bytes from the pattern data, and fill each line with one of the two We use E for one line, then D for one line - this allows us to make a nice 'checkerboard' patterned fill, or alternate lines in different colors. As so little data is read, This routine is the fastest, so should be used for as much as possible of our tilemap! |
 |
| The final type is the Transparent
tile. if the Tilenumber=255 then this tile is completely transparent, and no data will be drawn |
|
| Our transparency is a crude '0 byte'
transparency. Basically, any byte equal to 0 is not drawn to the screen, others are drawn normally. We compare to the transparent 0 (in C, moved to A) and skip over the draw command if the bytes match. In fact, if we switch C we can define another byte to be transparent (Chibiakumas used a 'rainbow byte' with color 3210 or 0123 as transparent in some cases). More impressive transparency can be achieved via a LUT and a combination of AND/OR, however this simple transparency is fast, and tends to give a nice 'cartoon' effect with black outlines to characters |
  |

MaxTile Definitions
| This is the Simple version of ZX Maxtile. Tile patterns do not set the color attributes, so each pattern is 8 bytes. |
 |
| The screen is 256x192, which is 128x96 in logical units. The VRAM base of the screen is &4000. We use some of this spare memory for the 3 draw caches (each 256 bytes) we also use 256 bytes for the 'Xflip lookup table' We define these in the unused memory of the &C000-&FFFF bank Our drawing routine uses Stack misuse, and we use the IX+IY registers, so we keep interrupts disabled by defining the 'DOEI' macro to not turn interrupts back on. |
 |
| Here is the Tile pattern data The Speccy Tile Drawing routines use 2 color 8x8 tiles, So each tile uses 8 bytes. MaxTile was designed for 4 color, 16 byte tiles, so we will need to do some extra shifting in pattern calculations. 'Fill tiles' are a special case, they fill a tile with 2 bytes (saving time and memory) |
 |
| The Spectrum screen has eight 1 bit pixels in a byte We'll calculate an Xflip LUT It would be too slow to shift these in realtime, so we 'precaclulate' the flipped equivalent of each of the 256 possible source bytes. This saves memory compared to storing alternative patterns. Yflip does not require a lookup table, we instead move UP VRAM instead of DOWN as we draw the pattern! |
 |
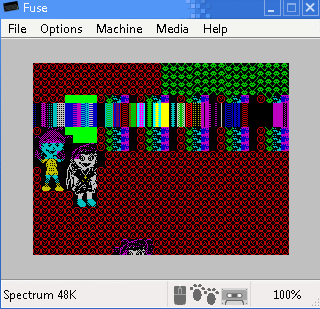
| The Tile drawing routines do not set color attributes in this example, so we 'clear the screen' to a single color here. |  |
| When we want to draw a sprite object to the screen, we need
to calculate the VRAM destination. MaxTile uses X,Y co-ordinates in 'Logical Units' (Pairs of pixels) - this is passed in BC, and the Vram destination is returned in HL Moving across the screen is easy, we just add 1 to the HL pos. as our tiles are always 8 pixel aligned on the speccy Moving down within a tile is also easy, we just add 1 to H The full calculation is a little tricky though, we have to split the Y-line into 3 parts, and shift the bits to the correct positions. |
 |
Tile Drawing!
| The DrawTile Routine is called by the shared code, This
shared code will backup and restore the stack pointer and load
the first byte of the 16 bit tile number into A The low bit is shifted out (the update bit)... we need to reset it to 0 anyway! The following registers are loaded: BC=Tilemap DE=Tile Bitmap Pattern data HL'=VRAM Destination |
|
| To optimize things, the tile drawing works as a 'binary
tree', deciding the kind of tile drawing routine to use The Platform specific draw routine DrawTile starts by ckecking Bit 1 (now Bit 0) This is the 'Program' flag - If this is 0, then this is the simplest unflipped tile, otherwise we switch to the advanced routine. If we're drawing a basic tile, we shift a 0 back into A, and write it back, that clears the Update flag, as we will draw the tile now. |
|
| We're going to draw a basic
unflipped tile We need to load the second byte of the tilenumber, As it was designed for a 16 byte pattern,The data is in the format %NNNNNNNN NNNN---- , we need to shift it right 1 bit for an 8 byte pattern and add it to DE (the pattern data) This gives us the source address - which we shift into SP, as we'll use stack misuse and POP the source bitmap data off the stack! |
 |
| We now use ab 'unwrapped loop to move each line
of our source pattern to the screen. HL is the VRAM destination. We back up the top byte of the HL destination in C We pop a pair of bytes out the pattern source and write them to the HL destination, moving down after each line by INCing H we reset the HL pair (from C) after the tile and return. Note: the XY bits of the pattern number are unused in this case (They define flip mode if the Program bit was set)... These could be used for a 'Tile Tint' (for 4 color patterns on 16 color systems) or a bank number (for bankswitching huge tile sets) |
 |
| If the Program bit was 1, then either we need to flip, or
run some 'custom code' Next we check the XY bits, if both are 0 this is not a flip (Transparent, Filled, Double etc) If either bit (or both) is 1, then this is some kind of flip, so we calculate the pattern source address, and move it into the stack pointer. |
 |
| If the Y flip bit is 0 we must be X flipping! We use BC as a pointer to the Xflip lookupt table we defined before, we load C with the value we want to flip, and read the flipped equivalent from (BC) We Pop each source pattern byte off the stack, then Xflip it via the Lookup table (in BC) The code is basically the same as the unflipped one, but Unfortunately, as we're using BC for the LUT and A for converting bytes, the code is a bit less efficient moving down the screen. As we're using BC this time, we reset the H part of HL by subtracting 7 |
 |
| If the Y flip bit was set we now check if the X
flip bit is also set. If it's not we're just Yflipping! To flip vertically we load the source pattern data normally, but we write it from the bottom of the tile upwards. We add 7 to the H port, this moves us to the last line of the tile |
 |
| if the X bit was set as well as Y we need to XY
flip. We do this with a combination of both 'tricks' We use the LUT to X flip, and draw to the screen Bottom to Top to Y flip! |
 |
MaxTile Custom Draw Types
| Bits 1,2,3... XYP=%001 defines a custom program When a custom program is being used Bits 4,5 define the program type (rather than part of the low tile number) %00=Filled Tile %01=Double height tile %10=unused %11=Transparent tile/empty tile The remaining two bits 6,7 act as the High part of the tile number %------NN nnnnnnnn |
|
| A double height
tile uses only 4 lines of a pattern, so we multiply the
pattern number by 4 We then draw each line of the pattern twice to the screen. |
 |
| The fill tile
is the simplest! We use 2 bytes from the pattern data, and fill each line with one of the two We use E for one line, then D for one line - this allows us to make a nice 'checkerboard' patterned fill, or alternate lines in different colors. As so little data is read, This routine is the fastest, so should be used for as much as possible of our tilemap! |
 |
| The final type is the Transparent
tile. if the Tilenumber=255 then this tile is completely transparent, and no data will be drawn |
|
| Our transparency is a crude '0 byte'
transparency. Basically, any byte equal to 0 is not drawn to the screen, others are drawn normally. We compare to the transparent 0 (in A) and skip over the draw command if the bytes match. In fact, if we switch C we can define another byte to be transparent (Chibiakumas used a 'rainbow byte' with color 3210 or 0123 as transparent in some cases). More impressive transparency can be achieved via a LUT and a combination of AND/OR, however this simple transparency is fast, and tends to give a nice 'cartoon' effect with black outlines to characters |
 |
MaxTile Definitions
| This is the Simple version of ZX Maxtile. Tile patterns do not set the color attributes, so each pattern is 8 bytes. |
 |
| The screen is 256x192, which is 128x96 in logical units. The VRAM base of the screen is &4000. We use some of this spare memory for the 3 draw caches (each 256 bytes) we also use 256 bytes for the 'Xflip lookup table' We define these in the unused memory of the &C000-&FFFF bank Our drawing routine uses Stack misuse, and we use the IX+IY registers, so we keep interrupts disabled by defining the 'DOEI' macro to not turn interrupts back on. |
|
| Here is the Tile pattern data The Speccy Tile Drawing routines use 2 color 8x8 tiles, with a 1 byte color attribute per tile , So each tile uses 9 bytes. MaxTile was designed for 4 color, 16 byte tiles, so we will need to do some extra shifting in pattern calculations. 'Fill tiles' are a special case, they fill a tile with 2 bytes 1 color attribute (saving time and memory) |
 |
| The Spectrum screen has eight 1 bit pixels in a byte We'll calculate an Xflip LUT It would be too slow to shift these in realtime, so we 'precaclulate' the flipped equivalent of each of the 256 possible source bytes. This saves memory compared to storing alternative patterns. Yflip does not require a lookup table, we instead move UP VRAM instead of DOWN as we draw the pattern! |
|
| When we want to draw a sprite object to the screen, we need
to calculate the VRAM destination. MaxTile uses X,Y co-ordinates in 'Logical Units' (Pairs of pixels) - this is passed in BC, and the Vram destination is returned in HL Moving across the screen is easy, we just add 1 to the HL pos. as our tiles are always 8 pixel aligned on the speccy Moving down within a tile is also easy, we just add 1 to H The full calculation is a little tricky though, we have to split the Y-line into 3 parts, and shift the bits to the correct positions. |
|
Tile Drawing!
| The DrawTile Routine is called by the shared code, This
shared code will backup and restore the stack pointer and load
the first byte of the 16 bit tile number into A The low bit is shifted out (the update bit)... we need to reset it to 0 anyway! The following registers are loaded: BC=Tilemap DE=Tile Bitmap Pattern data HL'=VRAM Destination |
|
| To optimize things, the tile drawing works as a 'binary
tree', deciding the kind of tile drawing routine to use The Platform specific draw routine DrawTile starts by ckecking Bit 1 (now Bit 0) This is the 'Program' flag - If this is 0, then this is the simplest unflipped tile, otherwise we switch to the advanced routine. If we're drawing a basic tile, we shift a 0 back into A, and write it back, that clears the Update flag, as we will draw the tile now. |
|
| We're going to draw a basic
unflipped tile We need to load the second byte of the tilenumber, As it was designed for a 16 byte pattern,The data is in the format %NNNNNNNN NNNN---- Each tile pattern has 8 bitmap bytes + 1 color attrib byte. We repeatedly bit shift, first to the 'x8' position, then to the 'x1' position, we then add these two together we need to shift it right 1 bit for an 8 byte pattern and add it to DE (the pattern data) This gives us the source address - which we shift into SP, as we'll use stack misuse and POP the source bitmap data off the stack! |
 |
| We now use ab 'unwrapped loop' to move each
line of our source pattern to the screen. HL is the VRAM destination. We back up the top byte of the HL destination in C We pop a pair of bytes out the pattern source and write them to the HL destination, moving down after each line by INCing H we reset the HL pair (from C) after the tile and return. Note: the XY bits of the pattern number are unused in this case (They define flip mode if the Program bit was set)... These could be used for a 'Tile Tint' (for 4 color patterns on 16 color systems) or a bank number (for bankswitching huge tile sets) |
 |
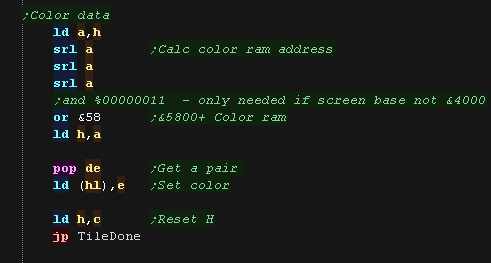
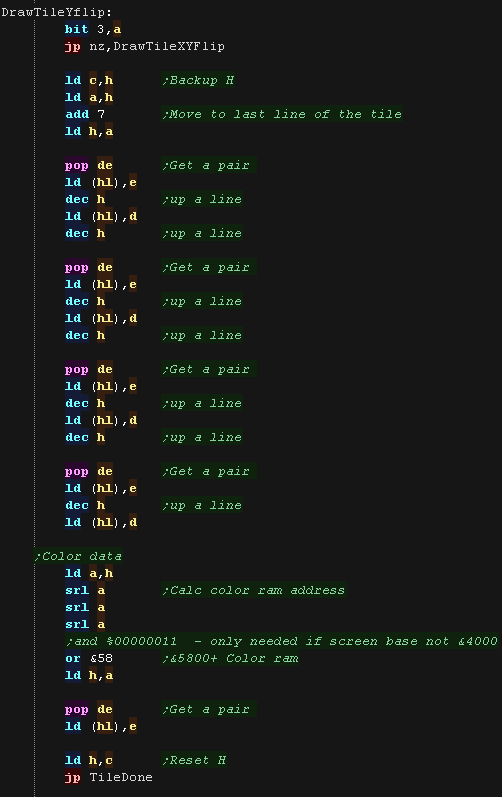
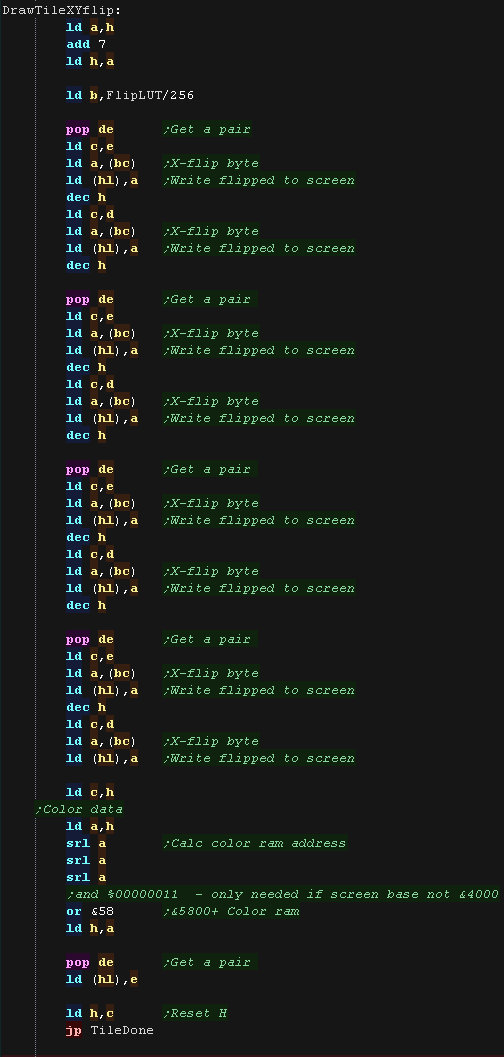
| We now need to do the color data. We can convert our HL vram destination to point to the tiles color attribute by bit shifting the H byte 3 bits right, and ORing in the color base at &5800 We then transfer the 9th byte (E) from the pattern data into the color attribute |
 |
| If the Program bit was 1, then either we need to flip, or
run some 'custom code' Next we check the XY bits, if both are 0 this is not a flip (Transparent, Filled, Double etc) If either bit (or both) is 1, then this is some kind of flip, so we calculate the pattern source address, and move it into the stack pointer. |
|
| If the Y flip bit is 0 we must be X flipping! We use BC as a pointer to the Xflip lookupt table we defined before, we load C with the value we want to flip, and read the flipped equivalent from (BC) We Pop each source pattern byte off the stack, then Xflip it via the Lookup table (in BC) The code is basically the same as the unflipped one, but Unfortunately, as we're using BC for the LUT and A for converting bytes, the code is a bit less efficient moving down the screen. As we're using BC this time, we reset the H part of HL by subtracting 7 |
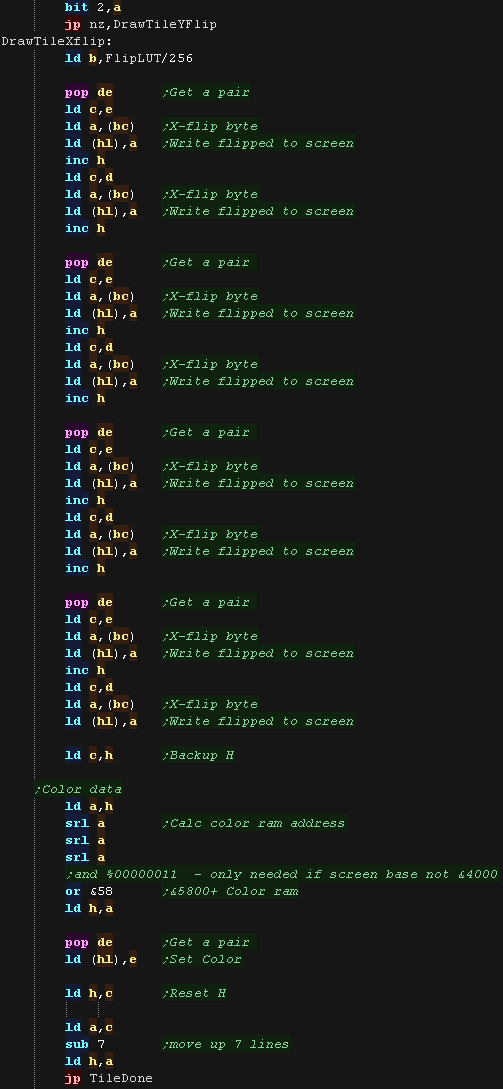 |
| If the Y flip bit was set we now check if the X
flip bit is also set. If it's not we're just Yflipping! To flip vertically we load the source pattern data normally, but we write it from the bottom of the tile upwards. We add 7 to the H port, this moves us to the last line of the tile |
 |
| if the X bit was set as well as Y we need to XY
flip. We do this with a combination of both 'tricks' We use the LUT to X flip, and draw to the screen Bottom to Top to Y flip! |
 |
MaxTile Custom Draw Types
| Bits 1,2,3... XYP=%001 defines a custom program When a custom program is being used Bits 4,5 define the program type (rather than part of the low tile number) %00=Filled Tile %01=Double height tile %10=unused %11=Transparent tile/empty tile The remaining two bits 6,7 act as the High part of the tile number %------NN nnnnnnnn |
|
| A double height
tile uses only 4 lines of a pattern, so we multiply the
pattern number by 9, then use either the first byte, or offset
by 4 to get the second half of the bitmap data We then draw each line of the pattern twice to the screen. once we've done the bitmap data we do the color byte, which is either next, or 4 bytes onward |
  |
| The fill tile
is the simplest! We use 2 bytes from the pattern data, and fill each line with one of the two We use E for one line, then D for one line - this allows us to make a nice 'checkerboard' patterned fill, or alternate lines in different colors. As so little data is read, This routine is the fastest, so should be used for as much as possible of our tilemap! |
 |
| The final type is the Transparent
tile. if the Tilenumber=255 then this tile is completely transparent, and no data will be drawn |
|
| Our transparency is a crude '0 byte'
transparency. Basically, any byte equal to 0 is not drawn to the screen, others are drawn normally. We compare to the transparent 0 (in A) and skip over the draw command if the bytes match. In fact, if we switch C we can define another byte to be transparent (Chibiakumas used a 'rainbow byte' with color 3210 or 0123 as transparent in some cases). More impressive transparency can be achieved via a LUT and a combination of AND/OR, however this simple transparency is fast, and tends to give a nice 'cartoon' effect with black outlines to characters |
 |

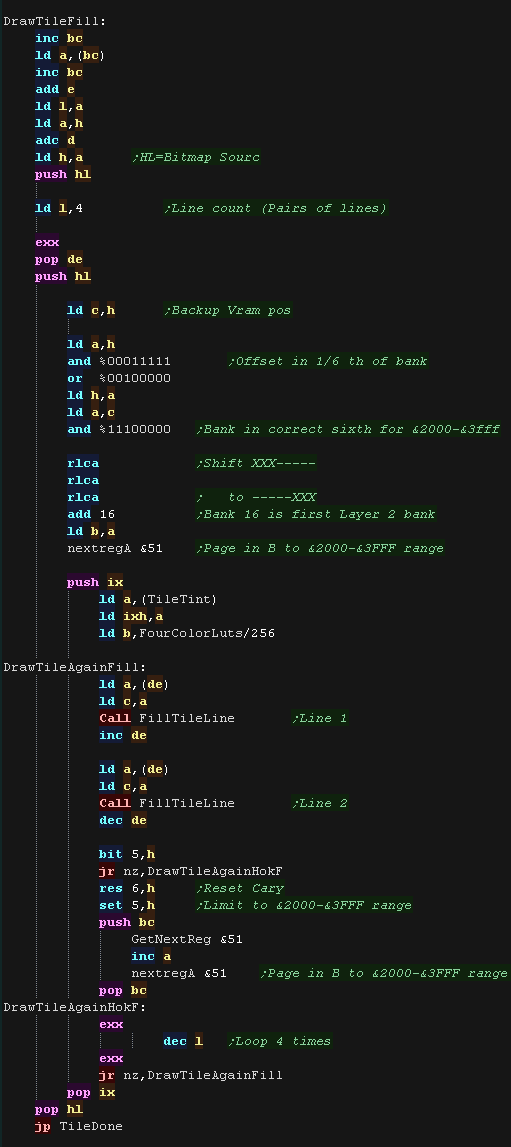
MaxTile Definitions
| This is the 256 color version of Maxtile, Each pixel of a tile can be any of the 256 colors used by layer 2. |
 |
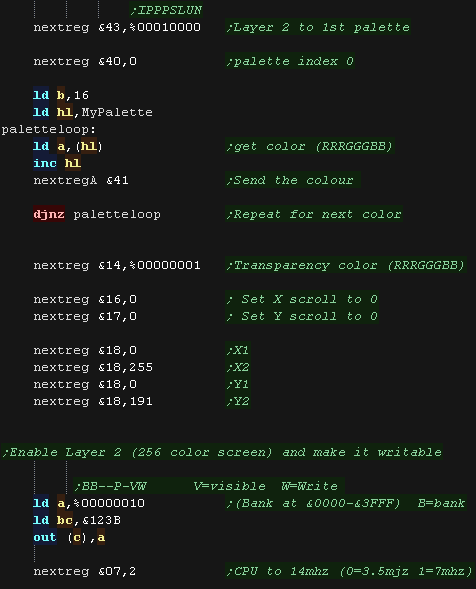
| The screen is 256x192, which is 128x96 in logical units. The 256 color Layer 2 screen works as a 'through address' in the rom area, we access it in the &2000-&3FFF Range... 'Screenbase' here is actually the XY co-ordinate of the top left of the screen. We use some of this spare memory for the 3 draw caches (each 256 bytes) We define these in the unused memory at the top of memory at &F000 Our drawing routine uses Stack misuse, and we use the IX+IY registers, so we keep interrupts disabled by defining the 'DOEI' macro to not turn interrupts back on. |
 |
| We build the 4 entries from each possible source byte. We use the L part of the HL pair as the byte we want to convert, and H+0, H+1 , H+2 and H+3 as the destination bytes. This makes selecting a byte to covert, and getting the converted bytes relatively easy. |
 |
| Here is the Tile pattern data In 4 color mode, each tile uses 16 bytes! 'Fill tiles' are a special case, they fill a tile with 2 bytes (saving time and memory) If 64 bytes is too much, take a look at the 4 color version we'll look at next time, which uses smaller 16 byte tiles. |
 |
First we need to set up the 256 color Layer 2 screen |
 |
| When we want to draw a sprite object to the screen, we
need to calculate the VRAM
destination. However because of the banks switching we do this a t the tile drawing stage, so we just store the Y and X position in L and H |
 |
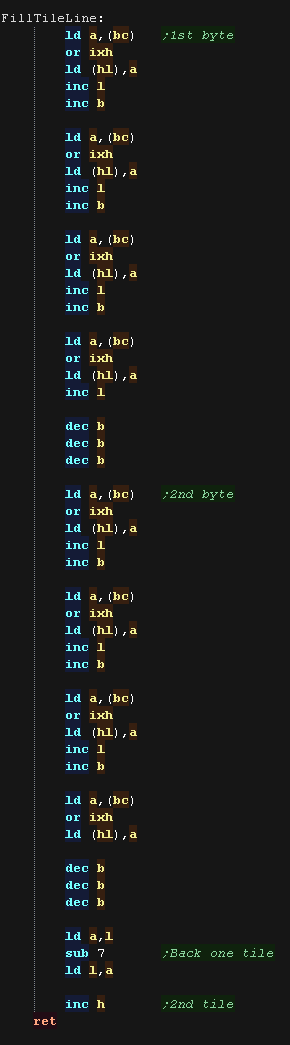
Tile Drawing!
| The DrawTile Routine is called by the shared code, This
shared code will backup and restore the stack pointer and
load the first byte of the 16 bit tile number into A The low bit is shifted out (the update bit)... we need to reset it to 0 anyway! The following registers are loaded: BC=Tilemap DE=Tile Bitmap Pattern data HL'=VRAM Destination |
|
| To optimize things, the tile drawing works as a 'binary
tree', deciding the kind of tile drawing routine to use The Platform specific draw routine DrawTile starts by ckecking Bit 1 (now Bit 0) This is the 'Program' flag - If this is 0, then this is the simplest unflipped tile, otherwise we switch to the advanced routine. If we're drawing a basic tile, we shift a 0 back into A, and write it back, that clears the Update flag, as we will draw the tile now. |
|
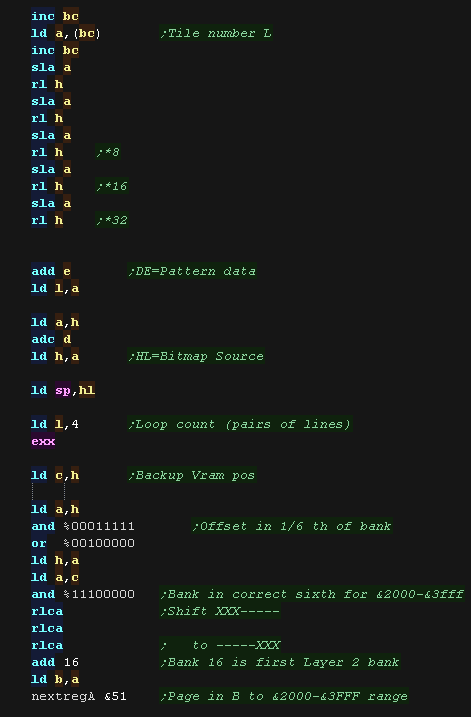
| We're going to draw a basic
unflipped tile We need to load the second byte of the tilenumber, As it was designed for a 16 byte pattern,The data is in the format %NNNNNNNN NNNN---- Each tile pattern has 64 bitmap bytes, the 'base' address of the tile patterns is at DE This gives us the source address - which we shift into SP, as we'll use stack misuse and POP the source bitmap data off the stack! |
 |
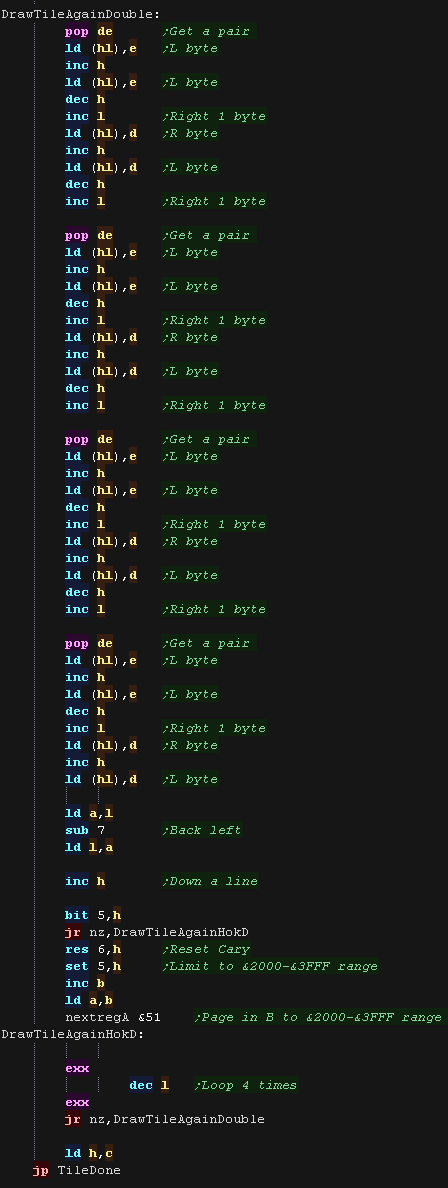
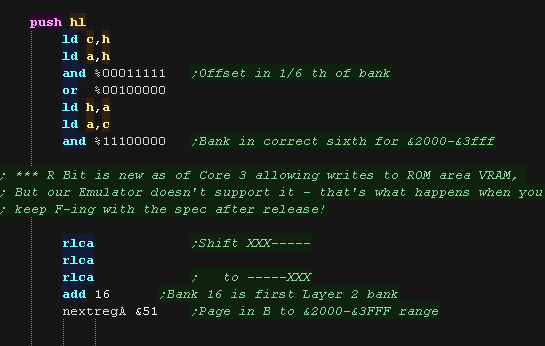
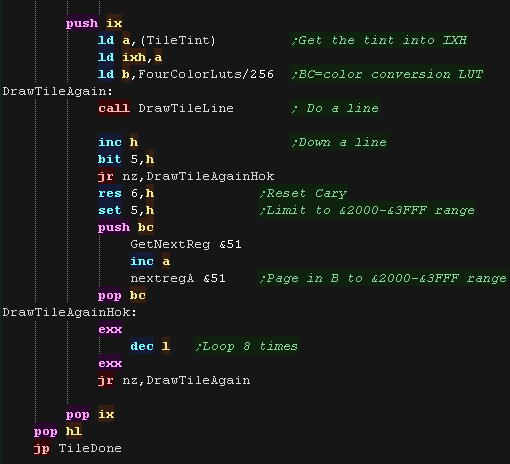
| We need to draw 8 lines, we use L' as
the line count Next we need to page in the correct block of Layer 2 Vram. We do this by taking the screen Y-Line number, and using the top 3 bits as the bank number. |
 |
| We now draw each of the lines to the screen, After each line we check if we need to page in a new Layer 2 bank. |
 |
| If the Program bit was 1, then either we need to flip, or
run some 'custom code' Next we check the XY bits, if both are 0 this is not a flip (Transparent, Filled, Double etc) If either bit (or both) is 1, then this is some kind of flip, so we calculate the pattern source address, and move it into the stack pointer. |
 |
| If the Y flip bit is 0 we must be X flipping! We pop each line from the source data as before, but We draw each line from right to left, so we add 7 to our HL destination |
 |
| If the Y flip bit was set we now check if the
X flip bit is also set. If it's not we're just Yflipping! To flip vertically we load the source pattern data normally, but we write it from the bottom of the tile upwards. We add 7 to the H port, this moves us to the last line of the tile |
 |
| if the X bit was set as well as Y we need to
XY flip. We do this with a combination of both 'tricks' De draw right to left to X flip, and draw to the screen Bottom to Top to Y flip! |
 |
MaxTile Custom Draw Types
| Bits 1,2,3... XYP=%001 defines a custom program When a custom program is being used Bits 4,5 define the program type (rather than part of the low tile number) %00=Filled Tile %01=Double height tile %10=unused %11=Transparent tile/empty tile The remaining two bits 6,7 act as the High part of the tile number %------NN nnnnnnnn |
|
| A double height
tile uses only 4 lines of a pattern, so we multiply the
pattern number by 32 We then draw each line of the pattern twice to the screen, repeating 4 times. |
  |
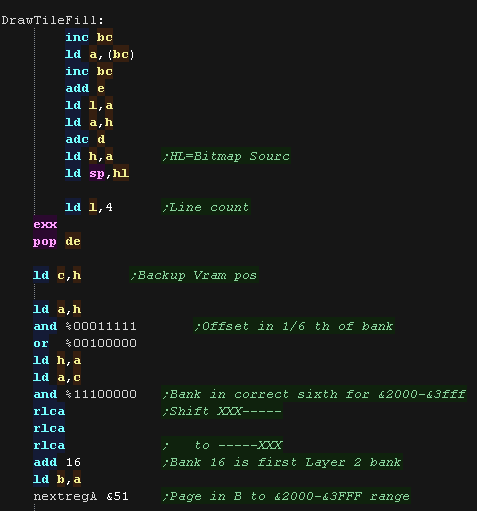
| The fill tile
is the simplest! We use 2 bytes from the pattern data, and fill each line with one of the two We use E for one line, then D for one line - this allows us to make a nice 'checkerboard' patterned fill, or alternate lines in different colors. As so little data is read, This routine is the fastest, so should be used for as much as possible of our tilemap! |
  |
| The final type is the Transparent
tile. if the Tilenumber=255 then this tile is completely transparent, and no data will be drawn |
|
| Our transparency is a crude '0 byte'
transparency. Basically, any byte equal to 0 is not drawn to the screen, others are drawn normally. We compare to the transparent 0 (in A) and skip over the draw command if the bytes match. In fact, if we switch C we can define another byte to be transparent (Chibiakumas used a 'rainbow byte' with color 3210 or 0123 as transparent in some cases). More impressive transparency can be achieved via a LUT and a combination of AND/OR, however this simple transparency is fast, and tends to give a nice 'cartoon' effect with black outlines to characters |
  |
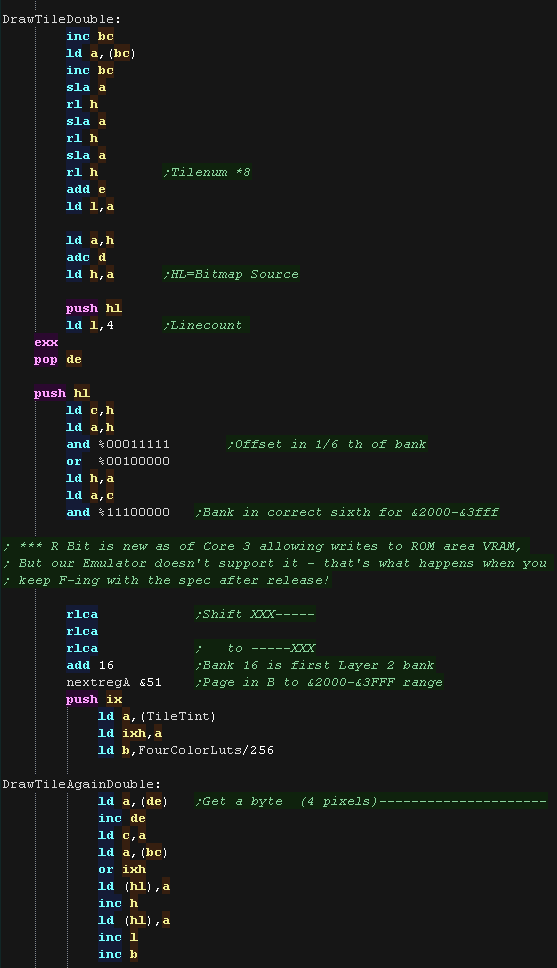
MaxTile Definitions
| This is the 4 color version of Maxtile, A 'Tint' can be added to the 4 color definition, effectively giving us 64 'palettes' |
 |
| The screen is 256x192, which is 128x96 in logical units. The 256 color Layer 2 screen works as a 'through address' in the rom area, we access it in the &2000-&3FFF Range... 'Screenbase' here is actually the XY co-ordinate of the top left of the screen. We use some of this spare memory for the 3 draw caches (each 256 bytes) we also use 4x 256 bytes for the 4 color FourColorLuts table, which 'unwraps' the 4 pixels in the sourcebyte into 4 bytes in vram. We define these in the unused memory at the top of memory at &F000 Our drawing routine uses Stack misuse, and we use the IX+IY registers, so we keep interrupts disabled by defining the 'DOEI' macro to not turn interrupts back on. |
|
| Here is the Tile pattern data With 4 color tiles, each tile is 16 bytes. 'Fill tiles' are a special case, they fill a tile with 2 bytes (saving time and memory) The data is in 'linear format' so two neighboring bits define a pixel. If our pixels were labeled A B C D the bits would be %AABBCCDD |
 |
First we need to set up the 256 color Layer 2 screen |
|
| When we want to draw a sprite object to the screen, we need to
calculate the VRAM destination. However because of the banks switching we do this a t the tile drawing stage, so we just store the Y and X position in L and H |
|
Tile Drawing!
| The DrawTile Routine is called by the shared code, This shared
code will backup and restore the stack pointer and load the
first byte of the 16 bit tile number into A The low bit is shifted out (the update bit)... we need to reset it to 0 anyway! The following registers are loaded: BC=Tilemap DE=Tile Bitmap Pattern data HL'=VRAM Destination |
|
| To optimize things, the tile drawing works as a 'binary tree',
deciding the kind of tile drawing routine to use The Platform specific draw routine DrawTile starts by ckecking Bit 1 (now Bit 0) This is the 'Program' flag - If this is 0, then this is the simplest unflipped tile, otherwise we switch to the advanced routine. If we're drawing a basic tile, we shift a 0 back into A, and write it back, that clears the Update flag, as we will draw the tile now. |
|
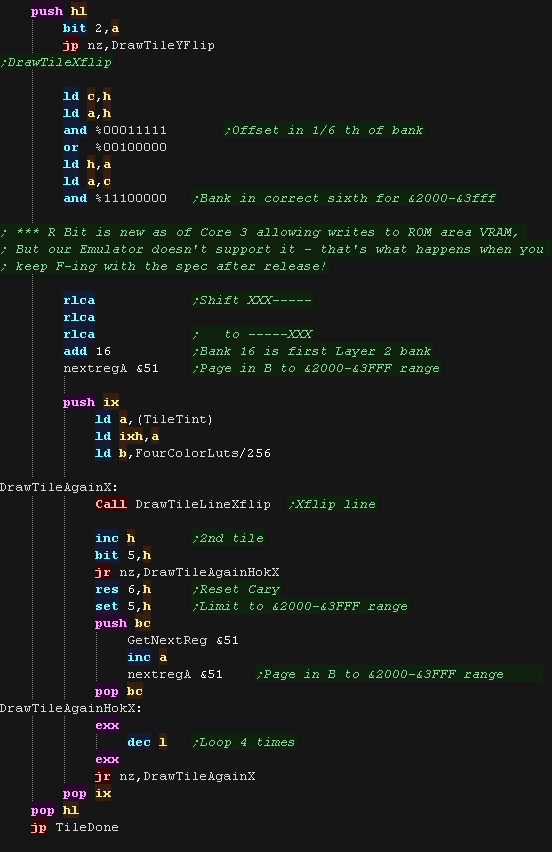
| We're going to draw a basic unflipped
tile We need to load the second byte of the tilenumber, As it was designed for a 16 byte pattern,The data is in the format %NNNNNNNN NNNN---- The 'base' address of the tile patterns is at DE, we add DE, and move it into the shadow registers DE' - we use L as a loop counter for the 8 lines |
 |
| Next we need to page in the correct block of
Layer 2 Vram. We do this by taking the screen Y-Line number, and using the top 3 bits as the bank number. |
 |
| We now draw each of the lines to the screen, BC points to our color conversion LUT IXH is our TINT, which is ORed with the 4 color value before being drawn to the screen. We have a routine DrawTileLine which will draw a single unflipped line, We use L' as our loopcount After each line we check if we need to page in a new Layer 2 bank. |
 |
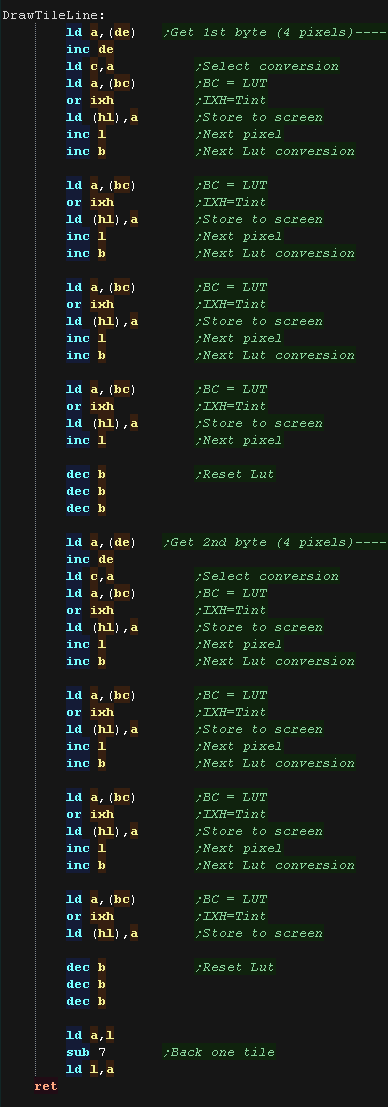
| The Line has 8 destination bytes, but only 2
source bytes in our pattern, We load a byte from the pattern into C, then draw the 4 bytes to the screen, from (BC) incrementing B 3 times to get the 4 other bytes. We repeat this twice to do the line. |
 |
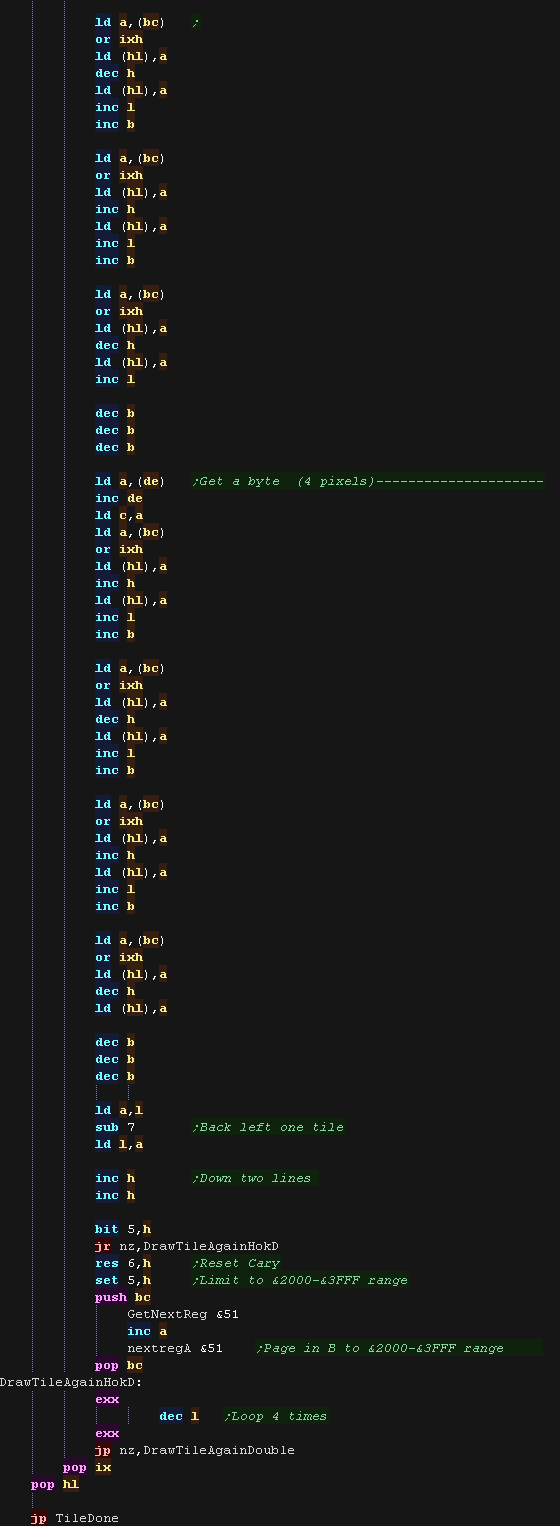
| If the Program bit was 1, then either we need to flip, or run
some 'custom code' Next we check the XY bits, if both are 0 this is not a flip (Transparent, Filled, Double etc) If either bit (or both) is 1, then this is some kind of flip, so we calculate the pattern source address, and move it into the stack pointer. |
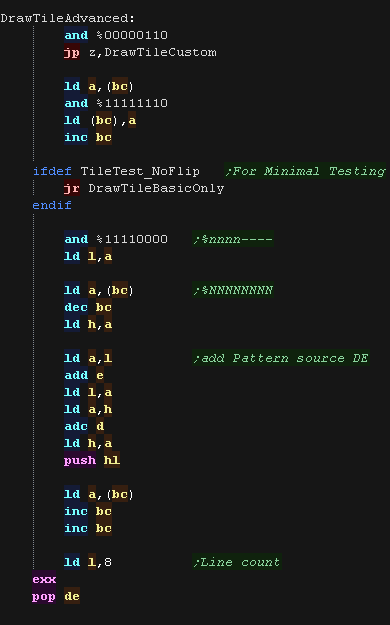 |
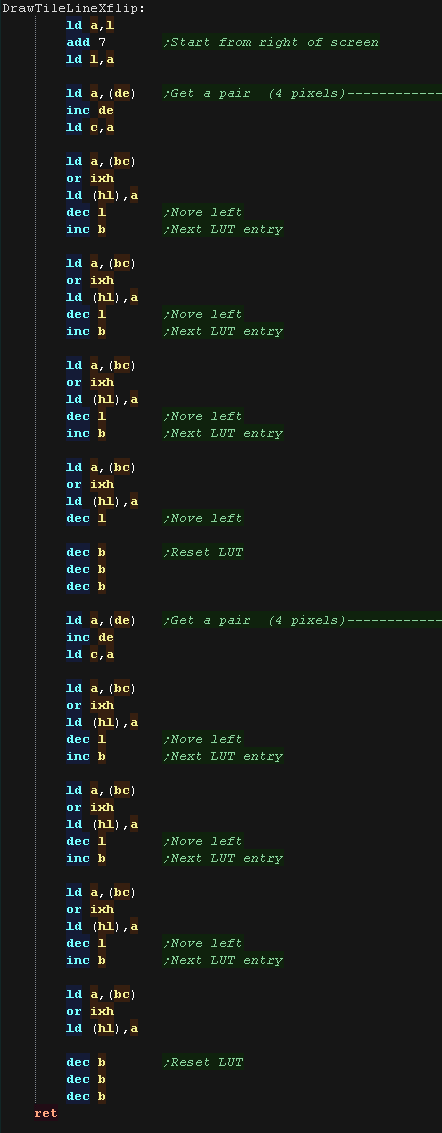
| If the Y flip bit is 0 we must be X flipping! The init routine is pretty similar, however we use a different line drawing routine this time 'DrawTileLineXflip' |
 |
| The DrawTileLineXflip routine is almost identical
to the normal one. The Xflip effect is achieved by drawing from right to left, we move +7 pixels across the screen, and DEC L to move left after each pixel has been drawn8 |
 |
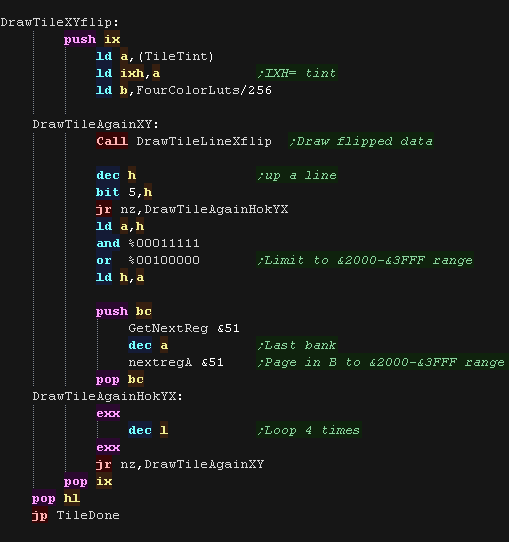
| If the Y flip bit was set we now check if the X
flip bit is also set. If it's not we're just Yflipping! To flip vertically we load the source pattern data normally, but we write it from the bottom of the tile upwards. We add 7 to the H port, this moves us to the last line of the tile |
 |
| if the X bit was set as well as Y we need to XY
flip. We do this with a combination of both 'tricks' De draw right to left to X flip, and draw to the screen Bottom to Top to Y flip! |
 |
MaxTile Custom Draw Types
| Bits 1,2,3... XYP=%001 defines a custom program When a custom program is being used Bits 4,5 define the program type (rather than part of the low tile number) %00=Filled Tile %01=Double height tile %10=unused %11=Transparent tile/empty tile The remaining two bits 6,7 act as the High part of the tile number %------NN nnnnnnnn |
|
| A double height
tile uses only 4 lines of a pattern, so we multiply the pattern
number by 32 We then draw each line of the pattern twice to the screen, repeating 4 times. |
  |
| The fill tile is
the simplest! We use 2 bytes from the pattern data, and fill each line with one of the two We use E for one line, then D for one line - this allows us to make a nice 'checkerboard' patterned fill, or alternate lines in different colors. As so little data is read, This routine is the fastest, so should be used for as much as possible of our tilemap! |
  |
| The final type is the Transparent
tile. if the Tilenumber=255 then this tile is completely transparent, and no data will be drawn |
|
| Our transparency is a crude '0 byte' transparency. Basically, any byte equal to 0 is not drawn to the screen, others are drawn normally. We compare to the transparent 0 (in A) and skip over the draw command if the bytes match. We use DrawTransparentQuad to read in each source byte, and decide how to process it, skipping 4 pixels for the unneeded ones In fact, if we switch C we can define another byte to be transparent (Chibiakumas used a 'rainbow byte' with color 3210 or 0123 as transparent in some cases). More impressive transparency can be achieved via a LUT and a combination of AND/OR, however this simple transparency is fast, and tends to give a nice 'cartoon' effect with black outlines to characters |
  |

MaxTile Definitions
| This is the simplest version of Maxtile, We use the hardware
tilemap to draw our graphics, and our 'sprites' are simulated
using the tilemap. To save ROM memory and match other systems We use 4 color patterns for our graphics |
 |
| The screen is 256x192, which is 128x96 in logical units. We use some of this spare memory for the 3 draw caches (each 256 bytes) We define these in ram at &C000+ We draw straight into the tilemap at VRAM address &3900 |
 |
| Here is the Tile pattern data With 4 color tiles, each tile is 16 bytes, Bitplanes 0,1 are defined here, 2+3 are a constant color for the tile 'Fill tiles' are a special case, they are 16 color, filling all the lines with the same 4 bytes |
 |
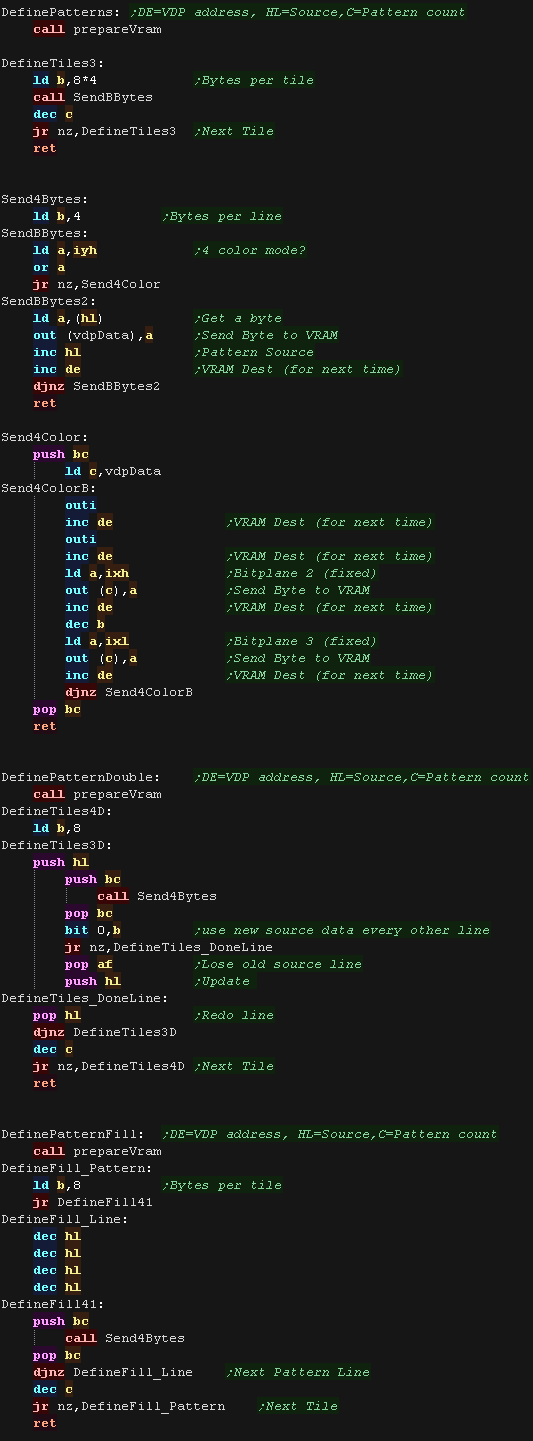
We need to send the bitmap pattern data to VRAM We use DefinePatterns , DefinePatternsFill for solid fill patterns, and DefinePatternDouble for double height patterns HL is the source data DE is the VRAM destination IYH defines if the source data is 4 or 16 colors IX is the fixed bitplane 2,3 data in 4 color mode. |
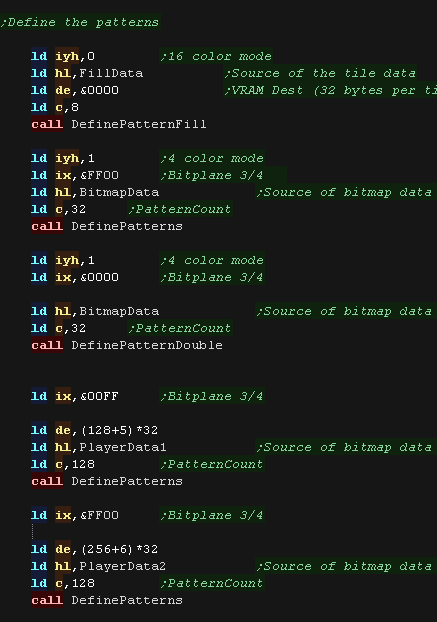 |
| The 4 routines all share the same 'Send4Bytes
routine. In 16 color mode, 4 bytes are sent from (HL) to VRAM in 4 color mode, the first 2 bytes are sent from (HL), the remaining 2 are sent from IX |
 |
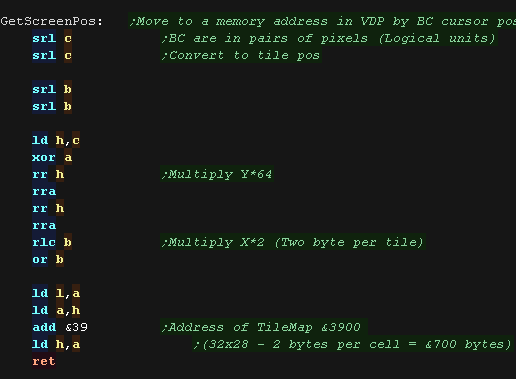
| When we want to draw a sprite object to the screen, we need to
calculate the VRAM destination. We shifted the tilemap start to &3900 (from &3800 to save 256 bytes for sprite data!) each tile definition is 2 bytes, so each line is 64 bytes |
 |
Tile Drawing!
| The DrawTile Routine is called by the shared code, This shared
code will backup and restore the stack pointer and load the
first byte of the 16 bit tile number into A The low bit is shifted out (the update bit)... we need to reset it to 0 anyway! The following registers are loaded: BC=Tilemap DE=Tile Bitmap Pattern data HL'=VRAM Destination |
|
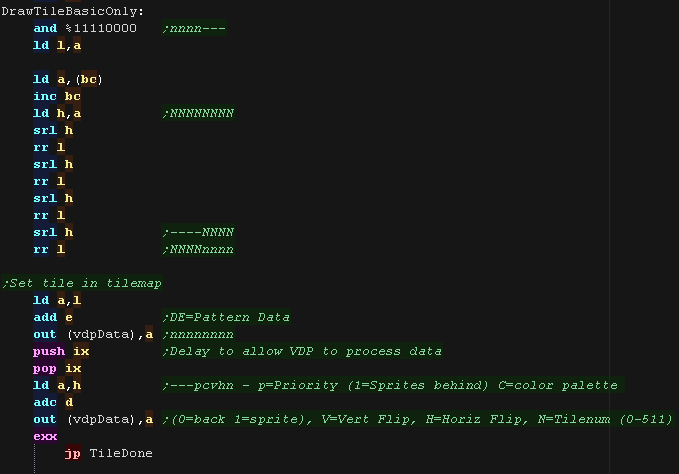
| first we select the VRAM destination via VdpControl To optimize things, the tile drawing works as a 'binary tree', deciding the kind of tile drawing routine to use The Platform specific draw routine DrawTile starts by ckecking Bit 1 (now Bit 0) This is the 'Program' flag - If this is 0, then this is the simplest unflipped tile, otherwise we switch to the advanced routine. If we're drawing a basic tile, we shift a 0 back into A, and write it back, that clears the Update flag, as we will draw the tile now. |
|
| We're going to draw a basic unflipped
tile We need to load the second byte of the tilenumber, As it was designed for a 16 byte pattern,The data is in the format %NNNNNNNN nnnn---- We shift this 4 bits, so it's in the format %----NNNN NNNNnnnn The 'base' address of the tile patterns is at DE, we add DE to HL we then write HL into the tilemap in VRAM |
 |
| If the Program bit was 1, then either we need to flip, or run
some 'custom code' Next we check the XY bits, if both are 0 this is not a flip (Transparent, Filled, Double etc) If either bit (or both) is 1, then this is some kind of flip, so we calculate the pattern source address as before, and store it in HL |
 |
| If the Y flip bit is 0 we must be X flipping! The SMS tilemap can do the Xflip for us, so we just set bit 1 of the second byte of the tile data |
 |
| If the Y flip bit was set we now check if the X
flip bit is also set. If it's not we're just Yflipping! We set bit 2 of the second byte to enable Yflip |
 |
| if the X bit was set as well as Y we need to XY
flip. We set bits 1+2 to do this. |
 |
MaxTile Custom Draw Types
| Bits 1,2,3... XYP=%001 defines a custom program When a custom program is being used Bits 4,5 define the program type (rather than part of the low tile number) %00=Filled Tile %01=Double height tile %10=unused %11=Transparent tile/empty tile The remaining two bits 6,7 act as the High part of the tile number %------NN nnnnnnnn |
|
| A double height
tile uses the alternate 'vertically stretched' pattern set,
starting from tile number 'PatternDoubleHeight' |
 |
| The fill tile is
the same, but we use the 'PatternFill' tileset |
 |
| The final type is the Transparent
tile. if the Tilenumber=255 then this tile is completely transparent, and no data will be drawn |
|
| On other systems we don't write bitmap bytes which
are all zero bits, but on the SMS with the tilemap this is
impossible, so we just draw the tile as is. |
 |
| View Options |
| Default Dark |
| Simple (Hide this menu) |
| Print Mode (white background) |
| Top Menu |
| ***Main Menu*** |
| Youtube channel |
| Patreon |
| Introduction to Assembly (Basics for absolute beginners) |
| Amazon Affiliate Link |
| AkuSprite Editor |
| ChibiTracker |
| Dec/Bin/Hex/Oct/Ascii Table |
| Alt Tech |
| Archive.org |
| Bitchute |
| Odysee |
| Rumble |
| DailyMotion |
| Please note: I wlll upload more content to these alt platforms based on the views they bring in |
| 68000 Content |
| ***68000 Tutorial List*** |
Learn 68000 Assembly  |
| Hello World Series |
| Platform Specific Series |
| Simple Samples |
| Grime 68000 |
| 68000 Downloads |
| 68000 Cheatsheet |
| Sources.7z |
| DevTools kit |
| 68000 Platforms |
| Amiga 500 |
| Atari ST |
| Neo Geo |
| Sega Genesis / Mega Drive |
| Sinclair QL |
| X68000 (Sharp x68k) |
| 8086 Content |
| Learn 8086 Assembly |
| Platform Specific Series |
| Hello World Series |
| Simple Samples |
| 8086 Downloads |
| 8086 Cheatsheet |
| Sources.7z |
| DevTools kit |
| 8086 Platforms |
| Wonderswan |
| MsDos |
| ARM Content |
| Learn ARM Assembly |
| Learn ARM Thumb Assembly |
| Platform Specific Series |
| Hello World |
| Simple Samples |
| ARM Downloads |
| ARM Cheatsheet |
| Sources.7z |
| DevTools kit |
| ARM Platforms |
| Gameboy Advance |
| Nintendo DS |
| Risc Os |
| Risc-V Content |
| Learn Risc-V Assembly |
| Risc-V Downloads |
| Risc-V Cheatsheet |
| Sources.7z |
| DevTools kit |
| MIPS Content |
| Learn Risc-V Assembly |
| Platform Specific Series |
| Hello World |
| Simple Samples |
| MIPS Downloads |
| MIPS Cheatsheet |
| Sources.7z |
| DevTools kit |
| MIPS Platforms |
| Playstation |
| N64 |
| PDP-11 Content |
| Learn PDP-11 Assembly |
| Platform Specific Series |
| Simple Samples |
| PDP-11 Downloads |
| PDP-11 Cheatsheet |
| Sources.7z |
| DevTools kit |
| PDP-11 Platforms |
| PDP-11 |
| UKNC |
| TMS9900 Content |
| Learn TMS9900 Assembly |
| Platform Specific Series |
| Hello World |
| TMS9900 Downloads |
| TMS9900 Cheatsheet |
| Sources.7z |
| DevTools kit |
| TMS9900 Platforms |
| Ti 99 |
| 6809 Content |
| Learn 6809 Assembly |
| Learn 6309 Assembly |
| Platform Specific Series |
| Hello World Series |
| Simple Samples |
| 6809 Downloads |
| 6809/6309 Cheatsheet |
| Sources.7z |
| DevTools kit |
| 6809 Platforms |
| Dragon 32/Tandy Coco |
| Fujitsu FM7 |
| TRS-80 Coco 3 |
| Vectrex |
| 65816 Content |
| Learn 65816 Assembly |
| Hello World |
| Simple Samples |
| 65816 Downloads |
| 65816 Cheatsheet |
| Sources.7z |
| DevTools kit |
| 65816 Platforms |
| SNES |
| eZ80 Content |
| Learn eZ80 Assembly |
| Platform Specific Series |
| eZ80 Downloads |
| eZ80 Cheatsheet |
| Sources.7z |
| DevTools kit |
| eZ80 Platforms |
| Ti84 PCE |
| IBM370 Content |
| Learn IBM370 Assembly |
| Simple Samples |
| IBM370 Downloads |
| IBM370 Cheatsheet |
| Sources.7z |
| DevTools kit |
| Super-H Content |
| Learn SH2 Assembly |
| Hello World Series |
| Simple Samples |
| SH2 Downloads |
| SH2 Cheatsheet |
| Sources.7z |
| DevTools kit |
| SH2 Platforms |
| 32x |
| Saturn |
| PowerPC Content |
| Learn PowerPC Assembly |
| Hello World Series |
| Simple Samples |
| PowerPC Downloads |
| PowerPC Cheatsheet |
| Sources.7z |
| DevTools kit |
| PowerPC Platforms |
| Gamecube |
| Work in Progress |
| ChibiAndroids |
| Misc bits |
| Ruby programming |
Buy my Assembly programming book
on Amazon in Print or Kindle!


Available worldwide!
Search 'ChibiAkumas' on
your local Amazon website!
Click here for more info!


Buy my Assembly programming book
on Amazon in Print or Kindle!
Available worldwide!
Search 'ChibiAkumas' on
your local Amazon website!
Click here for more info!
Buy my Assembly programming book
on Amazon in Print or Kindle!
Available worldwide!
Search 'ChibiAkumas' on
your local Amazon website!
Click here for more info!